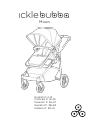
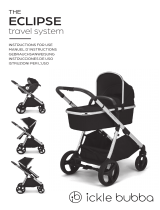
ickle bubba 10-005-101-014 Manuale utente
- Categoria
- Passeggini
- Tipo
- Manuale utente
Questo manuale è adatto anche per

English P. 2-13
Francais P. 14-25
Deutsch P. 26-37
Español P. 38-49
Italiano P. 50-61
Moon

02
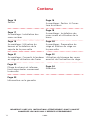
Contents
Page 03
Components
Page 04
Assembly: Parts & Opening the
Frame
Page 05
Assembly: Installing the Rear
Wheels
Page 06
Assembly: Installing the Front
Wheels & Using the Bumper Bar
Page 07
Assembly: Using the Harness &
Installing the Pram Hood
Page 08
Assembly: Preparing the Seat Unit
& Attaching Seat Unit to Pram
Page 09
Assembly: Converting Pram Mode
to Seat Unit & Operating the Brakes
Page 10
Operating the Front Wheel
Lock & Seat Recline
Page 12
Warnings
Page 11
Folding the Frame & Important
Safety Information
Page 13
Warranty Information
IMPORTANT! READ THE INSTRUCTIONS CAREFULLY BEFORE USE AND
KEEP THEM FOR FUTURE REFERENCE.
V.11.20

5
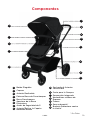
Components
03
1
2
3
5
6
7
8
1
2
3
7
6
4
10
Shopping Basket
* Not Pictured
8
4
11
Built in Suspension
12
Foam Filled Wheels
13
Brake
10
11
13
12
14
Footmu*
15
Raincover*
Folding Button
Hood
Seat Recline
Seat Unit Toggle
Bumper Bar
Bumper Bar Release
5 Point Safety Harness
Seat/
Pram Body
Removal Button
9
9
Convertible Pram Body
& Seat Unit
V.11.20

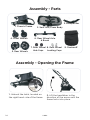
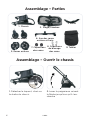
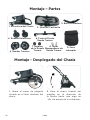
Assembly - Parts
04
1. Chassis Frame
2. Seat Unit/Pram Body
3. Bumper Bar
4. Front Wheels
5. Rear Wheels
6. Rear Wheel Axle
& Break
9. Footmu
7. Rear Wheel
Hub Caps
8. Rear Wheel
Locking Caps
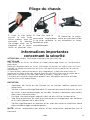
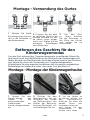
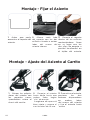
Assembly - Opening the Frame
1. Unhook the latch, located on
the right hand side of the frame
2. Lift the handlebar in the
direction of the arrow until the
frame locks into place.
V.11.20

05
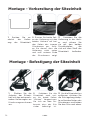
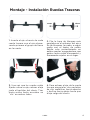
Assembly - Installing the Rear Wheels
1. Insert the axle through each
rear wheel, with the axle going
through the break cluster on
the wheel first.
2. Fix the smallest locking cap
at the end of the axle to lock
the wheel on, then repeat with
the hub cap. Repeat this for
both wheels, ensuring both
sides are securely locked in
place.
3. Once the wheels are fixed
onto the axle, place the axle
onto the frame of the chassis.
Push it upwards until you hear a
‘click’ on both sides
4. To remove the rear wheel
axle, push both the metal push
pin clips inward, and slide
downwards until the axle is
clear of the chassis.
V.11.20

06
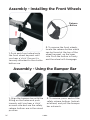
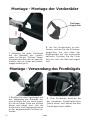
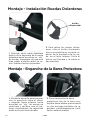
Assembly - Installing the Front Wheels
1. Push each front wheel onto
the front wheel bayonet until
you hear a ‘click’. Ensure it is
securely attached to the stroller
before use.
2. To remove the front wheels,
locate the release button which
can be found at the top of the
wheel bayonet, on the inner
side. Push the button in firmly
and the wheel will disengage.
Release
Button
Assembly - Using the Bumper Bar
1. Align the bumper bar with the
fitting on the frame and push
inwards until you hear a ‘click’
on each side and see the safety
release buttons are in the raised
position.
2. To remove, press each of the
safety release buttons (indicat-
ed above) and pull the bumper
bar outwards.
V.11.20

07
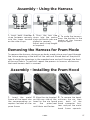
Assembly - Using the Harness
1. Insert both shoulder
strap fasteners securely
into the loops located
on the side straps
2. Press the two side
straps into the centre
clasp until both sides are
clicked in securely.
Adjust each strap length
as required.
3. To undo the harness,
press the buckles in the
centre of the harness
and pull apart.
1. Insert the metal
frame of the hood into
the corresponding re-
ceptors located on the
pram frame.
2. Align the zip located
on the rear side of the
hood to the zip found
on the pram/seat
unit fabric and fasten.
3. To remove the hood,
unfasten the zip, then
press both of the
hood connector but-
tons and pull the metal
hood frame upwards.
Removing the Harness for Pram Mode
To remove the harness during
pram body mode, place your hand through
the Velcro opening at the back of the seat and thread each of the plastic
tabs through the openings in the wooden base and pull through the front
of the seat fabric. To reinstall, repeat the process in reverse, and ensure
that each harness belt is secured.
Assembly - Installing the Pram Hood
V.11.20

08
Assembly - Preparing the Seat Unit
1. Firstly, locate the seat
unit support.
2.
Align either side of the
support with the two holes
situatied on both sides of
the inner seat frame.
Ensure that the support
is facing downwards and
towards the lower end of
the seat frame.
3. Push the support into
the holes and secure in
place with the two push
press clips located on
the seat unit fabric.
1. Align the seat unit
adapters with the cor-
responding holders on
the pram frame
2.
Push the seat unit
downwards until both
sides ‘Click’. Ensure that
the seat is securely fas-
tened before use.
3. To remove the seat
unit, press the release
buttons on both sides
of the seat frame and
lift the seat upwards.
Assembly - Attaching Seat Unit to Pram
V.11.20

09
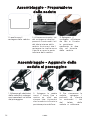
1. To use the seat unit in
pram mode, discon-
nect the
two clips locat-
ed at the bottom of the
seat unit, and loosen the
toggle at the top. Push
the fabric downwards
from the inside to en-
sure it lies flat.
2. To convert pram
body to seat unit,
connect the
two clips
located at the bottom
of the pram body/seat
unit
3. Tighten the tog-
gle located on the
top of the pram
body/seat unit. Ensure
that all fabrics and
buckles are secure
before use.
Asse
mbly - Converting Pram to Seat
Operating the Brakes
1. To engage the brake, apply
a light downward pressure to
the brake lever. Ensure that the
brakes have been applied cor-
rectly and that the stroller will
not move.
2. To release the breakes, gently
lift up the brake lever.
V.11.20

10
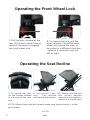
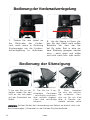
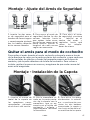
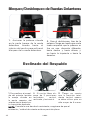
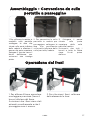
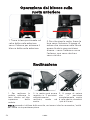
Operating the Front Wheel Lock
1. Pull the lever located at the
rear of the front wheel inwards
towards the pram to engage
the front wheel lock.
2. To release the lock, pull the
lever outwards. Note that each
wheel will require the lever to
be pulled in a dierent direction
- inwards & outwards, and not
left or right.
Operating the Seat Recline
1. To recline the seat,
lift the handle located
at the top of the seat
unit.
2.
The seat has 3 posi-
tions - Fully reclined,
mid recline and upright.
3. Please note that the
fully upright position
should only be used for a
child over 6 months old.
NOTE: When using from birth please make sure the pushchair is in the
pram mode
v.02.20
V.11.20

11
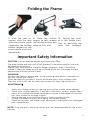
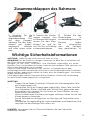
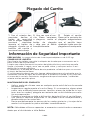
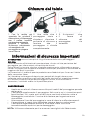
Folding the Frame
1. With the seat re-
moved, slide the lock
with your thumb, while
squeezing the folding
button located on the
pram handle and push
downwards.
2. Once the stroller
begins to fold, release
the folding button and
allow to fully fold.
3. Secure the stroll-
er in the folded posi-
tion by ensuring the
latch has fastened.
Important Safety Information
CAUTION: Do not load the basket with more than 3kgs
The pram mode and seat unit of this product is manufactured for use with
the Moon pram chassis.
Should your child need to sleep for longer durations, then it should be
placed in the pram body or seat unit instead of the car seat when using in
conjunction with the stroller frame.
CLEANING
To clean the fabrics, please refer to the washing label which is located on
the rear side of the stroller.
Clean periodically the fabric, plastic and metal parts with a damp cloth.
Then dry with a soft and dry cloth to prevent rust from the metal parts.
MAINTENANCE
• Apply dry silicone oil on any moving parts of the stroller when needed.
• Check your stroller regularly. If any parts (like bolts, screws, wheels fabric
pieces or stitching) are found to be loose, broken or damaged, always con-
tact your retailer to arrange a repair.
• Where damage or dysfunction occurs, stop using the stroller.
• Strong sun exposure may cause aging and colour fading.
• Check caster bolts and wheel axles periodically and replace any damaged
parts immediately.
NOTE: Only use parts and accessories that are recommended by the manu-
facturer.
V.11.20

12
WARNINGS!
I
MP
O
RTANT: Read these instructions carefully before
use and keep them for future reference.
The Moon pushchair in pram mode is suitable for children from birth up to a
maximum weight of 9kgs.
The Moon pushchair in seat mode is suitable for children from 6months up to a
maximum weight of 15kgs.
Using Moon in Pram Mode:
WARNING This product is only suitable for a child who cannot sit up unaided, roll
over and cannot push itself up on its hands and knees. Maximum weight of the child:
9kgs
WARNING Never leave the child unattended.
The head of the child in the pram body should never be lower than the body of the
child.
Remove the harness when in pram mode using the instructions in this manual.
Do not add an additional mattress to the pram body.
This pram body is not intended to use on its own as a sleeping unit. It is
manufactured to use with the Moon chassis.
Using Moon in Seat Mode:
WARNING The seat unit is not suitable for children under 6months.
WARNING Always use the restraint system.
WARNING Always use the crotch strap in combination with the waist belt.
WARNING Use a harness as soon as the child can sit unaided
WARNING Ensure that all the locking devices are engaged before use.
WARNING Do not let the child play with this product.
WARNING This product is not suitable for running or skating.
WARNING Do not carry more than one child in this vehicle.
WARNING Check that the pram body, seat unit or car seat attachments are correctly
engaged before use.
WARNING To avoid injury ensure that the child is kept away when unfolding and
folding this product.
WARNING To avoid the risk of suffocation, keep all plastic packaging and materials
out of reach from children.
WARNING Do not use if any part of the product is broken, torn or missing.
WARNING Keep away from fire and other sources of strong heat.
Ensure your child wears a correctly fitted and adjusted harness at all times.
Use the parking brake when stationary and when removing or placing the child into
the stroller.
Any additional load attached to the pushchair will affect the stability and safety of
the vehicle.
Do not use a platform with this product as it may render the product unsafe.
Do not lift the pram body or seat unit using the bumper bar.
Only use the seat unit, pram body provided with the Moon travel system.
Do not use replacement parts or accessories other than those approved by Ickle
Bubba.
Recommended to be used with the Ickle Bubba Astral, Galaxy or Mercury Car seat.
When using a car seat with chassis, please note this does not replace a cot or bed
and should your child need to sleep, then it should be placed in a suitable pram body,
cot or cot bed.
A basket is provided for the carriage of goods up to a maximum weight of 3kg. Store
in a safe place away from children.
The Moon travel system complies with – EN1888-1:2018
V.11.20

PRODUCT WARRANTY
Please retain your receipt and keep it with this User Guide for future reference.
(Failure to produce proof of purchase could aect your warranty)
Don’t forget to register online today at:
www.icklebubba.com/warranty
Warranty Term
Stroller frame – 2 years from purchase date
Wheels - 1 year from purchase date
Fabrics - 6 months from purchase date
(Seat fabrics and hood)
Register within 28 days of purchase for a FREE
4 Year Extended Warranty
To activate your FREE 4 year warranty, register online and keep your proof of
purchase for any future claim. If you register within 28 days of purchase we
will extend your standard warranty to 4 years from the date of purchase at no
extra cost
.
What Your Warranty Does Not Cover
Damage caused by normal wear and tear, accidental
damage, improper use and damage caused by negligence, misuse and by not
following the maintenance instructions.
The warranty is not valid in the following situations:
In case of use or purpose other than described in the instruction
manual.
If the product is submitted for repair through a retailer/distributor that is not
approved or authorised by us.
If repairs have been carried out by third parties or a retailer who is not au-
thorised or approved by us.
If you have purchased your product over the internet from an unauthorised
reseller.
Where Your Warranty Applies
Your warranty applies in the country of purchase only.
The warranty applies to the first owner and is non transferrable.
What to Do in Case of Defects
If you feel there is a problem with yourickle bubbaproduct thenplease con-
tact your original approved reseller.
13
V.11.20

14
Contenu
Page 15
Parties
Page 16
Assemblage : Parties & Ouver-
ture du chassis
Page 17
Assemblage : Installation des
roues arrières
Page 18
Assemblage : Installation des
roues avant et utilisation de la
barre
Page 19
Assemblage : Utilisation du
harnais et installation de la
capote de la poussette
Page 20
Assemblage : Preparation du
siège et fixation du siège sur
la poussette
Page 21
Assemblage : Convertir le landeau
en siège et utilisation des freins
Page 22
Utilisation du blocage des roues
avant et de l’inclinaison du siège
Page 24
Attention
IMPORTANT! LISEZ CES INSTRUCTIONS ATTENTIVEMENT AVANT USAGE ET
CONSERVEZ LES POUR VOUS Y REFEREZ ULTERIEUREMENT
Page 23
Pliage du chassis et informa-
tions importantes concernant
la sécurité
Page 25
Information sur la garantie
V.11.20

5
Parties
15
1
2
3
5
6
7
8
Bouton de pliage
Capote
Inclinaison du siège
Barre
Retirer la barre
Harnais de sécurité 5 points
1
2
3
7
6
4
10
Panier
* Non présent en photo
8
4
Bouton pour retirer le
landeau
11
Suspensions intégrées
12
Roues remplies de mousse
13
Frien
10
11
13
12
14
Tablier*
15
Habillage de pluie*
Cadre du siège
9
9
Landeau convertible
et siège
V.11.20

Assemblage – Parties
16
1. Chassis
2. Siège/Landeau
3. Barre
4. Roues avant
5. Roues arrières
6. Axe des roues
arrières et frein
9. Tablier
7. Capuchons
des roues
8. Capuchons
de blocage
des roues
Assemblage – Ouvrir le chassis
1. Détacher le loquert, situé sur
la droite du chassis
2. Lever la poignée en suivant
la flèche jusqu’à ce qu’il s’en-
clenche
V.11.20

17
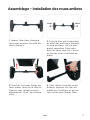
Assemblage – Installation des roues arrières
1. Inserer l’axe dans chacune
des roues arrières, du côté des
freins d’abord.
2. Fixer le plus petit capuchon
au bout des axes pour bloquer
la roue en place, puis le plus
grand capuchon. Faire cela
pour les deux roues et s’assur-
er que les roues sont bien en
place.
3. Une fois les roues fixées sur
l’axe, placer l’axe sur le chassis.
Pousser vers le haut jusqu’à
entendre un “click” de chaque
côté.
4. Pour retirer l’axe des roues
arrières, pousser les clips en
métal vers l’intérieur et glisser
vers le bas pour libérer l’axe.
V.11.20

18
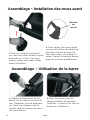
Assemblage – Installation des roues avant
1. Pousser chaque roue avant
sur l’axe des roues avant jusqu’à
entendre un “click”. S’assurer
que les roues sont biens fixées
avant utilisation.
2. Pour retirer les roues avant,
trouver le bouton de retrait qui
peut être trouvé en haut de
l’axe des roues, sur la face in-
terne. Presser le bouton ferme-
ment et la roue se détachera.
Bouton
de
retrait
Assemblage – Utilisation de la barre
1. Aligner la barre avec les fix-
ations sur le chassis et pousser
vers l’intérieur jusqu’à entendre
un “click” de chaque côté et
vérifier que les bouton de sécu-
rité sont relevés.
2. Pour les retirer, presser
chaque bouton de sécurité
(indiqués ci-dessus) et tirer la
barre vers l’extérieur.
V.11.20

19
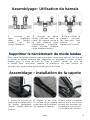
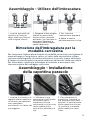
Assemblyage- Utilisation du harnais
1. Inserer les
deux
bretelles
dans
les
fentes
situés
sur
les
straps latéraux.
2. Presser les deux
straps latéraux dans le
creux du centre jusqu’à
ce que chaque côté
s’enclenche
correcte-
ment. Ajuster chaque
strap comme requis.
3.
Pour
retirer le
har
nais, presser
les
bou-cles aux
centre
du
harnais et l’ouvrir
.
1. Inserer le chassis en
métal de la capote dans
les fentes correspon-
dantes situées dans le
chassis.
2. Aligner le zip situé
à l’arrière de la capote
avec celui de le landau/
du siège et le fermer.
3. Pour retirer la capote,
défaire le zip et presser
chacun des boutons de
la capote et tirer le chas-
sis en métal vers le haut..
Supprimer le harcèlement du mode landau
Pour retirer le harnais, placez votre main dans l'ouverture Velcro à l'arrière de
le landau et enfilez chacune des languettes en plastique à travers le petit
espace dans la base en bois et tirez à travers l'avant du tissu de
le landau. Pour réinstaller, répétez le processus en sens inverse et
assurez-vous que chaque ceinture de harnais est fixée.
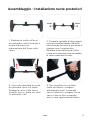
Assemblage – Installation de la capote
V.11.20

20
Assemblage – Preparation du siège
1. D’abord, trouver le
support du siège.
2.
Aligner chaque côté
du support avec les deux
trous situés de chaque
côté de la face interne du
chassis. S’assurer que le
support est à l’avant et au
dessus de la partie la plus
basse du chassis.
3. Pousser le support
dans les trous et main-
tenir en place en pous-
sant les deux clips situés
sur le tissus du siège.
1. Aligner les adapta-
teurs du siège avec les
emplacements corre-
spondants sur le chas-
sis.
2.
Pousser le siège vers
le bas jusqu’à ce chaque
côté clique. S’assurer
qu’il est bien fixé avant
usage.
3. Pour retirer le siège,
presser les boutons
de retrait de chaque
côté du siège et lever
le siège vers le haut.
Assemblage – Attacher le siège
sur la poussette
V.11.20
La pagina sta caricando ...
La pagina sta caricando ...
La pagina sta caricando ...
La pagina sta caricando ...
La pagina sta caricando ...
La pagina sta caricando ...
La pagina sta caricando ...
La pagina sta caricando ...
La pagina sta caricando ...
La pagina sta caricando ...
La pagina sta caricando ...
La pagina sta caricando ...
La pagina sta caricando ...
La pagina sta caricando ...
La pagina sta caricando ...
La pagina sta caricando ...
La pagina sta caricando ...
La pagina sta caricando ...
La pagina sta caricando ...
La pagina sta caricando ...
La pagina sta caricando ...
La pagina sta caricando ...
La pagina sta caricando ...
La pagina sta caricando ...
La pagina sta caricando ...
La pagina sta caricando ...
La pagina sta caricando ...
La pagina sta caricando ...
La pagina sta caricando ...
La pagina sta caricando ...
La pagina sta caricando ...
La pagina sta caricando ...
La pagina sta caricando ...
La pagina sta caricando ...
La pagina sta caricando ...
La pagina sta caricando ...
La pagina sta caricando ...
La pagina sta caricando ...
La pagina sta caricando ...
La pagina sta caricando ...
La pagina sta caricando ...
-
 1
1
-
 2
2
-
 3
3
-
 4
4
-
 5
5
-
 6
6
-
 7
7
-
 8
8
-
 9
9
-
 10
10
-
 11
11
-
 12
12
-
 13
13
-
 14
14
-
 15
15
-
 16
16
-
 17
17
-
 18
18
-
 19
19
-
 20
20
-
 21
21
-
 22
22
-
 23
23
-
 24
24
-
 25
25
-
 26
26
-
 27
27
-
 28
28
-
 29
29
-
 30
30
-
 31
31
-
 32
32
-
 33
33
-
 34
34
-
 35
35
-
 36
36
-
 37
37
-
 38
38
-
 39
39
-
 40
40
-
 41
41
-
 42
42
-
 43
43
-
 44
44
-
 45
45
-
 46
46
-
 47
47
-
 48
48
-
 49
49
-
 50
50
-
 51
51
-
 52
52
-
 53
53
-
 54
54
-
 55
55
-
 56
56
-
 57
57
-
 58
58
-
 59
59
-
 60
60
-
 61
61


ickle bubba 10-005-101-014 Manuale utente
- Categoria
- Passeggini
- Tipo
- Manuale utente
- Questo manuale è adatto anche per
in altre lingue
Documenti correlati
-
 ickle bubba COSMO Guida utente
-
 ickle bubba Discovery Stroller Guida utente
-
 ickle bubba Snowdon Collection Guida utente
-
 ickle bubba Eclipse Travel System Guida utente
-
 ickle bubba Gravity Stroller Guida utente
-
 ickle bubba Tenby Collection Guida utente
-
 ickle bubba Tenby Collection Manuale utente
-
 ickle bubba Aston Rose Travel System Guida utente
-
 ickle bubba Pembrey Collection Guida utente


Altri documenti
-
Baby Jogger City Versa Assembly Instructions Manual
-
 Baby Jogger VUE Assembly Instructions Manual
-
 Baby Jogger city lite Assembly Instructions Manual
-
Hauck MIAMI Manuale del proprietario
-
-
teutonia BeYou V3 Operating Instructions Manual
-
-
Valco baby Snap Duo Istruzioni per l'uso
-
-

