
PNI PMR R18
EN User manual ......................................................... 3
BG Ръководство за употреба ............................. 18
DE Benutzerhandbuch .............................................. 34
ES Manual de usuario ............................................... 50
FR Manuel utilisateur ............................................... 66
HU Használati utasítás .............................................. 82
IT Manuale utente .................................................. 98
NL Handleiding ........................................................ 114
PL Instrukcja obsługi ............................................... 130
RO Manual de utilizare ............................................. 146


User manual - 3
Safety warnings
DO NOT operate the radio without the antenna attached, as this may damage the radio and may also cause RF exposure limits to be
exceeded. The antenna is supplied together with this radio and cannot be detached.
DO NOT transmit more than 50% of the total time using the radio, more than 50% of the time may cause RF exposure compliance
requirements to be exceeded.
During transmissions, your radio generates RF energy that may cause interference with other devices or systems. To avoid such
interference, turn o the radio in areas where signs indicating this are displayed.
DO NOT use the radio in areas sensitive to electromagnetic radiation, such as hospitals, airplanes and places with a risk of explosion.
Hold the radio in a vertical position at least 2.5 cm (one inch) from your head. Respecting this distance is important because RF
exposure decreases with increasing distance from the antenna.
DO NOT use a dierent type of battery than the one recommended by the manufacturer.
When the life of the battery has expired, do not throw the battery anywhere, take it to a specialized collection center.
Warnings regarding exposure to RF energy
Do not use this device if the safety and operating requirements described in this manual are not met.
This radio uses electromagnetic energy in the radio frequency (RF) spectrum to allow remote communications between two or more
users. RF energy, when used improperly, can cause biological damage.
All PNI radios are designed, manufactured and tested to ensure they meet RF exposure levels set by law.
These instructions are important because they inform users about exposure to RF energy and provide simple procedures for
controlling it. Please refer to the following website http://www.who.int/en/ for more information on exposure to RF energy.
The user manual for this device includes information and operating instructions necessary to control RF exposure and meet
compliance requirements.
To comply with legal requirements, device repair should only be performed by or under the supervision of a certified person. Do not
open the case of the device and do not repair it yourself in case of failure.

User manual - 4
Battery charging
The battery does not come charged from the factory. Please charge it before using the radio.
Only after repeating the charge/discharge cycle 2-3 times, the battery reaches its maximum capacity.
Warnings:
Use only the original battery supplied with the radio.
Do not short-circuit the battery terminals.
Do not throw the battery into fire, risk of explosion.
Do not open the battery case.
Charge the battery in environmental conditions with a temperature between 0 - +40°C. Outside this temperature range, the
battery may charge incompletely.
Turn o the radio while charging the battery. If you keep the radio on, it could aect the correct charging of the battery.
Do not disconnect the battery during charging, as it could aect its correct charging.
When the life of the battery has expired, replace the battery with a similar one. Contact the radio manufacturer or distributor.
Do not charge the battery if it is not discharged. This could cause a reduction in battery life.
Do not charge the battery if it or the radio is wet.
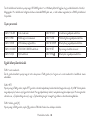
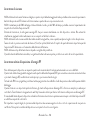
Charging instructions
If the low battery indicator appears on the screen, we recommend charging the battery.
You can charge the battery detached from the radio or together with it.
To charge the battery, use the charging base supplied with the radio.
During charging, the red LED on the charging base is lit. When the battery is fully charged (after about 4 hours), the green LED
lights up.

User manual - 5
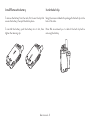
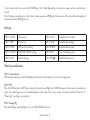
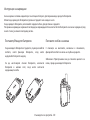
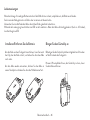
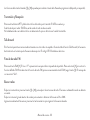
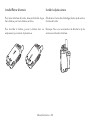
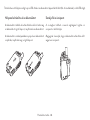
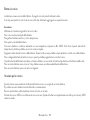
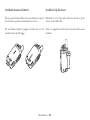
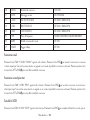
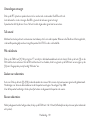
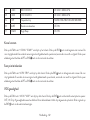
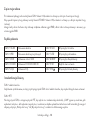
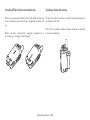
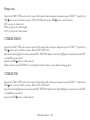
Install/Remove the battery
To remove the battery from the radio, first loosen the clip that
secures the battery, then pull the battery down.
To reinstall the battery, push the battery into its slot, then
tighten the retaining clip.
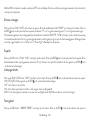
Instal the belt clip
Using the screws included in the package, fix the belt clip on the
back of the radio.
Note: We recommend you to detach the belt clip before
removing the battery.

User manual - 6
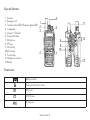
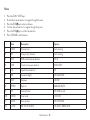
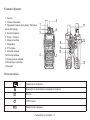
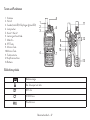
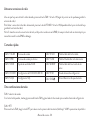
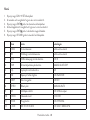
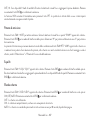
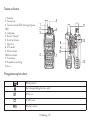
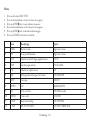
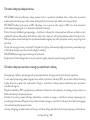
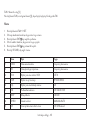
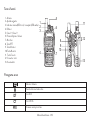
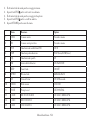
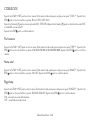
Keys and functions
1. Antenna
2. Emergency call
3. Transmission (red LED) / Reception (green LED)
4. Loudspeaker
5. Channel + / Channel +
6. Power and Volume
7. Microphone
8. PTT key
9. Monitor key
10. Monitor key
11. Function key
12. Headphone connector
13. Battery
1
2
3
4
5
6
7
8
9
10
11
12
13
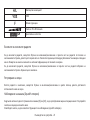
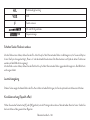
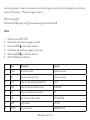
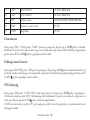
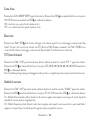
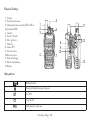
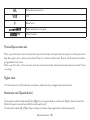
Screen icons
Battery indicator
The key lock function is active
DT DCS tone
CT CTCSS tones
PRI Priority scan

User manual - 7
H/L High/low power
VOX VOX
FFunctions menu
TX and RX signal strength
Frequency display
Turn the radio on and o
To turn on the radio, rotate the on/o button on the top of the radio clockwise until you hear a beep. The voice prompt will confirm
“Power on” and the current channel number. The channel number and icons of active functions will be displayed on the screen.
To turn o the radio, rotate the on/o button on the top of the radio counterclockwise. The screen will turn o.
Volume adjustment
With the radio on, rotate the on/o button in both directions until you reach the optimal volume level.
Channel Monitoring (Squelch Open)
Hold down one of the side keys [9] or [10] to hear the background noise on the current channel. Adjust the volume to the desired
level.
Release the key to exit the Monitoring function (squelch closed).
The functions of the side keys [9] and [10] can be customized through the programming software (purchased separately).

User manual - 8
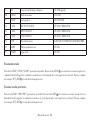
Transmission and Reception
Press the PTT side key and speak into the radio’s microphone to transmit. The LED turns red.
Release the key to receive. The LED is green when the radio receives a signal.
Do not speak too close to the microphone or too loudly so as not to distort the transmitted signal.
Talk Around
This function allows you to communicate directly with other radios without a repeater. When you use the Talk Around function, the
transmission frequency is the same as the reception frequency. The CTCSS code is also the same.
FM Radio function
Press the FUN key [11]. The “F” icon will appear in the lower left corner of the screen. Press the [9] key to activate the FM Radio
function. To deactivate the FM radio function, press the FUN key again, then the [9] key. The voice prompt will announce “Exit”.
Search for radio stations
Auto scan: Press the [9] or [10] key to scan the radio stations. Scanning will stop when a signal is detected.
Manual scan: Turn the channel selector to increase or decrease the frequency. Step: 50K.
Manually input the frequency: press the numeric keys to enter the desired frequency.
Save radio stations
After you have found the desired radio, press the FUN key + the 1-9 key (depending on the position where you want to save the
radio station).

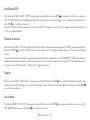
User manual - 9
To call a stored radio station, press the VFO/MR key + the 1-9 key (depending on the position where you have saved the radio
station).
Note: If while you are listening to a radio station, the device receives a PMR signal, the reception of the radio will be interrupted and
will resume when the PMR signal stops.
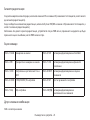
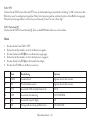
Hot keys
FUN + 1 SCAN Channel scan FUN + 6 SCR Enable/Disable Scrambler
FUN + 2 PRI Priority scan FUN + 7 LED Enable/Disable backlight
FUN + 3 VOX VOX sensitivity setting FUN + 8 BEEP Enable/Disable key beep
FUN + 4 CODE CTCSS/DCS RX/TX settings FUN + 9 SET Access the settings menu
FUN + 5 SQL Squelch settings FUN + ENT/ Enable/Disable key lock
Other key combinations
FUN + channel selector
With the keys locked, press and hold FUN key and rotate the channel selector to access the settings menu.
FUN + PTT
Press the FUN key, then the PTT key to select the transmit power (high/low). “LOW” will appear on the screen if you select low
power. If you select high power, no icon will be displayed on the screen. If the voice prompt is activated, you will hear “Power low” or
“Power high” according to your selection.
FUN + side key [9]
Press the FUN key, then the [9] key to turn on/o the FM Radio function.

User manual - 10
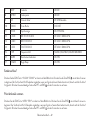
Menu
1. Press the FUN + 9 SET keys.
2. Rotate the channel selector to navigate through the menu.
3. Press the ENT/ key to enter a submenu.
4. Turn the channel selector to navigate through the options.
5. Press the ENT/ key to confirm the selection.
6. Press VFO/MR to exit the menu.
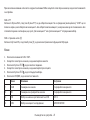
Menu Description Options
1SCAN Channel scan Start scanning
2PRI Scan priority channels Start scanning
3VOX VOX sensitivity level selection OFF-9
4POW Transmission power selection HIGH/LOW
5SQL Squelch level selection 0-9
6LED Screen backlight OFF/AUTO/ON
7BEEP Key beep ON/OFF
8KEYBO Key lock MANUAL/AUTO
9TOT Timeout Timer OFF-270 seconds
10 SCANS Scan mode TO/CO/SE
11 VOICE Voice prompt OFF/CHS/ENG
12 C-CDC RX/TX CTCSS/DCS OFF-254.1 / D023-D754

User manual - 11
13 R-CDC RX CTCSS/DCS OFF-254.1 / D023-D754
14 T-CDC TX CTCSS/DCS OFF-254.1 / D023-D754
15 STEP Frequency step 2.5K/5K/6.25K/10K/12.5K/25K/50K/100K
16 NAME Edit channel name OFF/ON
17 ROGER Roger Beep OFF/ON
Channel scan
Press the FUN key + 1 SCAN. “SCAN?” will appear on the screen. Press the ENT/ key to start scanning. The scan will stop for 5
seconds if a signal is detected on a channel, after which the scan will continue. Press any key except the PTT and ENT/ key to exit
the scan mode.
Scan priority channels
Press the FUN key + 2 PRI. “PRI?” will appear on the screen. Press the ENT/ key to start scanning. The scan will stop for 5 seconds
if a signal is detected on a channel, after which the scan will continue. Press any key except the PTT and ENT/ key to exit the scan
mode.
VOX sensitivity
Press FUN key + 3 VOX. “VOX?” will appear on the screen. Press the ENT/ key to enter the interface with options: OFF, 1-9. 9
levels of sensitivity are available. Turn the channel selector until you reach the desired option. Press the ENT/ key again to confirm
the selection.
The VOX function allows you to transmit without pressing the PTT key. The show is activated by voice and will stop automatically as
soon as you stop talking.

User manual - 12
Transmission power
Press the FUN + 9 SET key to enter the menu. Turn the channel selector until “POW?” appears on the screen. Press the ENT/ key
to enter the options interface. Select “H” for high emission power and “L” for low emission power.
The transmission power can also be selected by the FUN+PTT key combination. “LOW” will appear on the screen if you select low
power. If you select high power, no icon will be displayed on the screen. If the voice prompt is activated, you will hear “Power low” or
“Power high” depending on the selection.
Squelch
Press the FUN key + 5 SQL. “SQL?” will appear on the screen. Press the ENT/ key to enter the options interface. Turn the channel
selector until you reach the desired option. 9 levels of squelch are available. Press the ENT/ key again to confirm the selection.
Backlight
Press the FUN + 7 LED key. “LED?” will appear on the screen. Press the ENT/ key to enter the interface with options: ON, OFF,
AUTO. Press the ENT/ key again to confirm the selection.
OFF - the screen is not illuminated.
ON - the screen is permanently illuminated, even if no key is pressed.
AUTO - the screen turns on when a key is pressed and stays on for 10 seconds, after which it turns o.
Key beep
Press the FUN key + 8 BEEP. “BEEP?” will appear on the screen. Press the ENT/ key to enter the interface with options: ON,
OFF. Press the ENT/ key again to confirm the selection.
ON - a sound will be heard every time a key is pressed.
OFF - no sound will be heard when the keys are pressed.

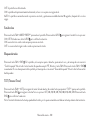
User manual - 13
Key lock
Press the FUN + ENT/ key. On the screen, in the upper right corner, the icon will appear, and the voice prompt will announce “Key
locked”. Now all keys are locked except PTT, Monitor and FUN key. Press the FUN + ENT/ keys again. The icon will disappear from
the screen, and the voice prompt will announce “Key unlocked”. Now all keys are unlocked.
TOT (Timeout timer)
Press the FUN + 9 SET key to enter the menu. Turn the channel selector until “TOT ?” appears on the screen. Press the ENT/ key
to enter the interface with options: OFF, 30, 60, 90, 120, 150, 180, 210, 240, 270. Press the ENT/ key to confirm the selection.
Note: Transmitting for a long time can damage the radio, therefore we recommend setting a maximum transmitting time.
Scan mode
Press the FUN + 9 SET key to enter the menu. Turn the channel selector until “SCANS?” appears on the screen. Press the ENT/
key to enter the interface with options: TO, CO, SE. Press the ENT/ key to confirm the selection.
TO - Time Operation Mode. When the radio detects a signal, it will stop scanning for 5 seconds after which it will resume scanning
even if the signal persists.
CO - Carrier Frequency Mode. When the radio detects a signal, it will stop scanning and stay on that channel until the signal
disappears. After 2 seconds from when the signal disappears, it will resume scanning.
SE - Search Scan Mode. When the radio detects a signal, it will stay on the respective channel or frequency and exit the scanning
mode.
Voice prompt
Press the FUN + 9 SET key to enter the menu. Turn the channel selector until “VOICE?” appears on the screen. Press the ENT/
key to enter the interface with options: OFF, CHS, ENG. Press the ENT/ key to confirm the selection.
OFF - voice prompt disabled

User manual - 14
ENG - voice prompt in English
CHS - voice prompt in Chinese
CTCSS/DCS RX/TX
Press the FUN + 9 SET key to enter the menu. Turn the channel selector until “C-CDC?” appears on the screen. Press the ENT/
key to enter the options interface. For CTCSS: OFF-254.1.
Press the side key [9] to pass to DCS options: OFF-D754. Press the side key [10] to toggle between normal (N) or inverted (I)
DCS codes.
Press the ENT/ key to confirm the selection.
You can enter non-standard CTCSS/DCS codes through the radio’s keypad or programming software.
CTCSS/DCS RX
Press the FUN + 9 SET key to enter the menu. Turn the channel selector until “R-CDC?” appears on the screen. Press the ENT/
key to enter the options interface. For CTCSS: OFF-254.1.
Press the side key [9] to go to DCS options: OFF-D754. Press the side key [10] to toggle between normal (N) or inverted (I) DCS
codes.
Press the ENT/ key to confirm the selection.
CTCSS/DCS TX
Press the FUN + 9 SET key to enter the menu. Turn the channel selector until “T-CDC?” appears on the screen. Press the ENT/
key to enter the options interface. For CTCSS: OFF-254.1.
Press the side key [9] to go to DCS options: OFF-D754. Press the side key [10] to toggle between normal (N) or inverted (I) DCS
codes.
Press the ENT/ key to confirm the selection.
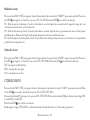
Frequency step

User manual - 15
Press the FUN + 9 SET key to enter the menu. Turn the channel selector until “STEP?” appears on the screen. Press the ENT/
key to enter the interface with options: 2.5K/5K/6.25K/10K/12.5K/25K/50K/100K. Press the ENT/ key to confirm the selection.
Channel name
Press the FUN + 9 SET key to enter the menu. Turn the channel selector until “NAME?” appears on the screen. Press the ENT/
key to enter the interface with options: ON, OFF. Press the ENT/ key to confirm the selection.
Roger beep
Press the FUN + 9 SET key to enter the menu. Turn the channel selector until “ROGER?” appears on the screen. Press the ENT/
key to enter the interface with options: ROGON, ROGOFF. Press the ENT/ key to confirm the selection.
ON - you will emit an end-of-broadcast sound.
OFF - final broadcast sound disabled.
DTMF code
The radio has the DTMF function. In the emission mode, press the numeric keys or the other functional keys to emit a DTMF code.
The DTMF code issued by the functional keys is as follows:
FUN → A
Key [9] → B
Key [10] → C
Emergency key [2] → D

User manual - 16
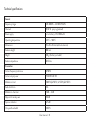
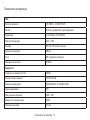
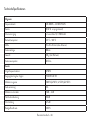
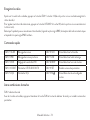
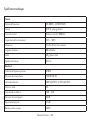
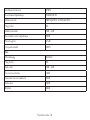
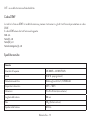
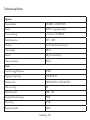
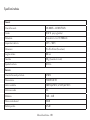
Technical specifications
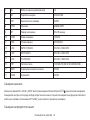
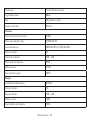
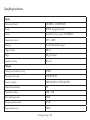
General
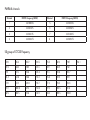
Frequency range 446.00625 - 446.09375 MHz
Channels 16 (8 + 8 pre-programmed)
Power supply Li-Ion battery 7.4V 1600mAh
Operating temperature -26°C ~ +80°C
Dimensions 115 x 55 x 35 mm (without antenna)
Antenna length 108 mm
Weight 239 gr (battery included)
Antenna impedance 50 Ohms
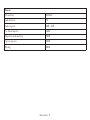
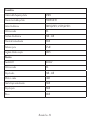
Transmitter
Carrier frequency tolerance ±250Hz
Carrier output power H≤0.5W L≤0.1W
Modulation limit ≤50KHz@25KHz; ≤2.5KHz@12.5KHz
Audio distortion ≤5%
Modulation character +3dB ~ -3dB
Adjacent channel power ≥65dB
Spurious radiation ≤7.5uW
Occupied bandwidth ≤16KHz

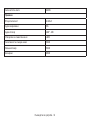
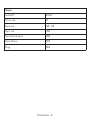
User manual - 17
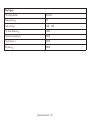
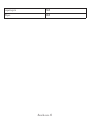
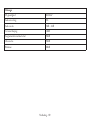
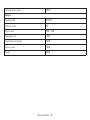
Receiver
RF sensitivity ≤0.224uV
Audio distortion ≤5%
Audio response +3dB ~ -3dB
Co-channel rejection ≥-8dB
Adjacent channel selectivity ≥55dB
Spurious response ≥55dB
Blocking ≥85dB

Ръководство за употреба - 18
Предупреждения за безопасност
НЕ работете с радиото без прикрепена антена, тъй като това може да го повреди и може също да доведе до
превишаване на границите на радиочестотно излагане. Антената се доставя заедно с това радио и не може да се
отделя.
НЕ предавайте повече от 50% от общото време, като използвате радиото, повече от 50% от времето може да доведе
до превишаване на изискванията за съответствие с радиочестотното излагане.
По време на предаване вашето радио генерира радиочестотна енергия, която може да причини смущения на други
устройства или системи. За да избегнете подобни смущения, изключете радиото на места, където има знаци,
показващи това.
НЕ използвайте радиото в зони, чувствителни към електромагнитно излъчване, като болници, самолети и места с
риск от експлозия.
Дръжте радиото във вертикално положение на поне 2,5 см (един инч) от главата си. Спазването на това разстояние е
важно, тъй като радиочестотното излагане намалява с увеличаване на разстоянието от антената.
НЕ използвайте батерии, различни от препоръчаните от производителя.
Когато животът на батерията е изтекъл, не я изхвърляйте никъде, а я занесете в специализиран център за събиране.
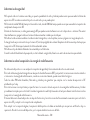
Предупреждения относно излагане на радиочестотна енергия
Не използвайте това устройство, ако изискванията за безопасност и работа, описани в това ръководство, не са
изпълнени.
Това радио използва електромагнитна енергия в радиочестотния (RF) спектър, за да позволи дистанционна
комуникация между двама или повече потребители. RF енергията, когато се използва неправилно, може да причини
биологични щети.
Всички радиостанции PNI са проектирани, произведени и тествани, за да се гарантира, че отговарят на нивата на
излагане на RF, определени от закона.
Тези инструкции са важни, защото информират потребителите за излагането на радиочестотна енергия и предоставят
прости процедури за нейното контролиране. Моля, вижте следния уебсайт hp://www.who.int/en/ за повече

Ръководство за употреба - 19
информация относно излагането на радиочестотна енергия.
Ръководството за потребителя на това устройство включва информация и инструкции за работа, необходими за
контролиране на радиочестотното облъчване и отговаряне на изискванията за съответствие.
За да отговаря на законовите изисквания, ремонтът на устройството трябва да се извършва само от или под надзора
на сертифицирано лице. Не отваряйте кутията на устройството и не го ремонтирайте сами в случай на повреда.
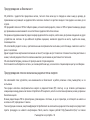
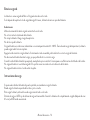
Батерията се зарежда
Батерията не идва заредена фабрично. Моля, заредете го, преди да използвате радиото.
Само след повторение на цикъла зареждане/разреждане 2-3 пъти, батерията достига своя максимален капацитет.
Предупреждения:
Използвайте само оригиналната батерия, доставена с радиото.
Не давайте накъсо клемите на батерията.
Не хвърляйте батерията в огън, риск от експлозия.
Не отваряйте кутията на батерията.
Зареждайте батерията при условия на околната среда с температура между 0 - +40°C. Извън този температурен
диапазон батерията може да се зареди непълно.
Изключете радиото, докато зареждате батерията. Ако оставите радиото включено, това може да повлияе на
правилното зареждане на батерията.
Не изключвайте батерията по време на зареждане, тъй като това може да повлияе на правилното й зареждане.
Когато животът на батерията изтече, сменете батерията с подобна. Свържете се с производителя или дистрибутора
на радиото.
Не зареждайте батерията, ако не е разредена. Това може да доведе до намаляване на живота на батерията.
Не зареждайте батерията, ако тя или радиото са мокри.

Ръководство за употреба - 20
Инструкции за зареждане
Ако на екрана се появи индикаторът за изтощена батерия, препоръчваме да заредите батерията.
Можете да зареждате батерията отделена от радиото или заедно с него.
За да заредите батерията, използвайте зарядната база, предоставена с радиото.
По време на зареждане червеният светодиод на зареждащата база свети. Когато батерията е напълно заредена (след
около 4 часа), зеленият светодиод светва.
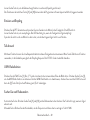
Поставете/Извадете батерията
За да извадите батерията от радиото, първо разхлабете
скобата, която фиксира батерията, след което
издърпайте батерията надолу.
За да инсталирате отново батерията, натиснете
батерията в нейния слот, след което затегнете
задържащата скоба.
Поставете скобата за колан
С помощта на винтовете, включени в опаковката,
фиксирайте скобата за колан на гърба на радиото.
Забележка: Препоръчваме ви да откачите щипката за
колан, преди да извадите батерията.
La pagina si sta caricando...
La pagina si sta caricando...
La pagina si sta caricando...
La pagina si sta caricando...
La pagina si sta caricando...
La pagina si sta caricando...
La pagina si sta caricando...
La pagina si sta caricando...
La pagina si sta caricando...
La pagina si sta caricando...
La pagina si sta caricando...
La pagina si sta caricando...
La pagina si sta caricando...
La pagina si sta caricando...
La pagina si sta caricando...
La pagina si sta caricando...
La pagina si sta caricando...
La pagina si sta caricando...
La pagina si sta caricando...
La pagina si sta caricando...
La pagina si sta caricando...
La pagina si sta caricando...
La pagina si sta caricando...
La pagina si sta caricando...
La pagina si sta caricando...
La pagina si sta caricando...
La pagina si sta caricando...
La pagina si sta caricando...
La pagina si sta caricando...
La pagina si sta caricando...
La pagina si sta caricando...
La pagina si sta caricando...
La pagina si sta caricando...
La pagina si sta caricando...
La pagina si sta caricando...
La pagina si sta caricando...
La pagina si sta caricando...
La pagina si sta caricando...
La pagina si sta caricando...
La pagina si sta caricando...
La pagina si sta caricando...
La pagina si sta caricando...
La pagina si sta caricando...
La pagina si sta caricando...
La pagina si sta caricando...
La pagina si sta caricando...
La pagina si sta caricando...
La pagina si sta caricando...
La pagina si sta caricando...
La pagina si sta caricando...
La pagina si sta caricando...
La pagina si sta caricando...
La pagina si sta caricando...
La pagina si sta caricando...
La pagina si sta caricando...
La pagina si sta caricando...
La pagina si sta caricando...
La pagina si sta caricando...
La pagina si sta caricando...
La pagina si sta caricando...
La pagina si sta caricando...
La pagina si sta caricando...
La pagina si sta caricando...
La pagina si sta caricando...
La pagina si sta caricando...
La pagina si sta caricando...
La pagina si sta caricando...
La pagina si sta caricando...
La pagina si sta caricando...
La pagina si sta caricando...
La pagina si sta caricando...
La pagina si sta caricando...
La pagina si sta caricando...
La pagina si sta caricando...
La pagina si sta caricando...
La pagina si sta caricando...
La pagina si sta caricando...
La pagina si sta caricando...
La pagina si sta caricando...
La pagina si sta caricando...
La pagina si sta caricando...
La pagina si sta caricando...
La pagina si sta caricando...
La pagina si sta caricando...
La pagina si sta caricando...
La pagina si sta caricando...
La pagina si sta caricando...
La pagina si sta caricando...
La pagina si sta caricando...
La pagina si sta caricando...
La pagina si sta caricando...
La pagina si sta caricando...
La pagina si sta caricando...
La pagina si sta caricando...
La pagina si sta caricando...
La pagina si sta caricando...
La pagina si sta caricando...
La pagina si sta caricando...
La pagina si sta caricando...
La pagina si sta caricando...
La pagina si sta caricando...
La pagina si sta caricando...
La pagina si sta caricando...
La pagina si sta caricando...
La pagina si sta caricando...
La pagina si sta caricando...
La pagina si sta caricando...
La pagina si sta caricando...
La pagina si sta caricando...
La pagina si sta caricando...
La pagina si sta caricando...
La pagina si sta caricando...
La pagina si sta caricando...
La pagina si sta caricando...
La pagina si sta caricando...
La pagina si sta caricando...
La pagina si sta caricando...
La pagina si sta caricando...
La pagina si sta caricando...
La pagina si sta caricando...
La pagina si sta caricando...
La pagina si sta caricando...
La pagina si sta caricando...
La pagina si sta caricando...
La pagina si sta caricando...
La pagina si sta caricando...
La pagina si sta caricando...
La pagina si sta caricando...
La pagina si sta caricando...
La pagina si sta caricando...
La pagina si sta caricando...
La pagina si sta caricando...
La pagina si sta caricando...
La pagina si sta caricando...
La pagina si sta caricando...
La pagina si sta caricando...
La pagina si sta caricando...
La pagina si sta caricando...
La pagina si sta caricando...
La pagina si sta caricando...
La pagina si sta caricando...
La pagina si sta caricando...
La pagina si sta caricando...
La pagina si sta caricando...
La pagina si sta caricando...
La pagina si sta caricando...
-
 1
1
-
 2
2
-
 3
3
-
 4
4
-
 5
5
-
 6
6
-
 7
7
-
 8
8
-
 9
9
-
 10
10
-
 11
11
-
 12
12
-
 13
13
-
 14
14
-
 15
15
-
 16
16
-
 17
17
-
 18
18
-
 19
19
-
 20
20
-
 21
21
-
 22
22
-
 23
23
-
 24
24
-
 25
25
-
 26
26
-
 27
27
-
 28
28
-
 29
29
-
 30
30
-
 31
31
-
 32
32
-
 33
33
-
 34
34
-
 35
35
-
 36
36
-
 37
37
-
 38
38
-
 39
39
-
 40
40
-
 41
41
-
 42
42
-
 43
43
-
 44
44
-
 45
45
-
 46
46
-
 47
47
-
 48
48
-
 49
49
-
 50
50
-
 51
51
-
 52
52
-
 53
53
-
 54
54
-
 55
55
-
 56
56
-
 57
57
-
 58
58
-
 59
59
-
 60
60
-
 61
61
-
 62
62
-
 63
63
-
 64
64
-
 65
65
-
 66
66
-
 67
67
-
 68
68
-
 69
69
-
 70
70
-
 71
71
-
 72
72
-
 73
73
-
 74
74
-
 75
75
-
 76
76
-
 77
77
-
 78
78
-
 79
79
-
 80
80
-
 81
81
-
 82
82
-
 83
83
-
 84
84
-
 85
85
-
 86
86
-
 87
87
-
 88
88
-
 89
89
-
 90
90
-
 91
91
-
 92
92
-
 93
93
-
 94
94
-
 95
95
-
 96
96
-
 97
97
-
 98
98
-
 99
99
-
 100
100
-
 101
101
-
 102
102
-
 103
103
-
 104
104
-
 105
105
-
 106
106
-
 107
107
-
 108
108
-
 109
109
-
 110
110
-
 111
111
-
 112
112
-
 113
113
-
 114
114
-
 115
115
-
 116
116
-
 117
117
-
 118
118
-
 119
119
-
 120
120
-
 121
121
-
 122
122
-
 123
123
-
 124
124
-
 125
125
-
 126
126
-
 127
127
-
 128
128
-
 129
129
-
 130
130
-
 131
131
-
 132
132
-
 133
133
-
 134
134
-
 135
135
-
 136
136
-
 137
137
-
 138
138
-
 139
139
-
 140
140
-
 141
141
-
 142
142
-
 143
143
-
 144
144
-
 145
145
-
 146
146
-
 147
147
-
 148
148
-
 149
149
-
 150
150
-
 151
151
-
 152
152
-
 153
153
-
 154
154
-
 155
155
-
 156
156
-
 157
157
-
 158
158
-
 159
159
-
 160
160
-
 161
161
-
 162
162
-
 163
163
-
 164
164
-
 165
165
-
 166
166


in altre lingue
- français: PNI PMR R18 Manuel utilisateur
- Deutsch: PNI PMR R18 Benutzerhandbuch
- polski: PNI PMR R18 Instrukcja obsługi