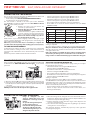
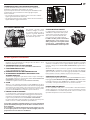
Franke FDW 613 E5P F Guida utente
- Categoria
- Lavastoviglie
- Tipo
- Guida utente

EN User manual
DE Bedienungsanleitung
ES Manual de usuario
FR Manuel d‘utilisation
IT Istruzioni per l‘uso
NL Gebruiksaanwijzing
PT Manual do utilizador
Dishwasher
Geschirrspüler
Lavavajillas
Lave-vaisselle
Lavastoviglie
Vaatwasmachine
Lava-louças
FDW 613 E5P F

2

3
EN
LANGUAGES Sprachen / Idiomas / Langues / Lingue / Talen / Línguas
EN USER MANUAL ........................................................................................................................................................................ 3
DE BEDIENUNGSANLEITUNG ................................................................................................................................................ 15
ES MANUAL DE USUARIO ....................................................................................................................................................... 25
FR MANUEL D‘UTILISATION ................................................................................................................................................... 35
IT ISTRUZIONI PER L‘USO ....................................................................................................................................................... 45
NL GEBRUIKSAANWIJZING ..................................................................................................................................................... 55
PT MANUAL DO UTILIZADOR ............................................................................................................................................... 65

4

5
EN
TABLE OF CONTENTS
OVERVIEW .............................................................................................................................................................................................. 6
FIRST TIME USE ..................................................................................................................................................................................... 7
PROGRAMS TABLE ............................................................................................................................................................................... 8
LOADING THE RACKS .......................................................................................................................................................................... 8
DAILY USE ............................................................................................................................................................................................... 9
ADVICE AND TIPS ............................................................................................................................................................................... 10
CLEANING AND MAINTENANCE .................................................................................................................................................. 10
INSTALLATION ..................................................................................................................................................................................... 12
TROUBLESHOOTING ......................................................................................................................................................................... 13
SUPPORT .............................................................................................................................................................................................. 14

6
Before using the appliance carefully read Safety Instructions guide.
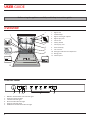
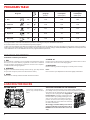
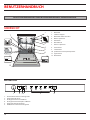
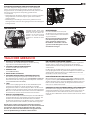
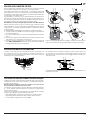
OVERVIEW
CONTROL PANEL
USER GUIDE
1. Upper rack
2. Foldable aps
3. Upper rack height adjuster
4. Upper spray arm
5. Lower rack
6. Cutlery basket
7. Lower spray arm
8. Filter Assembly
9. Salt reservoir
10. Detergent and Rinse Aid dispensers
11. Rating plate
12. Control panel
0000 000 00000
Service:
1
2
3
4
5
6
10
12
7
11
9
8
1. ON-OFF / Reset button with indicator light
2. Program selection button
3. Salt rell indicator light
4. Rinse Aid rell indicator light
5. Program indicator lights
6. START/Pause button with indicator light
1 2 3 4 5 6

7
EN
The use of salt prevents the formation of LIMESCALE on the dishes and
on the machine’s functional components.
• It is mandatory that THE SALT RESERVOIR NEVER BE EMPTY.
• It is important to set the water hardness.
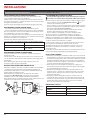
The salt reservoir is located in the lower part of the dishwasher
(see OVERVIEW) and must be lled when the SALT REFILL indicator
light in the control panel is lit.
1. Remove the lower rack and unscrew the
reservoir cap (anticlockwise).
2. Only the rst time you do this: ll the salt
reservoir with water.
3. Position the funnel (see gure) and ll the salt
reservoir right up to its edge (approximately 1
kg); it is not unusual for a little water to leak out.
4. Remove the funnel and wipe any salt resi-
due away from the opening.
Make sure the cap is screwed on tightly, so that no detergent can get
into the container during the wash program (this could damage the
water softener beyond repair).
Whenever you need to add salt, it is mandatory to complete the
procedure before the beginning of the washing cycle to avoid corrosion.
.....................................................................................................................................................................................
SETTING THE WATER HARDNESS
To allow the water softener to work in a perfect way, it is essential that
the water hardness setting is based on the actual water hardness in
your house. This information can be obtained from your local water
supplier.
The factory sets the default value for the water hardness.
FILLING THE SALT RESERVOIR
Rinse aid makes dish DRYING easier. The rinse aid dispenser A should
be lled when the RINSE AID REFILL indicator light in the control
panel is lit.
1. Open the dispenser B by pressing and pulling up the tab on the lid.
2. Pour in the rinse aid (max.110 ml), making sure it does not overow
from the dispenser. If this happens, clean the spill immediately with
a dry cloth.
3. Press the lid down until you hear a click to close it.
NEVER pour the rinse aid directly into the appliance tub.
• Switch on the appliance by pressing the ON/OFF button.
• Switch o the appliance by pressing the ON/OFF button.
• Hold down button P for 5 seconds, until you hear a beep.
• Switch on the appliance by pressing the ON/OFF button.
• The program indicator light of the current set level ashes.
• Press button P to select the desired hardness level (see WATER
HARDNESS TABLE).
• Switch o the appliance by pressing the ON/OFF button.
Setting is complete!
As soon as this procedure is complete, run a program without loading.
Only use salt that has been specically designed for dishwashers.
After the salt has been poured into the machine, the SALT REFILL indi-
cator light switches o.
If the salt container is not lled, the water softener and the heating
element may be damaged as a result of limescale accumulation.
Using of Salt is recommended with any type of dishwasher detergent.
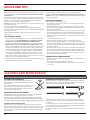
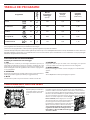
Water Hardness Table
Level
°dH
German degrees
°fH
French degrees
°Clark
English degrees
1 Soft 0 - 6 0 - 10 0 - 7
2 Medium 7 - 11 11 - 20 8 - 14
3 Average 12 - 16 21 - 29 15 - 20
4 Hard 17 - 34 30 - 60 21 - 42
5 Very hard 35 - 50 61 - 90 43 - 62
FILLING THE RINSE AID DISPENSER
A
B
Usage of detergent not desi-
gned for dishwashers may cause
malfunction or damage to the ap-
pliance.
To open the detergent dispenser
use the opening device C.
Introduce the detergent into the
dry dispenser D only. Place the
amount of detergent for pre-wa-
shing directly inside the tub.
ADJUSTING THE DOSAGE OF RINSE AID
I
f you are not completely satised with the drying results, you can adjus
t
the quantity of rinse aid used.
• Switch the dishwasher on using the ON/OFF button.
• Switch it o using the ON/OFF button.
• Press button P three times - a beep will be heard.
• Switch it on using the ON/OFF button.
• The program indicator light of the current set level ashes.
• Press button P to select the level of rinse aid quantity to be supplied.
• Switch it o using the ON/OFF button
Setting is complete!
If the rinse aid level is set to 1 (ECO), no rinse aid will be supplied.
The LOW RINSE AID indicator light will not be lit if you run out of rinse aid.
A maximum of 5 levels can be set according to the dishwasher model.
The factory setting is specic to the model, please follow instruction
above to check this for your machine.
• If you see bluish streaks on the dishes, set a low number (2-3).
• If there are drops of water or limescale marks on the dishes, set a
mid-range number (4-5).
FILLING THE DETERGENT DISPENSER
C
D
1. When measuring out the detergent refer to the mentioned earlier in-
formation to add the proper quantity. Inside the dispenser D there are
indications to help the detergent dosing.
2. Remove detergent residues from the edges of the dispenser and
close the cover until it clicks.
3. Close the lid of the detergent dispenser by pulling it up until the
closing device is secured in place.
The detergent dispenser automatically opens up at the right time
according to the program.
After installation, remove the stoppers from the racks and the retaining elastic elements from the upper rack.
FIRST TIME USE SALT, RINSE AID AND DETERGENT

8
LOADING THE RACKS
UPPER RACK
Load delicate and light dishes:
glasses, cups, saucers, low salad
bowls.
(loading example for the upper rack)
ADJUSTING THE HEIGHT OF THE UPPER RACK
The height of the upper basket can be adjusted: high position to
place bulky crockery in the lower basket and low position to make the
most of the tip-up compartments by creating more space upwards.
The upper rack is equipped with a Upper Rack
height adjuster (see gure), without pressing
the levers, lift it up by simply holding the rack
sides, as soon as the rack is stable in its upper
position. To restore to the lower position, press
the levers (A) at the sides of the rack and move
the basket downwards.
We strongly recommend that you do not ad-
just the height of the rack when it is loaded.
NEVER raise or lower the basket on one side
only.
ECO program data is measured under laboratory conditions according to European Standard EN 60436:2020.
Pre-treatment of the dishes is not needed before any of the programs.
*) Values given for programs other than the program Eco are indicative only. The actual time may vary depending on many factors such as temperature
and pressure of the incoming water, room temperature, amount of detergent, quantity and type of load, load balancing, additional selected options and
sensor calibration. The sensor calibration can increase program duration up to 20 min.
Program
Drying
phase
Duration of wash
program
(h:min)
*)
Water
consumption
(litres/cycle)
Energy
consumption
(kWh/cycle)
1. Eco
50°
3:20 12.0 1.04
2. Intensive 65° 2:30 16,0 1.50
3. Mixed 55° 2:25 16.0 1.35
4. Rapid 30’
50°
-
0:30 9.0 0.60
5. Half Load
50°
1:20 12.0 1.10
Instructions on wash cycle selection.
1 ECO
Eco programme is suitable to clean normally soiled tableware, that for
this use, it is the most ecient programme in terms of its combined
energy and water consumption, and that it is used to assess complian-
ce with the EU Ecodesign legislation.
2 INTENSIVE
Program recommended for heavily soiled crockery, especially suitable
for pans and saucepans (not to be used for delicate items).
3 MIXED
Mixed soil. For normally soiled dishes with dried food residues.
4 RAPID 30’
Program to be used for half load of lightly-soiled dishes with no dried
food residues. Does not include drying phase.
5 HALF LOAD
Ideal for washing a half load of lightly or normally soiled crockery.
Notes:
Please note that cycle Rapid 30’ is dedicated for lightly soiled dishes.
PROGRAMS DESCRIPTION
PROGRAMS TABLE

9
EN
FOLDABLE FLAPS WITH ADJUSTABLE POSITION
The side foldable aps can be fold or unfold to optimize the arrange-
ment of crockery inside the rack.
Wine glasses can be placed safely in the foldable aps by inserting the
stem of each glass into the corresponding slots.
Depending on the model:
– to unfold the aps there is needed to slide it up and rotate or
release it from the snaps and pull it down.
– to fold the aps there is needed to rotate it and slide aps down or
pull it up and attach aps to the snaps.
DAILY USE
1. CHECK WATER CONNECTION
Check that the dishwasher is connected to the water supply and
that the tap is open.
2. SWITCH ON THE DISHWASHER
Open the door and press the ON/OFF button.
3. LOAD THE RACKS
(see LOADING THE RACKS)
4. FILLING THE DETERGENT DISPENSER
5. CHOOSE THE PROGRAM AND CUSTOMISE THE CYCLE
Select the most appropriate program in accordance with the type
of crockery and its soiling level (see PROGRAMS DESCRIPTION) by
pressing the P button.
Select the desired options (see OPTIONS AND FUNCTIONS).
6. START
Start the wash cycle by pressing START/Pause button (led is lit) and
closing the door within 4 sec. When the program starts you hear
a single beep. If the door was not closed within 4 sec., the alarm
sound will be played. In this case, open the door, press START/Pause
button and close the door again within 4 sec.
7. END OF WASH CYCLE
The end of the wash cycle is indicated by beeps and by the ashing
of the indicator light of the selected program. Open the door and
switch o the appliance by pressing the ON/OFF button.
Wait for a few minutes before removing the crockery - to avoid
burns. Unload the racks, beginning with the lower one.
The machine will switch o automatically during certain extended
periods of inactivity, in order to minimise electricity consumption.
If the crockery is only lightly soiled or if it has been rinsed with
water before being placed in the dishwasher, reduce the amount
of detergent used accordingly.
MODIFYING A RUNNING PROGRAM
If a wrong program was selected, it is possible to change it, provided
that it has only just begun: open the door, press and hold the ON/OFF
button, the machine will switch o.
Switch the machine back on using the ON/OFF button and select
the new wash cycle and any desired options; Start the wash cycle by
pressing START/Pause button and closing the door within 4 sec.
....................................................................................................................................................................................
ADDING EXTRA CROCKERY
Without switching o the machine, open the door (START/Pause
led starts blinking) (be ware of HOT steam!) and place the crockery
inside the dishwasher. Press the START/Pause button and close the
door within
4 sec., the cycle will resume from the point at which it was
interrupted.
....................................................................................................................................................................................
ACCIDENTAL INTERRUPTIONS
If the door is opened during the wash cycle, or if there is a power cut,
the cycle stops. Press the START/Pause button and close the door
within
4 sec., the cycle will resume from the point at which it was
interrupted.
LOWER RACK
For pots, lids, plates, salad
bowls, cutlery etc.... Large pla-
tes and lids should ideally be
placed at the sides to avoid in-
terferences with the spray arm.
(loading example for the lower rack)
CUTLERY BASKET
The basket is equipped with top
grilles
for improved cutlery arrangement.
The
cutlery basket should be positioned only
at the front of the lower rack.
Knives and other utensils with sharp
edges must be placed in the cutlery
basket with the points facing down-
wards or they must be positioned ho-
rizontally in the tip-up compartments
on the upper rack.

10
TIPS
Before loading the baskets, remove all food residues from the crockery
and empty the glasses. You do not need to rinse beforehand under
running water.
Arrange the crockery so that it is held in place rmly and does not tip
over; and arrange the containers with the openings facing downwards
and the concave/convex parts placed obliquely, thus allowing the
water to reach every surface and ow freely.
Warning: lids, handles, trays and frying pans do not prevent the spray-
er arms from rotating.
Place any small items in the cutlery basket.
Very soiled dishes and pans should be placed in the lower basket
because in this sector the water sprays are stronger and allow a higher
washing performance.
After loading the appliance, make sure that the sprayer arms can
rotate freely.
.....................................................................................................................................................................................
TIPS ON ENERGY SAVING
• When the household dishwasher is used according to the manufac-
turer’s instructions, washing tableware in a dishwasher usually
consumes less energy and water than hand dishwashing.
• In order to maximize dishwasher eciency it is recommended to
initiate the wash cycle once dishwasher is fully loaded. Loading
the household dishwasher up to the capacity indicated by the man-
ufacturer will contribute to energy and water savings. Information
on correct loading of tableware can be found in Loading chapter.
In case of partial loading it is recommended to use dedicated wash
options if available (Multizone), illing up only selected racks. Incor-
rect loading or overloading the dishwasher may increase resources
usage (such as water, energy and time, as well as increase noise level),
reducing cleaning and drying performance.
• Manual pre-rinsing of tableware items leads to increased water and
energy consumption and is not recommended.
HYGIENE
To avoid odour and sediment which can be accumulated in the
dishwasher please run a high temperature program at least one a
month. Use a tea spoon of detergent and run it without the loading to
clean your appliance.
.....................................................................................................................................................................................
UNSUITABLE CROCKERY
Items which are not dishwasher-safe:
• Wooden dishes, pots or pans: these may be damaged by the high
washing temperatures.
• Handcrafted items: these are rarely suitable for washing in a dish-
washer. The relatively high water temperatures and the detergents
used may damage them.
• Plastic dishes: these are not heat resistant and may lose their shape.
Heat resistant plastic dishes must be washed in the upper basket.
• Dishes and objects in copper, tin, zinc or brass: these tend to stain.
• Aluminium dishes: items made from anodised aluminium may lose
their colour.
• Silverware: silver items may stain.
• Glass and crystal: in general, glass and crystal objects can be
washed in the dishwasher. However, certain types of glass and crys-
tal may become dull and lose their clearness after many washings.
Therefore, for these items we recommend using the least aggressive
program available.
• Decorated items: the decorated objects available on the market are
generally able to withstand washing in the dishwasher, although
the colours may fade after a great many washes. If in doubt as to the
fastness of the colours, it is advisable to wash just a few items at a
time for approximately one month.
.....................................................................................................................................................................................
DAMAGE TO GLASS AND CROCKERY
• Only use glasses and porcelain guaranteed by the manufacturer as
dishwasher safe.
• Use a delicate detergent suitable for crockery
• Collect glasses and cutlery from the dishwasher as soon as the wash
cycle is over.
ADVICE AND TIPS
CLEANING AND MAINTENANCE
CLEANING THE DISHWASHER
Any marks on the inside of the appliance may be
removed using a cloth dampened with water and a
little vinegar.
The external surfaces of the machine and the control
panel can be cleaned using a non-abrasive cloth
which has been dampened with water. Do not use
solvents or abrasive products.
.....................................................................................................................................................................................
PREVENTING UNPLEASANT ODOURS
Always keep the door of the appliance ajar in order to avoid moisture
from forming and being trapped inside the machine.
Clean the seals around the door and detergent dispensers regularly
using a damp sponge. This will avoid food becoming trapped in the se-
als, which is the main cause behind the formation of unpleasant odours.
.....................................................................................................................................................................................
CLEANING THE WATER INLET HOSE
If the water hoses are new or have not been used for an extended
period of time, let the water run to make sure it is clear and free of im-
purities before performing the necessary connections. If this precau-
tion is not taken, the water inlet could become blocked and damage
the dishwasher.
CHEKING THE WATER SUPPLY HOSE
Check the inlet hose regularly for brittleness and cracks. If damaged,
replace it by a new hose available through our After-Sales Service or
your specialist dealer. Depending on the hose type:
If the inlet hose has a transparent coating, periodically check if the
colour intensies locally. If yes, the hose may have a leak and should
be replaced.
For water stop hoses: check the small safety valve inspection window
(see arrow). If it is red, the water stop function was triggered, and the
hose must be replaced by a new one.
For unscrewing this hose, press the release button while unscrewing
the hose.
Always unplug the appliance when cleaning it and when performing maintenance work. Do not use ammable liquids to clean the machine.

11
EN
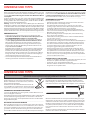
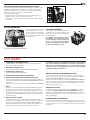
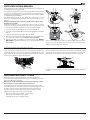
After cleaning the lters, replace the lter assembly and x it in
position correctly; this is essential for maintaining the ecient
operation of the dishwasher.
21
43
A
C
A
B
Regularly clean the lter assembly so that the lters do not clog and
that the waste water ows away correctly.
Using dishwasher with clogged lters or foreign objects inside ltration
system or sprayarms may cause unit malfunction resulting in lose of
performance, noisy work or higher resources usage.
The lter assembly consists of three lters which remove food residues
from the washing water and then recirculate the water.
The dishwasher must not be used without lters or if the lter is
loose.
At least once per month or after each 30 cycles, check the lter assembly
and if necessary clean it thoroughly under running water, using a non-
-metallic brush and following the instructions below:
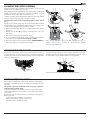
1. Turn the cylindrical lter A in an anti-clockwise direction and pull it
out (Fig 1).
2. Remove the cup lter B by exerting a slight pressure on the side
aps (Fig 2).
3. Slide out the stainless-steel plate lter C (Fig 3).
4. In case you nd foreign objects (such as broken glass, porcelain,
bones, fruit seeds etc.) please remove them carefully.
5. Inspect the trap and remove any food residues. NEVER REMOVE the
wash-cycle pump protection (black detail) (Fig 4).
On occasions, food residue may become encrusted onto the spray arms
and block the holes used to spray the water. It is therefore recommen-
ded that you check the arms from time to time and clean them with a
small non-metallic brush.
CLEANING THE SPRAY ARMS
To remove the upper spray arm, turn the plastic locking ring in an anti-
clockwise direction. The upper spray arm should be replaced so that
the side with the greater number of holes is facing upwards.
The lower spray arm may be removed by pulling it upwards.
CLEANING THE FILTER ASSEMBLY
WATER SOFTENING SYSTEM
Water softener automatically reduces water hardness, consequently
preventing scale buildup on heater, contributing also to better cleaning
eciency.
This system regenerates itself with salt, therefore it is required to
rell salt container when empty.
Frequency of regeneration depends on water hardness level setting
- regeneration takes place once per 5 Eco cycles with water hardness
level set to 3.
Regeneration process starts in nal rinse and nishes in drying phase,
before cycle ends.
• Single regeneration consumes: ~3.5L of water;
• Takes up to 5 additional minutes for the cycle;
• Consumes below 0.005kWh of energy.

12
If the appliance must be moved at any time, keep it in an upright position; if absolutely necessary, it may be tilted onto its back.
CONNECTING THE WATER SUPPLY
Adaptation of the water supply for installation should only be perfor-
med by a qualied technician.
The water inlet and outlet hoses may be positioned towards the right
or the left in order to achieve the best possible installation.
Make sure the dishwasher does not bend or squash the hoses.
.....................................................................................................................................................................................
CONNECTING THE WATER INLET HOSE
• Run the water until it is perfectly clear.
• Screw the inlet hose tightly into position and turn on the tap.
If the inlet hose is not long enough, contact a specialist store or an
authorised technician.
The water pressure must be within the values indicated in the Techni-
cal Data table - otherwise the dishwasher may be function properly.
Make sure the hose is not bent or compressed.
SPECIFICATIONS FOR THE CONNECTION OF THE WATER SUPPLY HOSE:
.....................................................................................................................................................................................
CONNECTING THE WATER OUTLET HOSE
Connect the outlet hose to a drain duct with a minimum diameter of
2 cm A.
The outlet hose connection must be at a height ranging from 40 to 80 cm
from the oor or surface where the dishwasher rests.
Before connecting the water outlet hose to the sink drain, remove the
plastic plug B.
.....................................................................................................................................................................................
ANTI-FLOODING PROTECTION
Anti-ooding protection. To ensure oods do not occur, the dishwasher:
- is provided with a special system which blocks the water supply in
the event of anomalies or leaks from inside the appliance.
Some models are also equipped with the supplementary safety device
New Aqua Stop, which guarantees anti-ooding protection even in
the event of a supply hose rupture.
Under no circumstances should the water inlet hose be cut as it conta-
ins live electrical parts.
ELECTRICAL CONNECTION
WARNING: Under no circumstances should the water inlet hose
be cut as it contains live electrical parts.
Before inserting the plug into the electrical socket, make sure that:
• The socket is earth and complies with current regulations;
• The socket can withstand the maximum load of the appliance as
shown on the data plate located on the inside of the door (see
OVERVIEW).
• The power supply voltage falls within the values indicated on the
data plate on the inside of the door.
• The socket is compatible with the plug of the appliance.
If this is not the case, ask an authorised technician to replace the plug
(see SUPPORT). Do not use extension cables or multiple sockets. Once
the appliance has been installed, the power supply cable and the
electrical socket should be easily accessible.
The cable should not be bent or compressed.
If the power supply cable is damaged, have it replaced by the ma-
nufacturer or its authorised Technical Assistance Service in order to
prevent all potential hazards.
The Company shall not be held responsible for any incidents, if these
regulations are not observed.
.....................................................................................................................................................................................
POSITIONING AND LEVELLING
1. Position the dishwasher on a level sturdy oor. If the oor is uneven,
the front feet of the appliance may be adjusted until it reaches
a horizontal position. If the appliance is levelled correctly, it will be
more stable and much less likely to move or cause vibrations and
noise while it is operating.
2. Before recessing the dishwasher, stick the adhesive transparent strip
under the wooden shelf in order to protect it from any condensation
which may form.
3. Place the dishwasher so that its sides or back panel are in contact
with the adjacent cabinets or the wall. This appliance can also be
recessed under a single worktop.
4. To adjust the height of the rear foot, turn the red hexagonal bushing
on the lower central part at the front of the dishwasher using a
hexagonal spanner with an opening of 8 mm. Turn the spanner in
a clockwise direction to increase the height and in an anticlockwise
direction to decrease it.
.....................................................................................................................................................................................
DIMENSIONS AND CAPACITY:
WATER SUPPLY cold or hot (max. 60°C)
WATER INTAKE 3/4”
POWER OF WATER PRESSURE
0,05 ÷ 1 MPa (0.5 ÷ 10 bar)
7,25 – 145 psi
MIN 40 cm
MAX 80 cm
WIDTH 598 mm
HEIGHT 820 mm
DEPTH 555 mm
CAPACITY 13 standard place-settings
INSTALLATION

13
EN
In case your dishwasher doesn’t work properly, check if the problem can be solved by going through the following list.
For other errors or issues please contact authorized After-sales Service which contact details can be found in the warranty booklet.
The manufacturer ensures the availability of spare parts for at least 10 years after production date of this appliance.
PROBLEMS POSSIBLE CAUSES SOLUTIONS
Salt
indicator is lit
Salt reservoir is empty. (After rell the salt
indicator may remain lit for several wash
cycles).
Rell reservoir with salt (for more information - see page 5).
Adjust water hardness - see table, page 5.
Rinse aid
indicator is lit
Rinse aid dispenser is empty. (After rell the
rinse aid indicator may remain lit for several
wash cycles).
Rell dispenser with rinse aid (for more information - see page 5).
The dishwasher
won’t start or
does not respond
to commands.
The appliance has not been plugged in
properly.
Insert the plug into the socket.
Power outage.
For safety reasons, dishwasher will not re-start automatically when power
returns. Open dishwasher door, press START/Pause button and close the door
within 4 seconds.
The dishwasher door is not closed. Vigorously push the door until you hear the “click”.
Cycle is interupted by door opening for
more than 4 seconds.
Press START/Pause and close the door within 4 seconds.
It does not respond to commands.
Switch o the appliance by pressing the ON/OFF button, switch it back on after
approximately one minute and restart the program. If problem persists, unplug
the appliance for 1 minute, then plug it back in.
The dishwasher
won’t drain.
The wash cycle has not nished yet. Wait until the wash cycle nishes.
The drain hose is bent. Check that the drain hose is not bent (see INSTALATION INSTRUCTION).
The sink drain pipe is blocked. Clean the sink drain pipe.
The lter is clogged up with food residues. Clean the lter (see CLEANING THE FILTER ASSEMBLY).
The dishwasher
makes excessive
noise.
The dishes are rattling against each Position the crockery correctly (see LOADING THE RACKS).
An excessive amount of foam has been
produced.
The detergent has not been measured out correctly or it is not suitable for
use in dishwashers (see FILLING THE DETERGENT DISPENSER). Restart the cur-
rent cycle by switching OFF the dishwasher, then switch it on again, select a
new program, press START/Pause and close the door within 4 seconds.
Please do not add any detergent.
The dishes are
not clean.
The crockery has not been arranged
properly.
Arrange the crockery correctly (see LOADING THE RACKS).
The spray arms cannot rotate freely, being
hindered by the dishes.
Arrange the crockery correctly (see LOADING THE RACKS).
The wash cycle is too gentle. Select an appropriate wash cycle (see PROGRAMS TABLE).
An excessive amount of foam has been
produced.
The detergent has not been measured out correctly or it is not suitable for use
in dishwashers (see FILLING THE DETERGENT DISPENSER).
The cap on the rinse aid compartment has
not been shut correctly.
Make sure the cap of the rinse aid dispenser is closed.
The lter is soiled or clogged. Clean the lter assembly (see CARE AND MAINTENANCE).
There is no salt. Fill the salt reservoir (see FILLING THE SALT RESERVOIR).
The dishwasher
does not ll the
water.
All LEDs are
blinking rapidly
No water in the water supply or the tap is
closed.
Make sure there is water in the water supply or the tap running.
The inlet hose is bent.
Make sure the inlet hose is not bent (see INSTALLATION) reprogram the
dishwasher and reboot.
The sieve in the water inlet hose is clogged;
it is necessary to clean it
After having carried out the verication and cleaning, turn o and turn on the
dishwasher and restart a new program.
Dishwasher
nishes the cycle
prematurely.
Drain hose positioned too low or siphoning
into home sewage system.
Check if end of drain hose is placed at correct height (see INSTALLATION).
Check for siphoning into home sewage system, install air admittance valve if
necessary.
Air in water supply. Check water supply for leaks or other issues letting air inside.
TROUBLESHOOTING

14
SUPPORT
The model information can be retrieved using the QR-Code reported in the energy label.
The label also includes the model identier that can be used to consult the portal of the registry at https://eprel.ec.europa.eu (available only on
certain models).
WWW.FR ANCE.COM
© Franke Technology and Trademark Ltd., Switzerland
012
In the event of any operation problems, contact a Franke Technical Service Centre.
Never use the services of unauthorised technicians.
Specify:
– type of fault
– appliance model (Art.)
– serial number (S.N.)
When you contact the After-Sales Service, you must provide the codes shown on the rating plate
attached to the left or right side inside the door of the dishwasher.
FDW XXX XXX XXX
XXXXXXXXXXXX
Built-in dishwasher /
XXXXXXXXXXXX
S/N
xxxxxxxxxxxx
FXXXXXXRMMDDXXXX
FDW XXX XXX XXX
XXXXXXXXXXXX
XXX.XXXX.XXX
TYPE: DWX-DEAXXX-X
Max.XXXX W XXXX W
XXX-XXX V ~XX Hz X,XX
÷
X MPa
XX A
I.C.
xxxxxxxxxxxx
[BAR-CODE AREA]
[CERTIFICATION AREA]
Made in Poland /
Energy efficiency class for RF A
Safety class I
IEC 436
÷
220-230 V~50 Hz 0,05 1 MPa
Max.XXXX W XXXX W
3
FDW XXX XXX XXX
XXXXXXXXXXX
[BAR-CODE AREA]
[ATESTATION AREA]
10 A
TYPE: DWL-DEA701-B
Max.1900 W
14
220-240 V~ 50 Hz
IEC 436
FDW 614 D10P LP A+++
769991577990
1800 W
Built-in dishwasher /
0,05 ÷ 1 MPa
Safety class І
869991577990
[BAR-CODE AREA]
I.C.769991577990
S/N
xxxxxxxxxxxx
SERVICE
F157799 RMMDDXXXX
FDW 614 D10P LP A+++
869991577990
117.0574.625
Made in Poland /
FDW XXX XXX XXX
XXXXXXXXXXXX
Built-in dishwasher /
XXXXXXXXXXXX
S/N
xxxxxxxxxxxx
FXXXXXXRMMDDXXXX
FDW XXX XXX XXX
XXXXXXXXXXXX
XXX.XXXX.XXX
TYPE: DWX-DEAXXX-X
Max.XXXX W XXXX W
XXX-XXX V ~XX Hz X,XX
÷
X MPa
XX A
I.C.
xxxxxxxxxxxx
[BAR-CODE AREA]
[CERTIFICATION AREA]
Made in Poland /
Energy efficiency class for RF A
Safety class I

15
DE
INHALT
ÜBERSICHT ........................................................................................................................................................................................... 16
ERSTER GEBRAUCH ........................................................................................................................................................................... 17
PROGRAMMTABELLE ........................................................................................................................................................................ 18
KÖRBE BELADEN ................................................................................................................................................................................ 18
TÄGLICHER GEBRAUCH ................................................................................................................................................................... 19
HINWEISE UND TIPPS ....................................................................................................................................................................... 20
REINIGUNG UND WARTUNG .......................................................................................................................................................... 20
INSTALLATION ..................................................................................................................................................................................... 22
LÖSEN VON PROBLEMEN ................................................................................................................................................................ 23
UNTERSTÜTZUNG ............................................................................................................................................................................. 24

16
Lesen Sie vor Gebrauch des Geräts die Sicherheitshinweise aufmerksam durch.
ÜBERSICHT
BEDIENTAFEL
1. Ein-Aus/Reset Taste mit Anzeigelicht
2. Programmwahl-Taste
3. Anzeigelicht zum Salz auüllen
4. Anzeigelicht zum Klarspüler auüllen
5. Programm Anzeigeleuchten
6. START/Pause Taste mit Anzeigelicht
BENUTZERHANDBUCH
1. Oberkorb
2. Faltbare Klappen
3. Oberkorb Höhenversteller
4. Oberer Sprüharm
5. Unterkorb
6. Besteckkorb
7. Unterer Sprüharm
8. Filtereinheit
9. Salzbehälter
10. Spülmittel und Klarspülerspender
11. Typenschild
12. Bedienfeld
0000 000 00000
Service:
1
2
3
4
5
6
10
12
7
11
9
8
1 2 3 4 5 6

17
DE
Mit der Verwendung von Salz werden KALKABLAGERUNGEN auf dem
Geschirr und den funktionalen Komponenten des Geschirrspülers
verhindert.
• DER SALZBEHÄLTER DARF NIE LEER SEIN!
• Es ist wichtig, die Wasserhärte einzustellen.
Der Salzbehälter bendet sich im Geschirrspülerboden (siehe ÜBERSICHT)
und muss aufgefüllt werden, wenn die SALZNACHFÜLLANZEIGE der
Bedienblende leuchtet.
1. Ziehen Sie den Unterkorb heraus und schrau-
ben Sie den Salzbehälterdeckel gegen den
Uhrzeigersinn ab.
2. Nur beim ersten Mal: Befüllen Sie
den Salzbehälter mit Wasser.
3. Setzen Sie den Trichter auf (siehe Abbildung)
und füllen Sie den Behälter bis zum Rand mit
Salz (ca. 1 kg), es ist normal,wenn etwas Wasser
ausläuft.
4. Den Trichter abnehmen und die Salzreste
vom Önungsrand entfernen.
Sicherstellen, dass der Deckel fest angeschraubt ist, so dass kein Spülmittel
während dem Waschprogramm in den Behälter gelangt (dies könnte den
Wasserenthärter irreparabel beschädigen).
Immer wenn Sie Salz zugeben müssen, ist es zwingend vorgeschrieben,
diesen Vorgang vor dem Beginn des Spülgangs auszuführen, um Korro-
sion zu vermeiden.
.....................................................................................................................................................................................
WASSERHÄRTE EINSTELLEN
Damit der Wasserenthärter perfekt arbeiten kann, muss die Wasserhär-
te je nach der aktuellen Wasserhärte in Ihrem Haus eingestellt werden.
Diese Information erhalten sie bei Ihrem örtlichen Wasserversorger.
SALZBEHÄLTER BEFÜLLEN
Klarspüler macht das TROCKNEN von Geschirr einfacher. Der Klarspüler-
spender A muss aufgefüllt werden, wenn das KLARSPÜLER AUFFÜL-
LEN Anzeigelicht auf der Bedienblende leuchtet.
1. Den Behälter B durch Drücken und Anheben der Zunge am Deckel önen.
2. Den Klarspüler vorsichtig bis zur maximalen Füllstandsmarkierung
(110 ml) an der Füllönung einfüllen und ein Überlaufen vermeiden.
Andernfalls sofort mit einem trockenen Tuch abwischen.
3. Den Deckel schließen bis er einrastet.
Füllen Sie den Klarspüler NIEMALS direkt ins Innere des Geschirr-
spülers.
Das Werk stellt den Standardwert für die Wasserhärte ein.
• Die Geschirrspülmaschine mit der Taste EIN/AUS einschalten.
• Mit der Taste EIN/AUS ausschalten.
• Die Taste P 5 Sekunden lang gedrückt halten, bis Sie einen Piepton hören.
• Mit der Taste EIN/AUS einschalten.
• Das Programm-Anzeigelicht der eingestellten Stufe blinkt..
• Drücken Sie die Taste P um die gewünschte Härtestufe auszuwählen
(siehe WASSERHÄRTE-TABELLE).
• Mit der Taste EIN/AUS ausschalten.
Die Einstellung ist abgeschlossen!
Sobald dieses Verfahren abgeschlossen ist, ein Programm ohne Bela-
dung laufen lassen.
Verwenden Sie bitte nur Spezialsalz für Geschirrspüler.
Nach dem Einfüllen des Salzes erlischt die SALZNACHFÜLLANZEIGE.
Wenn der Salzbehälter nicht gefüllt ist, könnten Kesselsteinabla-
gerungen den Wasserenthärter und das Heizelement beschädigen.
Die Verwendung von Salz wird bei jeder Art von Geschirrspülmittel
empfohlen.
Wasserhärte-Tabelle
Stufe
°dH
Deut. Härtegr.
°fH
Französischer Härtegr.
°Clark
Engl. Härtegr.
1 Weich 0 - 6 0 - 10 0 - 7
2 Mittel 7 - 11 11 - 20 8 - 14
3 Durchschnittlich 12 - 16 21 - 29 15 - 20
4 Hart 17 - 34 30 - 60 21 - 42
5 Sehr hart 35 - 50 61 - 90 43 - 62
KLARSPÜLERSPENDER AUFFÜLLEN
A
B
Die Verwendung von Reinigungsmit-
teln, die nicht für Geschirrspüler be-
stimmt sind, kann zu Fehlfunktionen
oder Schäden am Gerät führen.
Zum Önen des Spülmittelbe-
häters den Önungsmechanismus
C drücken. Füllen Sie das Spülmit-
tel ausschließlich in das trockene
Fach D ein. Die für den Vorspül-
gang benötigte Spülmittelmenge
wird direkt in den Geschirrspüler
gegeben.
KLARSPÜLERDOSIERUNG
Sollte das Trockenergebnis unzufrieden stellend sein, kann die Klar-
spülerdosierung neu eingestellt werden.
• Die Geschirrspülmaschine mit der Taste EIN/AUS einschalten.
• Mit der Taste EIN/AUS ausschalten.
• Drücken Sie die Taste P drei Mal - ein Piepton ertönt.
• Mit der Taste EIN/AUS einschalten.
• Das Programm-Anzeigelicht der eingestellten Stufe blinkt.
• Drücken Sie die Taste P, um den Stand der gelieferten Klarspülermenge
auszuwählen.
• Mit der Taste EIN/AUS ausschalten.
Die Einstellung ist abgeschlossen!
Die Klarspülerstufe kann auf 1 (ECO) eingestellt werden. In diesem Fall
wird kein Klarspüler ausgegeben. Die Kontrollleuchte zur ANZEIGE DES
FEHLENDEN KLARSPÜLERS leuchtet nicht mehr auf.
Je nach Gerätemodell können bis max. 5 Stufen eingestellt werden. Die
Werkseinstellung ist abhängig vom Modell. Bitte befolgen Sie die An-
weisungen oben, um dies für Ihr Gerät zu überprüfen.
• Wenn Sie bläuliche Streifen auf dem Geschirr sehen, stellen Sie eine
niedrigere Zahl ein (2-3).
• Wenn Wassertropfen oder Kalkablagerungen auf dem Geschirr sind,
eine höhere Zahl einstellen (4-5)
EINFÜLLEN DES SPÜLMITTELS
C
D
1. Hinsichtlich der Dosierung verweisen wir auf die zuvor erwähnte In-
formation, in der die richtige Menge angegeben ist. Im Fach D sind
Anzeigen die bei der Spülmitteldosierung helfen
.
2. Entfernen Sie eventuelle Spülmittelrückstände von den Kanten der
Kammern und schließen Sie den Deckel so, dass er einrastet.
3. Schieben Sie den Deckel der Spülmittelkammer zum Schließen nach
oben, bis er einrastet.
Die Spülmittelkammer önet sich automatisch zum richtigen.
Zeitpunkt des jeweils gewählten Programms.
Nach Abschluss der Installation die Puer an den Körben und die Rückhaltegummis vom oberen Korb entfernen.
ERSTER GEBRAUCH SALZ, KLARSPÜLER UND SPÜLMITTEL

18
KÖRBE BELADEN
OBERKORB
Hier sortieren Sie empndliches
und leichtes Geschirr ein: Glä-
ser, Tassen, kleine Teller, ache
Schüsseln.
(Sortierbeispiel für den Oberkorb)
HÖHENEINSTELLUNG DES OBERKORBES
Der Oberkorb kann in der Höhe verstellt werden: stellen Sie ihn in die
oberste Position, wenn Sie großes Geschirr in den Unterkorb einräu-
men wollen. Wenn Sie eher die klappbaren Bereiche nutzen wollen,
dann stellen Sie ihn in die untere Position.
Somit vermeiden Sie Zusammenstoßen mit
dem Geschirr im Unterkorb. Der Oberkorb ist
mit einem Oberkorb Höhenversteller (siehe
Abbildung) ausgestattet. Ohne Drücken der He-
bel kann er einfach durch Heben der Korbseiten
angehoben werden, sobald der Korb stabil in
seiner unteren Stellung ist. Um den Korb zurück
in die untere Stellung zu bringen, drücken Sie die
Hebel A an den Seiten des Korbs und schieben
Sie ihn nach unten.
Es empehlt sich, die Höhe des Oberkorbes bei leerem Korb zu regu-
lieren. Heben oder senken Sie den Korb NIEMALS nur an einer Seite.
Programm
Trocken-
phase
Programmdauer
(Std:Min)
*)
Wasser-
verbrauch
(Liter/Zyklus)
Energie-
verbrauch
(kWh/Zyklus)
1. Eco
50°
3:2
0 12,0 1,04
2. Intensiv 65° 2:30 16,0 1,50
3. Gemischt 55° 2:25 16,0 1,35
4. Express 30’
50°
-
0:30 9,0 0,60
5. Halbe Füllmenge
50°
1:20 12,0 1,10
Anweisungen bezüglich der Auswahl des Waschzyklus.
1 ECO
Das ECO-Programm eignet sich, um normal verschmutztes Geschirr zu
reinigen. In Bezug auf den kombinierten Energie- und Wasserverbra-
uch ist es das ezienteste Programm, das auch zur Prüfung der Einhal-
tung der Ökodesign-Richtlinie verwendet wird.
2 INTENSIV
Programm empfohlen für stark verschmutztes Geschirr, besonders
Töpfe und Pfannen (nicht für empndliche Teile verwenden).
3 GEMISCHT
Vermischte Verschmutzung. Für normal verschmutztes Geschirr mit
trockenen Speiseresten.
4 EXPRESS 30’
Programm ideal für eine halbe Beladung mit leicht verschmutztem
Geschirr ohne getrocknete Speisereste. Hat keine Trocknungsphase.
5 HALBE FÜLLMENGE
Leicht oder normal verschmutztes Geschirr, bei der Hälfte der normalen
Beladung.
Hinweise:
Bitte beachten Sie, dass das Programm Express 30’ für leicht verschmutztes
Geschirr geeignet ist.
PROGRAMMBESCHREIBUNG
PROGRAMMTABELLE
Die ECO-Programmdaten sind Labormessdaten, die gemäß der europäischen Vorschrift EN 60436:2020 erfasst wurden.
Eine Vorbehandlung des Geschirrs ist vor keinem Programm erforderlich.
*) Werte, die für andere Programme als das ECO-Programm angegeben werden, sind nur Richtwerte. Die aktuelle Zeit kann auf Grundlage von mehreren
Faktoren, wie Temperatur und Druck des eintretenden Wassers, Raumtemperatur, Spülmittelmenge, Menge und Art der Beladung, Lastausgleich, zusät-
zlich gewählte Optionen und Sensoreichung variieren. Die Sensoreichung kann die Programmdauer bis zu 20 Min. erhöhen

19
DE
KLAPPBARE KLAPPEN MIT VERSTELLBARER POSITION
Die seitlich, klappbaren Ablagen können ein- oder aufgeklappt
werden, um die Anordnung des Geschirrs im Korb zu optimieren.
Stielgläser können an den Ablagen stabilisiert werden, indem sie mit
dem Stiel in die vorgesehene Aussparung gestellt werden.
Je nach Modell:
– Zum Ausklappen der Ablagen, müssen diese nach oben geschoben
und gedreht oder aus den Schnappern gelöst und nach unten
gezogen werden.
– Zum Einklappen der Ablagen, müssen diese gedreht und nach
unten geschoben oder nach oben gezogen und an den Schnappern
befestigt werden.
Für Töpfe, Deckel, Teller, Salat-
schüsseln, Besteck usw. Große
Teller und Deckel sollten ide-
alerweise an die Seiten gelegt
werden, um nicht mit dem
Sprüharm in Kontakt zu kom-
men.
(Sortierbeispiel für den Unterkorb)
BESTECKKORB
Er ist oben mit Gittern versehen, um
das Besteck besser einzuordnen. Er darf
nur im vorderen Teil des unteren Korbes
eingesetzt werden.
Messer und andere Küchenutensilien
mit scharfen Spitzen sind mit nach
unten gerichteten Spitzen in den
Besteckkorb einzuordnen oder wa-
agerecht auf die Ablagen des oberen
Geschirrkorbs zu legen.
UNTERKORB
TÄGLICHER GEBRAUCH
1. ANSCHLUSS AN DIE WASSERLEITUNG PRÜFEN
Sicherstellen, dass der Geschirrspüler an die Wasserleitung
angeschlossen und der Wasserhahn auf ist.
2. SCHALTEN SIE DEN GESCHIRRSPÜLER EIN
Tür önen und EIN-/AUS-Taste drücken.
3. KÖRBE BELADEN
(siehe KÖRBE BELADEN)
4. EINFÜLLEN DES SPÜLMITTELS
5. PROGRAMM WÄHLEN UND DAS PROGRAMM ANPASSEN
Das am besten geeignete Programm je nach Besteckart und
Verschmutzungsgrad auswählen (siehe PROGRAMMBESCHREIBUNG)
durch Drücken der Taste P. Die gewünschten Optionen auswählen
(siehe OPTIONEN UND FUNKTIONEN).
6. START
Starten Sie das Spülprogramm mit der Taste START/Pause (LED
leuchtet) und schließen Sie die Tür innerhalb von 4 Sek. Bei
Programmstart ertönt ein einzelner Piepton. Wenn die Tür nicht in-
nerhalb von 4 Sek. geschlossen wurde, ertönt der akustische Alarm.
Önen Sie in diesem Fall die Tür, drücken Sie die Taste START/Pause
und schließen Sie die Tür erneut innerhalb von 4Sekunden.
7. ENDE DES SPÜLPROGRAMMS
Das Ende des Waschzyklus wird durch Pieptöne und durch Blinken
der Kontrollleuchte des ausgewählten Programms angezeigt. Die
Tür önen und das Gerät mit der EIN/AUS-Taste ausschalten.
Vor Entnahme des Bestecks einige Minuten warten - um Verbrennun-
gen zu vermeiden. Die Körbe entladen, mit dem Unteren beginnen.
Die Maschine schaltet sich automatisch während bestimmter
überschrittener Zeiten der Inaktivität aus, um den Stromverbrauch
zu reduzieren. Für nur leicht verschmutztes Geschirr, oder für
Geschirr, das vorher unter laufendem Wasser abgespült wurde,
kann die Spülmittelmenge erheblich reduziert werden.
EIN LAUFENDES PROGRAMM ÄNDERN
Wenn ein falsches Programm ausgewählt wurde, kann es geändert
werden, wenn es gerade erst gestartet wurde: die Tür önen,
die EIN-/AUS-Taste drücken und gedrückt halten, um die Maschine
auszuschalten.
Die Maschine mit der EIN-/AUS-Taste wieder einschalten und das
neue Spülprogramm und die gewünschten Optionen auswählen; das
Spülprogramm durch Drücken der Taste START/Pause starten und
innerhalb von 4 Sek. die Tür schließen.
....................................................................................................................................................................................
HINZUFÜGEN VON WEITEREM GESCHIRR
Ohne die Maschine auszuschalten, die Tür önen (START/Pause LED
beginnt zu blinken) (Vorsicht HEISSER Dampf!) und das Geschirr in
den Geschirrspüler geben. Die Taste START/Pause drücken und inner-
halb von 4 Sek. die Tür schließen; das Programm läuft automatisch
weiter, wo es unterbrochen wurde.
....................................................................................................................................................................................
UNBEABSICHTIGTES UNTERBRECHEN DES SPÜLPROGRAMMS
Wird während des Spülgangs die Gerätetür geönet, oder sollte ein
Stromausfall stattnden, wird der Spülgang unterbrochen. Damit das
Programm wieder an dem Punkt startet, an dem es unterbrochen
wurde, die Taste START/Pause drücken und innerhalb von 4 Sek. die Tür
schließen.

20
EMPFEHLUNGEN
Bevor Sie das Geschirr in den Geschirrspüler einräumen, befreien Sie es von
Speiserückständen und entleeren Sie Gläser und Behälter von Flüssigkeit-
sresten. Es ist nicht notwendig, das Geschirr unter ießendem Wasser
vorzuspülen.
Stellen Sie das Geschirr so ein, dass es fest steht und nicht umfallen kann
Behälter müssen mit der Önung nach unten eingestellt werden und hoh-
le oder gewölbte Teile müssen schräg stehen, damit das Wasser alle Ober-
ächen erreicht und dann abießen kann.
Achtung : Achten Sie darauf, dass Deckel, Grie, Töpfe und Tabletts die
Drehung der Sprüharme nicht behindern. Stellen Sie kleine Gegenstände
in den Besteckkorb. Stark verschmutztes Geschirr und Töpfe sollten in dem
Unterkorb untergebracht werden, da in diesem Bereich die Wasserstrahlen
stärker sind und eine höhere Spülleistung garantieren. Stellen Sie nach Ein-
räumen des Geschirrs sicher, dass sich die Sprüharme frei bewegen können.
.....................................................................................................................................................................................
ENERGIESPARTIPPS
• Sofern man die Herstelleranweisungen beim Einsatz beachtet,
verbraucht das Waschen von Geschirr im Geschirrspüler in der
Regel WENIGER ENERGIE und Wasser als Handspülen.
• Um die Ezienz des Geschirrspülers zu maximieren, empehlt es
sich, das Spülprogramm bei voll beladenem Gerät zu starten.
Wenn der Geschirrspüler bis zur vom Hersteller angegebenen
Kapazität beladen wird, hilft dies, Energie und Wasser zu sparen.
Angaben über die korrekte Beladung von Geschirr nden Sie im
Kapitel BELADEN DER KÖRBE.
Bei Teilbeladung empehlt es sich, die speziellen Spülprogramme
(Multizone) zu verwenden und nur die entsprechenden Körbe zu
beladen. Bei einer fehlerhaften Beladung oder Überladung des
Geschirrspülers könnten mehr Ressourcen verbraucht (z. B. Wasser,
Energie und Zeit), der Geräuschpegel erhöht und die Reinigungs-
und Trocknungsleistung verringert werden.
• Das manuelle Vorspülen von Geschirr führt zu erhöhtem Wasser-
und Energieverbrauch und wird nicht empfohlen.
HYGIENE
Um Gerüche und Ablagerung, die sich in dem Geschirrspüler ansetzen
können zu vermeiden, bitte mindestens einmal monatlich ein Hochtem-
peraturprogramm laufen lassen. Einen Teelöel Spülmittel verwen-
den und ohne Geschirr laufen lassen, um Ihr Gerät zu reinigen.
.....................................................................................................................................................................................
UNGEEIGNETES GESCHIRR
Nicht spülmaschinenfest:
• Holzschalen, Töpfe oder Pfannen: Diese können durch die hohen
Waschtemperaturen beschädigt werden.
• Handgefertigte Gegenstände: Diese sind nur sehr selten zum
Spülen geeignet. Die relativ hohen Wassertemperaturen und die
verwendeten Waschmittel können sie beschädigen.
• Kunststoschalen: Diese sind nicht hitzebeständig und können
ihre Form verlieren. Hitzebeständige Kunststoschalen müssen im
Oberkorb gewaschen werden.
• Geschirr und Gegenstände aus Kupfer, Zinn, Zink oder Messing:
diese neigen dazu, zu färben.
• Aluminiumschalen: Gegenstände aus eloxiertem Aluminium kön-
nen ihre Farbe verlieren.
• Silberwaren: Silbergegenstände können eckig sein.
• Glas und Kristall: Im Allgemeinen können Glas und Kristallobjekte in
der Spülmaschine gewaschen werden. Allerdings können bestim-
mte Arten von Glas und Kristall stumpf und verlieren ihre Klarheit
nach vielen Waschungen. Daher empfehlen wir Ihnen, das am
wenigsten aggressive Programm zu verwenden.
• Dekorierte Gegenstände: Die auf dem Markt erhältlichen dekori-
erten Gegenstände sind in der Regel in der Lage, dem Waschen in
der Spülmaschine zu widerstehen, obwohl die Farben nach vielen
Wäschen verblassen können. Bei Zweifeln an der Echtheit der Far-
ben ist es ratsam, nur ein paar Gegenstände zu einem Zeitpunkt für
etwa einen Monat zu waschen.
.....................................................................................................................................................................................
SCHÄDEN AN GLAS UND GESCHIRR
• Spülen Sie nur Gläser und Geschirr in Ihrem Geschirrspüler, die vom
Hersteller als spülmaschinenfest ausgezeichnet sind.
• Verwenden Sie ein Feinspülmittel für Geschirr.
• Nehmen Sie Gläser und Besteck so bald wie möglich nach Ablauf des
Programm aus der Spülmaschine.
HINWEISE UND TIPPS
HINWEISE UND TIPPS
Ziehen Sie den Netzstecker aus der Steckdose, bevor Sie Ihren Geschirrspüler reinigen oder Wartungsmaßnahmen getroen werden.
Keine brennbaren Flüssigkeiten zur Reinigung der Maschine verwenden.
REINIGUNG DES GESCHIRRSPÜLERS
Zur Beseitigung von evtl. Flecken im Innenraum des
Gerätes verwenden Sie ein feuchtes Tuch, auf das Sie
etwas weißen Essig träufeln.
Die Gehäuseteile und die Bedienblende können mit
einem mit Wasser angefeuchteten, weichen Tuch gere-
inigt werden. Vermeiden Sie Löse- und Scheuermittel.
.....................................................................................................................................................................................
VERMEIDUNG VON GERUCHSBILDUNG
Lassen Sie die Gerätetür stets nur angelehnt; auf diese Weise kann sich
keine Feuchtigkeit ansammeln.
Die Dichtungen der Tür und der Spülmittelfächer sollten regelmäßig mit
einem feuchten Tuch gereinigt werden. Sie vermeiden so die Ansam-
mlung von Speiseresten, der hauptsächlichen Ursache von Geruchsbil-
dung im Geschirrspüler.
.....................................................................................................................................................................................
WASSERZULAUFSCHLAUCH REINIGEN
Wenn der Wasserschlauch neu ist oder für längere Zeit nicht in Betrieb
war, das Warmwasser laufen lassen, um sicherzustellen, dass es klar und
frei von Verschmutzungen ist, bevor die erforderlichen Anschlüsse vor-
genommen werden. Bei Nichtbeachtung dieser Vorsichtsmaßnahme,
kann die Wasserzufuhr blockieren und den Geschirrspüler beschädigen.
ÜBERPRÜFUNG DES WASSERZULAUFSCHLAUCHS
Den Zulaufschlauch regelmäßig auf Sprödigkeit und Risse prüfen.
Bei Beschädigung, den Schlauch mit einem neuen ersetzen. Dieser ist bei
unserem Kundendienst oder Ihrem Händler verfügbar. Je nach Schlauchart:
Wenn der Zulaufschlauch eine transparente Beschichtung hat, regel-
mäßig prüfen, ob die Farbe sich örtlich verstärkt. Wenn ja, könnte der
Schlauch eine undichte Stelle haben und muss ausgetauscht werden.
Für Wasserstoppschläuche: Das kleine Sicherheitsventil-Kontrollfen-
ster prüfen (siehe Pfeil). Wenn es rot ist, wurde die Wasserstoppfunk-
tion ausgelöst und der Schlauch muss durch einen neuen ersetzt
werden.
Um diesen Schlauch abzuschrauben, die Entriegelungstaste drücken
und dabei den Schlauch abschrauben.
La pagina si sta caricando...
La pagina si sta caricando...
La pagina si sta caricando...
La pagina si sta caricando...
La pagina si sta caricando...
La pagina si sta caricando...
La pagina si sta caricando...
La pagina si sta caricando...
La pagina si sta caricando...
La pagina si sta caricando...
La pagina si sta caricando...
La pagina si sta caricando...
La pagina si sta caricando...
La pagina si sta caricando...
La pagina si sta caricando...
La pagina si sta caricando...
La pagina si sta caricando...
La pagina si sta caricando...
La pagina si sta caricando...
La pagina si sta caricando...
La pagina si sta caricando...
La pagina si sta caricando...
La pagina si sta caricando...
La pagina si sta caricando...
La pagina si sta caricando...
La pagina si sta caricando...
La pagina si sta caricando...
La pagina si sta caricando...
La pagina si sta caricando...
La pagina si sta caricando...
La pagina si sta caricando...
La pagina si sta caricando...
La pagina si sta caricando...
La pagina si sta caricando...
La pagina si sta caricando...
La pagina si sta caricando...
La pagina si sta caricando...
La pagina si sta caricando...
La pagina si sta caricando...
La pagina si sta caricando...
La pagina si sta caricando...
La pagina si sta caricando...
La pagina si sta caricando...
La pagina si sta caricando...
La pagina si sta caricando...
La pagina si sta caricando...
La pagina si sta caricando...
La pagina si sta caricando...
La pagina si sta caricando...
La pagina si sta caricando...
La pagina si sta caricando...
La pagina si sta caricando...
La pagina si sta caricando...
La pagina si sta caricando...
La pagina si sta caricando...
La pagina si sta caricando...
-
 1
1
-
 2
2
-
 3
3
-
 4
4
-
 5
5
-
 6
6
-
 7
7
-
 8
8
-
 9
9
-
 10
10
-
 11
11
-
 12
12
-
 13
13
-
 14
14
-
 15
15
-
 16
16
-
 17
17
-
 18
18
-
 19
19
-
 20
20
-
 21
21
-
 22
22
-
 23
23
-
 24
24
-
 25
25
-
 26
26
-
 27
27
-
 28
28
-
 29
29
-
 30
30
-
 31
31
-
 32
32
-
 33
33
-
 34
34
-
 35
35
-
 36
36
-
 37
37
-
 38
38
-
 39
39
-
 40
40
-
 41
41
-
 42
42
-
 43
43
-
 44
44
-
 45
45
-
 46
46
-
 47
47
-
 48
48
-
 49
49
-
 50
50
-
 51
51
-
 52
52
-
 53
53
-
 54
54
-
 55
55
-
 56
56
-
 57
57
-
 58
58
-
 59
59
-
 60
60
-
 61
61
-
 62
62
-
 63
63
-
 64
64
-
 65
65
-
 66
66
-
 67
67
-
 68
68
-
 69
69
-
 70
70
-
 71
71
-
 72
72
-
 73
73
-
 74
74
-
 75
75
-
 76
76


Franke FDW 613 E5P F Guida utente
- Categoria
- Lavastoviglie
- Tipo
- Guida utente
in altre lingue
- English: Franke FDW 613 E5P F User guide
- français: Franke FDW 613 E5P F Mode d'emploi
- español: Franke FDW 613 E5P F Guía del usuario
- Deutsch: Franke FDW 613 E5P F Benutzerhandbuch
- Nederlands: Franke FDW 613 E5P F Gebruikershandleiding
- português: Franke FDW 613 E5P F Guia de usuario
Documenti correlati
Altri documenti
-
Bauknecht BFP 5O41 PLT X Guida utente
-
Whirlpool WIS 1150 PEL Guida utente
-
Whirlpool WIS 9040 PEL Guida utente
-
Hotpoint LFF 8M122 X AUS Guida utente
-
Hoover DDY 095TX/3-AUS Manuale utente
-
-
-
Candy CDPE 6320X Manuale utente
-
-