

Overview English
Thank you for purchasing the LINDY HDMI 2.0 EDID Emulator Adapter.
This product has been designed to provide trouble free, reliable
operation. It benefits from both a LINDY 2 year warranty and free lifetime
technical support. To ensure correct use, please read this manual
carefully and retain it for future reference.
This product is designed to help overcome EDID related problems which
can occur when using AV/KVM Extenders, Switches and Splitters. It can
also be used in place of a monitor to keep a PC or Server awake for
remote access via IP.
Specification English
Supports EDID Learning and EDID Emulation
Supports resolutions up to 4096x2160p 60Hz according to HDMI 2.0
Support for 3D, Deep Colour, CEC and HDCP signals (inc. HDCP 2.2)
Powered via HDMI source interface
Package Contents English
HDMI 2.0 EDID Emulator Adapter
This Manual
Installation and Use English
The EDID Emulator Adapter contains preset EDID information for many
commonly used resolutions and refresh rates, please refer to the table on
the following page. To use the preset data skip to Step 7 of the Cloning
Procedure.
Cloning Procedure
1. Connect a standard HDMI cable to the HDMI Input port of the display
which you want to clone - but do not connect it to the Emulator!
2. Insert the male HDMI connector of the Emulator into the HDMI Output
port of your source device, the Status LED will flash red for 5 seconds.
3. Whilst the Status LED is flashing red connect the other end of the
HDMI cable from step one, the Status LED will momentarily turn purple
as is reads the EDID of the display.
4. When the Status LED switches from purple to blue the EDID has been
learnt and stored to the Emulator.
5. The Emulator can then be disconnected from the source/HDMI cable
and installed as required, please see the installation examples below
for suggested positioning within an installation.
6. It is recommended that all equipment is power cycled, before the
Emulator is used, to reinitiate the HDMI handshake.
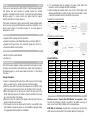
7. When installing the Emulator attach one end of a HDMI cable to the
display/extender/switch and then the other end to the Emulator. Finally
connect the Emulator directly to the HDMI source device.
Example for use with extender:
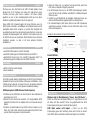
Example for use with a switch:
Preset EDID Data
Resolution
Refresh
Resolution
Refresh
Resolution
Refresh
640x480p
75Hz
1024x768p
85Hz
1280x1024p
60Hz
640x480p
67Hz
1024x768p
75Hz
1400x1050p
60Hz
640x480p
60Hz
1024x768p
70Hz
1440x900p
75Hz
720x400p
60Hz
1024x768p
60Hz
1440x900p
60Hz
720x480i/p
60Hz
1152x720p
60Hz
1600x1200p
60Hz
720x575i/p
50Hz
1152x864p
75Hz
1680x1050p
60Hz
800x600p
85Hz
1152x870p
75Hz
1920x1080p
24Hz
800x600p
75Hz
1280x720p
60Hz
1920x1080p
30Hz
800x600p
72Hz
1280x800p
60Hz
1920x1080i/p
50Hz
800x600p
60Hz
1280x960p
60Hz
1920x1080i/p
60Hz
800x600p
56Hz
1280x1024p
85Hz
1920x1200p
60Hz
832x624p
75Hz
1280x1024p
75Hz
3840x2160p
30Hz
Troubleshooting English
Windows shows a “Generic Non-PnP Monitor” is connected - Make
sure that the Emulator is directly connected to the HDMI source by its
male connector and that the Status LED is illuminated blue.
EDID Data is not cloned – Repeat steps 1-4, taking care to attach the
HDMI cable from the monitor to the Emulator whilst it is flashing red.

Einführung und Betrieb Deutsch
Wir freuen uns, dass Ihre Wahl auf ein LINDY-Produkt gefallen ist und
danken Ihnen für Ihr Vertrauen. Sie können sich jederzeit auf unsere
Produkte und einen guten Service verlassen. Auf diesen Adapter
gewähren wir eine 2 Jahre Herstellergarantie. Bitte lesen Sie dieses
Handbuch sorgfältig und bewahren Sie es für später auf.
Dieser HDMI EDID Emulator-Adapter löst einige Probleme wenn Sie
HDMI Signale umschalten, vervielfältigen oder verlängern wollen und die
Quellgeräte darauf kritisch reagieren. Er emuliert dem Quellgerät den
ununterbrochenen Anschluss des entsprechenden Monitors, do dass das
Quellgerät die Signalausgabe nicht unterbricht. Der Adapter kann auch
die EDID Daten aus den modernsten HDMI Monitoren durch einfachen
Knopfdruck auslesen, so dass er mit allen aktuellen Monitoren
kompatibel ist.
Eigenschaften Deutsch
Unterstützt EDID kopieren und EDID Emulation
Unterstützt Auflösungen bis 4096x2160p 60Hz nach HDMI 2.0
Unterstützt 3D, Deep Colour, CEC und HDCP Signale (inkl. HDCP 2.2)
Stromversorgung des Adapters über den HDMI Anschluss
Lieferumfang Deutsch
HDMI 2.0 EDID Emulator Adapter
Dieses Handbuch
Installation und Betrieb Deutsch
Der EDID Emulator Adapter enthält bereits eine EDID Preset Information
kompatibel mit vielen weit verbreiteten Auflösungen und Bildraten – siehe
Tabelle auf der Folgeseite. Um diesen Preset zu verwenden übergehen
Sie alle Schritte bis Punkt 7 in der folgenden Installationsanleitung.
EDID Kopierprozess (EDID Daten aus Monitor kopieren)
1. Schließen Sie ein HDMI-Kabel an Ihren Monitor an aber verbinden Sie
den Adapter noch nicht!
2. Stecken Sie den Stecker des Emulators in Ihr eingeschaltetes HDMI
Quellgerät, die Status LED am Adapter sollte nun 5 Sekunden lang rot
blinken.
3. Schließen Sie währenddessen das HDMI Kabel am Adapter an, die
Status LED sollte sofort dunkelrot leuchten während die EDID Daten
aus dem Monitor ausgelesen und kopiert werden.
4. Wenn die Status LED von dunkelrot auf blau wechselt wurden die
EDID Daten im Adapter erfolgreich gespeichert.
5. Der EDID Adapter kann nun von der HDMI Quelle abgezogen werden
und ist für die normale Installation einsatzbereit. Installationsbeispiele
finden Sie unten.
6. Schalten Sie nach Möglichkeit alle beteiligten Geräte einmal kurz aus
damit ein HDMI Handshake gegebenenfalls neu initialisiert wird.
7. Der Emulator-Adapter sollte immer direkt an der HDMI Signalquelle
angeschlossen werden. Schließen Sie die HDMI Kabel dann an die
Buchse des Adapters an.
Beispiel für die Installation mit einem KVM Switch:
Preset EDID Data
Auflösung
Bildrate
Auflösung
Bildrate
Auflösung
Bildrate
640x480p
75Hz
1024x768p
85Hz
1280x1024p
60Hz
640x480p
67Hz
1024x768p
75Hz
1400x1050p
60Hz
640x480p
60Hz
1024x768p
70Hz
1440x900p
75Hz
720x400p
60Hz
1024x768p
60Hz
1440x900p
60Hz
720x480i/p
60Hz
1152x720p
60Hz
1600x1200p
60Hz
720x575i/p
50Hz
1152x864p
75Hz
1680x1050p
60Hz
800x600p
85Hz
1152x870p
75Hz
1920x1080p
24Hz
800x600p
75Hz
1280x720p
60Hz
1920x1080p
30Hz
800x600p
72Hz
1280x800p
60Hz
1920x1080i/p
50Hz
800x600p
60Hz
1280x960p
60Hz
1920x1080i/p
60Hz
800x600p
56Hz
1280x1024p
85Hz
1920x1200p
60Hz
832x624p
75Hz
1280x1024p
75Hz
3840x2160p
30Hz
Problemlösung Deutsch
Windows zeigt als Monitorkennung “Generic Non-PnP Monitor” –
Stellen Sie sicher dass der Adapter direkt am PC angeschlossen ist und
die Status LED Blau leuchtet. Führen Sie gegebenenfalls den EDID
Kopiervorgang erneut genau nach Beschreibung durch.
EDID Daten werden nicht kopiert – Führen Sie den EDID
Kopiervorgang genau nach Anleitung erneut durch, achten Sie darauf,
dass HDMI Kabel anzuschließen während der Adapter noch rot blinkt.

Introduction Français
Merci d’avoir choisi ce produit LINDY, nous vous remercions pour la
confiance que vous nous accordez. Vous pouvez compter à tout moment
sur la qualité de nos produits et de notre service. Ce produit bénéficie de
la garantie LINDY de 2 ans. Merci de lire attentivement ce manuel et de
le conserver pour un usage futur. Ce produit est conçu pour résoudre les
problèmes EDID résultant de l’utilisation d’un extender AV/KVM, switch
et splitter. Il peut également être utilisé à la place d’un écran pour éviter
qu’un serveur ou PC n’entre en mode veille lors d’un accès distant via IP.
Caractéristiques Français
Prise en charge apprentissage et émulation EDID
Prise en charge des résolutions jusqu’à 4096x2160p 60Hz / HDMI 2.0
Prise en charge 3D, Deep Colour, CEC et HDCP (HDCP 2.2 inclus)
Alimenté par l’interface HDMI source
Livraison Français
Adaptateur émulateur EDID HDMI 2.0
Ce manuel
Installation et utilisation Français
L’émulateur EDID possède une présélection d’informations EDID pour
les résolutions et fréquences les plus utilisées, merci de vous référer au
tableau de la page suivante. Merci de passer à l’étape 7 de la procédure
pour utiliser les présélections.
Procédure de clonage
1. Connectez un câble HDMI standard au port d’entrée HDMI de votre
affichage à cloner – mais ne connectez pas l’émulateur !
2. Insérez le connecteur HDMI mâle de l’émulateur dans le port de sortie
HDMI de votre source, la LED d’état va flasher en rouge pendant 5
secondes.
3. Pendant le clignotement en rouge de la LED d’état, connectez l’autre
extrémité du câble HDMI de l’étape 1, la LED passe momentanément
en violet lors de la lecture de l’EDID de l’affichage.
4. Lorsque la LED passe du violet au bleu les données EDID sont
copiées et sauvegardées dans l’émulateur.
5. L’émulateur peut être déconnecté de la source et du câble HDMI pour
être utilisé selon besoin, les images ci-dessous permettre de voir des
exemples d’utilisation.
6. Il est recommandé de redémarrer tous les équipements avant d’utiliser
l’émulateur, pour ré initier le handshake HDMI.
7. Pour installer l’émulateur, connectez une extrémité du câble HDMI à
l’écran/extender/switch et l’autre à l’émulateur. Pour finir connectez
directement l’émulateur à la source HDMI.
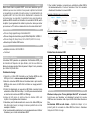
Exemple d’utilisation avec un extender:
Exemple d’utilisation avec un switch:
Présélections de données EDID
Résolution
Fréqu.
Résolution
Fréqu.
Résolution
Fréqu.
640x480p
75Hz
1024x768p
85Hz
1280x1024p
60Hz
640x480p
67Hz
1024x768p
75Hz
1400x1050p
60Hz
640x480p
60Hz
1024x768p
70Hz
1440x900p
75Hz
720x400p
60Hz
1024x768p
60Hz
1440x900p
60Hz
720x480i/p
60Hz
1152x720p
60Hz
1600x1200p
60Hz
720x575i/p
50Hz
1152x864p
75Hz
1680x1050p
60Hz
800x600p
85Hz
1152x870p
75Hz
1920x1080p
24Hz
800x600p
75Hz
1280x720p
60Hz
1920x1080p
30Hz
800x600p
72Hz
1280x800p
60Hz
1920x1080i/p
50Hz
800x600p
60Hz
1280x960p
60Hz
1920x1080i/p
60Hz
800x600p
56Hz
1280x1024p
85Hz
1920x1200p
60Hz
832x624p
75Hz
1280x1024p
75Hz
3840x2160p
30Hz
Dépannage Français
Windows indique qu’un “Ecran générique Non-PnP” est connecté-
Assurez-vous que l’émulateur est directement connecté à la source
HDMI avec son connecteur mâle et que la LED d’état et bien allumée en
bleu.
Les données EDID ne sont clonées – Répétez les étapes 1-4, en
prenant garde de connecter le câble HDMI de l’écran à l’émulateur
lorsque la LED flash en rouge.

Introduzione Italiano
Vi ringraziamo per aver acquistato l’Emulatore EDID HDMI 2.0 LINDY.
Questo prodotto è stato progettato per offrirvi la massima affidabilità e
semplicità di utilizzo ed è coperto da una garanzia LINDY di 2 anni e
supporto tecnico gratuito a vita. Per assicurarvi di farne un uso corretto vi
preghiamo di leggere attentamente il manuale e conservarlo per future
consultazioni.
Questo articolo consente di risolvere problemi di distribuzione dei EDID
che possono presentarsi utilizzando Extender AV/KVM, Switch e Splitter.
Può anche essere collegato al posto di un monitor per mantenere un PC
o Server attivo e consentirne l’accesso remoto via IP.
Caratteristiche Italiano
Supporto Apprendimento EDID ed emulazione EDID
Supporta risoluzioni fino a 4096x2160p 60Hz conformi HDMI 2.0
Supporto segnali 3D, Deep Colour, CEC e HDCP (inc. HDCP 2.2)
Alimentato dall’interfaccia HDMI della sorgente
Contenuto della confezione Italiano
Emulatore EDID HDMI 2.0
Questo manuale
Installazione ed utilizzo Italiano
L’emulatore EDID contiene le impostazioni EDID delle risoluzioni e
frequenze di refresh più comunemente utilizzate (vi preghiamo di far
riferimento alla tabella riportata nella pagine seguente). Se volete
utilizzare queste impostazioni pre-memorizzate andate direttamente al
passo 7 della procedura di copia descritta di seguito.
Procedura di copia impostazioni EDID
1. Collegate un cavo HDMI Standard alla porta di ingresso del monitor da
cui volete copiare i dati EDID ma NON COLLEGATE L’EMULATORE!
2. Inserite l’interfaccia HDMI maschio dell’emulatore nell’uscita HDMI
della vostra sorgente: il LED Status lampeggerà in rosso per 5 secondi
3. Mentre il LED Status LED sta lampeggiando collegate l’altro capo del
cavo HDMI collegato al monitor nel passo 1 all’emulatore. Il LED status
passerà al colore viola mentre legge i dati del monitor.
4. Quando il LED diventerà blu la procedura di copia sarà conclusa.
5. Potete ora disconnettere l’emulatore ed installarlo come richiesto dalla
vostra installazione (fate riferimento agli esempi riportati sotto).
6. E’ raccomandato il riavvio di tutte i dispositivi presenti nell’installazione
prima di connettere l’emulatore per inizializzare nuovamente tutte le
connessioni HDMI.
7. Installando l’emulatore collegate un capo di un cavo HDMI allo
schermo/extender/switch e l’altro capo all’emulatore stesso che poi
collegherete direttamente alla sorgente HDMI.
Esempio di utilizzo con un Extender:
Esempio di utilizzo con uno switch:
Informazioni EDID Pre-memorizzate
Risoluzione
Frequen.
Risoluzione
Frequen.
Risoluzione
Frequen.
640x480p
75Hz
1024x768p
85Hz
1280x1024p
60Hz
640x480p
67Hz
1024x768p
75Hz
1400x1050p
60Hz
640x480p
60Hz
1024x768p
70Hz
1440x900p
75Hz
720x400p
60Hz
1024x768p
60Hz
1440x900p
60Hz
720x480i/p
60Hz
1152x720p
60Hz
1600x1200p
60Hz
720x575i/p
50Hz
1152x864p
75Hz
1680x1050p
60Hz
800x600p
85Hz
1152x870p
75Hz
1920x1080p
24Hz
800x600p
75Hz
1280x720p
60Hz
1920x1080p
30Hz
800x600p
72Hz
1280x800p
60Hz
1920x1080i/p
50Hz
800x600p
60Hz
1280x960p
60Hz
1920x1080i/p
60Hz
800x600p
56Hz
1280x1024p
85Hz
1920x1200p
60Hz
832x624p
75Hz
1280x1024p
75Hz
3840x2160p
30Hz
Risoluzione dei problemi Italiano
Windows segnala che è connesso un “Generic Non-PnP Monitor” –
Assicuratevi che l’Emulatore sia connesso alla sorgente HDMI con il suo
connettore maschio e che il LED sia acceso in blu.
I dati EDID – Ripetete i passi 1-4 assicurandovi di collegare il cavo HDMI
all’emulatore mentre il LED lampeggia in rosso.

CE/FCC Statement
CE Certification
This equipment complies with the requirements relating to Electromagnetic
Compatibility Standards EN55022/EN55024 and the further standards cited therein.
It must be used with shielded cables only.
It has been manufactured under the scope of RoHS compliance.
CE Konformitätserklärung
Dieses Produkt entspricht den einschlägigen EMV Richtlinien der EU für IT-
Equipment und darf nur zusammen mit abgeschirmten Kabeln verwendet werden.
Diese Geräte wurden unter Berücksichtigung der RoHS Vorgaben hergestellt.
Die formelle Konformitätserklärung können wir Ihnen auf Anforderung zur
Verfügung stellen
FCC Certification
This equipment has been tested and found to comply with the limits for a Class B
digital device, pursuant to part 15 of the FCC Rules. These limits are designed to
provide reasonable protection against harmful interference in a residential
installation.
You are cautioned that changes or modification not expressly approved by the party
responsible for compliance could void your authority to operate the equipment.
This device complies with part 15 of the FCC Rules.
Operation is subject to the following two conditions:
1. This device may not cause harmful interference, and
2. This device must accept any interference received, including interference that
may cause undesired operation.
LINDY Herstellergarantie – Hinweis für Kunden in Deutschland
LINDY gewährt für dieses Produkt über die gesetzliche Regelung in Deutschland
hinaus eine zweijährige Herstellergarantie ab Kaufdatum. Die detaillierten
Bedingungen dieser Garantie finden Sie auf der LINDY Website aufgelistet bei den
AGBs.
Hersteller / Manufacturer (EU):
LINDY-Elektronik GmbH LINDY Electronics Ltd.
Markircher Str. 20 Sadler Forster Way
68229 Mannheim Stockton-on-Tees, TS17 9JY
GERMANY United Kingdom
Email: [email protected] Email: postmaster@lindy.co.uk
T: +49 (0)621 470050 T: +44 (0)1642 754000
Recycling Information
WEEE (Waste of Electrical and Electronic Equipment),
Recycling of Electronic Products
Europe, United Kingdom
In 2006 the European Union introduced regulations (WEEE) for the collection and recycling of all
waste electrical and electronic equipment. It is no longer allowable to simply throw away electrical
and electronic equipment. Instead, these products must enter the recycling process.
Each individual EU member state has implemented the WEEE regulations into national law in
slightly different ways. Please follow your national law when you want to dispose of any electrical
or electronic products. More details can be obtained from your national WEEE recycling agency.
Germany / Deutschland
Die Europäische Union hat mit der WEEE Direktive Regelungen für die Verschrottung und das
Recycling von Elektro- und Elektronikprodukten geschaffen. Diese wurden im Elektro- und
Elektronikgerätegesetz – ElektroG in deutsches Recht umgesetzt. Dieses Gesetz verbietet das
Entsorgen von entsprechenden, auch alten, Elektro- und Elektronikgeräten über die
Hausmülltonne! Diese Geräte müssen den lokalen Sammelsystemen bzw. örtlichen
Sammelstellen zugeführt werden! Dort werden sie kostenlos entgegen genommen. Die Kosten für
den weiteren Recyclingprozess übernimmt die Gesamtheit der Gerätehersteller.
France
En 2006, l'union Européenne a introduit la nouvelle réglementation (DEEE) pour le recyclage de
tout équipement électrique et électronique.
Chaque Etat membre de l’ Union Européenne a mis en application la nouvelle réglementation
DEEE de manières légèrement différentes. Veuillez suivre le décret d’application correspondant
à l’élimination des déchets électriques ou électroniques de votre pays.
Italy
Nel 2006 l’unione europea ha introdotto regolamentazioni (WEEE) per la raccolta e il riciclo di
apparecchi elettrici ed elettronici. Non è più consentito semplicemente gettare queste
apparecchiature, devono essere riciclate. Ogni stato membro dell’ EU ha tramutato le direttive
WEEE in leggi statali in varie misure. Fare riferimento alle leggi del proprio Stato quando si
dispone di un apparecchio elettrico o elettronico.
Per ulteriori dettagli fare riferimento alla direttiva WEEE sul riciclaggio del proprio Stato.
LINDY No. 32113
www.lindy.com
1
st
Edition June 2016
-
 1
1
-
 2
2
-
 3
3
-
 4
4
-
 5
5
-
 6
6


in altre lingue
- English: Lindy 32113 User manual
- français: Lindy 32113 Manuel utilisateur
- Deutsch: Lindy 32113 Benutzerhandbuch
Documenti correlati
-
Lindy 32103 Manuale utente
-
-
Lindy HDMI 2.0 EDID Emulator Manuale utente
-
-
-
-
-
Altri documenti
-
ATEN VC160A Guida Rapida
-
ATEN VC081A Guida Rapida
-
-
-
-
Barco MDSC-8255 Guida utente
-
-
Casio ClassWiz Emulator SubscriptionUPD Guida dell’utilizzatore
-