
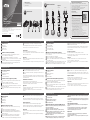
VC081 HDMI EDID Emulator
www.aten.com
A
Hardware Review
1
HDMI Out Port
2
Learning LED (Blue)
3
EDID LED (Green)
4
HDMI In Connector
B
Hardware Installation (Learning EDID)
It is recommended that all equipment is powered during the steps below.
1
Connect an HDMI cable to an HDMI display.
2
Connect the HDMI cable to the HDMI Out Port of the emulator.
3
Plug the HDMI In Connector of the emulator into the HDMI source. The EDID
LED lights green.
4
Disconnect the HDMI cable from the emulator. The Learning LED lights blue.
5
When the Learning LED starts fl ashing, reconnect the HDMI cable to the
emulator’s HDMI Out Port within 10 seconds.
6
When both LEDs stay lit, the learning of the display’s EDID is complete.
After the display’s EDID is learnt, the emulator can also be used in place of a
monitor to keep a PC or Server awake for remote access via IP.
Reset Emulator
Reset the emulator if EDID learning was unsuccessful.
To reset, go through the steps 1-4 described in "Hardware Installation". When the
LEDs dim, the emulator is reset.
Application
Examples of where the emulator should be placed when extenders or switches are
involved are shown above:
Please note that the emulator is always placed on the display end of the connection.
A
Hardware Review
B
Hardware Installation
© Copyright 2018 ATEN
®
International Co., Ltd.
ATEN and the ATEN logo are trademarks of ATEN International Co., Ltd. All rights reserved. All
other trademarks are the property of their respective owners.
This product is RoHS compliant.
Part No. PAPE-1223-N90G Printing Date: 08/2018
HDMI EDID Emulator
Quick Start Guide
VC081
Package Contents
1 VC081 HDMI EDID Emulator
1 User Instructions
Application
Support and Documentation Notice
All information, documentation, fi rmware, software utilities, and
specifi cations contained in this package are subject to change without
prior notifi cation bythe manufacturer.
To reduce the environmental impact of our products, ATEN
documentation and software can be found online at
http://www.aten.com/download/
Technical Support
www.aten.com/support
이 기기는 가정용(B급) 전자파적합기기로서 주로 가정에서 사용하는 것을 목적
으로 하며, 모든 지역에서 사용할 수 있습니다.
EMC Information
FEDERAL COMMUNICATIONS COMMISSION INTERFERENCE
STATEMENT:
This equipment has been tested and found to comply with
the limits for a Class B digital service, pursuant to Part 15 of
the FCC rules. These limits are designed to provide reasonable
protection against harmful interference in a residential
installation. Any changes or modifi cations made to this
equipment may void the user s authority to operate this
equipment. This equipment generates, uses, and can radiate
radio frequency energy. If not installed and used in accordance with the instructions, may cause harmful
interference to radio communications. However, there is no guarantee that interference will not occur
in a particular installation. If this equipment does cause harmful interference to radio or television
reception, which can be determined by turning the equipment off and on, the user is encouraged to try
to correct the interference by one or more of the following measures:
- Reorient or relocate the receiving antenna;
- Increase the separation between the equipment and receiver;
- Connect the equipment into an outlet on a circuit different from
that to which the receiver is connected;
- Consult the dealer/an experienced radio/television technician for help.
FCC Caution: Any changes or modifi cations not expressly approved by the party responsible for
compliance could void the user's authority to operate this equipment.
This device complies with Part 15 of the FCC Rules. Operation is subject to the following two
conditions:(1) this device mat not cause harmful interference, and(2) this device must accept any
interference received, including interference that may cause undesired operation.
Scan for
more information
1 432
Example 1 Example 2
PC
Video Out
Display
Video In
VC081
Emulator
Video
Extender
(Rx)
Video
Extender
(Tx)
PC PC
Video Out
Display
Video In Video In
VC081
Emulator
Video
SWitch
PC
VC081
Emulator
HDMI Cable
Display
1
2 4 5
3
PC
VC081
Emulator
HDMI Cable
Display
VC081 HDMI EDID Emulator
www.aten.com
Emulador HDMI EDID VC081
www.aten.com
Émulateur EDID HDMI VC081 Emulatore HDMI EDID VC081
HDMI-EDID-Emulator VC081 Эмулятор HDMI EDID VC081
www.aten.com
www.aten.com
www.aten.com
www.aten.com
A
Hardwareübersicht
1
HDMI-Ausgang
2
Lern-LED (blau)
3
EDID-LED (grün)
4
HDMI-Eingang
B
Hardware-Installation (Lern-LED)
Während der nachstehenden Schritte sollten alle Geräte mit Strom versorgt
werden.
1
Verbinden Sie ein HDMI-Kabel mit einem HDMI-Display.
2
Verbinden Sie das HDMI-Kabel mit dem HDMI-Ausgang des Emulators.
3
Schliesen Sie den HDMI-Eingang des Emulators an die HDMI-Quelle an. Die
EDID-LED leuchtet grün.
4
Trennen Sie das HDMI-Kabel vom Emulator. Die Lern-LED leuchtet blau.
5
Wenn die Lern-LED zu blinken beginnt, schließen Sie das HDMI-Kabel
innerhalb von 10 Sekunden erneut an den HDMI-Ausgang des Emulators an.
6
Wenn beide LEDs leuchten, ist das Lernen des Display-EDID abgeschlossen.
Nach Erlernen des Display-EDID kann der Emulator auch anstelle eines Monitors
verwendet werden, um einen PC oder Server für Fernzugriff via IP aktiv zu halten.
Emulator zurücksetzen
Setzen Sie den Emulator zurück, falls der EDID-Lernen fehlgeschlagen ist.
Durchlaufen Sie zum Rücksetzen die unter „Hardware-Installation“ beschriebenen
Schritte 1 bis 4. Wenn die LEDs erlöschen, wird der Emulator zurückgesetzt.
Anwendung
Beispiele für Positionen des Emulators, wenn Extender oder Switches involviert sind,
werden oben gezeigt:
Bitte achten Sie darauf, den Emulator immer am Displayende der Verbindung zu
platzieren.
A
Revisión de hardware
1
Puerto de salida HDMI
2
LED de aprendizaje (azul)
3
LED de encendido (verde)
4
Conector de Entrada HDMI
B
Instalación de hardware (EDID de aprendizaje)
Se recomienda que todos los equipos estén conectados a la alimentados durante
los pasos a continuación.
1
Conecte un cable HDMI a una pantalla HDMI.
2
Conecte el cable HDMI al puerto de Salida HDMI del emulador.
3
Enchufe el conector HDMI de Entrada del emulador a la fuente HDMI. El LED
EDID se ilumina en verde.
4
Desconecte el cable HDMI del emulador. El LED de aprendizaje se ilumina en azul.
5
Cuando el LED de aprendizaje comience a parpadear, vuelva a conectar el
cable HDMI al puerto de salida HDMI del emulador dentro de 10 segundos.
6
Cuando ambos LED permanezcan encendidos, se habrá completado el
aprendizaje del EDID de la pantalla.
Una vez que se aprende el EDID de la pantalla, el emulador también se puede usar
en lugar de un monitor para mantener activo un PC o un servidor para el acceso
remoto a través de IP.
Restablecer el emulador
Restablezca el emulador si el aprendizaje de EDID no fue exitoso.
Para reiniciar, siga los pasos 1 - 4 descritos en "Instalación del hardware". Cuando
los LED se apagan, el emulador se reinicia.
Aplicación
Los ejemplos de dónde se debe colocar el emulador cuando se incorporan
extensores o interruptores se muestran arriba:
Tenga en cuenta que el emulador siempre se coloca en el extremo de visualización
de la conexión.
A
Descrizione hardware
1
Porta HDMI Out
2
LED di apprendimento (blu)
3
LED EDID (verde)
4
Connettore HDMI In
B
Installazione dell'hardware (EDID di apprendimento)
Si consiglia di alimentare tutte le apparecchiature durante i passaggi seguenti.
1
Collegare un cavo HDMI ad un display HDMI.
2
Collegare il cavo HDMI alla porta HDMI Out dell'emulatore.
3
Collegare il connettore HDMI In dell'emulatore nella sorgente HDMI. Il LED
EDID si accende in verde.
4
Scollegare il cavo HDMI dall'emulatore. Il LED di apprendimento si accende in blu.
5
Quando il LED di apprendimento inizia a lampeggiare, ricollegare il cavo
HDMI alla porta HDMI Out dell'emulatore entro 10 secondi.
6
Se il LED rimane acceso, l'apprendimento dell'EDID del display è completo.
Una volta appreso l'EDID del display, l'emulatore può anche essere utilizzato al posto
di un monitor per mantenere attivo un PC o un server per l'accesso remoto tramite IP.
Ripristino emulatore
Ripristinare l'emulatore se l'apprendimento EDID non riesce.
Per ripristinare, eseguire i passaggi 1-4 descritti in "Installazione dell'hardware".
Quando i LED si attenuano, l'emulatore viene ripristinato.
Applicazione
Esempi del punto in cui l'emulatore deve essere posizionato quando sono coinvolti
estensori o interruttori, come mostrato in precedenza:
Si noti che l'emulatore è sempre posizionato sul lato display del collegamento.
A
Обзор аппаратного обеспечения
1
Выходной порт HDMI
2
Индикатор обучения (синего цвета)
3
Индикатор EDID (зеленого цвета)
4
Входной разъем HDMI
B
Установка аппаратного обеспечения (EDID обучения)
На время выполнения следующей процедуры рекомендуется включить
питание всего оборудования.
1
Подключите кабель HDMI к дисплею HDMI.
2
Подключите кабель HDMI к выходному порту HDMI эмулятора.
3
Подключите входной разъем HDMI эмулятора к источнику сигнала
HDMI. Индикатор EDID загорается зеленым цветом.
4
Отсоедините кабель HDMI от эмулятора. Индикатор обучения
загорается синим цветом.
5
Когда индикатор обучения начнет мигать, снова подключите кабель
HDMI к выходному порту HDMI эмулятора в течение 10 секунд.
6
Обучение EDID дисплея завершено, когда оба индикатора непрерывно
светятся.
После изучения EDID дисплея эмулятор можно также использовать вместо
монитора, чтобы поддерживать активность ПК или сервера для удаленного
доступа через IP.
Сброс параметров эмулятора
Сброс параметров эмулятора выполняется, если обучение EDID прошло
неудачно.
Для сброса параметров выполните действия 1-4, описанные в разделе
"Установка аппаратного обеспечения". Сброс параметров эмулятора
завершен, когда индикатор перестает светиться.
Применение
Ниже приводятся примеры использования эмулятора с применением
удлинителей или коммутаторов.
Обратите внимание на то, что эмулятор должен располагаться со стороны
дисплея.
A
Présentation du matériel
1
Port de sortie HDMI
2
LED d'apprentissage (Bleue)
3
LED EDID (Verte)
4
Connecteur d'entrée HDMI
B
Installation du matériel (Apprentissage EDID)
Il est conseillé que tous les équipements soient alimentés pendant les étapes ci-
dessous.
1
Raccordez un câble HDMI à un écran HDMI.
2
Raccordez le câble HDMI au port de sortie HDMI de l’émulateur.
3
Branchez le connecteur d'entrée HDMI de l'émulateur dans la source HDMI.
La LED EDID s'allume en vert.
4
Débranchez le câble HDMI de l'émulateur. La LED d'apprentissage s'allume
en bleu.
5
Lorsque la LED d'apprentissage commence à clignoter, rebranchez le câble HDMI
au port de sortie HDMI de l'émulateur dans les 10 secondes.
6
Lorsque les deux LED restent allumées, l'apprentissage de l'EDID de l'écran est
terminé.
Une fois l'apprentissage de l'EDID de l'écran effectué, l'émulateur peut également
être utilisé à la place d'un moniteur pour maintenir un PC ou un serveur actif afi n d'y
accéder à distance via IP.
Réinitialisation de l'émulateur
Réinitialisez l'émulateur si l'apprentissage EDID a échoué.
Pour réinitialiser, suivez les étapes 1 à 4 décrites dans "Installation du matériel".
Lorsque les LED s'estompent, l'émulateur est réinitialisé.
Application
Des exemples d'emplacement de l'émulateur en présence de prolongateurs ou de
commutateurs sont présentés ci-dessus :
Veuillez noter que l'émulateur est toujours placé sur l'extrémité écran de la
connexion.
La pagina si sta caricando...
-
 1
1
-
 2
2


in altre lingue
- English: ATEN VC081 Quick start guide
- français: ATEN VC081 Guide de démarrage rapide
- español: ATEN VC081 Guía de inicio rápido
- Deutsch: ATEN VC081 Schnellstartanleitung
- русский: ATEN VC081 Инструкция по началу работы
- português: ATEN VC081 Guia rápido
- polski: ATEN VC081 Skrócona instrukcja obsługi
- 日本語: ATEN VC081 クイックスタートガイド
- Türkçe: ATEN VC081 Hızlı başlangıç Kılavuzu
Documenti correlati
Altri documenti
-
Lindy HDMI 2.0 EDID Emulator Manuale utente
-
-
-
-
Lindy HDMI 2.0 EDID Emulator Manuale utente
-
-
-
Casio fx-ES PLUS Emulator Subscription Manuale utente
-
-