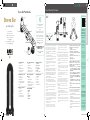
RODE Microphones STEREO BAR Guida Rapida
- Categoria
- Cavi di segnale
- Tipo
- Guida Rapida
La pagina si sta caricando...

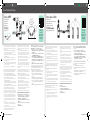
Stereo Mounting Technique
To correctly mount your microphones in ORTF configuration, the
microphones must be placed at 110 degrees, with the center of each
capsule exactly 17 centimeters apart from one another. Follow the
steps listed below.
1. Place one spacer ABOVE and one spacer BENEATH the stereo
Bar. (This is important to ensure that XLR connectors are not
touching once the mics are plugged in.)
2. Attach your mic clips, and secure them in place loosely using the
knurled tightening rings.
3. Place both microphones with their pickup areas facing at 110
degrees outward, using the placement diagram in the center of
the Stereo Bar as a quide.
4. Slide the microphones into place, ensuring that the center of the
each capsule is 17cm apart from one another, using the spacing
guide on the side of the bar.
5. Lock the microphones in place using the knurled tightening
rings.
Die korrekte Montage für die ORTF-Konfiguration erfordert einen
Winkel von 110° und einen Abstand von exakt 17 Zentimetern
zwischen den Kapseln. Verfahren Sie folgendermaßen.
1. Bringen Sie einen Abstandhalter ÜBER und einen UNTER der
Stereo Bar an. (Hiermit verhindern Sie, dass die XLR-Stecker der
Kabel einander während des Betriebs berühren.)
2. Bringen Sie die Stativflansche an und arretieren Sie sie mit den
geriffelten Schrauben provisorisch.
3. Installieren Sie die Mikrofone so, dass sich die Kapseln in einem
110°-Winkel zueinander befinden. Das Platzierungsdiagramm in
der Mitte der Stereo Bar hilft Ihnen dabei.
4. Bringen Sie die Mikrofone so an, dass der Abstand zwischen den
Kapseln 17cm beträgt (siehe das Lineal an der Seite).
5. Arretieren Sie die Mikrofone mit den geriffelten Schrauben.
Pour installer correctement un couple ORTF, les micros doivent for-
mer un angle de 110° et les centres des capsules doivent être exacte-
ment à 17cm l’un de l’autre. Suivez les étapes décrites ci-dessous.
1. Insérez un espaceur AU-DESSUS et un espaceur EN DESSOUS
de la Stereo Bar. (C’est très important pour éviter que les con-
necteurs XLR ne se touchent quand les micros sont branchés.)
2. Attachez vos fixations de micro sans serrer complètement les
vis moletées.
3. Placez les deux micros en orientant leur axe vers l’extérieur,
selon un angle de 110°, en vous aidant du schéma de montage
au centre de la Stereo Bar.
4. Faites glisser les micros pour espacer le centre des capsules de
17cm (guide d’espacement sur la face latérale de la barre).
5. Fixez les micros en serrant bien les vis moletées.
Para montar correctamente los micrófonos en la configuración
ORTF, deben colocarse a 110° y con los centros de cada cápsula
separados exactamente 17 centímetros entre sí. Siga los pasos que
se indican a continuación.
1. Coloque un separador ENCIMA y otro DEBAJO de la Stereo
Bar. (Esto es importante para garantizar que los conectores XLR
no entren en contacto cuando se conecten los micrófonos).
2. Coloque los clips de micrófono y fíjelos en su posición (sin apre-
tarlos demasiado) con los aros de fijación moleteados.
3. Coloque los dos micrófonos con sus zonas de captura encaradas
110°hacia el exterior, utilizando como guía el diagrama de
colocación mostrado en el centro de la Stereo Bar.
4. Deslice los micrófonos hasta su posición, comprobando que los
centros de cada cápsula queden separados 17cm entre sí, utili-
zando la guía de separación mostrada en el lateral de la barra.
5. Bloquee los micrófonos en su posición con los aros de fijación
moleteados.
Per montare correttamente i vostri microfoni in configurazione
ORTF, li dovete angolare di 110°, distanziando i centri delle capsule
di esattamente 17. Seguite le istruzioni seguenti.
1. Mettete un distanziatore SOPRA ed uno SOTTO la Stereo Bar.
(Questo è importante per assicurare che i connettori XLR non si
tocchino una volta collegati ai microfoni.)
2. Montate i vostri portamicrofoni e fermateli ruotando gli anelli
zigrinati senza stringere troppo.
3. Posizionate entrambi i microfoni con la loro area di ripresa
rivolta verso l’esterno di 110°, usando come guida lo schema di
posizionamento che si trova al centro della Stereo Bar.
4. Infilate i microfoni, assicurandovi che i centri delle capsule si
trovino a 17cm di distanza uno dall’altro, usando come guida la
misura che trovate lateralmente alla barra.
5. Fissate la posizione dei microfoni stringendo gli anelli zigrinati.
ORTF配置中,为了正确地安装话筒,麦克风必须放置在 110°,每个
极头完全相同以17中心彼此分开。 按照下面列出的步骤操作。
1. 在Stereo Bar上下各放置一个垫片。 (这一步很重要,目的是确
保话筒插入后XLR接头不发生触摸,并实现为叠放极头配置)。
2. 将你的话筒夹装好,并用滚花紧缩环将其固定。
3. 将两个话筒都以110°向内面向拾音区域,使用Stereo Bar的中心
位置作为指导。
4. 话筒滑动入位,确保每个极头中心为17cm,使用指南上的侧条
间距彼此分开。
5. 使用滚花紧缩环锁定话筒。
ORTF 構成でマイクを正しく設置するためには、カプセルの中心が
お互いに 17 cm離れた位置で、それぞれのマイクを 110°の角度で
設置する必要があります。 以下の手順で行なってください。
1. Stereo Bar の上に1つ、下に1つスペーサーを配置します。 (マイ
クを取り付けた際に XLR コネクターと接触しないように距離を置
く事が重要です。)
2. マイク・クリップを取り付けてから、へりにぎざぎざのついた締め付け
リングで設置箇所に仮締めで取り付けます。
3. Stereo Bar の中央部に記されている配置図を参考にして、両マイク
のピックアップ部分が 110° の角度で外側へ向けて設置します。
4. バーの側面に記されているスペースガイドを使用して、それぞれの
カプセルの中心がお互いに 17cm離れる位置までマイクをスライ
ドさせます。
5. ぎざぎざのついた締め付けリングを使用してマイクを固定します。
마이크를 ORTF 배치로 정확하게 마운트하시려면, 마이크 사이의 각
도는 110°, 마이크 캡슐 중앙 사이의 거리는 정확히 17 센티미터
간격을 유지해야 합니다. 다음의 단계를 따르십시오.
1. 하나의 스페이서는 Stereo Bar의 위쪽에, 또 다른 스페이서는 그
아래쪽에 놓으십시오. (마이크가 연결된후 XLR 커넥터가 서로
닿이거나 건드리지 않도록 주의하는것이 중요합니다.)
2. 마이크 클립을 대고 요철 처리된 조임 링을 이용하여 가볍게 죄
어주십시오.
3. 배치 도면을 참고하여, 두 개 마이크를 픽업 부위가 외측 각도
110°로 마주보도록 해 Stereo Bar의 중앙 부분에 설치합니다.
4. 스페이싱 가이드에 안내된 대로 마이크의 각 캡슐 중앙 부위 간
격이 17cm가 되도록 유지하면서 마이크를 바의 제자리에 밀
어 넣습니다.
5. 요철 처리된 조임 링을 이용해 마이크를 제자리에 고정하십시오.
The Stereo Bar can accommodate spaced pair configurations up
to 20cm apart. To mount your microphones in the spaced pair
configuration, follow the steps below.
1. Place both spacers in position BENEATH the stereo Bar
2. Attach your mic clips, and secure them in place loosely using
the knurled tightening rings.
3. Place both microphones with their pickup areas facing directly
forward, using the placement diagram in the center of the
Stereo Bar as a quide.
4. Slide the microphones along the bar until the desired distance
is reached, and then lock in place using the knurled tightening
rings.
Die Stereo Bar erlaubt einen maximalen Abstand von 20cm für
A/B-Mikrofonierungen. Installieren Sie die Mikrofone folgender-
maßen.
1. Bringen Sie beide Abstandhalter an der UNTERSEITE der
Stereo Bar an.
2. Bringen Sie die Stativflansche an und arretieren Sie sie mit den
geriffelten Schrauben provisorisch.
3. Installieren Sie die Mikrofone so, dass die Kapseln geradeaus
zeigen. Siehe das Platzierungsdiagramm in der Mitte der
Stereo Bar.
4. Verschieben Sie die Mikrofone in der jeweiligen Schiene, bis sie
sich im gewünschten Abstand zueinander befinden. Arretieren
Sie sie anschließend mit den geriffelten Schrauben.
La Stereo Bar peut accueillir des couples A/B dont l’espacement
peut aller jusqu’à 20cm. Pour installer vos microphones en couple
A/B, suivez les étapes ci-dessous.
1. Placez les deux espaceurs SOUS la Stereo Bar
2. Attachez vos fixations de micro sans serrer complètement les
vis moletées.
3. Orientez l’axe des deux micros vers l’avant en vous aidant du
schéma de montage au centre de la Stereo Bar.
4. Faites glisser les micros sur la barre jusqu’à ce qu’ils aient
l’espacement souhaité puis fixez les micros en serrant bien les
vis moletées.
La Stereo Bar acepta configuraciones de par separado, con una
separación máxima de 20cm. Para montar los micrófonos en la
configuración de par separado, siga los pasos que se indican a
continuación.
1. Coloque ambos separadores en su posición DEBAJO de la
Stereo Bar
2. Coloque los clips de micrófono y fíjelos en su posición (sin
apretarlos demasiado) con los aros de fijación moleteados.
3. Coloque los dos micrófonos con sus zonas de captura
encaradas directamente hacia delante, utilizando como guía el
diagrama de colocación mostrado en el centro de la Stereo Bar.
4. Deslice los micrófonos por la barra hasta alcanzar la distancia
deseada y, a continuación, bloquéelos en su posición con los
aros de fijación moleteados.
La Stereo Bar può accomodare configurazioni non coincidenti dis-
tanziate fino a 20cm. Per montare i vostri microfoni in configurazione
non coincidente distanziata, seguite le seguenti istruzioni.
1. Mettete entrambi i distanziatori SOTTO la Stereo Bar
2. Montate i vostri portamicrofoni e fermateli ruotando gli anelli
zigrinati senza stringere troppo.
3. Posizionate entrambi i microfoni con la loro area di ripresa
rivolta verso avanti, usando come guida lo schema di posiziona-
mento che si trova al centro della Stereo Bar.
4. Fate scorrere i microfoni lungo la barra fino a che raggiungono
la distanza desiderata, poi fissateli stringendo gli anelli zigrinati.
Stereo Bar可容纳20cm对隔开配置。 要将话筒安装在 配置,请按
照下列步骤操作。
1. 两个垫片都放在Stereo Bar下面。
2. 将你的话筒夹装好,并用滚花紧缩环将其固定。
3. 将两个话筒都以Stereo Bar向内面向拾音区域,使用的中心位
置作为指导。
4. 使用滚花紧缩环锁定话筒。
Stereo Bar は 20cm まで離したペア構成でマイクを設置すること
ができます。 ペア構成でマイクを設置する場合は、以下の手順で行な
ってください。
1. Stereo Barの下方に両方のスペーサーを配置します。
2. マイク・クリップを取り付けてから、へりにぎざぎざのついた締め付け
リングを使用して、仮締めで取り付けます。
3. Stereo Bar の中央部に記されている配置図を参考にして、両マイク
のピックアップ部分が真っすぐ正面を向くように設置します。
4. 任意の距離が得られるまでマイクをバーに沿ってスライドさせ、ぎざ
ぎざのついた締め付けリングで固定します。
Stereo Bar는 20cm 간격까지의 스페이스 페어 배치에 사용할 수
있습니다. 마이크를 스페이스 페어 배치로 마운트하시려면, 다음 단
계를 따르십시오.
1. 두 스페이서를 모두 Stereo Bar 아래에 배치합니다.
2. 마이크 클립을 대고 요철 처리된 조임 링을 이용하여 가볍게 조
여주십시오.
3. 배치 도면을 참고하여, 두 개 마이크를 픽업 부위가 모두 정면을
향하도록 해 Stereo Bar의 중앙 부분에 설치합니다.
4. 마이크를 밀면서 원하는 간격을 조절한 후, 요철 처리된 조임 링
으로 마이크를 고정하십시오.
Scan the QR
code or visit
rodemic.com/
stereobar for more
information about
this mounting
configuration
Scan the QR
code or visit
rodemic.com/
stereobar for more
information about
this mounting
configuration
Stereo Spaced Pair
A/B-Stereofonie
Couple A/B (stéréophonie de phase)
Par separado estéreo
Coppia Stereo Distanziata
立体声对隔开
ステレオで使用する際の間隔
스테레오 스페이스 페어 배치
17cm
110°
Stereo ORTF
ORTF-Stereofonie
Couple ORTF
ORTF estéreo
ORTF Stereo
立体声ORTF
ステレオ ORTF
스테레오 ORTF
378-1-5_Stereobar_Quickstart.indd 2 13/12/2013 1:50:56 PM
-
 1
1
-
 2
2


RODE Microphones STEREO BAR Guida Rapida
- Categoria
- Cavi di segnale
- Tipo
- Guida Rapida