Thrustmaster DUAL TRIGGER 2-IN-1 RUMBLE FORCE Manuale del proprietario
- Categoria
- Controlli di gioco
- Tipo
- Manuale del proprietario
Questo manuale è adatto anche per

5075094
Thrustmaster is a division
of the Guillemot Corporation group
USER MANUAL
MANUEL DE L’UTILISATEUR
BENUTZERHANDBUCH
HANDLEIDING
MANUALE D’USO
MANUAL DEL USUARIO
MANUAL DO UTILIZADOR
Dual Trigger 2-in-1
Rumble Force
P
la
y
s
ta
tio
n
®
2
Gamepad
© 2005 Guillemot Corporation S.A., rue du Chêne Héleuc, 56910 Carentoir, France (414 196 758 R.C.S. Rennes)

1/6
User Manual
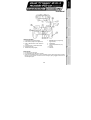
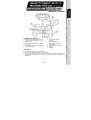
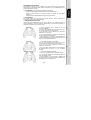
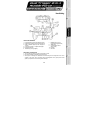
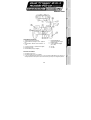
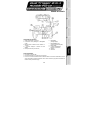
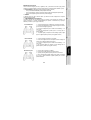
TECHNICAL FEATURES
1. Programmable and progressive triggers
2. 8 action buttons (analog on PS2 / digital on PC)
3. START + SELECT buttons on PS2 / Buttons 9 +
10 on PC
4. 2 analog mini-sticks + 2 digital action buttons
5. D-Pad (Point Of View)
6. MODE button (Analog / Digital)
7. MAPPING button (for programming
trigger functions)
8. TURBO button
9. 2 built-in independent motors (only
on PS2)
10. PC cable
11. PS2 cable
SAFETY NOTICE
• Do not twist or pull on the cable.
• Do not spill liquid on the cable and/or connectors.
• In the event of malfunction during use due to electrostatic emission, please exit the game and unplug
the device from the computer or console. Resume normal game play by plugging the device back in
and restarting the game.

2/6
INSTALLATION ON PC
System requirements: PC (Windows 98 SE, Me, 2000, XP) equipped with USB port.
The CD-ROM included with this product allows you to install the Force Feedback drivers.
1. Insert the installation CD-ROM into your CD-ROM drive. Follow the on-screen instructions to install
the Force Feedback drivers. Once the installation is complete, click Finish and restart your computer.
2. Once your computer has restarted, connect the USB connector (10) to one of your computer’s USB
ports. Windows 98/Me/2000/XP will automatically detect the new device. (If you are connecting a
USB device for the first time, Windows may ask you to insert the Windows CD-ROM during the
installation procedure in order to install the required system files.)
3. Driver installation:
Windows 98
: the Add New Hardware Wizard will search for the appropriate drivers. Click Next.
Follow the on-screen instructions to complete the installation.
Windows Me/2000/XP
: the drivers are installed automatically.
4. Select Start/All Programs/Thrustmaster/Force Feedback driver/Control Panel. The Game
Controllers dialog box displays the gamepad’s name with OK status.
5. In the Control Panel, click Properties to configure your gamepad:
• Test device: allows you to test and visualize the buttons, the D-Pad, and the axes of the 2 mini-
sticks and the 2 triggers.
• Test forces: allows you to test 8 vibration effects and configure the vibration effect settings.
INSTALLATION ON PS2
1. Plug the gameport connector on the PS2 cable (11) into a controller port on your console.
2. Turn on your console and start up your game.
You are now ready to play!
ADVANCED FUNCTIONS
• MODE button (6): press this button to switch between modes.
- Analog mode (default on PS2 and PC): MODE button (6) lights up blue.
- Digital mode: MODE button (6) is not lit up.
• TURBO button (8): allows you to repeat an action continuously (does not work with mini-sticks or
START + SELECT buttons).
- Simultaneously press the TURBO button (8) + the button whose action you want to repeat. The
MODE LED turns red. Turbo mode is now enabled.
- To disable Turbo mode, repeat this procedure. The MODE LED turns off. Turbo mode is now
disabled.
TRIGGER MAPPING
All analog buttons (on PS2) or digital buttons (on PC) and mini-stick directions (axes) can be mapped to
the left and right triggers (except D-Pad and START, SELECT, L3 and R3 buttons).
• MAPPING button (7) (used to map left and right triggers):
- Press and release the MAPPING button (LED flashes slowly).
- Press and release the button or direction you want to assign to the trigger (LED flashes quickly).
- Press and release the trigger assigned to this function (LED turns off).
• EEPROM:
Your gamepad includes an internal memory chip, which stores your last mapping configuration even if you
turn your gamepad off.

3/6
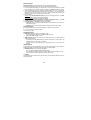
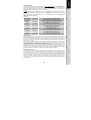
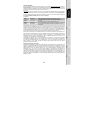
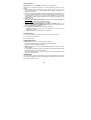
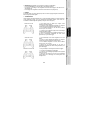
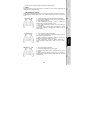
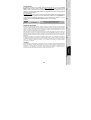
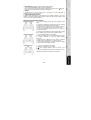
• TRIGGER BEHAVIOR:
Triggers react differently according to whether you map 2 separate analog axes, one same analog axis or
2 separate analog/digital buttons to them. Below are 3 different examples (in this case, for racing games).
PS2 recommended
• 2 analog (PS2) or digital (PC) buttons are mapped to the 2 triggers.
• On PS2, this configuration is the most useful for racing games
(because of the progressive analog buttons).
• You are in the same configuration as a PS2 Force Feedback racing
wheel (i.e. in 3-axis mode).
• On PC, this configuration is possible but not the best (because of the
digital buttons).
• This enables you to separately regulate analog (PS2) or digital (PC)
control of the left and right triggers (there is no “master” trigger).
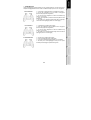
PC recommended
• 2 separate axes are mapped to the 2 triggers.
• On PC, this configuration is the most useful for lots of racing games
(because of the progressive analog buttons).
• You are in the same configuration as a PC Force Feedback racing
wheel (i.e. in 3-axis mode).
• This enables you to separately regulate analog control of the left and
right triggers (there is no “master” trigger).
PC and PS2 alternative
• One same axis is mapped to the 2 triggers.
• In this case the left trigger is the “master” trigger.
• If you press the left and right triggers together, your car will brake.
• This allows you to use the right trigger to control your car’s speed,
and briefly use the left trigger for powerful braking control.

4/6
EXAMPLES OF OTHER POSSIBLE MAPPING
The triggers provide intuitive performance in all types of games: action and FPS (progressive zoom, view,
lateral movement or fire), racing (progressive gas, brake, emergency brake, manual transmission), sports
(progressive pass, shoot, punch or jump…) and more.
Thus, many mapping configurations are available, according to the possibilities offered by your game. If
your game does not accept your current mapping configuration, the triggers will produce strange
reactions; in this case, please try defining another mapping configuration (using other axes and buttons).
For a better understanding of all the possibilities available on PC, try them out in “Game
Controllers” (Thrustmaster Control Panel).

5/6
TECHNICAL SUPPORT
If you encounter a problem with your product, please go to http://ts.thrustmaster.com
and click Technical Support.
From there you will be able to access various utilities (Frequently Asked Questions (FAQ), the latest versions of
drivers and software) that may help to resolve your problem. If the problem persists, you can contact the
Thrustmaster products technical support service (“Technical Support”):
By email:
In order to take advantage of technical support by email, you must first register online. The information you provide
will help the agents to resolve your problem more quickly. Click Registration on the left-hand side of the Technical
Support page and follow the on-screen instructions. If you have already registered, fill in the Username and
Password fields and then click Login.
By telephone:
United Kingdom
0207 216 0047
price of a national phone call, Monday to Friday
from 12PM to 4PM and from 5PM to 10PM
United States /
Canada
514-279-9911
price of a long distance phone call, Monday to Friday
from 7AM to 11AM and from 12PM to 5PM (Eastern time)
Denmark 82 33 28 58
price of a national phone call, Monday to Friday
from 1PM to 5PM and from 6PM to 11PM
Finland 09 81 71 01 54
price of a national phone call, Monday to Friday
from 2PM to 6PM and from 7PM to 12AM
Netherlands 0900 2026765
€0.30/min, Monday to Friday
from 1PM to 5PM and from 6PM to 11PM
Norway 23 50 01 16
price of a national phone call, Monday to Friday
from 1PM to 5PM and from 6PM to 11PM
Sweden 08-51992032
price of a national phone call, Monday to Friday
from 1PM to 5PM and from 6PM to 11PM
Warranty information
Worldwide, Guillemot Corporation S.A. (“Guillemot”) warrants to the consumer that this Thrustmaster product will be free
from material defects and manufacturing flaws for a period of two (2) years from the original date of purchase. Should the
product appear to be defective during the warranty period, immediately contact Technical Support, who will indicate the
procedure to follow. If the defect is confirmed, the product must be returned to its place of purchase (or any other location
indicated by Technical Support).
Within the context of this warranty, the consumer’s defective product will, at Technical Support’s option, be either repaired or
replaced. Where authorized by applicable law, the full liability of Guillemot and its subsidiaries (including for indirect
damages) is limited to the repair or replacement of the Thrustmaster product. The consumer’s legal rights with respect to
legislation applicable to the sale of consumer goods are not affected by this warranty.
This warranty shall not apply: (1) if the product has been modified, opened, altered, or has suffered damage as a result of
inappropriate or abusive use, negligence, an accident, normal wear, or any other cause not related to a material defect or
manufacturing flaw; (2) in the event of failure to comply with the instructions provided by Technical Support; (3) to software
not published by Guillemot, said software being subject to a specific warranty provided by its publisher.
Additional warranty provisions
In the United States of America and in Canada, this warranty is limited to the product’s internal mechanism and external
housing. Any applicable implied warranties, including warranties of merchantability and fitness for a particular purpose, are
hereby limited to two (2) years from the date of purchase and are subject to the conditions set forth in this limited warranty.
In no event shall Guillemot Corporation S.A. or its affiliates be liable for consequential or incidental damage resulting from
the breach of any express or implied warranties. Some States/Provinces do not allow limitation on how long an implied
warranty lasts or exclusion or limitation of incidental/consequential damages, so the above limitation may not apply to you.
This warranty gives you specific legal rights, and you may also have other legal rights which vary from State to State or
Province to Province.

6/6
COPYRIGHT
© 2005 Guillemot Corporation S.A. All rights reserved. Thrustmaster® is a registered trademark of Guillemot Corporation.
PlayStation® is a registered trademark of Sony Computer Entertainment Inc. Microsoft® Windows® is a registered
trademark of Microsoft Corporation in the United States and/or other countries. All other trademarks and brand names are
hereby acknowledged and are property of their respective owners. Illustrations not binding. Contents, designs and
specifications are subject to change without notice and may vary from one country to another.
ENVIRONMENTAL PROTECTION RECOMMENDATION
At the end of its working life, this product should not be disposed of with standard household
waste, but rather dropped off at a collection point for the disposal of Waste Electrical and
Electronic Equipment (WEEE) for recycling.
This is confirmed by the symbol found on the product, user manual or packaging.
Depending on their characteristics, the materials may be recycled. Through recycling and other
forms of processing Waste Electrical and Electronic Equipment, you can make a significant
contribution towards helping to protect the environment.
Please contact your local authorities for information on the collection point nearest you.
FAQs, tips and drivers available at www.thrustmaster.com

1/6
Manuel de l'utilisateur
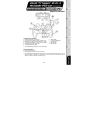
CARACTÉRISTIQUES TECHNIQUES
1. Gâchettes programmables à action progressive
2. 8 boutons d'action (analogiques sur PS2 /
digitaux sur PC)
3. Boutons START et SELECT sur PS2 / Boutons
9 et 10 sur PC
4. 2 sticks analogiques / 2 boutons d'action digitaux
5. Croix multidirectionnelle
6. Bouton MODE (analogique /
numérique)
7. Bouton MAPPING (pour
programmation des gâchettes)
8. Bouton TURBO
9. 2 moteurs intégrés indépendants
10. Câble PC
11. Câble PS2
AVERTISSEMENT
• Ne tordez pas et ne tirez pas trop fort sur le cordon.
• Ne renversez pas de liquide sur le cordon ou les connecteurs.
• En cas de mauvais fonctionnement dû à une émission électrostatique, quittez le jeu et débranchez le
périphérique de votre ordinateur ou de votre console. Pour rejouer, rebranchez le périphérique et
relancez le jeu.

2/6
INSTALLATION SUR PC
Configuration requise : PC (Windows 98 SE, Me, 2000 et XP) équipé d'un port USB.
INSTALLATION DES PILOTES
Le CD-ROM fourni avec ce produit permet d'installer les pilotes Force Feedback.
1. Insérez le CD-ROM d'installation dans votre lecteur de CD-ROM. Suivez les instructions affichées à
l'écran pour installer les pilotes Force Feedback. Une fois l'installation terminée, cliquez sur Terminer
et redémarrez votre ordinateur.
2. Au redémarrage de l'ordinateur, reliez le connecteur USB (10) à l'un des ports USB de votre unité
centrale. Windows 98/Me/2000/XP détectera automatiquement le nouveau périphérique. (Si vous
branchez un périphérique USB pour la première fois, il est possible que, pendant l'installation,
Windows vous demande d'insérer le CD-ROM Windows afin d'installer les fichiers système
nécessaires.)
3. Installation des pilotes :
Windows 98
: l'Assistant Ajout de nouveau matériel se charge de rechercher pour vous les pilotes
appropriés. Cliquez sur Suivant. Suivez les instructions affichées à l'écran pour terminer l'installation.
Windows Me/2000/XP
: l'installation des pilotes est automatique.
4. Sélectionnez Démarrer/Tous les programmes/Thrustmaster/Force Feedback driver/Control
Panel
La boîte de dialogue Contrôleurs de jeu affichera le nom de la manette avec l'état OK.
5. Dans le Control Panel, cliquez sur « Propriétés » pour configurer votre manette :
• Test du périphérique : vous permet de tester et visualiser les boutons, le D-Pad et les axes des 2
mini-sticks et des 2 gâchettes.
• Tester les forces : vous permet de tester 8 effets de vibrations et de configurer le réglage des
effets de vibrations.
INSTALLATION SUR PS2
1. Branchez le connecteur du câble PS2 (11) sur un port jeu de la console.
2. Allumez votre console et lancez le jeu.
Vous êtes maintenant prêt à jouer !
FONCTIONS AVANCÉES
• Bouton MODE (6) : ce bouton permet de passer d'un mode à un autre.
- Mode Analog (par défaut sur PS2 et PC) : le bouton MODE (6) s'allume (bleu).
- Mode Digital : le bouton MODE (6) est éteint.
• Bouton TURBO (8) : ce bouton permet de répéter une action en continu (ne fonctionne pas avec les
sticks ou les boutons START et SELECT).
- Appuyez simultanément sur le bouton TURBO (8) et sur le bouton correspondant à l'action que
vous souhaitez répéter. Le voyant MODE devient rouge. Le mode Turbo est désormais activé.
- Pour désactiver le mode Turbo, répétez cette procédure. Le voyant MODE s'éteint. Le mode Turbo
est désormais désactivé.

3/6
PROGRAMMATION DES GACHETTES
Tous les boutons analogiques (sur PS2) ou digitaux (sur PC) et les directions des sticks (axes) peuvent
être programmés sur les gâchettes gauche et droite (à l'exception de la croix multidirectionnelle et des
boutons START, SELECT, L3 et R3).
• Bouton MAPPING (7) (pour programmer les gâchettes gauche et droite) :
- Pressez et relâchez le bouton de programmation (le voyant clignote lentement).
- Pressez et relâchez le bouton ou la direction à affecter à la gâchette (le voyant clignote
rapidement).
- Pressez et relâchez la gâchette affectée à cette fonction (le voyant s'éteint).
• Mémoire EEPROM :
Votre manette dispose d'une puce interne qui garde en mémoire la dernière configuration de
programmation, même lorsque la manette est éteinte.
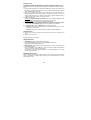
• COMPORTEMENT DES GACHETTES :
Les gâchettes réagissent différemment selon que vous leur affectez 2 axes analogiques distincts, un
même axe analogique ou 2 boutons analogiques / digitaux distincts. Trois exemples sont présentés ci-
après (dans le cas présent, il s'agit d'un jeu de course) :
Conseillé PS2
•
2 boutons analogiques (PS2) ou digitaux (sur PC) sont
affectés aux 2 gâchettes.
• Sur PS2, cette configuration est la plus efficace pour les jeux
de course (en raison de leur fonction progressive).
• Vous êtes dans la même configuration qu’un volant force
feedback PS2 = en mode 3 axes
• Sur PC, cette configuration est possible, mais pas idéale (les
boutons n'ont pas de fonction progressive).
• Cette configuration vous permet de régler séparément le
contrôle analogique (PS2) ou digital (PC) des gâchettes gauche et
droite (il n'y a pas de gâchette "maîtresse").
Conseillé PC
• 2 axes distincts sont affectés aux 2 gâchettes.
• Sur PC, cette configuration est la plus efficace pour la plupart
des jeux de course (en raison de leur fonction progressive).
• Vous êtes dans la même configuration qu’un volant force
feedback PC = en mode 3 axes
• Elle vous permet de régler séparément le contrôle analogique
des gâchettes gauche et droite (il n'y a pas de gâchette
maîtresse).
Alternative PC et PS2
• Un même axe est affecté aux 2 gâchettes
• Dans ce cas, la gâchette gauche est la gâchette maîtresse.
• Si vous appuyez simultanément sur les gâchettes gauche et
droite, votre véhicule va freiner.
• Cette configuration vous permet d'utiliser la gâchette droite
pour contrôler la vitesse du véhicule et d'utiliser brièvement la
gâchette gauche pour un freinage puissant.

4/6
AUTRES AFFECTATIONS POSSIBLES
Les gâchettes offrent un contrôle intuitif dans tous les types de jeux : action et FPS (zoom progressif, vue,
déplacement latéral ou tir), course (accélération et freinage progressifs, freinage d'urgence, transmission
manuelle), sports (passe dosée, tir, coup de poing ou saut…) et bien d'autres encore.
Il existe donc de nombreuses possibilités de configuration, mais elles dépendent du jeu. Si le jeu
n'accepte pas votre configuration de programmation actuelle, les gâchettes pourront produire un effet non
souhaité ; dans ce cas, essayez de définir une autre configuration de programmation (en utilisant les
autres axes et boutons).
Pour bien comprendre toutes les possibilités offertes sur PC, essayez-les dans le « Contrôleur de
jeu » (Control Panel Thrustmaster)

5/6
SUPPORT TECHNIQUE
Si vous rencontrez un problème avec votre produit, rendez-vous sur le site http://ts.thrustmaster.com
et cliquez sur
Support Technique. Vous aurez alors accès à différents services (Foire Aux Questions (FAQ), dernières versions
des pilotes et logiciels) susceptibles de résoudre votre problème. Si le problème persiste, vous pouvez contacter le
support technique des produits Thrustmaster (« Support Technique ») :
Par e-mail :
Pour bénéficier du support technique par e-mail, vous devez d’abord vous enregistrer en ligne. Les informations
fournies vont permettre aux techniciens de résoudre plus rapidement votre problème. Cliquez sur Enregistrement à
gauche de la page Support technique et suivez les instructions à l’écran. Si vous êtes déjà enregistré, renseignez les
champs Nom d’utilisateur et Mot de passe puis cliquez sur Connexion.
Par téléphone :
Informations relatives à la garantie
Dans le monde entier, Guillemot Corporation S.A. (« Guillemot ») garantit au consommateur que le présent produit
Thrustmaster est exempt de défauts matériels et de vices de fabrication, et ce, pour une période de deux (2) ans à
compter de la date d’achat d’origine. Si, au cours de la période de garantie, le produit semble défectueux,
contactez immédiatement le Support Technique qui vous indiquera la procédure à suivre. Si le défaut est confirmé,
le produit devra être retourné à son lieu d’achat (ou tout autre lieu indiqué par le Support Technique).
Dans le cadre de la garantie, le consommateur bénéficiera, au choix du Support Technique, du remplacement ou
de la réparation du produit défectueux. Lorsque la loi applicable l’autorise, toute responsabilité de Guillemot et ses
filiales (y compris pour les dommages indirects) se limite à la réparation ou au remplacement du produit
Thrustmaster. Les droits légaux du consommateur au titre de la législation applicable à la vente de biens de
consommation ne sont pas affectés par la présente garantie.
Cette garantie ne s’appliquera pas : (1) si le produit a été modifié, ouvert, altéré, ou a subi des dommages résultant
d’une utilisation inappropriée ou abusive, d’une négligence, d’un accident, de l’usure normale, ou de toute autre
cause non liée à un défaut matériel ou à un vice de fabrication ; (2) en cas de non-respect des instructions du
Support Technique ; (3) aux logiciels non-édités par Guillemot, lesdits logiciels faisant l’objet d’une garantie
spécifique accordée par leurs éditeurs.
Stipulations additionnelles à la garantie
Aux États-Unis d’Amérique et au Canada, cette garantie est limitée au mécanisme interne et au boîtier externe du
produit. Toute garantie implicite applicable, incluant les garanties de qualité marchande ou d’adaptation à un usage
particulier, est limitée à deux (2) ans à compter de la date d’achat et soumise aux conditions de la présente
garantie limitée. En aucun cas, Guillemot Corporation S.A. ou ses sociétés affiliées ne sauraient être tenues
responsables envers qui que ce soit de tous dommages indirects ou dommages accessoires résultant du
non-respect des garanties expresses ou implicites. Certains États/Provinces n’autorisent pas la limitation sur la
durée d’une garantie implicite, ou l’exclusion ou la limitation de responsabilité pour les dommages indirects ou
accessoires, de sorte que les limitations ou exclusions ci-dessus peuvent ne pas vous être applicables. Cette
garantie vous confère des droits spécifiques ; vous pouvez également bénéficier d’autres droits qui peuvent différer d’un
État/Province à l’autre.
France 0892 690 024
0,34 €/min, du lundi au vendredi de 13h à 17h et de 18h à 22h
Belgique 02 / 732 55 77
prix d’un appel national, du lundi au vendredi de 9h à 12h30 et de
14h à 17h30
Suisse 22 567 51 20
prix d’un appel national, du lundi au vendredi de 13h à 22h
Canada 514-279-9911
prix d’un appel longue distance, du lundi au vendredi de 7h à 17h
(heure de l’Est)

6/6
COPYRIGHT
© 2005 Guillemot Corporation S.A. Tous droits réservés. Thrustmaster® est une marque déposée de Guillemot Corporation S.A.
PlayStation® est une marque déposée de Sony Computer Entertainment Inc. Microsoft® Windows® est une marque déposée de
Microsoft Corporation aux États-Unis et/ou dans d’autres pays. Toutes les autres marques déposées et noms commerciaux sont
reconnus par les présentes et sont la propriété de leurs propriétaires respectifs. Illustrations non contractuelles. Le contenu, la conception
et les spécifications sont susceptibles de changer sans préavis et de varier selon les pays.
RECOMMANDATION RELATIVE À LA PROTECTION DE L’ENVIRONNEMENT
En fin de vie, ce produit ne doit pas être éliminé avec les déchets ménagers normaux mais déposé à un
point de collecte des déchets d'équipements électriques et électroniques en vue de son recyclage.
Ceci est confirmé par le symbole figurant sur le produit, le manuel utilisateur ou l’emballage.
En fonction de leurs caractéristiques, les matériaux peuvent être recyclés. Par le recyclage et par les
autres formes de valorisation des déchets d'équipements électriques et électroniques, vous contribuez
de manière significative à la protection de l’environnement.
Veuillez consulter les autorités locales qui vous indiqueront le point de collecte concerné.
FAQ, astuces et pilotes sur www.thrustmaster.com

1/6
Benutzerhandbuch
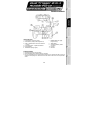
TECHNISCHE DATEN
1. Programmierbare, progressive Trigger
2. 8 Action-Buttons (analog auf PS2 / digital auf PC)
3. START + SELECT Buttons auf der PS2 / Buttons 9
+ 10 auf PC
4. 2 analoge Mini-Sticks + 2 digitale Action-Buttons
5. D-Pad (Sichtwahl)
6. MODE Button (Analog / Digital)
7. MAPPING Button (zur Trigger-
Programmierung)
8. TURBO Button
9. 2 eingebaute Motoren (arbeiten
nur mit PS2)
10. PC Kabel
11. PS2 Kabel
SICHERHEITSHINWEIS
• Nicht das Kabel knicken oder daran ziehen
• Keine Flüssigkeiten über die Kabel und Stecker verschütten.
• Falls es zu Fehlfunktionen durch elektrostatische Aufladung kommt, beenden Sie bitte Ihr Spiel und
stöpseln Sie den Empfänger aus. Danach stecken Sie ihn wieder ein und können nun das Spiel wieder
starten.

2/6
INSTALLATION AUF DEM PC
Systemvoraussetzung: PCs (Windows 98 SE, Me, 2000, XP) mit USB Ports.
Die mitgelieferte CD-ROM ermöglicht es Ihnen die Force Feedback Treiber zu installieren.
1. Legen Sie die Installations-CD-ROM in Ihr CD-Laufwerk ein. Folgen Sie nun den Anweisungen, um
die Force Feedback Treiber zu installieren. Nachdem die Installation abgeschlossen ist, klicken Sie
bitte auf Beenden und starten Sie den PC neu.
2. Nach dem Neustart den PCs schließen Sie bitte den USB-Stecker (10)des Pads am USB-Port des
PCs an. Windows 98/Me/2000/XP erkennt automatisch das neue Gerät. (Beim allerersten
Anschließen des Gerätes kann es sein, dass einige Windows-Versionen nach der Installations-CD
verlangen, um einige Systemdateien nach zu installieren)
3. Treiberinstallation:
Windows 98
: Die Hardwareerkennung sucht die entsprechenden Treiber. Klicken Sie bitte auf
Weiter. Folgen Sie nun den Anweisungen auf dem Monitor um die Installation abzuschließen.
Windows Me/2000/XP
: Die Treiber werden automatisch installiert.
4. Öffnen Sie nun Start/Programme/Thrustmaster/Force Feedback driver/Control Panel. Die Game
Controllers Dialogbox öffnet sich mit der entsprechenden Spielekontroller-Bezeichnung und dem
Status OK.
5. Im Control Panel klicken Sie bitte auf Properties um das Gamepad zu konfigurieren:
• Test Device: Diese Funktion erlaubt den Test und die Funktionsanzeige der Buttons, des D-Pad,
und der Bewegungsachsen der beiden Ministicks und Trigger.
• Test Forces: Hier können Sie die acht Vibrationseffekte testen und die Vibrationen konfigurieren.
INSTALLATION AUF DER PS2
1. Stecken Sie den Gameportstecker des PS2 Kabels (11) in einen Controller-Anschluß Ihrer Konsole.
2. Stellen Sie Ihre Konsole an, und starten Sie Ihr Spiel.
Jetzt können Sie loslegen!
ERWEITERTE FUNKTIONEN
• MODE (6) Button: Button drücken um zwischen verschiedenen Modi zu wechseln.
- Analog-Modus (Standardeinstellung auf PS2 und PC): MODE (6) Button leuchtet blau.
- Digital-Modus: Der MODE (6) Button leuchtet nicht.
• TURBO Button (8): Er ermöglicht, eine Aktion ständig zu wiederholen (funktioniert nicht mit den Mini-
Sticks oder START + SELECT Buttons).
- Drücken Sie gleichzeitig den TURBO Button (8) + den Knopf, dessen Funktion wiederholt ausgeführt
werden soll. Die MODE LED wird rot. Der Turbo-Modus ist nun aktiviert.
- Um den Turbo-Modus zu deaktivieren, wiederholen Sie den Vorgang. Die MODE LED verlöscht. Der
Turbo-Modus ist nun deaktivert.
TRIGGER-BELEGUNG
Alle analogen Knöpfe (der PS2) oder digitalen Knöpfe (des PCs) und alle Mini-Stick-Richtungen (Achsen)
können auf die Trigger gelegt werden (ausgenommen D-Pad und Buttons START, SELECT, L3 und R3).
MAPPING (7) Button (zum Belegen des rechten und linken Triggers):
- Drücken Sie kurz den MAPPING Button (LED blinkt langsam).
- Drücken Sie kurz den Button oder die Richtung mit welcher Sie den Trigger belegen wollen (LED blinkt
schnell).
- Bedienen Sie kurz den Trigger, den Sie mit dieser Funktion belegen wollen (LED geht aus).

3/6
o EEPROM:
Das Gamepad verfügt über einen internen Speicherchip, welcher Ihre Tastenbelegung speichert, auch
wenn das Gamepad ausgeschaltet ist.
• TRIGGER-VERHALTEN:
Das Trigger-Verhalten hängt von der Belegung ab, ob nun zwei separate analoge Achsen, eine
gemeinsame analoge Achse oder zwei separate analoge/digitale Buttons zugewiesen werden.
Nachfolgend drei Beispiele (hier für ein Rennspiel).
PS2 Empfehlung
• 2 analoge (PS2) oder digitale (PC) Buttons werden auf die beiden
Trigger gelegt.
• Auf der PS2 ist diese Konfiguration für Rennspiele ideal (aufgrund der
analogen, progressiven Trigger).
• Sie haben nun die gleiche Konfiguration wie ein PS2 Force Feedback
Lenkrad (also 3-Bewegungsachsen-Modus).
• Auf dem PC ist diese Konfiguration eine mögliche, aber nicht die
beste (wegen der digitalen Buttonfunktion).
• Diese Konfiguration ermöglicht Ihnen die analogen (PS2) oder
digitalen (PC) Steuerungen des rechten und linken Triggers (es gibt
keinen Master-Trigger) unabhängig voneinander zu regulieren.
PC Empfehlung
• 2 separate Achsen sind zwei Triggern zugewiesen.
• Auf dem PC ist diese Konfiguration für Rennspiele ideal (wegen der
analogen, progressiven Trigger).
• Sie haben nun die gleiche Konfiguration wie ein PC Force Feedback
Lenkrad (also 3-Bewegungsachsen-Modus).
• Das erlaubt Ihnen unabhängige analoge Steuerung mit dem rechten
und linken Trigger (es gibt keinen Master-Trigger).
Alternativ PC & PS2
• Eine gemeinsame Achse ist zwei Triggern zugewiesen.
• Der linke Trigger ist dann der Master-Trigger.
• Wenn Sie den linken und rechten Trigger gemeinsam bedienen, wird
das Auto bremsen.
• So können Sie mit dem linken Trigger die Geschwindigkeit
kontrollieren und den linken zum kurzen, kräftigen Bremsen für
Powerslides nutzen.

4/6
BEISPIELE ANDERER MÖGLICHER BELEGUNGEN
Die Trigger liefern intuitive Performance in allen möglichen Spielen: Actionspiele und First Person Shooter
(progressiver Zoom, Ansichten, seitliche Bewegung oder Feuer), Rennspiele (progressives Gas, Bremse,
Notbremse, manuelle Schaltung), Sportspiele (progressiver Pass, Schuß, Punch oder Sprung...) und
mehr.
Es gibt viel verschiedene weitere Möglichkeiten, welche vom jeweils verwendeten Spiel abhängig sind.
Falls das Spiel die aktuellen Einstellungen nicht unterstützt, kann es zu ungewöhnlichen Steuereffekten
kommen. In diesem Fall müssen Sie die Programmierung des Pads dem Spiel anpassen.
Zum besseren Verständnis aller verfügbaren Möglichkeiten auf dem PC testen Sie sie am besten
im “Game Controllers”-Fenster (Thrustmaster Control Panel).

5/6
TECHNISCHER SUPPORT
Sollten Sie mit Ihrem Produkt ein Problem haben, besuchen Sie bitte die Seite http://ts.thrustmaster.com
und klicken Sie auf Technischer Support. Von dort aus können Sie auf verschiedene Hilfen zugreifen
(Fragen und Antworten (FAQ), die neuesten Versionen von Treibern und Software), die Ihnen bei der
Lösung Ihres Problems helfen könnten. Falls das Problem weiterhin besteht, können Sie mit dem
technischen Support für Thrustmaster Produkte in Kontakt treten („Technischer Support“):
Per Email:
Um den technischen Supports per Email in Anspruch nehmen zu können, müssen Sie sich zunächst online
registrieren. Mit den Informationen, die Sie uns so zukommen lassen, können die Mitarbeiter Ihr Problem
schneller lösen. Klicken Sie bitte auf Registrierung links auf der Seite des technischen Supports und
folgen Sie den Anweisungen auf dem Bildschirm. Falls Sie bereits registriert sind, füllen Sie die Textfelder
Anwendername und Paßwort aus und klicken dann auf Login.
Per Telefon:
Deutschland
0180/5824763
0,12 €/Minute, Montag bis Freitag
von 15 bis 18 Uhr und 19 bis 22 Uhr
Schweiz 22 567 51 20
Zum Preis eines landesweiten Telefongesprächs,
Montag bis Freitag von 13 bis 22 Uhr
GEWÄHRLEISTUNGSINFORMATION
Guillemot Corporation S.A. („Guillemot“) bietet dem Kunden ab dem Kaufdatum weltweit eine 2-jährige
Garantie auf Materialschäden und Herstellungsmängel. Sollte das Produkt dennoch während dieser zwei
Jahre Schäden oder Mängel aufweisen, kontaktieren Sie bitte unverzüglich den technischen Support, der
Ihnen die weitere Verfahrensweise mitteilen wird. Im Falle eines technischen Defektes können Sie da
Produkt dort, wo Sie es gekauft haben, zurückgeben (oder an die vom Technischen Support angegebene
Adresse).
Im Rahmen dieser Garantie wird das defekte Produkt nach Ermessen des technischen Supports entweder
repariert oder ersetzt. Überall wo es geltendes Recht zulässt, wird die Haftung von Guillemot und seinen
Niederlassungen für das jeweilige Produkt(einschließlich für indirekte Beschädigungen), nur soweit
übernommen, als das eine Reparatur durchgeführt wird oder Ersatz geleistet wird. Die Rechte des Käufers
gemäß dem geltenden Recht des jeweiligen Landes werden durch diese Garantie nicht beeinflusst.
Diese Garantie tritt unter folgenden Umständen nicht in Kraft :
(1) Falls am Produkt etwas verändert wurde oder es geöffnet wurde, ein Schaden durch unangebrachte
Nutzung, Fahrlässigkeit, einen Unfall, Verschleiß oder irgendeinen anderen Grund verursacht wurde, der
nicht im Zusammenhang mit einem Materialdefekt oder Herstellungsmangel aufgetreten ist.
(2) Im Falle der Nichtbeachtung der durch den technischen Support erteilten Anweisungen.
(3) Software, die nicht von Guillemot herausgegeben wurde, unterliegt der speziellen Garantie des
jeweiligen Softwareherstellers.
COPYRIGHT
© 2005 Guillemot Corporation S.A. Alle Rechte vorbehalten. Thrustmaster® ist ein eingetragenes Warenzeichen der
Guillemot Corporation S.A. PlayStation® ist ein eingetragenes Warenzeichen der Sony Computer Entertainment Inc.
Microsoft® Windows® 98, 2000, Me und XP sind eingetragene Warenzeichen der Microsoft Corporation in den Vereinigten
Staaten von Amerika und/oder anderen Ländern. Alle anderen Warenzeichen und Markennamen werden hiermit anerkannt
und sind Eigentum ihrer jeweiligen Eigentümer. Fotos und Abbildungen nicht bindend. Inhalt, Design und Eigenschaften des
Produkts können ohne Bekanntmachung geändert werden und variieren von Land zu Land.

6/6
Hinweise zum Umweltschutz
Dieses Produkt darf am Ende seiner Lebensdauer nicht über den normalen Haushaltsabfall entsorgt
werden, sondern muss an einem Sammelpunkt für das Recycling von elektrischen und elektronischen
Geräten abgegeben werden.
Das Symbol auf dem Produkt, der Gebrauchsanleitung oder der Verpackung weist darauf hin.
Die Werkstoffe sind gemäß ihrer Kennzeichnung wiederverwertbar. Mit der Wiederverwendung, der
stofflichen Verwertung oder anderen Formen der Verwertung von Altgeräten leisten Sie einen wichtigen
Beitrag zum Schutze unserer Umwelt.
Bitte erfragen Sie bei der Gemeindeverwaltung die zuständige Entsorgungsstelle.
FAQs, Tipps und Treiber erhalten Sie auf www.thrustmaster.com

1/6
Handleiding
TECHNISCHE KENMERKEN
1. Programmeerbare, progressief reagerende triggers
2. 8 actieknoppen (analoog opn PS2 / digitaal onp PC)
3. START + SELECT knoppen op PS2 / Knoppen 9 +
10 op PC
4. 2 analoge minijoysticks + 2 digitale actieknoppen
5. D-Pad (Point Of View)
6. MODE knop (analoog / digitaal)
7. MAPPING knop (voor het
programmeren triggerfuncties)
8. TURBO knop
9. 2 onafhankelijke motoren
(alleen op PS2)
10. PC kabel
11. PS2 kabel
VEILIGHEID & VOORSCHRIFTEN
• Trek nooit aan een kabel en zorg dat er geen knikken in komen.
• Mors geen vloeistoffen op de kabel en/of de connectoren.
• Sluit in geval van storingen door interferentie van buitenaf de game af en koppel de unit los van de
computer of de console. Als de unit daarna weer wordt aangesloten en de game opnieuw wordt
gestart, zijn de problemen in de meeste gevallen verholpen.
La pagina si sta caricando...
La pagina si sta caricando...
La pagina si sta caricando...
La pagina si sta caricando...
La pagina si sta caricando...
La pagina si sta caricando...
La pagina si sta caricando...
La pagina si sta caricando...
La pagina si sta caricando...
La pagina si sta caricando...
La pagina si sta caricando...
La pagina si sta caricando...
La pagina si sta caricando...
La pagina si sta caricando...
La pagina si sta caricando...
La pagina si sta caricando...
La pagina si sta caricando...
La pagina si sta caricando...
La pagina si sta caricando...
La pagina si sta caricando...
La pagina si sta caricando...
La pagina si sta caricando...
La pagina si sta caricando...
-
 1
1
-
 2
2
-
 3
3
-
 4
4
-
 5
5
-
 6
6
-
 7
7
-
 8
8
-
 9
9
-
 10
10
-
 11
11
-
 12
12
-
 13
13
-
 14
14
-
 15
15
-
 16
16
-
 17
17
-
 18
18
-
 19
19
-
 20
20
-
 21
21
-
 22
22
-
 23
23
-
 24
24
-
 25
25
-
 26
26
-
 27
27
-
 28
28
-
 29
29
-
 30
30
-
 31
31
-
 32
32
-
 33
33
-
 34
34
-
 35
35
-
 36
36
-
 37
37
-
 38
38
-
 39
39
-
 40
40
-
 41
41
-
 42
42
-
 43
43


Thrustmaster DUAL TRIGGER 2-IN-1 RUMBLE FORCE Manuale del proprietario
- Categoria
- Controlli di gioco
- Tipo
- Manuale del proprietario
- Questo manuale è adatto anche per
in altre lingue
- français: Thrustmaster DUAL TRIGGER 2-IN-1 RUMBLE FORCE Le manuel du propriétaire
- español: Thrustmaster DUAL TRIGGER 2-IN-1 RUMBLE FORCE El manual del propietario
- Deutsch: Thrustmaster DUAL TRIGGER 2-IN-1 RUMBLE FORCE Bedienungsanleitung
- Nederlands: Thrustmaster DUAL TRIGGER 2-IN-1 RUMBLE FORCE de handleiding
- português: Thrustmaster DUAL TRIGGER 2-IN-1 RUMBLE FORCE Manual do proprietário
Documenti correlati
-
TRUSTMASTER DUAL TRIGGER 2-IN-1 Manuale del proprietario
-
Thrustmaster Run N Drive 3-in-1 Rumble Force PS2 and PS3 Manuale utente
-
-
-
TRUSTMASTER ADVANCE WIRELESS DUAL TRIGGER Manuale del proprietario
-
-
TRUSTMASTER DUAL TRIGGER 2-IN-1 RUMBLE FORCE Manuale del proprietario
-
-
-