YURAKU YUR.PHOTO 15KS2 - Manuale utente
- Categoria
- Cornici per foto digitali
- Tipo
- Manuale utente

YURAKU Yur.Photo 15KS2
Instruction manual ver1.00
All specification and information are subject to changes without further notice
Features
1.5” CSTN LCD display
Auto slide show when power on
Built-in 3.7V rechargeable lithium battery
Storage space for 143 pictures
Picture format supporting JPG and BMP
Button Descriptions
△
△△
△ PREVIOUS: For previous picture or menu selection upwards
▽
▽▽
▽ NEXT: For next picture or menu selection downwards
◎
◎◎
◎ MENU: For power ON/OFF or enter into menu
⊙
⊙⊙
⊙ RESET: For resetting default value of the unit in case of program error
Accessories
* USB cable 1 piece
* User manual 1 piece
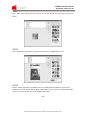
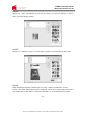
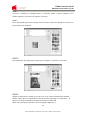
Operation
Putting your own photos into the 1.5” Digital Photo Frame
To put your own photos into the unit, please follow the steps below:
STEP 1
Connect the 1.5” Digital Photo Frame to your PC with the USB cable provided with the unit. Please
ensure the drive is set to AUTO-RUN for the software to auto launch.
STEP 2
Press “MENU” button to access the main menu, and select “USB CONNECT”. Next select “YES”
and Press “MENU” button to confirm.
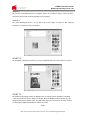
STEP 3
Select and transfer your photos from your PC. Locate your photo library on the left window and
select the photos to transfer.

YURAKU Yur.Photo 15KS2
Instruction manual ver1.00
All specification and information are subject to changes without further notice
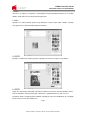
STEP 4
Press “Add” to move the picture to the column on the right. Repeat the same steps to input more
photos.
STEP 5
Press “Download” to copy all the selected pictures into the 1.5” Digital Photo Frame.
STEP 6
Exit the software application and double click on the “Safely Remove Hardware” applet on the
Notification area and stop this device. When a dialog advice you can remove, then unplug the USB
cable. You are now ready to use the 1.5” Digital Photo Frame.
- end -

YURAKU Yur.Photo 15KS2
Bedienungsanleitung Version 1.00
Alle technischen Daten und Informationen können ohne Vorankündigung geändert warden.
Funktionen
1.5” CSTN-LCD
Automatische Diashow bei eingeschaltetem Display
Integrierte aufladbare Lithium-Batterie (3.7 V)
Speicherplatz für 143 Bilder
Unterstützte Bildformate: JPG und BMP
Beschreibung der Tasten
△
△△
△ PREVIOUS [ZURÜCK]: Rückkehr zum vorhergehenden Bild oder Menüauswahl nach oben
▽
▽▽
▽ NEXT [VOR]: Vor zum nächsten Bild oder Menüauswahl nach unten
◎
◎◎
◎ MENU [MENÜ]: Ein- und Ausschalten oder Zugang zum Menü
⊙
⊙⊙
⊙ RESET: Rückstellung auf die werkseitige Konfiguration im Fall von Programmfehlern
Zubehör
* USB-Kabel 1 Stück
* Bedienungsanleitung 1 Stück
Bedienung
Betrachten Sie Ihre eigenen Fotos in dem digitalen Fotorahmen mit 1,5"-Display
Zum Laden von Fotos auf das Gerät folgendermaßen vorgehen:
SCHRITT 1
Das Gerät über das mitgelieferte USB-Kabel an den PC anschließen. Um die Software automatisch
zu starten, muss das Laufwerk auf AUTOSTART eingestellt sein.
SCHRITT 2
Die Taste MENU [MENÜ] drücken, um das Hauptmenü zu öffnen und dort „USB CONNECT“ [USB-
VERBINDUNG] und YES“ [JA] auswählen. Die Taste MENU [MENÜ] erneut drücken, um die
Auswahl zu bestätigen.

YURAKU Yur.Photo 15KS2
Bedienungsanleitung Version 1.00
Alle technischen Daten und Informationen können ohne Vorankündigung geändert warden.
SCHRITT 3
Die vom PC hochzuladenden Fotos auswählen. Hierzu das Verzeichnis öffnen, in dem die Fotos
gespeichert sind, und die zu übertragenden Fotos auswählen.
SCHRITT 4
Auf „Add“ [Hinzufügen] klicken, um ein Bild in die rechte Spalte zu kopieren. Den Vorgang
wiederholen, um weitere Fotos hochzuladen.
SCHRITT 5
Die Schaltfläche „Download“ anklicken, um die ausgewählten Fotos auf dem Gerät zu speichern.
SCHRITT 6
Die Softwareanwendung beenden, im Dialogfenster auf „Safely Remove Hardware“ [Hardware
sicher trennen] klicken und das Gerät ausschalten. Wenn die Meldung angezeigt wird, dass das
Gerät vom PC getrennt werden kann, das USB-Kabel abnehmen. Nun können die Fotos auf dem
1,5"-Display des digitalen Fotorahmens betrachtet werden.
- Ende -

YURAKU Yur.Photo 15KS2
Manuel d’instruction ver1.00
Toutes les spécifications et informations sont sujettes à changement sans préavis
Propriétés
Ecran LCD CSTN 1.5”
Diaporama automatique en état allumé
Batterie lithium 3,7 V rechargeable intégrée
Espace d’archivage pour 143 photos
Formats de photos supportés JPG et BMP
Description des boutons
△
△△
△ PREVIOUS : pour la photo précédente ou sélection vers le haut dans le menu
▽
▽▽
▽ NEXT : pour la prochaine photo ou sélection vers le bas dans le menu
◎
◎◎
◎ MENU : pour MARCHE/ARRET ou entrer dans le menu
⊙
⊙⊙
⊙ RESET : pour la réinitialisation des valeurs par défaut de l’unité ou en cas d’erreur de programme
Accessoires
* Câble USB 1 pièce
* Manuel de l’utilisateur 1 pièce
Fonctionnement
Entrée de vos propres photos dans le cadre photo numérique 1.5”
Pour entrer vos propres photos dans l’unité, procéder de la manière suivante :
ETAPE 1
Connecter l’unité au PC au moyen du câble USB fourni avec l'unité. S’assurer que le lecteur est
réglé sur AUTO-RUN pour que le logiciel démarre automatiquement.
ETAPE 2
Appuyer sur le bouton « MENU » pour entrer dans le menu principal, sélectionner « USB
CONNECT » puis « YES ». Appuyer sur le bouton « MENU » pour confirmer.
ETAPE 3
Sélectionner et entrer la photo à télécharger sur le PC. Localiser la librairie de photo dans la fenêtre
de gauche et sélectionner la photo devant être transférée.

YURAKU Yur.Photo 15KS2
Manuel d’instruction ver1.00
Toutes les spécifications et informations sont sujettes à changement sans préavis
ETAPE 4
Appuyer sur « Add » pour déplacer la photo vers la colonne sur la gauche. Répétez les mêmes
étapes pour entrer d’autres photos.
ETAPE
5
Appuyer sur « Download » pour s’assurer que toutes les photos seront enregistrées dans l'unité.
ETAPE
6
Quitter l’application logicielle et double-cliquer sur l’icône « Retirer le périphérique en toute
sécurité » de la barre d’applications et retirer cet appareil. Lorsqu’un message indique qu’il peut être
retiré, débrancher le câble USB. Le cadre photo numérique 1.5” est maintenant prêt à l’emploi.
- fin -

YURAKU Yur.Photo 15KS2
Manual de instrucciones ver1,00
Toda especificación e información está sujeta a cambios sin previo aviso
Características
Pantalla de cristal líquido CSTN de 1,5 pulgadas
Presentación automática de diapositivas al encender
Batería recargable de litio integrada de 3,7 V
Espacio de almacenamiento para 143 imágenes
Compatible con formatos de imagen JPG y BMP
Descripción de los botones
△
△△
△ PREVIOUS (ANTERIOR): Presenta la imagen anterior o recorre la selección del menú hacia arriba
▽
▽▽
▽ NEXT (SIGUIENTE): Presenta la imagen siguiente o recorre la selección del menú hacia abajo
◎
◎◎
◎ MENU (MENÚ): Permite encender y apagar el marco o presentar el menú
⊙
⊙⊙
⊙ RESET (RESTABLECER): Permite restablecer el valor por defecto de la unidad en caso de
presentarse un error de programa
Accesorios
* Cable USB 1 pieza
* Manual del usuario 1 pieza
Operación
Colocación de sus propias imágenes en el marco fotográfico digital de 1,5”
Para introducir sus propias imagines en la unidad, por favor siga los pasos indicados a continuación:
PASO 1
Conecte la unidad a su PC con el cable USB provisto con la unidad. Por favor asegúrese de que su
manejador esté programado en AUTO-RUN (ejecución automática) en el software para ejecutarse
automáticamente.
PASO 2
Pulse el botón “MENU” para presentar el menú principal, seleccione “USB CONNECT” (Conexión
USB) y seleccione “YES” (sí). Pulse el botón “MENU” para confirmar.

YURAKU Yur.Photo 15KS2
Manual de instrucciones ver1,00
Toda especificación e información está sujeta a cambios sin previo aviso
PASO 3
Seleccione e introduzca su fotografía desde su ordenador. Ubique su librería fotográfica en la
ventana izquierda y seleccione las fotografías a transferir.
PASO 4
Pulse “Add” (añadir) para mover la imagen hacia la columna a la derecha. Repita los mismos pasos
para introducir más fotografías.
PASO 5
Pulse “Download” (descargar) para asegurar que las imágenes se guarden en la unidad.
PASO 6
Salga de la aplicación de software y pulse dos veces en el cuadro “Safely Remove Hardware”
(Retirar el dispositivo con seguridad) en la zona de mensajes y detenga a este dispositivo. Al
aparecer el mensaje de diálogo usted puede desenchufar el cable USB.
Ahora está todo listo para que utilice el marco fotográfico digital de 1,5”.
- fin -

YURAKU Yur.Photo 15KS2
Manuale di istruzioni ver1.00
Tutte le specifiche tecniche e le informazioni sono soggette a modifica senza previo avviso
Caratteristiche
Display LCD CSTN da 1,5”
Slideshow automatico all'accensione
Batteria al litio ricaricabile integrata da 3,7 V
Spazio di archiviazione per 143 foto
Supporto formato foto JPG e BMP
Descrizione tasti
△
△△
△ PREVIOUS (PRECEDENTE): per passare alla foto o alla selezione menu precedente
▽
▽▽
▽ NEXT (SUCCESSIVO): per passare alla foto o alla selezione menu successiva
◎
◎◎
◎ MENU: per accendere/spegnere (ON/OFF) o accedere al menu
⊙
⊙⊙
⊙ RESET: per ripristinare i valori predefiniti dell'unità in caso di errore di programmazione
Accessori
* Cavo USB 1
* Manuale dell'utente 1
Funzionamento
Trasferimento delle foto nella cornice digitale da 1,5”
Per trasferire le foto nell'unità, eseguire le operazioni di seguito:
PASSO 1
Collegare l'unità al PC con il cavo USB in dotazione. Assicurarsi che il drive sia impostato su
AUTO-RUN (AUTOESECUZIONE) per l'esecuzione automatica del software.
PASSO 2
Premere il tasto “MENU” per accedere al menu principale, selezionare “USB CONNECT”
(CONNESSIONE USB), quindi selezionare “YES” (SÌ). Premere il tasto “MENU” per confermare.
PASSO 3
Selezionare e trasferire le foto dal PC. Posizionare la library delle foto sulla finestra sinistra e
selezionare le foto da trasferire.

YURAKU Yur.Photo 15KS2
Manuale di istruzioni ver1.00
Tutte le specifiche tecniche e le informazioni sono soggette a modifica senza previo avviso
PASSO 4
Premere “Add” (Aggiungi) per spostare la foto sulla colonna a destra. Ripetere le stesse operazioni
per trasferire altre foto.
PASSO 5
Premere “Download” per garantire il salvataggio delle foto nell'unità.
PASSO 6
Uscire dall'applicazione e fare doppio clic su “Safely Remove Hardware” (Rimozione sicura
hardware) nell'area di notifica, quindi arrestare il dispositivo. Quando una finestra di dialogo indica la
possibilità di rimozione, scollegare il cavo USB. Si è quindi pronti per usare la cornice digitale da
1,5”.
- end -

YURAKU Yur.Photo 15KS2
Használati utasítás az 1.00 verzióhoz
Valamennyi adat és információ elızetes értesítés nélkül módosítható.
Tulajdonságok
1,5” CSTN folyadékkristályos kijelzı
Automatikus diavetítés bekapcsoláskor
3,7 V beépített újratölthetı lítium elem
Tárhely 143 kép számára
A JPG és a BMP kiterjesztést támogató képformátum
A nyomógombok ismertetése
△
△△
△ PREVIOUS (ELİZİ): Ugrás az elızı képhez vagy eggyel följebbi menüponthoz
▽
▽▽
▽ NEXT (KÖVETKEZİ): Ugrás a következı képhez vagy eggyel lejjebbi menüponthoz
◎
◎◎
◎ MENU (MENÜ): BE/KI kapcsoláshoz vagy a menübe történı belépéshez
⊙
⊙⊙
⊙ RESET (VISSZAÁLLÍTÁS): A készülék alapértékének visszaállításához programhiba esetén
Kiegészítık
* USB-kábel 1 db.
* Használati utasítás 1 db.
Mővelet
Képek átvitele az 1.5” Digital Photo Frame készülékbe
Hajtsa végre az alábbi lépéseket, ha fényképeit át kívánja vinni a készülékbe:
1. LÉPÉS
Csatlakoztassa a készüléket a számítógéphez a készletben lévı USB-kábellel. Feltétlenül
kapcsolja a hajtást AUTO-RUN (automatikus futtatás) üzemmódba, hogy a szoftver automatikusan
induljon.
2. LÉPÉS
A „MENÜ” gomb lenyomásával lépjen a fımenübe, majd válassza az „USB CONNECT” (USB
csatlakozás) menüpontot és a „YES” (igen) lehetıséget. A megerısítéshez nyomja le a „MENU”
gombot.

YURAKU Yur.Photo 15KS2
Használati utasítás az 1.00 verzióhoz
Valamennyi adat és információ elızetes értesítés nélkül módosítható.
3. LÉPÉS
Válassza ki és vigye be a fényképet a számítógéprıl. Fénykép-könyvtárát helyezze el a bal oldali
ablakba, majd válassza ki az áthelyezendı fényképeket.
4. LÉPÉS
Nyomja le az „Add” (hozzáad) gombot, hogy áthelyezze a képet a jobb oldali oszlopba. Ismételje
meg ugyanezeket a lépéseket több fénykép beviteléhez.
5. LÉPÉS
Nyomja le a „Download” (letöltés) gombot, hogy biztosan elmentse a képeket a készülékbe.
6. LÉPÉS
Lépjen ki a felhasználói szoftverbıl, majd kétszer kattintson az értesítési területen található „Safely
Remove Hardware” (hardver biztonságos eltávolítása) segédalkalmazásra és állítsa le ezt a
készüléket. Amint a megjelenı párbeszédablak engedélyezi, húzza ki az USB kábelt. Az 1.5” Digital
Photo Frame most már használatra kész.
- vége -
-
 1
1
-
 2
2
-
 3
3
-
 4
4
-
 5
5
-
 6
6
-
 7
7
-
 8
8
-
 9
9
-
 10
10
-
 11
11
-
 12
12


YURAKU YUR.PHOTO 15KS2 - Manuale utente
- Categoria
- Cornici per foto digitali
- Tipo
- Manuale utente