
ATLAS THE ALS SIMULATOR P75
USER MANUAL 1023796, 1024113

ATLAS THE ALS SIMULATOR P75
CONTENTS
Product Introduction ......................................................................................................................................................................................................................................................
Delivery Content .............................................................................................................................................................................................................................................................
Features .............................................................................................................................................................................................................................................................................
General Handling ............................................................................................................................................................................................................................................................
Safety Instruction ............................................................................................................................................................................................................................................................
Installation .........................................................................................................................................................................................................................................................................
Airway .................................................................................................................................................................................................................................................................................
Cardiopulmonary resuscitation (CPR) ......................................................................................................................................................................................................................
Circulation .........................................................................................................................................................................................................................................................................
Network/Router Settings ...........................................................................................................................................................................................................................................
How to connect Atlas with REALITi ? ..............................................................................................................................................................................................................
How to change the Wi-Fi setting on Atlas? ............................................................................................................................................................................................................
FAQ ...................................................................................................................................................................................................................................................................................
Spare Parts .....................................................................................................................................................................................................................................................................
Technical Data ...............................................................................................................................................................................................................................................................
Contact Information ....................................................................................................................................................................................................................................................
2 ATLAS THE ALS SIMULATOR P75 | Contents

ATLAS THE ALS SIMULATOR P75
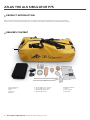
PRODUCT INTRODUCTION
Atlas is the ALS simulator by B Scientific used for conducting interdisciplinary and interprofessional emergency training.
It oers extensive emergency-specific applications for advanced life support in simulation-based training and further training.
DELIVERY CONTENT
. Consumable bag
. Atlas charger
. Tape
. Lubricant
. Adapter
. IV cannulation pad – forearm
. IV cannulation pad - dorsal
. Humeral IO replacement
. Humeral IO extra fat
. Quick Start Guide
. Router
. Luer lock pipe
. Carry Bag
3 ATLAS THE ALS SIMULATOR P75 | Product Introduction | Delivery Content

ATLAS THE ALS SIMULATOR P75
4 ATLAS THE ALS SIMULATOR P75 | Features
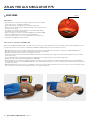
FEATURES
Atlas features:
• Atlas replicates the anatomy of the airways, complete with tongue, epiglottis,
vocal cords, trachea, esophagus and vallecula.
• Airway management - head-tilt/chin-lift or the Esmarch maneuvre.
• Ability to clear the airway includes simulated aspiration and removing inserted
foreign bodies. No fluids.
• The airway of the simulator can accommodate extra-/supra-glottic airway
alternatives and oral and nasal intubation.
• Advanced airway, for insertion of oral airways (OPA) and nasal airways (NPA).
• Intraosseous (IO) vascular access via the left proximal humerus.
• Intravenous (IV) vascular access via the right dorsal and antecubital fossa.
• Compatible with mCPR piston-based devices.
Atlas features in combination with REALITi :
Atlas works with REALITi using Wi-Fi connection. By using on the fly or pre-programmed scenarios, the manikin and the virtual defibrillator interact.
The following functions can be shown in combination with REALITi depending on the monitor interface selected:
• CPR dashboard screen for viewing all relevant parameters and values of cardiopulmonary resuscitation according to the AHA & ERC Guidelines.
• Atlas allows observation and recognition of vital sign such as bilateral carotid pulse.
• Automatic simulation control based on pre-programmed scenarios.
• Compression artifact waveform displayed in the ECG and information of the hand position, compression depth and rate displayed when performing
chest compressions.
• Synchronous CO graphs during manual ventilation and information on breathing frequency and inspiratory tidal volume.
• Carotid pulse when using a perfusing rhythm (Systolic >mmHg).
• Dedicated CPR screen for viewing all relevant parameters and values of cardiopulmonary resuscitation including hands-o time during defibrillation.
• Using dynamic vital signs provided by REALITi , Atlas can simulate dierent emergency scenarios including cardiac arrest that require a wide range
of invasive procedures.
• REALITi extends the therapy options to defibrillation, cardioversion and pacemaker application on the real or generic monitor. The bilateral carotid
pulse feature allows to determine the indication and success of applied intervention.
Vallecula

ATLAS THE ALS SIMULATOR P75
5 ATLAS THE ALS SIMULATOR P75 | General Handling | Safety Instructions | Installation
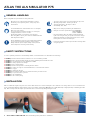
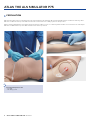
GENERAL HANDLING
INSTALLATION
Atlas is . m tall, weighs kg and comes in two dierent skin tones. It has a battery life of to hours. The charge status is color-coded and shown
on the on/o button. Battery status indicator on the power button: white light (%-%) green light (%-%) red light (%-%) red blinking (less than
%) . Atlas is charged via the adapter provided and can be used wirelessly during training sessions.
• Wear gloves as required during simulation scenarios.
• Avoid using colored plastic gloves, as they may cause
discoloration.
• To maintain Atlas skin, wash hands before use and place
Atlas on a clean surface.
• To avoid permanent staining avoid the use of ink pens,
felt-tipped markers, acetone, or iodine.
• Avoid placing Atlas on newsprint or colored paper.
• After using Atlas, remove glue residue from Atlas skin with
% ethyl alcohol wipes.
• Ensure that Atlas is properly secured during transportation
to prevent personal injury or damage to the product.
• Always lubricate (silicon oil) the airway device (tracheal
tubes, iGel) before inserting it in the airway.
• The device may only be stored and charged in dry rooms.
• Operating temperature: - °C up to + °C
• Storage temperature: - °C up to + °C
• Air humidity: % - %
• Only use the charger provided by the manufacturer.
• Charger connection specifications: Input - V
Output -Hz
.V = mA
• Recommendation: Once the battery is fully charged (the
light on the charger turns green), take it out of the charger.
Getting the manikin overcharged puts more stress on the
battery and can shorten the battery life
• Follow the instructions and keep in mind the warnings while
using the product.
Before using Atlas keep in mind these safety instruction
i
SAFETY INSTRUCTIONS
To ensure optimum performance and durability of Atlas, read and follow the user information and warnings:
DO NOT perform mouth-to-mouth or mouth-to-nose rescue breathing on Atlas.
DO NOT introduce fluids into Atlas with the exception of IV/IO systems built into the arms.
DO NOT use electrotherapy or a live defibrillator or AED.
DO NOT use sharp objects in the airways.
DO NOT create a surgical airway.
DO NOT perform a relief puncture or inserting thoracic drains.
DO NOT use if there are signs of electrical malfunction, or unusual smell of smoke.
DO NOT use oxygen.
DO NOT use damaged chargers.
DO NOT take the battery apart. Never try to take the battery out of the device.
DO NOT try to repair the device yourself.
DO NOT use live defibrillators.
DO NOT use live cardiac pacing.
Ø
Ø
Ø
Ø
Ø
Ø
Ø
Ø
Ø
Ø
Ø
Ø
Ø

ATLAS THE ALS SIMULATOR P75
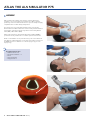
AIRWAY
Atlas replicates the anatomy of the airways, complete with tongue,
epiglottis, vocal cords, trachea and esophagus. Use Atlas to practice
positioning of the head, manual maneuvers to open the airway and apply
compatible aids for realistic airway management.
The airway can be opened by tilting back the head or by using the
Esmarch maneuver. Other methods to clear the airway include simulated
dry aspiration, removing inserted foreign bodies and inserting Guedel
tubes (OPA) or Wendl tubes (NPA).
When single-assistant or dual assistant bag mask ventilation (BVM) is
performed correctly on Atlas there is a visible expansion of the thorax
Nasal or oral intubation can be performed using a size . endotracheal
tube (ET). For optimal intubation, use the improved Jackson position and
the BURP maneuver. To intubate use a classic laryngoscopy, or video
laryngoscopy.
è
Recommended tube sizes:
• Oraltracheal tube .
• Nasotracheal tube . –
• iGel
• Laryngeal mask
• Laryngeal tube
èè
6 ATLAS THE ALS SIMULATOR P75 | Airway

ATLAS THE ALS SIMULATOR P75
By using auscultation and checking for an excursion in the thoracic region, you can determine whether bag-mask ventilation was performed correctly and
if the airway was properly cleared. Likewise incorrect right stem intubations can be confirmed when there is chest excursion and lung sound in the right
side. Use auscultation to check for an excursion in the abdomen to determine esophageal intubation.
Supra-glottic airway alternatives like, iGel, Laryngeal Masks (LMA) and Laryngeal Tubes (LT) can be used in accordance with manufacturers’ instructions.
Moreover a gastric probe can be inserted. Second generation airway option make it possible to insert a gastric probe.
In order to see the inspiratory tidal volume use the quality CPR Dashboard and generic defibrillator screen from REALITi .
è
Note:
Prior to using airway adjuncts, apply a small amount of silicon airway lubricant to the equipment.
èè
7 ATLAS THE ALS SIMULATOR P75 | Airway
è
Lung Specification
• Max tidal volume: mL
• May airway pressure: cm HO
èè

ATLAS THE ALS SIMULATOR P75
8 ATLAS THE ALS SIMULATOR P75 | CPR
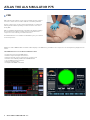
CPR
Atlas replicates the anatomy of a rib cage and enables thoracic compres-
sions to be carried out in accordance with the resuscitation guidelines.
Thoracic compressions can be performed intermittently or continuously
with bag-mask ventilation providing a realistic resistance of the chest
during CPR.
Atlas is compatible with mechanical resuscitation aids. Practice applying
the mechanical resuscitation aid while carrying out manual thoracic
compressions and continuing resuscitation measures.
The CPR dashboard screen and Generic Defibrillator gives you feedback
on the hand position.
With the use with of REALITi resuscitation artifact displays on the ECG tracing, in addition to the compression rate and depth being displayed on the
monitor.
The CPR Dashboard screen and Generic Defibrillator allows:
Compressions that generate ECG artifacts
Realistic compression depth and resistance
Detection of depth, release, and frequency of compressions
Real-time view of Quality of CPR on the CPR Dashboard
Use of mCPR piston-based devices
Detection of hand position
Compliant with ILCOR resuscitation

ATLAS THE ALS SIMULATOR P75
è
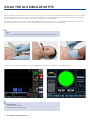
CIRCULATION
Atlas has two IV pads on the forearm and dorsal side of the hand back of the right hand. We recommend G cannulas or smaller for ideal usage times.
Atlas has one IO insert at the top of the Atlas’s left arm. We recommend the use of drilling systems for this procedure.
When performing administration of medication via the IV pad and /or IO access site, use a drain bag which should be connected to the Luer lock adapter.
Atlas has one IO drain at the top of the Atlas’ left arm and one at the top of the IV.
Recommended puncture sizes
• IV: ≤G
• IO: drilling system
9 ATLAS THE ALS SIMULATOR P75 | Circulation

ATLAS THE ALS SIMULATOR P75
10 ATLAS THE ALS SIMULATOR P75 | Circulation
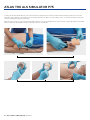
To change the IV pads and the IO insert, remove them from their original position and disconnect them from the drainage system. Then connect the
replacement to the drainage system and place the new training pad in the slot. At the end of the training session, we recommend drying, removing the
cannulas, and taking the drainage system apart.
When the day’s sessions are done, flush the IV and IO sites with air to remove any fluid/liquid in the system. Connect a syringe filled with air to the IV/IO
catheter and flush the IV pads/IO insert with air until only air exits the overflow tube.
Replacement of IV sites
Replacement of IO site

ATLAS THE ALS SIMULATOR P75
11 ATLAS THE ALS SIMULATOR P75 | Network/Router Settings | Connect Atlas with REALITi 360
NETWORK/ROUTER SETTINGS
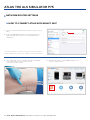
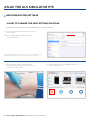
HOW TO CONNECT ATLAS WITH REALITI 360?
1. Power on the mini router PIX-Link provided in the delivery content of
Atlas. *
2. Connect the REALITi Monitor iPad Pro and the Control iPad to the
Wi-Fi network. Both iPads must be on the same Wi-Fi network:
iSimulate-5.0
* If the mini router PIX-Link is not included in the delivery content, set up the Wi-Fi net-
work with the REALITi router as below › Name: iSimulate-5.0 › Password: iSimulate2012
3. Turn on Atlas. Atlas connects to the Wi-Fi network of your REALITi
router automatically. The power button is located
on the right side of the manikin.
4. On the Monitor iPad Pro, start the REALITi application and
select the “Staging” button:

ATLAS THE ALS SIMULATOR P75
12 ATLAS THE ALS SIMULATOR P75 | Connect Atlas with REALITi 360
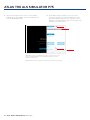
5. On the Control iPad Pro, start the REALITi application and select the
“Control” button:
6. On the Control iPad, press “Tap to Connect” at the bottom of the
screen:
7. In the window that appears, select the corresponding REALITi monitor
to your REALITi ecosystem. If the monitor does not appear in the list,
check that the Control iPad and the Monitor iPad Pro are both con-
nected to the Wi-Fi network of your REALITi router: iSimulate-5.0 (both
iPads must be on the same Wi-Fi network).
8. After selecting the monitor name on the Control iPad, it
will automatically switch to the options of starting with a
scenario (red outline) or a monitor (blue outline):

1
2
3
ATLAS THE ALS SIMULATOR P75
13 ATLAS THE ALS SIMULATOR P75 | Connect Atlas with REALITi360
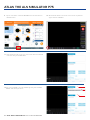
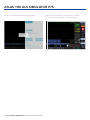
9. Tap the “start” button. Launch the Defibrillator from the main menu on
the Monitor iPad:
10. On the Monitor iPad Pro the monitor selected from step 9 should
appear. Start the defibrillator.
11. Swipe in from the right screen edge of the monitor iPad show the CPR
connection dialog on the Defibrillator:
12. Tap “Scan for Manikin”. Select the manikin appearing in the “Available
Manikin” table and tap “Connect.”

ATLAS THE ALS SIMULATOR P75
14 ATLAS THE ALS SIMULATOR P75 | Connect Atlas with REALITi 360
14. Compress the manikin. You should be able to see the CPR
compressions in the ECG waveform and the bar graph.
13. The connected manikin will be calibrated automatically:

ATLAS THE ALS SIMULATOR P75
15 ATLAS THE ALS SIMULATOR P75 | Network/Router Settings | Wi-Fi Setting
NETWORK/ROUTER SETTINGS
HOW TO CHANGE THE WIFI SETTING ON ATLAS
Only follow the steps below if you need to match Atlas with your existing network setting
1. Power on the mini router PIX-Link provided in the delivery
content of Atlas. *
2. Connect the REALITi Monitor iPad Pro to the Wi-Fi
network: iSimulate-5.0
* If the mini router PIX-Link is not included in the delivery content, set up the Wi-Fi network
with the REALITi router as below › Name: iSimulate-5.0 › Password: iSimulate2012
3. Turn on Atlas. Atlas connects to the Wi-Fi network
iSimulate-5.0 automatically. The power button is located
on the right side of the manikin.
4. On the Monitor iPad Pro, start the REALITi application and
select the “Staging” button::

1
3
4
2
ATLAS THE ALS SIMULATOR P75
16 ATLAS THE ALS SIMULATOR P75 | Wi-Fi Setting
5. Swipe in from the right screen in order to see the available
manikins. Tap “Scan for Manikin”. Select the manikin appeared
in the “Available Manikin” table.
6. Update Wi-Fi settings to match the router of your choice.
Press the arrow button to save. Please wait for 30 seconds.
Turn o the manikin and then power on again. Now, connect
both iPads to the Wi-Fi network of your choice. The mini router
PIX-Link is not required any more.
NOTE: Atlas connects to 2.4 GHz frequency. We recommend to set up the
networks, 2.4GHz & 5.0GHz to the same SSID and password to ensure
eciency in your training.
NOTE: Maximum character length of 19 characters for username and password.

ATLAS THE ALS SIMULATOR P75
17 ATLAS THE ALS SIMULATOR P75 | FAQ
FAQ
My Atlas is unable to connect to REALITi?
Cause Solution
Incorrect Wi-Fi Network selected • Connect to the correct Wi-Fi on both iPads
NOTE: Default SSID Wi-Fi “iSimulate-.”
Default password is “iSimulate”
• If operating more than one Atlas, ensure that each simulator has its own unique SSID name. If
operating more than one Atlas, ensure each simulator has its own router/network to connect to.
NOTE: After minutes of not being able to connect, Atlas will temporarily revert to the default SSID and
Password to allow you to rename the connection Wi-Fi and Password.
NOTE: Follow the procedure from the Quick Start Guide
(How to connect Atlas with REALITi?)
REALITi App is not updated Go to the App Store on both your iPads and update the REALITi app to the latest version
available
Atlas not turned on Turn Atlas o and on again
Atlas battery low Charge Atlas
Atlas too far from Wi-Fi Move your network and REALITi system closer to Atlas
My connection with REALITi and Atlas is lost?
Multiple network connections may interfere with transmissions between REALITi and Atlas.
Forget other networks on both your iPads beside the network required to connect with Atlas. Default network is “iSimulate-.”
How to change the Wi-Fi setting on Atlas?
Refer to the ‘Additional Information (How to change the Wi-Fi setting on Atlas?).’
NOTE: The steps are also available on page of the Atlas manual.
Atlas airways have become contaminated from mouth-to-mouth resuscitation
DO NOT perform mouth-to-mouth on Atlas. If damage is reported:
• Clean the outside of Atlas with manikin wipes.
• Clean the inside of the oral cavity with manikin wipes.
• Change the lung bag.
No chest rise visible on Atlas
• If chest-rise is unilateral, ETT may be inserted into the right main stem bronchus. Correct the insertion of the ETT.
• Lung bag is leaking or tubing to lung is twisted, kinked, or disconnected for which the lung bag will need to be replaced.
• Seal the airway.
• Check air tubing for leakage.
• Check that all connections are intact.
• Replacing tubing if necessary.
Atlas carotid pulse can not be felt
The following may be the cause:
• The blood pressure is set below mmHg Systolic.
• The connection is lost between the REALITi system and Atlas.
• Non-perfusing cardiac rhythm
• PEA rhythm

ATLAS THE ALS SIMULATOR P75
18 ATLAS THE ALS SIMULATOR P75 | Spare Parts | Technical Data | Contact Information
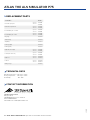
TECHNICAL DATA
CONTACT INFORMATION
REPLACEMENT PARTS
Consumables Item No.
Chest skin spare part light skin
dark skin
Humeral IO replacement light skin
dark skin
IV cannulation pad – forearm light skin
dark skin
IV cannulation pad – hand light skin
dark skin
Lung bag
Stomach bag
Carry Bag
Foam leg (right)
Foam leg (left)
Right arm (w/o IV pad) light skin
dark skin
Left arm (w/o IO insert) light skin
dark skin
Right foot light skin
dark skin
Left foot light skin
dark skin
Battery charge
03/2023
Operating temperature: - °C up to + °C
Storage temperature: - °C up to + °C
Air humidity: % - %
UK 3B Scientific Limited
9 Regent Street
TA8 1AX Burnham-on-Sea • Somerset
Phone: 01934 425333
3bscientific.com • uk3bs@3bscientific.com
A worldwide group of companies
-
 1
1
-
 2
2
-
 3
3
-
 4
4
-
 5
5
-
 6
6
-
 7
7
-
 8
8
-
 9
9
-
 10
10
-
 11
11
-
 12
12
-
 13
13
-
 14
14
-
 15
15
-
 16
16
-
 17
17
-
 18
18


3B SCIENTIFIC 1023796 [P75] Manuale del proprietario
- Tipo
- Manuale del proprietario
- Questo manuale è adatto anche per
in altre lingue
Documenti correlati
Altri documenti
-
laerdal Resusci Anne QCPR Guida d'installazione
-
Atlas Copco LWP 2 Safety And Operating Instructions Manual
-
Atlas TSD-DA28 Manuale del proprietario
-
Pioneer AVIC-F320BT Manuale del proprietario
-
Bard Atlas Gold PTA Dilatation Catheter Instructions For Use Manual
-
Cateye INOU [MSC-GC100] Manuale utente
-
AEG Atlas Copco HS 60 Manuale del proprietario
-
Taurus ATLAS 2400 CERAMIC Steam Iron Manuale utente
-
-