
NAMRON ZIGBEE
SKJØTELEDNING
4-veis + 2 USB
INSTRUCTION MANUAL

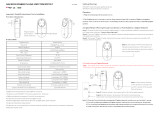
NAMRON ZIGBEE SKJØTELEDNING 4-veis + 2 USB 70110005
Important: Read All Instructions Prior to Installation
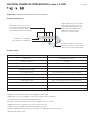
Produc t Data
Function introduction
Radio Frequency
Input Voltage
Device ID
Zigbee profile
Number of US B Port
Number of AC Output
US B Output Volta ge
Dimensions
AC O utput Load
US B Output Loa d
Relative humidity
Opera ting tempera ture
Max. Loa d Tota l 16A
4
AC200-240V, 50/60Hz
Max. 2.1A/output, tota l 3.1A for 2 outputs
5V DC
350×68×40(mm)
8% to 80%
0 to 40°C
Max. 16A/output, total 16A for 4 outputs
2
0x0104(ZHA)
0x000A(Plug-in Unit)
2.4GHz
Loa d sta tus indica tor, turns
off when corresponding load
is turned off, turns on when
corresponding load is turned on
2 US B ports, 1 endpoint
4 AC o utputs, 4 endpoints
• T he 4 AC outputs can be controlled individua lly
• E na bles to control ON/OFF o f the loa d, supports max. 16 scenes
• S upports find a nd bind mode to bind a Z igBee remote
• Supports zigbee green power and can bind max. 20 zigbee green power switches
• ZigBee device that supports Touchlink commissioning
• Wa terproof grade: IP 20
• Z igBee smart outlet based on latest ZigBee 3.0 protocol
• Z igbee device with 5 endpoints, With 4 AC o utputs a nd 2 US B ports
Program button, for network
pairing, touchlink, factory reset,
short press to turn on/off loads
Zigbee indica tor, sta y off when
power on the outlet, turns on
after a dded to a Z igbee hub,
indica tes when progra m the
outlet (network pairing,
touchlink, factory reset)

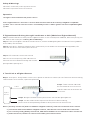
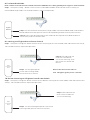
3. Z igbee Network P airing through C oordinator o r Hu b ( Added to a Zigbee Network)
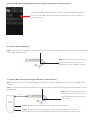
4. Tou c hLink to a Zigbee Remote
Zigbee
Remote
S tep 1 : Remove the device from previous zigbee network if it has a lready been a dded to, otherwise pairing will
fail. P lease refer to the pa rt " Fac tory Res et Manu ally".
S tep 2 : From your ZigBee Controller or hub interface, choose to add lighting device a nd enter P a iring mode a s
instructed by the controller.
S tep 3: Short press “Program” button 5 times continuously to set the device to network pa iring mode, LE D
indica tor will fla sh 3 times slowly then fla sh fast.
Step 1: S hort press “Prog” button 4 times (Or re- power on the device 4 times) to start Touchlink commissioning,
180S timeout. Once timeout, repeat the operation.
S tep 4: There sha ll be indication
on the remote for successful link
and LED indica tor of the outlet will
fla sh twice.
2.Th is Z igB ee d evic e i s a w ireles s r ec eiver that c ommun ic ates w ith a v ariety o f ZigB ee c ompatible
s ys tems . T his r ec eiver r ec eives a nd i s c o ntrolled by wireles s r adio s ign als f rom the c o mpatible Z igB ee
s ys tem.
1 .Plug the s mart ou tlet into AC p ower s ou rc e.
• DO NOT expose the device to moisture.
• DO NOT insta ll with power applied to device.
S afety & Warnings
Operation
S tep 4: LED indica tors will fla sh 6 times to
indica te successful pairing. LE D indica tor will
maintain the sta tus before entering into network
pa iring mode if pairing fails.
< 10cm
S tep 3: Set the remote or touch panel into Touchlink commissioning,
please refer to corresponding remote or touch pa nel ma nua l to learn how.
Note: 1 ) Direc tly Tou c hLink ( both n ot added to a Z igB ee n etwork), e ac h d evic e c an l ink with 1 r emote.
2 ) Tou c hLink after b oth added to a Z igB ee n etwork, e ac h d evic e c an l ink with m ax. 3 0 remotes .
3 ) To c ontrol b y bo th g ateway and r emote, add r emote and devic e to n etwork firs t th en Tou c h Link.
4 ) After Tou c hLink, the d evic e c an b e c o ntrolled by the l inked r emotes .
S tep 2 : Bring the remote or touch pa nel within 10cm of the lighting device.

6. F ac tory R es et Manu ally
S tep 1 : Short press the “program” button 5 times continuously, the outlet will be reset to fa ctory default and enter
into network pa iring mode.
S tep 1 : Short press the progra m button 4 times to sta rt TouchLink C ommissioning, 180 seconds timeout, repea t
the operation.
7 . F ac tory R es et thro u gh a Zigbee Remote ( Touc h R es et)
Note: Ma ke sure the device a lready a dded to a n etwork, the remote a dded to the sa me one or not added to any
network.
Step 2: LE D indica tor will fla sh 3 times
slowly a nd then flahs fast and the
outlet will try to join a Z igbee network.
S tep 4: There sha ll be indication
on the remote for successful reset
and LED indica tor of the outlet will
fla sh 3 times.
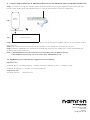
5. R emoved fro m a Z igbee Network throu gh C oordinator o r Hub Interfac e
From your ZigBee controller or hub interface, choose to delete or reset the
outlet as instructed. LE D indica tor of the outlet blinks 3 times to indica te
successful reset.
Zigbee
Remote
S tep 3: Set the remote or touch panel into Touch R eset procedure to reset the
device, please refer to corresponding remote or touch pa nel ma nua l to learn how.
< 10cm
S tep 2 : Bring the remote or touch pa nel within 10cm of the outlet.

8. F ind and B ind Mode
S tep 1 : Short press “Prog.” button 3 times to sta rt Find a nd Bind mode ( LE D indica tor flashes slowly) to
find a nd bind ta rget node, 180 seconds timeout, repeat the opera tion.
9. L earning to a Z igbee G reen P ower S witc h
S tep 2 : Set the green power
switch into Lea rning mode,
please refer to its manua l.
Zigbee
Green Power
Switch
S tep 3: LED indica tor will
fla sh twice to indica te
successful learning. Then
the switch ca n control the
device.
S tep 1 : Short press “P rogram” button 4 times to start Lea rning to GP switch mode ( LED indica tor fla shes twice),
180 seconds timeout, repeat the operation.
Note: E ac h d evic e c an l earn to
max. 2 0 zigbee g reen p ower s witc h es .
1 0. D elete L earning to a Z igbee G reen P ower Switch
S tep 2 : S et the paired green power switch into
Lea rning mode, plea se refer to its ma nua l.
Zigbee
Green Power
Switch
S tep 3: LED indica tor will
fla sh 4 times to indica te
successful deleting.
S tep 1 : Short press “P rogram” button 3 times to start delete Lea rning to G P switch mode (LE D indica tor flashes
slowly), 180 seconds timeout, repeat the operation.
Note: M ake s u re bo th the d evic e and r emote are added to the s ame g ateway that s upports f ind and b ind.
Zigbee
Remote
S tep 2 : Set the remote or touch panel (ta rget node) i nto find a nd bind mode, a nd enable it
to find a nd bind initia tor, plea se refer to corresponding remote or touch pa nel manual.
S tep 3: There sha ll be indica tion on the remote or touch panel tha t it bind the device
successfully a nd ca n control it then.

Inpu t Clu s ters
• 0x0000: Basic • 0x0003: Identify • 0x0004: Groups • 0x0005: Scenes • 0x0006: On/off
• 0x0b05: Diagnostics
Outpu t Clu s ters
• 0x0003: Identify
1 2. Z igB ee C lu s ters t he d evic e s u pports a re as f ollows :
Note: 1 ) E ac h added d evic e c an l ink and b e c on trolled b y m ax. 3 0 added r emotes .
2 ) E ac h added remote c an l in k and c ontrol m ax. 3 0 added d evic es .
• 0x1000: ZLL Commissioning
• 0x0019: OTA
11 . S etu p a Z igbee Network & Add O ther Devic es t o the Network ( No C oordinator R equ ired)
S tep 1 : Short press “P rogram” button 4 times to ena ble the device to setup a z igbee network (LE D indicator
fla shes twice) to discover a nd add other devices, 180 seconds timeout, repeat the operation.
Zigbee
Remote
ZigB ee L ighting Devic e
< 10cm TouchLink
S tep 2 : Set another device or remote or touch pa nel into network pairing mode a nd pa ir to the network, refer to
their manuals.
S tep 3: Pa ir more devices and remotes to the network as you would like, refer to their ma nuals.
S tep 4: Bind the added devices a nd remotes through Touchlink so that the devices ca n be controlled by the
remotes, refer to their ma nua ls.
Namron AS
Nedre kalbakkvei 88B
1081 Oslo
Norway
post@namron.com
-
 1
1
-
 2
2
-
 3
3
-
 4
4
-
 5
5
-
 6
6


in altre lingue
- English: NAMRON 4512735 User manual
Documenti correlati
Altri documenti
-
Niko 552-720X1 Manuale utente
-
MUTOH Viper TX 100 Manuale utente
-
-
ClimateMaster Vertical-Stack Units Install Manual
-
Panasonic SCAK17 Manuale del proprietario
-
-
REX DE6540A Manuale utente
-
CASTOR CV2948 Manuale utente
-
-
Indesit TRP 632 TD L Guida utente