NAMRON 4512746 Manuale utente

Categoria
Dimmer
Tipo
Manuale utente
70110004
Function introduction
Important: Read All Ins tructions P rior to Installation
DO NOT install with power applied to device.
DO NOT expose the device to moisture.
S afety & Warnings
Reset” Key: for
network pairing,
touchlink, factory
reset of the dimmer,
turn on/off load
Operation
Neutral lead input
Live lead input
ZigBee AC phase cut dimmer based on latest ZigBee 3.0 protocol
100-240VAC wide input and output voltage
Supports resistive loads and capacitive loads
1 channel output, up to 400W
input and output with screw terminals, safe and reliable
Both leading edge version and trailing edge version are available for choosing, default factory setting is trailing edge
Enables to control ON/OFF and light intensity of connected triac dimmable led light or led driver
ZigBee end device that supports Touchlink commissioning
Can directly pair to a compatible ZigBee remote via Touchlink without coordinator
Supports self-forming zigbee network without coordinator and add other devices to the network
Supports find and bind mode to bind a ZigBee remote
Supports zigbee green power and can bind max. 20 zigbee green power switches
Compatible with universal ZigBee gateway products
Can be controlled by push switches or momentary switches
Mini size, easy to be installed into a standard size wall box
Radio Frequency : 2.4GHz
• Waterproof grade: IP20
Min. Set” Key:
1) to set or delete a minimum
dimming level
2) to set or delete a s ta rtup
brightness level
Input Voltage Output Voltage Output Current
Product Data
Size(LxWxH)
Compatible Load Types
Load Symbol Load Type Maximum Load Remarks
Due to va riety of LE D la mp
designs, maximum number
of LED la mps is further
dependent on power factor
result when connected to
dimmer.
Maximum permitted number
of drivers is 200W divided
by driver nameplate power
rating.
Dimmable LED lamps
Dimmable LED drivers
Incandescent lighting,
HV Halogen lamps
Low voltage halogen
lighting with electronic
transformers
100-240VAC 1.8A max
100-240VAC 45.5x45x20.3mm
200W @ 2 30V
100W @ 110V
200W @ 2 30V
100W @ 110V
400W @ 2 30V
200W @ 110V
200W @ 2 30V
100W @ 110V
1.Do wiring according to connection diagram correctly.
3. Z igbee Network P airing throu gh C oo rdinato r o r Hu b ( Added to a Zigbee Network)
Step 1 : Remove the device from previous zigbee network if it has already been added to,otherwisepairingwill
fail. Pleaserefertothepart"Factory Reset Manually".
Step 2: From your ZigBee Controller or hub interface, choose to add lighting device and enter Pairing mode as
instructed by the controller.
Step 3: Reset power of the device to
set it into network pairing mode
(connected light flashes twice
slowly), 15 seconds timeout, repeat
this step.
Step 4: Connected light will blink 5
times and then stay solid on, then the
device will appear in your controller's
menu and can be controlled through
controller or hub interface.
Input Clusters
0x0000: Basic • 0x0003: Identify 0x0004: Groups • 0x0005: S cenes
0x0006: On/off 0x0008: Level Control 0x0b05: Diagnostics
Ou tpu t Clus ters
0x0019: OTA
ZigB ee C lus ters t he d evic e s u pports a re as f ollows :
2.is ZigBee device is a wireless receiver that communicates with a variety of ZigBee compatible systems. is
receiver receives and is controlled by wireless radio signals from the compatible ZigBee system.
Allowed Inrush Current
Cold Start 75A max.
Neutral lead output
Live lead output
Switch input
Lin Nin
Lout
Nout
NAMRON ZIGBEE DIMMER 2-POL 400W
Min .S et
Ratings:100-240V~,50/60Hz,
MAX:1.8A
Reset
S
COM
LoutNoutLin NinNin
Lin Nin
Lout Nout
4512746
SR-ZG9101SAC-HP-CLN
Mi n. S e t
Ratings:100-240V~,50/60Hz,
MAX:1.8A
Reset
S
COM
LoutNoutLin NinNin
Lin Nin
Lout Nout
4512746
SR-ZG9101SAC-HP-CLN
4. Touc hLink to a Zigbee Remote
5. R emo ved from a Z igbee Netwo rk throu gh C oo rdin ato r o r Hu b I n terfac e
From your ZigBee controller or hub
interface, choose to delete or reset the
lighting device as instructed. The
connected light blinks 3 times to indicate
successful reset.
S tep 1 : M eth od 1 : Short press
Reset button 4 times (or
reset power of the device 4
times) to start Touchlink
commissioning immediately,
180S timeout, repeat this step.
Method 2 : R eset power of the
device, Touchlink
commissioning will start after
15S if it’s not added to a z igbee
network, 165S timeout. Or
start immediately if it’s alrea dy
added to a network, 180S
timeout. Once timeout, repeat
this step.
Step 4: There shall be
indication on the remote for
successful link and connected
light will flash twice.
Zigbee
Remote < 10cm
Step 2: Bring the remote or
touch panel wi th i n 10cm of the
lighting device.
Step 3: Set the remote or
touch panel into Touchlink
commissioning,
please refer to corresponding
remote or touch panel manual
to learn how.
Note: 1 ) Direc tly Touc hLin k ( both n ot added to a Z igB ee n etwork), e ach d evic e c an l i n k with 1 r emote.
2 ) Tou c h Link after both added to a Z igB ee n etwork, e ac h d evic e c an l in k w ith m ax . 3 0 remotes .
3 ) To c ontrol b y b o th g ateway & r emo te, add r emo te an d d evic e to n etwo rk firs t then Tou c hLin k.
4 ) After Touc hLi nk, th e d evic e c an b e c ontroll ed by the l inked r emo tes .
6. F ac to ry R es et Manu ally
Step 2: Connected light
will blink 3 times to
indicate successful reset.
Step 1 : S hort press “R eset.
key for 5 times continuously
or reset power of the device
for 5 times continuously if
the “Reset” key is not
accessible.
Note: 1 ) If the d evic e i s a lready at fac tory
defau lt s etting, th ere i s n o i ndic atio n
when fac tory r es et again .
2 ) All c on figu ration p arameters w ill
be r es et after the d evi c e i s r es et or
remo ved from th e n etwork.
7 . F ac tory R es et throu gh a Zigbee Remote ( Tou c h R es et)
Note: Make sure the device already added to a network, the remote added to the same one or not added to any
network.
Step 1 : R eset power of the
device to start TouchLink
Commissioning, 180
seconds timeout, repeat
this step.
Step 4: There shall be indication
on the remote and connected light
flashes 3 times for successful
reset.
Zigbee
Remote < 10cm
Step 2: Bring the remote or touch
panel within 10cm of the lighting
device.
Step 3: Set the remote or touch
panel into Touch Reset procedure
to reset the device, please refer to
corresponding remote or touch
panel manual to learn how.
8. F ind and B ind Mode
Step 1 : S hort press “R eset.
button 3 times (Or reset
power of the device (initiator
node) 3 times) to start Find
and Bind mode (connected
light flashes slowly) to find
and bind target node, 180
seconds timeout, repeat this
step.
Zigbee
Remote
Step 2: S et the remote or touch
panel (target node) into find
and bind mode, and enable it
to find and bind initiator, please
refer to corresponding remote
or touch panel manual.
Step 3: There shall be
indication on the remote or
touch panel that it bind the
device successfully and can
control it then.
Note: M ake s ure the d evic e and remo te already added to the s ame z igbee n etwork.
9. L earning to a Z igbee G reen P ower S witc h
Step 1 : S hort press “R eset.
button 4 times (Or reset
power of the device 4 times)
to start Learning to GP
switch mode (connected
light flashes twice), 180
seconds timeout, repeat this
step.
Zigbee
Green Power
Switch
Step 2: Set the green power
switch into Learning mode,
please refer to its manual.
Step 3: Connected light will
flash twice to indicate
successful learning. Then the
switch can control the device.
Note: E ac h d evic e c an l earn to m ax. 2 0 zi gbee g reen p ower s witc h es .
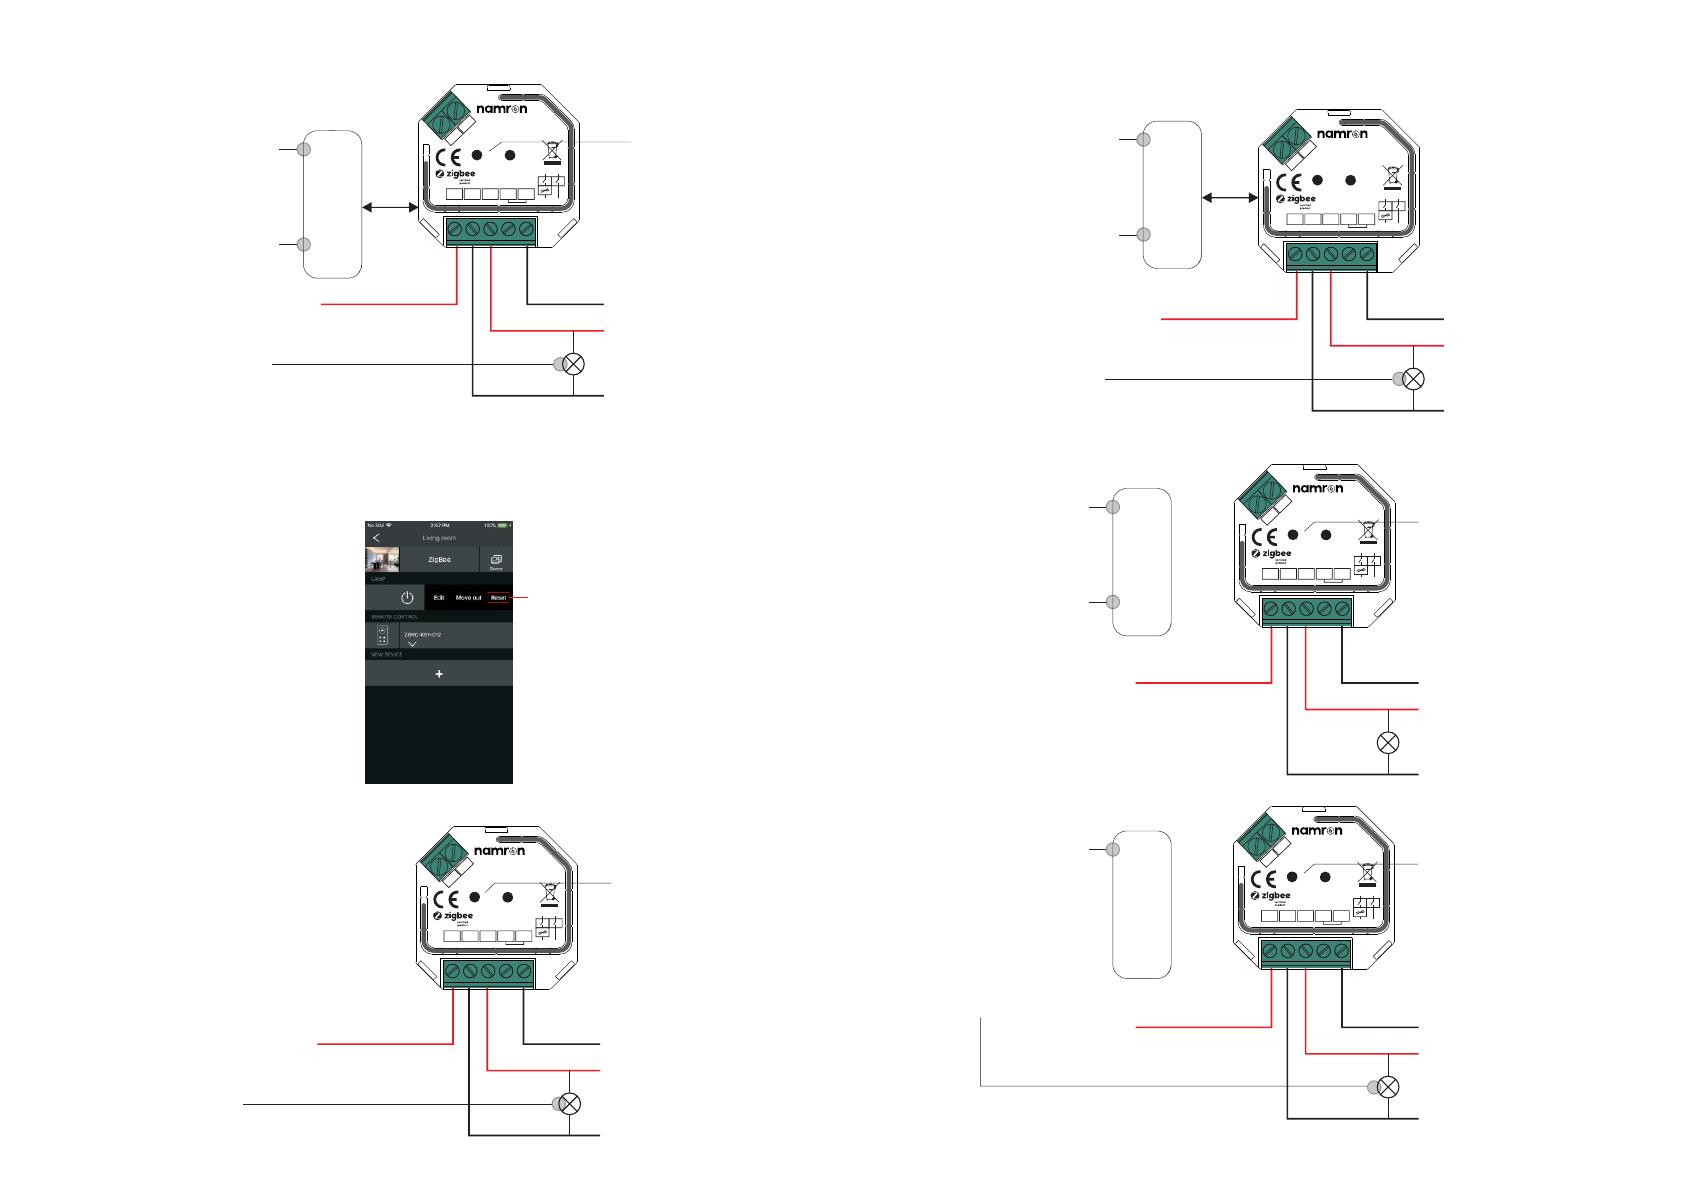
Lin Nin
Lout
Nout
Lin Nin
Lout
Nout
Lin Nin
Lout
Nout
Lin Nin
Lout
Nout
Lin Nin
Lout
Nout
Mi n. S e t
Ratings:100-240V~,50/60Hz,
MAX:1.8A
Reset
S
COM
LoutNoutLin NinNin
Lin Nin
Lout Nout
4512746
SR-ZG9101SAC-HP-CLN
Mi n. S e t
Ratings:100-240V~,50/60Hz,
MAX:1.8A
Reset
S
COM
LoutNoutLin NinNin
Lin Nin
Lout Nout
4512746
SR-ZG9101SAC-HP-CLN
Mi n. S e t
Ratings:100-240V~,50/60Hz,
MAX:1.8A
Reset
S
COM
LoutNoutLin NinNin
Lin Nin
Lout Nout
4512746
SR-ZG9101SAC-HP-CLN
Mi n. S e t
Ratings:100-240V~,50/60Hz,
MAX:1.8A
Reset
S
COM
LoutNoutLin NinNin
Lin Nin
Lout Nout
4512746
SR-ZG9101SAC-HP-CLN
Mi n. S e t
Ratings:100-240V~,50/60Hz,
MAX:1.8A
Reset
S
COM
LoutNoutLin NinNin
Lin Nin
Lout Nout
4512746
SR-ZG9101SAC-HP-CLN
11 . S etu p a Z igbee Network & Add Other Devic es t o the Network ( No C oordinator R equ ired)
Step 1 : Short press “R eset.
button 4 times (Or reset
power of the device 4 times)
to enable the device to setup
a z igbee network (connected
light flashes twice) to
discover and add other
devices, 180 seconds
timeout, repeat this step.
Zigbee
Remote
Step 2: Set another device or remote or touch panel into network pairing mode and pair to the network, refer to
their manuals.
Step 3: Pair more devices and remotes to the network as you would like, refer to their manuals.
Step 4: Bind the added devices and remotes through Touchlink so that the devices can be controlled by the
remotes, refer to their manuals.
< 10cm
TouchLink
1 0. Delete L earning to a Z igbee G reen P ower S witc h
Step 1 : S hort press “R eset.
button 3 times (Or reset
power of the device 3 times)
to start delete Learning to GP
switch mode (connected light
flashes slowly), 180 seconds
timeout, repeat this step.
Zigbee
Green Power
Switch
Step 2: Set the paired green
power switch into Learning
mode, please refer to its manua l.
Step 3: Connected light will
flash 4 times to indicate
successful deleting.
Note: 1 ) E ach added d evic e c an l ink an d b e c ontrolled b y m ax . 3 0 added r emotes .
2 ) E ach added remote c an l i nk an d c ontrol m ax. 3 0 added d evic es .
1 2. O TA
The device supports firmware updating through OTA, and will acquire new firmware from zigbee controller or
hub every 10 minutes a utomatically.
13.Setting minimum brightness:
Adjust brightness to a desired level from zigbee hub or controller interface or a remote, then press and hold down “Min.
Set ” key until connected light flashes, the minimum dimming level is set successfully, then the connected load can only
be dimmable between this minimum brightness and 100% brightness.
The dimming range of this dimmer is 1%-100%, but some load types may flicker when dimmed to 1%, thus a
minimum brightness shall be set higher than 1% to avoid flickering during dimming process.
14.Delete the minimum brightness:
Adjust the brightness to 100% from zigbee hub or controller interface or a remote, then press and hold down the “Min.
Set” key on the dimmer until connected light flashes, which means minimum brightness is deleted successfully.
15.Set Startup Brightness
Step 1: adjust the brightness of connected load to a desired level between 1%-50%.
Step 2: double click “Min. set” key to set the brightness adjusted in step 1 as startup brightness, then the load will first go
to startup brightness when turned on every time, then drop down to the brightness before last time turned off.
Note: startup brightness setting function is to avoid the phenomenon that some dimmable LED drivers can not be turned
on after turned off at a very low brightness level. Once setting a startup brightness, if the startup brightness is higher than
the brightness before turned off, the driver will first go to the startup brightness after turned on then drop down to the
level before turned off. If the startup brightness is lower than the brightness before tured off, the driver will directly go to
the brightness before turned off.
16.Delete Startup Brightness
Step 1 : adjust the brightness of connected load to 0%.
Step 2 : double click “Min. set” key to delete the previously set startup brightness.
17.Controlled by a push switch:
Once connected with a push switch, click the push switch to switch ON/OFF, press and hold down it to
increase/decrease light intensity.
Lin Nin
Lout
Nout
Lin Nin
Lout
Nout
Wiring diagram
Notes f o r the d i agrams :
Lin - termina l for live lead input
Nin - terminal for neutral lead input
Lout - terminal for live lead output
Nout - terminal for neutral lead output
S1 - terminal for switch (has the option of entering the device in inclusion/exclusion mode)
COM - terminal for grounding to the switch connected to the dimmer
1 ) With S ingle P u s h S wi tc h
PUSH
Lin
NOTE : Switch connected to the S1 terminal activates the basic functionality of the dimmer (turning the light
on/off, dimming) .
PUSH
With PUSH LV With PUSH
Nin
Lout
Nout
Lin Nin
Lout
Nout
Mi n. S e t
Ratings:100-240V~,50/60Hz,
MAX:1.8A
Reset
S
COM
LoutNoutLin NinNin
Lin Nin
Lout Nout
4512746
SR-ZG9101SAC-HP-CLN
Min.Set
Ratings:100-240V~,50/60Hz,
MAX:1.8A
Reset
S
COM
LoutNoutLin NinNin
Lin Nin
Lout Nout
4512746
SR-ZG9101SAC-HP-CLN
Mi n. S e t
Ratings:100-240V~,50/60Hz,
MAX:1.8A
Reset
S
COM
LoutNoutLin NinNin
Lin Nin
Lout Nout
4512746
SR-ZG9101SAC-HP-CLN
Mi n. S e t
Ratings:100-240V~,50/60Hz,
MAX:1.8A
Reset
S
COM
LoutNoutLin NinNin
Lin Nin
Lout Nout
4512746
SR-ZG9101SAC-HP-CLN
Min.Set
Ratings:100-240V~,50/60Hz,
MAX:1.8A
Reset
S
COM
LoutNoutLin NinNin
Lin Nin
Lout Nout
4512746
SR-ZG9101SAC-HP-CLN
2) With Mu ltiple P u s h S witc hes f or Multiple C ontrol P oints
This phase dimmer adopts leading edge dimming (forward phase control) or trailing edge dimming (reverse
phase control), two versions are available for choosing, default factory setting is trailing edge, leading edge
version available upon request. Please make sure the connected loads support the control type you choose.
Please refer to the user manual of the load or consult the supplier of the load.
Note:
1) T he max. allowed LED drivers or LED
luminaries in parallel, please
.
2) The recommended number of parallel connected drivers or
inrush current of this dimmer is cold start 75A, when connecting
make sure that the total inrush current of the parallel connected drivers or
luminaries do not exceed the max. allowed inrush current of this dimmer
luminaries shall not be more tha n 10, otherwise
the dimmer may be damaged due to the high inrush current at the moment of starting.
With P US H LV
With P US H
Live
Neutral
Produ c t Dimens ion
45.5 mm
20.3 mm
45 mm
Mi n. S e t
Ratings:100-240V~,50/60Hz,
MAX:1.8A
Reset
S
COM
LoutNoutLin NinNin
Lin Nin
Lout Nout
4512746
SR-ZG9101SAC-HP-CLN
Min.Set
Ratings:100-240V~,50/60Hz,
MAX:1.8A
Reset
S
COM
LoutNoutLin NinNin
Lin Nin
Lout Nout
4512746
SR-ZG9101SAC-HP-CLN
Importer:
Namron AS
Nedre kalbakkvei 88B
1081 Olso
Norway
Made in China
  • Page 1 1
  • Page 2 2
  • Page 3 3
  • Page 4 4

NAMRON 4512746 Manuale utente

Categoria
Dimmer
Tipo
Manuale utente

in altre lingue