LD Systems Maui 44 G2 Manuale utente
- Categoria
- Set di altoparlanti
- Tipo
- Manuale utente

USER´S MANUAL
BEDIENUNGSANLEITUNG
MANUEL D´UTILISATION
MANUAL DE USUARIO
INSTRUKCJA OBSŁUGI
MANUALE D´USO
MAUI
®
44 G2
PROFESSIONAL COLUMN PA SYSTEM
LDMAUI44G2
SUBWOOFER EXTENSION
LDMAUI44G2SUB

CONTENTS / INHALTSVERZEICHNIS / CONTENU / CONTENIDO / TREŚĆ / CONTENUTO
ENGLISH
SAFETY INFORMATION 3
INTRODUCTION 4
ASSEMBLY, CONNECTION AND OPERATION 5
CONNECTIONS, OPERATING AND DISPLAY ELEMENTS 6
WIRING EXAMPLES 9
OPTIONAL ACCESSORIES 12
TECHNICAL DATA 12
MANUFACTURER´S DECLARATIONS 14
DEUTSCH
SICHERHEITSHINWEISE 15
EINLEITUNG 16
AUFBAU, ANSCHLUSS UND INBETRIEBNAHME 17
ANSCHLÜSSE, BEDIEN- UND ANZEIGEELEMENTE 18
VERKABELUNGSBEISPIELE 21
OPTIONALES ZUBEHÖR 24
TECHNISCHE DATEN 24
HERSTELLERERKLÄRUNGEN 26
ESPAÑOL
MEDIDAS DE SEGURIDAD 39
INTRODUCCIÓN 40
MONTAJE, CONEXIÓN Y PUESTA EN MARCHA 41
CONEXIONES, ELEMENTOS DE MANEJO Y ELEMENTOS DE VISUALIZACIÓN 42
EJEMPLOS DE CABLEADO 45
ACCESORIOS OPCIONALES 48
DATOS TÉCNICOS 48
DECLARACIÓN DEL FABRICANTE 50
ESPAÑOL
MEDIDAS DE SEGURIDAD 39
INTRODUCCIÓN 40
MONTAJE, CONEXIÓN Y PUESTA EN MARCHA 41
CONEXIONES, ELEMENTOS DE MANEJO Y ELEMENTOS DE VISUALIZACIÓN 42
EJEMPLOS DE CABLEADO 45
ACCESORIOS OPCIONALES 48
DATOS TÉCNICOS 48
DECLARACIÓN DEL FABRICANTE 50
POLSKI
ŚRODKI OSTROŻNOŚCI 51
WPROWADZENIE 52
MONTAŻ, PODŁĄCZANIE I URUCHAMIANIE 53
PRZYŁĄCZA, ELEMENTY STERUJĄCE I WSKAŹNIKI 54
PRZYKŁADY OKABLOWANIA 57
AKCESORIA OPCJONALNE 58
DANE TECHNICZNE 58
DEKLARACJE PRODUCENTA 60
ITALIANO
MISURE PRECAUZIONALI 61
INTRODUZIONE 62
INSTALLAZIONE, CONNESSIONE E MESSA IN FUNZIONE 63
RACCORDI, ELEMENTI DI COMANDO E DI VISUALIZZAZIONE 64
ESEMPI DI CABLAGGIO 67
ACCESSORI OPZIONALI 70
DATI TECNICI 70
DICHIARAZIONI DEL PRODUTTORE 72

3
DEUTSCHFRANCAIS
ESPAÑOL
ENGLISH
ITALIANO POLSKI
ENGLISH
YOU‘VE MADE THE RIGHT CHOICE!
We have designed this product to operate reliably over many years. LD Systems stands for this with its name and many years of experience
as a manufacturer of high-quality audio products. Please read this User‘s Manual carefully, so that you can begin making optimum use of
your LD Systems product quickly.
You can nd more information about LD-SYSTEMS at our Internet site WWW.LD-SYSTEMS.COM
SAFETY INFORMATION
1. Please read these instructions carefully.
2. Keep all information and instructions in a safe place.
3. Follow the instructions.
4. Observe all safety warnings. Never remove safety warnings or other information from the equipment.
5. Use the equipment only in the intended manner and for the intended purpose.
6. Use only sufciently stable and compatible stands and/or mounts (for xed installations). Make certain that wall mounts are properly
installed and secured. Make certain that the equipment is installed securely and cannot fall down.
7. During installation, observe the applicable safety regulations for your country.
8. Never install and operate the equipment near radiators, heat registers, ovens or other sources of heat. Make certain that the equipment
is always installed so that is cooled sufciently and cannot overheat.
9. Never place sources of ignition, e.g., burning candles, on the equipment.
10. Ventilation slits must not be blocked.
11. Keep a minimum distance of 20 cm around and above the device.
12. Do not use this equipment in the immediate vicinity of water (does not apply to special outdoor equipment - in this case, observe the
special instructions noted below. Do not expose this equipment to ammable materials, uids or gases. Avoid direct sunlight!
13. Make certain that dripping or splashed water cannot enter the equipment. Do not place containers lled with liquids, such as vases or
drinking vessels, on the equipment.
14. Make certain that objects cannot fall into the device.
15. Use this equipment only with the accessories recommended and intended by the manufacturer.
16. Do not open or modify this equipment.
17. After connecting the equipment, check all cables in order to prevent damage or accidents, e.g., due to tripping hazards.
18. During transport, make certain that the equipment cannot fall down and possibly cause property damage and personal injuries.
19. If your equipment is no longer functioning properly, if uids or objects have gotten inside the equipment or if it has been damaged in
anot her way, switch it off immediately and unplug it from the mains outlet (if it is a powered device). This equipment may only be repaired
by authorized, qualied personnel.
20. Clean the equipment using a dry cloth.
21. Comply with all applicable disposal laws in your country. During disposal of packaging, please separate plastic and paper/cardboard.
22. Plastic bags must be kept out of reach of children.
23. Please note that changes or modications not expressly approved by the party responsible for compliance could void the user´s
authority to operate the equipment.
FOR EQUIPMENT THAT CONNECTS TO THE POWER MAINS
24. CAUTION: If the power cord of the device is equipped with an earthing contact, then it must be connected to an outlet with a protective
ground. Never deactivate the protective ground of a power cord.
25. If the equipment has been exposed to strong uctuations in temperature (for example, after transport), do not switch it on immediately.
Moisture and condensation could damage the equipment. Do not switch on the equipment until it has reached room temperature.
26. Before connecting the equipment to the power outlet, rst verify that the mains voltage and frequency match the values specied on
the equipment. If the equipment has a voltage selection switch, connect the equipment to the power outlet only if the equipment values
and the mains power values match. If the included power cord or power adapter does not t in your wall outlet, contact your electrician.
27. Do not step on the power cord. Make certain that the power cable does not become kinked, especially at the mains outlet and/or power
adapter and the equipment connector.
28. When connecting the equipment, make certain that the power cord or power adapter is always freely accessible. Always disconnect the
equipment from the power supply if the equipment is not in use or if you want to clean the equipment. Always unplug the power cord and
power adapter from the power outlet at the plug or adapter and not by pulling on the cord. Never touch the power cord and power adapter
with wet hands.
29. Whenever possible, avoid switching the equipment on and off in quick succession because otherwise this can shorten the useful life of
the equipment.
30. IMPORTANT INFORMATION: Replace fuses only with fuses of the same type and rating. If a fuse blows repeatedly, please contact an
authorised service centre.
31. To disconnect the equipment from the power mains completely, unplug the power cord or power adapter from the power outlet.
32. If your device is equipped with a Volex power connector, the mating Volex equipment connector must be unlocked before it can be
removed. However, this also means that the equipment can slide and fall down if the power cable is pulled, which can lead to personal
injuries and/or other damage. For this reason, always be careful when laying cables.

4
ITALIANO
POLSKI
ESPAÑOL
FRANCAIS
DEUTSCH
ENGLISH
33. Unplug the power cord and power adapter from the power outlet if there is a risk of a lightning strike or before extended periods
of disuse.
34. The appliance is not to be used by persons (including children) with reduced physical, sensory or mental capabilities, or lack of experience
and knowledge.
35. Children must be instructed not to play with the device.
36. If the power cord of the device is damaged, do not use the device. The power cord must be replaced by an adequate cable or assembly from an
authorized service center.
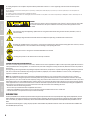
CAUTION:
To reduce the risk of electric shock, do not remove cover (or back). There are no user serviceable
parts inside. Maintenance and repairs should be exclusively carried out by qualied service
personnel.
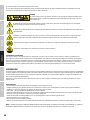
The warning triangle with lightning symbol indicates dangerous uninsulated voltage inside the unit, which may cause an
electrical shock.
The warning triangle with exclamation mark indicates important operating and maintenance instructions.
Warning! This symbol indicates a hot surface. Certain parts of the housing can become hot during operation. After use, wait for
a cool-down period of at least 10 minutes before handling or transporting the device.
Warning! This device is designed for use below 2000 metres in altitude.
Warning! This product is not intended for use in tropical climates.
CAUTION! HIGH VOLUMES IN AUDIO PRODUCTS!
This device is meant for professional use. Therefore, commercial use of this equipment is subject to the respectively applicable national ac-
cident prevention rules and regulations. As a manufacturer, Adam Hall is obligated to notify you formally about the existence of potential
health risks.
Hearing damage due to high volume and prolonged exposure: When in use, this product is capable of producing high sound-pressure levels
(SPL) that can lead to irreversible hearing damage in performers, employees, and audience members. For this reason, avoid prolonged
exposure to volumes in excess of 90 dB.
NOTE: This equipment has been tested and found to comply with the limits for a Class B digital device, pursuant to Part 15 of the FCC
Rules. These limits are designed to provide reasonable protection against harmful interference in a residential installation. This equip-
ment generates, uses and can radiate radio frequency energy and, if not installed and used in accordance with the instructions, may cause
harmful interference to radio communications. However, there is no guarantee that interference will not occur in a particular installation.
If this equipment does cause harmful interference to radio or television reception, which can be determined by turning the equipment off
and on, the user is encouraged to try to correct the interference by one or more of the following measures:
– Reorient or relocate the receiving antenna.
– Increase the separation between the equipment and receiver.
– Connect the equipment into an outlet on a circuit different from that to which the receiver is connected.
– Consult the dealer or an experienced radio/TV technician for help.
INTRODUCTION
The LD Systems MAUI 44 G2 column PA system has been designed for professional use. The PA system provides high-quality components, DSP-con-
trolled ampliers and a balanced sound across the entire frequency spectrum. The digital signal processing of the LD LECC DSP includes functions
such as crossover, EQ, compressor and limiter, and has been tailored to the MAUI 44 G2 PA system to ensure optimum audio performance at all
times.
The system has been designed as a plug and play system. It comes without any additional cables or stands and can therefore be assembled and
disassembled quickly and easily.

5
DEUTSCHFRANCAIS
ESPAÑOL
ENGLISH
ITALIANO POLSKI
FEATURES
• Professional column PA system with 1500 W RMS and 132 dB max. SPL
• Cardioid column for controlled low- and mid-range frequency dispersion and cardioid subwoofer application (with additional subwoofer)
• TrueWireless™ stereo technology for wireless stereo pairing of two column systems
• aptX™ coding and advanced audio coding (AAC) for high-resolution Bluetooth® streaming
• BEM-optimized high-frequency waveguide for uniform dispersion pattern, phase plug for coherent mid-range wavefront and ow-optimised
bass-reex ports
• DynX® DSP technology for distortion-free sound at maximum volume
• Automatic setup detection
• Fast and simple assembly without stands or cables
• Rugged subwoofer housing made out of polyurea-coated birch plywood and lightweight, powder-coated aluminium column
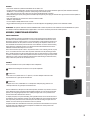
PLEASE NOTE: The optional subwoofer extension LDMAUI44G2SUB is technically identical to the subwoofer from the LDMAUI44G2 PA system.
The subwoofer extension LDMAUI44G2SUB is supplied with a cover for the connection panel for the column speakers.
A
B
C
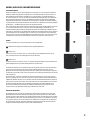
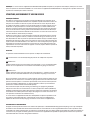
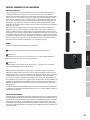
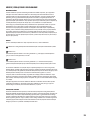
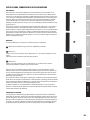
GENERAL INFORMATION
Both the subwoofer of the LD Systems MAUI 44 G2 PA system and the optional subwoofer exten-
sion MAUI 44 G2 SUB must be positioned on a at surface on their rubber feet before use. Never
operate the system on a trolley as there is a risk that the entire system may begin to move in an
uncontrolled manner. This may result in accidents and damage. The amplier is cooled via the
heat sink below the connection panel on the back of the subwoofer. To ensure sufcient cooling
during operation, a minimum distance of 50 cm must be maintained between the back of the
subwoofer and other similar objects such as walls.
Please ensure that the system as well as any connected devices such as mixing consoles, CD play-
ers etc. are connected to the correct audio and power connections. Use only undamaged cables
with a suitable diameter and always unroll cable reels fully. Use cable protectors to avoid tripping
accidents caused by loose cables. Never position the device directly on an edge. Do not place the
subwoofer on a table. In order to eliminate unwanted noise when turning on connected devices,
always switch the system on last and switch it off rst.
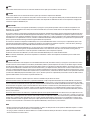
ASSEMBLY
The LD Systems MAUI 44 G2 PA system comprises three components:
A
Subwoofer with integrated electronics for all system components.
B
MAUI 44 G2 LC:
Lower vertical array column with six 3.5" speakers, each with a multipin connector on the
top and bottom and a guide pin on the underside.
C
MAUI 44 G2 U:
The upper vertical array column with six 3.5” loudspeakers with phase plug, tweeters and
a multi-pin connector and guide pins on the bottom side.
After the subwoofer has been placed in the desired position, the lower array column is attached
to the subwoofer. Rugged guide pins help the multipin connectors on each speaker to interlock
perfectly. Two strong magnets provide extra stability. The upper vertical array column is then
attached to the lower column in the same way.
To simplify transport, set-up and dismantling, two ergonomic handles are located on the sides of
the subwoofer and an optionally available castor board (LDM44G2CB) can be installed on the back
that also provides protection for the connection panel and controls during transport. Recessed
handles are located on the top and underside of the array columns.
The optional MAUI 44 G2 SUB subwoofer extension is positioned next to the MAUI 44 G2 PA system.
The orientation of the subwoofer extension depends on whether the cardioid preset in the
subwoofer extension is used or not.
ASSEMBLY, CONNECTION AND OPERATION

6
ITALIANO
POLSKI
ESPAÑOL
FRANCAIS
DEUTSCH
ENGLISH
CONNECTION AND OPERATION
A playback device can be connected via the balanced XLR inputs. The integrated Bluetooth module enables wireless control via smartphone or tab-
let. There is also a stereo link function for wireless transmission of the Bluetooth signal to another MAUI 44 G2 PA system as a stereo extension. Both
the volume of the entire system as well as the volume of subwoofer relative to the overall volume can be adjusted on the device. An optionally
available subwoofer extension can be used in two different setups together with the MAUI 44 G2 PA system.
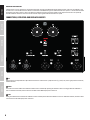
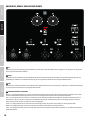
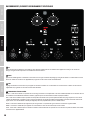
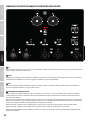
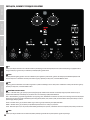
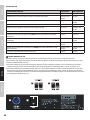
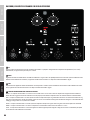
CONNECTIONS, OPERATING AND DISPLAY ELEMENTS
2
3
4
7
8
9
1
5 6
1
IN
Balanced line stereo input with two 3-pin female XLR sockets for connection of a playback device (e.g. mixer). Any stereo signal present is internally
summed to mono.
2
MAIN
Level control for overall volume. The subwoofer volume level is controlled by adjusting the SUB level control accordingly. When the subwoofer is
used as subwoofer extension, the level control is disabled and the MAIN display eld is turned off.
3
SUB
Setting the volume balance between the subwoofer and the column speaker. When the subwoofer is used as subwoofer extension, the level control
is deactivated and the SUB display eld is turned off.

7
DEUTSCHFRANCAIS
ESPAÑOL
ENGLISH
ITALIANO POLSKI
4
SYSTEM STATUS DISPLAY
PROTECT – The display eld lights up if the system is overloaded/overheating. The ampliers are then muted automatically. After reaching normal
operating conditions, the unit returns to the normal operating mode after a few minutes.
LIMIT – The display eld lights up if the speaker system is being operated in its upper limit range. Brief illumination of the LED is not critical. To
protect the system, any excessive signal level is lowered smoothly by the integrated limiter. If the limiter LED remains lit for longer or permanently,
reduce the volume level.
SIGNAL – The display eld lights up when the device is receiving an audio signal. The signal is received before the MAIN level control.
POWER – The display eld lights up when the device is properly connected to the mains and switched on.
SLAVE – The display eld lights up when the columns are detached from the system and the subwoofer can be used as a subwoofer extension.
5
THRU
Balanced stereo line output with two male 3-pin XLR sockets for sending the input signal.
6
SUB OUT
Balanced line output with male 3-pin XLR socket for control of the subwoofer extension.
Subwoofer extension: Use either line input L or R for signal control. Both MAIN and SUB level controls and the Bluetooth unit with TWS are disabled if
the MAUI 44 G2 subwoofer is used as a subwoofer extension. A description of the cardioid set-up can be found under point 9 CARDIOID ON/OFF.
7
HOLD TO LINK
The MAUI 44 G2 PA system is equipped with Bluetooth, which means that audio les from a Bluetooth playback device (e.g. smartphone or tablet)
can be played back on the MAUI 44 G2 PA (maximum distance between the two devices depends on the surroundings).
To pair and connect the internal Bluetooth unit with a Bluetooth playback device, press and hold the HOLD TO LINK button for approximately 3
seconds until the Bluetooth display eld above the button ashes rhythmically (approx. 3 Hz). Enable Bluetooth on your playback device and search
on the user interface for available devices. Select “MAUI 44 G2” and pair your Bluetooth device with the Bluetooth unit of the MAUI 44 G2 PA system. If
successfully paired, the Bluetooth symbol will light up permanently and playback can be started. The volume is controlled via the MAIN level control
or on the playback device.
To disconnect a Bluetooth device and set the Bluetooth unit back to standby, press and hold the HOLD TO LINK button again for approximately 3
seconds. To delete the entire list of paired devices (= factory default), press and hold the HOLD TO LINK and STEREO LINK buttons simultaneously for
approximately 2 seconds.
If the Bluetooth connection is interrupted (e.g. range is exceeded), the Bluetooth LED will go out. Connection can be restored automatically within
approx. 90 seconds (Bluetooth device back in range). After 90 seconds, the connection can be restored with the Bluetooth playback device (connect
paired device).
When using a single MAUI 44 G2 PA system, any stereo signal is automatically summed to mono in the Bluetooth module.
Note: The Bluetooth and TWS functions are not available if the subwoofer is used as a subwoofer extension for an existing MAUI 44 G2 PA system.
8
STEREO LINK / TWS
The MAUI 44 G2 PA system is equipped with a Bluetooth stereo link function (true wireless stereo), which means that if two MAUI 44 G2 systems
are used, stereo audio signals transmitted via Bluetooth can also be played back in stereo without a cable connection between the two systems
(the maximum distance between the two devices is 40 metres under optimal conditions). The system that is connected to the Bluetooth playback
device is hereinafter referred to as the master unit, the stereo expansion as a slave unit. If the master unit with the Bluetooth playback device
is connected to the slave unit, the Bluetooth display eld and the TWS display eld on the master unit light up permanently. If connection is
successfully established between the slave unit and the master unit, the TWS display eld on the slave unit lights up permanently and the Blue-
tooth display eld ashes slowly (approximately 0.3 Hz). During the pairing process, the TWS display elds on both systems ash rhythmically at a
frequency of about 3 Hz.
Depending on the situation, there are two different methods to pair two MAUI 44 G2 PA systems via TWS:
Situation A. Stereo system with 2 x MAUI 44 G2 and 1x Bluetooth playback device: Pair a Bluetooth playback device with the left MAUI 44 G2 system.
The left-hand system automatically becomes the master unit. Disconnect all existing Bluetooth connections on the right-hand MAUI 44 G2 (press
and hold HOLD TO LINK and STEREO LINK simultaneously for approximately 2 seconds). Now pair the right MAUI 44 G2 system with the master unit by
pressing and holding the STEREO LINK button on both devices for approximately 3 seconds within 30 seconds. The right-hand system automatically
becomes the slave unit (max. distance when pairing 15 m). The master unit transmits the left channel of the stereo signal from the Bluetooth device
and the slave unit the right channel.
Situation B. Stereo system with 2 x MAUI 44 G2, pair Bluetooth playback device later: Disconnect all existing Bluetooth connections on the slave unit
by simultaneously pressing and holding the HOLD TO LINK and STEREO LINK buttons on the slave unit for approximately 2 seconds. When pairing two
MAUI 44 G2 systems, ensure that the distance between the systems is no more than 15 metres. Press and hold the STEREO LINK button on the master
unit for approximately 3 seconds and press the STEREO LINK button twice in quick succession on the slave unit. Pairing occurs place automatically
within approximately 30 seconds. Pairing a Bluetooth playback device with the master unit can now be done later. The master unit transmits the
left channel of the stereo signal from a Bluetooth playback device and the slave unit the right channel.

8
ITALIANO
POLSKI
ESPAÑOL
FRANCAIS
DEUTSCH
ENGLISH
PLEASE NOTE:
• Only audio signals from a paired Bluetooth playback device can be transmitted via the TWS stereo link function. Audio signals at the line input will
not be transmitted via TWS.
• When the MAUI 44 G2 systems have been switched off and back on, the Bluetooth playback device will pair automatically and the systems will
connect with each other automatically via TWS.
• The maximum number of paired Bluetooth devices is 8 (including paired MAUI 44 G2 systems). If another device is paired, the last entry from the
list of stored devices will be deleted. A maximum of one Bluetooth playback device and one MAUI 44 G2 system can be connected simultaneously
with the MAUI 44 G2 master unit to create a stereo extension.
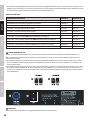
Bluetooth and TWS status
Bluetooth and stereo link status Bluetooth LED STEREO LINK LED
Pair Bluetooth unit with playback device Flashes (3 Hz) off
Bluetooth unit is paired and connected only with playback device on permanently off
Pair Bluetooth unit with playback device (as stereo link – master) Flashes (3 Hz) on permanently
Pair slave unit – stereo link to master unit Flashes (0,3 Hz) Flashes (3 Hz)
Slave unit – stereo link paired with master unit Flashes (0.3 Hz) on permanently
Slave unit – slave unit paired but not connected Flashes (0.3 Hz) off
Pair master unit - stereo link pairing without Bluetooth connection to playback device off Flashes (3 Hz)
Master unit connected to slave unit but without Bluetooth connection to playback device off on permanently
Master unit – stereo link pairing with Bluetooth connection to playback device on permanently Flashes (3 Hz)
Master unit connected to slave unit with Bluetooth connection to playback device on permanently on permanently
Neither Bluetooth nor stereo link connection off off
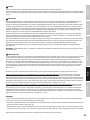
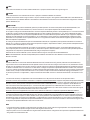
9
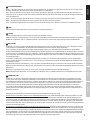
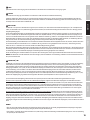
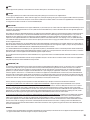
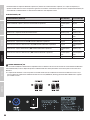
CARDIOID SUBWOOFER ON / OFF
Note: The cardioid subwoofer feature is only available when the loudspeaker columns are not connected to the MAUI 44 G2 subwoofer.
MAIN / SLAVE operation: The optionally available MAUI 44 G2 SUB subwoofer extension can be used with the MAUI 44 G2 PA system in two different ways.
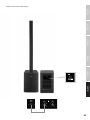
A. The subwoofer extension is positioned in the same orientation as the subwoofer of the MAUI 44 G2 PA system. In this case, the cardioid preset on
the subwoofer extension must be disabled (CARDIOID OFF). Press and hold the CARDIOID button for about 2 seconds to change status.
A. The subwoofer extension is positioned 180° to the subwoofer of the MAUI 44 G2 PA system. In this case, the cardioid preset must be enabled
(CARDIOID ON). Press and hold the CARDIOID button for about 2 seconds to change status. The cardioid set up results in more prominent bass
dispersion at the front and a clearer stage sound at the rear due to extensive low-frequency cancellation.
A B
10
11

9
DEUTSCHFRANCAIS
ESPAÑOL
ENGLISH
ITALIANO POLSKI
10
POWER INPUT
Neutrik powerCON mains input socket. A suitable power cable is included.
11
POWER
On–off switch for power supply to the device. Safe disconnection from the power supply is achieved only by pulling the mains plug.
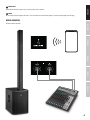
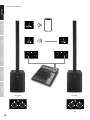
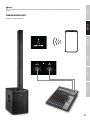
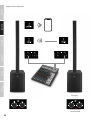
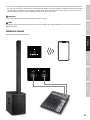
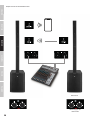
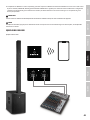
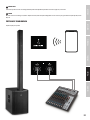
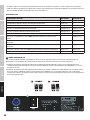
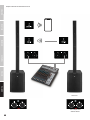
WIRING EXAMPLES
Example of mono operation

10
ITALIANO
POLSKI
ESPAÑOL
FRANCAIS
DEUTSCH
ENGLISH
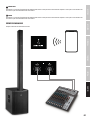
Example of stereo operation
Master unit Slave unit
Same settings as main
unit

11
DEUTSCHFRANCAIS
ESPAÑOL
ENGLISH
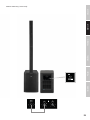
ITALIANO POLSKI
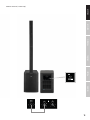
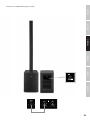
Subwoofer extension (cardioid setup):

12
ITALIANO
POLSKI
ESPAÑOL
FRANCAIS
DEUTSCH
ENGLISH
OPTIONAL ACCESSORIES
LDMAUI44G2SUB
Subwoofer extension
LDM44G2CB
Castor board for subwoofer
LDM44G2SUBPC
Cover for subwoofer
LDM44G2SATBAG
Transport bag for columns
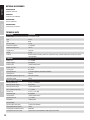
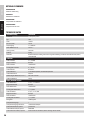
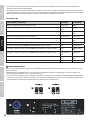
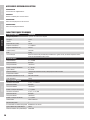
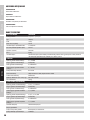
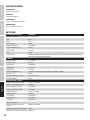
TECHNICAL DATA
Model name: LDMAUI44G2
Product type PA Complete Systems
Type Active
Color Black
Max. SPL (Peak) 132 dB
Frequency response: 37–20,000 Hz
Dispersion angle (H x V): 120 x 25 °
Height (total) 2256 mm
Weight 47.6 kg
Features Bluetooth audio streaming, DSP-based signal processing, excellent dispersion characteristics, mono/
slave operation
Subwoofer
Woofer size 15" / 381 mm
Woofer magnet Neodymium
Woofer brand Custom-manufactured
Woofer voice coil 4" / 101 mm
Housing type Bass reex
Housing material 15 mm birch plywood, 18 mm birch plywood
Housing nish Polyurea
Subwoofer dimensions (W x H x D) 434 x 634 x 637 mm
Subwoofer weight 36.4 kg
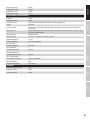
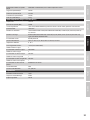
Mid/high-frequency system
Mid-range driver size 12 x 3.5" / 12 x 89 mm
Mid-range driver magnet Neodymium
Mid-range driver brand Custom-manufactured
Voice coil mid-range driver 1" / 25.4 mm
Tweeter size 4 x 0.5" / 4 x 12.7 mm
Tweeter magnet Neodymium
Tweeter brand Custom-manufactured
Tweeter voice coil 1" / 25.4 mm
Waveguide CD Waveguide
Speaker inputs 1
Speaker input connections Custom-made multipin
Housing type mid/hi system Closed
Housing material mid/hi system Aluminum
Housing nish mid/hi system High-density coated aluminium, multi-layered mesh fabric

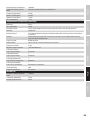
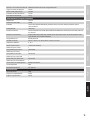
13
DEUTSCHFRANCAIS
ESPAÑOL
ENGLISH
ITALIANO POLSKI
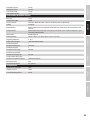
Width mid/hi system 103 mm
Height mid/hi system 1621 mm
Depth mid/hi system 135 mm
Weight mid/hi system 11.2 kg
Amplier module (built into subwoofer)
Amplier Class D
System power (RMS) 1500 W
Protective circuitry Short-circuit, multiband limiter, DC protection, overheating protection
Cooling Convection
Operating controls Bluetooth HOLD TO LINK button, Bluetooth STEREO LINK button, Cardioid On/Off, Main Level, Power On/
Off, Sub Level
Display indicators Bluetooth, Bluetooth STEREO LINK, Cardioid On/Off, Limit, Power, Protect (protection circuit active), Signal,
Slave Mode, Subwoofer Mode
Mains connection Neutrik powerCON
Operating voltage 100–120 V AC / 50–60 Hz, 220–240 V AC / 50–60 Hz
Ambient temperature 0 – 40°C
Relative air humidity <80% (non-condensing)
No. of line inputs 2
Line input connections XLR female
No. of line outputs 2
Line output connections XLR male
No. of line outputs SUB 1
Line output SUB connection XLR male
No. of speaker outputs 1
Speaker output connection Custom-made multipin
Bluetooth standard A2DP
Bluetooth audio decoder AAC, aptX, SBC
DSP features
Word width AD/DA converter 24 bit
Sampling frequency 48 kHz
Signal-to-noise ratio 106 dB

14
ITALIANO
POLSKI
ESPAÑOL
FRANCAIS
DEUTSCH
ENGLISH
MANUFACTURER´S DECLARATIONS
MANUFACTURER‘S WARRANTY & LIMITATIONS OF LIABILITY
You can nd our current warranty conditions and limitations of liability at: https://cdn-shop.adamhall.com/media/pdf/MANUFACTURERS-DECLARATIONS_
LD_SYSTEMS.pdf To request warranty service for a product, please contact Adam Hall GmbH, Adam-Hall-Str. 1,
61267 Neu Anspach / Email: [email protected] / +49 (0)6081 / 9419-0.
CORRECT DISPOSAL OF THIS PRODUCT
(valid in the European Union and other European countries with a differentiated waste collection system)
This symbol on the product, or on its documents indicates that the device may not be treated as household waste. This is to avoid environ-
mental damage or personal injury due to uncontrolled waste disposal. Please dispose of this product separately from other waste and have it
recycled to promote sustainable economic activity. Household users should contact either the retailer where they purchased this product, or their
local government ofce, for details on where and how they can recycle this item in an environmentally friendly manner. Business users should
contact their supplier and check the terms and conditions of the purchase contract. This product should not be mixed with other commercial waste
for disposal.
FCC STATEMENT
This device complies with Part 15 of the FCC Rules. Operation is subject to the following two conditions:
(1) This device may not cause harmful interference, and
(2) This device must accept any interference received, including interference that may cause undesired operation
EU DECLARATION OF CONFORMITY
Hereby, Adam Hall GmbH declares that this radio equipment type is in compliance with Directive 2014/53/EU.
The full text of the EU declaration of conformity is available at the following
internet address: www.adamhall.com/compliance/
CE Compliance
Adam Hall GmbH states that this product meets the following guidelines (where applicable):
R&TTE (1999/5/EC) or RED (2014/53/EU) from June 2017
Low voltage directive (2014/35/EU)
EMV directive (2014/30/EU)
RoHS (2011/65/EU)
The complete declaration of conformity can be found at www.adamhall.com.
Furthermore, you may also direct your enquiry to [email protected].

15
DEUTSCHFRANCAIS
ESPAÑOL
ENGLISH
ITALIANO POLSKI
DEUTSCH
SIE HABEN DIE RICHTIGE WAHL GETROFFEN!
Dieses Gerät wurde unter hohen Qualitätsanforderungen entwickelt und gefertigt, um viele Jahre einen reibungslosen Betrieb zu gewährleisten.
Dafür steht LD Systems mit seinem Namen und der langjährigen Erfahrung als Hersteller hochwertiger Audioprodukte. Bitte lesen Sie diese Bedie-
nungsanleitung sorgfältig, damit Sie Ihr neues Produkt von LD Systems schnell optimal einsetzen können.
Mehr Informationen zu LD SYSTEMS nden Sie auf unserer Internetseite WWW.LD-SYSTEMS.COM
SICHERHEITSHINWEISE
1. Lesen Sie diese Anleitung bitte sorgfältig durch.
2. Bewahren Sie alle Informationen und Anleitungen an einem sicheren Ort auf.
3. Befolgen Sie die Anweisungen.
4. Beachten Sie alle Warnhinweise. Entfernen Sie keine Sicherheitshinweise oder andere Informationen vom Gerät.
5. Verwenden Sie das Gerät nur in der vorgesehenen Art und Weise.
6. Verwenden Sie ausschließlich stabile und passende Stative bzw. Befestigungen (bei Festinstallationen). Stellen Sie sicher, dass Wandhalterungen
ordnungsgemäß installiert und gesichert sind. Stellen Sie sicher, dass das Gerät sicher installiert ist und nicht herunterfallen kann.
7. Beachten Sie bei der Installation die für Ihr Land geltenden Sicherheitsvorschriften.
8. Installieren und betreiben Sie das Gerät nicht in der Nähe von Heizkörpern, Wärmespeichern, Öfen oder sonstigen Wärmequellen. Sorgen Sie dafür,
dass das Gerät immer so installiert ist, dass es ausreichend gekühlt wird und nicht überhitzen kann.
9. Platzieren Sie keine Zündquellen wie z.B. brennende Kerzen auf dem Gerät.
10. Lüftungsschlitze dürfen nicht blockiert werden.
11. Halten Sie einen Mindestabstand von 20 cm seitlich und oberhalb des Geräts ein.
12. Betreiben Sie das Gerät nicht in unmittelbarer Nähe von Wasser. Bringen Sie das Gerät nicht mit brennbaren Materialien, Flüssigkeiten oder
Gasen in Berührung. Direkte Sonneneinstrahlung vermeiden!
13. Sorgen Sie dafür, dass kein Tropf- oder Spritzwasser in das Gerät eindringen kann. Stellen Sie keine mit Flüssigkeit gefüllten Behältnisse wie
Vasen oder Trinkgefäße auf das Gerät.
14. Sorgen Sie dafür, dass keine Gegenstände in das Gerät fallen können.
15. Betreiben Sie das Gerät nur mit dem vom Hersteller empfohlenen und vorgesehenen Zubehör.
16. Öffnen Sie das Gerät nicht und verändern Sie es nicht.
17. Überprüfen Sie nach dem Anschluss des Geräts alle Kabelwege, um Schäden oder Unfälle, z. B. durch Stolperfallen zu vermeiden.
18. Achten Sie beim Transport darauf, dass das Gerät nicht herunterfallen und dabei möglicherweise Sach- und Personenschäden
verursachen kann.
19. Wenn Ihr Gerät nicht mehr ordnungsgemäß funktioniert, Flüssigkeiten oder Gegenstände in das Geräteinnere gelangt sind, oder das Gerät an-
derweitig beschädigt wurde, schalten Sie es sofort aus und trennen es von der Netzsteckdose (sofern es sich um ein aktives Gerät handelt). Dieses
Gerät darf nur von autorisiertem Fachpersonal repariert werden.
20. Verwenden Sie zur Reinigung des Geräts ein trockenes Tuch.
21. Beachten Sie alle in Ihrem Land geltenden Entsorgungsgesetze. Trennen Sie bei der Entsorgung der Verpackung bitte Kunststoff und Papier bzw.
Kartonagen voneinander.
22. Kunststoffbeutel müssen außer Reichweite von Kindern aufbewahrt werden.
23. Sämtliche vom Benutzer vorgenommenen Änderungen und Modikationen, denen die für die Einhaltung der Richtlinien verantwortliche Partei
nicht ausdrücklich zugestimmt hat, können zum Entzug der Betriebserlaubnis für das Gerät führen.
BEI GERÄTEN MIT NETZANSCHLUSS
24. ACHTUNG: Wenn das Netzkabel des Geräts mit einem Schutzkontakt ausgestattet ist, muss es an einer Steckdose mit Schutzleiter angeschlossen
werden. Deaktivieren Sie niemals den Schutzleiter eines Netzkabels.
25. Schalten Sie das Gerät nicht sofort ein, wenn es starken Temperaturschwankungen ausgesetzt war (beispielsweise nach dem Transport). Feuch-
tigkeit und Kondensat könnten das Gerät beschädigen. Schalten Sie das Gerät erst ein, wenn es Zimmertemperatur erreicht hat.
26. Bevor Sie das Gerät an die Steckdose anschließen, prüfen Sie zuerst, ob die Spannung und die Frequenz des Stromnetzes mit den auf dem Gerät
angegebenen Werten übereinstimmen. Verfügt das Gerät über einen Spannungswahlschalter, schließen Sie das Gerät nur an die Steckdose an,
wenn die Gerätewerte mit den Werten des Stromnetzes übereinstimmen. Wenn das mitgelieferte Netzkabel bzw. der mitgelieferte Netzadapter
nicht in Ihre Netzsteckdose passt, wenden Sie sich an Ihren Elektriker.
27. Treten Sie nicht auf das Netzkabel. Sorgen Sie dafür, dass spannungsführende Kabel speziell an der Netzbuchse bzw. am Netzadapter und der
Gerätebuchse nicht geknickt werden.
28. Achten Sie bei der Verkabelung des Geräts immer darauf, dass das Netzkabel bzw. der Netzadapter stets frei zugänglich ist. Trennen Sie das
Gerät stets von der Stromzuführung, wenn das Gerät nicht benutzt wird, oder Sie das Gerät reinigen möchten. Ziehen Sie Netzkabel und Netzadapter
immer am Stecker bzw. am Adapter und nicht am Kabel aus der Steckdose. Berühren Sie Netzkabel und Netzadapter niemals mit nassen Händen.
29. Schalten Sie das Gerät möglichst nicht schnell hintereinander ein und aus, da sonst die Lebensdauer des Geräts beeinträchtigt werden könnte.
30. WICHTIGER HINWEIS: Ersetzen Sie Sicherungen ausschließlich durch Sicherungen des gleichen Typs und Wertes. Sollte eine Sicherung wiederholt
auslösen, wenden Sie sich bitte an ein autorisiertes Servicezentrum.
31. Um das Gerät vollständig vom Stromnetz zu trennen, entfernen Sie das Netzkabel bzw. den Netzadapter aus der Steckdose.
32. Wenn Ihr Gerät mit einem verriegelbaren Netzanschluss bestückt ist, muss der passende Gerätestecker entsperrt werden, bevor er entfernt wer-
den kann. Das bedeutet aber auch, dass das Gerät durch ein Ziehen am Netzkabel verrutschen und herunterfallen kann, wodurch Personen verletzt
werden und/oder andere Schäden auftreten können. Verlegen Sie Ihre Kabel daher immer sorgfältig.
33. Entfernen Sie Netzkabel und Netzadapter aus der Steckdose bei Gefahr eines Blitzschlags oder wenn Sie das Gerät länger nicht verwenden.
34. Das Gerät darf nicht von Personen (einschließlich Kindern) mit eingeschränkten körperlichen, sensorischen oder geistigen Fähigkeiten oder

16
ITALIANO
POLSKI
ESPAÑOL
FRANCAIS
DEUTSCH
ENGLISH
mangelnder Erfahrung und Kenntnis benutzt werden.
35. Kinder müssen angewiesen werden, nicht mit dem Gerät zu spielen.
36. Wenn das Netzkabel des Geräts beschädigt ist, darf das Gerät nicht verwendet werden. Das Netzkabel muss durch ein adäquates Kabel oder eine
spezielle Baugruppe von einem autorisierten Service-Center ersetzt werden.
ACHTUNG
Entfernen Sie niemals die Abdeckung, da sonst das Risiko eines elektrischen Schlages besteht. Im In-
neren des Geräts benden sich keine Teile, die vom Bediener repariert oder gewartet werden können.
Lassen Sie Wartung und Reparaturen ausschließlich von qualiziertem Servicepersonal durchführen.
Das gleichseitige Dreieck mit Blitzsymbol warnt vor nichtisolierten, gefährlichen Spannungen im Geräteinneren, die einen elektrischen
Schlag verursachen können.
Das gleichseitige Dreieck mit Ausrufungszeichen kennzeichnet wichtige Bedienungs- und Wartungshinweise.
Warnung! Dieses Symbol kennzeichnet heiße Oberächen. Während des Betriebs können bestimmte Teile des Gehäuses heiß werden.
Berühren oder transportieren Sie das Gerät nach einem Einsatz erst nach einer Abkühlzeit von mindestens 10 Minuten.
Warnung! Dieses Gerät ist für eine Nutzung bis zu einer Höhe von maximal 2000 Metern über dem Meeresspiegel bestimmt.
Warnung! Dieses Gerät ist nicht für den Einsatz in tropischen Klimazonen bestimmt.
ACHTUNG HOHE LAUTSTÄRKEN BEI AUDIOPRODUKTEN!
Dieses Gerät ist für den professionellen Einsatz vorgesehen. Der kommerzielle Betrieb dieses Geräts unterliegt den jeweils gültigen nationalen
Vorschriften und Richtlinien zur Unfallverhütung. Als Hersteller ist Adam Hall gesetzlich verpichtet, Sie ausdrücklich auf mögliche Gesundheitsrisiken
hinzuweisen. Gehörschäden durch hohe Lautstärken und Dauerbelastung: Bei der Verwendung dieses Produkts können hohe Schalldruckpegel
(SPL) erzeugt werden, die bei Künstlern, Mitarbeitern und Zuschauern zu irreparablen Gehörschäden führen können. Vermeiden Sie länger anhaltende
Belastung durch hohe Lautstärken über 90 dB.
EINLEITUNG
Das LD Systems MAUI 44 G2 Säulen PA-System wurde für den professionellen Einsatz konzipiert. Das PA-System bietet hochwertige Komponenten,
DSP-gesteuerte Endstufen und einen über das gesamte Frequenzspektrum ausgewogenen Klang. Die digitale Signalbearbeitung des LD LECC DSP
umfasst Funktionen wie Frequenzweiche, Equalizer, Kompressor und Limiter, und ist speziell auf das MAUI 44 G2 PA-System abgestimmt, um jeder-
zeit eine optimale Audio-Leistung zur Verfügung zu stellen.
Das nach dem „Plug-and-Play“-Prinzip konzipierte System kommt ohne zusätzliche Kabel oder Stative aus und lässt sich daher schnell und einfach
auf- und abbauen.
EINGENSCHAFTEN
• Professionelles Säulen-PA-System mit 1500 W RMS und 132 dB max. SPL
• TrueWireless Stereo™ für kabelloses Stereo pairing
• aptX™ and AAC Codec für HD Bluetooth® Streaming
• Cardioid-Säule für kontrolliertes Abstrahlverhalten in den Tief-Mittenfrequenzen
• Cardioid-Subwoofer Anwendung (mit zweitem Subwoofer)
• Homogenes Abstrahlverhalten durch einen BEM-optimierten Hochton-Wellenleiter
• Automatische Setup-Erkennung
• Verzerrungsfreier Klang bei maximaler Lautstärke dank DynX® DSP-Technologie
• Schneller und einfacher Aufbau ohne Stative oder Kabel
• Akustik Linse für kohärente Wellenfront im Mittenbereich
• Robustes Multiplex Subwoofer-Gehäuse mit Polyurea-Beschichtung und leichte, pulverbeschichtete Aluminiumsäule
• Strömungsoptimierte Bass-Reex Kanäle
• Neutrik powerCon Netzeingangsbuchse
HINWEIS: Die optional erhältliche Subwoofer-Erweiterung LDMAUI44G2SUB ist technisch identisch mit dem Subwoofer des LDMAUI44G2 PA-Systems.
Der Subwoofer-Erweiterung LDMAUI44G2SUB liegt eine Abdeckung bei, die auf das Anschlussfeld für die Lautsprechersäule gesteckt wird.

17
DEUTSCHFRANCAIS
ESPAÑOL
ENGLISH
ITALIANO POLSKI
ALLGEMEINE HINWEISE
Sowohl der Subwoofer des LD Systems MAUI 44 G2 PA-Systems, als auch die optional erhältliche
Subwoofer-Erweiterung MAUI 44 G2 SUB müssen vor der Inbetriebnahme auf ebener Fläche auf
ihre Gummifüße gestellt werden. Betreiben Sie das System niemals auf einem Rollwagen, da
die Gefahr besteht, dass sich das gesamte System unkontrolliert in Bewegung setzt. Unfälle und
Beschädigungen können die Folge sein. Die Kühlung der Endstufe erfolgt über den Kühlkörper
unterhalb des Anschlussfelds auf der Rückseite des Subwoofers. Um eine ausreichende Kühlung
zu gewährleisten, muss bei Betrieb zwischen der Rückseite des Subwoofers und anderen Objekten
wie Wänden o. ä. ein Mindestabstand von 50 cm eingehalten werden.
Bitte achten Sie bei dem System sowie den angeschlossenen Geräten wie Mischpulten, CD-Playern
etc. auf den korrekten Anschluss von Audio- und Stromverbindungen. Verwenden Sie aus-
schließlich unbeschädigte Kabel mit geeignetem Durchmesser und rollen Sie Kabelrollen immer
vollständig ab. Verwenden Sie gegebenenfalls Kabelbrücken, um Stolperfallen durch lose Kabel zu
vermeiden. Stellen Sie Gerät niemals direkt an einer Kante auf. Positionieren Sie den Subwoofer
nicht auf einem Tisch. Um ungewollte Nebengeräusche beim Einschalten angeschlossener Geräte
zu vermeiden, schalten Sie das System immer als letztes Gerät ein und als erstes Gerät aus.
AUFBAU
Das LD Systems MAUI 44 G2 PA-System besteht aus drei Komponenten:
A
Subwoofer mit integrierter Elektronik für alle Systemkomponenten.
B
MAUI 44 G2 LC:
Untere Vertical-Array-Säule mit sechs 3,5“ Lautsprechern, je einen Multipin-Anschluss auf der
Ober- und Unterseite und den Führungsbolzen auf der Unterseite.
C
MAUI 44 G2 UC:
Die obere Vertical-Array-Säule mit sechs 3,5“ Lautsprechern mit Akustiklinse, den Hochtönern und
einem Multipin-Anschluss und den Führungsbolzen auf der Unterseite.
Nachdem der Subwoofer an der gewünschten Stelle aufgestellt wurde, wird zunächst die untere
Array-Säule auf den Subwoofer aufgesteckt. Stabile Führungsbolzen helfen dabei, dass die
Multipin-Stecker beider Lautsprecher perfekt ineinander greifen, zwei starke Magnete sorgen für
zusätzlichen Halt. Die obere Vertical-Array-Säule wird nun nach dem gleichen Prinzip auf die untere
Säule aufgesteckt.
Um den Transport, sowie Auf- und Abbau zu erleichtern, benden sich an den Seiten des Sub-
woofers ergonomische Griffe und auf der Rückseite kann ein optional erhältliches Rollenbrett
(LDM44G2CB) montiert werden, das das Anschlussfeld und die Bedienelemente beim Transport zu-
dem zuverlässig schützt. Auf der Ober- und Unterseite der Array-Säulen benden sich Griffschalen.
Die optional erhältliche MAUI 44 G2 SUB Subwoofer-Erweiterung wird neben dem MAUI 44 G2
PA-System positioniert. Die Ausrichtung der Subwoofer-Erweiterung hängt davon ab, ob das
Cardioid-Preset in der Subwoofer-Erweiterung verwendet wird oder nicht.
ANSCHLUSS UND BETRIEB
Ein Zuspielgerät lässt sich über die symmetrischen XLR-Eingänge anschließen. Das integrierte
Bluetooth-Modul erlaubt die kabellose Ansteuerung durch ein Smartphone oder Tablet. Ebenso
existiert eine Stereo-Link-Funktion für die drahtlose Weiterleitung des Bluetooth-Signals zu einem
weiteren MAUI 44 G2 PA-System als Stereo-Erweiterung. Am Gerät lässt sich sowohl die Lautstärke
des gesamten Systems als auch die Lautstärke des Subwoofers im Verhältnis zur Gesamtlautstär-
ke einstellen. Eine optional erhältliche Subwoofer-Erweiterung kann in zwei unterschiedlichen
Setups zusammen mit dem MAUI 44 G2 PA-System verwendet werden.
AUFBAU, ANSCHLUSS UND INBETRIEBNAHME
A
B
C

18
ITALIANO
POLSKI
ESPAÑOL
FRANCAIS
DEUTSCH
ENGLISH
ANSCHLÜSSE, BEDIEN- UND ANZEIGEELEMENTE
2
3
4
7
8
9
1
5 6
1
IN
Symmetrischer Stereo Line-Eingang mit zwei weiblichen 3-Pol XLR-Buchsen zum Anschließen eines Zuspielgeräts (z.B. Mischpult). Ein anliegendes
Stereo-Signal wird intern Mono summiert.
2
MAIN
Pegelsteller für die Gesamtlautstärke. Die Subwooferlautstärke wird entsprechend der Voreinstellung am Pegelsteller SUB mitgeregelt. Bei der
Verwendung des Subwoofers als Subwoofer-Erweiterung ist der Pegelsteller deaktiviert und das Anzeigefeld MAIN erloschen.
3
SUB
Einstellung des Lautstärkeverhältnisses vom Subwoofer zum Säulenlautsprecher. Bei der Verwendung des Subwoofers als Subwoofer-Erweiterung
ist der Pegelsteller deaktiviert und das Anzeigefeld SUB erloschen.
4
ANZEIGEFELDER FÜR SYSTEMSTATUS
PROTECT – Das Anzeigefeld leuchtet auf, falls das System überlastet/überhitzt. Die Verstärker werden dabei automatisch stummgeschaltet. Nach
Erreichen normaler Betriebsbedingungen wechselt das Gerät nach einigen Minuten wieder in den normalen Betriebsmodus.
LIMIT – Das Anzeigefeld leuchtet auf, wenn das Lautsprecher-System im oberen Grenzbereich betrieben wird. Ein kurzes Aueuchten der LED ist
dabei unkritisch. Um das System zu schützen, wird ein überhöhter Signal-Pegel vom integrierten Limiter sanft heruntergeregelt. Leuchtet die
Limiter-LED länger oder dauerhaft, reduzieren Sie den Lautstärkepegel.
SIGNAL – Das Anzeigefeld leuchtet auf, wenn am Gerät ein Audiosignal anliegt. Die Signalerfassung erfolgt vor dem Pegelsteller MAIN.
POWER – Das Anzeigefeld leuchtet, wenn das Gerät korrekt am Stromnetz angeschlossen und eingeschaltet ist.
SLAVE – Das Anzeigefeld leuchtet, sobald die Lautsprechersäulen vom System getrennt werden und der Subwoofer so als Subwoofer-Erweiterung
genutzt werden kann.

19
DEUTSCHFRANCAIS
ESPAÑOL
ENGLISH
ITALIANO POLSKI
5
THRU
Symmetrischer Stereo Line-Ausgang mit zwei männlichen 3-Pol XLR-Buchsen zum Weiterleiten des Eingangssignals.
6
SUB OUT
Symmetrischer Line-Ausgang mit männlicher 3-Pol XLR-Buchse zum Ansteuern der Subwoofer-Erweiterung.
Subwoofer-Erweiterung: Nutzen Sie für die Signalansteuerung entweder Line-Eingang L oder R. Die beiden Pegelsteller MAIN und SUB sowie die
Bluetooth-Einheit mit TWS sind deaktiviert, wenn der MAUI 44 G2 Subwoofer als Subwoofer-Erweiterung genutzt wird. Die Beschreibung des Cardi-
oid-Setups nden Sie unter Punkt 9 CARDIOID ON / OFF.
7
HOLD TO LINK
Das MAUI 44 G2 PA-System ist mit Bluetooth ausgestattet, was bedeutet, dass Audio-Dateien eines Bluetooth-Zuspielgeräts (z.B. Smartphone oder
Tablet) auf dem MAUI 44 G2 PA-System wiedergegeben werden können (die maximale Entfernung zwischen beiden Geräten ist abhängig von den
Umgebungsbedingungen).
Um die interne Bluetooth-Einheit mit einem Bluetooth-Zuspielgerät zu koppeln und zu verbinden, drücken und halten Sie den HOLD TO LINK-Taster
für circa 3 Sekunden, bis das Bluetooth-Anzeigefeld über dem Taster rhythmisch blinkt (ca. 3Hz), aktivieren Bluetooth auf Ihrem Zuspielgerät und
suchen auf der Benutzeroberäche nach verfügbaren Geräten. Wählen Sie den Eintrag „MAUI 44 G2“ und koppeln damit Ihr Bluetooth-Gerät mit der
Bluetooth-Einheit des MAUI 44 G2 PA-Systems. War die Kopplung erfolgreich, leuchtet das Bluetooth-Symbol permanent, die Titelwiedergabe kann
nun gestartet werden. Die Lautstärkeeinstellung erfolgt mit Hilfe des Pegelstellers MAIN, bzw. am Zuspielgerät.
Um eine Verbindung zu einem Bluetooth-Gerät zu trennen und die Bluetooth-Einheit wieder in Koppelbereitschaft zu versetzen, drücken und halten
Sie den HOLD TO LINK-Taster wiederum für circa 3 Sekunden. Um die gesamte Liste der gekoppelten Geräte zu löschen (= Auslieferungszustand),
halten Sie für circa 2 Sekunden die Taster HOLD TO LINK und STEREO LINK gleichzeitig gedrückt.
Wird die Bluetooth-Verbindung unterbrochen (z.B. überschreiten der Reichweite), erlischt die Bluetooth-LED. Innerhalb von ca. 90 Sekunden kann die
Verbindung automatisch wiederhergestellt werden (Bluetooth-Gerät wieder in Reichweite). Bei Überschreiten der Zeitdauer von 90 Sekunden kann
die Verbindung mit Hilfe des Bluetooth-Zuspielgeräts wiederhergestellt werden (gekoppeltes Gerät verbinden).
Bei der Verwendung eines einzelnen MAUI 44 G2 PA-Systems wird ein anliegendes Stereo-Signal im Bluetooth-Modul automatisch Mono summiert.
Hinweis: Die Bluetooth- und TWS-Funktionen sind nicht verfügbar, wenn der Subwoofer als Erweiterungs-Subwoofer für ein bestehendes MAUI 44 G2
PA-System verwendet wird.
8
STEREO LINK / TWS
Das MAUI 44 G2 PA-System ist mit einer Bluetooth Stereo Link Funktion ausgestattet (True Wireless Stereo), was bedeutet, dass bei der Verwendung
zweier MAUI 44 G2 Systeme Stereo-Audiosignale, die über Bluetooth übertragen werden, auch in Stereo wiedergegeben werden können, ohne
eine Verbindung zwischen beiden Systemen via Kabel herzustellen (die maximale Entfernung zwischen beiden Geräten beträgt unter optimalen
Bedingungen 40 Meter). Das System, das mit dem Bluetooth-Zuspielgerät verbunden ist, wird nachfolgend als Master-Einheit bezeichnet, die
Stereo-Erweiterung als Slave-Einheit. Ist die Master-Einheit mit dem Bluetooth-Zuspielgerät und der Slave-Einheit verbunden, leuchten sowohl
das Bluetooth-Anzeigefeld als auch das Anzeigefeld TWS der Master-Einheit permanent. Wurde die Verbindung der Slave-Einheit mit der Master-
Einheit erfolgreich hergestellt, leuchtet das Anzeigefeld TWS der Slave-Einheit permanent und das Bluetooth-Anzeigefeld blinkt langsam (ca. 0,3Hz).
Während des Kopplungsvorgangs blinken die Anzeigefelder TWS beider Systeme rhythmisch in einer Frequenz von circa 3Hz.
Je nach Situation kann die Kopplung zweier MAUI 44 G2 PA-Systeme per TWS durch zwei unterschiedliche Vorgehensweisen erfolgen:
Situation A. Stereo-System mit 2x MAUI 44 G2 und 1x Bluetooth-Zuspielgerät: Koppeln Sie ein Bluetooth-Zuspielgerät mit dem linken MAUI 44 G2
System, das linke System wird dabei automatisch zur Master-Einheit. Entkoppeln Sie beim rechten MAUI 44 G2 System alle bestehenden Bluetooth-
Verbindungen (HOLD TO LINK und STEREO LINK gleichzeitig für circa 2 Sekunden drücken). Koppeln Sie nun das rechte MAUI 44 G2 System mit der
Master-Einheit, indem Sie bei beiden Geräten innerhalb von 30 Sekunden den STEREO LINK-Taster für circa 3 Sekunden drücken, das rechte System
wird dabei automatisch zur Slave-Einheit (Distanz beim Koppeln maximal 15m). Die Master-Einheit überträgt den linken Kanal des Stereo-Signals
des Bluetooth-Zuspielgeräts, die Slave-Einheit den rechten Kanal.
Situation B. Stereo-System mit 2x MAUI 44 G2, Bluetooth-Zuspielgerät später koppeln: Entkoppeln Sie bei der Slave-Einheit vorbereitend alle beste-
henden Bluetooth-Verbindungen, indem Sie beide Taster HOLD TO LINK und STEREO LINK der Slave-Einheit für circa 2 Sekunden gleichzeitig drücken.
Achten Sie beim Koppeln zweier MAUI 44 G2 Systeme darauf, dass die Distanz zwischen den Systemen nicht mehr als 15 Meter beträgt. Drücken Sie
bei der Master-Einheit den STEREO LINK-Taster für circa 3 Sekunden und bei der Slave-Einheit den STEREO LINK-Taster 2x kurz hintereinander. Die
Kopplung erfolgt nun automatisch innerhalb von circa 30 Sekunden. Die Kopplung eines Bluetooth-Zuspielgeräts mit der Master-Einheit kann nun
nachträglich erfolgen. Die Master-Einheit überträgt den linken Kanal des Stereo-Signals eines Bluetooth-Zuspielgeräts, die Slave-Einheit den rechten
Kanal.
HINWEIS:
• Über die Stereo-Link-Funktion TWS können nur Audiosignale übertragen werden, die auf einem gekoppelten Bluetooth-Zuspielgerät abgespielt
werden. Audiosignale, die am Line-Eingang anliegen, werden nicht per TWS übertragen.
• Nach dem Aus- und wieder Einschalten der MAUI 44 G2 Systeme erfolgt sowohl die Verbindung zum Bluetooth-Zuspielgerät als auch die Verbindung
der Systeme per TWS automatisch.

20
ITALIANO
POLSKI
ESPAÑOL
FRANCAIS
DEUTSCH
ENGLISH
• Die maximale Anzahl gekoppelter Bluetooth-Geräte beträgt 8 (inklusive gekoppelter MAUI 44 G2 Systeme). Wird darüber hinaus ein weiteres Gerät
gekoppelt, wird der letzte Eintrag aus der Liste der gespeicherten Geräte gelöscht. Maximal ein Bluetooth-Zuspielgerät und ein MAUI 44 G2 System
als Stereo-Erweiterung können simultan mit der MAUI 44 G2 Master-Einheit verbunden sein.
Bluetooth und TWS Status
9
CARDIOID SUBWOOFER ON / OFF
Hinweis: Die Cardioid Subwoofer Funktion ist nur verfügbar, wenn Lautsprechersäulen nicht mit dem MAUI 44 G2 Subwoofer verbunden sind.
MAIN / SLAVE-Betrieb: Die optional erhältliche Subwoofer-Erweiterung MAUI 44 G2 SUB kann auf zwei Arten zusammen mit dem MAUI 44 G2 PA-
System verwendet werden.
A. Die Subwoofer-Erweiterung wird parallel in gleicher Ausrichtung zum Subwoofer des MAUI 44 G2 PA-Systems positioniert. Hierbei darf das Cardioid-
Preset in der Subwoofer-Erweiterung nicht aktiviert sein (CARDIOID OFF). Drücken und halten Sie den Taster CARDIOID für circa 2 Sekunden, um
den Status umzuschalten.
B. Die Subwoofer-Erweiterung wird parallel und um 180° gedreht zum Subwoofer des MAUI 44 G2 PA-Systems positioniert. Hierbei muss das Cardioid-
Preset aktiviert werden (CARDIOID ON). Drücken und halten Sie den Taster CARDIOID für circa 2 Sekunden, um den Status umzuschalten. Das
Resultat des Cardioid-Setups ist eine nach vorn gerichtete Bass-Abstrahlung und durch weitgehende Bass-Auslöschung nach hinten ein deutlich
klarerer Bühnenklang.
Bluetooth und Stereo Link Status Bluetooth LED STEREO LINK LED
Bluetooth-Einheit mit Zuspielgerät koppeln blinkt (3Hz) aus
Bluetooth-Einheit nur mit Zuspielgerät gekoppelt und verbunden permanent an aus
Bluetooth-Einheit mit Zuspielgerät koppeln (als Stereo Link - Master) blinkt (3Hz) permanent an
Slave-Einheit - Stereo Link koppeln mit Master-Einheit blinkt (0,3Hz) blinkt (3Hz)
Slave-Einheit - Stereo Link mit Master-Einheit gekoppelt blinkt (0,3Hz) permanent an
Slave-Einheit - Slave-Einheit gekoppelt aber nicht verbunden blinkt (0,3Hz) aus
Master-Einheit - Stereo Link koppeln ohne Bluetooth-Verbindung zu Zuspielgerät aus blinkt (3Hz)
Master-Einheit - mit Slave-Einheit verbunden aber ohne Bluetooth-Verbindung zu Zuspielgerät aus permanent an
Master-Einheit - mit Slave-Einheit koppeln und mit Bluetooth-Verbindung zu Zuspielgerät permanent an blinkt (3Hz)
Master-Einheit - mit Slave-Einheit verbunden und mit Bluetooth-Verbindung zu Zuspielgerät permanent an permanent an
Weder Bluetooth- noch Stereo Link-Verbindung aus aus
A B
10
11
10
POWER INPUT
Neutrik powerCON Netzeingangsbuchse. Ein geeignetes Netzkabel bendet sich im Lieferumfang.
La pagina si sta caricando...
La pagina si sta caricando...
La pagina si sta caricando...
La pagina si sta caricando...
La pagina si sta caricando...
La pagina si sta caricando...
La pagina si sta caricando...
La pagina si sta caricando...
La pagina si sta caricando...
La pagina si sta caricando...
La pagina si sta caricando...
La pagina si sta caricando...
La pagina si sta caricando...
La pagina si sta caricando...
La pagina si sta caricando...
La pagina si sta caricando...
La pagina si sta caricando...
La pagina si sta caricando...
La pagina si sta caricando...
La pagina si sta caricando...
La pagina si sta caricando...
La pagina si sta caricando...
La pagina si sta caricando...
La pagina si sta caricando...
La pagina si sta caricando...
La pagina si sta caricando...
La pagina si sta caricando...
La pagina si sta caricando...
La pagina si sta caricando...
La pagina si sta caricando...
La pagina si sta caricando...
La pagina si sta caricando...
La pagina si sta caricando...
La pagina si sta caricando...
La pagina si sta caricando...
La pagina si sta caricando...
La pagina si sta caricando...
La pagina si sta caricando...
La pagina si sta caricando...
La pagina si sta caricando...
La pagina si sta caricando...
La pagina si sta caricando...
La pagina si sta caricando...
La pagina si sta caricando...
La pagina si sta caricando...
La pagina si sta caricando...
La pagina si sta caricando...
La pagina si sta caricando...
La pagina si sta caricando...
La pagina si sta caricando...
La pagina si sta caricando...
La pagina si sta caricando...
La pagina si sta caricando...
La pagina si sta caricando...
La pagina si sta caricando...
La pagina si sta caricando...
-
 1
1
-
 2
2
-
 3
3
-
 4
4
-
 5
5
-
 6
6
-
 7
7
-
 8
8
-
 9
9
-
 10
10
-
 11
11
-
 12
12
-
 13
13
-
 14
14
-
 15
15
-
 16
16
-
 17
17
-
 18
18
-
 19
19
-
 20
20
-
 21
21
-
 22
22
-
 23
23
-
 24
24
-
 25
25
-
 26
26
-
 27
27
-
 28
28
-
 29
29
-
 30
30
-
 31
31
-
 32
32
-
 33
33
-
 34
34
-
 35
35
-
 36
36
-
 37
37
-
 38
38
-
 39
39
-
 40
40
-
 41
41
-
 42
42
-
 43
43
-
 44
44
-
 45
45
-
 46
46
-
 47
47
-
 48
48
-
 49
49
-
 50
50
-
 51
51
-
 52
52
-
 53
53
-
 54
54
-
 55
55
-
 56
56
-
 57
57
-
 58
58
-
 59
59
-
 60
60
-
 61
61
-
 62
62
-
 63
63
-
 64
64
-
 65
65
-
 66
66
-
 67
67
-
 68
68
-
 69
69
-
 70
70
-
 71
71
-
 72
72
-
 73
73
-
 74
74
-
 75
75
-
 76
76


LD Systems Maui 44 G2 Manuale utente
- Categoria
- Set di altoparlanti
- Tipo
- Manuale utente
in altre lingue
- English: LD Systems Maui 44 G2 User manual
- français: LD Systems Maui 44 G2 Manuel utilisateur
- español: LD Systems Maui 44 G2 Manual de usuario
- Deutsch: LD Systems Maui 44 G2 Benutzerhandbuch
- polski: LD Systems Maui 44 G2 Instrukcja obsługi
Documenti correlati
-
LD Systems MAUI44 G2 Column PA System Manuale utente
-
-
-
-
-
-
-
-
-
LD Systems STINGER SUB 15 A G3 Manuale utente