Datalogic Heron D150 Manuale utente
- Categoria
- Lettori di codici a barre
- Tipo
- Manuale utente
Questo manuale è adatto anche per
La pagina si sta caricando...

USING HERON™ SERIES READERS
UK
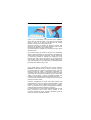
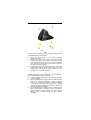
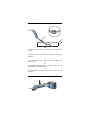
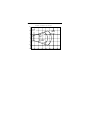
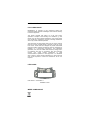
Heron™ guns automatically scan barcodes at a distance.
Simply aim and pull the trigger. Code scanning is performed
along the center of the light bar emitted from the reading
window. This bar must cover the entire code.
Successful scanning is obtained by tilting the scanner with
respect to the barcode to avoid direct reflections which impair
the reading performance, see the figure above.
Successful reading is signaled by an audible tone plus a good-
read green spot.
By correctly inserting the reader into its stand, it is immediately
ready to read automatically any code present in its reading area
without pressing the trigger. Furthermore, a green aiming light
is continuously emitted to facilitate the positioning of the
barcode to be read, see the figure above. To guarantee single
code reading, same code consecutive reading requires the
code to be removed from the reading area (no decoding) before
the reader will accept the same code.
I
Con le pistole Heron™ la lettura dei codici a barre avviene a
distanza: è sufficiente mirare sul codice e premere il grilletto.
La finestra anteriore proietta una banda luminosa che deve
essere centrata sul codice e attraversarlo interamente. Le
condizioni ottimali per la lettura si ottengono quando la pistola
viene usata con un'inclinazione rispetto al piano su cui si trova il
codice, così da evitare il rischio di riflessione diretta, che
potrebbe compromettere il risultato della lettura (vedi figura).
La buona lettura è segnalata da un beep sonoro e da uno spot
verde che illumina il codice.
Inserendo correttamente la pistola nello stand, questa sarà
immediatamente pronta per leggere automaticamente i codici
presenti nella sua area di lettura senza premere il grilletto.
Inoltre, un puntatore di luce verde verrà attivato per facilitare il
posizionamento del codice da leggere, (vedi figura).
La singola lettura di un codice viene garantita dal fatto che una
lettura consecutiva dello stesso codice richiede la sua
rimozione dell’area di lettura (nessuna decodifica) prima di
essere nuovamente accettato dal lettore.
La pagina si sta caricando...
La pagina si sta caricando...

TAG DEACTIVATION
UK
The tag deactivation is performed at a distance (a few
centimeters). Simply bring the reader closer to the tag.
Successful deactivation is signaled by an audible tone (see
your EAS System manual).
I
La disattivazione dell’etichetta avviene a distanza (alcuni
centimetri). Avvicinare il lettore all’etichetta fino a quando il
sistema non emette il segnale di avvenuta disattivazione
(consultare il manuale del sistema EAS utilizzato).
F
La désactivation de l'étiquette s'effectue automatiquement et à
distance (quelques centimètres). Il suffit d'approcher le lecteur à
l'étiquette. La désactivation est signalée par un beep sonore (se
réferez au manuel de votre système EAS).
D
Die Deaktivierung des tag erfolgt aus einer Distanz weniger
Zentimeter. Das Lesegerät einfach solange an den tag
annähern bis ein akustisches Deaktivierungs-Signal ertönt
(siehe Handbuch ihres EAS Systems).
E
La desactivación del tag se hace a distancia (a pocos
centímetros). Simplemente acerca el lector al tag, y el sistema
emitirá una señal sonora indicando que la desactivación se ha
realizado correctamente (consultar el manual del sistema EAS
utilizado).

STAND INSTALLATION
UK
The stand can be mounted by using self-tapping screws, double
sided adhesive strips or rubber feet:
A) mount the stand directly to the surface using the
self-tapping screws;
B) carefully clean the bottom surface of the stand and the
table surface. Remove the protective plastic from one side
of the adhesive strips and stick them on the stand bottom.
Then, remove the plastic from the other side of the strips
and affix the stand to the table;
C) carefully clean the bottom surface of the stand, remove the
protective film from the rubber feet and stick them in the
corresponding housing on the bottom surface. It is also
possible to fix an optional metal plate.
I
Lo stand può essere montato utilizzando le viti autofilettanti, le
strisce adesive oppure i piedini di gomma:
A) montare lo stand direttamente sulla superficie utilizzando
le viti autofilettanti;
B) pulire accuratamente la superficie inferiore della base dello
stand e la superficie d’appoggio. Togliere la plastica
protettiva da un lato di ogni striscia e attaccare entrambe
le strisce alla base dello stand. Rimuovere la plastica
protettiva dall’altro lato delle strisce adesive e attaccare lo
stand alla superficie d’appoggio;
C) pulire accuratamente la superficie inferiore della base dello
stand, quindi togliere la pellicola protettiva dai piedini e
attaccarli all’interno delle apposite sedi nella base di
plastica. Inoltre, è possibile fissare una base metallica
opzionale.
La pagina si sta caricando...

INSERTION INTO STAND
UK
Pair the reader to the stand paying attention to
insert the handle into the stand clip (see figure
above). Correct insertion will be signaled by a
beep; the reader will then be ready to read
barcodes.
I Posizionare la pistola nello stand assicurandosi
che il manico sia inserito nel fermo dello stand
stesso (vedi figura sopra). Un beep sonoro
segnalerà il corretto inserimento ed il lettore sarà
pronto per leggere i codici a barre.
F Placer le pistolet dans le support en faisant
attention d’introduire la poignée dans le crochet du
support (voir figure ci-dessus). Un beep sonore
indiquera un positionnement correct. Le pistolet est
ainsi prêt à lire les codes.
D Positionieren Sie die Pistole im Halter und stecken
Sie den Griff in die Öffnung des Halters (siehe Bild
oben). Das korrekte Positionieren wird durch einen
Piepton angezeigt. Dann ist die Pistole bereit
Codes zu lesen.
E Poner el lector en su soporte insertando la
empuñadura en el clip del soporte (ver figura
arriba). El soporte emitirá un pitido al insertar el
lector de forma correcta. El lector estará entonces
listo para leer códigos de barras.
La pagina si sta caricando...
La pagina si sta caricando...
La pagina si sta caricando...
La pagina si sta caricando...

2 READER CONFIGURATION
UK
Read the interface selection code for your applica-
tion.
I Leggere il codice per la selezione dell’interfaccia
relativo al modo di comunicazione desiderato.
F Lecture du code “Interface” correspondant à votre
modèle.
D Lesen Sie denjenigen Schnittstellen-Code, der
Ihrem gewünschten Kommunikationsmodus
entspricht.
E Lea el código correspondiente al modo de
comunicación deseado.
RESTORE DEFAULT
Ì$+$*oÎ
RS232
Standard
Ì$+CP0$-$Î
POS SYSTEMS
Nixdorf Mode A
Ì$+CM2EC0$->Î
Fujitsu
Ì$+CM1$-ÈÎ
ICL Mode
Ì$+CM0$-ÃÎ

UK YOUR READER IS NOW READY TO READ
CODES.
To change the defaults refer to the "HHD II Software
Configuration Manual", part number 90ACC1877, or
to the DL Sm@rtSet™ Configuration program, both
downloadable from the website.
I IL LETTORE È PRONTO PER LEGGERE I CODICI.
Per cambiare le impostazioni di default fare
riferimento al manuale "HHD II Software Configuration
Manual", n. d'ordine 90ACC1877, oppure al
programma di configurazione DL Sm@rtSet™.
Entrambi sono scaricabili dal sito web.
F
VOTRE LECTEUR EST PRÊT POUR LA LECTURE
DE CODES.
Pour changer les paramètres voir le manuel "HHD II
Software Configuration Manual", numéro d'ordre
90ACC1877, ou bien le programme de configuration
DL Sm@rtSet™. Le manuel et le programme peuvent
être déchargés de notre site internet.
D
DAS LESEGERÄT IST JETZT BEREIT CODES ZU
LESEN.
Um die Werkseinstellungsparameter zu ändern,
konsultieren Sie entweder das Handbuch "HHD II
Software Configuration Manual", Bestellnummer
90ACC1877, oder nehmen das
Konfigurationsprogramm DL Sm@rtSet™ zu Hilfe.
Sie können beide von der Internetseite herunterladen.
E EL LECTOR ESTÁ AHORA LISTO PARA LEER
CÓDIGOS.
Para cambiar los parámetros de configuración de
fábrica, ver el manual "HHD II Software Configuration
Manual", n. de orden 90ACC1877, o bien el programa
de configuración DL Sm@rtSet™. Ambos pueden
descargarse de la página web.
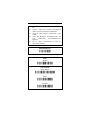
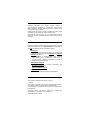
TRIGGER SELECTION
After configuring the reader interface type, the software trigger
parameter can be selected so that the reader operates like a
model without trigger.
Software Trigger
Ì$+BK0$-tÎ
♦ Hardware Trigger
Ì$+BK1$-yÎ

3 OPERATING TEST
UK
Read the TEST codes below.
I Leggere i codici di test.
F Lire les codes tests.
D Lesen Sie die Test-Coden.
E Lea los códigos de prueba.
EAN-8
1234 5670
EAN-13
1 234567 000992
Code 39 (Normal)
17162
Code 128
test
Interleaved 2 of 5
0123456784
La pagina si sta caricando...
La pagina si sta caricando...
La pagina si sta caricando...
La pagina si sta caricando...
La pagina si sta caricando...
-
 1
1
-
 2
2
-
 3
3
-
 4
4
-
 5
5
-
 6
6
-
 7
7
-
 8
8
-
 9
9
-
 10
10
-
 11
11
-
 12
12
-
 13
13
-
 14
14
-
 15
15
-
 16
16
-
 17
17
-
 18
18
-
 19
19
-
 20
20


Datalogic Heron D150 Manuale utente
- Categoria
- Lettori di codici a barre
- Tipo
- Manuale utente
- Questo manuale è adatto anche per
in altre lingue
- English: Datalogic Heron D150 User manual
- français: Datalogic Heron D150 Manuel utilisateur
- español: Datalogic Heron D150 Manual de usuario
- Deutsch: Datalogic Heron D150 Benutzerhandbuch
Documenti correlati
-
Datalogic Heron D110 Guida di riferimento
-
-
Datalogic FireScan D111 Series Guida di riferimento
-
-
-
-
-
Datalogic Heron D140 LASEROUT Manuale utente
-
-