
1
E
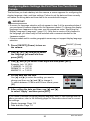
Thank you for purchasing this CASIO product.
• Before using it, be sure to read the precautions contained in this User’s Guide.
• Keep the User’s Guide in a safe place for future reference.
• For the most up-to-date information about this product, visit the official EXILIM
Website at http://www.exilim.com/
Digital Camera
User’s Guide

2
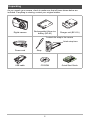
As you unpack your camera, check to make sure that all items shown below are
included. If anything is missing, contact your original retailer.
Unpacking
Digital camera
Rechargeable lithium ion
battery (NP-80)
Charger unit (BC-81L)
Power cord Strap
USB cable CD-ROM Quick Start Guide
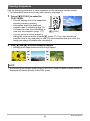
To attach the strap to the camera
1
2
Attach strap here.

3
• The contents of this manual and the bundled Quick Start Guide are subject to
change without notice.
• The contents of this manual have been checked at each step of the production
process. Feel free to contact us if you notice anything that is questionable,
erroneous, etc.
• Any copying of the contents of this User’s Guide, either in part or its entirety, is
forbidden. Except for your own personal use, any other use of the contents of this
manual without the permission of CASIO COMPUTER CO., LTD. is forbidden
under copyright laws.
• CASIO COMPUTER CO., LTD. shall not be held liable for any damages or lost
profits suffered by you or any third party due to the use or malfunction of this
product.
• CASIO COMPUTER CO., LTD. shall not be held liable for any damages, lost
profits, or claims by third parties arising out of the use of Photo Transport or
YouTube Uploader for CASIO.
• CASIO COMPUTER CO., LTD. shall not be held liable for any damages or lost
profits caused by loss of memory contents due to malfunction, repair, or any other
reason.
• Note that the example screens and product illustrations shown in this User’s Guide
may differ somewhat from the screens and configuration of the actual camera.
LCD Panel
The liquid crystal panel of the monitor screen uses high-precision technology that
provides a pixel yield in excess of 99.99%. This means that some very small number
of pixels may not light or may remain lit at all times. This is due to the characteristics
of the liquid crystal panel, and does not indicate malfunction.
Read this first!
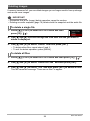
Take a few test shots
Before shooting your final image, shoot a test shot to ensure that the camera is
recording correctly.

4
Contents
Contents
Unpacking . . . . . . . . . . . . . . . . . . . . . . . . . . . . . . . . . . . . . . . . . . . . . . . . . . . . 2
Read this first! . . . . . . . . . . . . . . . . . . . . . . . . . . . . . . . . . . . . . . . . . . . . . . . . . 3
General Guide . . . . . . . . . . . . . . . . . . . . . . . . . . . . . . . . . . . . . . . . . . . . . . . . . 8
Monitor Screen Contents . . . . . . . . . . . . . . . . . . . . . . . . . . . . . . . . . . . . . . . . 10
❚❙
Quick Start Basics 13
What is a digital camera? . . . . . . . . . . . . . . . . . . . . . . . . . . . . . . . . . . . . . . . 13
What you can do with your CASIO camera . . . . . . . . . . . . . . . . . . . . . . . . . . 14
First, charge the battery prior to use.. . . . . . . . . . . . . . . . . . . . . . . . . . . . . . . 15
❚
Charging the Battery . . . . . . . . . . . . . . . . . . . . . . . . . . . . . . . . . . . . . . . . . . . . . . 15
❚
To load the battery . . . . . . . . . . . . . . . . . . . . . . . . . . . . . . . . . . . . . . . . . . . . . . . 18
Configuring Basic Settings the First Time You Turn On the Camera. . . . . . . 20
Preparing a Memory Card . . . . . . . . . . . . . . . . . . . . . . . . . . . . . . . . . . . . . . . 21
❚
Supported Memory Cards. . . . . . . . . . . . . . . . . . . . . . . . . . . . . . . . . . . . . . . . . . 21
❚
To load a memory card . . . . . . . . . . . . . . . . . . . . . . . . . . . . . . . . . . . . . . . . . . . . 21
❚
To format (initialize) a new memory card . . . . . . . . . . . . . . . . . . . . . . . . . . . . . . 22
Turning the Camera On and Off . . . . . . . . . . . . . . . . . . . . . . . . . . . . . . . . . . 23
❚
To turn power on . . . . . . . . . . . . . . . . . . . . . . . . . . . . . . . . . . . . . . . . . . . . . . . . . 23
❚
To turn off the camera. . . . . . . . . . . . . . . . . . . . . . . . . . . . . . . . . . . . . . . . . . . . . 23
Holding the Camera Correctly . . . . . . . . . . . . . . . . . . . . . . . . . . . . . . . . . . . . 24
To shoot a snapshot. . . . . . . . . . . . . . . . . . . . . . . . . . . . . . . . . . . . . . . . . . . . 25
Viewing Snapshots . . . . . . . . . . . . . . . . . . . . . . . . . . . . . . . . . . . . . . . . . . . . 28
Deleting Images. . . . . . . . . . . . . . . . . . . . . . . . . . . . . . . . . . . . . . . . . . . . . . . 29
❚
To delete a single file . . . . . . . . . . . . . . . . . . . . . . . . . . . . . . . . . . . . . . . . . . . . . 29
❚
To delete all files . . . . . . . . . . . . . . . . . . . . . . . . . . . . . . . . . . . . . . . . . . . . . . . . . 29
Snapshot Shooting Precautions . . . . . . . . . . . . . . . . . . . . . . . . . . . . . . . . . . 30
❚
Auto Focus Restrictions . . . . . . . . . . . . . . . . . . . . . . . . . . . . . . . . . . . . . . . . . . . 30
❚❙
Snapshot Tutorial 31
Using the Control Panel. . . . . . . . . . . . . . . . . . . . . . . . . . . . . . . . . . . . . . . . . 31
Changing the Image Size . . . . . . . . . . . . . . . . . . . . . . . . . . . . . . . . (Size) . . 32
Using Flash . . . . . . . . . . . . . . . . . . . . . . . . . . . . . . . . . . . . . . . . . . .(Flash) . . 36
Using the Self-timer . . . . . . . . . . . . . . . . . . . . . . . . . . . . . . . . (Self-timer) . . 38
Specifying the Auto Focus Area . . . . . . . . . . . . . . . . . . . . . . . . (AF Area) . . 39
Specifying ISO Sensitivity . . . . . . . . . . . . . . . . . . . . . . . . . . . . . . . . . (ISO) . . 41
Using the easy Mode . . . . . . . . . . . . . . . . . . . . . . . . . . . . . . (easy Mode) . . 42
Using Face Detection . . . . . . . . . . . . . . . . . . . . . . . . . . . (Face Detection) . . 44
Changing the Control Panel Date/Time Style . . . . . . . . . . . . . . . . . . . . . . . . 45
Shooting with Zoom . . . . . . . . . . . . . . . . . . . . . . . . . . . . . . . . . . . . . . . . . . . . 45
❚
Optical Zoom and Digital Zoom Switch Point . . . . . . . . . . . . . . . . . . . . . . . . . . . 46

5
Contents
❚❙
Recording Movie Images and Audio 48
To record a movie . . . . . . . . . . . . . . . . . . . . . . . . . . . . . . . . . . . . . . . . . . . . . 48
Shooting a Snapshot while Shooting a Movie . . . . . . . . . . . . . . . . . . . . . . . . 50
Recording Audio Only . . . . . . . . . . . . . . . . . . . . . . . . . . (Voice Recording) . . 50
❚
To play back an audio recording . . . . . . . . . . . . . . . . . . . . . . . . . . . . . . . . . . . . . 51
❚❙
Using BEST SHOT 52
What is BEST SHOT? . . . . . . . . . . . . . . . . . . . . . . . . . . . . . . . . . . . . . . . . . . 52
❚
Some Sample Scenes . . . . . . . . . . . . . . . . . . . . . . . . . . . . . . . . . . . . . . . . . . . . 52
To shoot an image with BEST SHOT. . . . . . . . . . . . . . . . . . . . . . . . . . . . . . . 52
❚❙
Advanced Settings 55
Using On-screen Menus . . . . . . . . . . . . . . . . . . . . . . . . . . . . . . . . . . . . . . . . 55
REC Mode Settings . . . . . . . . . . . . . . . . . . . . . . . . . . . . . . . . . . . . (REC) . . 57
❚
Selecting a Focus Mode . . . . . . . . . . . . . . . . . . . . . . . . . . . . . . . . .(Focus). . . 57
❚
Changing the Focus Frame Shape . . . . . . . . . . . . . . . . . . . (Focus Frame). . . 60
❚
Using Continuous Shutter . . . . . . . . . . . . . . . . . . . . . . . . . . . . . . . . . . (CS). . . 61
❚
Using the Self-timer . . . . . . . . . . . . . . . . . . . . . . . . . . . . . . . . . . (Self-timer). . . 61
❚
Shooting with Face Detection . . . . . . . . . . . . . . . . . . . . . .(Face Detection). . . 62
❚
Reducing the Effects of Camera and Subject Movement . . . . (Anti Shake). . . 62
❚
Specifying the Auto Focus Area . . . . . . . . . . . . . . . . . . . . . . . . . . (AF Area). . . 63
❚
Using the easy Mode . . . . . . . . . . . . . . . . . . . . . . . . . . . . . . . . (easy Mode). . . 63
❚
Assigning Functions to the [4] and [6] Keys . . . . . . . . . . . . . . . (L/R Key). . . 63
❚
Displaying the On-screen Grid . . . . . . . . . . . . . . . . . . . . . . . . . . . . . . (Grid) . . . 64
❚
Turning Digital Zoom On or Off . . . . . . . . . . . . . . . . . . . . . . .(Digital Zoom). . . 64
❚
Turning on Image Review . . . . . . . . . . . . . . . . . . . . . . . . . . . . . . .(Review). . . 64
❚
Using Icon Help . . . . . . . . . . . . . . . . . . . . . . . . . . . . . . . . . . . . . (Icon Help). . . 64
❚
Configuring Power On Default Settings . . . . . . . . . . . . . . . . . . . . (Memory). . . 65
Image Quality Settings . . . . . . . . . . . . . . . . . . . . . . . . . . . . . . . . (Quality) . . 66
❚
Specifying Snapshot Size . . . . . . . . . . . . . . . . . . . . . . . . . . . . . . . . . (Size). . . 66
❚
Specifying Snapshot Image Quality . . . . . . . . . . . . . . . (Quality (Snapshot)). . . 66
❚
Specifying Movie Image Quality . . . . . . . . . . . . . . . . . . . . .(Quality (Movie)). . . 66
❚
Correcting Image Brightness . . . . . . . . . . . . . . . . . . . . . . . . . . . . (EV Shift). . . 67
❚
Controlling White Balance . . . . . . . . . . . . . . . . . . . . . . . . . (White Balance) . . . 68
❚
Specifying ISO Sensitivity . . . . . . . . . . . . . . . . . . . . . . . . . . . . . . . . . .(ISO). . . 69
❚
Specifying the Metering Mode . . . . . . . . . . . . . . . . . . . . . . . . . . .(Metering). . . 69
❚
Optimizing Image Brightness . . . . . . . . . . . . . . . . . . . . . . . . . . . . (Lighting). . . 69
❚
Using Built-in Color Filters . . . . . . . . . . . . . . . . . . . . . . . . . . . . (Color Filter). . . 70
❚
Controlling Image Sharpness . . . . . . . . . . . . . . . . . . . . . . . . . . (Sharpness). . . 70
❚
Controlling Color Saturation . . . . . . . . . . . . . . . . . . . . . . . . . . . (Saturation). . . 70
❚
Adjusting Image Contrast . . . . . . . . . . . . . . . . . . . . . . . . . . . . . . . (Contrast). . . 70
❚
Specifying Flash Intensity . . . . . . . . . . . . . . . . . . . . . . . . . (Flash Intensity). . . 70

6
Contents
❚❙
Viewing Snapshots and Movies 71
Viewing Snapshots . . . . . . . . . . . . . . . . . . . . . . . . . . . . . . . . . . . . . . . . . . . . 71
Viewing a Movie. . . . . . . . . . . . . . . . . . . . . . . . . . . . . . . . . . . . . . . . . . . . . . . 71
Zooming an On-screen Image . . . . . . . . . . . . . . . . . . . . . . . . . . . . . . . . . . . . 72
Displaying the Image Menu . . . . . . . . . . . . . . . . . . . . . . . . . . . . . . . . . . . . . . 72
Viewing Snapshots and Movies on a TV Screen . . . . . . . . . . . . . . . . . . . . . . 73
❚❙
Other Playback Functions (PLAY) 75
Playing a Slideshow on the Camera . . . . . . . . . . . . . . . . . . . . (Slideshow) . . 75
Using Red Eye Correction . . . . . . . . . . . . . . . . . . . . . . . . . . . . (Red Eye) . . 76
Selecting Images for Printing . . . . . . . . . . . . . . . . . . . . . (DPOF Printing) . . 76
Protecting a File Against Deletion . . . . . . . . . . . . . . . . . . . . . . . . (Protect) . . 77
Rotating an Image . . . . . . . . . . . . . . . . . . . . . . . . . . . . . . . . . . (Rotation) . . 78
Resizing a Snapshot . . . . . . . . . . . . . . . . . . . . . . . . . . . . . . . . . . .(Resize) . . 78
Cropping a Snapshot . . . . . . . . . . . . . . . . . . . . . . . . . . . . . . . .(Trimming) . . 79
Adding Audio to a Snapshot . . . . . . . . . . . . . . . . . . . . . . . . . . . (Dubbing) . . 79
❚
To play snapshot audio . . . . . . . . . . . . . . . . . . . . . . . . . . . . . . . . . . . . . . . . . . . . 80
Copying Files . . . . . . . . . . . . . . . . . . . . . . . . . . . . . . . . . . . . . . . . . (Copy) . . 81
❚❙
Printing 82
Printing Snapshots. . . . . . . . . . . . . . . . . . . . . . . . . . . . . . . . . . . . . . . . . . . . . 82
Connecting Directly to a PictBridge Compatible Printer . . . . . . . . . . . . . . . . 83
Using DPOF to Specify Images to be Printed and the Number of Copies. . . 85
❚❙
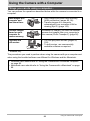
Using the Camera with a Computer 88
Things you can do using a computer... . . . . . . . . . . . . . . . . . . . . . . . . . . . . . 88
Using the Camera with a Windows Computer . . . . . . . . . . . . . . . . . . . . . . . . 89
❚
Viewing and Storing Images on a Computer. . . . . . . . . . . . . . . . . . . . . . . . . . . . 90
❚
Playing Movies . . . . . . . . . . . . . . . . . . . . . . . . . . . . . . . . . . . . . . . . . . . . . . . . . . 93
❚
Uploading Movie Files to YouTube . . . . . . . . . . . . . . . . . . . . . . . . . . . . . . . . . . . 94
❚
Transferring Images from Your Computer to Camera Memory. . . . . . . . . . . . . . 96
❚
Viewing User Documentation . . . . . . . . . . . . . . . . . . . . . . . . . . (PDF Files). . . 98
❚
User Registration . . . . . . . . . . . . . . . . . . . . . . . . . . . . . . . . . . . . . . . . . . . . . . . . 98
Using the Camera with a Macintosh . . . . . . . . . . . . . . . . . . . . . . . . . . . . . . . 99
❚
Connecting the Camera to Your Computer and Saving Files . . . . . . . . . . . . . . . 99
❚
Transferring Images Automatically and Managing Them on Your Macintosh . . 102
❚
Playing a Movie. . . . . . . . . . . . . . . . . . . . . . . . . . . . . . . . . . . . . . . . . . . . . . . . . 102
❚
Viewing User Documentation . . . . . . . . . . . . . . . . . . . . . . . . . . . (PDF Files) . . 103
❚
User Registration . . . . . . . . . . . . . . . . . . . . . . . . . . . . . . . . . . . . . . . . . . . . . . . 103
Using an Eye-Fi Wireless SD Memory Card to Transfer Images . (Eye-Fi) . 103
Files and Folders . . . . . . . . . . . . . . . . . . . . . . . . . . . . . . . . . . . . . . . . . . . . . 105
Memory Card Data . . . . . . . . . . . . . . . . . . . . . . . . . . . . . . . . . . . . . . . . . . . 106

7
Contents
❚❙
Other Settings (Set Up) 108
Turning off Eye-Fi Card Communication . . . . . . . . . . . . . . . . . . . . (Eye-Fi) . 108
Configuring Camera Sound Settings . . . . . . . . . . . . . . . . . . . . . (Sounds) . 108
Configuring a Startup Image . . . . . . . . . . . . . . . . . . . . . . . . . . . . (Startup) . 109
Specifying the File Name Serial Number Generation Rule . . . . . (File No.) . 109
Configuring World Time Settings . . . . . . . . . . . . . . . . . . . . . (World Time) . 110
Time Stamping Snapshots . . . . . . . . . . . . . . . . . . . . . . . . . . (Timestamp) . .111
Setting the Camera’s Clock . . . . . . . . . . . . . . . . . . . . . . . . . . . . . (Adjust) . .111
Specifying the Date Style . . . . . . . . . . . . . . . . . . . . . . . . . . . . (Date Style) . 112
Specifying the Display Language . . . . . . . . . . . . . . . . . . . . . . (Language) . 112
Configuring Sleep State Settings . . . . . . . . . . . . . . . . . . . . . . . . . (Sleep) . 113
Configuring Auto Power Settings . . . . . . . . . . . . . . . . . . (Auto Power Off) . 113
Configuring [r] and [p] Settings . . . . . . . . . . . . . . . . . . . (REC/PLAY) . 114
Configuring USB Protocol Settings . . . . . . . . . . . . . . . . . . . . . . . . . (USB) . 114
Selecting the Screen Aspect Ratio and
Video Output System . . . . . . . . . . . . . . . . . . . . . . . . . . . . . . . (Video Out) . 115
Formatting Built-in Memory or a Memory Card . . . . . . . . . . . . . . (Format) . 116
Resetting the Camera to Factory Defaults . . . . . . . . . . . . . . . . . . (Reset) . 116
❚❙
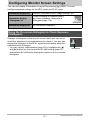
Configuring Monitor Screen Settings 117
Using the On-screen Histogram to Check Exposure . . . . . . . (Histogram) . 117
❚
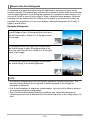
How to Use the Histogram . . . . . . . . . . . . . . . . . . . . . . . . . . . . . . . . . . . . . . . . 118
❚❙
Appendix 119
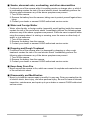
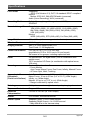
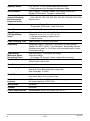
Precautions during Use . . . . . . . . . . . . . . . . . . . . . . . . . . . . . . . . . . . . . . . . 119
Power Supply. . . . . . . . . . . . . . . . . . . . . . . . . . . . . . . . . . . . . . . . . . . . . . . . 126
❚
Charging . . . . . . . . . . . . . . . . . . . . . . . . . . . . . . . . . . . . . . . . . . . . . . . . . . . . . . 126
❚
To replace the battery . . . . . . . . . . . . . . . . . . . . . . . . . . . . . . . . . . . . . . . . . . . . 126
❚
Battery Precautions. . . . . . . . . . . . . . . . . . . . . . . . . . . . . . . . . . . . . . . . . . . . . . 127
❚
Using the Camera in another Country . . . . . . . . . . . . . . . . . . . . . . . . . . . . . . . 127
Using a Memory Card . . . . . . . . . . . . . . . . . . . . . . . . . . . . . . . . . . . . . . . . . 128
❚
To replace the memory card . . . . . . . . . . . . . . . . . . . . . . . . . . . . . . . . . . . . . . . 128
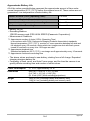
Computer System Requirements for
Bundled Software . . . . . . . . . . . . . . . . . . . . . . . . . . . .(Bundled CD-ROM) . 130
Reset Initial Default Settings . . . . . . . . . . . . . . . . . . . . . . . . . . . . . . . . . . . . 131
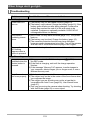
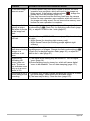
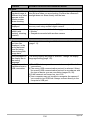
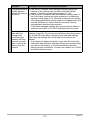
When things don’t go right... . . . . . . . . . . . . . . . . . . . . . . . . . . . . . . . . . . . . 133
❚
Troubleshooting . . . . . . . . . . . . . . . . . . . . . . . . . . . . . . . . . . . . . . . . . . . . . . . . 133
❚
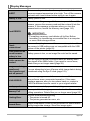
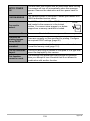
Display Messages. . . . . . . . . . . . . . . . . . . . . . . . . . . . . . . . . . . . . . . . . . . . . . . 138
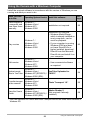
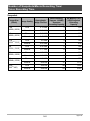
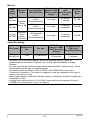
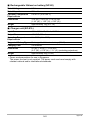
Number of Snapshots/Movie Recording Time/Voice Recording Time . . . . . 140
Specifications. . . . . . . . . . . . . . . . . . . . . . . . . . . . . . . . . . . . . . . . . . . . . . . . 142

8
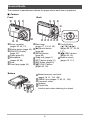
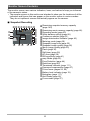
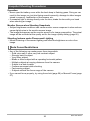
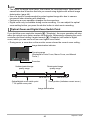
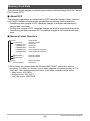
The numbers in parentheses indicate the pages where each item is explained.
. Camera
General Guide
1
Zoom controller
(pages 25, 45, 72)
2
Shutter button (page 25)
3
[ON/OFF] (Power)
(page 23)
4
Flash (page 36)
5
Microphone
(pages 49, 80)
6
Lens
7
Front lamp (page 38)
bs
Battery/memory card slots
(pages 18, 21, 126, 128)
bt
USB/AV port (pages 73, 83, 91, 100)
ck
Connector cover
cl
Speaker
cm
Tripod hole
Use this hole when attaching to a tripod.
4321
6
5
7
[ ]
[ ]
[ ]
[ ]
[
SET
]
bk
bn
8 9
bl
bm
bpbqbr bo
Front Back
bs
cl
cm
ck bt
Bottom
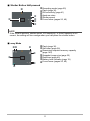
8
Back lamp
(pages 17, 23, 26, 36)
9
[0] (Movie) button
(page 48)
bk
[MENU] button
(page 55)
bl
Strap hole (page 2)
bm
[SET] button (page 31)
bn
[BS] button (page 52)
bo
[p] (PLAY) button
(pages 23, 28)
bp
Control button
([8][2][4][6])
(pages 29, 31, 36, 55,
117)
bq
[r] (REC) button
(pages 23, 25)
br
Monitor screen
(pages 10, 117)

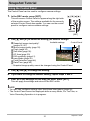
9
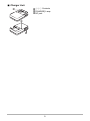
. Charger Unit
3
2
1
1
+7- Contacts
2
[CHARGE] Lamp
3
AC jack

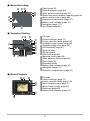
10
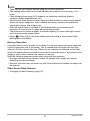
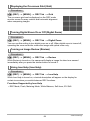
The monitor screen uses various indicators, icons, and values to keep you informed
of the camera’s status.
• The sample screens in this section are intended to show you the locations of all the
indicators and figures that can appear on the monitor screen in various modes.
They do not represent screens that actually appear on the camera.
. Snapshot Recording
Monitor Screen Contents
1
Remaining snapshot memory capacity
(page 140)
2
Remaining movie memory capacity (page 48)
3
Recording mode (page 25)
4
White balance setting (page 68)
5
Continuous shutter (page 61)
6
Image deterioration indicator (page 46)
7
Metering mode (page 69)
8
Snapshot image size (page 32)
9
Snapshot image quality (page 66)
bk
Movie image quality (page 35)
bl
Flash (page 36)
bm
Self-timer (page 38)
bn
AF Area (page 39)
bo
ISO sensitivity (page 41)
bp
easy Mode (page 42)
bq
Face Detection (page 44)
br
Date/time (page 45)
bs
Timestamp indicator (page 111)
bt
Exposure compensation (page 67)
ck
Focus frame (pages 26, 40)
cl
Battery level indicator (page 19)
cm
Histogram (page 117)
cn
Anti Shake (page 62)
co
Focus mode (page 57)
bq
bk
bl
bm
bo
bp
bn
brbs
89
341657
ckcl
2
bt
cn
co
cm

11
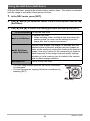
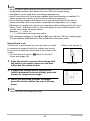
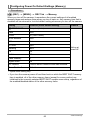
. Shutter Button Half-pressed
.
easy Mode
1
Recording mode (page 25)
2
Flash (page 36)
3
ISO sensitivity (page 41)
4
Aperture value
5
Shutter speed
6
Focus frame (pages 26, 40)
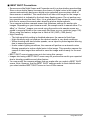
NOTE
• If the current aperture, shutter speed, ISO sensitivity, or Auto Exposure is not
correct, the setting will turn orange when you half-press the shutter button.
1
Flash (page 36)
2
Self-timer (page 38)
3
Remaining snapshot memory capacity
(page 140)
4
Snapshot image size (page 32)
5
Date/time (page 45)
6
Battery level indicator (page 19)
7
Focus frame (pages 26, 40)
6
3
2
4
5
1
6
7
5
4
321

12
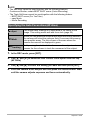
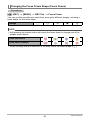
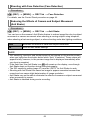
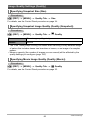
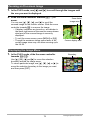
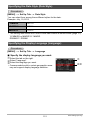
. Movie Recording
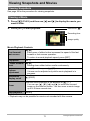
. Snapshot Viewing
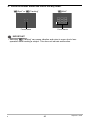
. Movie Playback
1
Flash (page 36)
2
Recording mode (page 48)
3
White balance setting (page 68)
4
Remaining movie memory capacity (page 48)
5
Movie recording time (page 48)
6
Exposure compensation (page 67)
7
Battery level indicator (page 19)
8
Histogram (page 117)
9
Anti Shake (page 62)
1
File type
2
Protect indicator (page 77)
3
Folder name/file name (page 105)
4
Snapshot image quality (page 66)
5
Snapshot image size (page 32)
6
ISO sensitivity (page 41)
7
Aperture value
8
Shutter speed
9
Date/time (page 45)
bk
Metering mode (page 69)
bl
White balance setting (page 68)
bm
Flash (page 36)
bn
Recording mode
bo
Battery level indicator (page 19)
bp
Histogram (page 117)
bq
Exposure compensation (page 67)
1
File type
2
Protect indicator (page 77)
3
Folder name/file name (page 105)
4
Movie recording time (page 71)
5
Movie image quality (page 35)
6
Date/time (page 45)
7
Battery level indicator (page 19)
123
7 6
8
9
4
5
31
bp
bq
bo blbkbmbn
4
7
5
8
9
6
2
1
4
5
7
23
6

13
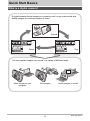
Quick Start Basics
Quick Start Basics
What is a digital camera?
Delete
A digital camera stores images on a memory card, so you can record and
delete images a countless number of times.
Play
Record
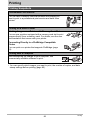
You can use the images you record in a variety of different ways.
Store images on your
computer.
Print images. Attach images to e-mail.

14
Quick Start Basics
Your CASIO camera is packed with a powerful selection of features and functions to
make recording of digital images easier, including the following three main functions.
What you can do with your CASIO camera
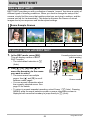
BEST SHOT
Simply select the sample scene you want and the
camera sets up automatically. Then all you need
do is press the shutter button for perfect images.
Anti Shake
The camera corrects automatically to minimize
image blur due to camera movement and high-
speed subject movement.
See page
62 for more information.
See page
52 for more information.
See page
44 for more information.
Face Detection
Point the camera at a person and it automatically
detects the person’s face for beautiful portraits
every time.

15
Quick Start Basics
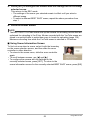
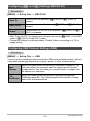
Note that the battery of a newly purchased camera is not charged. Perform the steps
under “Charging the Battery” to bring the battery to a full charge.
• Your camera requires a special CASIO rechargeable lithium ion battery (NP-80) for
power. Never try to use any other type of battery.
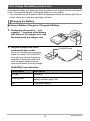
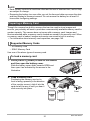
. Using a Battery Charger to Charge the Battery
1. Positioning the positive
+
and
negative
-
terminals of the battery
with those of the charger unit, load
the battery into the charger unit.
2. Plug the charger unit into a
household power outlet.
About 210 minutes are required to
reach full charge. The [CHARGE]
lamp will go out when charging is
complete. Unplug the power cord
from the power outlet and then
remove the battery from the charger.
[CHARGE] Lamp Operation
First, charge the battery prior to use.
Charging the Battery
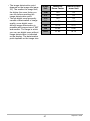
Lamp Status Description
Lit Red Charging
Flashing Red
Abnormal ambient temperature, charger problem, or
battery problem (page 126)
Off Charging complete
[CHARGE] lamp

16
Quick Start Basics
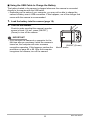
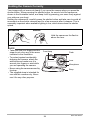
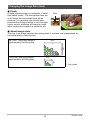
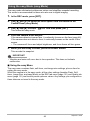
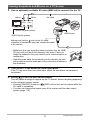
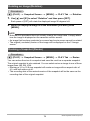
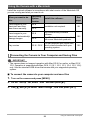
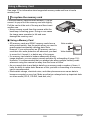
. Using the USB Cable to Charge the Battery
The battery loaded in the camera is charged whenever the camera is connected
directly to a computer with the USB cable.
• Depending on the setup of your computer, you may not be able to charge the
camera’s battery over a USB connection. If this happens, use of the charger that
comes with the camera is recommended.
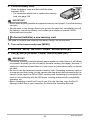
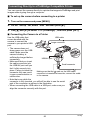
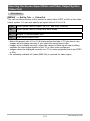
1. Load the battery into the camera (page 18).
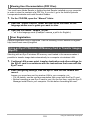
2. Turn off the camera.
Check to make sure that the camera’s monitor
screen is blank. If it isn’t, press [ON/OFF]
(Power) to turn off the camera.
IMPORTANT!
• If you connect the camera to a computer for the
first time after you purchase it while the camera is
turned on, the computer will enter a camera
recognition operation. If this happens, perform the
procedure on page 90 or 99. After the computer
recognizes the camera, turn off the camera.
Monitor screen
[ON/OFF] (Power)

17
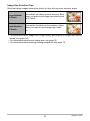
Quick Start Basics
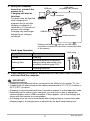
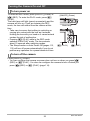
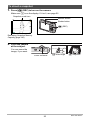
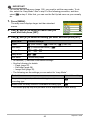
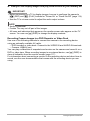
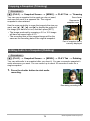
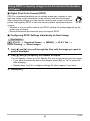
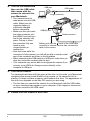
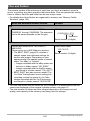
3. With your computer
turned on, connect the
camera to it.
Charging will start at
this time.
The back lamp will light red
while charging is in
progress and go out after
charging is complete. It
takes about 170 minutes to
achieve a full charge.
Charging may take longer
depending on charging
conditions.
Back Lamp Operation
4. After charging is complete, disconnect the USB cable from the camera
and then from the computer.
IMPORTANT!
• Charging is not performed when connected to the USB port of a printer, TV, etc.
• Charging will not start whenever the battery temperature is 0°C (32°F) or below or
60°C (140°F) or above.
• Charging is not performed while the connected computer is in the hibernate mode.
• Depending on the setup of your computer, you may not be able to charge the
camera’s battery over a USB connection. If this happens, use of the charger that
comes with the camera is recommended.
• A charging error can occur immediately after charging begins or some time after
charging begins. A charging error is indicated by the back lamp flashing red.
Lamp Status Description
Lit Red Charging
Flashing Red
Abnormal ambient temperature,
charging taking abnormally long,
or battery problem (page 126)
Off Charging complete
USB port
USB cable
(included with camera)
Making sure that the mark on the USB cable
connector is towards the lens side, connect the cable
to the camera.
USB/AV port
Large connector
Small connector
Back lamp

18
Quick Start Basics
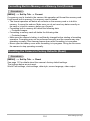
Other Charging Precautions
• Use the special charger (BC-81L if included with camera, BC-80L if purchased
separately) to charge the special lithium ion battery (NP-80). Never use any other
type of charger device. Attempting to use a different charger can result in
unexpected accident.
• A battery that is still warm due to normal use may not charge fully. Give the battery
time to cool before charging it.
• A battery discharges slightly even when it is not loaded in the camera. Because of
this, it is recommended that you charge the battery immediately before you need to
use it.
• Charging the camera’s battery may cause interference with TV and radio reception.
If this happens, plug the charger into an outlet that is further away from the TV or
radio.
• Actual charging time depends on current battery capacity and charging conditions.
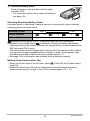
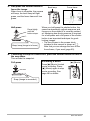
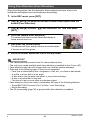
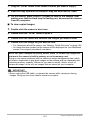
1. Open the battery cover.
Slide the battery cover slider towards OPEN and
then open it as indicated by the arrows in the
illustration.
2. Load the battery.
With the EXILIM logo on
the battery facing upwards
(in the direction of the
monitor screen), hold the
stopper next to the battery
in the direction indicated
by the arrow as you slide
the battery into the
camera. Press the battery
in until the stopper
secures it in place.
To load the battery
2
1
Stopper
EXILIM logo
Front
Back
Battery contacts

19
Quick Start Basics
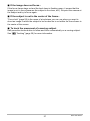
3. Close the battery cover.
Close the battery cover and then shift the slider
towards LOCK.
• For information about how to replace the battery,
see page 126.
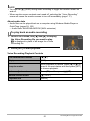
Checking Remaining Battery Power
As battery power is consumed, a battery indicator on the monitor screen indicates
remaining power as shown below.
indicates battery power is low. Charge the battery as soon as possible.
Recording is not possible when is indicated. Charge the battery immediately.
• The level shown by the battery indicator may change when you switch between the
REC mode and PLAY mode.
• The camera date and time display will not be correct if the camera is left for about
two days with no power supplied while the battery is dead. If this happens, load
new battery and then set the correct time and date (page 111).
• See page 144 for information about battery life and memory capacity.
Battery Power Conservation Tips
• When you do not need to use the flash, select ? (Flash Off) for the flash setting
(page 36).
• Enable the Auto Power Off and the Sleep features to protect against wasting
battery power when you forget to turn off the camera (pages 113, 113).
Remaining Power High Low
Battery Indicator ***
Indicator Color Cyan * Amber * Red * Red
1
2

20
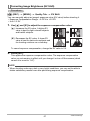
Quick Start Basics
The first time you load a battery into the camera, a screen appears for configuring the
display language, date, and time settings. Failure to set the date and time correctly
will cause the wrong date and time data to be recorded with images.
IMPORTANT!
• A screen for language selection will not appear in step 2 of the procedure below if
you purchased a camera intended for the Japanese market. To change the display
language from Japanese in this case, use the procedure under “Specifying the
Display Language (Language)” (page 112). Note that a version of this manual in
the language you select may not be included with a camera intended for the
Japanese market.
• Camera models sold in certain geographic areas may not support display language
selection.
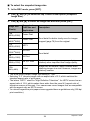
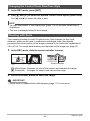
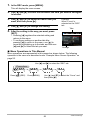
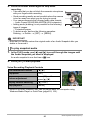
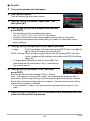
1. Press [ON/OFF] (Power) to turn on
the camera.
2. Use [8], [2], [4], and [6] to select
the language you want and then
press [SET].
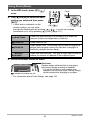
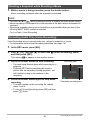
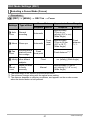
3. Use [8] and [2] to select a date style and then press [SET].
Example: July, 10, 2012
YY/MM/DD
* 12/7/10
DD/MM/YY
* 10/7/12
MM/DD/YY
* 7/10/12
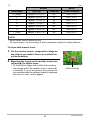
4. Set the date and the time.
Use [4] and [6] to select the setting you want to
change and then use [8] and [2] to change it.
To switch between 12-hour and 24-hour format, press
[BS].
5. After setting the date and time, use [4] and [6]
to select “Apply” and then press [SET].
Configuring Basic Settings the First Time You Turn On the
Camera
If you make a mistake configuring display language, date, or time settings with the
above procedure, refer to the following pages for information about how to correct
the settings.
– Display language: Page 112
– Date and time: Page 111
[
SET
]
[ON/OFF] (Power)
[BS]
La pagina sta caricando ...
La pagina sta caricando ...
La pagina sta caricando ...
La pagina sta caricando ...
La pagina sta caricando ...
La pagina sta caricando ...
La pagina sta caricando ...
La pagina sta caricando ...
La pagina sta caricando ...
La pagina sta caricando ...
La pagina sta caricando ...
La pagina sta caricando ...
La pagina sta caricando ...
La pagina sta caricando ...
La pagina sta caricando ...
La pagina sta caricando ...
La pagina sta caricando ...
La pagina sta caricando ...
La pagina sta caricando ...
La pagina sta caricando ...
La pagina sta caricando ...
La pagina sta caricando ...
La pagina sta caricando ...
La pagina sta caricando ...
La pagina sta caricando ...
La pagina sta caricando ...
La pagina sta caricando ...
La pagina sta caricando ...
La pagina sta caricando ...
La pagina sta caricando ...
La pagina sta caricando ...
La pagina sta caricando ...
La pagina sta caricando ...
La pagina sta caricando ...
La pagina sta caricando ...
La pagina sta caricando ...
La pagina sta caricando ...
La pagina sta caricando ...
La pagina sta caricando ...
La pagina sta caricando ...
La pagina sta caricando ...
La pagina sta caricando ...
La pagina sta caricando ...
La pagina sta caricando ...
La pagina sta caricando ...
La pagina sta caricando ...
La pagina sta caricando ...
La pagina sta caricando ...
La pagina sta caricando ...
La pagina sta caricando ...
La pagina sta caricando ...
La pagina sta caricando ...
La pagina sta caricando ...
La pagina sta caricando ...
La pagina sta caricando ...
La pagina sta caricando ...
La pagina sta caricando ...
La pagina sta caricando ...
La pagina sta caricando ...
La pagina sta caricando ...
La pagina sta caricando ...
La pagina sta caricando ...
La pagina sta caricando ...
La pagina sta caricando ...
La pagina sta caricando ...
La pagina sta caricando ...
La pagina sta caricando ...
La pagina sta caricando ...
La pagina sta caricando ...
La pagina sta caricando ...
La pagina sta caricando ...
La pagina sta caricando ...
La pagina sta caricando ...
La pagina sta caricando ...
La pagina sta caricando ...
La pagina sta caricando ...
La pagina sta caricando ...
La pagina sta caricando ...
La pagina sta caricando ...
La pagina sta caricando ...
La pagina sta caricando ...
La pagina sta caricando ...
La pagina sta caricando ...
La pagina sta caricando ...
La pagina sta caricando ...
La pagina sta caricando ...
La pagina sta caricando ...
La pagina sta caricando ...
La pagina sta caricando ...
La pagina sta caricando ...
La pagina sta caricando ...
La pagina sta caricando ...
La pagina sta caricando ...
La pagina sta caricando ...
La pagina sta caricando ...
La pagina sta caricando ...
La pagina sta caricando ...
La pagina sta caricando ...
La pagina sta caricando ...
La pagina sta caricando ...
La pagina sta caricando ...
La pagina sta caricando ...
La pagina sta caricando ...
La pagina sta caricando ...
La pagina sta caricando ...
La pagina sta caricando ...
La pagina sta caricando ...
La pagina sta caricando ...
La pagina sta caricando ...
La pagina sta caricando ...
La pagina sta caricando ...
La pagina sta caricando ...
La pagina sta caricando ...
La pagina sta caricando ...
La pagina sta caricando ...
La pagina sta caricando ...
La pagina sta caricando ...
La pagina sta caricando ...
La pagina sta caricando ...
La pagina sta caricando ...
La pagina sta caricando ...
La pagina sta caricando ...
La pagina sta caricando ...
La pagina sta caricando ...
La pagina sta caricando ...
La pagina sta caricando ...
-
 1
1
-
 2
2
-
 3
3
-
 4
4
-
 5
5
-
 6
6
-
 7
7
-
 8
8
-
 9
9
-
 10
10
-
 11
11
-
 12
12
-
 13
13
-
 14
14
-
 15
15
-
 16
16
-
 17
17
-
 18
18
-
 19
19
-
 20
20
-
 21
21
-
 22
22
-
 23
23
-
 24
24
-
 25
25
-
 26
26
-
 27
27
-
 28
28
-
 29
29
-
 30
30
-
 31
31
-
 32
32
-
 33
33
-
 34
34
-
 35
35
-
 36
36
-
 37
37
-
 38
38
-
 39
39
-
 40
40
-
 41
41
-
 42
42
-
 43
43
-
 44
44
-
 45
45
-
 46
46
-
 47
47
-
 48
48
-
 49
49
-
 50
50
-
 51
51
-
 52
52
-
 53
53
-
 54
54
-
 55
55
-
 56
56
-
 57
57
-
 58
58
-
 59
59
-
 60
60
-
 61
61
-
 62
62
-
 63
63
-
 64
64
-
 65
65
-
 66
66
-
 67
67
-
 68
68
-
 69
69
-
 70
70
-
 71
71
-
 72
72
-
 73
73
-
 74
74
-
 75
75
-
 76
76
-
 77
77
-
 78
78
-
 79
79
-
 80
80
-
 81
81
-
 82
82
-
 83
83
-
 84
84
-
 85
85
-
 86
86
-
 87
87
-
 88
88
-
 89
89
-
 90
90
-
 91
91
-
 92
92
-
 93
93
-
 94
94
-
 95
95
-
 96
96
-
 97
97
-
 98
98
-
 99
99
-
 100
100
-
 101
101
-
 102
102
-
 103
103
-
 104
104
-
 105
105
-
 106
106
-
 107
107
-
 108
108
-
 109
109
-
 110
110
-
 111
111
-
 112
112
-
 113
113
-
 114
114
-
 115
115
-
 116
116
-
 117
117
-
 118
118
-
 119
119
-
 120
120
-
 121
121
-
 122
122
-
 123
123
-
 124
124
-
 125
125
-
 126
126
-
 127
127
-
 128
128
-
 129
129
-
 130
130
-
 131
131
-
 132
132
-
 133
133
-
 134
134
-
 135
135
-
 136
136
-
 137
137
-
 138
138
-
 139
139
-
 140
140
-
 141
141
-
 142
142
-
 143
143
-
 144
144
-
 145
145
-
 146
146


in altre lingue
- English: Casio EX-Z16 User manual
Documenti correlati
-
Casio EX-S9 Manuale utente
-
-
-
-
Casio MA0907-A Manuale utente
-
Casio EX-ZS100 Manuale utente
-
-
-
-
Altri documenti
-
Canon PowerShot S110 Guida utente
-
Panasonic RRXS420E Manuale utente
-
Panasonic RR-XS410 Manuale del proprietario
-
-
Medion MD 85472 Manuale del proprietario
-
AEE Magicam S50+ Manuale utente
-
Nikon L-ENREGISTREUR DE DONNEES MV-1 Manuale utente
-
Panasonic AK-HRP200G Operating Instructions Manual