Indesit C 3V P6 (X) R Guida utente
- Categoria
- Forni
- Tipo
- Guida utente

GB
COOKER AND OVEN
C3VP6R
Operating Instructions
English, 1
GB
Ðóññêèé, 12
RS
Polski, 23
PL
Magyar, 34
HU
Cesky, 45
CZ
Contents
Installation, 2-3
Positioning and levelling
Electrical connection
Table of characteristics
Description of the appliance, 4
Overall view
Control panel
Start-up and use, 5-8
Using the oven
Cooking modes
Practical cooking advice
Planning cooking with the programmer
Oven cooking advice table
Using the glass ceramic hob, 9
Switching the cooking zones on and off
Cooking zones
Precautions and tips, 10
General safety
Disposal
Respecting and conserving the environment
Maintenance and care, 11
Switching the appliance off
Cleaning the appliance
Replacing the oven light bulb
Cleaning the glass ceramic hob
Assistance

2
GB
! Before operating your new appliance please read
this instruction booklet carefully. It contains
important information concerning the safe installation
and operation of the appliance.
! Please keep these operating instructions for future
reference. Make sure that the instructions are kept
with the appliance if it is sold, given away or moved.
! The appliance must be installed by a qualified
professional according to the instructions provided.
! Any necessary adjustment or maintenance must be
performed after the cooker has been disconnected
from the electricity supply.
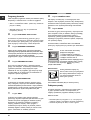
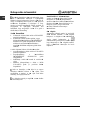
Positioning and levelling
! It is possible to install the appliance alongside
cupboards whose height does not exceed that of the
hob surface.
! Make sure that the wall in contact with the beck of
the appliance is made from a non-flammable, heat-
resistant material (T 90°C).
To install the appliance correctly:
Place it in the kitchen, dining room or the bed-sit
(not in the bathroom).
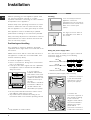
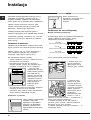
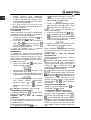
If the top of the hob is higher than the cupboards,
the appliance must be installed at least 200 mm
away from them.
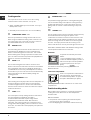
If the cooker is
installed underneath a
wall cabinet, there must
be a minimum distance
of 420 mm between this
cabinet and the top of
the hob.
This distance should be
increased to 700 mm if
the wall cabinets are
flammable (see figure).
Do not position blinds behind the cooker or less
than 200 mm away from its sides.
Any hoods must be installed according to the
instructions listed in the relevant operating manual.
Levelling
If it is necessary to level the
appliance, screw the
adjustable feet into the places
provided on each corner of the
base of the cooker (see
figure).
The legs* fit into the slots on
the underside of the base of
the cooker.
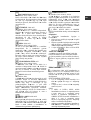
Electrical connection
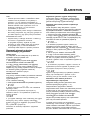
Fitting the power supply cable
The cable should be suited to the type of electrical
connection used, according to the following
connection diagram:
1 2
3
4
5
12345
1
2
3
4
5
R
S
T
N
R
S
N
R
N
400 3N
H05RR-F 5x2.5 CEI-UNEL 35363
400V 2N
H05RR-F 4x2.5 CEI-UNEL 35363
230V 1N
H07RN-F 3x4 CEI-UNEL 35364
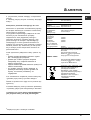
To install the power supply cable correctly:
1. Loosen the screw V
in the terminal board
and pull the cover to
open it (see figure).
2. Position the
connection supports A
(see figure) according
to the connection
diagram shown above.
The terminal board is
designed for single-
phase 230 V
connection: terminals 1,
2 and 3 are connected
Installation
HOOD
420
Min.
min.
650
mm. with hood
min.
700
mm. without hood
mm.
600
Min. mm.
420
Min. mm.
V
1
2
3
N
A
B
*
Only available in certain models.

GB
3
to each other; jumper 4-5 is located in the lower area
of the terminal board.
3. Position the wires N and
6 as shown in the
diagram (see figure) and proceed with the
connection process, tightening the terminal screws
as far as possible.
4. Position the remaining wires on terminals 1-2-3
and tighten the screws.
5. Fix the power supply cable in place by fastening
the cable clamp screw.
6. Close the terminal board cover by tightening the
screws V.
Connecting the supply cable to the mains
Install a standardised plug corresponding to the
load indicated on the appliance data plate (see
Technical data table).
The appliance must be directly connected to the mains
using an omnipolar circuit-breaker with a minimum
contact opening of 3 mm installed between the
appliance and the mains. The circuit-breaker must be
suitable for the charge indicated and must comply with
NFC 15-100 regulations (the earthing wire must not be
interrupted by the circuit-breaker). The supply cable
must be positioned so that it does not come into
contact with temperatures higher than 50°C at any point.
Before connecting the appliance to the power
supply, make sure that:
The appliance is earthed and the plug is compliant
with the law.
The socket can withstand the maximum power of
the appliance, which is indicated by the data
plate.
The voltage is in the range between the values
indicated on the data plate.
The socket is compatible with the plug of the
appliance. If the socket is incompatible with the
plug, ask an authorised technician to replace it.
Do not use extension cords or multiple sockets.
! Once the appliance has been installed, the power
supply cable and the electrical socket must be
easily accessible.
! The cable must not be bent or compressed.
! The cable must be checked regularly and replaced
by authorised technicians only.
! The manufacturer declines any liability should
these safety measures not be observed.
*
Only available in certain models.
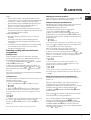
TABLE OF CHARACTERISTSICS
Dimensions
Oven HxDxW
34x41x38
Volume
53 l
Useful
measurements
relating to the oven
compartment
width 42 cm
depth 44 cm
height 17 cm
Voltage and
frequency
see data plate
Ceramic hob
Front Left
Back Left
Back Right
Front Right
Max. ceramic hob
consumption
1200 W
1800 W
1200 W
1800 W
6000 W
ENERGY LABEL
Directive 2002/40/EC on the label of
electric ovens.
Standard EN 50304
Energy consumption for Natural
convection – heating mode: a
Traditional mode;
Declared energy consumption for
Forced convection Class – heating
mode: u Baking mode.
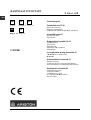
This appliance conforms to the following
European Economic Community
directives: 73/23/EEC dated 19/02/73
(Low Voltage) and subsequent
amendments - 89/336/EEC dated
03/05/89 (Electromagnetic
Compatibility) and subsequent
amendments - 93/68/EEC dated
22/07/93 and subsequent amendments.
2002/96/EEC

4
GB
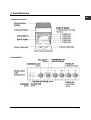
Description
of the appliance
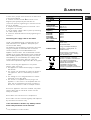
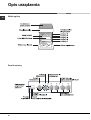
Overall view
Control panel
Control panel
GRILL rack
DRIPPING PAN
GUIDE RAILS
for the sliding racks
position 3
position 2
position 1
Glass
ceramic hob
Adjustable foot
Adjustable foot
position 5
position 4
Electronic
cooking
programmer
TIMER button
COOKING END TIME button
COOKING TIME button
THERMOSTAT
knob
HOTPLATES
indicator light
HOTPLATES
knob
SELECTOR
knob
THERMOSTAT
indicator light

GB
5
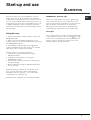
Start-up and use
! The first time you use your appliance, heat the
empty oven with its door closed at its maximum
temperature for at least half an hour. Ensure that the
room is well ventilated before switching the oven off
and opening the oven door. The appliance may emit
a slightly unpleasant odour caused by protective
substances used during the manufacturing process
burning away.
Using the oven
1. Select the desired cooking mode by turning the
SELECTOR knob.
2. Select the recommended temperature for the
cooking mode or the desired temperature by turning
the THERMOSTAT knob.
A list detailing cooking modes and suggested
cooking temperatures can be found in the relevant
table (see Oven cooking advice table).
During cooking it is always possible to:
Change the cooking mode by turning the
SELECTOR knob.
Change the temperature by turning the
THERMOSTAT knob.
Set the total cooking time and the cooking end
time (see below).
Stop cooking by turning the SELECTOR knob to
the 0 position.
! Never put objects directly on the bottom of the
oven; this will avoid the enamel coating being
damaged. Only use position 1 in the oven when
cooking with the rotisserie spit.
! Always place cookware on the rack(s) provided.
THERMOSTAT indicator light
When this is illuminated, the oven is generating
heat. It switches off when the inside of the oven
reaches the selected temperature. At this point the
light illuminates and switches off alternately,
indicating that the thermostat is working and is
maintaining the temperature at a constant level.
Oven light
This is switched on by turning the SELECTOR knob
to any position other than 0. It remains lit as long
as the oven is operating. By selecting
8
with the
knob, the light is switched on without any of the
heating elements being activated.

6
GB
Cooking modes
! A temperature value can be set for all cooking
modes between 50°C and Max, except for
GRILL, DOUBLE GRILL (recommended: set only to
MAX power level);
GRATIN (recommended: do not exceed 200°C).
a
TRADITIONAL OVEN mode
Both the top and bottom heating elements will come on.
When using this traditional cooking mode, it is best to use
one cooking rack only. If more than one rack is used, the
heat will be distributed in an uneven manner.
u BAKING mode
The rear heating element and the fan are switched on, thus
guaranteeing the distribution of heat in a delicate and
uniform manner throughout the entire oven. This mode is
ideal for baking and cooking temperature sensitive foods
(such as cakes that need to rise) and for the preparation of
pastries on 3 shelves simultaneously.
w PIZZA mode
The circular heating elements and the elements at the
bottom of the oven are switched on and the fan is activated.
This combination heats the oven rapidly by producing a
considerable amount of heat, particularly from the element
at the bottom. If you use more than one rack simultaneously,
switch the position of the dishes halfway through the
cooking process.
b MULTI-COOKING mode
All the heating elements (top, bottom and circular) switch on
and the fan begins to operate. Since the heat remains
constant throughout the oven, the air cooks and browns
food in a uniform manner. A maximum of two racks may be
used at the same time.
d GRILL mode
The central part of the top heating element is switched on.
The high and direct temperature of the grill is
recommended for food that requires a high surface
temperature (veal and beef steaks, fillet steak and
entrecôte). This cooking mode uses a limited amount of
energy and is ideal for grilling Place the food in the centre
of the rack, as it will not be cooked properly if it is placed in
the corners.
2
DOUBLE GRILL mode
This provides a larger grill than the normal grill setting and
has an innovative design that improves cooking efficiency
by 50% and eliminates the cooler corner areas. Use this
grilling mode to achieve a uniform browning on top of the
food.
T
GRATIN mode
The top heating element and the rotisserie (where present)
are activated and the fan begins to operate. This
combination of features increases the effectiveness of the
unidirectional thermal radiation provided by the heating
elements through forced circulation of the air throughout
the oven. This helps prevent food from burning on the
surface and allows the heat to penetrate right into the food.
! The GRILL, DOUBLE GRILL and GRATIN cooking modes
must be performed with the oven door shut.
Rotisserie*
To operate the rotisserie proceed as
follows:
1. Place the dripping pan in position 1.
2. Place the rotisserie support in position 4
and insert the spit in the hole provided
on the back panel of the oven (see
figure).
3. Activate the rotisserie by selecting
2/T
with the
SELECTOR knob.
Lower oven compartment
There is a compartment underneath the
oven that may be used to storeoven
accessories or deep dishes. To open the
door pull it downwards (see figure).
! Do not place flammable materials in the lower oven
compartment.
Practical cooking advice
! Do not place racks in position 1 or 5 during fan-assisted
cooking. Excessive direct heat can burn temperature
sensitive foods.
MULTI-COOKING
Use positions 2 and 4, placing the food that requires
more heat on the rack in position 2.
Place the dripping pan on the bottom and the rack on top.

GB
7
GRILL
When using the GRILL and DOUBLE GRILL cooking
modes, place the rack in position 5 and the dripping pan
in position 1 to collect cooking residues (fat and/or
grease). When using the GRATIN cooking mode, place
the rack in position 2 or 3 and the dripping pan in
position 1 to collect cooking residues.
We recommend that the power level is set to maximum.
The top heating element is regulated by a thermostat and
may not always operate contantly.
PIZZA OVEN MODE
Use a light aluminium pizza pan. Place it on the rack
provided.
For a crispy crust, do not use the dripping pan as it
prevents the crust from forming by extending the total
cooking time.
If the pizza has a lot of toppings, we recommend adding
the mozzarella cheese on top of the pizza halfway
through the cooking process.
Planning cooking with the electronic
programmer*
Setting the clock
After the appliance has been connected to the power
supply, or after a blackout, the display will automatically
reset to 0:00 and begin to blink. To set the time:
1. Press the COOKING TIME button
$
and the COOKING
END TIME
%
simultaneously.
2. Within 4 seconds of having pressed these buttons, set
the exact time by pressing the
*
and
)
buttons. The
*
button advances the hours and the
)
button decreases
the hours.
Once the time has been set, the programmer automatically
switches to manual mode.
Setting the timer
The timer enables a countdown to be set, when the time has
elapsed a buzzer sounds.
To set the timer proceed as follows:
1. press the TIMER button
H. The display shows:
N.
2. Press the
*
and
)
buttons to set the desired time.
3. When the buttons are released the timer begins
counting down and the current time appears on the
display.
R
4. After the time has elapsed a buzzer will sound, and
this can be switched off by pressing any button
(except the
*
and
)
buttons). The symbol
H
will
switch off.
! The timer does not switch the oven on or off.
Adjusting the volume of the buzzer
After selecting and confirming the clock settings, use the
)
button to adjust the volume of the alarm buzzer.
Setting the cooking time with a delayed start
First decide which cooking mode you wish to use and set a
suitable temperature using the SELECTOR and
THERMOSTAT knobs on the oven.
At this point it is possible to set the cooking time:
1. Press the COOKING TIME button
$
.
2. Within 4 seconds of having pressed this button, set the
desired amount of time by pressing the
*
and
)
buttons. If,
for example, you wish to set a cooking time of 30 minutes, the
display will show:
N.
3. 4 seconds after the buttons are released, the current
time (for example 10.00) reappears on the display with
the symbol
m
and the letter A (AUTO).
Next the desired cooking end time must be set:
4. Press the END COOKING TIME button
%
.
5. Within 4 seconds of having pressed this button,
adjust the cooking end time by pressing the
*
and
)
buttons. If, for example, you want cooking to end at
13.00, the display shows:
O
6. 4 seconds after the buttons are released, the
current time (for example 10.00) reappears on the
display with the letter A (AUTO).
P
At this point, the oven is programmed to switch on
automatically at 12:30 and switch off after 30 minutes,
at 13.00.
Setting the cooking time with an immediate start
Follow the above procedure for setting the cooking time
(points 1-3).
! When the letter A appears, this indicates that both the
cooking time and the end cooking time have been
programmed in AUTO mode. To restore the oven to manual
operation, after each AUTO cooking mode press the
COOKING TIME
$
and END COOKING TIME
%
buttons
simultaneously.
! The symbol
m
will remain lit, along with the oven, for the
entire duration of the cooking programme.
The set cooking duration can be displayed at any time by
pressing the COOKING TIME button
$>$
, and the
cooking end time may be displayed by pressing the END
COOKING TIME button
%
. When the cooking time has
elapsed a buzzer sounds. To stop it, press any button apart
from the
*
and
)
buttons.

8
GB
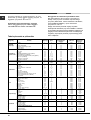
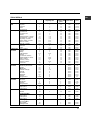
Cooking advice table for the oven
Cooking
modes
Foods Weight
(in kg)
Rack position Preheating
time
(min)
Recommended
temperature
Cooking
time
(minutes)
Convection
Oven
Duck
Roast veal or beef
Roast pork
Biscuits (shortcrust pastry)
Tarts
1
1
1
-
1
3
3
3
3
3
15
15
15
15
15
200
200
200
180
180
65-75
70-75
70-80
15-20
30-35
Baking mode
Tarts
Fruit cakes
Sponge cake made with
yoghurt
Sponge cake
Stuffed pancakes (on 2 racks)
Small cakes (on 2 racks)
Cheese puffs (on 2 racks)
Cream puffs (on 3 racks)
Biscuits (on 3 racks)
Meringues (on 3 racks)
0.5
1
0.7
0.5
1.2
0.6
0.4
0.7
0.7
0.5
3
2 or 3
3
3
2 and 4
2 and 4
2 and 4
1 and 3 and 5
1 and 3 and 5
1 and 3 and 5
15
15
15
15
15
15
15
15
15
15
180
180
180
160
200
190
210
180
180
90
20-30
40-45
40-50
25-30
30-35
20-25
15-20
20-25
20-25
180
Pizza Mode
Pizza
Roast veal or beef
Chicken
0.5
1
1
3
2
2 or 3
15
10
10
220
220
180
15-20
25-30
60-70
Multi-cooking
Pizza (on 2 racks)
Lasagne
Lamb
Roast chicken + potatoes
Mackerel
Sponge cake made with
yoghurt
Cream puffs (on 2 racks)
Biscuits (on 2 racks)
Sponge cake (on 1 rack)
Sponge cake (on 2 racks)
Savoury pies
1
1
1
1+1
1
1
0.5
0.5
0.5
1
1.5
2 and 4
3
2
2 and 4
2
2
2 and 4
2 and 4
2
2 and 4
3
15
10
10
15
10
10
10
10
10
10
15
230
180
180
200
180
170
190
180
170
170
200
15-20
30-35
40-45
60-70
30-35
40-50
20-25
10-15
15-20
20-25
25-30
Grill
Sole and cuttlefish
Squid and prawn kebabs
Cuttlefish
Cod fillet
Grilled vegetables
Veal steak
Sausages
Hamburgers
Mackerel
Toasted sandwiches (or toast)
0.7
0.6
0.6
0.8
0.4
0.8
0.6
0.6
1
n.° 4 and 6
4
4
4
4
3 or 4
4
4
4
4
4
100%
100%
100%
100%
100%
100%
100%
100%
100%
100%
10-12
8-10
10-15
10-15
15-20
15-20
15-20
10-12
15-20
3-5
Veal steak
Cutlets
Hamburgers
Mackerel
Toast
1
1
1
1
n.° 4
4
4
4
4
4
5
5
5
5
5
Max
Max
Max
Max
Max
15-20
15-20
7-10
15-20
2-3
Double Grill
With the rotisserie
Spit-roast veal
Spit-roast chicken
1.0
2.0
5
5
Max
Max
70-80
70-80
Grilled chicken
Cuttlefish
1.5
1.5
2
2
10
10
200
200
55-60
30-35
With the rotisserie
Spit-roast veal
Spit-roast chicken
Spit-roast lamb
1.5
1.5
1.5
5
5
5
200
200
200
70-80
70-80
70-80
Gratin
With multi-spit rotisserie
(selected models only)
Meat kebabs
Vegetable kebabs
1.0
0.8
5
5
Max
Max
40-45
25-30
Cancelling a previously set cooking programme
Press the COOKING TIME button
$
and the
COOKING END TIME
%
simultaneously.
Correcting or cancelling previously set data
The data entered can be changed at any time by pressing
the corresponding button (TIMER, COOKING TIME or
COOKING END TIME) and the
*
or
)
button.
When the cooking time data is cancelled, the cooking end
time data is also cancelled automatically, and vice versa.
If the oven has already been programmed, it will not accept
cooking end times which are before the start of the
programmed cooking process.

GB
9
Using the glass ceramic hob
! The glue applied on the gaskets leaves traces of
grease on the glass. Before using the appliance, we
recommend you remove these with a special non-
abrasive cleaning product. During the first few hours
of use there may be a smell of rubber which will
disappear very quickly.
Switching the cooking zones on and off
To switch on a cooking zone, turn the corresponding
knob in a clockwise direction.
To switch it off again, turn the knob in an
anticlockwise direction until it is in the "0" position.
If the ELECTRIC HOTPLATE ON indicator light is lit,
this shows that at least one hotplate on the hob is
switched on.
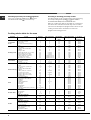
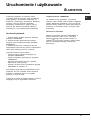
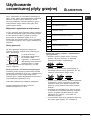
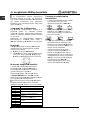
Cooking zones
The hob is equipped with electric halogen heating
elements. When they are in use the following items
on the hob become red.
A. The cooking zone with
halogen heating elements.
B. The residual heat indicator
light: this indicates that the
temperature of the
corresponding cooking zone
is greater than 60°C, even when the heating element
has been switched off but is still hot.
Cooking zones with halogen heating elements
These emit heat via radiation from the halogen
lamps they contain. They have similar properties to
gas burners: they are easy to control and reach set
temperatures quickly, allowing you to actually see
the power they are providing.
! Do not stare directly at the halogen heating elements.
Turn the corresponding knob in a clockwise
direction, to a position between 1 and 12.
Pos. Radiant hotplate
0
Off
1 Melting butter and chocolate
2
Heating liquids
3
4
Soups and sauces
5
6
Cooking at boiling point
7
8
Pan-roasting
9
10
Boiling large quantities
11
12
Frying
Practical advice on using the hob
Use pans with a thick, flat base to ensure that
they adhere perfectly to the cooking zone.
Always use pans with a diameter that is large
enough to cover the hotplate fully, in order to use
all the heat produced.
Always make sure that the base of the pan is
completely clean and dry: this ensures that the
pans adhere perfectly to the cooking zones and
that both the pans and the hob last for a longer
period of time.
Avoid using the same cookware that is used on
gas burners: the heat concentration on gas
burners may have warped the base of the pan,
causing it not to adhere to the surface correctly.
Never leave a cooking zone switched on without a
pan on top of it, as doing so may cause the zone
to become damaged.
A
A
A
A
B

10
GB
Precautions and tips
! This appliance has been designed and manufactured
in compliance with international safety standards.
The following warnings are provided for safety
reasons and must be read carefully.
General safety
The vitreous china hob is resistant to temperature
fluctuations and shockproof. Remember however
that sharp kitchen tools or cutters may break the
surface of the hob. If this happens, unplug the
cooker immediately from the mains and call only an
authorised after-sales servicing centre and request
the use of original spare parts only. Failure to
comply with the above may compromise the safety
of the appliance.
The appliance was designed for domestic use
inside the home and is not intended for commercial
or industrial use.
The appliance must not be installed outdoors, even
in covered areas. It is extremely dangerous to leave
the appliance exposed to rain and storms.
Do not touch the appliance with bare feet or with
wet or damp hands and feet.
The appliance must be used by adults only for the
preparation of food, in accordance with the
instructions provided in this booklet.
The instruction booklet accompanies a class 1
(insulated) or class 2 - subclass 1 (recessed
between 2 cupboards) appliance.
Keep children away from the oven.
Make sure that the power supply cables of other
electrical appliances do not come into contact with
the hot parts of the oven.
The openings used for the ventilation and
dispersion of heat must never be covered.
Always use oven gloves when placing cookware in
the oven or when removing it.
Do not use flammable liquids (alcohol, petrol, etc...)
near the appliance while it is in use.
Do not place flammable material in the lower
storage comaprtment or in the oven itself. If the
appliance is switched on accidentally, it could
catch fire.
Always make sure the knobs are in the
position
when the appliance is not in use.
When unplugging the appliance, always pull the plug
from the mains socket; do not pull on the cable.
Never perform any cleaning or maintenance work
without having disconnected the appliance from
the electricity mains.
If the appliance breaks down, under no
circumstances should you attempt to repair the
appliance yourself. Repairs carried out by
inexperienced persons may cause injury or further
malfunctioning of the appliance. Contact
Assistance.
Do not rest heavy objects on the open oven door.
Disposal
When disposing of packaging material: observe
local legislation so that the packaging may be
reused.
The European Directive 2002/96/EC relating to
Waste Electrical and Electronic Equipment (WEEE)
states that household appliances should not be
disposed of using the normal solid urban waste
cycle. Exhausted appliances should be collected
separately in order to optimise the cost of re-using
and recycling the materials inside the machine,
while preventing potential damage to the
atmosphere and to public health. The crossed-out
dustbin is marked on all products to remind the
owner of their obligations regarding separated
waste collection. For more information relating to
the correct disposal of household appliances,
owners should contact their local authorities or
appliance dealer.
Respecting and conserving the
environment
You can help to reduce the peak load of the
electricity supply network companies by using the
oven in the hours between late afternoon and the
early hours of the morning.
Always keep the oven door closed when using the
GRILL, DOUBLE GRILL and GRATIN modes: this will
achieve better results while saving energy
(approximately 10%).
Check the door seals regularly and wipe them
clean to ensure they are free of debris so that they
adhere properly to the door, thus avoiding heat
dispersion.

GB
11
Switching the appliance off
Disconnect your appliance from the electricity supply
before carrying out any work on it.
! Do not use steam jets to clean the appliance.
Cleaning the appliance
The stainless steel or enamel-coated external parts
and the rubber seals may be cleaned using a
sponge that has been soaked in lukewarm water
and neutral soap. Use specialised products for the
removal of stubborn stains. After cleaning, rinse
well and dry thoroughly. Do not use abrasive
powders or corrosive substances.
The inside of the oven should ideally be cleaned
after each use, while it is still lukewarm. Use hot
water and detergent, then rinse well and dry with a
soft cloth. Do not use abrasive products.
Clean the glass oven door using non-abrasive
products and sponges and dry it with a soft cloth.
The accessories can be washed like everyday
crockery, and are even dishwasher safe.
Dirt and grease should be removed from the control
panel using a non-abrasive sponge or a soft cloth.
Inspecting the oven seals
Check the door seals around the oven regularly. If the
seals are damaged, please contact your nearest
Authorised After-sales Service Centre. We
recommend that the oven is not used until the seals
have been replaced.
Replacing the oven light bulb
1. After disconnecting the oven
from the electricity mains, remove
the glass lid covering the lamp
socket (see figure).
2. Remove the light bulb and
replace it with a similar one: voltage
230 V, wattage 25 W, cap E 14.
3. Replace the lid and reconnect the oven to the
electricity supply.
Cleaning the glass ceramic hob
! Do not use abrasive or corrosive detergents (for
example, products in spray cans for cleaning barbecues
and ovens), stain removers, anti-rust products, powder
detergents or sponges with abrasive surfaces: these may
scratch the surface beyond repair.
It is usually sufficient simply to wash the hob using a
damp sponge and dry it with absorbent kitchen roll.
If the hob is particularly dirty, rub it with a special glass
ceramic cleaning product, then rinse well and dry
thoroughly.
To remove more stubborn dirt, use a suitable scraper
(this is not supplied with the appliance). Remove
spills as soon as possible, without waiting for the
appliance to cool, to avoid residues forming crusty
deposits. You can obtain excellent results by using a
rustproof steel wire sponge - specifically designed for
glass ceramic surfaces - soaked in soapy water.
If plastic or sugary substances have accidentally
been melted on the hob, remove them immediately
with the scraper, while the surface is still hot.
Once it is clean, the hob may be treated with a special
protective maintenance product: the invisible film left
by this product protects the surface from drips during
cooking. This maintenance should be carried out
while the appliance is warm (not hot) or cold.
Always remember to rinse the appliance well with
clean water and dry it thoroughly: residues can
become encrusted during subsequent cooking
processes.
Glass ceramic hob
cleaners
Available from
Window scraper Razor blade
scrapers
DIY Stores
Replacement blades DIY Stores,
supermarkets,
chemists
COLLO luneta
HOB BRITE
Hob Clean
SWISSCLEANER
Boots, Co-op stores,
department stores, Regional
Electricity Company shops,
supermarkets
Cleaning stainless steel
Stainless steel can be marked by hard water that has
been left on the surface for a long time, or by aggressive
detergents that contain phosphorus. We recommend
that the steel surfaces are rinsed well then dried
thoroughly.
Assistance
Please have the following information to hand:
The appliance model (Mod.).
The serial number (S/N).
This information can be found on the data plate
located on the appliance and/or on the packaging.
Care and maintenance

C3VP6R
Ñîäåðæàíèå
Ìîíòàæ, 13-14
Ðàñïîëîæåíèå è íèâåëèðîâêà
Ýëåêòðè÷åñêîå ïîäñîåäèíåíèå
Òåõíè÷åñêèå äàííûå
Îïèñàíèå èçäåëèÿ, 15
Îáùèè âèä
Ïàíåëü óïðàâëåíèÿ
Ïîðÿäîê ýêñïëóàòàöèè äóõîâîãî øêàôà, 16-
19
Âêëþ÷åíèå äóõîâîãî øêàôà
Ïðîãðàììû ïðèãîòîâëåíèÿ
Ïðàêòè÷åñêèå ñîâåòû ïî ïðèãîòîâëåíèþ
Ïðîãðàììèðîâàíèå ïðèãîòîâëåíèÿ ïðè ïîìîùè òàèìåðà
Òàáëèöà ïðèãîòîâëåíèÿ â äóõîâîì øêàôó
Ñòåêëîêåðàìè÷åñêàÿ âàðî÷íàÿ ïàíåëü, 20
Âêëþ÷åíèå è âûêëþ÷åíèå íàãðåâàòåëüíûõ çîí
Íàãðåâàòåëüíûå çîíû
Ïðåäîñòîðîæíîñòè è ðåêîìåíäàöèè, 21
Îáùèå òðåáîâàíèÿ ê áåçîïàñíîñòè
Óòèëèçàöèÿ
Ýêîíîìèÿ ýëåêòðîýíåðãèè è îõðàíà îêðóæàþùåè ñðåäû
Òåõíè÷åñêîå îáñëóæèâàíèå è óõîä, 22
Îòêëþ÷åíèå ýëåêòðîïèòàíèÿ
×èñòêà äóõîâîãî øêàôà
Çàìåíà ëàìïî÷êè â äóõîâîì øêàôó
×èñòêà ñòåêëîêåðàìè÷åñêîè âàðî÷íîè ïàíåëè
Òåõíè÷åñêîå îáñëóæèâàíèå
Ðóêîâîäñòâî ïî
ýêñïëóàòàöèè
ÊÓÕÎÍÍÀß ÏËÈÒÀ Ñ ÄÓÕÎÂÛÌ ØÊÀÔÎÌ
RS
English, 1
RS
Ðóññêèé,12
GB
Polski, 23
PL
Magyar, 34
HU
Cesky, 45
CZ

13
RS
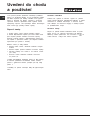
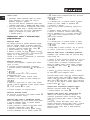
! Âàæíî ñîõðàíèòü äàííîå ðóêîâîäñòâî äëÿ åãî
ïîñëåäóþùèõ êîíñóëüòàöèè.  ñëó÷àå ïðîäàæè,
ïåðåäà÷è èëè ïåðååçäà ïðîâåðüòå, ÷òîáû äàííîå
ðóêîâîäñòâî ñîïðîâîæäàëî èçäåëèå.
! Âíèìàòåëüíî ïðî÷èòàèòå èíñòðóêöèè: â íèõ
ñîäåðæàòñÿ âàæíûå ñâåäåíèÿ îá óñòàíîâêå,
ýêñïëóàòàöèè è áåçîïàñíîñòè èçäåëèÿ.
! Óñòàíîâêà èçäåëèÿ ïðîèçâîäèòñÿ â ñîîòâåòñòâèè
ñ äàííûìè èíñòðóêöèÿìè êâàëèôèöèðîâàííûìè
ñïåöèàëèñòàìè.
! Ëþáàÿ îïåðàöèÿ ïî ðåãóëÿöèè èëè òåõíè÷åñêîìó
îáñëóæèâàíèþ äîëæíà ïðîèçâîäèòüñÿ òîëüêî ïîñëå
îòñîåäèíåíèÿ ýëåêòðîïðèáîðà îò ñåòè ýëåêòðîïèòàíèÿ.
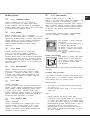
Ðàñïîëîæåíèå è íèâåëèðîâêà
! Èçäåëèå ìîæåò áûòü óñòàíîâëåíî ðÿäîì ñ
êóõîííûìè ýëåìåíòàìè, âûñîòà êîòîðûõ íå
ïðåâûøàåò ïîâåðõíîñòü âàðî÷íîè ïàíåëè.
! Ïðîâåðüòå, ÷òîáû ñòåíà, ê êîòîðîè ïðèëåãàåò
çàäíÿÿ ÷àñòü èçäåëèÿ, áûëà èç íåâîçãîðàåìîãî
ìàòåðèàëà è óñòîè÷èâîè ê òåïëó (Ò 90°C).
Ïîðÿäîê ìîíòàæà:
èçäåëèå ìîæåò áûòü óñòàíîâëåíî íà êóõíå, â
ñòîëîâîè èëè â îäíîêîìíàòíîè êâàðòèðå (íå â
âàííîè êîìíàòå);
åñëè âàðî÷íàÿ ïàíåëü êóõîííîè ïëèòû âûøå
ìåáåëüíûõ ýëåìåíòîâ, íåîáõîäèìî îòîäâèíóòü èõ
îò ïëèòû íà ðàññòîÿíèå íå ìåíåå 200 ìì.
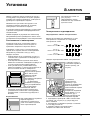
åñëè êóõîííàÿ ïëèòà óñòàíàâëèâàåòñÿ ïîä
íàâåñíûì øêàôîì, îí äîëæåí ðàñïîëàãàòüñÿ íà
âûñîòå íå ìåíåå 420 ìì îò ïîâåðõíîñòè
âàðî÷íîè ïàíåëè.
Ýòî ðàññòîÿíèå äîëæíî
áûòü 700 ìì, åñëè
íàâåñíûå øêàôû
âûïîëíåíû èç
âîçãîðàåìîãî ìàòåðèàëà
(ñì. ðèñóíîê);
íå çàïðàâëÿèòå
çàíàâåñêè çà êóõîííóþ
ïëèòó è íå ïðèáëèæàèòå
èõ íà ðàññòîÿíèå
ìåíüøå 200 ìì.
âîçìîæíàÿ êóõîííàÿ âûòÿæêà äîëæíà áûòü
óñòàíîâëåíà â ñîîòâåòñòâèè ñ èíñòðóêöèÿìè,
ïðèâåäåííûìè â òåõíè÷åñêîì ðóêîâîäñòâå ê
âûòÿæêå.
Âûðàâíèâàíèå
Ïðè íåîáõîäèìîñòè âûðîâíÿòü
èçäåëèå âêðóòèòå â
ñïåöèàëüíûå îòâåðñòèÿ ïî
óãëàì â îñíîâàíèè êóõîííîè
ïëèòû ïðèëàãàþùèåñÿ
ðåãóëÿöèîííûå íîæêè* ïî
(ñì. ðèñóíîê).
Ïðèëàãàþùèåñÿ íîæêè*
âñòàâëÿþòñÿ ïîä îñíîâàíèå
êóõîííîè ïëèòû.
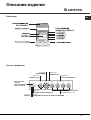
Ýëåêòðè÷åñêîå ïîäñîåäèíåíèå
Ïîäñîåäèíåíèå êàáåëÿ ýëåêòðîïèòàíèÿ
Êàáåëü ðàñ÷èòûâàåòñÿ â çàâèñèìîñòè îò òèïà
ýëåêòðè÷åñêîãî ñîåäèíåíèÿ ïî ñëåäóþùåè
ýëåêòðè÷åñêîè ñõåìå:
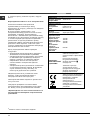
Ïîðÿäîê ïîäñîåäèíåíèÿ êàáåëÿ ýëåêòðîïèòàíèÿ:
1. Îòâèíòèòå øóðóï V
íà çàæèìíîè êîðîáêå è
ñíèìèòå êðûøêó (ñì.
ðèñóíîê).
2. óñòàíîâèòå
ñîåäèíèòåëüíóþ
ïåðåìû÷êó À (ñì.
ðèñóíîê) ïî ïðèâåäåííîè
âûøå ýëåêòðè÷åñêîè
ñõåìå Çàæèìíàÿ êîðîáêà
ðàñ÷èòàíà íà
ìîíîôàçíîå ñîåäèíåíèå
230 Â: çàæèìû 1, 2 è 3
ñîåäèíåíû äðóã ñ
äðóãîì; ïåðåìû÷êà 4-5
ðàñïîëîæåíà â íèæíåè ÷àñòè çàæèìíîè êîðîáêè.
3. ïîäñîåäèíèòå ïðîâîäà N è
6 â ñîîòâåòñòâèè
ñî ñõåìîè (ñì. ðèñóíîê) è äî óïîðà çàêðóòèòå
âèíòû çàæèìîâ.
4. ïîäñîåäèíèòå îñòàâøèåñÿ ïðîâîäà ê çàæèìàì
1-2-3 è çàêðóòèòå âèíòû.
5. çàêðåïèòå êàáåëü ýëåêòðîïèòàíèÿ â
ñïåöèàëüíîì êàáåëüíîì ñàëüíèêå.
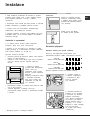
Óñòàíîâêà
HOOD
420
Min.
min.
650
mm. with hood
min.
700
mm. without hood
mm.
600
Min. mm.
420
Min. mm.
V
1
2
3
N
A
B
1 2
3
4
5
12345
1
2
3
4
5
R
S
T
N
R
S
N
R
N
400 3N
H05RR-F 5x2.5 CEI-UNEL 35363
400V 2N
H05RR-F 4x2.5 CEI-UNEL 35363
230V 1N
H07RN-F 3x4 CEI-UNEL 35364

14
RS
6. çàêðîèòå êðûøêó çàæèìíîè êîðîáêè, çàêðóòèâ
âèíò V.
Ïîäñîåäèíåíèå êàáåëÿ ê ñåòè ýëåêòðîïèòàíèÿ
Óñòàíîâèòå íà êàáåëü ýëåêòðîïèòàíèÿ
íîðìàëèçîâàííóþ øòåïñåëüíóþ âèëêó,
ðàñ÷èòàííóþ íà íàãðóçêó, óêàçàííóþ íà çàâîäñêîè
òàáëè÷êå èçäåëèÿ.
 ñëó÷àå ïðÿìîãî ïîäêëþ÷åíèÿ ê ñåòè
ýëåêòðîïèòàíèÿ ìåæäó êóõîííîè ïëèòîè è ñåòüþ
íåîáõîäèìî óñòàíîâèòü ìóëüòèïîëÿðíûè
âûêëþ÷àòåëü ñ ìèíèìàëüíûì ðàññòîÿíèåì ìåæäó
êîíòàêòàìè 3 ìì, ðàñ÷èòàííûè íà äàííóþ íàãðóçêó
è ñîîòâåòñòâóþùèè äåèñòâóþùèì íîðìàòèâàì
(âûêëþ÷àòåëü íå äîëæåí ðàçìûêàòü ïðîâîä
çàçåìëåíèÿ). Êàáåëü ýëåêòðîïèòàíèÿ äîëæåí áûòü
ðàñïîëîæåí òàêèì îáðàçîì, ÷òîáû íè â îäíîè
òî÷êå åãî òåìïåðàòóðà íå ïðåâûøàëà òåìïåðàòóðó
ïîìåùåíèÿ áîëåå ÷åì íà 50°C.
Ïåðåä ïîäñîåäèíåíèåì êàáåëÿ ïðîâåðüòå
ñëåäóþùåå:
ýëåêòðè÷åñêàÿ ðîçåòêà äîëæíà áûòü ñîåäèíåíà ñ
çàçåìëåíèåì è ñîîòâåòñòâîâàòü íîðìàòèâàì;
ýëåêòðè÷åñêàÿ ðîçåòêà äîëæíà áûòü ðàññ÷èòàíà
íà ìàêñèìàëüíóþ ïîòðåáëÿåìóþ ìîùíîñòü
èçäåëèÿ, óêàçàííóþ íà çàâîäñêîè òàáëèêå;
íàïðÿæåíèå è ÷àñòîòà òîêà ñåòè äîëæíû
ñîîòâåòñòâîâàòü ýëåêòðè÷åñêèì äàííûì
èçäåëèÿ;
ýëåêòðè÷åñêàÿ ðîçåòêà äîëæíà áûòü ñîâìåñòèìà
ñî øòåïñåëüíîè âèëêîè èçäåëèÿ. Â ïðîòèâíîì
ñëó÷àå çàìåíèòå ðîçåòêó èëè âèëêó; íå
èñïîëüçóèòå óäëèíèòåëè èëè òðîèíèêè.
! Èçäåëèå äîëæíî áûòü óñòàíîâëåíî òàêèì
îáðàçîì, ÷òîáû ýëåêòðè÷åñêèè êàáåëü è
ýëåêòðîðîçåòêà áûëè ëåãêî äîñòóïíû.
! Ýëåêòðè÷åñêèè êàáåëü èçäåëèÿ íå äîëæåí áûòü
ñîãíóò èëè ñæàò.
! Ðåãóëÿðíî ïðîâåðÿèòå ñîñòîÿíèå êàáåëÿ
ýëåêòðîïèòàíèÿ è ïðè íåîáõîäèìîñòè ïîðó÷àèòå
åãî çàìåíó òîëüêî óïîëíîìî÷åííûì òåõíèêàì.
! Ïðîèçâîäèòåëü íå íåñåò îòâåòñòâåííîñòè çà
ïîñëåäñòâèÿ íåñîáëþäåíèÿ ïåðå÷èñëåííûõ
òðåáîâàíèè.
*
Èìååòñÿ òîëüêî â íåêîòîðûõ ìîäåëÿõ
ÒÅÕÍÈ×ÅÑÊÈÅ ÄÀÍÍÛÅ
Ãàáàðèòíûå
ðàçìåðû äóõîâîãî
øêàôà ÂõØõÃ
34x41x38 cì
Îáúåì
ë 53
Ðàáî÷èå ðàçìåðû
ÿùèêà äëÿ
ðàçîãðåâàíèÿ
ïèùè
øèðèíà 42 ñì
ãëóáèíà 44 cì
âûñîòà 17 ñì.
Íàïðÿæåíèå è
÷àñòîòà
ýëåêòðîïèòàíèÿ
ñì. òàáëè÷êó ñ òåõíè÷åñêèìè
õàðàêòåðèñòèêàìè
Êåðàìè÷åñêàÿ
âàðî÷íàÿ ïàíåëü
Ïåðåäíÿÿ ëåâàÿ
Çàäíÿÿ ëåâàÿ
Çàäíÿÿ ïðàâàÿ
Ïåðåäíÿÿ ïðàâàÿ
Ìàêñ.
ïîãëîùàåìàÿ
ìîùíîñòü
êåðàìè÷åñêèìè
âàðî÷íûìè
ïàíåëÿìè
1200 Âò
1800 Âò
1200 Âò
1800 Âò
6000 Âò
ÒÀÁËÈ×ÊÀ Ñ
ÝËÅÊÒÐÈ×ÅÑÊÈÌ
È ÄÀÍÍÛÌÈ
Äèðåêòèâà 2002/40/ÑÅ îá
ýòèêåòêàõ ýëåêòðè÷åñêèõ
äóõîâûõ øêàôîâ. Íîðìàòèâ EN
50304
Ðàñõîä ýëåêòðîýíåðãèè
Íàòóðàëüíàÿ êîíâåêöèÿ
ôóíêöèÿ íàãðåâàíèÿ: a
Ñòàíäàðòíàÿ;
Çàÿâëåíèå î ðàñõîäå
ýëåêòðîýíåðãèè êëàññà
ïðèíóäèòåëüíîé êîíâåêöèè -
ôóíêöèÿ íàãðåâàíèÿ: u
Êîíäèòåðñêàÿ âûïå÷êà.
Äèðåêòèâà ÅÑ: 73/23/CEE îò
19/02/73 (Íèçêîå íàïðÿæåíèå) ñ
ïîñëåäóþùèìè èçìåíåíèÿìè
89/336/ÑÅÅ îò 03/05/89
(Ýëåêòðîìàãíèòíàÿ
ñîâìåñòèìîñòü) ñ
ïîñëåäóþùèìè èçìåíåíèÿìè
93/68/ÑÅÅ îò 22/07/93 ñ
ïîñëåäóþùèìè èçìåíåíèÿìè
2002/96/ÅÑ.

15
RS
Îïèñàíèå èçäåëèÿ
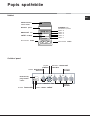
Îáùèè âèä
Ïàíåëü óïðàâëåíèÿ
Ýëåêòðîííûé
òàéìåð
ïðîãðàììèðîâàíèÿ
ïðèãîòîâëåíèÿ
Êíîïêà
òàéìåðà
Êíîïêà
ÊÎÍÅÖ ÏÐÈÃÎÒÎÂËÅÍÈß
Êíîïêà
ÏÐÎÄÎËÆÈÒÅËÜÍÎÑÒÜ ÏÐÈÃÎÒÎÂËÅÍÈß
Ðóêîÿòêà
ÒÅÐÌÎÑÒÀÒÀ
Èíäèêàòîð
ÐÀÁÎÒÀ ÊÎÍÔÎÐÎÊ
Ðóêîÿòêè ÃÀËÎÃÅÍÍÛÕ
íàãðåâàòåëüíûõ çîí
Ðóêîÿòêà
ÏÐÎÃÐÀÌÌÛ
Èíäèêàòîð
ÒÅÐÌÎÑÒÀÒÀ

16
RS
Âêëþ÷åíèå è ýêñïëóàòàöèÿ
! Ïðè ïåðâîì âêëþ÷åíèè äóõîâîãî øêàôà
ðåêîìåíäóåì ïðîêàëèòü åãî ïðèìåðíî â òå÷åíèå
30 ìèíóò ïðè ìàêñèìàëüíîè òåìïåðàòóðå ñ
çàêðûòîè äâåðöåè. Çàòåì âûêëþ÷èòå äóõîâîè
øêàô, îòêðîèòå äâåðöó è ïðîâåòðèòå ïîìåùåíèå.
Çàïàõ, êîòîðûè âû ìîæåòå ïî÷óâñòâîâàòü, âûçâàí
èñïàðåíèåì âåùåñòâ, èñïîëüçîâàííûõ äëÿ
ïðåäîõðàíåíèÿ äóõîâîãî øêàôà.
Âêëþ÷åíèå äóõîâîãî øêàôà
1. Âûáåðèòå íóæíóþ ïðîãðàììó ïðèãîòîâëåíèÿ ïðè
ïîìîùè ðóêîÿòêè ÏÐÎÃÐÀÌÌÛ.
2. Âûáåðèòå òåìïåðàòóðó, ðåêîìåíäóåìóþ äëÿ
äàííîè ïðîãðàììû èëè íóæíóþ âàì òåìïåðàòóðó
ïðè ïîìîùè ðóêîÿòêè ÒÅÐÌÎÑÒÀÒ.
 ñïåöèàëüíîè òàáëèöå ïðèâîäèòñÿ ïåðå÷åíü
òèïîâ ïðèãîòîâëåíèÿ ñ ñîîòâåòñòâóþùèìè
ðåêîìåíäóåìûìè òåìïåðàòóðàìè (ñì. Òàáëèöà
ïðèãîòîâëåíèÿ â äóõîâîãî øêàôó).
 ïðîöåññå ïðèãîòîâëåíèÿ â ëþáîè ìîìåíò ìîæíî:
èçìåíèòü ïðîãðàììó ïðèãîòîâëåíèÿ ïðè ïîìîùè
ðóêîÿòêè ÏÐÎÃÐÀÌÌÛ;
èçìåíèòü òåìïåðàòóðó ïðè ïîìîùè ðóêîÿòêè
ÒÅÐÌÎÑÒÀÒ;
çàïðîãðàììèðîâàòü ïðèãîòîâëåíèå è âðåìÿ
îêîí÷àíèÿ ïðèãîòîâëåíèÿ (ñì íèæå);
ïðåðâàòü ïðèãîòîâëåíèå, ïîâåðíóâ ðóêîÿòêó
ÏÐÎÃÐÀÌÌÛ â ïîëîæåíèå «0».
! Íèêîãäà íå ñòàâüòå íèêàêèõ ïðåäìåòîâ íà äíî
äóõîâîãî øêàôà, òàê êàê îíè ìîãóò ïîâðåäèòü
ýìàëèðîâàííîå ïîêðûòèå. Èñïîëüçóèòå ïîëîæåíèå
1 íàñòðîèêè äóõîâîãî øêàôà òîëüêî äëÿ
ïðèãîòîâëåíèÿ íà âåðòåëå.
! Âñåãäà ñòàâüòå ïîñóäó íà ïðèëàãàþùóþñÿ
ðåøåòêó.
Èíäèêàòîð ÒÅÐÌÎÑÒÀÒÀ
Âêëþ÷åíèå ýòîãî èíäèêàòîðà îçíà÷àåò, ÷òî
äóõîâîè øêàô íàãðåâàåòñÿ. Èíäèêàòîð ãàñíåò,
êîãäà âíóòðè äóõîâîãî øêàôà áóäåò äîñòèãíóòà
çàäàííàÿ òåìïåðàòóðà. Íà äàííîì ýòàïå
èíäèêàòîð òî çàãîðàåòñÿ, òî ãàñíåò, ïîêàçûâàÿ, ÷òî
òåðìîñòàò âêëþ÷åí è ïîääåðæèâàåò òåìïåðàòóðó
íåèçìåííîè.
Îñâåùåíèå äóõîâîãî øêàôà
Âêëþ÷åòñÿ, êîãäà ðóêîÿòêà ÏÐÎÃÐÀÌÌÛ
óñòàíàâëèâàåòñÿ â ëþáîå ïîëîæåíèå êðîìå 0, è
îñòàåòñÿ âêëþ÷åííûì äî òåõ ïîð, ïîêà ðàáîòàåò
äóõîâîè øêàô. Ïðè âûáîðå ïîëîæåíèÿ
8
ïðè
ïîìîùè ðóêîÿòêè îñâåùåíèå âêëþ÷àåòñÿ áåç
ïîäêëþ÷åíèÿ íàãðåâàòåëüíûõ ýëåìåíòîâ.

17
RS
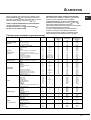
Ïðîãðàììû ïðèãîòîâëåíèÿ
! Äëÿ âñåõ ïðîãðàìì ìîæíî çàäàòü òåìïåðàòóðó îò 50°C
äî ÌÀÊÑ êðîìå:
ÃÐÈËÜ è ÄÂÎÈÍÎÈ ÃÐÈËÜ (ðåêîìåíäóåòñÿ
óñòàíàâëèâàòü òîëüêî ÌÀÊÑ. òåìïåðàòóðó);
ÄÂÎÈÍÎÈ ÂÅÍÒÈËÈÐÎÂÀÍÍÛÈ ÃÐÈËÜ
(ðåêîìåíäóåòñÿ íå ïðåâûøàòü òåìïåðàòóðó 200°C).
a Ïðîãðàììà ÑÒÀÒÈ×ÅÑÊÀß ÄÓÕÎÂÊÀ
Âêëþ÷àþòñÿ äâà íàãðåâàòåëüíûõ ýëåìåíòà:
íèæíèè è âåðõíèè. Â ðåæèìå òðàäèöèîíàëüíîãî
ïðèãîòîâëåíèÿ ðåêîìåíäóåòñÿ èñïîëüçîâàòü
òîëüêî îäèí óðîâåíü: ïðè èñïîëüçîâàíèè
íåñêîëüêèõ óðîâíåè ðàñïðåäåëåíèå òåìïåðàòóðû
áóäåò íåîïòèìàëüíûì.
a Ïðîãðàììà Ôóíêèöÿ êîíäèòåðñêàÿ âûïå÷êà
Âêëþ÷àåòñÿ çàäíèè íàãðåâàòåëüíûè ýëåìåíò è
âåíòèëÿòîð, îáåñïå÷èâàÿ óìåðåííûè è îäíîðîäíûè æàð
âíóòðè äóõîâêè. Äàííàÿ ôóíêöèÿ ðåêîìåíäóåòñÿ äëÿ
ïðèãîòîâëåíèÿ äåëèêàòíûõ áëþä (íàïðèìåð,
êîíäèòåðñêèõ èçäåëèè, òðåáóþùèõ ïîäúåìà òåñòà) è
ìåëêîè âûïå÷êè îäíîâðåìåííî íà òðåõ óðîâíÿõ.
w Ïðîãðàììà Ôóíêöèÿ ïèööà
Âêëþ÷àþòñÿ íèæíèè è êðóãëûè íàãðåâàòåëüíûå
ýëåìåíòû è âåíòèëÿòîð. Òàêîå ñî÷åòàíèå ïîçâîëÿåò
áûñòðî ðàçîãðåòü äóõîâêó ñ áîëåå ñèëüíûì
âûäåëåíèåì æàðà ñíèçó. Åñëè èñïîëüçóþòñÿ íåñêîëüêî
óðîâíåè îäíîâðåìåííî, íåîáõîäèìî ìåíÿòü ìåñòàìè
áëþäà â ñåðåäèíå èõ ïðèãîòîâëåíèÿ.
b Ïðîãðàììà Óíèâåðñàëüíàÿ ôóíêöèÿ
Âêëþ÷àþòñÿ âñå íàãðåâàòåëüíûå ýëåìåíòû (âåðõíèè,
íèæíèè è êðóãëûè) è âåíòèëÿòîð. Òàê êàê æàð ÿâëÿåòñÿ
ïîñòîÿííûì âî âñåì äóõîâîì øêàôó, âîçäóõ
îáåñïå÷èâàåò îäíîðîäíîå ïðèãîòîâëåíèå è
ïîäðóìÿíèâàíèå ïðîäóêòà. Ìîæíî îäíîâðåìåííî
èñïîëüçîâàòü íå áîëåå äâóõ óðîâíåè â äóõîâêå.
d Ïðîãðàììà ÃÐÈËÜ
Âêëþ÷àåòñÿ öåíòðàëüíàÿ ÷àñòü âåðõíåãî
íàãðåâàòåëüíîãî ýëåìåíòà. Âûñîêàÿ òåìïåðàòóðà è æàð
ïðÿìîãî äåèñòâèÿ ãðèëÿ ðåêîìåíäóåòñÿ äëÿ
ïðèãîòîâëåíèÿ ïðîäóêòîâ, íóæäàþùèõñÿ â âûñîêîè
ïîâåðõíîñòíîè òåìïåðàòóðå (òåëÿ÷èè è ãîâÿæèõ
áèôøòåêñîâ, âûðåçêè, àíòðåêîòîâ). Ýòî ïðîãðàììà íå
òðåáóåò áîëüøîãî ðàñõîäà ýíåðãèè, èäåàëüíî ïîäõîäèò
äëÿ ïðèãîòîâëåíèÿ íà ãðèëå íåáîëüøèõ ïîðöèè.
Ïîìåñòèòå ïðîäóêò â öåíòð ðåøåòêè, òàê êàê æàð íå
ðàñïðîñòðàíÿåòñÿ ïî óãëàì.
2 Ïðîãðàììà ÄÂÎÈÍÎÈ ÃÐÈËÜ
Ýòî ãðèëü áîëüøåãî ðàçìåðà îñîáîè ôîðìû,
ïîâûøàþùèè íà 50% ýôôåêòèâíîñòü ïðèãîòîâëåíèÿ,
ïîçâîëÿþùèè ðàñïðîñòðàíåíèå æàðà ïî óãëàì.
Èñïîëüçóèòå ýòîò ðåæèì ãðèëÿ äëÿ îäíîðîäíîãî
ïîäðóìÿíèâàíèÿ.
T
Ïðîãðàììà GRATIN
Âêëþ÷àåòñÿ âåðõíèè íàãðåâàòåëüíûè ýëåìåíò, âåðòåë è
âåíòèëÿòîð.(ãäå èìååòñÿ) Ñî÷åòàåò îäíîíàïðàâëåííîå
âûäåëåíèå æàðà ñ ïðèíóäèòåëüíîè öèðêóëÿöèåè
âîçäóõà âíóòðè äóõîâîãî øêàôà. Ýòî ïðåïÿòñòâóåò
îáãîðàíèþ ïîâåðõíîñòè ïðîäóêòîâ, ïîâûøàÿ
ïðîíèêàþùóþ ñïîñîáíîñòü æàðà.
! Äëÿ ïðèãîòîâëåíèÿ â ðåæèìàõ ÃÐÈËÜ, ÄÂÎÈÍÎÈ
ÃÐÈËÜ è GRATIN (Ïîäðóìÿíèâàíèå) äâåðöà äóõîâîãî
øêàôà äîëæíà áûòü çàêðûòà.
Âåðòåë*
Âêëþ÷åíèå âåðòåëà ïðîèçâîäèòñÿ
ñëåäóþùèì îáðàçîì:
1. óñòàíîâèòå ïðîòèâåíü íà 1-ûè
óðîâåíü;
2. óñòàíîâèòå äåðæàòåëü âåðòåëà íà 4-
ûè óðîâåíü è âñòàâüòå âåðòåë â
ñïåöèàëüíîå îòâåðñòèå â çàäíåè ñòåíêå
äóõîâîãî øêàôà; (ñì. ðèñóíîê)
3. âêëþ÷èòå âåðòåë ïðè ïîìîùè ðóêîÿòêè ÏÐÎÃÐÀÌÌÛ
2
.
Íèæíèè îòñåê
Ñíèçó äóõîâîãî øêàôà èìååòñÿ
îòñåê, êîòîðûè ìîæåò áûòü
èñïîëüçîâàí äëÿ õðàíåíèÿ êóõîííûõ
ïðèíàäëåæíîñòåè èëè êàñòðþëü. Äëÿ
îòêðûâàíèÿ äâåðöû ïîâåðíèòå åå
âíèç (ñì. ðèñóíîê).
! Íå ïîìåùàèòå âîçãîðàåìûõ ïðåäìåòîâ â íèæíèè
îòñåê.
Ïðàêòè÷åñêèå ñîâåòû ïî ïðèãîòîâëåíèþ
! Â ðåæèìå âåíòèëèðóåìîãî ïðèãîòîâëåíèÿ íå
èñïîëüçóèòå 1-ûè è 5-ûè óðîâíè: îíè ïîäâåðãàþòñÿ
ïðÿìîìó âîçäåèñòâèþ ãîðÿ÷åãî âîçäóõà, êîòîðûè ìîæåò
ñæå÷ü äåëèêàòíûå ïðîäóêòû.
Óíèâåðñàëüíàÿ ôóíêöèÿ
Èñïîëüçóþòñÿ 2-îè è 4-ûè óðîâíè, íà 2-îè
ïîìåùàþòñÿ ïðîäóêòû, òðåáóþùèå áîëåå
èíòåíñèâíîãî æàðà.
Óñòàíîâèòå ïðîèòâåíü ñíèçó, à ðåøåòêó ñâåðõó.

18
RS
ÃÐÈËÜ
Ïðè èñïîëüçîâàíèè ÃÐÈËß è ÄÂÎÈÍÎÃÎ ÃÐÈËß
óñòàíîâèòå ðåøåòêó íà 5-ûè óðîâåíü è ïðîòèâåíü
äëÿ ñáîðà ñîêîâ (æèðà) íà 1-ûè. Ïðè
èñïîëüçîâàíèè ðåæèìà GRATIN (Ïîäðóìÿíèâàíèå)
óñòàíîâèòå ðåøåòêó íà 2-îè èëè 3-èè óðîâåíü, à
ïðîòèâåíü íà 1-ûè äëÿ ñáîðà ñîêîâ.
Ðåêîìåíäóåòñÿ âûáðàòü ìàêñèìàëüíóþ ìîùíîñòü
äóõîâêè. Íå áåñïîêîèòåñü, åñëè âåðõíèè ýëåìåíò
íå îñòàåòñÿ ïîñòîÿííî âêëþ÷åííûì: åãî ðàáîòà
óïðàâëÿåòñÿ òåðìîñòàòîì.
Ôóíêöèÿ ïèööà
Èñïîëüçóèòå ïðîòèâåíü èç ëåãêîãî àëþìèíèÿ,
óñòàíàâëèâàÿ åãî íà ïðèëàãàþùóþñÿ ðåøåòêó.
Ïðè èñïîëüçîâàíèè ïðîòèâåíÿ âðåìÿ âûïå÷êè
óäëèíÿåòñÿ, ÷òî çàòðóäíÿåò ïîëó÷åíèå õðóñòÿùåè ïèööû.
 ñëó÷àå âûïå÷êè ïèööû ñ îáèëüíîè íà÷èíêîè
ðåêîìåíäóåòñÿ ïîëîæèòü íà ïèööó ñûð
ìîööàðåëëà â ñåðåäèíå âûïå÷êè.
Ïðîãðàììèðîâàíèå ïðèãîòîâëåíèÿ ïðè
ïîìîùè ýëåêòðîííîãî òàèìåðà
Ïðîãðàììèðîâàíèå öèôðîâûõ ÷àñîâ
Ïîñëå îñóùåñòâëåíèÿ ïîäñîåäèíåíèÿ ê ñåòè
ýëåêòðîïèòàíèÿ èëè ïîñëå îòêëþ÷åíèÿ íàïðÿæåíèÿ íà
äèñïëåå ìèãàåò çíà÷åíèå 0.00.
Ïîðÿäîê íàñòðîèêè âðåìåíè:
1. íàæìèòå îäíîâðåìåííî êíîïêè
ÏÐÎÄÎËÆÈÒÅËÜÍÎÑÒÜ ÏÐÈÃÎÒÎÂËÅÍÈß
$
è
ÊÎÍÅÖ ÏÐÈÃÎÒÎÂËÅÍÈß
%
;
2. â òå÷åíèå 4 ñåêóíä ââåäèòå òî÷íîå âðåìÿ ïðè
ïîìîùè êíîïîê
*
è
)
. Ïðè ïîìîùè êíîïêè
*
çíà÷åíèå óâåëè÷èâàåòñÿ; ïðè ïîìîùè êíîïêè
)
çíà÷åíèå óìåíüøàåòñÿ.
Ïîñëå óñòàíîâêè âðåìåíè òàèìåð àâòîìàòè÷åñêè
âîçâðàùàåòñÿ â ðó÷íîè ðåæèì.
íàñòðîèòü òàèìåð
Ïðè ïîìîùè òàèìåðà ìîæíî óñòàíîâèòü îáðàòíûè
îòñ÷åò âðåìåíè, ïî îêîí÷àíèè êîòîðîãî âêëþ÷èòñÿ
çâóêîâîè ñèãíàë.
Ïîðÿäîê íàñòðîèêè òàèìåðà:
1. íàæìèòå êíîïêó ÒÀÈÌÅÐ
H
. Íà äèñïëåå ïîÿâèòñÿ: :
N
2. íàæìèòå êíîïêè
*
è
)
äëÿ óñòàíîâêè íóæíîãî
âðåìåíè;
3. ïîñëå òîãî, êàê âû îòïóñòèòå êíîïêè, íà÷íåòñÿ
îáðàòíûè îòñ÷åò, è íà äèñïëåå ïîÿâèòñÿ òåêóùåå
âðåìÿ:
R
4. ïî èñòå÷åíèè çàäàííîãî âðåìåíè âêëþ÷àåòñÿ
çâóêîâîè ñèãíàë, êîòîðûè ìîæíî îòêëþ÷èòü ïðè
ïîìîùè ëþáîè êíîïêè (êðîìå êíîïîê
*
è
)
):
ñèìâîë
H
ãàñíåò.
! Òàèìåð íå óïðàâëÿåò âêëþ÷åíèåì èëè
âûêëþ÷åíèåì äóõîâîãî øêàôà.
Îòðåãóëèðóèòå ãðîìêîñòü çâóêîâîãî ñèãíàëà
Ïîñëå îñóùåñòâëåíèÿ è ïîäòâåðæäåíèÿ ðåãóëÿöèè
÷àñîâ ïðè ïîìîùè êíîïêè
)
ìîæíî îòðåãóëèðîâàòü
ãðîìêîñòü çâóêîâîãî ñèãíàëà.
Ïðîãðàììèðîâàíèå ïðîäîëæèòåëüíîñòè
ïðèãîòîâëåíèÿ ñ çàäåðæêîè íà÷àëà.
Ïðåæäå âñåãî íåîáõîäèìî âûáðàòü íóæíóþ ïðîãðàììó
ïðèãîòîâëåíèÿ è ñîîòâåòñòâóþùóþ òåìïåðàòóðó ïðè
ïîìîùè ðóêîÿòîê äóõîâîãî øêàôà ÏÐÎÃÐÀÌÌÛ è
ÒÅÐÌÎÑÒÀÒ.
Íà äàííîì ýòàïå ìîæíî çàïðîãðàììèðîâàòü
ïðîäîëæèòåëüíîñòü ïðèãîòîâëåíèÿ:
1. íàæìèòå êíîïêó ÏÐÎÄÎËÆÈÒÅËÜÍÎÑÒÜ
ÏÐÈÃÎÒÎÂËÅÍÈß
$
;
2. â òå÷åíèå 4 ñåêóíä ââåäèòå íóæíóþ
ïðîäîëæèòåëüíîñòü ïðèãîòîâëåíèÿ ïðè ïîìîùè êíîïîê
*
è
)
. Åñëè, íàïðèìåð,ïëàíèðóåòñÿ ïðèãîòîâëåíèå â
òå÷åíèå 30 ìèíóò, íà äèñïëåå ïîêàçûâàåòñÿ:
N
3. êîãäà âû îòïóñêàåòå êíîïêè, ÷åðåç 4 ñåêóíäû íà
äèñïëåå ïîÿâëÿåòñÿ òåêóùåå âðåìÿ (íàïðèìåð,
10.00) ñ ñèìâîëîì
m
è áóêâîè A (ÀÂÒÎÌ.):
Çàòåì çàïðîãðàììèðóåòñÿ âðåìÿ îêîí÷àíèÿ
ïðèãîòîâëåíèÿ:
4. íàæìèòå êíîïêó ÊÎÍÅÖ ÏÐÈÃÎÒÎÂËÅÍÈß
%
;
5. â òå÷åíèå 4 ñåêóíä ââåäèòå íóæíîå âðåìÿ
îêîí÷àíèÿ ïðèãîòîâëåíèÿ ïðè ïîìîùè êíîïîê
*
è
)
. Åñëè, íàïðèìåð, òðåáóåòñÿ çàâåðøèòü
ïðèãîòîâëåíèå â 13.00, íà äèñïëåå ïîêàçûâàåòñÿ:
O
6. êîãäà âû îòïóñêàåòå êíîïêè, ÷åðåç 4 ñåêóíäû íà
äèñïëåå ïîÿâëÿåòñÿ òåêóùåå âðåìÿ (íàïðèìåð,
10.00) ñ áóêâîè A (ÀÂÒÎÌ.):
Ð
Ñîãëàñíî ïðèâåäåííîìó ïðèìåðó äóõîâîè øêàô
àâòîìàòè÷åñêè âêëþ÷èòñÿ â 12.30 è îòêëþ÷èòñÿ
÷åðåç 30 ìèíóò, â 13.00.
Ïðîãðàììèðîâàíèå ïðîäîëæèòåëüíîñòè
ïðèãîòîâëåíèÿ ñ ìãíîâåííûì íà÷àëîì.
Ñëåäóèòå âûøåîïèñàííîè ïîñëåäîâàòåëüíîñòè
ïðîãðàììèðîâàíèÿ ïðîäîëæèòåëüíîñòè ïðèãîòîâëåíèÿ
(ïóíêòû 1 3)
! Âêëþ÷åííàÿ áóêâà À íàïîìèíàåò î çàäàííîè
ïðîäîëæèòåëüíîñòè è îêîí÷àíèè ïðèãîòîâëåíèÿ â
àâòîìàòè÷åñêîì ðåæèìå. Äëÿ âîçâðàùåíèÿ â ðó÷íîè
ðåæèì äóõîâîãî øêàôà ïîñëå êàæäîãî àâòîìàòè÷åñêîãî
ïðèãîòîâëåíèÿ íàæìèòå îäíîâðåìåííî êíîïêè
ÏÐÎÄÎËÆÈÒÅËÜÍÎÑÒÜ ÏÐÈÃÎÒÎÂËÅÍÈß
$
è
ÊÎÍÅÖ ÏÐÈÃÎÒÎÂËÅÍÈß
%
.
! Ñèìâîë
m
îñòàåòñÿ âêëþ÷åííûì íà ïðîòÿæåíèè
âñåãî ïðèãîòîâëåíèÿ.
Âû âñåãäà ìîæåòå ïðîâåðèòü çàäàííóþ
ïðîäîëæèòåëüíîñòü ïðè ïîìîùè êíîïêó
ÏÐÎÄÎËÆÈÒÅËÜÍÎÑÒÜ ÏÐÈÃÎÒÎÂËÅÍÈß
$
è

19
RS
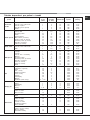
Òàáëèöà ïðèãîòîâëåíèÿ â äóõîâîì øêàôó
âðåìÿ îêîí÷àíèÿ ïðèãîòîâëåíèÿ ïðè ïîìîùè êíîïêè
ÏÐÈÃÎÒÎÂËÅÍÈß
%
. Ïî îêîí÷àíèè ïðèãîòîâëåíèÿ
âêëþ÷àåòñÿ çâóêîâîè ñèãíàë. Äëÿ îòêëþ÷åíèÿ ñèãíàëà
íàæìèòå ëþáóþ êíîïêó êðîìå êíîïîê
*
è
)
.
Îòìåíà çàïðîãðàììèðîâàííîãî ïðèãîòîâëåíèÿ
Íàæìèòå îäíîâðåìåííî êíîïêè
ÏÐÎÄÎËÆÈÒÅËÜÍÎÑÒÜ ÏÐÈÃÎÒÎÂËÅÍÈß
$
è
ÊÎÍÅÖ ÏÐÈÃÎÒÎÂËÅÍÈß
%
.
Èçìåíåíèå èëè îòìåíà çàäàííûõ ïàðàìåòðîâ
Âû âñåãäà ìîæåòå èçìåíèòü çàäàííûå çíà÷åíèÿ ïðè
ïîìîùè ñîîòâåòñòâóþùåè êíîïêè (ÒÀÈÌÅÐ,
ÏÐÎÄÎËÆÈÒÅËÜÍÎÑÒÜ ÏÐÈÃÎÒÎÂËÅÍÈß ÈËÈ
ÊÎÍÅÖ ÏÐÈÃÎÒÎÂËÅÍÈß) è êíîïêè
*
èëè æå
)
.
Ïðè îòìåíå çàäàííîè ïðîäîëæèòåëüíîñòè
ïðèãîòîâëåíèÿ àâòîìàòè÷åñêè îòìåíÿåòñÿ òàêæå âðåìÿ
îêîí÷àíèÿ ïðèãîòîâëåíèÿ è íàîáîðîò.
 ñëó÷àå çàïðîãðàììèðîâàííîãî ïðèãîòîâëåíèÿ
èçäåëèå íå äîïóñêàåò ââîä âðåìåíè îêîí÷àíèÿ
ïðèãîòîâëåíèÿ ðàíüøå çàäàííîãî âðåìåíè íà÷àëà
ïðèãîòîâëåíèÿ, óñòàíîâëåííûå ñàìèì èçäåëèåì.
Ïðîãðàììû Ïðîäóêòû Âåñ (êã) Óðîâåíü Âðåìÿ
íàãðåâàíèÿ
(ìèí.)
Ðåêîìåíäóåìàÿ
òåìïåðàòóðà
Ïðîäîëæèò-òü
ïðèãîòîâëåíèÿ
(ìèíóòû)
Òðàäèöèîíàëüíàÿ
äóõîâêà
Óòêà
Æàðêîå èç òåëÿòèíû èëè ãîâÿäèíû
Æàðêîå èç ñâèíèíû
Ïå÷åíüå (ïåñî÷íîå)
Ïåñî÷íûé òîðò ñ íà÷èíêîé
1
1
1
-
1
3
3
3
3
3
15
15
15
15
15
200
200
200
180
180
65-75
70-75
70-80
15-20
30-35
Ôóíêèöÿ
êîíäèòåðñêàÿ
âûïå÷êà
Ïåñî÷íûé òîðò ñ íà÷èíêîé
Ôðóêòîâûé òîðò
Êåêñ
Áèñêâèò
Áëèíû ñ íà÷èíêîé (íà 2-õ óðîâíÿõ)
Ìåëêèå êåêñû (íà 2-õ óðîâíÿõ)
Ïå÷åíüÿ èç ñëîåíîãî òåñòà ñ ñûðîì (íà 2-
óõ óðîâíÿõ)
Ýêëåðû (íà 3 óðîâíÿõ)
Ïå÷åíüå (íà 3 óðîâíÿõ)
Áåçå (íà 3-õ óðîâíÿõ)
0.5
1
0.7
0.5
1.2
0.6
0.4
0.7
0.7
0.5
3
3 èëè 4
3
3
2 èëè 4
2 èëè 4
2 èëè 4
1 èëè 3 èëè 5
1 èëè 3 èëè 5
1 èëè 3 èëè 5
15
15
15
15
15
15
15
15
15
15
180
180
180
160
200
190
210
180
180
90
20-30
40-45
40-50
25-30
30-35
20-25
15-20
20-25
20-25
180
Ôóíêöèÿ Ïèööà
Ïèööà
Æàðêîå èç òåëÿòèíû èëè ãîâÿäèíû
Êóðèöà
0.5
1
1
3
2
3 èëè 4
15
10
10
220
220
180
15-20
25-30
60-70
Ìóëüòèïðè-
ãîòîâëåíèå
Ïèööà (íà 2 óðîâíÿõ)
Ëàçàíüÿ
Áàðàíèíà
Êóðèöà ñ êàðòîøêîé
Ñêóìáðèÿ
Êåêñ
Ýêëåðû (íà 2 óðîâíÿõ)
Ïå÷åíüå (íà 2 óðîâíÿõ)
Áèñêâèòíûé òîðò (íà 1 óðîâíå)
Áèñêâèòíûé òîðò (íà 2 óðîâíÿõ)
Íåñëàäêèå òîðòû
1
1
1
1+1
1
1
0.5
0.5
0.5
1
1.5
2 èëè 4
3
2
2 èëè 4
2
2
2 èëè 4
2 èëè 4
2
2 èëè 4
3
15
10
10
15
10
10
10
10
10
10
15
230
180
180
200
180
170
190
180
170
170
200
15-20
30-35
40-45
60-70
30-35
40-50
20-25
10-15
15-20
20-25
25-30
Ãðèëü
Êàìáàëà è êàðàêàòèöû
Êàëüìàðû è êðåâåòêè íà øàìïóðàõ
Êàðàêàòèöû
Ôèëå òðåñêè
Îâîùè-ãðèëü
Òåëÿ÷èé áèôøòåêñ
Êîëáàñêè-øïèêà÷êè
Ãàìáóðãåð
Ñêóìáðèÿ
Ôàðøèðîâàíûé ãîðÿ÷èé áóòåðáðîò (èëè
îáæàðåííûé õëåá)
0.7
0.6
0.6
0.8
0.4
0.8
0.6
0.6
1
4 äî 6
4
4
4
4
3 èëè 4
4
4
4
4
4
-
-
-
-
-
-
-
-
-
-
-
100%
100%
100%
100%
100%
100%
100%
100%
100%
100%
10-12
8-10
10-15
10-15
15-20
15-20
15-20
10-12
15-20
3-5
Òåëÿ÷èé áèôøòåêñ
Îòáèâíûå
Ãàìáóðãåð
Ñêóìáðèÿ
Ãîðÿ÷èå áóòåðáðîäû
1
1
1
1
4 øò.
4
4
4
4
4
5
5
5
5
5
Ìàêñ.
Ìàêñ.
Ìàêñ.
Ìàêñ.
Ìàêñ.
15-20
15-20
7-10
15-20
2-3
Äâîéíîé ãðèëü
Íà âåðòåëå
Òåëÿòèíà íà âåðòåëå
Êóðèöà íà âåðòåëå
1.0
2.0
-
-
5
5
Ìàêñ.
Ìàêñ.
70-80
70-80
Êóðèöà-ãðèëü
Êàðàêàòèöû
1.5
1.5
2
2
10
10
200
200
55-60
30-35
Íà âåðòåëå
Òåëÿòèíà íà âåðòåëå
Êóðèöà íà âåðòåëå
Áàðàíèíà íà âåðòåëå
1.5
1.5
1.5
-
-
-
5
5
5
200
200
200
70-80
70-80
70-80
Gratin
(Ïîäðóìÿíèâàíèå)
Íà âåðòåëå ñ íåñêîëüêèìè øàìïóðàìè
(ãäå èìååòñÿ)
Øàøëûê
Îâîùíîé øàøëûê
1.0
0.8
-
-
5
5
Ìàêñ.
Ìàêñ.
40-45
25-30

20
RS
Ñòåêëîêåðàìè÷åñêàÿ âàðî÷íàÿ
ïàíåëü
! Íà ñòåêëÿííîè ïîâåðõíîñòè âàðî÷íîè ïàíåëè
ìîãóò áûòü âèäíû ñàëüíûå ñëåäû îò êëåÿ,
íàíåñåííîãî íà ïðîêëàäêè Ïåðåä íà÷àëîì
ýêñïëóàòàöèè èçäåëèÿ ñëåäóåò óäàëèòü ñëåäû
êëåÿ ïðè ïîìîùè ñïåöèàëüíîãî íåàáðàçèâíîãî
ìîþùåãî ñðåäñòâà.  ïåðâûå ÷àñû ðàáîòû âû
ìîæåòå ïî÷óâñòâîâàòü çàïàõ ææåíîè ðåçèíû,
êîòîðûè áûñòðî ïðîïàäàåò.
Âêëþ÷åíèå è âûêëþ÷åíèå
íàãðåâàòåëüíûõ çîí
Äëÿ âêëþ÷åíèÿ íàãðåâàòåëüíîè çîíû ïîâåðíèòå ïî
÷àñîâîè ñòðåëêå ñîîòâåòñòâóþùóþ ðóêîÿòêó.
Äëÿ âûêëþ÷åíèÿ ïîâåðíèòå ðóêîÿòêó ïðîòèâ
÷àñîâîè ñòðåëêè íà «0».
Âêëþ÷åíèå èíäèêàòîðà ÇÎÍÛ ÂÊËÞ×ÅÍÛ
ïîêàçûâàåò, ÷òî êàêàÿ-òî èç íàãðåâàòåëüíûõ çîí íà
âàðî÷íîè ïàíåëè âêëþ÷åíà.
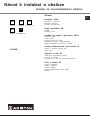
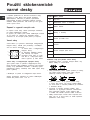
Íàãðåâàòåëüíûå çîíû
Íà âàðî÷íîè ïàíåëè íàõîäÿòñÿ ýëåêòðè÷åñêèå
ãàëîãåííûå íàãðåâàòåëüíûå ýëåìåíòû.  ðàáî÷åì
ðåæèìå îíà ðàñêàëàþòñÿ äî êðàñíà:
A. Íàãðåâàòåëüíàÿ çîíà ñ
ãàëîãåííûìè ýëåìåíòàìè.
B. Èíäèêàòîð íàãðåâà:
ïîêàçûâàåò, ÷òî òåìïåðàòóðà
â ñîîòâåòñòâóþùåè
íàãðåâàòåëüíîè çîíå
ïðåâûøàåò 60°C, òàêæå â
ñëó÷àå, åñëè ýëåìåíò âûêëþ÷åí, íî åùå íå îñòûë.
Íàãðåâàòåëüíûå çîíû ñ ãàëîãåííûìè
ýëåìåíòàìè.
Ïåðåäàþò òåïëî ïîñðåäñòâîì èçëó÷åíèÿ
âíóòðåííåè ãàëîãåííîè ëàìïû. Òàêîè ïðèíöèï
íàãðåâàíèÿ ïî ñâîèì õàðàêòåðèñòèêàì àíàëîãè÷åí
òèïè÷íûì ãàçîâûì êîíôîðêàì: áûñòðàÿ ðåàêöèÿ íà
óïðàâëåíèå è ìãíîâåííàÿ âèçóàëèçàöèÿ
ìîùíîñòè.
! Íå ñëåäóåò äîëãî ñìîòðåòü íà âêëþ÷åííûå
ãàëîãåííûå ýëåìåíòû.
Ïîâåðíèòå ñîîòâåòñòâóþùóþ ðóêîÿòêó ïî ÷àñîâîè
ñòðåëêè èç ïîëîæåíèÿ 1 â ïîëîæåíèå 12.
Ïðàêòè÷åñêèå ðåêîìåíäàöèè ïî
èñïîëüçîâàíèþ âàðî÷íîè ïàíåëè
Èñïîëüçóèòå ïîñóäó ñ ïëîñêèì òîëñòûì äíîì,
èäåàëüíî ïðèëåãàþùèì ê çîíå íàãðåâàíèÿ;
Èñïîëüçóèòå êàñòðþëè ñ äíîì òàêîãî äèàìåòðà,
÷òîáû ïîëíîñòüþ çàêðûòü çîíó íàãðåâàíèÿ äëÿ
îïòèìàëüíîãî èñïîëüçîâàíèÿ âñåãî
âûäåëÿåìîãî òåïëà;
ïðîâåðüòå, ÷òîáû äíî êàñòðþëü áûëî âñåãäà
ñóõèì è ÷èñòûì: òàêèì îáðàçîì ãàðàíòèðóåòñÿ
îïòèìàëüíîå ïðèëåãàíèå ê íàãðåâàòåëüíûì
çîíàì, à òàêæå ïðîäëåâàåò ñðîê ñëóæáû
âàðî÷íîè ïàíåëè è êàñòðþëü;
íå ñëåäóåò èñïîëüçîâàòü íà ïîñóäó,
èñïîëüçîâàííóþ íà ãàçîâûõ êîíôîðêàõ:
êîíöåíòðàöèÿ òåïëà íà ãàçîâûõ êîíôîðêàõ
ìîæåò äåôîðìèðîâàòü äíî ïîñóäû è íàðóøèòü
ïðèëåãàíèå ê íàãðåâàòåëüíîè çîíå;
íèêîãäà íå îñòàâëÿèòå íàãðåâàòåëüíûå çîíû
âêëþ÷åííûìè áåç ïîñóäû, òàê êàê ýòî ìîæåò
ïîâðåäèòü èõ.
A
A
A
A
B
Ïîç. Ýëåêòðè÷åñêàÿ êàíôîðêà
0
Âûêëþ÷åíî
1 Äëÿ òîïëåíèÿ ñëèâî÷íîãî ìàñëà, øîêîëàäà
2
3
Äëÿ ðàçîãðåâàíèÿ æèäêîñòåé
4
5
Äëÿ êðåìîâ è ñîóñîâ
6
7
Äëÿ ïðèãîòîâëåíèÿ ïðè òåìïåðàòóðå êèïåíèÿ
8
9
Äëÿ æàðêîãî
10
11
Äëÿ êðóïíûõ âàðåíûõ áëþä
12 Äëÿ ôðèòþðà
La pagina si sta caricando...
La pagina si sta caricando...
La pagina si sta caricando...
La pagina si sta caricando...
La pagina si sta caricando...
La pagina si sta caricando...
La pagina si sta caricando...
La pagina si sta caricando...
La pagina si sta caricando...
La pagina si sta caricando...
La pagina si sta caricando...
La pagina si sta caricando...
La pagina si sta caricando...
La pagina si sta caricando...
La pagina si sta caricando...
La pagina si sta caricando...
La pagina si sta caricando...
La pagina si sta caricando...
La pagina si sta caricando...
La pagina si sta caricando...
La pagina si sta caricando...
La pagina si sta caricando...
La pagina si sta caricando...
La pagina si sta caricando...
La pagina si sta caricando...
La pagina si sta caricando...
La pagina si sta caricando...
La pagina si sta caricando...
La pagina si sta caricando...
La pagina si sta caricando...
La pagina si sta caricando...
La pagina si sta caricando...
La pagina si sta caricando...
La pagina si sta caricando...
La pagina si sta caricando...
La pagina si sta caricando...
La pagina si sta caricando...
La pagina si sta caricando...
La pagina si sta caricando...
La pagina si sta caricando...
-
 1
1
-
 2
2
-
 3
3
-
 4
4
-
 5
5
-
 6
6
-
 7
7
-
 8
8
-
 9
9
-
 10
10
-
 11
11
-
 12
12
-
 13
13
-
 14
14
-
 15
15
-
 16
16
-
 17
17
-
 18
18
-
 19
19
-
 20
20
-
 21
21
-
 22
22
-
 23
23
-
 24
24
-
 25
25
-
 26
26
-
 27
27
-
 28
28
-
 29
29
-
 30
30
-
 31
31
-
 32
32
-
 33
33
-
 34
34
-
 35
35
-
 36
36
-
 37
37
-
 38
38
-
 39
39
-
 40
40
-
 41
41
-
 42
42
-
 43
43
-
 44
44
-
 45
45
-
 46
46
-
 47
47
-
 48
48
-
 49
49
-
 50
50
-
 51
51
-
 52
52
-
 53
53
-
 54
54
-
 55
55
-
 56
56
-
 57
57
-
 58
58
-
 59
59
-
 60
60


Indesit C 3V P6 (X) R Guida utente
- Categoria
- Forni
- Tipo
- Guida utente
in altre lingue
- slovenčina: Indesit C 3V P6 (X) R Užívateľská príručka
- polski: Indesit C 3V P6 (X) R instrukcja
Documenti correlati
-
Indesit CI 3V P6 Manuale del proprietario
-
Indesit K3C11(W)/R Guida utente
-
Hotpoint Ariston C 3V N1 (W) R Guida utente
-
Whirlpool C 3V M5 (W) R /HA Guida utente
-
Hotpoint Ariston C 3V N1 (X) R /HA Guida utente
-
-
HOTPOINT/ARISTON C 3V P6 (X) R /HA Guida utente
-
-
Hotpoint Ariston C 30 N1 (W) R Guida utente
-