
WX523 WX523.9
P08
P16
P26
P36
P45
P54
P63
P72
P81
P90
P99
P108
P117
P125
EN
D
F
I
ES
NL
PL
HU
RO
CZ
SK
PT
SV
SL
Lithium-Ion cordless circular saw
Kabellose Handkreissäge mit Lithium-Ionen-Akku
Scie circulaire lithium-ion sans fil
Sega circolare cordless agli ioni di litio
Sierra circular inalámbrica de iones de litio
Lithium-Ion snoerloze cirkelzaag
Bezprzewodowa pilarka tarczowa z akumulatorem litowo-jonowym
Lítium-ion vezeték nélküli körfűrész
Ferăstrău circular cu acumulator litiu-ion
Akumulátorová kotoučová pila Li-Ion
Akumulátorová kotúčová píla Li-Ion
Serra circular sem os de lítio-ião
Sladdlös cirkelsåg med litiumjonbatteri
Brezžična krožna žaga z litijevim akumulatorjem

Original instructions EN
Originalbetriebsanleitung D
Notice originale F
Istruzioni originali I
Manual original ES
Oorspronkelijke gebruiksaanwijzing NL
Tłumaczenie oryginalnych instrukcji PL
Eredeti használati utasítás HU
Traducerea instrucţiunilor iniţiale RO
Překlad původních pokynů CZ
Preklad pôvodných pokynov SK
Tradução das instruções originais PT
Översättning av originalinstruktionerna SV
Izvorna navodila SL


Lithium-Ion Cordless Circular Saw
EN
8
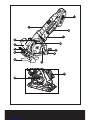
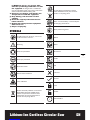
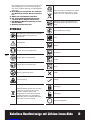
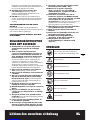
1. SOFT GRIP HANDLE
2. FIXED UPPER GUARD
3. VACUUM ADAPTER
4. DUST EXTRACTION OUTLET
5. PARALLEL GUIDE CLAMPING FIXTURE
6. PARALLEL GUIDE
7. LOWER BLADE GUARD
8. BASE PLATE
9. LOWER GUARD LEVER
10. DEPTH ADJUSTMENT LEVER
11. LOCK OFF BUTTON
12. ON/OFF SWITCH
13. BATTERY PACK
14. SPINDLE LOCK BUTTON
15. LASER
16. SAW BLADE (See Fig. B)
17. BLADE BOLT (See Fig. B)
18. OUTER FLANGE (See Fig. B)
19. HEX KEY (See Fig. B)
20. LASER ON-OFF SWITCH (See Fig. F)
21. LASER BATTERIES (TWO) (See Fig. G2)
Not all the accessories illustrated or described
are included in standard delivery.
TECHNICAL DATA
Type WX523 WX523.9 (5-designation of
machinery, representative of Saw)
WX523 WX523.9
Voltage 100-240V ~ 50/60Hz
Rated voltage 20 V Max**
No load (rated) speed 2300/min
Blade size
TCT blade
85mmx1.2mmx15mmx24T
HSS blade
85mmx1.2mmx15mmx44T
Diamond
disc
85mmx1.2mmx15mmx60G
Max.cutting depth 27mm
Recom-
mended
maximum
material
thickness
Wood 27mm
Aluminum 3mm
PVC pipe
(diameter) 13mm
Tile 8mm
Sheet steel 0.91mm
Laser battery model no.
LR44 1.5V
Bare tool weight 2.0kg 1.6kg
Spindle thread size M5
Saw blade
thickness
TCT blade 0.8mm
HSS blade 0.65mm
Diamond
disc 0.8mm
**Voltage measured without workload. Initial battery
voltage reaches maximum of 20 volts. Nominal
voltage is 18 volts.
NOISE INFORMATION
A weighted sound
pressure LpA:92.0dB(A)
A weighted sound
power
LwA: 103.0dB(A)
KPA& KWA 3.0dB(A)
Wear ear protection.
VIBRATION INFORMATION
Vibration total values (triax vector sum) deter-
mined according to EN 60745:
Cutting
wood
Vibration emission value ah,W=
5,480m/s2
Uncertainty K= 1.5m/s²
Cutting
metal
Vibration emission value ah,W=
4,628m/s2
Uncertainty K= 1.5m/s²
Cutting tile
Vibration emission value a
h
= 6.13m/s
2
Uncertainty K = 1.5m/s²
The declared vibration total value may be used for
comparing one tool with another, and may also be

Lithium-Ion Cordless Circular Saw
EN
9
used in a preliminary assessment of exposure.
WARNING: The vibration emission value
during actual use of the power tool can differ
from the declared value depending on the ways in
which the tool is used dependant on the following
examples and other variations on how the tool is
used:
How the tool is used and the materials being cut or
drilled.
The tool being in good condition and well maintained
The use the correct accessory for the tool and
ensuring it is sharp and in good condition.
The tightness of the grip on the handles and if any
anti vibration accessories are used.
And the tool is being used as intended by its design
and these instructions.
This tool may cause hand-arm vibration
syndrome if its use is not adequately
managed.
WARNING: To be accurate, an estimation of
exposure level in the actual conditions of use
should also take account of all parts of the operating
cycle such as the times when the tool is switched off
and when it is running idle but not actually doing the
job. This may significantly reduce the exposure level
over the total working period.
Helping to minimise your vibration exposure risk.
ALWAYS use sharp chisels, drills and blades
Maintain this tool in accordance with these
instructions and keep well lubricated (where
appropriate)
If the tool is to be used regularly then invest in anti
vibration accessories.
Avoid using tools in temperatures of 10°C or less
Plan your work schedule to spread any high vibration
tool use across a number of days.
ACCESSORIES
WX523 WX523.9
TCT 24T Blade 1 1
HSS 44T Blade 1 1
Diamond Disc 1 1
Parallel Guide 1 1
Vacuum Adaptor 1 1
Hex Key 1 1
20V 2.0 Ah
Li-Ion battery
WA3551.1 1 /
1hr
charger(WA3860)
1 /
We recommend that you purchase your ac-
cessories from the same store that sold you
the tool. Use good quality accessories marked
with a well-known brand name. Choose the
type according to the work you intend to un-
dertake. Refer to the accessory packaging for
further details. Store personnel can assist you
and offer advice.
SAFETY WARNINGS FOR
ALL SAWS
a) DANGER: Keep hands away from
cutting area and the blade. If both hands
are holding the saw, they cannot be cut by
the blade.
b) Do not reach underneath the workpiece. The
guard cannot protect you from the blade below
the workpiece.
c) Adjust the cutting depth to the thickness
of the workpiece. Less than a full tooth of
the blade teeth should be visible below the
workpiece.
d) Never hold piece being cut in your hands
or across your leg. Secure the workpiece to
a stable platform. It is important to support the
work properly to minimize body exposure, blade
binding, or loss of control.
e) Hold the power tool by insulated gripping
surfaces only, when performing an
operation where the cutting tool may
contact hidden wiring or its own cord.
Contact with a "live" wire will also make exposed
metal parts of the power tool "live" and could give
the operator an electric shock.
f) When ripping always use a rip fence or
straight edge guide. This improves the accuracy
of cut and reduces the chance of blade binding.
g) Always use blades with correct size and
shape (diamond versus round) of arbour
holes. Blades that do not match the mounting
hardware of the saw will run eccentrically,
causing loss of control.
h) Never use damaged or incorrect blade
washers or bolt. The blade washers and
bolt were specially designed for your saw, for
optimum performance and safety of operation.
FURTHER SAFETY
INSTRUCTIONS FOR ALL
SAWS
KICKBACK CAUSES AND RELATED WARNINGS
- Kickback is a sudden reaction to a pinched, bound
or misaligned saw blade, causing an uncontrolled
saw to lift up and out of the workpiece toward the
operator.

Lithium-Ion Cordless Circular Saw
EN
10
- When the blade is pinched or bound tightly by the
kerf closing down, the blade stalls and the motor
reaction drives the unit rapidly back toward the
operator.
- If the blade becomes twisted or misaligned in the
cut, the teeth at the back edge of the blade can dig
into the top surface of the wood causing the blade
to climb out of the kerf and jump back toward the
operator.
Kickback is the result of saw misuse and/or incorrect
operating procedures or conditions and can be
avoided by taking proper precautions as given below.
a) Maintain a firm grip on the saw and position
your arms to resist kickback forces.
Position your body to either side of the
blade, but not in line with the blade. Kickback
could cause the saw to jump backwards, but
kickback forces can be controlled by the operator,
if proper precautions are taken.
b) When blade is binding, or when interrupting
a cut for any reason, release the trigger and
hold the saw motionless in the material until
the blade comes to a complete stop. Never
attempt to remove the saw from the work
or pull the saw backward while the blade is
in motion or kickback may occur. Investigate
and take corrective actions to eliminate the cause
of blade binding.
c) When restarting a saw in the workpiece,
center the saw blade in the kerf and check
that saw teeth are not engaged into the
material. If saw blade is binding, it may walk
up or kickback from the workpiece as the saw is
restarted.
d) Support large panels to minimize the risk of
blade pinching and kickback. Large panels
tend to sag under their own weight. Supports
must be placed under the panel on both sides,
near the line of cut and near the edge of the panel.
e) Do not use dull or damaged blades.
Unsharpened or improperly set blades produce
narrow kerf causing excessive friction, blade
binding and kickback.
f) Blade depth and bevel adjusting locking
levers must be tight and secure before
making cut. If blade adjustment shifts while
cutting, it may cause binding and kickback.
g) Use extra caution when sawing into existing
walls or other blind areas. The protruding
blade may cut objects that can cause kickback.
SAFETY INSTRUCTIONS
FOR PLUNGE TYPE SAW
a) Check guard for proper closing before each
use. Do not operate the saw if guard does
not move freely and enclose the blade
instantly. Never clamp or tie the guard so
that the blade is exposed. If saw is accidentally
dropped, guard may be bent. Check to make sure
that guard moves freely and does not touch the
blade or any other part, in all angles and depths of
cut.
b) Check the operation and condition of the
guard return spring. If the guard and the
spring are not operating properly, they
must be serviced before use. Guard may
operate sluggishly due to damaged parts, gummy
deposits, or a build-up of debris.
c) Assure that the base plate of the saw will not
shift while performing the “plunge cut” when
the blade bevel setting is not at 90°. Blade
shifting sideways will cause binding and likely kick
back.
d) Always observe that the guard is covering
the blade before placing saw down on
bench or floor. An unprotected, coasting blade
will cause the saw to walk backwards, cutting
whatever is in its path. Be aware of the time it
takes for the blade to stop after switch is released.
ADDITIONAL SAFETY
RULES FOR YOUR
CIRCULAR SAW
1) Always wear a dust mask, hearing protection and
eye protection.
2) Only use saw blades recommended in the
specification.
3) Use only blade diameter(s) in accordance with the
markings.
ADDITIONAL SAFETY
WARNING FOR TILE
CUTTING
a) The guard provided with the tool must be
securely attached to the power tool and
positioned for maximum safety, so the least
amount of wheel is exposed towards the
operator. Position yourself and bystanders
away from the plane of the rotating wheel.
The guard helps to protect operator from broken
wheel fragments and accidental contact with
wheel.
b) Use only diamond cut-off wheels for your
power tool. Just because an accessory can be
attached to your power tool, it does not assure
safe operation.
C) The rated speed of the accessory must be at
least equal to the maximum speed marked
on the power tool. Accessories running faster
than their rated speed can break and fly apart.
d) Wheels must be used only for recommended
applications. For example: do not grind with
the side of cut-off wheel. Abrasive cut-off
wheels are intended for peripheral grinding, side
forces applied to these wheels may cause them to
shatter.

Lithium-Ion Cordless Circular Saw
EN
11
e) Always use undamaged wheel flanges that
are of correct diameter for your selected
wheel. Proper wheel flanges support the wheel
thus reducing the possibility of wheel breakage.
f) Do not use worn down reinforced wheels
from larger power tools. Wheels intended for
a larger power tool are not suitable for the higher
speed of a smaller tool and may burst.
g) The outside diameter and the thickness of
your accessory must be within the capacity
rating of your power tool. lncorrectly sized
accessories cannot be adequately guarded or
controlled.
h) The arbour size of wheels and flanges must
properly fit the spindle of the power tool.
Wheels and flanges with arbour holes that do not
match the mounting hardware of the power tool
will run out of balance, vibrate excessively and
may cause loss of control.
i) Hold the power tool by insulated gripping
surfaces only, when performing an
operation where the cutting accessory
may contact hidden wiring. Cutting accessory
contacting a “live” wire may make exposed metal
parts of the power tool “live” and could give the
operator an electric shock.
j) Wear personal protective equipment.
Depending on application, use face
shield, safety goggles or safety glasses.
As appropriate, wear dust mask, hearing
protectors, gloves and shop apron capable
of stopping small abrasive or workpiece
fragments. The eye protection must be capable
of stopping flying debris generated by various
operations. The dust mask or respirator must be
capable of filtrating particles generated by your
operation. Prolonged exposure to high intensity
noise may cause hearing loss.
k) Keep bystanders a safe distance away from
work area. Anyone entering the work area
must wear personal protective equipment.
Fragments of workpiece or of a broken wheel
may fly away and cause injury beyond immediate
area of operation.
I) Hold the power tool by insulated gripping
surfaces only, when performing an
operation where the cutting accessory
may contact hidden wiring or its own cord.
Cutting accessory contacting a “live” wire may
make exposed metal parts of the power tool
“live” and could give the operator an electric
shock.
m) Never lay the power tool down until the
accessory has come to a complete stop.
The spinning wheel may grab the surface and
pull the power tool out of your control.
n) Do not run the power tool while carrying
it at your side. Accidental contact with the
spinning accessory could snag your clothing,
pulling the accessory into your body.
o) Regularly clean the power tool’s air vents.
The motor’s fan will draw the dust inside
the housing and excessive accumulation of
powdered metal may cause electrical hazards.
p) Do not operate the power tool near
flammable materials. Sparks could ignite these
materials.
KICKBACK AND RELATED WARNINGS
Kickback is a sudden reaction to a pinched or snagged
rotating wheel. Pinching or snagging causes rapid
stalling of the rotating wheel which in turn causes the
uncontrolled power tool to be forced in the direction
opposite of the wheel’s rotation at the point of the
binding.
For example, if an abrasive wheel is snagged or
pinched by the workpiece, the edge of the wheel
that is entering into the pinch point can dig into the
surface of the material causing the wheel to climb
out or kick out. The wheel may either jump toward
or away from the operator, depending on direction
of the wheel’s movement at the point of pinching.
Abrasive wheels may also break under these
conditions.
Kickback is the result of power tool misuse and/or
incorrect operating procedures or conditions and can
be avoided by taking proper precautions as given
below.
a) Maintain a firm grip on the power tool and
position your body and arm to allow you to
resist kickback forces. Always use auxiliary
handle, if provided, for maximum control
over kickback or torque reaction during
start-up. The operator can control torque
reactions or kickback forces, if proper precautions
are taken.
b) Never place your hand near the rotating
accessory. Accessory may kickback over your
hand.
C) Do not position your body in line with the
rotating wheel. Kickback will propel the tool in
direction opposite to the wheel’s movement at
the point of snagging.
d) Use special care when working Corners,
sharp edges etc. Avoid bouncing and
snagging the accessory. Corners, sharp edges
or bouncing have a tendency to snag the rotating
accessory and cause loss of control or kickback.
e) Do not attach a saw chain, woodcarving
blade, segmented diamond wheel with
a peripheral gap greater than 10 mm
or toothed saw blade. Such blades create
frequent kickback and loss of control.
f) Do not “jam” the wheel or apply excessive
pressure. Do not attempt to make an
excessive depth of cut. Overstressing the
wheel increases the loading and susceptibility to
twisting or binding of the wheel in the cut and the
possibility of kickback or wheel breakage.
g) When wheel is binding or when interrupting
a cut for any reason, switch off the power
tool and hold the power tool motionless
until the wheel Comes to a complete
stop. Never attempt to remove the wheel
from the cut while the wheel is in motion

Lithium-Ion Cordless Circular Saw
EN
12
otherwise kickback may occur. lnvestigate
and take corrective action to eliminate the cause
of wheel binding.
h) Do not restart the cutting operation in the
workpiece. Let the wheel reach full speed
and carefully re-enter the cut. The wheel
may bind, walk up or kickback if the power tool is
restarted in the workpiece.
i) Support panels or any oversized workpiece
to minimize the risk of wheel pinching and
kickback. Large workpieces tend to sag under
their own weight. Supports must be placed under
the workpiece near the line of cut and near the
edge of the workpiece on both sides of the wheel.
j) Use extra caution when making a “pocket
cut” into existing walls or other blind areas.
The protruding wheel may cut gas or water
pipes, electrical wiring or objects that can cause
kickback.
ADDITIONAL SAFETY
RULES:
1. Always wear a dust mask.
GENERAL SAFETY
WARNINGS FOR YOUR
LASER
WARNING: Read all safety warnings and
all instructions. Failure to follow the
warnings and instructions may result in
serious injury.
Save all warnings and instructions for future
reference.
These lasers do not normally present an
optical hazard although staring at the beam
may cause flash blindness.
Do not stare directly at the laser beam. A
hazard may exist if you deliberately stare into
the beam, please observe all safety rules as
follows:
1) The laser shall be used and maintained
in accordance with the manufacturer’s
instructions.
2) Never aim the beam at any person or an
object other than the work piece.
3) The laser beam shall not be deliberately
aimed at another person and shall be
prevented from being directed towards
the eye of a person for longer than 0.25
seconds area.
4) Always ensure the laser beam is aimed
at a sturdy work piece without reflective
surfaces, e.g. wood or rough-coated
surfaces are acceptable. Bright shiny
reflective sheet steel or similar is not suitable for
laser applications as the reflective surface may
direct the laser beam back at the operator.
5) Do not change the laser device with
a different type. The manufacturer or an
authorized agent must carry out repairs.
6) CAUTION: Use of controls or adjustments
other than those specified herein may result in
hazardous radiation exposure.
ADDITIONAL SAFETY WARNING FOR CLASS
2 LASER
The laser device fitted to this tool is CLASS 2
with a maximum radiation of 1.5mW and 650nm
wavelength.
CLASS 2 LASER RADIATION, DO NOT STARE
INTO BEAM
SAFETY INSTRUCTIONS
FOR BATTERY PACK
a) Do not dismantle, open or shred cells
or battery pack.
b) Do not short-circuit a battery pack. Do not
store battery packs haphazardly in a box or
drawer where they may short-circuit each
other or be short-circuited by conductive
materials. When battery pack is not in use, keep
it away from other metal objects, like paper
clips, coins, keys, nails, screws or other small
metal objects, that can make a connection from
one terminal to another. Shorting the battery
terminals together may cause burns or a fire.
c) Do not expose battery pack to heat or fire.
Avoid storage in direct sunlight.
d) Do not subject battery pack to mechanical
shock.
e) In the event of battery leaking, do not
allow the liquid to come into contact
with the skin or eyes. If contact has been
made, wash the affected area with copious
amounts of water and seek medical advice.
f) Seek medical advice immediately if a cell or
battery pack has been swallowed.
g) Keep battery pack clean and dry.
h) Wipe the battery pack terminals with a
clean dry cloth if they become dirty.
i) Battery pack needs to be charged before
use. Always refer to this instruction and
use the correct charging procedure.
j) Do not maintain battery pack on charge
when not in use.
k) After extended periods of storage, it may
be necessary to charge and discharge
the battery pack several times to obtain
maximum performance.
l) Battery pack gives its best performance
when it is operated at normal room
temperature (20°C ± 5°C).
m) When disposing of battery packs, keep
battery packs of different electrochemical
systems separate from each other.
n) Recharge only with the charger specified

Lithium-Ion Cordless Circular Saw
EN
13
by WORX. Do not use any charger other
than that specifically provided for use with
the equipment. A charger that is suitable for
one type of battery pack may create a risk of fire
when used with another battery pack.
o) Do not use any battery pack which is not
designed for use with the equipment.
p) Keep battery pack out of the reach of
children.
q) Retain the original product literature for
future reference.
r) Remove the battery from the equipment
when not in use.
s) Dispose of properly.
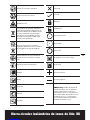
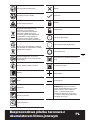
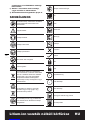
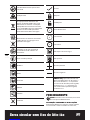
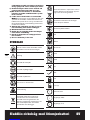
SYMBOLS
To reduce the risk of injury, user must
read instruction manual
Warning
Wear ear protection
Wear eye protection
Wear dust mask
Do not stare into beam
Laser radiation
Waste electrical products must not be
disposed of with household waste.
Please recycle where facilities exist.
Check with your local authorities or
retailer for recycling advice.
Do not dispose of batteries, Return
exhausted batteries to your local col-
lection or recycling point.
Make sure the battery is removed prior
to changing accessories.
Wear protective gloves
Wood
Metal
Aluminium
Plastic
Tile
Incorrect
Correct
Lock
Unlock
Diamond disc
Li-Ion

Lithium-Ion Cordless Circular Saw
EN
14
HSS blade
TCT blade
Do not expose to rain or water
Do not burn
Positive terminal
Negative terminal
xINR18/65-y: Cylindrical lithium
Ion battery cells with max diameter
of 18mm and max height of 65mm;
“x” represents a number cells serial
connected, blank if 1; “-y” represents a
number of cells paralleled connected,
blank if 1.
OPERATING INSTRUCTIONS
NOTE: Before using the tool, read the
instruction book carefully.
INTENDED USE:
The tool is intended for ripping and cross-cutting
wood and other materials in straight cutting lines,
while resting firmly on the work piece.
ASSEMBLY AND OPERATION
Action Figure
BEFORE OPERATION
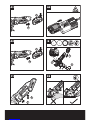
Removing the battery pack See Fig. A1
Charging the battery See Fig. A2
Installing the battery pack See Fig. A3
ASSEMBLY
Saw blade Assembly and
Removing
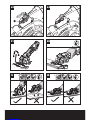
WARNING: Always
remove the battery
before changing the blade!
See Fig. B
Safety On/Off Switch
WARNING:
To avoid
cutting injury from the
sharp blade, please don’t put
your hands around the Base
Plate.
See Fig. C1, C2
Cross and Rip Cutting
Note: To avoid injury from
Kickback, please don’t start
cutting until the blade runs
stably.
See Fig. D1, D2
Cutting Depth Adjusting See Fig. E1, E2
Using the laser light feature See Fig. F
Replacing laser batteries See Fig. G1-G3
Parallel Guide See Fig. H1, H2
Pocket Cutting See Fig. I1, I2
Sawdust Removal See Fig. J
WORKING HINTS FOR YOUR
TOOL
If your power tool becomes too hot, please run your
circular saw no load for 2-3 minutes to cool the motor.
Avoid prolonged usage at very low speeds.
Protect saw blades against impact and shock. Cutting with
extreme force can significantly reduces the performance
capability of the tool and reduces the service life of the
saw blade. Sawing performance and cutting quality
depend essentially on the condition and the tooth count
of the saw blade. Therefore, use only sharp saw blades
that are suited for the material being cut.
Choice of blades: 24 teeth for general work, approx.
40 teeth for finer cuts, more than 40 teeth for very fine
cuts into delicate surfaces, diamond for tile, cement
board, etc.
Only use saw blades recommended.
MAINTAIN TOOLS WITH
CARE
Remove the plug from the socket before
carrying out any adjustment, servicing or
maintenance.
Keep tools sharp and clean for better and safer
performance. Follow instructions for lubricating and
changing accessories. Inspect tool cords periodically
and if damaged, have repaired by authorized service
facility. Your power tool requires no additional
lubrication or maintenance. There are no user
serviceable parts in your power tool. Never use water
or chemical cleaners to clean your power tool. Wipe
clean with a dry cloth. Always store your power tool
in a dry place. Keep the motor ventilation slots clean.
Keep all working controls free of dust.

Lithium-Ion Cordless Circular Saw
EN
15
If the supply cord is damaged, it must be replaced
by the manufacturer, its service agent or similarly
qualified persons in order to avoid a hazard.
Periodically clear dust and chips from guard and
base to ensure proper performance.
ENVIRONMENTAL
PROTECTION
Waste electrical products must not be disposed
of with household waste. Please recycle where
facilities exist. Check with your local authorities
or retailer for recycling advice.
TROUBLE SHOOTING
Symptom Possible Causes Possible Solution
Tool will not start when operating
the on/off switch.
Battery park not plugged in.
Battery park is powered off.
Carbon brush has worn down
Check to make sure battery park is
connected well into a working outlet
Charging the battery.
Replace the carbon brush using a
qualified maintenance person.
Cutting depth is less than that
is set. Sawdust accumulated at the
rear of the base.
Shake out sawdust. Consider
connecting a vacuum for dust
collection.
Blade spins or slips Blade is not tightly engaged
with the spindle.
Remove the blade, and reassemble
it as described in SAW BLADE
ASSEMBLY AND REMOVING
section.
Blade will not cut a straight line.
Blade is dull.
Blade is not mounted properly.
Saw is not being guided
properly.
Mount a new, sharp blade on the saw.
Check that blade is properly mounted.
Use a parallel guide.
Blade kicks back when beginning
a cut Blade is not spinning fast
enough
Allow the saw blade to reach full
speed prior to beginning a cut in the
material.
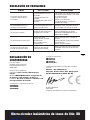
DECLARATION OF
CONFORMITY
We,
POSITEC Germany GmbH
Konrad-Adenauer-Ufer 37
50668 Köln
Declare that the product,
Description Battery-powered circular saw
Type WX523 WX523.9 (5-designation of
machinery, representative of Saw)
Function Cutting various materials with a
rotating toothed blade
Complies with the following Directives,
2006/42/EC
2011/65/EU
2014/30/EU
Standards conform to:
EN 55014-1
EN 55014-2
EN 60745-1
EN 60745-2-5
The person authorized to compile the technical file,
Name: Russell Nicholson
Address: Positec Power Tools (Europe) Ltd, PO
Box 6242 Newbury RG14 9LT UK
Suzhou 2015/04/21
Allen Ding
Deputy Chief Engineer,Testing & Certification

17
16
Kabellose Handkreissäge mit Lithium-Ionen-Akku
D
1. SOFTHANDGRIFF
2. FESTER OBERER SCHUTZ
3. STAUBSAUGERADAPTER
4. STAUBSAUGER-ANSCHLUSS
5.
PARALLELFÜHRUNG-KLEMMBEFESTIGUNG
6. PARALLELANSCHLAG
7. UNTERE SCHUTZHAUBE
8. GRUNDPLATTE
9. RÜCKZIEHHEBEL
10. TIEFENEINSTELLUNGSHEBEL
11. FREIGABEKNOPF
12. EIN-AUS-SCHALTER
13. AKKU
14. SPINDEL-STOPP-TASTE
15. LASER
16. SÄGEBLATT (Siehe Bild B)
17.
SCHRAUBE FÜR
SÄGEBLATT-BEFESTIGUNG (Siehe Bild B)
18. ÄUSSERER FLANSCH (Siehe Bild B)
19. SCHRAUBENSCHLÜSSEL(Siehe Bild B)
20. LASER EIN-/AUSSCHALTER (Siehe Bild F)
21. LASERBATTERIEN (ZWEI) (Siehe Bild G2)
Abgebildetes oder beschriebenes Zubehör
gehört teilweise nicht zum Lieferumfang.
TECHNISCHE DATEN
Typ WX523 WX523.9 (5- Bezeichnung der
Maschine, repräsentiert die Säge)
WX523 WX523.9
Spannung Ladegerät 100-240V ~ 50/60Hz
Akku Gleich-Spannung 20 V Max**
Ohne Last (Nenn-)
Geschwindigkeit 2300/min
Blatt-
durchmesser
TCT
Sägeblatt
85mmx1.2mmx15mmx24T
HSS
Sägeblatt
85mmx1.2mmx15mmx44T
Normales
Sägeblatt
85mmx1.2mmx15mmx60G
Max.
Schnitttiefe 27mm
Maximale
Material-
dicke
(emp-
fohlen)
Holz 27mm
Aluminium 3mm
PVC Rohre
(Durchm-
esser) 13mm
Fliese 8mm
Dünnes
Stahlblech 0.91mm
Laserbatterie-Modellnr. LR44 1.5V
Gewicht 2.0kg 1.6kg
Spindelgewinde größe M5
Sägeblatt-
stärke
TCT
Sägeblatt 0.8mm
HSS
Sägeblatt 0.65mm
Normales
Sägeblatt 0.8mm
**Spannung ohne Arbeitslast gemessen.
Anfangsakkuspannung erreicht maximal 20 Volt.
Nennspannung ist 18 Volt.
INFORMATIONEN ÜBER
LÄRM
Gewichteter Schalldruck LpA:92.0dB(A)
Gewichtete
Schallleistung LwA: 103.0dB(A)
KPA& KWA 3.0dB(A)
Tragen Sie einen
Gehörschutz.

17
16
Kabellose Handkreissäge mit Lithium-Ionen-Akku
D
INFORMATIONEN ÜBER
VIBRATIONEN
Vibrationsgesamtmesswertermittlung gemäß
EN60745:
Schnitte
in Holz
Vibrationsemissionswert ah,W= 5,480m/s2
Unsicherheit K= 1.5m/s²
Schnitte
in
Metall
Vibrationsemissionswert a
h,W
= 4,628m/s
2
Unsicherheit K= 1.5m/s²
Schnitte
in Fliese
Vibrationsemissionswert ah = 6.13m/s2
Unsicherheit K = 1.5m/s²
Der angegebene Gesamtvibrationswert kann zum
Vergleich eines Werkzeugs mit einem anderen und
auch zur vorläufigen Expositionsbewertung verwen-
det werden.
WARNUNG: Der Vibrationsemissionswert
kann während des tatsächlichen Gebrauchs
des Elektrowerkzeugs vom angegebenen Wert
abweichen, je nachdem, wie das Werkzeug gemäß
folgenden Beispielen und weiteren
Verwendungsmöglichkeiten eingesetzt wird:
Wie das Werkzeug verwendet wird und Materialen
geschnitten oder angebohrt werden.
Der Pflege- und Wartungszustand des Werkzeugs.
Die Verwendung des richtigen Zubehörs und dessen
Schärfe und Zustand.
Die Festigkeit der Handgriffe und die Benutzung von
Antivibrations zubehör.
Der bestimmungsgemäß und diesen Anweisungen
entsprechende Gebrauch.
Wird dieses Werkzeug nicht angemessen
gehandhabt, kann es zum Auftreten des Hand-
Arm-Vibrationssyndroms kommen.
WARNUNG: Um genau zu sein, sollte ein
Abschätzung des Belastungsgrades aller
Arbeitsabschnitte während tatsächlicher
Verwendung berücksichtigt werden, z.B. die Zeiten,
wenn das Werkzeug ausgeschaltet ist, und wenn es
sich im Leerlauf befindet und eigentlich nicht
eingesetzt wird. Auf diese Weise kann der
Belastungsgrad während der gesamten Arbeitszeit
möglicherweise wesentlich gemindert werden.
So minimieren Sie das Risiko, dem Sie bei Vibra-
tionen ausgesetzt sind.
Verwenden Sie IMMER scharfe Meissel, Bohrer und
Sägeblätter.
Pflegen Sie dieses Werkzeug diesen Anweisungen
entsprechend und achten Sie auf eine gute Einfettung
(wo erforderlich).
Bei regelmäßiger Verwendung von Elektrowerkzeug
sollten Sie in Antivibrations zubehör investieren.
Vermeiden Sie den Einsatz von Werkzeugen bei Tem-
peraturen von 10ºC oder darunter.
Erstellen Sie einen Arbeitsplan, um die Verwendung
von hoch vibrierenden Werkzeugen auf mehrere Tage
zu verteilen.
ZUBEHÖRTEILE
WX523 WX523.9
TCT Sägeblatt (24T) 1 1
HSS Sägeblatt (44T) 1 1
Diamantscheibe: 1 1
Parallelanschlag 1 1
Staubsaugeradapter
1 1
Inbusschlüssel 1 1
20 V 2,0 Ah Li-Ionen-
Akku WA3551.1 1 /
1 Stunden Lader
(WA3860) 1 /
Wir empfehlen Ihnen, sämtliche Zubehörteile beim
selben Fachhändler zu beziehen, bei dem Sie auch Ihr
Elektrowerkzeug gekauft haben. Weitere Informa-
tionen finden Sie auf der Verpackung der Zubehör-
teile. Auch Ihr Fachhändler berät Sie gerne.
SICHERHEITSANWEI-
SUNGEN FÜR ALLE SÄGEN
a) WARNUNG: Kommen Sie mit Ihren
Händen nicht in den Sägebereich und
an das Sägeblatt . Wenn beide Hände
die Kreissäge halten, kann das Sägeblatt diese
nicht verletzen.
b) Greifen Sie nicht unter das Werkstück. Die
Schutzhaube kann Sie unter dem Werkstück nicht
vor dem Sägeblatt schützen.
c) Passen Sie die Schnittiefe an die Dicke des
Werkstückes an. Es sollte weniger als eine
volle Zahnhöhe unter dem Werkstück sichtbar
sein.
d) Halten Sie das zu sägende Werkstück
niemals mit der Hand oder über dem
Bein fest. Sichern Sie das Werkstück an
einer stabilen Unterlage. Es ist wichtig, das
Werkstück gut zu befestigen, um die Gefahr von
Körperkontakt, Klemmen des Sägeblattes oder
Verlust der Kontrolle zu minimieren.
e) Halten Sie das Gerät nur an den isolierten
Griffflächen, wenn Sie Arbeiten ausführen,

19
18
Kabellose Handkreissäge mit Lithium-Ionen-Akku
D
bei denen das Einsatzwerkzeug verborgene
Stromleitungen. Der Kontakt mit einer
spannungsführenden Leitung kann auch
metallene Geräteteile unter Spannung setzen
und zu einem elektrischen Schlag führen.
f) Verwenden Sie beim Längsschneiden
immer einen Anschlag oder eine
gerade Kantenführung. Dies verbessert
die Schnittgenauigkeit und verringert die
Möglichkeit, dass das Sägeblatt klemmt.
g) Verwenden Sie immer Sägeblätter in
der richtigen Grösse und mit passender
Aufnahmebohrung (z.B. sternförmig
oder rund). Sägeblätter, die nicht zu den
Montageteilen der Säge passen, laufen unrund
und führen zum Verlust der Kontrolle.
h) Verwenden Sie niemals beschädigte
oder falsche Sägeblatt-Unterlegscheiben
(Flansche) oder –schrauben. Die Sägeblatt-
Unterlegscheiben und –schrauben wurden
speziell für Ihre Säge konstruiert, für optimale
Leistung und Betriebssicherheit.
URSACHEN UND
VERMEIDUNG EINES
RÜCKSCHLAGES:
URSACHEN EINES RÜCKSCHLAGS UND
DIESBEZÜGLICHE WARNHINWEISE
- Ein Rückschlag ist die plötzliche Reaktion infolge
eines hakenden, klemmenden oder falsch
ausgerichteten Sägeblattes, die dazu führt,
daß eine unkontrollierte Säge abhebt und sich
aus dem Werkstück heraus in Richtung der
Bedienperson bewegt;
- Wenn sich das Sägeblatt in dem sich
schließenden Sägespalt verhakt oder verklemmt,
blockiert es, und die Motorkraft schlägt das Gerät
in Richtung der Bedienperson zurück;
- Wird das Sägeblatt im Sägeschnitt verdreht oder
falsch ausgerichtet, können sich die Zähne der
hinteren Sägeblattkante in der Oberfläche des
Werkstücks verhaken, wodurch sich das Sägeblatt
aus dem Sägespalt herausbewegt und die Säge
in Richtung der Bedienperson zurückspringt.
Ein Rückschlag ist die Folge eines falschen oder
fehlerhaften Gebrauchs der Säge. Er kann durch
geeignete Vorsichtsmaßnahmen, wie nachfolgend
beschrieben, verhindert werden.
a) Halten Sie die Säge fest und bringen
Sie Ihre Arme in eine Stellung, in der
Sie den Rückschlagkräften standhalten
können. Halten Sie sich immer seitlich
des Sägeblattes, nie das Sägeblatt in
eine Linie mit Ihrem Körper bringen. Bei
einem Rückschlag kann die Kreissäge rückwärts
springen, jedoch kann die Bedienperson die
Rückschlagkräfte beherrschen, wenn geeignete
Maßnahmen getroffen wurden.
b) Falls das Sägeblatt klemmt oder das Sägen
aus einem anderen Grund unterbrochen
wird, lassen Sie den Ein-Aus-Schalter los
und halten Sie die Säge im Werkstoff ruhig,
bis das Sägeblatt vollständig still steht.
Versuchen Sie niemals, die Säge aus dem
Werkstück zu entfernen oder sie rückwärts
zu ziehen, solange das Sägeblatt sich
bewegt oder sich ein Rückschlag ereignen
könnte. Finden Sie die Ursache für das Klemmen
des Sägeblattes und beseitigen Sie diese durch
geeignete Maßnahmen.
c) Wenn Sie eine Säge, die im Werkstück
steckt, wieder starten wollen, zentrieren
Sie das Sägeblatt im Sägespalt und
überprüfen Sie, ob die Sägezähne nicht
im Werkstück verhakt sind. Klemmt das
Sägeblatt, kann es sich aus dem Werkstück
herausbewegen oder einen Rückschlag
verursachen, wenn die Säge erneut gestartet
wird.
d)
Stützen Sie grosse Platten ab, um das
Risiko durch ein klemmendes Sägeblatt
zu vermindern. Grosse Platten können sich
durch ihr Eigengewicht durchbiegen. Platten
müssen auf beiden Seiten, sowohl in der Nähe
des Sägespaltes als auch am Rand, abgestützt
werden.
e) Verwenden Sie keine stumpfen oder
beschädigten Sägeblätter. Sägeblätter mit
stumpfen oder falsch ausgerichteten Zähnen
verursachen durch einen zu engen Sägespalt eine
erhöhte Reibung, Klemmen des Sägeblattes und
Rückschlag.
f) Ziehen Sie vor dem Sägen die Schnittiefen-
und Schnittwinkeleinstellungen fest. Wenn
sich während des Sägens die Einstellungen
verändern, kann sich das Sägeblatt verklemmen
und ein Rückschlag auftreten.
g) Seien Sie besonders vorsichtig, wenn sich
sägen in einen verborgenen Bereich, z. B. in
einer bestehenden Wand. Das eintauchende
Sägeblatt kann beim Sägen in verborgene
Objekte blockieren und einen Rückschlag
verursachen.
SICHERHEITSHINWEISE
FÜR TAUCHSÄGE
a)
Überprüfen Sie vor jeder Benutzung, ob die
untere Schutzhaube einwandfrei schließt.
Verwenden Sie die Säge nicht, wenn die
untere Schutzhaube nicht frei beweglich
ist und sich nicht sofort schließt. Klemmen
oder binden Sie die untere Schutzhaube
niemals in geöffneter Position fest. Sollte
die Säge unbeabsichtigt zu Boden fallen,
kann die untere Schutzhaube verbogen
werden. Öffnen Sie die Schutzhaube mit dem
Rückziehhebel und stellen Sie sicher, dass sie
sich frei bewegt und bei allen Schnittwinkeln und
–tiefen weder Sägeblatt noch andere Teile berührt.

19
18
Kabellose Handkreissäge mit Lithium-Ionen-Akku
D
b) Überprüfen Sie die Funktion der Feder für
die untere Schutzhaube. Lassen Sie das
Gerät vor dem Gebrauch warten, wenn
die untere Schutzhaube und Feder nicht
einwandfrei arbeiten. Beschädigte Teile,
klebrige Ablagerungen oder Ablagerung von
Spänen lassen die untere Schutzhaube verzögert
arbeiten, ggf mit Pinsel oder Druckluft reinigen.
c) Versichern, dass die Führungsplatte der
Säge nicht verlagert wird während der
Durchführung der “stürzen schneiden “,
wenn die Klinge Fase Einstellung wird
nicht bei 90°. Blade seitliche Verschiebung
verursachen wird verbindlich und wahrscheinlich
abschalten.
d) Legen Sie die Säge nicht auf der Werkbank
oder auf dem Boden ab, ohne dass die
untere Schutzhaube das Sägeblatt bedeckt.
Ein ungeschütztes, nachlaufendes Sägeblatt
bewegt die Säge entgegen der Schnittrichtung
und sägt, was ihm im Weg ist. Beachten Sie
dabei die Nachlaufzeit der Säge.
ZUSÄTZLICHE
ZUSÄTZLICHE
SICHERHEITSHINWEISE
FÜR KREISSÄGEN
1. Tragen Sie grundsätzlich eine Staubmaske, einen
Gehörschutz und eine Schutzbrille.
2. Verwenden Sie ausschließlich die in den
Spezifikationen genannten Sägeblätter.
3. Verwenden Sie nur Sägeblätter mit
einem Durchmesser entsprechend den
Kennzeichnungen.
ZUSÄTZLICHE
SICHERHEITSHINWEISE
FÜR DAS SCHNEIDEN VON
FLIESEN
a) Die Schutzvorrichtung des Werkzeugs
muss sicher befestigt und so ausgerichtet
sein, dass ein möglichst kleiner Teil der
Schleifscheibe zum Bediener zeigt. Halten
Sie sich selbst und in der Nähe befindliche
Personen aus der Ebene des rotierenden
Einsatzwerkzeugs fern. Die Schutzhaube
soll die Bedienperson vor Bruchstücken und
zufälligemKontakt mit dem Schleifkörper
schützen.
b) Nur Diamant-Trennschleifscheiben für Ihr
elektrisches Werkzeug verwenden. Nur
weil Sie das Zubehör an Ihrem Elektrowerkzeug
befestigen können, garantiert das keine sichere
Verwendung.
c) Die zulässige Drehzahl des
Einsatzwerkzeugs muss mindestens so
hoch sein wie die auf dem Elektrowerkzeug
angegebene Höchstdrehzahl. Zubehör, das
sich schneller als zulässig dreht, kann zerstört
werden.
d) Schleifkörper dürfen nur für die
empfohlenen Einsatzmöglichkeiten
verwendet werden. Zum Beispiel:
Schleifen Sie nie mit der Seitenfläche
einer Trennscheibe. Trennscheiben sind
zum Materialabtrag mit der Kante der Scheibe
bestimmt. Seitliche Krafteinwirkung auf diese
Schleifkörper kann sie zerbrechen.
e) Verwenden Sie immer unbeschädigte
Spannflansche in der richtigen Größe
und Form für die von Ihnen gewählte
Schleifscheibe. Geeignete Flansche stützen
die Schleifscheibe und verringern so die Gefahr
eines Schleifscheibenbruchs.
f) Verwenden Sie keine abgenutzten
Schleifscheiben von größeren
Elektrowerkzeugen. Schleifscheiben
für größere Elektrowerkzeuge sind nicht
für die höheren Drehzahlen von kleineren
Elektrowerkzeugen ausgelegt und können
brechen.
g) Außendurchmesser und Dicke des
Einsatzwerkzeugs müssen den
Maßangaben Ihres Elektrowerkzeugs
entsprechen. Falsch bemessene
Einsatzwerkzeuge können nicht ausreichend
abgeschirmt oder kontrolliert werden.
h) Die Aufsteckhalter von Schleifscheiben
und Flanschen müssen genau auf
die Spindel Ihres Elektrowerkzeugs
passen. Schleifscheiben und Flansche mit
Aufsteckhalterlöchern, die nicht genau auf die
Spindel des Elektrowerkzeugs passen, drehen
sich ungleichmäßig, vibrieren sehr stark und
können zum Verlust der Kontrolle führen.
i) Halten Sie das Gerät nur an den isolierten
Griffflächen, wenn Sie Arbeiten ausführen,
bei denen das Einsatzwerkzeug verborgene
Stromleitungen . Metallteile am Werkzeug,
die mit stromführenden Drähten in Berührung
kommen, werden selbst stromführend und
können der Bedienperson einen elektrischen
Schlag versetzen.
j) Tragen Sie persönliche Schutzausrüstung.
Verwenden Sie je nach Anwendung
Vollgesichtsschutz, Augenschutz oder
Schutzbrille. Soweit angemessen,
tragen Sie Staubmaske, Gehörschutz,
Schutzhandschuhe oder Spezialschürze,
die kleine Schleif- und Materialpartikel
von Ihnen fernhält. Die Augen sollen vor
herumfliegenden Fremdkörpern geschützt
werden, die bei verschiedenen Anwendungen
entstehen. Staub- oder Atemschutzmaske
müssen den bei der Anwendung entstehenden
Staub filtern. Wenn Sie lange lautem Lärm
ausgesetzt sind, können Sie einen Hörverlust
erleiden.

21
20
Kabellose Handkreissäge mit Lithium-Ionen-Akku
D
k) Achten Sie bei anderen Personen auf
sicheren Abstand zu Ihrem Arbeitsbereich.
Jeder, der den Arbeitsbereich betritt, muss
persönliche Schutzausrüstung tragen.
Bruchstücke des Werkstücks oder gebrochener
Einsatzwerkzeuge können wegfliegen und
Verletzungen auch außerhalb des direkten
Arbeitsbereichs verursachen.
l) Halten Sie das Werkzeug an den isolierten
Griffen, wenn die Gefahr besteht, dass
Sie beim Arbeiten in Wänden, Decken
usw. verborgene Leitungen . Metallteile
am Werkzeug, die mit stromführenden
Drähten in Berührung kommen, werden selbst
stromführend und können der Bedienperson
einen elektrischen Schlag versetzen.
m) Legen Sie das Elektrowerkzeug niemals
ab, bevor das Einsatzwerkzeug völlig zum
Stillstand gekommen ist. Das rotierende
Einsatzwerkzeug kann in Kontakt mit der
Ablagefläche geraten, wodurch Sie die Kontrolle
über das Elektrowerkzeug verlieren können.
n) Lassen Sie das Elektrowerkzeug nicht
laufen, während Sie es tragen. Ihre Kleidung
kann durch zufälligen Kontakt mit dem sich
drehenden Einsatzwerkzeug erfasst werden,
und das Einsatzwerkzeug sich in Ihren Körper
bohren.
o) Reinigen Sie regelmäßig die
Lüftungsschlitze Ihres Elektrowerkzeugs.
Das Motorgebläse zieht Staub in das Gehäuse,
und eine starke Ansammlung von Metallstaub
kann elektrische Gefahren verursachen.
p) Verwenden Sie das Elektrowerkzeug nicht
in der Nähe brennbarer Materialien. Funken
können diese Materialien entzünden.
RÜCKSCHLAG UND ENTSPRECHENDE
WARNHINWEISE
Rückstoß ist eine plötzliche Reaktion auf eine
verklemmte oder verhakte Drehscheibe.Klemmen
oder Haken verursacht schnelles Blockieren der
Drehscheibe, was das unkontrollierte Werkzeug
zum Zeitpunkt der Blockade in die der Drehung der
Scheibe entgegengesetzte Richtung zwingt.
Wenn z. B. eine Schleifscheibe im Werkstück
hakt oder blockiert, kann sich die Kante der
Schleifscheibe, die in das Werkstück eintaucht,
verfangen und dadurch die Schleifscheibe
ausbrechen oder einen Rückschlag verursachen.
Die Schleifscheibe bewegt sich dann auf die
Bedienperson zu oder von ihr weg, je nach
Drehrichtung der Scheibe an der Blockierstelle.
Hierbei können Schleifscheiben auch brechen.
Ein Rückschlag ist die Folge eines falschen oder
fehlerhaften Gebrauchs des Elektrowerkzeugs. Er
kann durch geeignete Vorsichtsmaßnahmen, wie
nachfolgend beschrieben, verhindert werden.
a) Halten Sie das Elektrowerkzeug gut
fest und bringen Sie Ihren Körper und
Ihre Arme in eine Position, in der Sie
die Rückschlagkräfte abfangen können.
Verwenden Sie immer den Zusatzgriff,
falls vorhanden, um die größtmögliche
Kontrolle über Rückschlagkräfte oder
Reaktionsmomente beim Hochlauf zu
haben. Die Bedienperson kann durch geeignete
Vorsichtsmaßnahmen die Rückschlag- und
Reaktionskräfte beherrschen.
b) Bringen Sie Ihre Hand nie in die Nähe
sich drehender Einsatzwerkzeuge. Das
Einsatzwerkzeug kann sich beim Rückschlag
über Ihre Hand bewegen.
c) Positionieren Sie Ihren Körper nicht
in einer Linie mit der Drehscheibe. Der
Rückschlag treibt das Elektrowerkzeug in die
Richtung entgegengesetzt zur Bewegung der
Schleifscheibe an der Blockierstelle.
d) Arbeiten Sie besonders vorsichtig im
Bereich von Ecken, scharfen Kanten usw.
Verhindern Sie, dass Einsatzwerkzeuge
vom Werkstück zurückprallen und
verklemmen. Das rotierende Einsatzwerkzeug
neigt bei Ecken, scharfen Kanten oder wenn
es abprallt, dazu, sich zu verklemmen.
Dies verursacht einen Kontrollverlust oder
Rückschlag.
e) Keine Sägekette, Holzschnittblatt,
segmentierte Diamantscheibe mit einem
peripheren Abstand von mehr als 10 mm
oder gezahntes Sägeblatt anbringen. Solche
Einsatzwerkzeuge verursachen häufig einen
Rückschlag oder den Verlust der Kontrolle über
das Elektrowerkzeug.
f) Scheibe nicht verklemmen oder
übermäßigen Druck ausüben. Eine
Überlastung der Trennscheibe erhöht deren
Beanspruchung und die Anfälligkeit zum
Verkanten oder Blockieren und damit
die Möglichkeit eines Rückschlags oder
Schleifkörperbruchs.
g) Falls die Trennscheibe verklemmt oder
Sie die Arbeit unterbrechen, schalten Sie
das Gerät aus und halten Sie es ruhig, bis
die Scheibe zum Stillstand gekommen
ist. Versuchen Sie nie, die noch laufende
Trennscheibe aus dem Schnitt zu ziehen,
sonst kann ein Rückschlag erfolgen.
Ermitteln und beheben Sie die Ursache für das
Verklemmen.
h) Schalten Sie das Elektrowerkzeug nicht
wieder ein, solange es sich im Werkstück
befindet. Lassen Sie die Trennscheibe erst ihre
volle Drehzahl erreichen, bevor Sie den Schnitt
vorsichtig fortsetzen. Anderenfalls kann die
Scheibe verhaken, aus dem Werkstück springen
oder einen Rückschlag verursachen.
i) Stützen Sie Platten oder große Werkstücke
ab, um das Risiko eines Rückschlags
durch eine eingeklemmte Trennscheibe
zu vermindern. Große Werkstücke können
sich unter ihrem eigenen Gewicht durchbiegen.
Das Werkstück muss auf beiden Seiten
abgestützt werden, und sowohl in der Nähe des
Trennschnitts als auch an der Kante.
j) Seien Sie besonders vorsichtig bei
La pagina si sta caricando...
La pagina si sta caricando...
La pagina si sta caricando...
La pagina si sta caricando...
La pagina si sta caricando...
La pagina si sta caricando...
La pagina si sta caricando...
La pagina si sta caricando...
La pagina si sta caricando...
La pagina si sta caricando...
La pagina si sta caricando...
La pagina si sta caricando...
La pagina si sta caricando...
La pagina si sta caricando...
La pagina si sta caricando...
La pagina si sta caricando...
La pagina si sta caricando...
La pagina si sta caricando...
La pagina si sta caricando...
La pagina si sta caricando...
La pagina si sta caricando...
La pagina si sta caricando...
La pagina si sta caricando...
La pagina si sta caricando...
La pagina si sta caricando...
La pagina si sta caricando...
La pagina si sta caricando...
La pagina si sta caricando...
La pagina si sta caricando...
La pagina si sta caricando...
La pagina si sta caricando...
La pagina si sta caricando...
La pagina si sta caricando...
La pagina si sta caricando...
La pagina si sta caricando...
La pagina si sta caricando...
La pagina si sta caricando...
La pagina si sta caricando...
La pagina si sta caricando...
La pagina si sta caricando...
La pagina si sta caricando...
La pagina si sta caricando...
La pagina si sta caricando...
La pagina si sta caricando...
La pagina si sta caricando...
La pagina si sta caricando...
La pagina si sta caricando...
La pagina si sta caricando...
La pagina si sta caricando...
La pagina si sta caricando...
La pagina si sta caricando...
La pagina si sta caricando...
La pagina si sta caricando...
La pagina si sta caricando...
La pagina si sta caricando...
La pagina si sta caricando...
La pagina si sta caricando...
La pagina si sta caricando...
La pagina si sta caricando...
La pagina si sta caricando...
La pagina si sta caricando...
La pagina si sta caricando...
La pagina si sta caricando...
La pagina si sta caricando...
La pagina si sta caricando...
La pagina si sta caricando...
La pagina si sta caricando...
La pagina si sta caricando...
La pagina si sta caricando...
La pagina si sta caricando...
La pagina si sta caricando...
La pagina si sta caricando...
La pagina si sta caricando...
La pagina si sta caricando...
La pagina si sta caricando...
La pagina si sta caricando...
La pagina si sta caricando...
La pagina si sta caricando...
La pagina si sta caricando...
La pagina si sta caricando...
La pagina si sta caricando...
La pagina si sta caricando...
La pagina si sta caricando...
La pagina si sta caricando...
La pagina si sta caricando...
La pagina si sta caricando...
La pagina si sta caricando...
La pagina si sta caricando...
La pagina si sta caricando...
La pagina si sta caricando...
La pagina si sta caricando...
La pagina si sta caricando...
La pagina si sta caricando...
La pagina si sta caricando...
La pagina si sta caricando...
La pagina si sta caricando...
La pagina si sta caricando...
La pagina si sta caricando...
La pagina si sta caricando...
La pagina si sta caricando...
La pagina si sta caricando...
La pagina si sta caricando...
La pagina si sta caricando...
La pagina si sta caricando...
La pagina si sta caricando...
La pagina si sta caricando...
La pagina si sta caricando...
La pagina si sta caricando...
La pagina si sta caricando...
La pagina si sta caricando...
La pagina si sta caricando...
La pagina si sta caricando...
La pagina si sta caricando...
La pagina si sta caricando...
La pagina si sta caricando...
La pagina si sta caricando...
-
 1
1
-
 2
2
-
 3
3
-
 4
4
-
 5
5
-
 6
6
-
 7
7
-
 8
8
-
 9
9
-
 10
10
-
 11
11
-
 12
12
-
 13
13
-
 14
14
-
 15
15
-
 16
16
-
 17
17
-
 18
18
-
 19
19
-
 20
20
-
 21
21
-
 22
22
-
 23
23
-
 24
24
-
 25
25
-
 26
26
-
 27
27
-
 28
28
-
 29
29
-
 30
30
-
 31
31
-
 32
32
-
 33
33
-
 34
34
-
 35
35
-
 36
36
-
 37
37
-
 38
38
-
 39
39
-
 40
40
-
 41
41
-
 42
42
-
 43
43
-
 44
44
-
 45
45
-
 46
46
-
 47
47
-
 48
48
-
 49
49
-
 50
50
-
 51
51
-
 52
52
-
 53
53
-
 54
54
-
 55
55
-
 56
56
-
 57
57
-
 58
58
-
 59
59
-
 60
60
-
 61
61
-
 62
62
-
 63
63
-
 64
64
-
 65
65
-
 66
66
-
 67
67
-
 68
68
-
 69
69
-
 70
70
-
 71
71
-
 72
72
-
 73
73
-
 74
74
-
 75
75
-
 76
76
-
 77
77
-
 78
78
-
 79
79
-
 80
80
-
 81
81
-
 82
82
-
 83
83
-
 84
84
-
 85
85
-
 86
86
-
 87
87
-
 88
88
-
 89
89
-
 90
90
-
 91
91
-
 92
92
-
 93
93
-
 94
94
-
 95
95
-
 96
96
-
 97
97
-
 98
98
-
 99
99
-
 100
100
-
 101
101
-
 102
102
-
 103
103
-
 104
104
-
 105
105
-
 106
106
-
 107
107
-
 108
108
-
 109
109
-
 110
110
-
 111
111
-
 112
112
-
 113
113
-
 114
114
-
 115
115
-
 116
116
-
 117
117
-
 118
118
-
 119
119
-
 120
120
-
 121
121
-
 122
122
-
 123
123
-
 124
124
-
 125
125
-
 126
126
-
 127
127
-
 128
128
-
 129
129
-
 130
130
-
 131
131
-
 132
132
-
 133
133
-
 134
134
-
 135
135
-
 136
136


Worx WX523 WorxSaw Manuale utente
- Tipo
- Manuale utente
- Questo manuale è adatto anche per
in altre lingue
- français: Worx WX523 WorxSaw Manuel utilisateur
- español: Worx WX523 WorxSaw Manual de usuario
- Deutsch: Worx WX523 WorxSaw Benutzerhandbuch
- português: Worx WX523 WorxSaw Manual do usuário
- slovenčina: Worx WX523 WorxSaw Používateľská príručka
- polski: Worx WX523 WorxSaw Instrukcja obsługi
- română: Worx WX523 WorxSaw Manual de utilizare
Documenti correlati
Altri documenti
-
Ferm CSM1043 Istruzioni per l'uso
-
Hitachi C 18DBAL Handling Instructions Manual
-
Parkside PHKSA 18-Li B2 Istruzioni per l'uso
-
Parkside PHKS 1350 C2 Translation Of The Original Instructions
-
Pattfield PSC120M1 Manuale del proprietario
-
Stanley FME380 Manuale del proprietario
-
Parkside PTS 500 A1 Istruzioni per l'uso
-
Ferm CSM1016 Manuale del proprietario
-
-
Ferm CSM1015 Manuale utente