Jeep Blizzard Mountain Electric Bike Manuale utente
- Categoria
- Accessori per biciclette
- Tipo
- Manuale utente

English | Italiano | Español | Français | Deutsch | Polski | Nederlands
MOUNTAIN E-BIKES
USER MANUAL

English ..................................................................................02
Italiano ..................................................................................29
Español.................................................................................56
Français ................................................................................ 83
Deutsch .............................................................................. 110
Polski .................................................................................. 137
Nederlands ......................................................................... 164

02
User manual
Contents
Instructions translated from the original Italian
Thank you for choosing this product.
For information, technical support, assistance or to consult the general terms of the warranty, please contact your
dealer or visit the website www.jeepurbanemobility.com
For spare parts visit www.urbanemobility.com
This manual is valid for the following electrically power assisted cycles (EPAC)
Hemlock
Blizzard
English
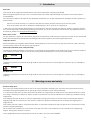
1. Introduction
2. Warnings on use and safety
3. Product overview
4. Technical data sheet
5. Assembly
6. Display
7. Battery
8. First use
9. Storage, maintenance and cleaning
10. Liability and general terms of warranty
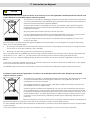
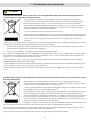
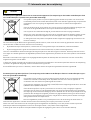
11. Information on disposal
2. Warnings on use and safety

03
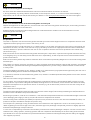
English 1. Introduction
Overview
This manual is an integral and essential part of the electrically power assisted cycle (EPAC).
Before using the bike for the rst time, it is essential that users read, understand and strictly observe the requirements
outlined below.
M.T. Distribution shall not be liable for any damages caused and is in no way responsible for damages caused to property or
persons when:
- the item is used incorrectly or in a manner that does not comply with the instructions of the user guide;
- after the purchase, the item is modied or tampered with in all or some of its components.
In the interest of technological development, the manufacturer reserves the right to modify the product in question without
prior notice and without automatically updating this manual. For further information and to consult any updated versions of
the manual, please visit www.jeepurbanemobility.it
After-sales service
For any problem or request for clarication, please do not hesitate to contact the after-sales service team of your authorised
dealer who has expertise and specialist knowledge and access to specic tools and original spare parts.
Legal note for use
Check and observe the highway code and local road regulations in force for cyclists on any restrictions for riders, who may
use the product, and on the use of this type of product.
Visual representation of the safety warnings
To identify the safety messages in the manual, the following warning symbols will be used which serve to draw the reader’s/
user’s attention in order to ensure that the electrically power assisted cycle is used correctly and safely.
CAUTION
Caution
Highlights the presence of hazards causing residual risks, which the user must be aware of to prevent injury or damage to
property.
DANGER
Residual risks
Highlights the presence of hazards causing residual risks, which the user must be aware of to prevent injury or damage to
property.
2. Warnings on use and safety
General safety rules
Even if you are already familiar with the use of an electrically power assisted cycle, the instructions given below must be
followed and the general guidelines for operating a motorised vehicle must also be observed.
It is important to take the time required to learn the basics of using the bike to avoid serious injury which could occur when
rst using it. Contact your dealer for advice on how to use the bike correctly or indications on contacting a suitable training
organisation.
The company assumes no direct or indirect responsibility arising from misuse of the bike, failure to comply with both the
highway code and the instructions in the manual, accidents or disputes caused by failure to comply with regulations or
illegal actions.
This product must be used for recreational purposes. It cannot be used by more than one person at a time and must not be
used to transport passengers.
Do not modify the intended use of the vehicle in any way. The item is not suitable for stunts, competitions, transporting
objects, towing other vehicles or trailers.
The A-weighted emission sound pressure level at the rider’s ear is less than 70 dB(A).

04
CAUTION
Using the electrically power assisted cycle
All users must have read and understood the instructions and information outlined in the manual.
If, during assembly, any factory defects are detected, certain steps are unclear, or in case of issues with assembly or
adjustments, do not ride the vehicle and contact your dealer or visit www.jeepurbanemobility.it for technical support.
CAUTION
Risks associated with the use of the electrically power assisted cycle
Despite the application of safety devices, to ensure safe use of the electrically power assisted cycle, all the safety provisions
reported in this manual must be observed.
Always maintain concentration while riding and do not underestimate the residual risks connected with use of the
electrically power assisted cycle.
CAUTION
Responsibility
The rider is required to use the electrically power assisted cycle with utmost diligence and in full compliance with the road
regulations and all cycling rules in force in the country of use.
It is important to bear in mind that when out in a public space or on the road, even when the instructions in the manual are
observed to the letter, the rider is not immune to injury caused by infractions or inappropriate actions taken towards other
vehicles, obstacles or persons. Misuse of the item or non-compliance with the instructions provided in this manual may
cause severe injury.
Riders must also ensure that the electrically power assisted cycle is kept clean, in perfect working order and serviced. They
must diligently carry out the safety checks which are their responsibility, as well as preserve all the documentation about
product maintenance.
Riders must carefully assess any weather conditions which could make it potentially dangerous to use the electrically power
assisted cycle.
This product is a vehicle, therefore, the faster is it goes, the longer the braking distance required. We, therefore, recommend
moderating your speed and maintaining an adequate braking distance if you are riding in adverse weather conditions and/
or heavy trafc.
The braking distance increases on wet, slippery, muddy or icy roads and the tyre grip decreases signicantly with the risk of
the wheels skidding and loss of balance compared to dry roads.
It is, therefore, essential to ride the bike with greater care, maintain a suitable speed and safety distance from other vehicles
or pedestrians.
Take extra care when riding on unfamiliar roads.
For your safety, we recommend wearing suitable protective equipment (helmet, knee and elbow pads) to protect yourself
from any falls or injuries while riding the bike. When allowing others to use the bike, ensure that the rider wears the safety
equipment and explain how to operate the vehicle. To avoid injury, do not allow other persons to use the item if they do not
know how to use it.
Wear shoes before using the item.
The bike has been designed to allow the load of a maximum overall weight (rider and any load being carried) that does not
exceed the value indicated in the product data sheet.
Avoid using the product, under all circumstances, if the total load transported exceeds the recommended weight to avoid the
risk of damaging the integrity of the structural and electronic components of the bike.
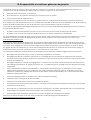
The electrically power assisted cycle (EPAC), as specied in the provisions of the current reference standard EN 15194, is a
means of transport intended to transport one person only.
The transport of a passenger is only permitted within the framework of the regulations in force in the country where it is
ridden regarding: the minimum age of the rider, maximum age of the passenger transported, provision of legally approved
and authorised passenger transport devices.
It is the user’s responsibility to ascertain the suitability of the devices used for passenger transport in terms of construction
characteristics, safety systems, anchoring systems and their installation and assembly on the electrically power assisted
cycle based on its structure and within the permitted load limits (maximum load supported by the bike and by the luggage
rack supplied, if present).

05
The user is also responsible for the provision and installation of devices used for the transport of objects and animals (e.g.
luggage racks, luggage bags, storage baskets, etc.) in compliance with the legally approved and authorised provisions in the
country of use and the limitations of the structure within the permitted load limits (maximum load supported by the bike and
by the luggage rack supplied, if present).
CAUTION
The installation of accessories and equipment on the bike, not only affect the performance of the bike and how it is used, but
can also cause damage if they are unsuitable, thus compromising correct operation and safety conditions during use.
For information on the supply and installation of equipment deemed suitable for the bike, please contact your authorised
dealer or specialised operators.
Warnings for users
• The electrically power assisted cycle can only be used by skilled adults and teenagers.
• Do not consume alcohol or medicines before riding the electrically power assisted cycle.
• This model of electrically power assisted cycle has been designed and built to be used outdoors, on public roads or
cycle paths.
• Do not the exceed the performance specications for which the electrically power assisted cycle has been designed.
• Never ride the electrically power assisted cycle with any of its parts disassembled.
• Ride with both hands on the handlebars.
• Replace worn and/or damaged parts; check that protection devices/guards are operating correctly before use.
• Keep children away from plastic items (including packaging materials) and small parts that may result in suffocation.
• Supervise children to make sure they do not play with the product.
• Remove any sharp edges caused by misuse, breakage or damage to the product.
• Pay special attention when using the product near pedestrians and make sure you slow down and signal your presence
to avoid frightening them when arriving from behind.
• Assemble the product correctly.
CAUTION
How to use
The electrically power assisted cycle is a bicycle tted with an auxiliary electric motor that is activated only when the pedals
are turned.
Therefore, the motor does not replace the work performed by your leg muscles, but assists them to prevent excessive strain
by activating according to the operating modes of the electrical and electronic components supplied with the product, i.e. the
battery, handlebar controls, sensors and control electronics.
More specically, the electric motor is powered by a battery and managed by a control unit that handles the delivery of
power and additional thrust provided to assist the effort made by the rider when pedalling based on the real-time reading of
values detected by a series of pedal-assist sensors. These sensors are positioned on the outside of the frame or inside the
components themselves and are based on the control parameters entered by the user via the handlebar controls (Display).
In accordance with the provisions of European Directive 2002/24/EC, the electric motor supplied with the electrically power
assisted cycle, is only activated to assist the user when pedalling and will be disabled upon reaching a speed of 25 km/h.
The electrically power assisted cycle has been designed and manufactured to be ridden outdoors on public roads and cycling
paths, on both tarmacked surfaces and/or ground that is suitable for the specic technical and structural features of the
bike.
Any changes to its construction may compromise the behaviour, safety and stability of the electrically power assisted cycle
and may cause an accident.
Any other types of use, or any extensions of use beyond the one intended, do not correspond to the intended use attributed
by the manufacturer and the latter, therefore, disclaims all liability for any resulting damage.
The autonomy of the battery supplied with the electrically power assisted cycle and, therefore, the relevant distance data
estimated in km, may vary signicantly depending on the specic mode of use (total load transported, how hard the rider
pedals the bike, level of electric pedal assistance detected, how often the rider departs and restarts), the mechanical and
electrical conditions of the product (tyre pressure and wear, battery efciency level) and external inuences (slopes and road
surface, atmospheric conditions).

06
Before each use, carefully check that the brakes are working correctly and are not worn; check the tyre pressure, the wear
of the wheels and battery charge status.
Regularly check that the tightness of the various elements secured by bolts. The nuts and all the other self-tightening parts
can become loose so, these components need to be periodically checked and tightened.
Like all mechanical components, the item is subject to wear and tear. Different materials and components may react to
wear or stress fatigue in a variety of ways. If the useful life of a component is exceeded, it could break unexpectedly and
injure the user. Any cracks, scratches or changes in colour in areas subject to high levels of stress indicate that the life of the
component has been reached and must be replaced.
CAUTION
Permitted speed
The maximum allowed legal speed is 25km/h.
The control unit has been congured to prevent any change to the maximum speed permitted.
Any changes to the control unit which have not been authorised by the manufacturer will exclude the latter from any liability
related to injury caused to persons and/or damage to property, and will invalidate the bike’s warranty terms and conditions.
DANGER
Risk of injury
Ride at a speed and behave in keeping with your ability; never use the electrically power assisted cycle over 25Km/h as this
could cause serious damage and injury to yourself or other people.
CAUTION
Place of use
• The electrically power assisted cycle can be used outdoors providing there are no adverse weather conditions (rain,
hail, snow, strong wind, etc.).
• Maximum permissible temperature: +40°C
• Minimum permissible temperature: +0°C
• Maximum permissible humidity: 80%
• The operating environment must be a at, compact, smooth tarmacked surface, with no potholes or depressions and
free of obstacles and patches of oil.
• In addition, the operating environment must be illuminated, either by sunlight or articial light, so as to ensure that the
path and the controls of the electrically power assisted cycle may be viewed correctly (300 to 500 lux recommended).
Misuse and precautions
• The actions described below, which clearly cannot cover the entire range of potential possibilities regarding ‘misuse’ of
the electrically power assisted cycle, are to be regarded as strictly prohibited.
DANGER
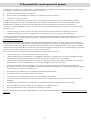
It is strictly prohibited to:
• Use the electrically power assisted cycle for uses other than the ones for which it was manufactured.
• Ride the electrically power assisted cycle if the rider’s weight exceeds the permitted limit.
• Use the electrically power assisted cycle under the inuence of alcohol or drugs.
• Use the electrically power assisted cycle in areas at a risk of re, explosions or in places with a corrosive and/or
chemically active atmosphere.
• Use the electrically power assisted cycle in adverse weather conditions (heavy rain, hail, snow, strong wind, etc.).
• Use the electrically power assisted cycle in poorly lit areas.
• Ride across or stop on uneven or rough ground (bumpy roads with potholes, depressions, obstacles, etc.) to avoid the
risk of falls and injury to the rider and damage to the product.
• Charge the battery in an environment that is either too hot or insufciently ventilated.
• Cover the battery while its charging.

07
• Smoke or use open ames near the charging area.
• Carry out any type of maintenance work with the battery connected.
• Insert limbs or ngers between the moving parts of the cycle.
• Touch the brakes immediately after use due to high temperatures.
• Allow the electric and electronic components of the electrically power assisted cycle to come into contact with water or
other liquids.
• Modify or change the product and its mechanical and electronic parts in any way to avoid the risk of structural damage,
impair its efciency and cause damage.
• If any manufacturing defects arise, or if any unusual noises or faults are detected, do not use the vehicle and contact
your dealer or visit the www.jeepurbanemobility.it website
Safety devices
It is strictly prohibited to modify or remove the safety devices for the battery, chain and other components installed on the
bike, such as the warning and identication plates.

08
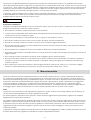
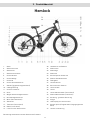
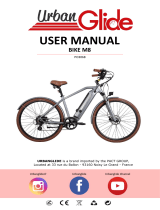
Example image of bike structure and components.
1. Saddle
2. Below saddle rear light
3. Seat post
4. Seat post clamp
5. Rear tyre
6. Front wheel rim
7. Rear wheel
8. Rear disc brake
9. Stand (opposite side)
10. 9-Speed cassette
11. Rear gear change - derailleur
12. Chain
13. Speed sensor magnet
14. Speed sensor
15. Motor (Drive unit)
16. Chainring
17. Crank arm (right side)
18. Pedal (right side)
19. Li-Ion battery
20. Battery charging socket on frame
21. Front tyre
22. Front wheel rim
23. Front wheel
24. Quick-release front wheel
25. Front disc brake
26. Suspension fork
27. Front LED light
28. Frame serial number
29. Handlebar attachment
30. Handlebars
31. Rear wheel brake lever (right side)
32. Front wheel brake lever (left side)
33. Gear change - indexed control
34. Bell
35. LCD display with control unit
36. Battery lock/release clamp (opposite side)
37. Rear air shock absorber
3. Product overview
Hemlock

09
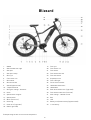
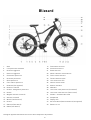
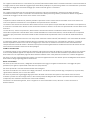
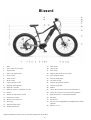
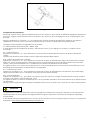
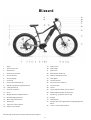
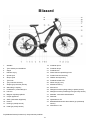
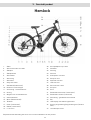
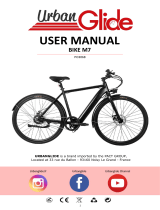
Example image of bike structure and components.
1. Saddle
2. Below saddle rear light
3. Seat post
4. Seat post clamp
5. Rear tyre
6. Front wheel rim
7. Rear wheel
8. Rear disc brake
9. Stand (opposite side)
10. 7-Speed cassette
11. Rear gear change - derailleur
12. Chain
13. Speed sensor magnet
14. Speed sensor
15. Motor (Drive unit)
16. Chainring
17. Crank arm (right side)
18. Pedal (right side)
19. Front tyre
20. Front wheel rim
21. Front wheel
22. Front wheel bolt hub
23. Front disc brake
24. Suspension fork
25. Front LED light
26. Frame serial number
27. Handlebar attachment
28. Handlebars
29. Rear wheel brake lever (right side)
30. Front wheel brake lever (left side)
31. Gear change - indexed control
32. Bell
33. LCD
34. Battery lock/release clamp (opposite side)
35. Li-Ion battery
Blizzard

10
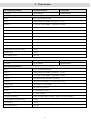
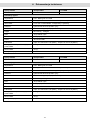
Product description Product code EAN code
Hemlock JE-BI-220002 8052679455935
General information
Display LCD - Bafang DP C07.CAN
Motor Bafang M500 36V 250W brushless - central
Battery Li-Ion 36V 13.0Ah 468Wh - integrated and extractable
Brakes front and rear hydraulic disc brakes
Gear change Shimano 9 gears (1x9) - rear derailleur
Drive chain - 9 speed
Wheels 29” front and rear
Lights Front and rear LEDs
Frame in aluminium 6061
Battery charger Input: AC 100V-240V 1.8A (Max) - Output: DC 42V 2.0A (Max)
Maximum load supported by E-bike 110 kg
Weight of E-bike 27 kg~
Full speed 25km/h
Product description Product code EAN code
Blizzard JE-BI-220003 8052679455942
General information
Display LCD - Bafang DP C07.CAN
Motor Bafang M400 36V 250W brushless - central
Battery Li-Ion 36V 13.0Ah 468Wh - integrated and extractable
Brakes front and rear hydraulic disc brakes
Gear change Shimano 7 gears (1x7) - rear derailleur
Drive chain - 7 speed
Wheels 26” front and rear
Lights Front and rear LEDs
Frame in aluminium 6061
Battery charger Input: AC 100V-240V 1.8A (Max) - Output: DC 42V 2.0A (Max)
Maximum load supported by E-bike 110 kg
Weight of E-bike 27 kg~
Full speed 25km/h
4. Technical data sheet

11
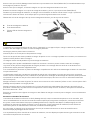
Carefully remove the bike from the packaging* and remove the protective material taking care not to damage the relevant
aesthetic parts or force the cables and pre-assembled components.
*The bike must be removed from the packaging by two adults to ensure that it is not damaged and avoid the risk of injury
and/or crushing.
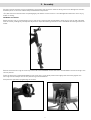
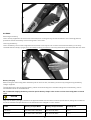
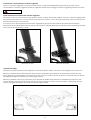
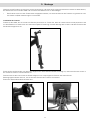
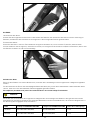
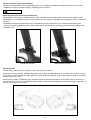
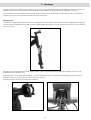
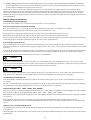
Handlebar installation
Rotate the fork until it is positioned in front of the frame, checking that the handlebar mount sits in front of and is aligned
with the frame, pending any subsequent adjustment required following installation of the handlebar and tting of the front
wheel.
Remove the bolts securing the front clip at the end of the handlebar mount and insert the handlebar into the housing in the
central position.
Place the previously removed handlebar mount front clip in its original position and lightly and alternately tighten the
securing screws to adjust the correct positioning of the handlebar.
Complete the operation by tightening the screws.
5. Assembly

12
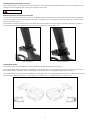
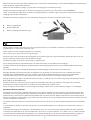
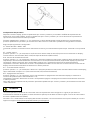
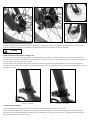
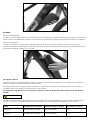
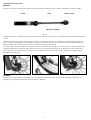
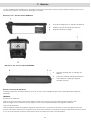
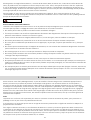
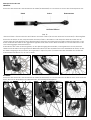
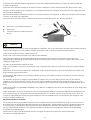
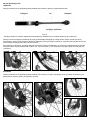
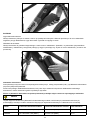
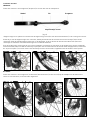
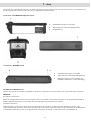
Front wheel installation
HEMLOCK
Insert the front wheel into the appropriate fork housings (dropouts) and tighten using the appropriate quick release device
Lever Pin Locking nut
Conical springs*
(g. A).
*Conical springs: position the end of the conical springs (those with the smallest diameter) in the direction of the wheel.
Insert the pin equipped with the relative conical spring inside the hub, leaving the lever on the right side of the cycle (side
without the brake disc); insert the second conical spring and the locking nut into the pin coming out of the hub on the
opposite side (side equipped with the brake disc), screwing it until it is ush against the dropout.
Close the lever towards the fork to complete the tightening operation by verifying that the lever has adequate resistance
during the closing phase (such as to leave a mark on the palm of the hand used to tighten the lever, so-called "imprint on
palm") and, after closing, requires a considerable force to be exerted to allow relative opening.
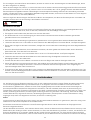
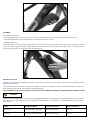
BLIZZARD
Insert the front wheel into the appropriate fork housings (dropouts) by securing and tightening the bolts (right and left side)
on the threaded hub pin as shown below.

13
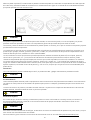
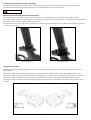
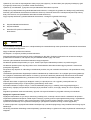
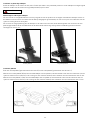
Installing and positioning the seat post
Insert the seat post into the seat tube of the frame and, after positioning the saddle correctly, secure the seat post rmly
using the special clamping device (seat post clamp) on the frame.
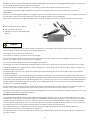
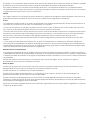
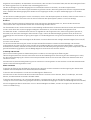
DANGER
Minimum insertion seat post insertion limit
For structural and safety reasons, it is strictly forbidden, when using the bike, to extract the seat post from the seat tube
of the frame beyond the limit indicated on the latter to avoid the risk of causing any structural fractures to the bike and
incurring serious injuries.
The seat post is deemed to be correctly and safely positioned inside the seat tube of the frame by inserting it so that no
markings and/or graphic indication of the minimum insertion limit can be seen; see:
Correct position Incorrect position
Installing the pedals
Locate the right pedal (marked with the letter R) and left pedal (marked with the letter L).
Fit the right pedal (R) by inserting the threaded pin of the pedal into the corresponding crank arm on the right side of the
bike and screwing it clockwise (turn it towards the front wheel) until it is tightened using a 15mm wrench.
Fit the left pedal (L) by inserting the threaded pin of the pedal into the corresponding crank arm on the left side of the bike
and screwing it anticlockwise (turn it towards the front wheel) until it is tightened using a 15mm wrench.

14
CAUTION
Verify and regularly check that the various bolted elements, fastening screws, quick releases and pass-through pins are
correctly tightened, and perform an overall check to ensure that all the parts are in order.
The nuts and all the other self-tightening parts can become loose so, these components need to be periodically checked and
tightened.
The recommended tightening torques for fastening the specic parts/components on the bike (e.g. handlebars, handlebar
attachment and stem, saddle, saddle clamp, wheels, etc.) can be identied depending on the relevant elements. An average
torque of 20Nm can be used for all other fastenings.
Verication of the correct tightening of the parts/components through lever systems (quick release, handlebar attachment,
seatpost collar, etc.), in the absence of technically precise indications of the relative values, can be done by testing that the
relative part/component being xed is not mobile and/or unstable if subjected to a vigorous attempt to remove and/or extract
(handlebar, seatpost channel, wheels, etc.) and by verifying that the tightening lever has adequate resistance during the
closing phase (such as to leave a mark on the palm of the hand used for lever tightening, so-called "imprint on palm") and,
after closing, requires a considerable force to be exerted to allow relative opening.
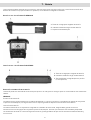
Rear light
The rear LED light is already installed under the saddle; it can be switched on and off manually by pressing the button.
CAUTION
Battery key set
The electrically power assisted cycle is exclusively equipped with 2 keys uniquely associated with the key lock on the padlock
on the product frame to allow locking and/or unlocking for battery extraction.
Identify the keys on the product, which are located near the handlebar or attached to another component of the electrically
power assisted cycle frame, taking care to avoid losing them.
CAUTION
Negative check
If any manufacturing defects are found during assembly, or in case of unclear steps or difculties with the assembly, do not
ride the electrically power assisted cycle and contact the after-sales service of your authorised dealer or visit the website
www.jeepurbanemobility.it
CAUTION
In the interest of technological development, the manufacturer reserves the right to modify the item with no prior notice and
this manual will not be automatically updated.
For further information and to consult different versions of the manual, visit www.jeepurbanemobility.com

15
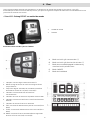
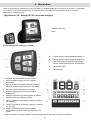
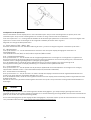
The electrically power assisted cycle has a control device on the handlebar, LCD display, powered by the battery supplied
with the bike which controls all the bike’s electrical and electronic functions.
• LCD display - Bafang DP C07 with control unit
• Control unit
• Display
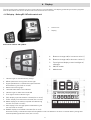
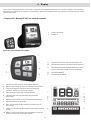
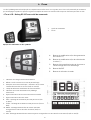
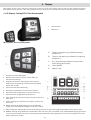
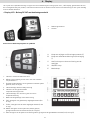
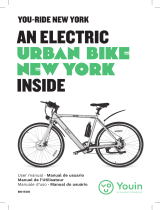
Overview of controls and symbols
A. Button to change and/or increase a value (+)
B. Button to change and/or decrease a value (-)
C. Front light and display screen backlight on/
off button
D. ON/OFF button
E. Mode button
1. Indicator light for residual battery charge
2. MENU: parameter setting menu access light
3. Digital speedometer: instantaneous speed indicator
detected during use (km/h or mile/h)
4. Malfunction warning light
5. Selected Pedal Assist Level Indicator
6. Indicator light for walk assist mode ON
7. Front light activation indicator light
8. TRIP: display of partial distance travelled (km or miles)
9. TOTAL: display of total distance travelled (km or miles)
10. MAXS: display of the maximum speed recorded during
the last use (km/h or mile/h)
11. AVG: display of the average speed recorded during the
last use (km/h or mile/h)
12. RANGE: display of estimated travel data (km or mile)
detected instantly in standard conditions and updated in real time based on the level of residual battery charge and
selected pedalling assistance level (km or mile)*.
6. Display

16
*The autonomy of the battery supplied with the electrically power assisted cycle and, therefore, the relevant distance data
estimated in km, may vary signicantly depending on the specic mode of use (total load transported, level of effort by
the rider, level of electric pedal assistance detected, how often the rider departs and restarts), mechanical and electrical
conditions of the product (tyre pressure and wear, battery efciency level) and external inuences (slopes and road surface,
atmospheric conditions).
Function description
Display on/off
Press the ON/OFF button for 2 seconds to switch the display on or off.
Selecting the assisted pedalling level
Press + or – button to increase or decrease the selected pedal assist level.
There are between 1 and 5 selectable levels of pedal assist.
Assist level 1 determines the setting of the minimum electrical power provided by the motor.
Assist level 5 determines the setting of the maximum electrical power provided by the motor.
To deactivate the electric motor support, press the - button until the display shows the numerical value of the pedalling
assistance level in use.
Enabling walk assist mode
After disabling the electric motor support, which is conrmed by the absence of indication of the numerical value of the
pedalling assistance level in use on the display, briey press the - button until the WALK symbol is displayed.
Press the - button to enable the walk assist function, indicated by the intermittent presence of the WALK symbol, which
allows activating an electric motor support up to a maximum speed of 6 km/h.
Disable the function by releasing the - button.
CAUTION
The walk assist mode must be used in compliance with the regulations in force in the country of use and is only allowed when
pushing the electrically power assisted cycle and walking alongside it holding the handlebar grips rmly with both hands.
DANGER
It is strictly prohibited to enable the walk assist mode when you are sitting on the saddle of the electrically power assisted
cycle to avoid the danger of injury and the risk of damaging the electrical components of the bike.
Switching the light on/off
Press the light on/off button for 2 seconds to turn the front light on or off and enable/disable the display backlight.
The front light and backlight of the display screen will be automatically activated in case of poor lighting based on the value
of the "light sensitivity sensor" parameter set via the conguration menu.
Data display (TRIP - TOTAL - MAXS - AVG - RANGE)
Shortly press the i button to view in sequence the available use data related to distance (TRIP, TOTAL and RANGE) and speed
(AVG and MAX); data display sequence: TRIP - TOTAL - MAXS - AVG - RANGE
Partial and/or temporary use data for TRIP, MAXS and AVG can be reset as follows:
quickly press the i button twice to access the setting MENU in which the tC parameter will be displayed; using the value
variation buttons, select the letter y and then press the + button for about 2 seconds.
Indicator light for residual battery charge
The battery charge level is shown on the display screen as a number of dashes between 0 and 10.
If there are 10 dashes, it means that the battery is charged to the maximum percentage dened and detected instantly.
Less dashes are shown to indicate a decrease in the battery charge level available and subsequent autonomy.
The level of the battery charging indicator may uctuate depending on how the electrically power assisted cycle is
being used, for example, when going up a slope, the level displayed can drop rapidly as there is a much higher battery
consumption.
The individual dashes indicate the specic battery charge range detected at the time and do not necessarily indicated a
percentage of the residual autonomy.
Malfunction indicator light
If a malfunction of the product’s electrical and/or electronic system is detected, the relevant warning light will appear on the
display screen and the corresponding identication Malfunction Code will be displayed at the same time.

17
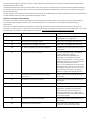
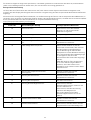
Refer to the following summary table to nd the description of the fault and the corresponding action to be taken to allow
the product to be restored to correct operation, either by you alone and/or by contacting the after-sales service for support:
https://www.jeepurbanemobility.com/support/
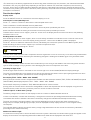
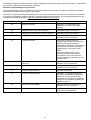
Error code Malfunction description Resolution / Suggested action
03 Brake activated. Check if a brake cable is blocked and
operate accordingly.
06 Protection against low voltage. Check the battery voltage.
07 Protection against excessive voltage. Check the battery voltage.
08 The motor signals the presence of a fault in
the wiring.
Contact authorised technical support
service.
10 Excessive motor temperature. Stop the product until the malfunction
code disappears, or temporarily turn it
off to allow the related components to
cool down and to restore the appropriate
conditions of use, indicated by the
disappearance of the anomaly code.
NB Overheating of the motor may occur
when travelling uphill for a prolonged
period; if the product is not stopped, the
motor will automatically shut down.
11 Faulty control unit temperature sensor. Contact authorised technical support
service.
12 Faulty current sensor. Contact authorised technical support
service.
13 Anomalous battery temperature. Check the battery.
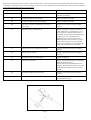
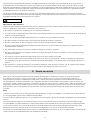
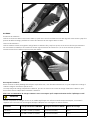
21 Faulty speed sensor. Check that the speed sensor is installed
and connected correctly.
Check that the alignment between the
magnet (located on the spoke of the rear
wheel) and the speed sensor is correct
(Fig.A).
22 Anomalous BMS communication. Contact authorised technical support
service.
30 Anomalous communication. Check that the connectors are properly
connected and intact.
Fig. A

18
Parameter configuration
After turning on the display, quickly press the i button twice to access the SETTING MENU of the product use parameters;
quickly press the i button twice to exit the setting menu and restore the main menu display.
Quickly press the + or – button to select the desired value of the individual parameter and then quickly press the i button to
conrm the data entered and view the next congurable parameter.
The sequence of parameters that can be congured is shown below:
tC - TRIP - MAXS - AVG data reset
Using the value variation buttons, select the letter y and then press the + button for about 2 seconds.
S7 - Unit of measurement:
press the + or – buttons to select the unit of measurement for the speed and distance data displayed:
international metric system (Km/h and Km) or British imperial (MPH and Mile).
bL0 - Light sensitivity sensor:
press the + or – buttons to increase or decrease the value of the light sensitivity detection parameter to automatically
activate the front light and the backlight of the display screen in poor lighting conditions; selectable values between 1
(minimum sensitivity) and 5 (maximum sensitivity).
When the value is set to 0, the function is disabled: in this case, the front light and backlight of the display screen can only be
turned on manually, using the relative button.
bLI – Screen brightness:
press the + or – buttons to increase or decrease the value of the display screen brightness parameter; selectable values
between 1 (minimum brightness) and 5 (maximum brightness).
0FF - Automatic Power Off:
press the + or – buttons to set the minutes before the display is automatically switched off when the product is no longer in
use (selectable values from 1 to 9).
When the value is set to 0, the function is disabled and the display can only be turned off manually, using the relative button.
Exit the parameter setting menu by quickly pressing the i button twice, allowing the conrmation of the selected values.
CAUTION
The following parameters - displayed in the setting menu - are congured by default to allow the product to operate in
optimal conditions and in accordance with the provisions of the current regulations regarding the use of the electrically
power assisted cycle (EPAC).
In case anomalous data are highlighted on the display, contact the after-sales technical assistance service to receive
appropriate support: https://www.jeepurbanemobility.com/support/

19
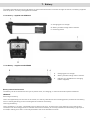
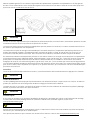
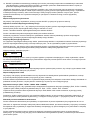
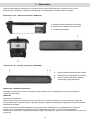
The pedal-assisted bicycle starts and powers its electrical and electronic functions through the lithium-ion battery supplied
with the product, correctly recharged and installed.
Li-Ion battery – supplied with HEMLOCK
A. Charging port for charger
B. Battery residual charge status indicator
C. Unlocking device
Li-Ion Battery – supplied with BLIZZARD
A. Charging port for charger
B. Battery residual charge status indicator
C. USB port for portable device charging
(where supplied)
Battery removal and insertion
The battery can be removed from the cycle to prevent theft, for charging, or to be stored under optimal conditions.
HEMLOCK
Removing the battery:
Insert the supplied key into the lock on the frame, turn the key clockwise to the unlocking position, and extract the battery
from its seat by operating on the unlocking device located on the battery.
Inserting the battery:
Insert the battery in its seat - integrated into the frame of the cycle - by securing it to the same by turning the key anti-
clockwise until the locking position is reached. Check that the battery is correctly installed and secured by trying to pull it
out and/or making sure that it is securely fastened to the frame and does not move.
7. Battery
La pagina si sta caricando...
La pagina si sta caricando...
La pagina si sta caricando...
La pagina si sta caricando...
La pagina si sta caricando...
La pagina si sta caricando...
La pagina si sta caricando...
La pagina si sta caricando...
La pagina si sta caricando...
La pagina si sta caricando...
La pagina si sta caricando...
La pagina si sta caricando...
La pagina si sta caricando...
La pagina si sta caricando...
La pagina si sta caricando...
La pagina si sta caricando...
La pagina si sta caricando...
La pagina si sta caricando...
La pagina si sta caricando...
La pagina si sta caricando...
La pagina si sta caricando...
La pagina si sta caricando...
La pagina si sta caricando...
La pagina si sta caricando...
La pagina si sta caricando...
La pagina si sta caricando...
La pagina si sta caricando...
La pagina si sta caricando...
La pagina si sta caricando...
La pagina si sta caricando...
La pagina si sta caricando...
La pagina si sta caricando...
La pagina si sta caricando...
La pagina si sta caricando...
La pagina si sta caricando...
La pagina si sta caricando...
La pagina si sta caricando...
La pagina si sta caricando...
La pagina si sta caricando...
La pagina si sta caricando...
La pagina si sta caricando...
La pagina si sta caricando...
La pagina si sta caricando...
La pagina si sta caricando...
La pagina si sta caricando...
La pagina si sta caricando...
La pagina si sta caricando...
La pagina si sta caricando...
La pagina si sta caricando...
La pagina si sta caricando...
La pagina si sta caricando...
La pagina si sta caricando...
La pagina si sta caricando...
La pagina si sta caricando...
La pagina si sta caricando...
La pagina si sta caricando...
La pagina si sta caricando...
La pagina si sta caricando...
La pagina si sta caricando...
La pagina si sta caricando...
La pagina si sta caricando...
La pagina si sta caricando...
La pagina si sta caricando...
La pagina si sta caricando...
La pagina si sta caricando...
La pagina si sta caricando...
La pagina si sta caricando...
La pagina si sta caricando...
La pagina si sta caricando...
La pagina si sta caricando...
La pagina si sta caricando...
La pagina si sta caricando...
La pagina si sta caricando...
La pagina si sta caricando...
La pagina si sta caricando...
La pagina si sta caricando...
La pagina si sta caricando...
La pagina si sta caricando...
La pagina si sta caricando...
La pagina si sta caricando...
La pagina si sta caricando...
La pagina si sta caricando...
La pagina si sta caricando...
La pagina si sta caricando...
La pagina si sta caricando...
La pagina si sta caricando...
La pagina si sta caricando...
La pagina si sta caricando...
La pagina si sta caricando...
La pagina si sta caricando...
La pagina si sta caricando...
La pagina si sta caricando...
La pagina si sta caricando...
La pagina si sta caricando...
La pagina si sta caricando...
La pagina si sta caricando...
La pagina si sta caricando...
La pagina si sta caricando...
La pagina si sta caricando...
La pagina si sta caricando...
La pagina si sta caricando...
La pagina si sta caricando...
La pagina si sta caricando...
La pagina si sta caricando...
La pagina si sta caricando...
La pagina si sta caricando...
La pagina si sta caricando...
La pagina si sta caricando...
La pagina si sta caricando...
La pagina si sta caricando...
La pagina si sta caricando...
La pagina si sta caricando...
La pagina si sta caricando...
La pagina si sta caricando...
La pagina si sta caricando...
La pagina si sta caricando...
La pagina si sta caricando...
La pagina si sta caricando...
La pagina si sta caricando...
La pagina si sta caricando...
La pagina si sta caricando...
La pagina si sta caricando...
La pagina si sta caricando...
La pagina si sta caricando...
La pagina si sta caricando...
La pagina si sta caricando...
La pagina si sta caricando...
La pagina si sta caricando...
La pagina si sta caricando...
La pagina si sta caricando...
La pagina si sta caricando...
La pagina si sta caricando...
La pagina si sta caricando...
La pagina si sta caricando...
La pagina si sta caricando...
La pagina si sta caricando...
La pagina si sta caricando...
La pagina si sta caricando...
La pagina si sta caricando...
La pagina si sta caricando...
La pagina si sta caricando...
La pagina si sta caricando...
La pagina si sta caricando...
La pagina si sta caricando...
La pagina si sta caricando...
La pagina si sta caricando...
La pagina si sta caricando...
La pagina si sta caricando...
La pagina si sta caricando...
La pagina si sta caricando...
La pagina si sta caricando...
La pagina si sta caricando...
La pagina si sta caricando...
La pagina si sta caricando...
La pagina si sta caricando...
La pagina si sta caricando...
La pagina si sta caricando...
La pagina si sta caricando...
La pagina si sta caricando...
La pagina si sta caricando...
La pagina si sta caricando...
La pagina si sta caricando...
La pagina si sta caricando...
La pagina si sta caricando...
La pagina si sta caricando...
La pagina si sta caricando...
La pagina si sta caricando...
La pagina si sta caricando...
La pagina si sta caricando...
La pagina si sta caricando...
La pagina si sta caricando...
La pagina si sta caricando...
La pagina si sta caricando...
La pagina si sta caricando...
-
 1
1
-
 2
2
-
 3
3
-
 4
4
-
 5
5
-
 6
6
-
 7
7
-
 8
8
-
 9
9
-
 10
10
-
 11
11
-
 12
12
-
 13
13
-
 14
14
-
 15
15
-
 16
16
-
 17
17
-
 18
18
-
 19
19
-
 20
20
-
 21
21
-
 22
22
-
 23
23
-
 24
24
-
 25
25
-
 26
26
-
 27
27
-
 28
28
-
 29
29
-
 30
30
-
 31
31
-
 32
32
-
 33
33
-
 34
34
-
 35
35
-
 36
36
-
 37
37
-
 38
38
-
 39
39
-
 40
40
-
 41
41
-
 42
42
-
 43
43
-
 44
44
-
 45
45
-
 46
46
-
 47
47
-
 48
48
-
 49
49
-
 50
50
-
 51
51
-
 52
52
-
 53
53
-
 54
54
-
 55
55
-
 56
56
-
 57
57
-
 58
58
-
 59
59
-
 60
60
-
 61
61
-
 62
62
-
 63
63
-
 64
64
-
 65
65
-
 66
66
-
 67
67
-
 68
68
-
 69
69
-
 70
70
-
 71
71
-
 72
72
-
 73
73
-
 74
74
-
 75
75
-
 76
76
-
 77
77
-
 78
78
-
 79
79
-
 80
80
-
 81
81
-
 82
82
-
 83
83
-
 84
84
-
 85
85
-
 86
86
-
 87
87
-
 88
88
-
 89
89
-
 90
90
-
 91
91
-
 92
92
-
 93
93
-
 94
94
-
 95
95
-
 96
96
-
 97
97
-
 98
98
-
 99
99
-
 100
100
-
 101
101
-
 102
102
-
 103
103
-
 104
104
-
 105
105
-
 106
106
-
 107
107
-
 108
108
-
 109
109
-
 110
110
-
 111
111
-
 112
112
-
 113
113
-
 114
114
-
 115
115
-
 116
116
-
 117
117
-
 118
118
-
 119
119
-
 120
120
-
 121
121
-
 122
122
-
 123
123
-
 124
124
-
 125
125
-
 126
126
-
 127
127
-
 128
128
-
 129
129
-
 130
130
-
 131
131
-
 132
132
-
 133
133
-
 134
134
-
 135
135
-
 136
136
-
 137
137
-
 138
138
-
 139
139
-
 140
140
-
 141
141
-
 142
142
-
 143
143
-
 144
144
-
 145
145
-
 146
146
-
 147
147
-
 148
148
-
 149
149
-
 150
150
-
 151
151
-
 152
152
-
 153
153
-
 154
154
-
 155
155
-
 156
156
-
 157
157
-
 158
158
-
 159
159
-
 160
160
-
 161
161
-
 162
162
-
 163
163
-
 164
164
-
 165
165
-
 166
166
-
 167
167
-
 168
168
-
 169
169
-
 170
170
-
 171
171
-
 172
172
-
 173
173
-
 174
174
-
 175
175
-
 176
176
-
 177
177
-
 178
178
-
 179
179
-
 180
180
-
 181
181
-
 182
182
-
 183
183
-
 184
184
-
 185
185
-
 186
186
-
 187
187
-
 188
188
-
 189
189
-
 190
190
-
 191
191
-
 192
192
-
 193
193
-
 194
194


Jeep Blizzard Mountain Electric Bike Manuale utente
- Categoria
- Accessori per biciclette
- Tipo
- Manuale utente
in altre lingue
- français: Jeep Blizzard Mountain Electric Bike Manuel utilisateur
- español: Jeep Blizzard Mountain Electric Bike Manual de usuario
- Deutsch: Jeep Blizzard Mountain Electric Bike Benutzerhandbuch
- Nederlands: Jeep Blizzard Mountain Electric Bike Handleiding
- polski: Jeep Blizzard Mountain Electric Bike Instrukcja obsługi
Altri documenti
-
 URBANGLIDE URBBK12915 Manuale utente
-
 URBANGLIDE URBBK12930 Manuale utente
-
 URBANGLIDE URBBK12931 Manuale utente
-
 URBANGLIDE URBBK12928 Manuale utente
-
 Youin BK1500 Manuale utente
-
Nilox X5 Manuale utente
-
Denver Orus E-TIMES CITY 8000H Instructions For Use And Maintenance Manual
-
MPMan EB9 Manuale del proprietario
-
-
Ducati MONSTER S4 Manuale del proprietario


