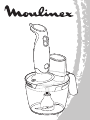
Moulinex DD908141 Manuale del proprietario
- Categoria
- Robot da cucina
- Tipo
- Manuale del proprietario


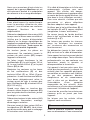
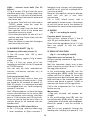
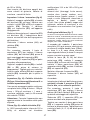
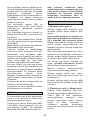
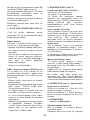
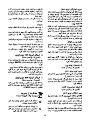
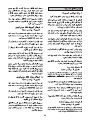
1
2
A3
A4
I
D1
E
A5
E1
2
2
1
1
E7
E6
E6
E3
E2
C1
C2
E10
F
H
A
E9
E4
E7
A2
S1
B1
E5
G
E9 bis

4 5
3
6 7
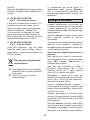
A1
A1
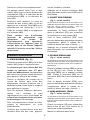
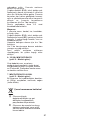
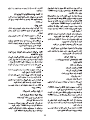
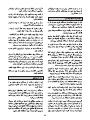
C1
C2
E6
E7
E9
E4
E5
E8
E1
E8
E1
E2
E3
E10
E8
E1
E6
E7
E2
E3
I4
I3
I1
I2
F3
F1
F2
B1
H
A
E6
E7
E2
E3
G
E9 bis

a4
English p8
p 28
Français p1
p 34
Türkce p 21
Italiano p 14

Nous vous remercions d’avoir choisi un
appareil de la gamme Moulinex qui est
exclusivement destiné à la préparation
des aliments et à un usage domestique.
Lisez attentivement le mode d’emploi
avant la première utilisation de votre
appareil : une utilisation non conforme
dégagerait Moulinex de toute
responsabilité.
Débranchez toujours le bloc moteur (A1)
lorsque vous le laissez sans surveillance.
Vérifiez que la tension d’alimentation
indiquée sur la plaque signalétique de
l’appareil correspond bien à celle de votre
installation électrique. Toute erreur de
branchement annule la garantie.
Ne touchez jamais les pièces en
mouvement. Ne manipulez jamais le
couteau du pied mixeur (B1) lorsque
l’appareil est branché.
Ne faites jamais fonctionner le bol
multifonctions (E), le mini hachoir 150 ml
(I), le maxi hachoir 600mL (F) et le pied
mixeur (B1) à vide.
Manipulez les couteaux ou les lames
du bol multifonctions (E) et des
hachoirs 600mL (F) ou 150mL (I) avec
précaution : ils sont extrêmement affûtés.
Vous devez obligatoirement retirer le
couteau avant de vider le contenu des
bols ( Multifonctions (E) et hachoir 600 ml
(F) & 150 ml (I) ).
Quand vous râpez ou tranchez des
aliments, utilisez toujours le poussoir (E2)
pour les guider dans la cheminée, jamais
les doigts, ni un ustensile.
Débranchez toujours le bloc moteur (A1)
avant toute intervention, montage,
démontage et entretien.
N’ouvrez jamais le bloc moteur (A1) ou
les réducteurs (C1, E6 &F3). Vous n’avez
pas d’intervention autre que le nettoyage
et l’entretien usuel à effectuer.
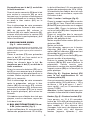
Conseils de sécurité
Si le câble d’alimentation ou la fiche sont
endommagés, n’utilisez pas votre
appareil. Afin d’éviter tout danger,
faites-les obligatoirement remplacer dans
un centre de service agréé Moulinex (voir
liste dans le livret «Moulinex service»).
Pour votre sécurité, n’utilisez que des
accessoires et pièces détachées
Moulinex adaptés à votre appareil.
N’utilisez pas le bol multifonctions (E) et
les hachoirs (I1 et F1) comme récipient
(congélation, cuisson, stérilisation).
Ne versez jamais de liquide bouillant
dans le bol multifonctions et dans les
hachoirs (I) et (F).
Ne laissez pas pendre les cheveux
longs, les écharpes, les cravates,
etc. au-dessus des accessoires en
fonctionnement.
Ne débranchez jamais le bloc moteur
(A1) en tirant sur le câble d’alimentation.
Votre appareil est exclusivement destiné
à un usage domestique. Toute utilisation
professionnelle, ou non-conforme aux
instructions annule la garantie et
déresponsabilise le fournisseur.
Cet appareil n’est pas prévu pour être
utilisé par des personnes (y compris les
enfants) dont les capacités physiques,
sensorielles ou mentales sont réduites,
ou par des personnes dénuées
d’expérience ou de connaissance,
sauf si elles ont pu bénéficier, par
l’intermédiaire d’une personne
responsable de leur sécurité, d’une
surveillance ou d’instructions préalables
concernant l’utilisation de l’appareil.
Il convient de surveiller les enfants pour
s’assurer qu’ils ne jouent pas avec
l’appareil.
Ne laissez pas les enfants utiliser
l’appareil sans surveillance;
Avant la première utilisation, nettoyez
tous vos accessoires à l’eau savonneuse.
Mise en service
1

Rincez-les, séchez-les soigneusement.
Ne passez jamais sous l’eau le bloc
moteur (A1), ni le couvercle réducteur du
maxi-hachoir (F3), ni le réducteur du bol
multifonctions (E6), ni le réducteur du
fouet (C1).
Branchez votre appareil. La mise en
marche du bloc moteur (A1) se fait en
appuyant sur le bouton Turbo (A2) ou en
sélectionnant une vitesse de 1 à 16 à
l’aide du variateur (A4) et en appuyant
sur le bouton (A3).
Dans certains cas d’utilisation
(quantité de préparation trop
importante ou temps de
fonctionnement trop important),
l’alimentation de l’appareil peut se
couper, dans ce cas laissez l’appareil
refroidir 30 minutes avant de l’utiliser
de nouveau.
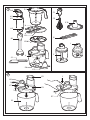
1. PIED MIXEUR (fig. 3) :
Emboîtez le pied mixeur (B1) sur le bloc
moteur (A1) jusqu’à l’enclenchement.
Le récipient que vous utilisez doit être
rempli au maximum aux 2/3 pour
éviter tout débordement. La préparation
doit couvrir au minimum le bas du mixeur
pour garantir l’efficacité du mixage.
Retirez le récipient de cuisson de la
source de chaleur pour mixer des
préparations chaudes. N’hésitez pas à
déplacer le pied mixeur dans le récipient
pour optimiser le mixage.
Pour les aliments filandreux (poireaux,
céleris, etc.) nettoyez le pied
régulièrement en cours d’utilisation en
suivant les consignes de sécurité pour
le démontage et le nettoyage.
Pour les préparations à base de fruits,
coupez et dénoyautez les fruits
préalablement.
N’utilisez pas le pied mixeur avec des
aliments durs tels que café, glaçons,
Conseils d’utilisation
sucres, céréales, chocolat.
Appuyez sur le bouton d’éjection (A5)
pour démonter le pied mixeur (B1) en fin
d’utilisation.
2. FOUET MULTIBRINS
(fig. 4 - selon modèle)
Si vous désirez vous procurer cet accessoire, il est
disponible auprès de notre service après-vente (voir
liste des centres agréés ci-jointe) sous les
références : MS0695561 & MS5937064.
Introduisez le fouet multibrins (C2)
dans le réducteur (C1) puis emboîtez
l’ensemble sur le bloc moteur (A1).
Avec le fouet multibrins (C2), vous
pouvez réaliser des préparations légères
(mayonnaise, pâtes à crêpes ou à
clafoutis, blancs en neige, chantilly....).
Appuyez sur le bouton d’éjection (A5)
pour démonter les accessoires en fin
d’utilisation.
3. DISQUE EMULSION
(fig. 4 - selon modèle)
Si vous désirez vous procurer cet accessoire, il est
disponible auprès de notre service après-vente (voir
liste des centres agréés ci-jointe) sous la référence :
MS0695636.
Placez le support couteau (E8) au centre
du bol (E) sur l’axe. Placez le disque
émulsion (E10) sur le support couteau
(E8). Placez le réducteur (E6) sur le
couvercle (E3) dans son emplacement
prévu.
Avec le disque émulsion (E10), vous
pouvez réaliser des préparations légères
(mayonnaise, pâtes à crêpes ou à
clafoutis, blancs en neige, chantilly....).
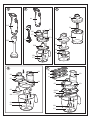
4. MINI-HACHOIR 150ML
(fig. 5 - selon modèle) :
Si vous désirez vous procurer cet accessoire, il est
disponible auprès de notre service après-vente (voir
liste des centres agréés ci-jointe) sous la référence :
MS5981760.
Placez le couteau (I2) avec précaution
dans le bol (I) sur l’axe central en le
tenant par la partie plastique.
Mettez les aliments dans le bol.
2

Ne remplissez pas le bol (I) au-delà de
la limite maximum.
Posez le contre couvercle (I3) dans le bol
puis mettez le couvercle (I4) en vous
assurant que le système d’entraînement
est bien positionné sur le couteau. Mettez
en place le bloc moteur (A1) sur le
couvercle.
Pour le démontage de votre accessoire
après utilisation, enlevez le bloc moteur
(A1) du couvercle (I4), enlevez le
couvercle (I4) et le contre couvercle (I3),
enlevez avec précaution le couteau (I2)
(en le tenant par la partie plastique), puis
retirez les aliments.
5. MAXI-HACHOIR 600ML
(fig. 5 - selon modèle) :
Si vous désirez vous procurer cet accessoire, il est
disponible auprès de notre service après-vente (voir
liste des centres agréés ci-jointe) sous la référence :
MS5937062.
Placez le couteau (F2) avec précaution
dans le bol (F) sur l’axe central en le
tenant par la partie plastique.
Mettez les aliments dans le bol. Ne
remplissez pas le bol (F) au-delà de la
limite maximum.
Posez le couvercle réducteur (F3) sur le
bol (F) en vous assurant que le système
d’entraînement est bien positionné sur le
couteau. Mettez en place le bloc moteur
(A1) sur le couvercle.
Pour le démontage de votre accessoire
après la préparation, enlevez le bloc
moteur (A1) du couvercle (F3), enlevez
le couvercle réducteur (F3), enlevez avec
précaution le couteau (F2) (en le tenant
par la partie plastique), puis retirez les
aliments.
N’introduisez pas d’objets durs tels que
glaçons, sucre en morceaux, noyaux de
fruits dans le bol.
6. BOL MULTIFONCTIONS 2L ou
3.2L (selon modèle) (fig. 2) :
Le bol multifonctions 2L vous permet de
réaliser des préparations de 150 à 800g.
Le bol multifonctions 3,2L vous permet de
réaliser des préparations de 150 à 1000g.
N’introduisez pas d’objets durs tels que
glaçons, sucre en morceaux, noyaux de
fruits dans le bol.
Pétrir / hacher / mélanger (fig. 6) :
Placez le support couteau (E8) au centre
du bol (E) sur l’axe. Placez les couteaux
(E4 ou E5) avec précaution sur le support
couteau (E8). Placez le réducteur (E6)
sur le couvercle (E3) dans l’emplacement
prévu à cet effet.
Placez et verrouillez bien le couvercle
(E3) sur le bol (E). La cheminée doit être
placée côté poignée du bol.
Mettez en place le bloc moteur (A1) sur le
réducteur (E6).
Mettez en marche.
Pour démonter, appuyez sur le bouton
d’éjection (A5) pour enlever le bloc
moteur (A1) du réducteur (E6) avant tout
démontage du couvercle (E3).
Déverrouillez (E7) le couvercle (E3) pour
pouvoir accéder à la préparation.
Enlevez le support couteau (E8) et les
couteaux (E4 ou E5) avant d’enlever la
préparation. Retirez ensuite avec
précaution le couteau très aiguisé (E4) du
support couteau (E8) en le tenant par la
partie plastique.
Pétrir (fig. 6) : Couteau hachoir (E4)
pour le bol multifonctions 2L ou
couteau pétrin (E5)
Avec cet accessoire vous pouvez réaliser
une pâte sablée (250 g de farine + 150 g
de beurre + 100 g de sucre + 1 œuf +
sucre vanillé + sel) en 30 secondes en
vitesse TURBO.
Attention : Arrêtez l’appareil dès que vous
constatez la formation de la boule de pâte.
Hacher (fig. 6) : Couteau hachoir (E4)
Vous pouvez, en 15 à 20 secondes,
hacher de 150 à 850 g d’aliments dans le
bol multifonctions 3,2L et de 150 à 300 g
dans modèle 2L: des aliments durs
(fromages, fruits secs), des légumes durs
(carottes, céleri, etc.), des légumes
tendres (oignons, épinards,...), des
3

viandes crues et cuites (désossées,
dénervées et coupées en dés), des
poissons crus ou cuits. Ne hachez pas de
produits trop durs (glace, sucre en
morceaux) ou nécessitant une mouture
fine (blé, café).
Râper / trancher (fig. 7) :
La lame G est spécifique à certains modèles de la
gamme. Si vous désirez vous procurer cet
accessoire, il est disponible auprès de notre service
après-vente (voir liste des centres agréés ci-jointe)
sous la référence : MS0695631.
Suivant le modèle, le porte-lames
amovibles (E9) peut être remplacé par un
plateau en métal double face (E9bis).
Les lames A et B sont alors obtenues par
retournement du plateau (la lame G ne
peut pas être montée dans ce cas).
Glissez les lames (A, G, H) dans le
disque porte-lame (E9), placez le support
couteau (E8) sur l’axe du bol (E), placez
le disque porte-lame (E9) sur le support
couteau (E8), placez le réducteur (E6)
sur le couvercle (E3).
Placez et verrouillez le couvercle (E3).
Mettez en place le bloc moteur (A1) sur le
couvercle.
Mettez en marche.
Introduisez les aliments par la cheminée
et guidez-les à l’aide du poussoir (E2),
jamais avec les doigts, ni un ustensile
quelconque.
Pour démonter, appuyez sur le bouton
d’éjection (A5) pour enlever le bloc
moteur (A1) du réducteur (E6) avant tout
démontage du couvercle.
Déverrouillez (E7) le couvercle (E3) pour
pouvoir accéder à la préparation.
Enlevez avec précaution le disque
porte-lame (E9) et le support couteau
(E8) avant d’enlever la préparation.
Retirez ensuite avec précaution les lames
(A, G, H) du disque porte-lame (E9).
Lame A (Râper) : carottes, gruyère,
céleri... Préparez au maximum 1000 g
d’aliments à la fois (pas de viande ni de
charcuterie).
Lame H (Trancher) : pommes de terre
crues pour gratins dauphinois, carottes,
concombres... maximum 800g.
Lame G (Parmesan) : parmesan,
pommes de terre crues.
Débranchez l’appareil, enlevez et
démontez les accessoires.
Les réducteurs (E6, F3 et C1) ainsi que
le bloc moteur (A1) ne passent pas au
lave-vaisselle, vous pouvez les nettoyer
avec une éponge légèrement humide.
Tous les autres accessoires passent au
lave-vaisselle. Placez votre pied mixeur
(B1) couteau vers le haut dans votre
lave-vaisselle.
Utilisez une éponge et de l’eau
savonneuse pour le lavage à la main et
rincez à l’eau tiède.
N’utilisez pas d’éponges abrasives
ou d’objets contenant des parties
métalliques.
Ne plongez jamais le bloc moteur (A1)
dans l’eau. Essuyez-le avec un chiffon
sec ou à peine humide.
En cas de coloration de vos accessoires
par les aliments (carottes, oranges...)
frottez-les avec un chiffon imbibé d’huile
alimentaire puis procédez au nettoyage
habituel.
Manipulez les couteaux E4, F2 et I2 ou
les lames A, G, H avec précaution; ils
sont extrêmement aiguisés.
Vérifiez tout d’abord le branchement
puis :
- Que le couvercle (E3) de votre bol
multifonctions est bien verrouillé. Si ce
n’est pas le cas, votre bloc moteur (A1)
sera dans l’impossibilité de faire
fonctionner votre bol multifonctions car le
système d’entraînement du réducteur
(E6) ne sera pas actionné.
Nettoyage
Si votre appareil ne
fonctionne pas, que faire ?
4

- Que le dispositif de sécurité de l’appareil
ne soit pas activé. Dans ce cas, laissez
l’appareil refroidir environ 30 minutes.
Si le couvercle ne se verrouille pas,
appuyez sur le bouton de déverrouillage
(E7) du réducteur (E6) avant de le
verrouiller.
Référez-vous au paragraphe «Conseils
d’utilisation» pour les instructions de
montage.
Vous avez soigneusement suivi toutes
ces instructions, votre appareil ne
fonctionne toujours pas ? Dans ce cas,
adressez-vous à votre revendeur ou à un
centre agréé Moulinex (voir liste dans le
livret « Moulinex Service »).
1. BOL MULTIFONCTIONS 3,2L
(fig. 6 & 7) :
a) Couteau ‘Pétrin’ (E5)
Blinis
(Spécialité russe et scandinave) :
200 g de farine, 3 œufs, 25 cl de lait,
65 g de beurre, 35 g de crème fraîche,
1/2 citron, 10 g de levure de bière, eau
tiède.
Faites dissoudre la levure dans un peu
d’eau tiède.
Mettez dans le bol multifonctions (E)
muni du couteau pétrin (E5) la farine, la
levure dissoute, quelques pincées de sel,
le lait tiède.
Mélangez en vitesse TURBO jusqu’à ce
que la pâte soit lisse. Si la pâte ne se
lisse pas, ajoutez un peu d’eau.
Sortez la pâte du bol (E) (Attention au
couteau), saupoudrez de farine et laissez
reposer la pâte 2 heures dans un endroit
tempéré.
Dans le bol multifonctions (E) muni du
disque émulsion (E10), montez les
3 blancs en neige en vitesse TURBO,
réservez.
Recettes
Une fois la pâte reposée, placez-la dans
le bol multifonctions (E) muni du couteau
pétrin (E5), ajoutez ensuite les 3 jaunes
d’oeufs, les 50 g de beurre fondu et la
crème fraîche additionnée de quelques
gouttes de citron, mélangez en vitesse
TURBO.
Vérifiez la consistance de la pâte et
incorporez enfin, juste avant utilisation,
les blancs en neige et mélangez en
vitesse 1. Graissez de petites poêles et
faites chauffer. Puis versez un peu de
pâte épaisse. Laissez cuire les blinis 2
minutes sur chaque face en les
badigeonnant avec du beurre fondu.
Servez chaud avec les
accompagnements ci-dessous.
SUGGESTIONS
D’ACCOMPAGNEMENT :
Crème fraîche citronnée, jambon cru,
poisson fumé ou salé, saumon, oeufs de
poissons ou, comme en Russie, caviar
arrosé de citron.
b) Couteau Hachoir (E4)
Köfte (Boulettes de viande hachée,
Spécialité Turque)
Pour 20 Köfte : 200 g de viande de
mouton, 360 g de viande de veau (la
viande doit être assez grasse).
1 gros oignon.
4 à 6 tranches de pain rassi.
Faites tremper la mie de pain dans l’eau
puis égouttez-la bien.
Dans le bol muni du couteau hachoir (E4)
et en vitesse TURBO, hachez la viande
pendant environ 30 secondes.
A l’aide du couteau pétrin (E5), mélangez
la mie de pain et la viande dans le bol
multifonctions (E) en vitesse TURBO.
Retirez le mélange du bol (E), formez des
petites boulettes de la taille de 2-3 noix et
aplatissez-les avec la paume de la main.
Placez les Köfte dans une poêle
anti-adhérente et laissez-les cuire jusqu’à
ce qu’elles soient dorées.
Accompagnez les Köfte de purée ou de riz.
5

2. BOL MULTIFONCTIONS 2 L (J)
(Toutes ces recettes peuvent être
réalisées dans le bol multifonctions
version 3,2 L à l’aide du couteau hachoir)
Pâte à pizza :
150 g de farine, 1/2 sachet de levure de
boulanger, sel, 9 cl d’eau tiède,
2 cueillères à soupe d’huile d’olive.
- Dans le bol muni du couteau, incorporez
farine, levure de boulanger et sel.
- Mettez l’appareil en marche vitesse 6
pendant 10 secondes puis versez l’eau
tiède ainsi que l’huile d’olive jusqu’à la
formation d’une boule de pâte.
- Laissez reposer 1 heure.
Köfte - Boulettes de viande hachée
(pour 20 köftes) :
170 g de viande de mouton, 330 g de
viande de veau (la viande doit être assez
grasse), 1 oignon (plus gros que la
moyenne), 4 à 6 tranches de pain rassi.
- Faites tremper la mie de pain dans l’eau
puis essorez-la bien.
- Dans le bol muni du couteau et en
vitesse TURBO, hachez la viande
pendant 30 secondes.
- Retirez la viande du bol puis ajoutez la
mie de pain et pétrissez le tout à la
main.
- Formez des petites boulettes de la taille
de 2-3 noix et aplatissez-les avec la
paume de la main.
- Placez les köftes dans une poêle
anti-adhérente et laissez-les cuire.
3. PIED MIXEUR (fig. 3) :
Milk-shake à la framboise (2 pers.) :
1/2 litre de lait entier, 150 g de
framboises, 1/2 yaourt, 30 g de sucre en
poudre.
Dans le pichet 1.5 l, mettez tous les
ingrédients, puis mixez pendant
20 secondes en vitesse turbo.
Variez les fruits (fraises, cerises, fruits
rouges, abricots…) selon votre goût.
Velouté de poireaux (4 personnes) :
Epluchez 150 g de poireaux et
coupez-les en tronçons. Mettez les
poireaux coupés dans le pichet 1.5 l,
mixez pendant 20 secondes en vitesse
14. Faites fondre 20 g de beurre dans
une casserole et ajoutez les poireaux
hachés, remuez, couvrez et faites étuver
pendant 15 minutes.
Pelez 150 g de pommes de terre,
coupez-les en gros dés et ajoutez-les
aux poireaux.
Salez, poivrez, ajoutez de la muscade,
puis versez 1/2 litre d’eau et 10 cl de lait.
Laissez cuire 1/2h. Après la cuisson,
mixez pendant 40 secondes avec le pied
mixeur.
Mayonnaise & Sauce Cocktail :
Dans le pichet 1.5 l, versez 1 œuf entier,
1 cuillère à soupe de moutarde de Dijon,
1 cuillère à café de vinaigre, du sel et du
poivre et 25 cl d’huile.
Mixez le tout à l’aide du pied mixeur
jusqu’à obtenir une mayonnaise bien
ferme.
Pour obtenir une sauce cocktail, ajoutez
à la mayonnaise une cuillère à soupe de
sauce tomate, quelques gouttes de
sauce piquante à base de piments
rouges et quelques traits de sauce
Worcestershire.
4. FOUET MULTIBRINS
(Fig. 4 - selon modèle) :
Pâte à crêpes (4 personnes) :
200 g de farine, une pincée de sel,
½ litre de lait, 40 g de beurre fondu,
3 œufs.
Mettez tous les ingrédients dans le pichet
1.5L puis utilisez la vitesse 16 du
variateur avec l’accessoire fouet
multibrins.
5. DISQUE EMULSION
(Fig. 4 - selon modèle) :
Mousse au chocolat (6 personnes) :
200 g de chocolat pâtissier, 6 blancs
6

d’œufs, 6 jaunes d’œufs.
Faites fondre le chocolat lentement au
bain-marie pour ne pas le brûler.
Incorporez les jaunes d’œufs puis
mélangez.
Dans le bol multifonctions (E) équipé du
disque émulsion (E10), montez les
6 blancs en neige en vitesse 16. Une fois
les blancs montés, ouvrez le bol et
incorporez le mélange chocolat/jaunes
d’œufs et mélangez en vitesse 1 pour ne
pas casser les blancs.
Réservez au réfrigérateur pendant 2 à
3 heures avant de servir.
Mayonnaise :
1 jaune d’œuf, moutarde, sel, poivre,
huile, vinaigre.
Dans le bol multifonctions (E) muni du
disque émulsion (E10), mettez le jaune
d’œuf, 1 cuillère à soupe de moutarde, le
sel, le poivre. Mélangez en vitesse 1 pour
rendre le tout homogène.
Incorporez l’huile en filet par la cheminée
tout en mélangeant en vitesse1.
Quand la quantité de mayonnaise
désirée est atteinte, ajoutez une cuillère à
soupe de vinaigre.
6. MINI-HACHOIR 150 ML
(fig. 5 - selon modèle) :
Vous pouvez vous procurer ce
Mini-Hachoir auprès de votre revendeur
ou d’un centre agréé sous la référence
suivante : 5981760.
Cet accessoire vous permet de hacher
par exemple en vitesse turbo :
- 80 g de viande de boeuf ou de poitrine
de porc crue en 3 secondes. Coupez
la viande préalablement en dés de 2
cm de côté.
7. MAXI-HACHOIR 600 ML
(Fig. 5 - selon modèle) :
Avec cet accessoire, vous pouvez hacher
les aliments suivants : viande (250 g),
persil, ail, oignons, par impulsions (en
vitesse TURBO).
7
Participons à la protection
de l’environnemet !
Votre appareil contient de
nombreux matériaux valorisables
ou recyclables.
Confiez celui-ci dans un point de
collecte ou à défaut dans un
centre service agréé pour que son
traitement soit effectué.

8
Thank you for choosing a Moulinex
appliance. This appliance is exclusively
designed for the preparation of food in a
domestic setting.
Read the instructions for use carefully
before using your appliance for the first
time: in the event of any inappropriate
use, Moulinex shall accept no liability.
Always unplug the motor unit (A1) when
you leave it unsupervised.
Check that the power voltage indicated
on the nameplate of the appliance
corresponds to that of your mains
installation.
Any connection error renders the
guarantee invalid.
Never touch moving parts. Never handle
the blade of the blender shaft (B1) when
the appliance is connected.
Never run the multifunction bowl (E), the
150 ml mini chopper (I), the 600 ml mini
chopper (F) and the blender shaft (B1)
without any food.
Be very careful when handling the
cartridges or the blades of the
multifunction bowl (E) and the 600 ml (F)
and 150 ml (I) mini chopper: they are
extremely sharp.
You must always remove the blades
before emptying the bowls (Multifunction
(E) and 600 ml (F) and 150 ml (I) mini
chopper).
When you want to grate or slice food,
always use the pusher (E2) to guide it into
the feeder tube, never use your fingers or
another utensil.
Always unplug motor unit (A1) before
performing any operations: assembly,
disassembly and maintenance.
Never open the motor unit (A1) or
reduction gears (C1, E6 &F3). The only
thing you need to do is usual cleaning
and maintenance.
Safety instructions
If the power cord or the plug is damaged,
do not use your appliance. In order to
avoid any danger, have them replaced by
an approved Moulinex service centre
(see the list in the "Moulinex service"
booklet). For your safety, only use the
Moulinex accessories and spare parts
that are specifically designed for your
appliance.
Do not unplug the appliance by pulling
on the cord.
Do not use the multifunction bowl (E) and
the mini choppers (I1 and F1) as a
container (freezing, cooking, sterilisation).
Never pour boiling liquids into the
multifunction bowl or into the mini
choppers (I) and (F).
Do not allow long hair, scarves, ties, etc.
to dangle over the accessories when they
are working.
Never unplug the motor unit (A1) by
pulling on the power cord.
Your appliance is designed for domestic
use only. Any commercial use,
inappropriate use or failure to comply with
the instructions, the manufacturer
accepts no responsibility and the
guarantee will not apply.
The appliance must not be used close to
a microwave oven or a mobile telephone.
This appliance is not intended for use by:
children; or persons who may suffer from
a mental and/or physical impairment -
unless they are adequately supervised in
its operation and use. Persons who have
a limited or no understanding in the
operation and use of this appliance must
first read and fully understand the
contents of the enclosed instruction
booklet, and where appropriate seek
additional guidance on its operation and
use from the person responsible…
It is important to supervise children to
make sure they do not play with the
appliance.
Never let children use this appliance
without supervision.

9
Before using the appliance for the first
time, clean all of the accessories in soapy
water. Rinse and dry them carefully.
Plug your appliance in. The motor unit
(A1) is turned on by pressing the Turbo
button (A2) or the speed button (1) and
selecting a speed from 1 to 16 to on the
switch (A4) and pressing the button (A3).
In some cases (if too much mixture
has been put into the bowl or
appliance has been used for too long),
the power supply to the appliance may
be switched off and it will stop
working. If this happens you should
leave the appliance to cool down for
30 minutes before using it again.
1. Blender shaft (fig. 3):
Fit the blender shaft (B1) to the motor unit
(A1) until it clicks.
The container that you are using must
be filled no more than two thirds full to
avoid overflowing. The mixture must at
least cover the bottom of the blender to
ensure that the blending is efficient.
Remove the cooking container off the
heat to blend hot mixtures. Do not
hesitate to move the blender shaft around
the container to optimise the blending
process.
For stringy foods (leeks, celery, etc.),
clean the shaft regularly as you use it,
following the safety instructions for
dismantling and cleaning.
For fruit mixtures, cut the fruit and remove
any stones or hard pips before you start.
Do not use the blender shaft with hard
foods such as coffee beans, ice cubes,
sugar, cereals, chocolate.
Press the ejecti button (A5) to remove the
blender shaft (B1) when you have
finished using it.
Using for the first time
Instructions for use
2. Whisk (H)
(fig. 4 - according to model)
If you wish to obtain this accessory, it is available
f
rom our after sales service (see list of approved
centres enclosed) under the references:
MS0695561 & MS5937064.
Attache the whisk (C2) into the whisk
holder (C1) then fit this assembly on to
the motor unit (A1).
Using the whisk (C2), you can make
lightweight preparations (mayonnaise,
pancake mixture, whip egg whites, whip
cream, etc.)
Press the eject button (A5) to remove the
accessories when you have finished
using them.
3. Emulsifying disk
(fig. 4
-
according to model)
If you wish to obtain this accessory, it is available
from our after sales service (see list of approved
centres enclosed) under the reference:
MS0695636.
Place the blade holder (E8) in the centre
of the bowl (E) on the axis. Place the
emulsifying disk (E10) on the blade
holder (E8).Place the reducer (E6) on the
lid (E3) in its housing.
Using the emulsifying disk (E10), you can
make light mixtures (mayonnaise,
pancake batter, whisked egg whites,
whipped cream, etc.)
4. Mini chopper 150 ml
(fig. 5
-
according to model)
If you wish to obtain this accessory, it is available
from our after sales service (see list of approved
centres enclosed) under the reference:
MS5981760.
Carefully place the blade (I2) into the
bowl (I) along the central axis, holding it
by the plastic part as you do so.
Place the food in the bowl. Do not fill the
bowl (I) higher than the maximum
limit.
Place the cover lid (I3) in the bowl and
then place the lid (I4) on top, ensuring
that the drive mechanism is properly
positioned on the blade. Put the motor

10
unit (A1) in position on the lid.
To dismantle your accessory after use,
remove the motor unit (A1) from the lid
(I4), remove the lid (I4) and the cover lid
(I3), then carefully remove the blade (I2)
(hold it by the plastic section) before
removing the meat or food with a spoon
or spatula.
5. Mini chopper 600 ml
(fig. 5 – according to model)
Carefully place the blade (F2) into the
bowl (F) along the central axis, holding it
by the plastic part as you do so.
Place the food in the bowl. Do not fill the
bowl (F) higher than the maximum limit.
Place the reducer lid (F3) in the bowl and
place the lid (F) on top ensuring that the
drive mechanism is properly positioned
on the blade. Set the motor unit (A1) in
position on the lid.
To dismantle your accessory after use,
remove the motor unit (A1) from the lid
(F3), remove the lid (F3) and the reducing
lid (F3), then carefully remove the blade
(F2) (hold it by the plastic section) before
removing the meat.
Do not put hard objects such as ice
cubes, sugar cubes or fruit stones in the
bowl.
6. 2L or 3.2L Multifunction bowl
(fig 2 - according to model)
The 2L multifunction bowl enables you to
prepare mixtures from 150 to 800 g.
The 3.2L multifunction bowl enables you
to prepare mixtures from 150 to 1000 g.
Do not put hard objects such as ice
cubes, sugar cubes or fruit stones in the
bowl.
Knead/Chop/Blend (fig 6)
Place the blade holder (E8) in the centre
of the bowl (E) on the axis. Carefully
place the blades (E4 or E5) on the blade
holder (E8). Place the reducer (E6) on the
lid (E3) in the slot designed to that effect.
Place the lid (E3) on the bowl (E) and lock
it. The feeder tube must be placed on the
same side of the bowl as the handle.
Set the motor unit (A1) in position on the
reducer (E6).
Turn on.
To dismantle, press the ejection button
(E7) to remove the motor unit (A1) from
the reducer (E6) before removing the lid
(E3).
Unlock (E7) the lid (E3) to access the food.
Remove the blade holder (E8) and the
blade (E4 or E5) before removing the
food. Then very carefully remove the
sharp blade (E4) from the blade holder
(E8), (hold it by the plastic section).
Knead (fig 6): Chopping knife (E4) for
the 2L multifunction bowl or
kneading blade (E5)
With this kneading blade you can make
a shortcrust pastry dough (250 g of flour
+ 150 g butter + 100 g of sugar + 1 egg
+ vanilla sugar + salt) in just 30
seconds.
Attention: Stop the appliance as soon as
dough begins to form a ball.
Chop (fig 6): Chopping Blade (E4)
In 15 to 20 seconds you can chop
between 150 and 850 g of food in the
3.2L multifunction bowl and from 150 to
300 g in the 2L model: hard foodstuffs
(cheeses, dried fruit), hard vegetables
(carrots, celery, etc.), tender vegetables
(onions, spinach, etc.), raw and cooked
meats (boned and chopped into chunks),
raw or cooked fish. Do not chop things
that are too hard (rice, sugar cubes) or
which require very fine chopping (wheat,
coffee).
Grate/slice (fig 7)
Blade G comes with some models of the range
nevertheless, if you wish to obtain this accessory, it
is available from our after sales service (see list of
approved centres enclosed) under the reference:
MS0695631.
Depending on the model, the detachable
blade holder (E9) may be replaced by a

11
double-sided metal tray (E9bis). Blades A
and B, in this case, are obtained by
turning the tray over (blade G cannot be
mounted in this case).
Slide the blades (A, G, H) into the blade
holder disc (E9), place the blade holder
(E8) on the axis of the bowl (E), then
place the blade holder disc (E9) on the
blade holder (E8). Put the reducer (E6)
on the lid (E3).
Place the lid (E3) on the bowl and lock it.
Set the motor unit (A1) in position on
the lid. Turn on.
Introduce the food through the feeder
tube and push them down using the
pusher (E2), never with your fingers or
any other utensil.
To dismantle, press the eject button (E7)
to remove the motor unit (A1) from the
reducer (E6) before removing the lid.
Unlock (E7) the lid (E3) to access the food.
Carefully remove the blade holder disc
(E9) and the blade holder (E8) before
removing the food. Then carefully remove
the blades (A, G, H) from the blade holder
disc (E9).
Blade A (Grater): carrots, cheese, celery,
etc.
Prepare a maximum of 1000g of food at a
time (but not meat or cold meat products).
Blade H (Slice): raw sliced potatoes for
gratins, carrots, cucumbers, etc.
maximum 800 g.
Blade G (Parmesan): Parmesan, raw
potatoes.
Unplug the appliance, remove the
accessories.
The reducers (E6, F3 and the whisk
holder C1) as well as the motor unit (A1)
are not dishwasher proof; you can wipe
them with a damp sponge.
All the other accessories are dishwasher
proof. Place the blender shaft (B1)
with the blade facing upwards in the
Cleaning
dishwasher. Do not use abrasive
sponges or objects that contain metal
parts.
Never plunge the motor unit (A1) into
water. Wipe it down with a dry or very
slightly damp cloth.
In the event that your accessories
become colour stained by foods such as
carrots, oranges, beetroot etc rub over
them immediately after use with a cloth
dipped in a little sunflower oil and then
clean them as usual.
Handle the blades E4, E5, F2 and I2
or blades A, G, H with extreme care;
they are very sharp.
Start by checking the power cord and
plug, then:
Check that the lid (E3) to your
multifunction bowl is properly locked. If it
is not properly locked your motor unit
(A1) will not be able to make your
multifunction bowl work because the
reducer drive system (E6) will not
operate.
Check whether the appliance’s safety
system has not been activated, by
processing too much mixture or by using
the appliance for too long. If it has, leave
the appliance to cool down for around
30 minutes.
If the lid does not lock properly, press the
unlocking button (E7) on the reducer (E6)
before locking it again.
Refer to the “Usage” paragraph for
assembly instructions.
You have carefully followed all these
instructions, and yet your appliance still
does not work?
Please contact our Helpline:
0845 602 1454 - UK
(01) 401 8448 - Ireland
or consult our website :
www.moulinex.co.uk
What do I do if my appliance
doesn’t work?

12
1. 3,2L MULTIFUNCTION BOWL
(fig 6 & 7):
a) Kneading blade (E5):
Blinis (Russian and Scandinavian
speciality):
200g plain flour
3 eggs
250 ml of milk
65g of melted butter
35g of crème fraîche
Juice of1/2 lemon
10g of fresh yeast
Lukewarm water
Dissolve the yeast in a little lukewarm
water.
Put the flour, the dissolved yeast, a few
pinches of salt and the warm milk into the
multifunction bowl (E) with the kneading
blade (E5).
Mix together on TURBO speed until the
dough is smooth. If the dough does not
become smooth, add a little water.
Remove the dough from the bowl (E) (be
careful of the blade), sprinkle a little flour
over the top and leave to rest for 2 hours
in a cool place.
In the multifunction bowl (E) with the
emulsifying disc (E10), whisk the three
egg whites until firm on TURBO speed,
put to one side.
Once the dough has rested, put it back in
the multifunction bowl (E) with the
kneading blade (E5), then add the three
egg yolks, 50 g cooled melted butter and
the crème fraîche along with a few drops
of lemon juice, mix on TURBO speed.
Check the consistency of the mixture and
just before using it, fold in three egg
whites which have been whisked until
firm, at speed 1.
Oil a small frying pan and heat. Then pour
in some of the thick mixture.
Leave the blinis to cook for 2 minutes on
each side, brushing them with a little
melted butter. Serve hot with the following
accompaniment.
Recipes
ACCOMPANIMENT:
Crème fraîche with lemon, cured ham,
smoked or salted fish, salmon, or, like in
Russia, caviar sprinkled with lemon juice.
b) Chopping Knife:
Köfte (minced meat balls – Turkish
speciality):
For 20 Köfte
200g mutton or lamb
360g of veal
Cookes note: the meat should be quite
fatty.
1 large onion.
4 to 6 slices of stale bread.
Soak the bread, crusts removed, in water
and then drain well.
In the bowl fitted with the chopping blade
(E4) and at TURBO speed, chop the
meat for around 30 seconds.
Using the kneading blade (E5), mix the
breadcrumbs and the meat in the
multifunction bowl (E) on TURBO speed.
Remove the mixture from the bowl (E),
form little balls about the size of 2 or 3
walnuts and then flatten them with the
palm of the hand.
Place the Köfte in a non-stick frying pan
and leave them to cook until golden.
Serve with mashed potato or rice.
2. 2L MULTIFUNCTION BOWL (J):
(All these recipes can be made in the
3.2 L version multifunction bowl using the
chopping knife)
Pizza dough:
150 g of flour, 1/2 packet of baker's yeast,
salt, 9 ml lukewarm water, 2 tablespoons
of olive oil.
- In the bowl fitted with the knife, fold in
the flour, baker’s yeast and the salt.
- Turn the appliance at speed 6 for
10 seconds then pour in the lukewarm
water as well as the olive oil through
until a ball of dough begins to form.
- Leave to rest for one hour.

13
Köfte - minced meat balls (for 20
köftes):
170 g of mutton, 330 g of veal (the meat
should be quite fatty), 1 onion (larger than
the average), 4 to 6 slices of stale bread.
- Soak the white of the bread in water and
then drain well.
- In the bowl fitted with the knife and at
TURBO speed, chop the meat for
around 30 seconds.
- Remove the meat from the bowl and
then add the white of the bread and
knead the mixture by hand.
- Form little balls about the size of 2 or 3
walnuts and then flatten them with the
palm of the hand.
- Place the köftes in a non-stick frying pan
and leave them to cook.
3. BLENDER SHAFT (fig. 3):
Raspberry milkshake (serves 2)
½ litre full cream milk, 150 g fresh
raspberries
1/2 pot raspberry yoghurt, 30 g of caster
sugar.
In the 1.5 litre jug, place all of the
ingredients and then mix for 20 seconds
on TURBO speed.
You can vary the fruits (strawberries,
cherries, red berries, apricots, etc.) to
your taste.
Leek soup (serves four)
Peel 150 g of leeks and cut them into
slices. Place the cut leeks into the 1.5 litre
jug, blend for 20 seconds at speed 14.
Melt 20 g butter in a saucepan and add
the chopped leeks, stir, cover and gently
seamer 15 minutes.
Peel 150g of potatoes, cut them into large
chunks and add them to the leeks. Add
salt and pepper and nutmeg, and then
pour in ½ litre of water and 100 ml of milk.
Leave to cook for half an hour. After it is
cooked, blend for 40 seconds with the
blender shaft.
Mayonnaise & 1000 Island Sauce
In the 1.5 litre jug, add one whole egg,
1 level teaspoon of Dijon mustard, 1
teaspoon wine vinegar, salt and pepper
and 250 ml oil. (olive oil, sunflower oil or
a mixture of both)
Blend all this together using the blender
shaft until you get a nice thick
mayonnaise.
For a 1000 Island sauce, add a
tablespoon of tomato sauce, a few drops
of red chilli sauce and a few dashes of
Worcestershire sauce to the mayonnaise.
4. WHISK
(fig. 4 – according to model):
Pancake batter (serves 4)
200 g of flour, a pinch of salt, ½ litre of
milk, 40 g of melted butter, 3 eggs.
Place all of the ingredients in the 1.5 l jug
then use speed 16 with the whisk
accessory.
5. EMULSIFYING DISK
(fig. 4 – according to model):
Chocolate mousse (serves 6)
200g of cooking chocolate, 6 egg whites,
6 egg yolks.
Melt the chocolate slowly over a bain
marie to ensure you don’t burn it. Fold in
the egg yolks and mix.
In the multifunction bowl (E) with the
emulsifying disc (E10), whisk the 6 egg
whites until firm at speed 16. Once the
egg whites have been whisked, open the
bowl and fold in the chocolate/egg yolk
mixture and blend at speed 1 order to
maintain the texture of the egg whites.
Chill in the refrigerator for 2 to 3 hours
before serving.
Mayonnaise
1 egg yolk, mustard, salt, pepper, oil,
vinegar.
In the multifunction bowl (E) with the
emulsifying disc (E10), place 1 egg yolk,
1 tablespoon of mustard, salt and pepper.
Blend on speed 1 until the mixture is
smooth.
Add the oil very gradually through the
feeding tube, keeping the speed at 1 all

14
the time.
When the desired quantity of mayonnaise
has been reached, add a tablespoon of
vinegar.
6. 150 ML MINI-CHOPPER
(fig. 5 – according to model):
If you wish to obtain this accessory, it is
available from our after sales service
(see list of approved centres enclosed)
under the reference: MS5981760.
This accessory, for example, at turbo
speed allows you to chop: 80g of raw
beef or pork belly in 3 seconds. Dice the
meat beforehand into 2cm cubes.
7. 600 ML MINI-CHOPPER
(fig. 5 – specific DDF8):
Using this accessory, you can chop
following foods: meat (250g), parsley,
garlic, onions, using a series of pulses (at
TURBO speed).
Do your part to protect the
environment!
Your appliance contains valuable
materials which can be recovered
or recycled.
Take it to a local civic waste
collection point.
Vi ringraziamo per avere scelto un
apparecchio della gamma Moulinex
che è esclusivamente destinato alla
preparazione degli alimenti e ad un uso
domestico.
Leggete attentamente le istruzioni per
l’uso prima di utilizzare per la prima volta
il vostro apparecchio: un utilizzo non
conforme solleverebbe Moulinex da ogni
responsabilità.
Staccate sempre il blocco motore (A1)
dalla corrente quando lo lasciate
incustodito.
Verificate che la tensione d’alimentazione
indicata sulla targhetta segnaletica
dell’apparecchio corrisponda a quella del
vostro impianto elettrico.
Ogni errore di collegamento annulla la
garanzia.
Non toccate mai i pezzi in movimento.
Non maneggiate mai il coltello del piede
mixer (B1) quando l’apparecchio è
collegato alla corrente.
Non fate mai funzionare a vuoto il
bicchiere multifunzione (E), il mini
tritatutto 150mL (I), il maxi tritatutto
600mL (F) e il piede mixer (B1).
Maneggiate i coltelli o le lame del
bicchiere multifunzione (E) e dei tritatutto
600mL (F) o 150mL (I) con attenzione:
sono estremamente affilati.
Dovete obbligatoriamente togliere il
coltello prima di vuotare il contenuto dei
bicchieri (Multifunzione (E) e tritatutto 600
ml (F) e 150 ml (I)).
Quando grattugiate o affettate degli
alimenti, utilizzate sempre il pressino (E2)
per guidarli nell’imboccatura, mai le dita
né un utensile.
Staccate sempre il blocco motore (A1)
dalla corrente prima di ogni intervento di
montaggio, smontaggio e manutenzione.
Non aprite mai il blocco motore (A1) o i
Consigli di sicurezza

15
riduttori (C1, E6 e F3). Non dovete
effettuare nessun altro intervento se non
la pulizia e la manutenzione ordinaria.
Se il cavo d’alimentazione o la spina sono
danneggiati, non utilizzate l’apparecchio.
Per evitare qualsiasi pericolo, fateli
obbligatoriamente sostituire da un centro
assistenza autorizzato Moulinex (vedere
elenco nel libretto «Moulinex service»).
Per la vostra sicurezza, utilizzate solo
accessori e pezzi di ricambio Moulinex
adatti al vostro apparecchio.
Non utilizzare il bicchiere multifunzione
(E) e i tritatutto (I e F) come recipienti per
altri usi (congelamento, cottura,
sterilizzazione).
Non versate mai liquidi bollenti nel
bicchiere multifunzione e nei tritatutto (I) e
(F).
Legate i capelli lunghi, e non fate pendere
sciarpe, cravatte, ecc. … al disopra degli
accessori in funzione.
Non staccate mai il blocco motore (A1)
dalla corrente tirando il cavo di
alimentazione.
Il vostro apparecchio è destinato soltanto
a un uso domestico. Qualsiasi utilizzo
professionale, o non conforme alle
istruzioni annulla la garanzia e
deresponsabilizza il fornitore.
L’apparecchio non deve essere utilizzato
vicino a un forno a microonde o a un
telefono cellulare.
Questo apparecchio non deve essere
utilizzato da persone (compresi i bambini)
con ridotte capacità fisiche, sensoriali o
mentali, o da persone prive di esperienza
o di conoscenza, tranne se hanno potuto
beneficiare, tramite una persona
responsabile della loro sicurezza, di una
sorveglianza o di istruzioni preliminari
relative all’utilizzo dell’apparecchio.
È opportuno sorvegliare i bambini per
assicurarsi che non giochino con
l’apparecchio.
Non lasciate che i bambini utilizzino
l’apparecchio senza sorveglianza.
Prima del primo utilizzo, pulite tutti gli
accessori con acqua e sapone.
Risciacquate e asciugateli
accuratamente.
Collegate l’apparecchio alla corrente.
L’avviamento del blocco motore (A1) si fa
premendo il tasto Turbo (A2) o
selezionando una velocità da 1 a 16
usando il variatore (A4) e premendo il
tasto (A3).
In alcuni casi d’utilizzo (quantità di
preparazione troppo elevata o tempo di
funzionamento troppo alto),
l’alimentazione dell’apparecchio può
interrompersi. In questo caso lasciare
raffreddare l’apparecchio per 30 minuti
prima di utilizzarlo nuovamente.
1. PIEDE MIXER (fig. 3)
Incastrate il piede mixer (B1) sul blocco
motore (A1) fino all’aggancio.
Il recipiente che utilizzate deve essere
riempito al massimo per 2/3 per evitare
che il contenuto fuoriesca. La
preparazione deve coprire come minimo
la parte inferiore del mixer per garantire
l’efficacia della frullatura.
Togliete il recipiente di cottura dalla fonte
di calore per frullare preparazioni calde.
Non esitate a spostare il piede mixer per
ottimizzare la frullatura.
Per gli alimenti filamentosi (porri, sedano,
ecc.) pulire il piede regolarmente in corso
d’utilizzo seguendo le norme di
sicurezza per lo smontaggio e la pulizia.
Per le preparazioni a base di frutta,
tagliate e snocciolate preventivamente la
frutta.
Non utilizzate il piede mixer con alimenti
duri come chicchi di caffè, cubetti di
ghiaccio, zollette di zucchero, cereali,
cioccolato.
Consigli d’uso
Messa in funzione

16
Premete il tasto di espulsione (A5) per
smontare il piede mixer (B1) a fine utilizzo.
2. FRUSTA
(fig. 4 - secondo i modelli)
S
e desiderate procurarvi questo accessorio, è
d
isponibile presso il nostro servizio assistenza
(vedere elenco dei centri autorizzati allegato) con i
codici: MS0695561 e MS5937064.
Introducete la frusta (C2) nel riduttore
(C1) poi incastrate l’insieme sul blocco
motore (A1).
Con la frusta (C2), potete realizzare
preparazioni leggere (maionese, pasta
per crêpes o per clafoutis, albumi montati
a neve, panna montata...).
Premete il tasto di espulsione (A5) per
smontare gli accessori a fine utilizzo.
3. DISCO EMULSIONATORE
(fig. 4 - secondo i modelli)
Se desiderate procurarvi questo
accessorio, è disponibile presso il nostro
servizio assistenza (vedere elenco dei
centri autorizzati allegato) con il codice:
MS0695636.
Mettete il supporto coltello (E8) al centro
del bicchiere (E) sull’asse. Mettete il disco
emulsionatore (E10) sul supporto coltello
(E8). Mettete il riduttore (E6) sul coperchio
(E3) nell’alloggiamento previsto.
Con il disco emulsionatore (E10), potete
realizzare preparazioni leggere (maionese,
pasta per crêpes o per clafoutis, albumi
montati a neve, panna montata...).
4. MINI TRITATUTTO 150ML
(fig. 5 - secondo i modelli)
Se desiderate procurarvi questo accessorio, è
disponibile presso il nostro servizio assistenza
(vedere elenco dei centri autorizzati allegato) con il
codice: MS5981760.
Mettete con cautela il coltello (I2) nel
bicchiere (I) sull’asse centrale tenendolo
per la parte in plastica.
Mettere gli alimenti nel bicchiere. Non
riempite il bicchiere (I) oltre il limite
massimo.
Posate il contro coperchio (I3) nel
bicchiere poi mettete il coperchio (I4)
assicurandovi che il sistema di
trascinamento sia ben posizionato sul
coltello. Sistemare il blocco motore (A1)
sul coperchio.
Per lo smontaggio dell’accessorio dopo
l’utilizzo, togliete il blocco motore (A1) dal
coperchio (I4), togliete il coperchio (I4) e
il contro coperchio (I3), poi togliete con
cautela il coltello (I2) (tenendolo per la
parte in plastica). prima di estrarre gli
alimenti
5. MAXI TRITATUTTO 600ML
(fig. 5 - secondo i modelli)
Se desiderate procurarvi questo accessorio, è
disponibile presso il nostro servizio assistenza
(vedere elenco dei centri autorizzati allegato) con il
codice: MS5937062.
Mettete con cautela il coltello (F2) nel
bicchiere (F) sull’asse centrale tenendolo
per la parte in plastica.
Mettere gli alimenti nel bicchiere. Non
riempite il bicchiere (F) oltre il limite
massimo.
Mettete il coperchio riduttore (F3) sul
bicchiere (F) assicurandovi che il sistema
di trascinamento sia ben posizionato sul
coltello. Sistemate il blocco motore (A1)
sul coperchio.
Per lo smontaggio dell’accessorio dopo
la preparazione, togliete il blocco motore
(A1) dal coperchio (F3), togliete il
coperchio riduttore (F3), poi togliete con
cautela il coltello (I2) (tenendolo per la
parte in plastica). prima di estrarre gli
alimenti.
Non introdurre nel bicchiere oggetti duri
come cubetti di ghiaccio, zollette di
zucchero, noccioli di frutta.
6. BICCHIERE MULTIFUNZIONE
2L o 3,2L (secondo il modello)
(fig. 2)
Il bicchiere multifunzione 2L vi permette
di realizzare delle preparazioni da 150 a
800g. Il bicchiere multifunzione 3,2L vi
permette di realizzare delle preparazioni
La pagina si sta caricando...
La pagina si sta caricando...
La pagina si sta caricando...
La pagina si sta caricando...
La pagina si sta caricando...
La pagina si sta caricando...
La pagina si sta caricando...
La pagina si sta caricando...
La pagina si sta caricando...
La pagina si sta caricando...
La pagina si sta caricando...
La pagina si sta caricando...
La pagina si sta caricando...
La pagina si sta caricando...
La pagina si sta caricando...
La pagina si sta caricando...
La pagina si sta caricando...
La pagina si sta caricando...
La pagina si sta caricando...
La pagina si sta caricando...
La pagina si sta caricando...
La pagina si sta caricando...
La pagina si sta caricando...
La pagina si sta caricando...
-
 1
1
-
 2
2
-
 3
3
-
 4
4
-
 5
5
-
 6
6
-
 7
7
-
 8
8
-
 9
9
-
 10
10
-
 11
11
-
 12
12
-
 13
13
-
 14
14
-
 15
15
-
 16
16
-
 17
17
-
 18
18
-
 19
19
-
 20
20
-
 21
21
-
 22
22
-
 23
23
-
 24
24
-
 25
25
-
 26
26
-
 27
27
-
 28
28
-
 29
29
-
 30
30
-
 31
31
-
 32
32
-
 33
33
-
 34
34
-
 35
35
-
 36
36
-
 37
37
-
 38
38
-
 39
39
-
 40
40
-
 41
41
-
 42
42
-
 43
43
-
 44
44


Moulinex DD908141 Manuale del proprietario
- Categoria
- Robot da cucina
- Tipo
- Manuale del proprietario
in altre lingue
- English: Moulinex DD908141 Owner's manual
- français: Moulinex DD908141 Le manuel du propriétaire
- Türkçe: Moulinex DD908141 El kitabı
Documenti correlati
-
Moulinex QA203810 Manuale utente
-
-
-
-
Moulinex DD861110 Manuale utente
-
-
Moulinex DP805G LA MOULINETTE XXL Manuale del proprietario
-
-
Moulinex DDH241 Manuale utente
-
Moulinex AT 7171 Manuale del proprietario
Altri documenti
-
Tefal HB406140 Manuale utente
-
-
Krups KA303110 Manuale utente
-
SEB DO221 Manuale del proprietario
-
Black & Decker BXHB500E Manuale utente
-
-
Tefal FP413DAE Manuale utente
-
Gaggia 610 100 361 Manuale del proprietario
-
Tefal PY551712 Manuale del proprietario
-
Campomatic FP1000 Manuale del proprietario