
www.lionelo.com
Manual de usuario
Handleiding
Naudojimo instrukcija
Návod k obsluze
Használa utasítás
Manual u lizare
User manual
Instrukcja obsługi
Bedienungsanleitung
Инструкция по эксплуатации
Manuale d’uso
Manuel de l’U lisateur
Niles
High chair and baby swing
Krzesełko do karmienia i bujaczek
Hochstuhl und Babywippe
Cтульчик для кормления
и Электронные качели
Seggiolone e l’altalena per bambini
Chaise haute et balançoire bébé
Sillita para la alimentación y balancín
Voedstoel en schommelstoel
Maitinimo kėdutė ir gultukas
Krmící židlička a houpačka
Etetőszék és ringató
Scaun înalt și balansoar

‑ 2 ‑
1
2
3

‑ 3 ‑
4
5
7
98
6

‑ 4 ‑
10 11
13
1412
15 16

‑ 5 ‑
17
18
19
20

‑ 6 ‑
21
1
2
3
4
5
6
7 14
15
13
12
11
10
9
8

‑ 7 ‑ EN
EN
Dear customer!
Should you have any remarks or quesons concerning the product, please do not
hesitate to contact us: [email protected]
Before you start using the product, please read this manual carefully.
The product has been tested and complies with the standard:
EN 14988:2017+A1:2020, EN 16232:2013+A1:2018
Note: Only an adult is allowed to assemble the product.
Producer:
BrandLine Group Sp. z o. o.
ul. A. Kręglewskiego 1, 61-248 Poznań, Poland
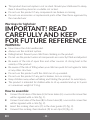
Warnings for infant swing:
IMPORTANT! READ
CAREFULLY AND KEEP
FOR FUTURE REFERENCE
WARNING:
• Never leave the child unaended.
•
Do not use this product once your child can sit up unaided or weighs more than 9 kg.
• This product is not intended for prolonged periods of sleeping.
• Never use this product on an elevated surface (e.g. a table).
• Always use the restraint system.
•
To avoid injury ensure that children are kept away when unfolding and folding
this product.
• Do not let children play with this product.
• Do not move or li this product with the baby inside it.
• When the product is connected to a music player, ensure that the volume of
the music player is set to a low value.

‑ 8 ‑EN
• This product does not replace a cot or a bed. Should your child need to sleep,
then it should be placed in a suitable cot or bed.
• Do not use the product if any components are broken or missing.
• Do not use accessories or replacement parts other than those approved by
the manufacturer
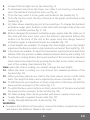
Warnings for highchair:
IMPORTANT! READ
CAREFULLY AND KEEP
FOR FUTURE REFERENCE
WARNING:
• Never leave the child unaended.
• Always use the restraint system.
• Falling hazard: Prevent your child from climbing on the product.
•
Do not use the product unless all components are correctly ed and adjusted.
•
Be aware of the risk of open res and other sources of strong heat in the
vicinity of the product.
• Be aware of the risk of lng when your child can push its feet against a table
or any other structure.
• Do not use the product unl the child can sit up unaided.
• Do not use the product if any part is broken, torn or missing.
• Keep children away when unfolding and folding the product to avoid injury.
• The product is intended for children able to sit up unaided and up to 3 years
or a maximum weight of 15 kg.
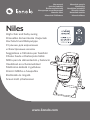
How to assemble:
1.
Connect front tubes of the base (A) to frame tubes (A); a successful connecon
will be signaled with a click (g. 1).
2.
Connect rear tubes of the base (B) to frame tubes (B); a successful connecon
will be signaled with a click (g. 2).
3. Insert the rocking chair arms (C) in the chair guides (C) (g. 3).
4. Connect the rocking chair interlock (D) to arm ps (D) (g. 4).

‑ 9 ‑ EN
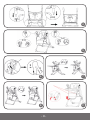
5. Connect le and right arm to the frame (g. 5).
6. To disconnect arms from the frame, use a thin 4-mm tool (e.g. screwdriver),
press the interlock and pull the arms out (g. 6).
7. To x the tray, insert it in the guide unl locked in the handle (g. 7).
8. To x the toy bar, insert the ps of the bar in the guides unl locked in the
handle (g. 8).
9. LO-Niles allows adjusng leg rest in four posions. To change the backrest
inclinaon angle, press buons on the sides (le and right side) of the seat
and set a suitable posion (g. 9, 10).
10. Before changing the backrest inclinaon angle, please take the child out of
the chair and lock arms. Next, press the backrest adjustment buon (the
buon is in the back of the rest in the upper area) and change backrest
inclinaon angle. 4 adjustment levels are available (g. 11).
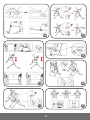
11. 6 chair heights are available. To change the chair height, press chair height
adjustment buons located on side backrests and adjust the height (g. 12).
12.
3 tray levels are available. To adjust the tray locaon, press buons located at the
boom of the tray and set a suitable distance between the tray and seat (g. 13).
13.
To acvate a rocking feature, the lowest posion of the seat must be adjusted.
Next release the protecon by pressing the buon in the center and lower
part of the rocking chair interlock (g. 14).
Note: when the chair is rocking, you cannot change the seat height.
14.
When the chair is rocking, you can choose two available posions of the
backrest (g. 15).
15. When you have placed your child in the chair, please secure it with safety
belts. The length of belts can be adjusted by means of buckles (g. 16).
16. To fold the base, press buons on front connectors of the base and fold the
lower part by moving it to the center (g. 17).
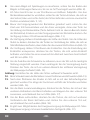
17.
To unfold the base, press buons on front connectors of the base and unfold
the lower part by moving it to the outside (g. 18).
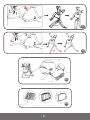
18. LO-Niles rocking chair can be provided with power supply in two ways.
a. Supply through a supplied feeder cable (fig. 19).
b. Supply through baeries AA (4 pieces) (g. 20).
WARNING:
•
To replace the baeries in the product, remove the baery compartment cover
and replace the baeries. Replace the cover.

‑ 10 ‑EN
• Do not charge single-use baeries.
• Only an adult is allowed to charge storage baeries.
• Storage baeries must be removed from the device before charging.
• Do not mix used baeries with new baeries.
• Do not use various types of baeries.
• Place the baery in accordance with proper baery terminals.
• Worn-out baeries must be removed from the device.
• Use the supplied feeder cable only.
• Keep baeries and feeder cable out of reach of children.
•
If you do not use the device for a long me, remove the baery and disconnect
the feeder cable.
•
Transformers used with the infant swing are to be regularly examined for
damage to the cord, plug, enclosure and other parts, and in the event of such
damage, they shall not be used.
• The infant swing shall only be used with the recommended transformer.
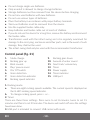
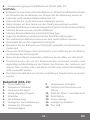
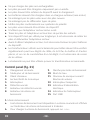
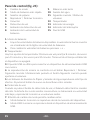
Control panel (g. 21)
1. Mode change
2. Rocking gear up
3. Birds sounds
4. Play/ pasuse music
5. On/ O switch
6. Voice detecon
7. Voice detecon indicator
8. Rocking speed indicator
9. Rocking gear down
10. Swoosh of water sound
11. Next track/ volume key
12. Timer
13. Power supply
14. Timer indicator
15. USB port
1. Rocking mode:
a. There are eight rocking speeds available. The current speed is displayed on
the 8-LED rocking speed indicator.
b. To change rocking speed, press + or -.
2. Timer:
There are three mer sengs. Press once to set 8 minutes, twice to set 15
minutes and thrice to set 30 minutes. The device will switch o once the sengs
have been done.
3. USB port is intended to connect USB carrier with music.

‑ 11 ‑ EN
4. You can control music via Play/Pause buon, Next track buon. Press and hold
Next track buon to adjust volume.
5. Birds sounds and swoosh of water sounds buons play sound eects. Press
the buon again to deacvate sounds.
6. Voice detecon:
Press the voice detecon buon to make the rocking chair listen to child’s sounds.
If two or more subsequent sounds are detected, the rocking chair will start rocking
slowly and play average-volume music.
7. The mode change buon switches between:
a. Rocking mode – music is played from the device memory.
b. USB mode – music is played from the USB carrier.
Cleaning and maintenance:
• Do not wash the device in the washing machine.
• Do not use bleach to clean the device.
• Material elements can be washed by hand at the temperature of max. 30°C.
• Before you start cleaning, unplug the device.
• Wipe the frame with a wet cloth.
The pictures are for reference only. The real design of the products may dier from the
pictures presented.
The product complies with requirements of EU direcves.
Pursuant to the Direcve 2012/19/EU, this product is subject to selecve
collecon. The product must not be disposed of along with domesc waste
as it may pose a threat to the environment and human health. The worn-out
product must be handed over to the electrics and electronics recycling center.

‑ 12 ‑PL
PL
Drogi Kliencie!
Jeśli masz jakiekolwiek uwagi lub pytania do zakupionego produktu, skontaktuj
się z nami: [email protected]
Przed użyciem produktu zapoznaj się dokładnie z poniższą instrukcją obsługi.
Produkt był testowany i jest zgodny z normą:EN 14988:2017+A1:2020,
EN 16232:2013+A1:2018
Uwaga: Montaż musi być przeprowadzony przez osobę dorosłą.
Niezastosowanie się do tych ostrzeżeń i instrukcji montażu może spowodować
poważne obrażenia lub śmierć.
Producent:
BrandLine Group Sp. z o. o.
ul. A. Kręglewskiego 1, 61-248 Poznań, Polska
Ostrzeżenia dotyczące huśtawki dla niemowląt:
WAŻNE! PRZECZYTAJ
UWAŻNIE I ZACHOWAJ
NA PRZYSZŁOŚĆ JAKO
ODNIESIENIE
OSTRZEŻENIE:
• Nigdy nie pozostawiać dziecka bez opieki.
•
Nie korzystać z produktu jeżeli dziecko jest w stanie samodzielnie siedzieć lub
waga dziecka przekracza 9 kg.
• Ten produkt nie jest przeznaczony do dłuższego spania.
• Nigdy nie używać tego produktu na podwyższeniu (np. na stole).
• Zawsze należy stosować systemy zabezpieczająco-podtrzymujące.

‑ 13 ‑ PL
•
Aby zapobiec obrażeniom należy upewnić się, czy podczas rozkładania
i składania produktu nie ma w pobliżu dzieci.
• Nie pozwalać dzieciom bawić się produktem.
•
Nie przenosić, ani nie podnosić tego produktu jeżeli znajduje się w nim dziecko.
•
Po podłączeniu produktu do odtwarzacza muzycznego upewnić się, że głośność
odtwarzacza jest ustawiona na niskim poziomie.
• Ten produkt nie zastępuje łóżeczka ani łóżka. Jeśli twoje dziecko potrzebuje
snu, należy je umieścić w odpowiednim łóżeczku lub łóżku.
• Nie używaj produktu, jeśli jakieś elementy są uszkodzone lub ich brakuje.
•
Nie należy używać akcesoriów ani części zamiennych innych niż zatwierdzone
przez producenta.
Ostrzeżenia dla krzesełka:
WAŻNE! PRZECZYTAJ
UWAŻNIE I ZACHOWAJ
NA PRZYSZŁOŚĆ JAKO
ODNIESIENIE
OSTRZEŻENIE:
• Nigdy nie pozostawiaj dziecka bez opieki.
• Zawsze stosuj system ograniczający.
• Zagrożenie upadkiem: Nie dopuść, aby dziecko wspinało się na produkt.
•
Nie używaj produktu, jeżeli wszystkie elementy nie są prawidłowo zamontowane
i wyregulowane.
•
Miej świadomość ryzyka otwartego ognia i innych źródeł silnego ciepła
w pobliżu produktu.
•
Miej świadomość ryzyka przewrócenia, jeżeli dziecko potra odepchnąć się
stopami od stołu lub jakiekolwiek inne konstrukcji.
•
Nie używaj produktu, dopóki dziecko nie będzie potrało samodzielnie usiąść.
•
Nie używaj produktu, jeśli jakakolwiek część jest zepsuta, rozdarta lub brakuje jej.
•
Podczas rozkładania i składania produktu trzymaj dzieci z dala, aby uniknąć
obrażeń.

‑ 14 ‑PL
• Produkt przeznaczony jest dla dzieci mogących samodzielnie siedzieć i do 3
lat lub o maksymalnej wadze 15 kg
Składanie:
1.
Połączyć przednie rury podstawy (A z rurami stelaża (A), prawidłowe
połączenie będzie potwierdzone kliknięciem (rys. 1).
2.
Połączyć tylne rury podstawy (B) z rurami stelaża (B), prawidłowe połączenie
będzie potwierdzone kliknięciem (rys. 2).
3. Włożyć ramiona bujaczka (C) w prowadnice fotelika (C) (rys. 3).
4. Połączyć blokadę bujaczka (D) z końcówkami ramion (D) (rys. 4).
5. Połączyć lewe i prawe ramię ze stelażem (rys. 5).
6. Aby odłączyć ramiona od stelaża, użyj cienkiego narzędzia o rozmiarze do 4
mm (np. śrubokrętu), wciśnij blokadę i wysuń ramiona (rys. 6).
7.
Aby zamontować tacę, należy wsunąć ją w prowadnicę do momentu
zablokowania w uchwycie (rys. 7).
8.
Aby zamontować pałąk z zabawkami, należy wsunąć końcówki pałąka
w prowadnice do momentu zablokowania w uchwycie (rys. 8).
9.
LO-Niles posiada regulowane w czterech pozycjach oparcie na nogi. Aby zmienić
kąt pochylenia oparcia, należy nacisnąć przyciski znajdujące się na bokach (z lewej
i prawej strony) siedziska i ustawić odpowiednią pozycję (rys. 9, 10).
10.
Przed zmianą kąta pochylenia oparcia należy wyciągnąć dziecko z fotelika oraz
zablokować ramiona. Następnie należy nacisnąć przycisk regulacji oparcia
(przycisk znajduję się z tyłu oparcia w górnej części) i zmienić kąt pochylenia
oparcia. Dostępne są 4 poziomy regulacji (rys. 11).
11.
Dostępnych jest 6 wysokości położenia fotelika. Aby zmienić wysokość położenia
fotelika, należy nacisnąć przyciski regulacji wysokości położenia fotelika, znajdujące
się na bocznych oparciach fotelika i dostosować wysokość (rys. 12).
12.
Dostępne są 3 poziomy ustawienia tacy. Aby dostosować położenie tacy,
należy wcisnąć przyciski znajdujące się od spodu tacy i ustawić odpowiedni
odstęp tacy od siedziska (rys. 13).
13.
Aby uruchomić opcję bujania, siedzisko musi znajdować się w najniższym
położeniu. Następnie należy zwolnić zabezpieczenie, naciskając przycisk
znajdujący się w środkowej dolnej części blokady bujaczka (rys. 14).
Uwaga: w trakcie bujania nie można zmieniać wysokości położenia siedziska.
14.
W trakcie bujania oparcie można regulować w dwóch dostępnych pozycjach (rys. 15).

‑ 15 ‑ PL
15.
Po posadzeniu dziecka na siedzisku należy zabezpieczyć je pasami bezpieczeństwa.
Długość pasów można regulować za pomocą sprzączek (rys.16).
16. Aby złożyć podstawę, należy nacisnąć przyciski znajdujące się na przednich
łącznikach podstawy i złożyć dolną część przesuwając ją do środka (rys. 17).
17. Aby złożyć podstawę, należy nacisnąć przyciski znajdujące się na przednich
łącznikach podstawy i złożyć dolną część przesuwając ją do środka (rys. 18).
18. Są dwie możliwości zasilania bujaczka LO-Niles.
a. Zasilanie poprzez zasilacz dołączony do zestawu (rys. 19).
b. Zasilanie bateriami typu AA 4 sztuki (rys. 20).
UWAGA:
• Aby wymienić baterie w produkcie, zdejmij pokrywę komory baterii i wymień
akumulatory. Nałóż ponownie pokrywę.
• Nie należy ładować baterii jednorazowych.
• Akumulatorki mogą być ładowane tylko przez osobę dorosłą.
• Akumulatorki muszą być wyciągnięte z urządzenia przed ładowaniem.
• Akumulatorki należy ładować w ładowarce zewnętrznej (brak w zestawie)
• Nie mieszać używanych baterii z nowymi.
• Nie mieszać różnych rodzajów baterii.
• Umieszczać baterię zgodnie ze znacznikami polaryzacji.
• Wyczerpane baterie muszą być usunięte z urządzenia.
• Używać tylko zasilacza dołączonego do zestawu.
• Baterie oraz zasilacz trzymać z dala od dzieci.
•
Jeśli urządzenie nie jest długo używane, należy wyciągnąć baterię oraz odłączyć
zasilacz.
• Przed użyciem zasilacza należy wyciągnąć baterię/akumulatorki z urządzenia.
•
Transformatory używane wraz z huśtawką dla niemowląt należy regularnie
sprawdzać pod kątem uszkodzenia przewodu, wtyczki, obudowy i innych
części, aw przypadku takiego uszkodzenia nie należy ich używać.
•
Huśtawka dla niemowląt może być używana wyłączniez zalecanym transformatorem.
Panel sterowania (rys. 21):
1. Zmiana trybu
2. Szybszy tryb bujania
3. Odgłosy ptaków
4. Odtwarzaj/ Zatrzymaj muzykę
5. Włącznik
6. Wykrywanie głosowe
7.
Wskaźnik wykrywania głosowego
8. Wskaźnik szybkości bujania

‑ 16 ‑PL
9. Wolniejszy bieg bujania
10. Odgłos szumu wody
11. Następny utwór/ Przycisk
głośności
12. Włącznik czasowy
13. Wskaźnik zasilania
14. Wskaźnik wyłącznika
15. Port USB
1. Tryb bujania:
a.
Jest dostępnych osiem szybkości bujania. Aktualna prędkość jest wyświetlana
na 8-diodowym wskaźniku szybkości bujania.
b. Aby zmienić prędkość bujania wciśnij + albo –.
2. Wyłącznik czasowy:
Są trzy ustawienia wyłącznika czasowego. Wciśnij raz, aby ustawić 8 minut, dwa
razy dla 15 minut i trzy razy dla 30 minut. Po ustawionym czasie urządzenie
wyłączy się.
3. Port USB służy do podłączenia nośnika USB z muzyką.
4. Odtwarzanie muzyki kontroluje się poprzez przycisk
Odtwarzaj/Zatrzymaj, Następny utwór. Trzymając przycisk Następny utwór, można
regulować głośność.
5. Przyciski Odgłos ptaków i Odgłos szumu wody odtwarzają dane efekty
dźwiękowe. Ponowne wciśnięcie przycisku wyłącza odgłosy.
6. Wykrywanie głosowe:
Po wciśnięciu przycisku wykrywania głosowego, bujaczek będzie nasłuchiwał
odgłosów dziecka. Jeśli usłyszy dwa lub więcej dźwięków następujących
po sobie, zacznie bujać z najwolniejszą szybkością i będzie odtwarzać muzykę
o średniej głośności.
7. Przycisk zmiany trybu przełącza między:
a. Trybem bujania - muzyka odtwarzana jest z pamięci urządzenia.
b. Trybem USB – muzyka odtwarzana jest z nośnika USB.
Czyszczenie i konserwacja
• Nie prać w pralce.
• Nie używać wybielacza do czyszczenia urządzenia.
• Elementy materiałowe można prać jedynie ręcznie w wodzie do 30˚C.
• Przed czyszczeniem odłączyć urządzenie od zasilacza.
• Stelaż można przecierać wilgotną szmatką

‑ 17 ‑
Zdjęcia mają charakter poglądowy, rzeczywisty wygląd produktów może różnić się od
prezentowanego na zdjęciach.
Produkt zgodny z wymaganiami dyrektyw Unii Europejskiej.
Zgodnie z Dyrektywą 2012/19/UE, niniejszy produkt podlega zbiórce
selektywnej. Produktu nie należy wyrzucać wraz z odpadami komunalnymi,
gdyż może stanowić on zagrożenie dla środowiska i zdrowia ludzi. Zużyty produkt
należy oddać do punktu recyklingu urządzeń elektrycznych i elektronicznych.
DE
Sehr geehrte Kunden!
Falls Bemerkungen oder Fragen über eingekaues Produkt, nehmen Sie mit uns
Kontakt auf: [email protected]
Vor dem Gebrauch des Produktes lesen Sie sorgfältig die vorliegende
Bedienungsanleitung durch.
Das Produkt wurde getestet und entspricht der Norm: EN 14988:2017+A1:2020
/ EN 16232:2013+A1:2018
Achtung: Die Montage muss durch einen Erwachsenen durchgeführt werden.
Hersteller:
BrandLine Group Sp. z o. o.
ul. A. Kręglewskiego 1, 61-248 Poznań, Polen
Warnungen für Kinderschaukel:
WICHTIG! BITTE
SORGFÄLTIG LESEN
UND FÜR SPÄTERES
PL | DE

‑ 18 ‑DE
NACHLESEN
AUFBEWAHREN
WARNUNG:
• Lassen Sie Ihr Kind nie unbeaufsichgt.
• Dieses Produkt nicht mehr verwenden, sobald Ihr Kind ohne Unterstützung
sitzen kann oder mehr als 9 kg wiegt.
• Dieses Produkt ist nicht für längere Schlafzeiten vorgesehen.
•
Dieses Produkt niemals auf einer erhöhten Fläche (z. B. einem Tisch) verwenden.
• Verwenden Sie stets die Rückhaltesysteme.
•
Um Verletzungen zu vermeiden, ist sicherzustellen, dass Kinder beim Auf- und
• Zusammenklappen dieses Produktes fern gehalten werden.
• Kinder nicht mit diesem Produkt spielen lassen.
•
Dieses Produkt nicht bewegen oder anheben, wenn sich das Baby darin
bendet.
• Wenn das Produkt an einen MP3-Player angeschlossen ist, stellen Sie sicher,
dass die Lautstärke des MP3-Players auf eine niedrige Stufe eingestellt ist.
•
Dieses Produkt ersetzt kein Kinderbe oder Be. Sollte Ihr Kind schlafen
müssen, sollte es platziert werden in einem geeigneten Kinderbe oder Be.
•
Verwenden Sie das Produkt nicht, wenn Komponenten defekt sind oder fehlen.
• Verwenden Sie kein anderes Zubehör oder Ersatzteile als die vom Hersteller
zugelassenen.
Warnungen für Hochstuhl
WICHTIG! BITTE
SORGFÄLTIG LESEN
UND FÜR SPÄTERES
NACHLESEN
UNBEDINGT

‑ 19 ‑ DE
AUFBEWAHREN
WARNUNG:
• Lassen Sie Ihr Kind nie unbeaufsichgt.
• Immer die Sicherheitsgurte benutzen.
• Fallrisiko: Kinder nicht auf das Produkt kleern lassen.
• Das Produkt nicht benutzen, wenn nicht alle Teile ordnungsgemäß monert
und jusert sind.
•
Darauf achten, dass das Produkt nicht in der Nähe von oenem Feuer und
anderen Hitzequellen aufgestellt wird.
• Es besteht das Risiko, dass das Produkt umkippen könnte, wenn das Kind die
Füße gegen einen Tisch oder einen anderen Gegenstand drückt.
• Verwenden Sie das Produkt erst, wenn das Kind alleine sitzen kann.
• Verwenden Sie das Produkt nicht, wenn Teile beschädigt sind, zerrissen sind
oder fehlen.
•
Halten Sie Kinder beim Ausklappen und Zusammenklappen fern, um
Verletzungen zu vermeiden.
•
Das Produkt ist für Kinder gedacht, die bis zu 3 Jahre alt oder mit einem
Höchstgewicht von 15 kg sitzen können.
Auau
1. Verbinden Sie die vorderen Rohre der Basis (A) mit Rohren des Gestells (A),
eine richge Verbindung wird mit einem Klick bestägt (Abb. 1).
2. Verbinden Sie die hinteren Rohre der Basis (B) mit Rohren des Gestells (B),
eine richge Verbindung wird mit einem Klick bestägt (Abb. 2).
3. Setzen Sie die Arme der Babywippe (C) in Führungsschienen des Sitzes (C)
ein (Abb. 3).
4. Verbinden Sie die Verriegelung der Babywippe (D) mit Enden der Arme (D)
(Abb. 4).
5. Verbinden Sie den linken und rechten Arm mit Gestell (Abb.5).
6.
Um die Arme vom Gestell zu trennen, benutzen Sie ein dünnes Werkzeug mit
einer Größe bis zu 4 mm (z.B. Schraubenzieher), drücken Sie die Verriegelung
und ziehen Sie die Arme heraus (Abb. 6).
7.
Um ein Essbre zu moneren, sollen Sie die Führungsschiene so herausziehen,
bis sie im Gri verriegelt werden (Abb. 7).

‑ 20 ‑DE
8.
Um einen Bügel mit Spielzeugen zu moneren, setzen Sie die Enden des
Bügels in Führungsschiene ein, bis sie im Gri verriegelt werden (Abb. 8).
9.
LO-Niles besitzt eine in vier Posionen verstellbare Fußplae. Um den
Rückenlehnenwinkel zu verstellen, sollen Sie die Tasten drücken, die sich an
den Seiten (linke und rechte Seite) des Sitzes benden und eine erwünschte
Posion einstellen (Abb. 9, 10).
10.
Bevor der Neigungswinkel der Rücklehne geändert wird, sollen Sie das
Kind vom Sitz herausziehen und die Arme verriegeln, dann eine Taste zur
Verstellung der Rückenlehne (Taste bendet sich im oberen Bereich, hinter
der Rücklehne) drücken und den Neigungswinkel der Rücklehne ändern. Zur
Verfügung stehen 4 Posionseinstellungen (Abb. 11).
11. Zur Verfügung stehen 6 Einstellungen der Höhe des Stuhls. Um die Höhe des
Stuhls zu ändern, drücken Sie die Tasten zur Verstellung der Höhe, die sich an
Sitzmielbahnen benden, dann stellen Sie die erwünschte Posion ein (Abb. 12).
12. Zur Verfügung stehen 3 Posionen des Essbrees. Um die Einstellung des
Essbrees anzupassen, drücken Sie die Tasten, die sich unten Essbre
benden und stellen Sie einen erwünschten Abstand zwischen dem Essbre
und Sitz ein (Abb. 13).
13.
Um die Funkon des Schaukelns zu akvieren, muss der Sitz auf die niedrigste
Stellung eingestellt werden. Dann entriegeln Sie die Verriegelung durch
Drücken der Taste, die sich im unteren Bereich der mileren Verriegelung
der Babywippe bendet (Abb. 14).
Achtung: Verstellen Sie die Höhe des Sitzes während Schaukelns nicht.
14.
Beim Schaukeln kann die Rücklehne in zwei Posionen verstellt werden (Abb. 15).
15.
Nach dem Platzieren des Kindes im Sitz soll er mit den Sicherheitsgurten
gesichert werden. Die Länge der Gurte kann mithilfe der Schnallen verstellen
werden (Abb. 16).
16. Um die Basis zusammenzuklappen, drücken Sie die Tasten, die sich auf den
vorderen Verbindern der Basis benden und klappen Sie den unteren Teil
zusammen, verschiebend ihn zur Mie (Abb. 17).
17.
Um die Basis aufzustellen, drücken Sie die Tasten, die sich auf vorderen
Verbindern der Basis befinden und stellen Sie den unteren Teil auf,
verschiebend ihn nach außen (Abb. 18).
18.
Es gibt zwei Möglichkeiten der Energieversorgung der Babywippe LO-Niles.
a. Energieversorgung mit einem beinhalteten Netzgerät (Abb. 19).
La pagina si sta caricando...
La pagina si sta caricando...
La pagina si sta caricando...
La pagina si sta caricando...
La pagina si sta caricando...
La pagina si sta caricando...
La pagina si sta caricando...
La pagina si sta caricando...
La pagina si sta caricando...
La pagina si sta caricando...
La pagina si sta caricando...
La pagina si sta caricando...
La pagina si sta caricando...
La pagina si sta caricando...
La pagina si sta caricando...
La pagina si sta caricando...
La pagina si sta caricando...
La pagina si sta caricando...
La pagina si sta caricando...
La pagina si sta caricando...
La pagina si sta caricando...
La pagina si sta caricando...
La pagina si sta caricando...
La pagina si sta caricando...
La pagina si sta caricando...
La pagina si sta caricando...
La pagina si sta caricando...
La pagina si sta caricando...
La pagina si sta caricando...
La pagina si sta caricando...
La pagina si sta caricando...
La pagina si sta caricando...
La pagina si sta caricando...
La pagina si sta caricando...
La pagina si sta caricando...
La pagina si sta caricando...
La pagina si sta caricando...
La pagina si sta caricando...
La pagina si sta caricando...
La pagina si sta caricando...
La pagina si sta caricando...
La pagina si sta caricando...
La pagina si sta caricando...
La pagina si sta caricando...
La pagina si sta caricando...
La pagina si sta caricando...
La pagina si sta caricando...
La pagina si sta caricando...
La pagina si sta caricando...
La pagina si sta caricando...
La pagina si sta caricando...
La pagina si sta caricando...
La pagina si sta caricando...
La pagina si sta caricando...
La pagina si sta caricando...
La pagina si sta caricando...
-
 1
1
-
 2
2
-
 3
3
-
 4
4
-
 5
5
-
 6
6
-
 7
7
-
 8
8
-
 9
9
-
 10
10
-
 11
11
-
 12
12
-
 13
13
-
 14
14
-
 15
15
-
 16
16
-
 17
17
-
 18
18
-
 19
19
-
 20
20
-
 21
21
-
 22
22
-
 23
23
-
 24
24
-
 25
25
-
 26
26
-
 27
27
-
 28
28
-
 29
29
-
 30
30
-
 31
31
-
 32
32
-
 33
33
-
 34
34
-
 35
35
-
 36
36
-
 37
37
-
 38
38
-
 39
39
-
 40
40
-
 41
41
-
 42
42
-
 43
43
-
 44
44
-
 45
45
-
 46
46
-
 47
47
-
 48
48
-
 49
49
-
 50
50
-
 51
51
-
 52
52
-
 53
53
-
 54
54
-
 55
55
-
 56
56
-
 57
57
-
 58
58
-
 59
59
-
 60
60
-
 61
61
-
 62
62
-
 63
63
-
 64
64
-
 65
65
-
 66
66
-
 67
67
-
 68
68
-
 69
69
-
 70
70
-
 71
71
-
 72
72
-
 73
73
-
 74
74
-
 75
75
-
 76
76


in altre lingue
- français: Lionelo NILES Manuel utilisateur
- español: Lionelo NILES Manual de usuario
- Nederlands: Lionelo NILES Handleiding
- slovenčina: Lionelo NILES Používateľská príručka
- polski: Lionelo NILES Instrukcja obsługi
- română: Lionelo NILES Manual de utilizare