
2. Maintenance Guidelines
3.
Product Overview
4.
S a a it nd Inst llat on5.
ITMC34V141WQHD User Manual
Table Of Contents
Connectivity Options
6.
Basic Operation
7.
Indicator Light
8.
OSD
9.
10.
ECO Modes and Gameplus Switching
11.
Safety Precautions
1.
12.
Box Contents
Technical Specifications
Mount Installation
For more information please visit our web site or write us an email:
https: //www. it ekevo. com
info@it ekevo.com

The terms HDMI and HDMI High-Definition Multimedia Interface, and the HDMI Logo are
trademarks or registered trademarks of HDMI Licensing Administrator, Inc. in the United
States and other countries.
Eng-1
1. Safety Precautions
WARNING:Safety Instructions
Do not plac e the monitor in rain,humid environment or open the monitor case to
avoid any s hoc k, electrical hazards ,and/or mechanic al haz ards.
Operation
• Keep the monitor out of direct sunlight and away from stoves or any other heat
source.
• Keep the monitor out of water source.
• Remove any object that could fall into ventilation holes or prevent proper
cooling of the monitor’s electronics.
• Do not block the ventilation holes.
• Do not knock or drop the monitor during operation or transportation.
• To clean your screen, slightly dampen a soft, clean cloth with water, If possible,
use a special screen-cleaning tissue or solution. Do not use benzene, thinner,
ammonia, abrasive cleaners, or compressed air.
• Use a slightly dampened, warm cloth to clean the frame. Avoid using detergent
of any kind as some detergents might leave a milky film on the plastics.
• Unplug the monitor if you are not going to use it for an extended period of time.
• To avoid the risk of shock or permanent damage to the set, do not expose the
monitor to dust, rain, water, or excessive moisture environment. If your monitor
gets wet, wipe it with dry cloth as soon as possible.
Caring For Your Monitor
Before c leaning the monitor, unplug the monitor power cable from the electrical
outlet.
CAUTION
2. Maintenance Guidelines

Eng-
2
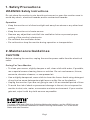
Monitor x 1 Stand Stem x 1 Stand Base x 1
Power Cable x 1 DP Cable x 1 User Manual x 1
Screws PM4*16mm x 4
(for wall mounting)
VESA connector up x 1 VESA connector down x 1
2. Maintenan ce Guidelines
3.
Product Over view
4.
S a a it n dIn st llat on5.
ITMC34V141WQHD User Manual
Table Of Contents
Connectivity Opt ions
6.
Basic Operation
7.
Indicator Light
8.
OSD
9.
10.
LED Effects System Console
11.
Safety Prcautions
1.
12.
Box Conten ts
RGB Ranges and Gameplus Switching
13. Technical Specificatio ns
Mount Installation
For more inf ormat ion plea se visit our web site or wr ite us an emai l:
http s://www. itekevo.co m
info@it ekevo.com
3.
Box Contens

Eng-
3
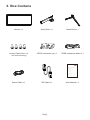
4.1 – Monitor Buttons
4.2 – Monitor Ports
Power Connector: Insert the power cable to supply power to the monitor.
HDMIl Connectors: Insert one end of the HDMl cable into the computer's
HDMl outputand connect the other end to the monitor's HDMI port.
DP Connectors: lnsert one end of the DP cable into the computer's DP
output andconnect the other end to the monitor's DP port.
Audio Output: Insert the audio cable for output of audio signals.
8
7
9
10
1 M Menu Button : Press to display the OSD menu or enter sub-menus.
2
3
Down Button: Press to move down in the menus.
Up Button: Press to move up in the menus.
4 E Exit Button : Press to exit.
5 Power Button: Press to turn the monitor on/off.
6 LED Indicator: changes colour according to status.
4.
Product
Overview

Eng-
4
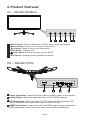
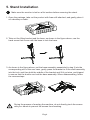
2. Take out the lifting bracket and the base, as shown in the figure above, use the
hand screw that comes with the base to lock the base.
3. As shown in the figure above, put the base assembly assembled in step 2 into the
corresponding slot of the rear case, gently press the bracket to fit the shaft assembly
into the lock, and then hold the middle of the bracket and lift it up twice, and tripped
to ensure that the buckle can lock the base assembly. When disassembling, follow
the reverse steps.
During the process of erecting the machine, do not directly pinch the screen
with your hands to prevent the screen from breaking.
1. Open the package, take out the product with foam still attached, and gently place it
on a desktop or table.
Make sure the monitor is laid on a flat surface before removing the stand.
5.
Stand Installation

Eng-
5
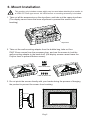
This monitor only includes screws which may be used when attaching the monitor to
a VESA 75*75mm type mount. No VESA mount or mounting accessory is included.
1. Take out all the accessories on the styrofoam, and take out the upper styrofoam.
(The display cannot leave the lower styrofoam to prevent the screen from
breaking)
2. Take out the wall-mounting adapter from the bubble bag, take out four
PM4*16mm screws from the accessory bag, and use the screws to lock the
wall-mounting adapter to the back shell. (the display screen cannot leave the
Polylon foam to prevent Broken screen)
3. Do not pinch the screen directly with your hands during the process of hanging
the product to prevent the screen from breaking.
Styrofoam
PM4*16 Screw X4
VESA Connector
Wall Bracker
6.
Mount Installation

7.2-
Connecting Your Earphones
7. Connectivity Options
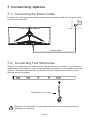
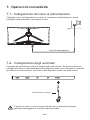
7.1-
Connect the included power cable to the power connector, and then plug the other
end into an wall outlet.
Connecting the Power Cable
Eng-
6
Plug in your earphones to receive audio signals from your monitor. If you have an
audio device connected to your computer when you connect your earphones to the
monitor, the audio devices will not produce sound. Earphones and other audio
devices are not included.
Exposure to loud audio for prolonged periods of time may permanently
damage your hearing.
Power Cable
Earphones (not included)

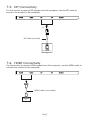
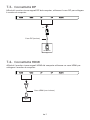
7.4-
HDMI Connectivity
7.3-
DP Connectivity
For the monitor to receive DP signals from the computer, use the DP cable to
connect the monitor to the computer.
DP
DP OUTPUT
Eng-
7
HDMI OUTPUT
PC
For the monitor to receive HDMl signals from the computer, use the HDMI cable to
connect the monitor to the computer.
HDMI Cable (not included)
DP Cable (included)

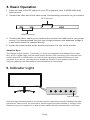
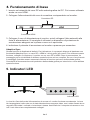
8. Basic Operation
Eng-
8
HDMI Connector
DP Connector
Adaptive-Sync
This feature is off by default. To activate, you must have hardware with Adaptive-Sync capa-
bility, a DP or HDMI cable, and the latest graphic drivers. After connecting your computer and
monitor with a DP or HDMI cable, you may receive a prompt to enable the feature on your
computer. If you do not, you may need to enable the function in your graphics card menu.
See your graphics card manufacturer’s documentation for instructions.
Solid blue light indicates power is on and the monitor is operating normally.Flashing blue light-
indicates no video source, no horizontal or vertical signal has been detectde or voltage is low.
Please ensure your computer is on and all video cables are fully inserted and/or connected.
lndicator Light
1. Insert one end of the DP cable into your PC's graphics card. A HDMl cable may
also be used.
2. Connect the other end of the cable to the corresponding connector on your monitor.
3. Connect the power cable to your monitor then connect the other end to your power
source. It is recommended that you use a surge protector with adequate voltage if
a wall outlet cannot be reached directly.
4. Locate the power button on the monitor and press it to turn on the monitor.
9. Indicator Light

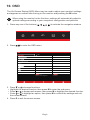
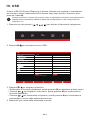
2. Press to enter the OSD menu.
The On-Screen Display(OSD) Menu may be used to adjust your monitor's settings
and appears on screen after turning on the monitor and pressing the M button.
When using the monitor for the first time, settings will automatically adjust to
optimal settings according to your computer's configuration and parts etc.
1. Press any one of the buttons ( ) to activate the navigation window.
10. OSD
Eng-
9
Resolution: 3440*1440@144Hz
DP1
DP2
HDMI1
HDMI2
InputSource: DP1
Resolution: 3440*1440@144Hz
InputSource
Resolution
eco
3. Press or to browse functions.
• Highlight the desired function, then press M to enter the sub-menu.
• Press or to browse sub-menus, then press M to highlight the desired function.
• Press or to highlight an option, then press M to confirm the settings and exit
the current screen.
4. Press E to exit the current screen.

Eng-
10
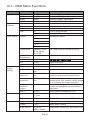
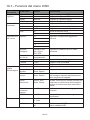
10.1– OSD Menu Functions
Main Menu Sub-Menu Options Description
Input Source
DP2
HDMI1
NONE
NONE
Switch to DP2 signal input
Switch to HDMI1 signal input
DP1 NONE Switch to DP1 signal input
Brightness/
Contrast
Brightness 0~100 Adjust display brightness
Blacklevel 0~100 Adjust display black level
Contrast 0~100 Adjust display contrast
DCR On Turn on DCR function
Off Turn off DCR function
Color Setting Gamma Set Gamma add-in1.8
2.0
2.6
Picture Mode Standard, Photo,
Movie, Game,
FPS, RTS
Set visual mode according to activity
Color
Temperature
Warm, Cool, User Select color temperature
Low Blue Light 0~100
Hue 0~100 Adjust hue levels
Saturation 0~100 Adjust saturation levels
Picture
Quality
Setting
Sharpness 0~100 Set display sharpness
Response Time Off, High, Middle,
Low
Adjust response time
Noise
Super-
Resolution
Off, High, Middle,
Low
When the resolution of the display
screen is low, this function can be turned
on to enhance the image resolution
Reduction
Off, High, Middle,
Low
Reduce the interference of image noise
caused by signal source interference
Dynamic
Luminous
Control
On, Off Compensate for gray scale display
screen and strengthen the expression of
gray scale
Display Aspect Ratio Wide Screen, 4:3,
1:1, Auto
Select on-screen aspect ratio
Audio Mute On, Off Turn mute mode on/off
Volume 0-100 Adjust audio volume
Audio Source DP1,DP2,
HDMI1, HDM2
Select audio signal input via HDMI or DP
HDMI2 NONE Switch to HDMI2 signal input
MPRT On, Off
Moving Picture Response Time
2.4
2.2
LedMode Flicker, Normal,off Switch LED modes / turn LEDS on/off

Eng-
11
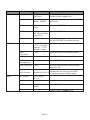
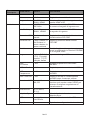
Main Menu Sub-Menu Options Description
Multi-Window Multi-Window Off, PIP Mode,
PBP 2Win
Select PIP/PBP modes according to the
number of input signals etc.
Sub Win2 Input DP1DP2,
HDMI1, HDMI2
Select according to input signal for PIP/
PBP mode
PIP Size Small, Medium,
Large
Adjust the PIP/PBP display window size
PIP Position Top Right, Top
Left, Bottom Right,
Bottom Left
Adjust the PIP/PBP window position
Swap NONE
Normal,90,180,270
When the user flips the display ,
thisfunction can also flip the OSD
to achievethe best display angle
Swap the two channel signal source of
only the PIP/PBP 2 screens function
OSD Language English
한국어,Русский,
Español,
Français, Italian
Set OSD language
OSD
H-Position
0-100 Adjust the OSD’s horizontal position
OSD V-Position 0-100 Adjust the OSD’s vertical position
OSD
Transparency
0-100 Set the OSD’s overall transparency
OSD Time Out
OSD Rotation
5-100 Set how long the OSD remains open
after non-use
Other DP Version DP1.1, DP1.2,
DP 1.4
Adaptive-Sync On, Off Turn the Adaptive-Sync function on/off
HDR On, Off; Auto
Detect
Turn the HDR mode on/off
Reset None

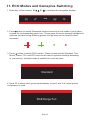
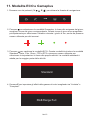
3. Press button to switch ECO modes. These modes include Standard, Text,
Movie, Game, FPs, and RTS and can be used to optimize settings according
to your activity. standard mode is suitable for most activities.
2. Press button to switch Gameplus modes.According to the needs of your game,
choose the corresponding game icon. These game icons are primarily designed to
optimize youraim during shooting games, though they can be used for other
scenarios.
1. Press any of the buttons( ) to activate the navigation window.
M, , , E,
eco
Standard
4. Press E to switch color gamut mode between “Limited” and “Full” when optimal
configuration is used.
RGB Range:Full
11. ECO Modes and Gameplus Switching
Eng-
12

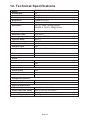
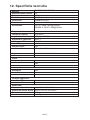
12. Technical Specifications
ITMC34V141WQHD
34"
21:9
E-LED
350cd/m2(Typ.)
VA
144Hz
1ms MPRT
75 x 75mm
DP 1.4*2, HDMI 2.0*2, Audio out*1
16.7M
AC 100-240~ 50/60Hz 2.0A
808.65*513.47*245.56mm
808.65*363.33*129.59mm
7.85kg
11.34kg
DisplayPort Cable
Additional Functions
Low Blue Light
Physical Dimensions
Dimensions (w/ stand)
Dimensions (w/o stand)
Net Weight
Gross Weight
4000:1
178°(H) , 178°(V)
Yes
NO
Yes
Yes
Yes
Yes
Model
Screen Size
Aspect Ratio
Backlight
Brightness
Panel
Resolution
Refresh Rate
Response Time
Viewing Angle
Contrast Ratio
VESA Mounting
Display Colours
Adaptive-sync
Interface
Power Input
Audio
Speakers
Audio Out
Accessories
Power Cable
Eng-1
3
DP1.4: 3440*1440@144Hz
HDMI2.0: 3440*1440@100Hz

ITMC34V141WQHD Manuale utente
Sommario
1. Misure di sicurezza
2. Linee guida per la manutenzione
3. Contenuto della scatola
4. Panoramica del prodotto
5. Installazione Stand
6. Installazione del supporto
7. Opzioni di connettività
8. Funzionamento di base
9. lndicatore LED
10. OSD
11. Modalità ECO e Gameplus
12. Specifiche tecniche
Per maggiori informazioni visitate il nostro sito web oppure scrivete una mail:
https: //www. it ekevo. com
info@it ekevo.com

I termini HDMI e HDMI High-Definition Multimedia Interface e il logo HDMI sono marchi o
marchi registrati di HDMI Licensing Administrator, Inc. negli Stati Uniti e in altri paesi.
Ita-1
1. Misure di sicurezza
AWISO: lstruzioni di sicurezza
Non posizionare il monitor in presenza di liquidi, umidità o aprire la scocca per evitare
scosse, pericoli elettrici e/o meccanici.
Funzionamento
• Tenere il monitor lontano dalla luce solare diretta e da qualsiasi altra fonte di calore.
• Evitare contatti con liquidi.
• Rimuovere qualsiasi oggetto che potrebbe cadere nei fori di dissipazione o
impedire il raffreddamento corretto della parte elettronica del monitor.
• Non bloccare i fori di ventilazione.
• Non sbattere o far cadere il monitor durante ii funzionamento o il trasporto
• Per pulire lo schermo, inumidire leggermente un panno morbido e pulito con acqua.
Se possibile, utilizzare un tessuto o una soluzione speciale per la pulizia dello
schermo. Non usare benzene, diluenti, ammoniaca, detergenti abrasivi o aria
compressa.
• Utilizzare un panno leggermente inumidito e caldo per pulire il telaio. Evitare di
utilizzare detergenti di qualsiasi tipo poiché alcuni detergenti potrebbero lasciare
una pellicola lattiginosa sulla plastica.
• Scollegare il monitor se non si intende utilizzarlo per un periodo di tempo prolungato.
• Per evitare il rischio di urti o danni permanenti, non esporre il monitor a polvere,
pioggia, acqua o ambiente con umidità eccessiva. Se il monitor si bagna, pulirlo con
un panno asciutto il prima possibile.
Cura del monitor
Prima di pulire il monitor, scollegare il cavo di alimentazione dalla presa elettrica.
Cautela
2. Linee guida per la manutenzione

Ita-
2
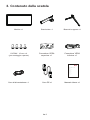
Monitor x 1 Stand stelo x 1 Base del supporto x 1
Cavo di alimentazione x 1 Cavo DP x1 Manuale Utente x 1
Viti PM4 * 16 mm x 4
(per montaggio a parete)
Connettore VESA
superiore x 1
Connettore VESA
inferiore x 1
ITMC34V141WQHD Manuale utente
Sommario
1. Misure di sicurezza
2. Linee guida per la manutenzione
3. Contenuto della scatola
4. Panoramica del prodotto
5. Installazione Stand
6. Installazione del supporto
7. Opzioni di connettività
8. Funzionamento di base
9. lndicatore LED
10. OSD
11. Modalità ECO e Gameplus
12. Specifiche tecniche
Per maggiori informazioni visitate il nostro sito web oppure scrivete una mail:
http s://www.i tekevo.co m
info@it ekevo.com
3.
Contenuto della scatola

Ita-
3
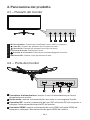
4.1 – Pulsanti del monitor
4.2 – Porte del monitor
Connettore di alimentazione: inserire il cavo di alimentazione per fornire
alimentazione al monitor.
Connettori HDMI: inserire un'estremità del cavo HDMI nell'uscita HDMI del
computer e collegare l'altra estremità alla porta HDMI del monitor.
Connettori DP: inserire un'estremità del cavo DP nell'uscita DP del computer e
collegare l'altra estremità alla porta DP del monitor.
Uscita audio: inserire un'estremità del cavo audio in una sorgente d'audio.
8
7
9
10
1 M Pulsante Menu: Premere per visualizzare il menu OSD o i sottomenu.
2
3
Tasto Giù: Premere per spostarsi verso il basso nei menu.
Pulsante Su: Premere per spostarsi verso l'alto nei menu.
4 E Pulsante di uscita: Premere per uscire.
5 Pulsante di accensione: Premere per accendere/spegnere il monitor.
6 lndicatore LED: Cambia i colori per indicare lo stato.
4.
Panoramica del prodotto

Ita-
4
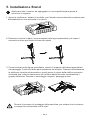
2. Estrarre lo stand e la base, come mostrato nella figura precedente, poi usare il
cacciavite incluso per fissare la base allo stand.
3. Come mostrato nella figura precedente, inserire il supporto della base assemblato
nel passaggio 2 nello slot della parte posteriore del monitor. Premere delicatamente
la staffa per inserirla nella serratura, quindi tenere il centro della staffa e provare a
sollevarla due volte per assicurarsi che la fibbia abbia bloccato correttamente il
gruppo della base. Durante lo smontaggio, seguire i passaggi inversi.
Durante il processo di montaggio della macchina, per evitare che lo schermo
si rompa non schiacciarlo con le mani.
1. Aprire la confezione, estrarre il prodotto con l'imballo ancora attaccato e posizionarlo
delicatamente su una scrivania o un tavolo.
Assicurarsi che il monitor sia appoggiato su una superficie piana prima di
rimuovere il supporto.
5.
lnstallazione Stand

Ita-
5
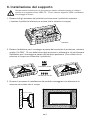
Questo monitor include solo viti che possono essere utilizzate quando si collega il
monitor a un supporto di tipo VESA 75 * 75 mm. Nessun supporto VESA o accessorio
di montaggio è incluso.
1. Estrarre tutti gli accessori dal polistirolo ed rimuovere il polistirolo superiore.
( Lasciare il polistirolo inferiore per evitare che lo schermo si rompa)
2. Estrarre l'adattatore per il montaggio a parete dal sacchetto di protezione, estrarne
quattro Viti PM4 * 16 mm dalla borsa degli accessori e utilizzare le viti per bloccare
l'adattatore per il montaggio a parete alla struttura posteriore. (Per evitare che lo
schermo si rompa non rimuovere il polistirolo)
3. Durante il processo di installazione del prodotto maneggiare con attenzione lo
schermo per evitare che si rompa.
Polistirolo
Viti PM4*16 mm X4
Connettore VESA
Supporto a parete
6.
lnstallazione del supporto
La pagina sta caricando ...
La pagina sta caricando ...
La pagina sta caricando ...
La pagina sta caricando ...
La pagina sta caricando ...
La pagina sta caricando ...
La pagina sta caricando ...
La pagina sta caricando ...
La pagina sta caricando ...
-
 1
1
-
 2
2
-
 3
3
-
 4
4
-
 5
5
-
 6
6
-
 7
7
-
 8
8
-
 9
9
-
 10
10
-
 11
11
-
 12
12
-
 13
13
-
 14
14
-
 15
15
-
 16
16
-
 17
17
-
 18
18
-
 19
19
-
 20
20
-
 21
21
-
 22
22
-
 23
23
-
 24
24
-
 25
25
-
 26
26
-
 27
27
-
 28
28
-
 29
29


in altre lingue
- English: Itek ITMC34V141WQHD User manual
Documenti correlati
Altri documenti
-
LC-Power Gaming Monitor Guida utente
-
LC-Power LC-M32-QHD-165-C Gaming Monitor Guida utente
-
LC-Power LC-M49-DQHD-120-C-Q Manuale del proprietario
-
Cooler Master GM34-CW Guida utente
-
GAME HERO HDR1000 Manuale utente
-
-
-
-
-
LC-Power LC-POWER LC-M34-UWQHD-144-C-Q Gaming Monitor Manuale utente