La pagina si sta caricando...

1
B WS 1 - 150 S H PR
Finish: PR (Physical Vapour Deposition Black), SS (Satin Stainless)
Hinge Type: See section Hinge Installation (page 5)
Bearing Type: S (Stainless Steel Bearing)
Load Capacity: 150kg (330lbs)
Set No.: 1(Pivot Set), 2 (End Hanger Set), 4 (Intermediate Hanger Set),
3 (Hinge Handle Set), 5 (Hinge Set), 6 (Offset Hinge Set),
7 (Offset Hinge Handle Set)
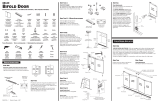
Brio Weatherfold 4s
Codes
Sets note codes do not show finish, hinge sets not shown to same scale
BWS1-150H
Weatherfold 4s 150
BWS2-150SH
BWS4-150SH BW3-150H BW5-150H
BW6-150H BW7-150H
INSTBWSH1 REV - 201G MAR 8
Brio Australia
P: +61 2 87186718
W: brio.com.au
E: brio.sales@allegion.com
Brio UK
P: +44 191 2291224
W: briouk.com
E: brio.sales.uk@allegion.com
Brio USA
P: +1 585 3195599
W: briousa.com
E: brio.sales.usa@allegion.com
Brio®

2
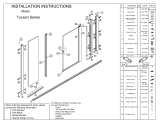
Door Hardware Set Orientation FB = Flush Bolt, FP = Flush Pull, LK = Lock, left systems shown
INWARD OPENING
OUTWARD OPENING

3
Opening Preparation note outward opening, dimensions shown in mm[inches]
Track & Channel Preparation
width)track & channel cut to length ‘W’ (finished opening
Install Track & Channel
Cut track to allow access to
hangers by removing track section
Use rods 700TJR for all other joints
Install pivot track once hangers in
27[1.06]
HEADBOARD
700 TRACK
98PPA CHANNEL
Insert Polypile Fix track with 12G Roofing Screw by 100[4.00] through to RHS
PS13B
POLYPILE
W
JAMB
REBATE
W
HEADBOARD
JAMB
LEVEL +3[0.12] MAX
- 0[0.00] MIN
±3 MAX[0.12]
±3 MAX[0.12]
W = FINISHED OPENING WIDTH
H = FINISHED OPENING HEIGHT
PT = PANEL THICKNESS
PB = PACKING BATTEN THICKNESS
PB = PT - 30[1.18]
OUTSIDE
INSIDE
Install polypile on inside of system
After initial end of track fixings (X & Y) fix track at 50[1.97] intervals (Z)
above all parked doors, then fix track at 250[9.84] intervals
HEADBOARD
LINTEL
PACKING
BATTEN
FASCIA
27[1.06]
H
INSIDE OUTSIDE
96[3.78]
85[3.35]
30.5[1.20]
24.5[0.96]
26[1.02]
H
PB
TRACK AND HEADBOARD TO BE FIXED TO
LOAD BEARING STRUCTURE (STEEL BEAM)
CONSULT A STRUCTURAL ENGINEER
40[1.57]
TRACK 2TRACK 1
Insert rods into track 1
Align track 1 with 2
Push track onto rods
Assemble sections before installing
CUT TRACK
100[3.94]
PIVOT TRACK
Countersink channel 20[0.79] from
ends and at 400[15.75] intervals
PP Insert = W - 95[3.74], insert from
non-pivot end after pivot installed
PP INSERT
Timber headboard can be replaced with
timber packers or gasket material
RHS
26[1.02]
JAMB
PIVOT PANEL
1ST INT. PANEL
END PANEL
2ND. INT PANEL
PARKED DOORS
X
Y Y
X
Y Y Z Z Z
X = 20[0.79]
Y = 30[1.18]
Z = 50[1.97]
X
YY
[9.84]
250
[9.84]
250
[9.84]
250
SILL
REBATE

4
Panel Size Calculation
Seal Preparation note left opening system shown
Meeting Door Selection
W
PWPW
N = No. of Panels
PW = Panel Width
JC = Jamb Clearance = [0. ]824
PC = Panel Clearance = 4[0.16]
Brio Weatherfold 4s allows for equal size panels
JC
PC
PWPW
PW = W-[PC(N-1) + 2(JC)]
N
Panel - AQ 36
D
PIVOT PANEL
INSIDE
OUTSIDE
C
B
2 Meeting end panels
12[0.47]
End panel meeting swing door
PH = H - 107[4.21]
H
PH
PH = Panel Height
85
[5.35]
10[0.39]
12[0.47]
Frame - AQ21 perimeter seals to butt against each other in all corners
A
C
A = 12[0.47]
B = 6[0.24]
C = 2.7[0.11]
B
A
B
C
A
PIVOT
PANEL
JC based on panels 1000[39.37] wide and 57[2.25] thick
OPTIONAL ASTRAGAL
SET2-H
16.6[0.65] 16.6[0.65]
SET2-H
2 AQ 3 Seals6
7[0.28]
D = [0.3]7.5
Lintel and sill rebate to be notched as shown
REBATE
NOTCH
SILL REBATE
REBATE
SILL REBATE
SWING DOOR
SET2-H
8[0.32]
16.6[0.65]
AQ 3 Seals3
D
C
B
D = [0.3 ]95

5
Hinge Installation Pilot hole of Ø3.5mm[0.14"] recommended
Non-mortice H
44[1.73]-68[2.68] Panel Thickness
X=24[0.95] on Set 4
X=60[2.36] min on Sets 3, 5, 6 & 7
X
30.4[1.20]
30.4[1.20]
30.4[1.20]
30.4[1.20]
15.4[0.61]
10[0.39] 15[0.59]
10[0.39] 15[0.59]
20.2[0.80]
91.9[3.62]
10[0.39]
20.2[0.80]
51.7[2.04]
24[0.95]
24[0.95]
24[0.95]

6
End Guide when viewed from outside doors folding left need a left end guide and vice versa for right
Bottom Pivot when viewed from outside doors folding left need a left pivot and vice versa for right
Intermediate Set security set/grub screw application
Handing Bottom Pivot
For Right:
Interchange pivot arm
Flip base over
Secure assembly by locking off cap screws
Handing End Guide
Back off cap screw and rotate
guide arm into left or right position
LEFT RIGHT
Lock off anti-shake set/grub screw
Handing pivot set hinge
LEFT
RIGHT
ANTI-SHAKE
SET/GRUB
SCREW
Lock off anti-shake set/grub screw
Handing end set hinge
LEFT
RIGHT
LEFT RIGHT
Determining System Orientation
For Right:
Flip hinge
For Right:
Flip hinge
Right, outward opening system
INSIDE
OUTSIDE
Left, outward opening system
INSIDE
OUTSIDE
Hanger security Guide security
HEX DRIVE
ANTI-SHAKE
SET/GRUB
SCREW
HINGE PIN
HINGE
Anti-shake set/grub screw prevents pin being removed from hinge Lock off both set/grub screw
ANTI-SHAKE
SET/GRUB
SCREW
ANTI-SHAKE
SET/GRUB
SCREW
ANTI-SHAKE
GRUB SCREW

7
Attaching Hardware to Panels recommended before installation
Installing Hardware and Hanging Panels clean down inside of track and channel
Optional Extras jamb pivot and flush bolts, see page 2 for flush bolt location on all configurations
Ensure doors are level and square from top
Place bottom pivot base in channel
Screw fix base in place
When cap screws loose, pivot arm can slide freely
Securely assemble bottom pivot for installation
Viewed from outside, insert rollers through opening in correct order Lock top pivot into position
CLAMP
PLATE
CAP
SCREWS
22[0.87]
18.6[0.73]
Set 1
Set 4
Set 2
Set 7
Set 7
Once all hangers in, attach pivot track section
JAMB
JAMB
PIVOT TRACK
JAMB
8[0.32]
Counter bore
for lockable
flush bolts
60
[2.36]
Install keeper to sill
FLUSH BOLT
INSIDE
OUTSIDE
Mark where flush bolt throw
strikes sill and notch out hollow
for dust box
PIVOT PANEL
For square flush
bolts chisel out
corners
Install flush bolt to panel
X
Ø24[0.95]
24[0.95]
41[1.61] 2.5[0.10]
11[0.43]
Router available for flush bolt
Installation of jamb pivot
PIVOT
PANEL
END
PANEL
30[1.18]
Ø18[0.71]
11[0.43]
8[0.32]
JAMB
PIVOT
PANEL
10[0.39]
HINGE
X = PT + 1 [0. ] Assemble after top and bottom pivot are set871
PT
XJAMB
PIVOT PANEL
7[0.28]
11[0.43]
REBATE
JAMB PIVOT
BOLT
Hinge aligns
with other
centre hinges
Wind jamb pivot
bolt in or out
until it aligns
with hinge pin
HINGE PIN
JAMB
4[0.16]
JAMB
98 Channel
98 PP Insert cut
95[3.74] short
of 98 Channel
Assemble pivot
CAM
CAP
SCREWS
ARM &
HINGE
PIVOT PANEL
1ST INT. PANEL
2ND INT. PANEL
END PANEL
FLUSH BOLT X
456R 190[7.48]
456RL 450[17.72]
456RLX-600 600[23.62]
456RLX-1000 1000[39.37]
KEEPER
DUST BOX
43[1.69]
8[0.32]

8
Hanging Panels
Adjustment bolt locking mechanism applied to all hangers and top pivot
System Overview
TRACK
CHANNEL
INSIDE
OUTSIDE
Push in spring loaded button
Slide back spring loaded button &
collar before winding bolt in or out
Adjust all hangers and top pivot
until panels are level with track
Once panels are level, partially
open doors - lock off 1st cap screw
Open fully, lock off 2nd cap screw
TRACK
PANEL PANEL
10[0.39]
CHANNEL JAMB
Viewed from
inside
Fix int. hanger to int. panel
Attach int. guide to int. panel
Bring 1st int. panel to pivot panel
Middle hinge of int. set attached
Bring pivot panel to pivot set
Hinge set 7 attached to pivot panel
Fix end panel to end hanger
Attach end guide to end panel and close all panels
Bring end panel to hinge set 7
Bring 2nd int. panel to the int. hanger with hinge set 7
TRACK
CHANNEL
1/8