Küppersbusch EMWK 1060.0 Operating Instructions Manual
- Categoria
- Microonde
- Tipo
- Operating Instructions Manual


2
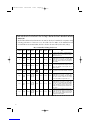
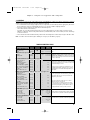
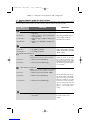
Data and instruction for Performance Tests according to IEC 705 and further Amendment Document
59H/69/CD.
The International Electrotechnical Commission SC 59H, has developed a Standard for comparative testing
of heating performances of microwave ovens. The Draft of the new Edition of this Standard has been
circulated with Document 59H/69/CD, which also describes the tests marked, in this table, with (*).
We recommend the following for this oven:
Test Nr. on
standard Item Duration Function Power
Level
Oven
temp. Weight Standing
time Note
AEgg
custard 16 min. only mw 1000 W - 750 gr 5 min The upper surface shall be evaluated after the
standing time. The inner custard evaluation shall be
conducted after two hours.
BSponge
cake 6 min. only mw 1000 W - 475 gr 5 min
Use the borosilicate glass container stated in the
Standard (max. dia. 210 mm) or a Pyrex® glass
container dia. 210 mm, height 50 mm and wall thick
6 mm. Put the container on the low wire rack placed
on the turntable.
CMeat loaf 20 min. only mw 750 W - 900 gr 5 min
Cover the container with cling film and pierce the
film. Use the rectangular borosilicate glass container
stated in the Standard or the Arcopal® Cat. nr.
Z1/B8 (01)10460-1.
Defrosting Defrosting
minced
meat 11 min. only mw - 500 gr 15 min Place the frozen load directly on the turntable (I ).
Turn upsidedown the load after half of the defrosting
time.
D (*) Potato
gratin 20 min. combi
mw + fan
(simult.) 750 W 190°C 1100 gr 5 min
Use the borosilicate glass container stated in the
Standard (max. dia. 210 mm) or a Pyrex® glass
container dia. 210 mm, height 50 mm and wall thick
6 mm. Put the container on the lower wire rack (F)
placed on the turntable.Do not preheat the oven.
E (*) Sponge
cake 30 min. combi
mw + fan
(simult.) 150 W 160°C 710 gr 5 min
Use the borosilicate glass container stated in the
Standard (max dia. 210 mm) or a Pyrex® glass
container dia. 210 mm, height 50 mm and wall thick
6 mm. The oven shall be preheated (in FAN ONLY
function) with the lower rack (F) placed on the
turntable. Once preheated, place the container on the
lower rack (F).
F (*) Poultry 40 min. combi
mw + fan
(simult.) 750 W 190°C 1200 gr 5 min
The following instruction shall be strictky observed for
this type of load: put the chicken in a pyrex® glass
container dia 210 mm, height 50 mm and wall
thickness of 6 mm. Put the container on the lower wire
rack (F) placed on the turntable.
5719125700•Intro 28-03-2002 16:42 Pagina 2

3
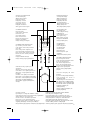
Anzeige der Zeit und Betriebsarten
Time and mode display
Afficheur temps et fonctions
Display tijd en functies
Display tempo e funzioni
Visor tiempo y funciones
Display tempo e funções
Display tid och funktioner
√ıfiÓË ¯ÚfiÓÔ˘ Î·È ÏÂÈÙÔ˘ÚÁÈÒÓ
Backofentemperaturanzeige
Oven temperature display
Afficheur température four
Display oven temperatuur
Display temperatura forno
Visor temperatura horno
Display temperatura do forno
Display ugnstemperatur
√ıfiÓË ıÂÚÌÔÎÚ·Û›·˜ ÊÔ‡ÚÓÔ˘
Taste Wahl der Betriebsart
Key mode selection
Touche sélection des fonctions
Keuze functies toets
Tasto selezione funzioni
Botón selección funciones
Botão de selecção das funções
Knapp för val av funktion
¶Ï‹ÎÙÚÔ ÂÈÏÔÁ‹˜ ÏÂÈÙÔ˘ÚÁÈÒÓ
Taste Wahl der Mikrowellenleistungsstufe
Key microwave power level selection
Touche sélection du niveau de puissance des
micro-ondes
Keuze vermogen niveau magnetron toets
Tasto selezione livello di potenza microonde
Botón selección nivel de potencia microondas
Botão de selecção do nível de potência das
microondas
Knapp för effektnivå mikrovågor
¶Ï‹ÎÙÚÔ ÂÈÏÔÁ‹˜ ÈÛ¯‡Ô˜ ÌÈÎÚÔÎ˘Ì¿ÙˆÓ
Tasten AUTO: Bereits gespeicherte, rasche
Garvorgänge
AUTO keys: pre-memorised rapid cooking
Touches AUTO: cuissons rapides prémémorisées.
AUTO toetsen: voorgeprogrammeede snelle
bereidingen
Tasti AUTO: cotture rapide pre-memorizzate
Botones AUTO: cocciones rápidas pre-memorizadas
Botões AUTO: cozeduras rápidas pré-memorizadas
AUTO-knapp: förinställd snabbtillagning
¶Ï‹ÎÙÚ· AUTO: ÁÚ‹ÁÔÚ˜ ·ÔıËÎÂ˘Ì¤Ó˜
Û˘ÓÙ·Á¤˜
Taste Start Garvorgang und rasches
Erwärmen
Key start of cooking and rapid reheating
Touche démarrage des cuissons et
réchauffement rapide.
Start bereidingen en snel verwarmen toets
Tasto partenza cotture e riscaldamento rapido
Botón arranque cocción y calentamiento rápido
Botão início da cozedura e aquecimento rápido
Startknapp för tillagning och
snabbuppvärmning
¶Ï‹ÎÙÚÔ ¤Ó·Ú͢ Ì·ÁÂÈڤ̷ÙÔ˜ ηÈ
ÁÚ‹ÁÔÚ˘ ı¤ÚÌ·ÓÛ˘
Taste Einstellen der Uhr
Key setting the clock
Touche réglage de l’horloge
Instellen klok toets
Tasto regolazione orologio
Botón regulación reloj
Botão regulação do relógio
Knapp för att ställa klockan
¶Ï‹ÎÙÚÔ Ú‡ıÌÈÛ˘ ÒÚ·˜
Taste Drehtellerstop
Turntable stop key
Touche d'arrêt plateau
Toets stilzetten schijf
Tasto ferma piatto
Botón detiene plato
Botão de bloqueio do prato
Stoppknapp
¶Ï‹ÎÙÚÔ ·ÎÈÓËÙÔÔ›ËÛ˘ È¿ÙÔ˘
Taste Wahl der Backofentemperatur
key oven temperature selection
Touche sélection de la température du four
Keuze oven temperatuur toets
Tasto selezione temperatura forno
Botón selección temperatura horno
Botão de selecção da temperatura do forno
Knapp för val av ugnstemperatur
¶Ï‹ÎÙÚÔ ÂÈÏÔÁ‹˜ ıÂÚÌÔÎÚ·Û›·˜
ÊÔ‡ÚÓÔ˘
Taste Stopp / Korrektur
Key interruption of cooking and cancellation of settings
Touche interruption de la cuisson et effacement des programmations.
Start bereidingen en snel verwarmen toets
Tasto arresto cotture e cancellazione impostazioni
Botón paro de cocción y anulación de planteos
Botão interrupção da cozedura e anulação das instruções
Stoppknapp för tillagning och radering av inställningar
¶Ï‹ÎÙÚÔ ‰È·ÎÔ‹˜ Ì·ÁÂÈڤ̷ÙÔ˜ Î·È ·Î‡ÚˆÛ˘ ÚÔÁÚ·ÌÌ·ÙÈÛÌÒÓ
Drehknopf zum Einstellen der Uhrzeit und der Kochzeitdauer
Knob setting of time and length of cooking
Bouton réglage de l’heure du jour et de la durée des cuissons.
Instellen van de tijd van de dag en de duur van de bereidingen toets
Manopola impostazione ora del giorno e durata delle cotture.
Selector planteo hora del día y duración de las cocciones
Botão giratório introdução da hora do dia e da duração da cozedura
Vred för inställning av klocka och tillagningstid.
¢È·ÎfiÙ˘ Ú‡ıÌÈÛ˘ ÒÚ·˜ Ë̤ڷ˜ Î·È ‰È¿ÚÎÂÈ·˜ Ì·ÁÂÈڤ̷ÙÔ˜.
5719125700•Intro 28-03-2002 16:42 Pagina 3

4
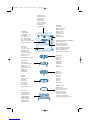
Heizelement Grill
Grill heating element
Résistance du gril
Grill weerstand
Resistenza grill
Resistencia del grill
Resistência do "grill"
Grillmotstånd
∞ÓÙ›ÛÙ·ÛË grill Bedienblende
Control panel
Tableau de commande
Bedieningspaneel
Pannello comandi
Panel de mandos
Painel dos comandos
Kontrollpanel
¶›Ó·Î·˜ ¯ÂÈÚÈÛÌÔ‡
Abdeckblende der Mikrowellenaustritts-öffnung
Microwave outlet cover
Couvercle sortie micro-ondes
Deksel uitgang microgolven
Coperchio uscita microonde
Tapa de salida de las microondas
Tampa de saída das microondas
Skydd för mikrovågsutsläpp
∫·¿ÎÈ ÂÍfi‰Ô˘ ÌÈÎÚÔÎ˘Ì¿ÙˆÓ
Niedriger Rost
Low wire rack
Grille basse
Laag rooster
Griglia bassa
Pasrilla baja
Grelha baixa
Låg grill
÷ÌËÏ‹ Û¯¿Ú·
Hoher Rost
High wire rack
Grille haute
Hoog rooster
Griglia alta
Parilla alta
Grelha alta
Hög grill
æËÏ‹ Û¯¿Ú·
Drehtellerhalterung
Turntable support
Support du plateau tournant
Houder voor draaischijf
Supporto piatto rotante
Soporte del plato giratorio
Suporte do prato giratório
Stöd för den roterande tallriken
™Ù‹ÚÈÁÌ· ÂÚÈÛÙÚÂÊfiÌÂÓÔ˘ È¿ÙÔ˘
Drehtellerstift
Turntable spindle
Axe du plateau tournant
Pin draaischijf
Perno piatto rotante
Perno del plato giratorio
Perno do prato giratório
Fäste för den roterande tallriken
∞ÍÔÓ·˜ ÂÚÈÛÙÚÂÊfiÌÂÓÔ˘ È¿ÙÔ˘
Türinnenseite
Inside of door
Côté intérieur de la porte
Binnenkant ovendeur
Lato interno porta
Lado interior de la puerta
Lado interno da porta
Luckans insida
∂ÛˆÙÂÚÈ΋ ÏÂ˘Ú¿ fiÚÙ·˜
Mittelhoher Rost
Medium height
Grille de hauter moyenne
Enkele niveau rooster
Griglia media
Parilla de altura mediana
Grelha média
Mellangrill
ªÂÛ·›· Û¯¿Ú·
Drehteller
Turntable
Plateau tournant
Draaischijf
Piatto rotante
Plato giratorio
Prato giratório
Roterande tallrik
¶ÂÚÈÛÙÚÂÊfiÌÂÓÔ È¿ÙÔ
Rechteckiger Rost
Rectangular wire rack
Grille rectangulaire
Rechthoekige rooster
Griglia rettangolare
Rejilla rectangular
Grelha rectangular
Rektangulär grill
√ÚıÔÁÒÓÈ· Û¯¿Ú·
5719125700•Intro 28-03-2002 16:42 Pagina 4

31
CHAP. 1 - GENERAL 1.1 Installation and electrical connection ........................pag. 32
1.2 Before operating the oven .......................................pag. 34
1.3 Important safety warnings .......................................pag. 34
1.4 Accessories supplied................................................pag. 35
1.5 Suitable ovenware ..................................................pag. 37
1.6 Selecting the power level ........................................pag. 38
1.7 Rules and general suggestions for using the oven .....pag. 38
CHAP. 2 - USING THE CONTROLS AND SETTING THE MODES
2.1 Setting the clock .....................................................pag. 40
2.2 “Memotime” function ..............................................pag. 41
2.3 Programming the cooking .......................................pag. 42
2.4 Automatic defrost and cooking sequence .................pag. 44
2.5 Recalling the pre-set recipes (“AUTO” buttons) .........pag. 45
2.6 Quick heating .......................................................pag. 45
2.7 Child safety ............................................................pag. 45
2.8 Turntable stop button ..............................................pag. 45
CHAP. 3 - USING THE OVEN: SUGGESTIONS AND COOKING TIMES
3.1 Defrosting...............................................................pag. 46
3.2 Heating .................................................................pag. 47
3.3 Cooking entrees, first courses ..................................pag. 48
3.4 Cooking meat ........................................................pag. 48
3.5 Cooking side dishes and vegetables ........................pag. 49
3.6 Cooking fish ..........................................................pag. 50
3.7 Cooking desserts and cakes ....................................pag. 50
3.8 Heating/cooking using the “AUTO” buttons .............pag. 51
3.9 Simultaneous cooking on two levels .........................pag. 52
CAP. 4 - CLEANING AND MAINTENANCE
4.1 Cleaning the oven ..................................................pag. 54
4.2 Maintenance...........................................................pag. 55
CONTENTS
5719125700•GB 28-03-2002 17:18 Pagina 31

32
50 min.
295 min.
550 min.
560
30
= =
30
A
+8
0
450
850 min
+2
0
X
18
595
458
X
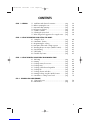
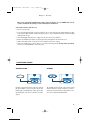
1.1 INSTALLATION AND ELECTRICAL CONNECTION
1. After removing the oven from the box, remove the protective packaging containing the turntable and its
support, and all the accessories.
2. Inside the oven is a packet containing all the materials required for assembly: Remove the packet from the
oven.
3. Remove the two screws marked with the letter (X) on the connecting bar underneath the microwave oven.
4. Fasten the metal plate (A) using the two screws removed as above.
The minimum required opening is 280 cm2
for the inlet of air for cooling.
CHAPTER 1 - GENERAL
ventilation passageway
5719125700•GB 28-03-2002 17:18 Pagina 32

33
=
B
=
H
HB
B H
B
F
BG
D
G
C
D
E
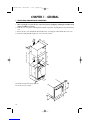
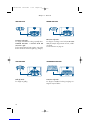
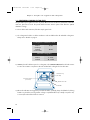
ELECTRICAL CONNECTION
• Only connect the appliance to a power outlet with a current rating of at least 16A. Also make sure that
the main switch installed in your home has a minimum current rating of 16A, in order to avoid it tripping
while the oven is on.
• Before use, check that the power supply voltage is the same as the one shown on the rating label, and
that the power outlet is properly earthed: the manufacturer declines all liability if this safety standard is
not observed.
• P osition the appliance so that the power plug and socket can be easily accessed after installation.
Chapter 1 - General
The connecting bar must be positioned so
that the two tabs protrude over the edge of
the support shelf and rest against it.
Completely open the smoke outlet cover
"C". Slide appliance into the recess, until
the front panel "G" rests against the cab-
inet, and the holes "D" underneath the
oven are in line with the holes "E" on the
connecting bar "B". Tighten the applian-
ce to the connecting bar "B", using the
screws "F".
Place the connecting bar "B" in the cor-
rect position in the recess. Check that
there is the same space on both parts of
the connecting bar. Fasten the bar using
the screws "H".
5719125700•GB 28-03-2002 17:18 Pagina 33

34
1.2 BEFORE OPERATING THE OVEN
• Carefully read the instructions and the warranty conditions, and keep them for future reference.
• Check that there is no damage to the oven. In particular, check that the door closes properly.
• Check that the turntable spindle is inserted correctly in the special slot in the centre of the cavity.
• Clean the inside with a soft, damp cloth.
• Position the support in the centre of the circular recess and rest the turntable on the support. The spindle must
be inserted in the corresponding hole in the centre of the turntable.
• The oven only works when the door is closed.
• If the oven is installed too close to radio/television appliances, or antennae, there may be radio disturban-
ce.
• The box is recyclable and marked with the corresponding symbol .
Warning
The oven must never be operated when empty, as this may damage the appliance.
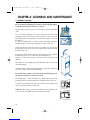
1.3 IMPORTANT SAFETY WARNINGS
• This oven has been designed to defrost, heat and cook food in the home. It must not be used for any other
purpose, nor modified or tampered with in any way.
• Before connecting this oven to the mains, check that the door closes tightly. Also check to see that the metal
frame is not warped and that the hinges and hooks have not loosened. In the event that these parts have been
damaged, the microwave oven cannot be used until a qualified technician has made the necessary repairs.
• Do not attempt to operate the oven with the door open by tampering with the safety devices.
• Do not operate the oven if objects of any kind get stuck between the front panel of the oven and the door.
Always keep the inside of the door clean, using a damp cloth and non-abrasive detergents. Do not allow dirt
or remains of food to accumulate between the front panel of the oven and the door.
• When the door is open, always keep in the following in mind;
- do not place heavy objects on the open door or do not forcefully push the open door down, to prevent the
appliance from tipping over.
- never place containers or hot pans (e.g. just removed from the oven) onto the open door.
• Do not operate the oven if the power cable or the plug is damaged (danger of electric shock).
• The adjustment, repair and replacement of the power cable should only be carried out by qualified person-
nel. Any repairs carried out by unqualified personnel may be dangerous.
• The oven must only be used by adults.
Do not allow children near the oven when it is in operation (danger of burns).
• Do not use the microwave oven to dry paper, fabrics or other combustible materials.
• During operation the oven becomes hot. Do not touch the heating element inside the oven.
• When heating liquids (water, coffee, milk, etc.), the contents may suddenly start to boil and spill violently as
a result of delayed boiling, causing scalding. To prevent this from happening, place a heat-resistant plastic
spoon or a glass rod in the container before starting to heat liquids.
• One of the main advantages of the microwave oven is the short cooking time, therefore do not exceed the
suggested times for cooking and heating the foods.
• For details, refer to the cooking tables, especially if cooking or heating foods containing alcohol.
• After heating foods for very young children (in feeding bottles or jars), ALWAYS test the temperature befo-
re feeding, to avoid burns. It is also recommended to mix or stir the food to make the temperature more
uniform.
Chapter 1 - General
5719125700•GB 28-03-2002 17:18 Pagina 34

When using commercially available bottle sterilisers, before turning the oven on, ALWAYS make sure the
container is filled with the quantity of water indicated by the manufacturer.
To avoid the risk of fire inside the oven:
• Never overcook foods.
• To avoid overheating and the consequent risk of fire, the oven should not be left unattended when cooking
foods in disposable containers made from plastic, paper or other combustible material, and when heating
small amounts of food.
• Never heat highly alcoholic liquors or large amounts of oil. These may catch fire!
• Remove the metal ties from plastic or paper bags before placing them in the microwave oven.
• Make sure that the utensils used in the oven are suitable for microwave cooking.
• If the oven should begin to release smoke as a result of food burning inside, DO NOT OPEN THE DOOR.
Turn the oven off immediately or remove the plug.
35
1.4 ACCESSORIES SUPPLIED
TURNTABLE SUPPORT
Insert the support in the bottom of the oven and rest
the glass turntable on top. Do not place objects other
than the glass turntable directly on the support. Used
liquid detergent, water and a soft cloth to clean the
support.
TURNTABLE
The turntable must be placed on the special support
and must always be used. It may also be used to col-
lect the juices produced when cooking and as a uten-
sil. It can be washed in the dishwasher.
Chapter 1 - General
5719125700•GB 28-03-2002 17:18 Pagina 35

36
LOW WIRE RACK
Convection only mode:
for all types of traditional cooking, especially cakes.
Combined microwave + convection mode and
microwave + grill
for the rapid cooking of meat, potatoes, some cakes
that rise and foods cooked au gratin (e.g. lasagne).
MEDIUM WIRE RACK
Microwave only mode
For all types of cooking on two levels AT THE SAME
TIME (for example: large amounts of food, or diffe-
rent foods).
See the instructions on page 52
HIGH WIRE RACK
Grill only mode:
for all types of grilling.
RECTANGULAR WIRE RACK
Convection only mode
For all types of traditional cooking using large rec-
tangular ovenproof dishes.
Chapter 1 - General
5719125700•GB 28-03-2002 17:18 Pagina 36

37
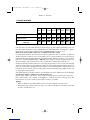
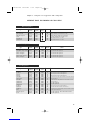
1.5 SUITABLE OVENWARE
Metal
contai-
ners
Paper or
cardboard
Plastic
Aluminium
foil
TerracottaPyroceramPyrexGlass
NOYESYESNOYESYESYESYES
NONONONOYESYESYESNO
YESNONOYESYESYESYESNO
“Microwave only” mode
“Combined” modes
mode “Convection only”
“Grill only”
In the microwave only and combined microwave modes, all types of glass containers (preferably Pyrex), cera-
mics, china and terracotta can be used, provided that they are undecorated and free of metal parts (i.e. gilt trim-
mings, handles, feet). Containers made from heat-resistant (200°C) plastic may also be used.
Metal, wood, cane and crystal containers are not suitable for microwave cooking.
It is worth remembering that - since microwaves heat the food, and not the dish - it is possible to cook the food
directly on the plate on which it is to be served, and thus save on using and washing up saucepans. However,
remember that heat may be transferred from the food itself to the plate, making it necessary to use an oven glove.
If the oven is used in the “Convection only” or “Grill only” modes, all types of ovenproof containers may be used.
The size and shape of the containers must be such as to allow them to rotate properly inside the oven.
Round and oval-shaped containers allow more even cooking. The food in the corners of square and rectangular
containers may absorb more energy, making the cooking less uniform. China and hardened glass (Pyrex) con-
tainers are recommended. Crystal may break and is therefore not recommended. Plastic containers may be used
to heat foods for a few minutes, while for cooking, plastic resistant to temperatures above 200°C must be used,
e.g. polypropylene and polyamide.
Some plastic materials, for example, melanine, are heated by the microwaves and therefore may be damaged.
To check that a container is suitable for use in the microwave oven:
place the empty container in the oven for 30 seconds at the maximum power level (“microwave only” mode).
If the container remains cold or is heats up only slightly, it is suitable for microwave cooking. If, on the other
hand, it becomes very hot (or sparks are produced), the container is not suitable.
Warning:
• Make sure that the commercially available accessories used are suitable for microwave ovens.
• When placing food, containers and covers in the oven, make sure that they are not in direct contact with
the side or top walls of the oven.
Chapter 1 - General
5719125700•GB 28-03-2002 17:18 Pagina 37

1.6 SELECTING THE POWER LEVEL
The oven features different power levels that can be used for different types of cooking.
38
1000W Very rapid heating of liquids and foods (fresh or frozen) and for cooking vegetables
750W For cooking fish and poultry in general
500W Used to melt chocolate and icing, and for cooking meat in general (roasts, kebabs etc.)
300W Used to simmer slowly, for example casseroles, and for reheating pastry.
150W Used to cook some types of cakes and delicate foods (baked fish, roast beef, etc.)
Used for defrosting all foods
1.7 RULES AND GENERAL SUGGESTIONS FOR USING THE OVEN
The amount of food
The more food is cooked the longer the cooking time. As a basic rule, twice the amount of food takes twice as
long to cook. For example, if it takes 4 minutes to cook one potato, it will take around 7 for two potatoes.
Initial temperature of the food
The lower the temperature of the food being cooked, the longer the cooking time. Food at room temperature will
be heated more quickly than food at refrigerator temperature.
Composition of the food
Foods with high amounts of fats or sugars are not only heated more quickly than those containing high percen-
tages of water, but also reach higher temperatures.
The denser the food, the longer it takes to heat. “Very dense” food takes longer to cook than lighter and more
porous food.
Size and shape
Small pieces of foods cook faster than large pieces. Even pieces cook more uniformly than irregular pieces. In
the case of foods with irregular shapes, the thinner parts cook faster than the thicker parts.
Place the thinner parts of chicken (wings and drumsticks) in the centre of the turntable.
One of the main procedures to be performed is to stir the food several times during cooking: this serves to make
the temperature more evenly spread and thus to reduce the cooking time.
It is also advisable to turn food over during cooking.
Suggestions for cooking certain foods
Food with skins or peels should be pierced in several places with a fork in order to let out the pressure that may
be produced due to the formation of steam.
This is true for jacket potatoes, hot dogs, sausages, egg yolks and some fruits.
To reduce the formation of condensate inside the oven, on the support shelf and around the door, cover food
with greaseproof paper, a glass lid or simply an upturned plate.
Chapter 1 - General
5719125700•GB 28-03-2002 17:18 Pagina 38

Also food with a high water content (e.g. vegetables) cooks better if covered. Covering food also helps keep the
inside of the oven clean. Use transparent film that is suitable for microwave ovens.
In “Microwave only” and the “Combined” modes, the oven must under no circumstances be preheated or ope-
rated when empty (without food), as sparks may be produced that would damage the appliance.
Do not cook eggs in their shells: the pressure that builds up on the inside would cause the egg to explode, even
after cooking has finished. Do not heat up eggs that have already been cooked, unless they are scrambled. Do
not forget to open containers that are air-tight or sealed before heating or cooking food in the oven. The pres-
sure inside the container would rise, causing them to explode even after cooking has finished.
Do not use the microwave oven for frying, as the temperature of the oil cannot be controlled.
Standing time
Always allow a standing time when cooking/heating/defrosting has finished. With microwave cooking, the food
continues to cook even after the oven has stopped, as the residual heat is distributed uniformly inside the food.
The length of the standing time depends on the amount and the density of the food. Often the time required to
remove the food from the oven and serve it at the table is sufficient, while at times up to 10-15 minutes is requi-
red.
The temperature inside the food may rise by up to 8°C during the standing time, which in effect completes the
cooking.
Arranging the food
For best results, the food can be arranged in different ways.
• When cooking portions of the same type of food, such as potatoes, place them in a circle in an oven-proof
dish, for uniform cooking.
• Irregular shaped food, such as fish, must be placed in the oven with the thinner part in the centre.
• When heating food straight from the refrigerator, place the denser and more bulky parts towards the outsi-
de of the turntable, and the thinner and less dense parts in the centre.
• Slightly overlap thin slices of meat, and place thicker pieces of meat or sausages next to each other.
• Dressings or sauces must be heated in separate containers. Use a high and narrow container, rather than a
low, wide one. When heating dressings, sauces or soups, never fill the container to more than 2/3 of its
capacity.
• When heating or cooking whole fish, pierce the skin, to prevent it from bursting.
STOPPING COOKING
To stop cooking:
If the food needs to be checked, mixed or turned, open the door and the oven will stop automatically.
To restart cooking:
Close the oven door, press the “start cooking” button again.
To turn off the oven (when cooking has finished):
Close the door and press the “stop cooking” button.
If cooking has not been stopped:
When cooking has finished, the oven will emit an audible signal (3 beeps) and the display will show the messa-
ge “END”. Open the door and remove the food (the time of day, or if the oven is hot, the message “COOL” will be
displayed).
This model is equipped with an automatic cooling cycle that comes into action whenever the oven is very hot (for
example, after something has been cooked for a long time). During this cycle, the message “
COOL
” will appear
on display. The fans and the oven light will come on (and then turn off automatically)
Note: Both the power level and the cooking time can be changed during cooking.
39
Chapter 1 - General
5719125700•GB 28-03-2002 17:18 Pagina 39

40
CHAPTER 2- USING THE CONTROLS AND SETTING THE MODES
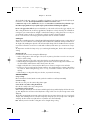
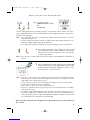
2.1 SETTING THE CLOCK
•When the appliance is connected for the first time to the mains power supply, or after a blackout, the dis-
play will show four dashes (--:--)
To set the time of day, proceed as described below:
Press the “clock” button (the
hours will flash on the “time
and mode” display).
1
Set the hours by turning the
“setting the time of day and
cooking time” knob (the hours
will flash on the display).
2
Press the “clock” button (the
minutes will flash on the dis-
play).
3
Set the minutes by turning the
“setting the time of day and
cooking time” knob (the minu-
tes will flash on the display).
4
Press the “clock” button (the
display will show the set time).
5
• To change the time on the dial once it has been set, press the “clock” button and then perform the opera-
tion again, as described above.
• The current time can also be displayed after having started the set cooking mode, by pressing the “clock”
button (the time is displayed for 2 seconds).
5719125700•GB 28-03-2002 17:18 Pagina 40

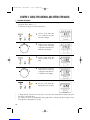
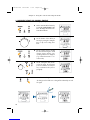
2.2 “MEMOTIME” FUNCTION
This function sets the timer, with the oven NOT in operation, for up to 60 minutes.
41
Chapter 2 - Using the controls and setting the modes
Press the “mode selection”
button until the “oven tempe-
rature” display shows 3 das-
hes
1
Set the desired time by turning
the “setting the time of day
and cooking time” knob
2
Press the “start cooking” but-
ton. The “time and mode” dis-
play will show the remaining
time, while the dashes will
start scrolling on the “oven
temperature” display.
3
Upon completion, 3 beeps will be emitted and the display will show “END“.
5719125700•GB 28-03-2002 17:18 Pagina 41

42
Chapter 2 - Using the controls and setting the modes
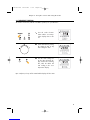
2.3 PROGRAMMING THE COOKING
Press the “mode selection” button
and choose the desired mode,
which will be displayed by the cor-
responding symbols lit up above
the display.
The available modes are:
1
INDICATOR MODE SELECTED INDICATOR MODE SELECTED
microwave only
automatic defrost
combined microwave and convection
combined microwave and grill
convection only
grill only
Set the duration of the cooking, in
minutes, by turning the “setting the
time of day and cooking time”
knob. When setting the cooking
time, always refer to the tables pro-
vided in Chapter 3.
2
In the following modes:
microwave only
combined microwave + convec-
tion
combined microwave + grill
3
select the microwave power level by repeatedly pressing the “power level” button until the required power
level flashes, expressed as a number above the “oven temperature” display (at the bottom). When setting the
power level, always refer to the tables shown in Chapter 3.
Note: • no power level needs to be set for the automatic defrost function.
• in the combined microwave + convection modes, the maximum microwave power available is 750
Watts.
• the power level can also be changed during cooking, by simply pressing “power level”.
5719125700•GB 28-03-2002 17:18 Pagina 42

43
Chapter 2 - Using the controls and setting the modes
In the following modes:
combined microwave + convec-
tion
convection only
4
select the cooking temperature by repeatedly pressing the “oven temperature” button, until the “oven tempe-
rature” display (at the bottom) shows the desired temperature. When setting the temperature, always refer to
the tables shown in Chapter 3.
Note: • once cooking has started, the “oven temperature” display will show the increase in the actual
temperature inside the oven.
• once the set temperature has been reached, an audible signal (3 beeps) will be emitted. The “oven
temperature” display will then display the set temperature.
• the set temperature can also be changed during cooking, by simply pressing “oven temperature”.
Start cooking by pressing the “start cooking” button. The “time and
mode” display will show the countdown of the time remaining and, if
featured in the mode, the oven temperature on the “oven temperatu-
re” display (at the bottom).
5
Note: • if for any reason cooking should not start, all the settings will automatically be cancelled after 2
minutes
When cooking finishes, an audible signal (3 beeps) is emitted and the
message “END” will appear on the display. Open the door and take
out the food (the time of day will be displayed, or, if the oven is hot,
the message “Cool” – see the note below).
6
Note: • the progress of the cooking can be checked at any time, by opening the door and inspecting the
food. This stops the emission of microwaves and the operation of the oven until the door is closed
again and the “start cooking” button is pressed.
• to stop cooking for any reason, without opening the door, simply press the “stop cooking” button.
• to end cooking, on the other hand, proceed as follows:
- if the oven door is open, press the “stop cooking” button once.
- if the door is closed and cooking is in progress, press the “stop cooking” button twice. The display
will show the current time.
• This model is equipped with an automatic cooling cycle that comes into action whenever the oven is
very hot (for example, after something has been cooked for a long time in the traditional heating
modes). During this cycle, the message “C CO OO OL L” will appear on display 1. The fans and
the oven light will come on (and then turn off automatically).
At the end of each cooking cycle, the oven light and the cooling fan will remain in operation until the oven
door is opened
5719125700•GB 28-03-2002 17:18 Pagina 43

44
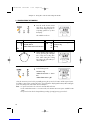
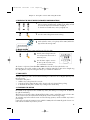
2.4 AUTOMATIC DEFROST AND COOKING SEQUENCE
To program an automatic defrost and cooking sequence, proceed as follows:
+
Set the automatic defrost function by
pressing the “mode selection” button
twice. The display will show the auto-
matic defrost indicator.
1
Set the duration of the defrost (in
minutes), by turning the “setting the
time of day and cooking time”
knob.
2
Set the cooking cycle by selecting
the desired mode using the “mode
selection” button until the corre-
sponding indicators are displayed.
(e.g. combined microwave + con-
vection mode)
3
Set the cooking time and, if featu-
red in the mode, the microwave
power level and the oven tempera-
ture, as indicated in the previous
paragraph.
4
Press the “start cooking” button.
The changeover from defrost to cooking will be indicated by an audi-
ble signal.
5
Chapter 2 - Using the controls and setting the modes
5719125700•GB 28-03-2002 17:18 Pagina 44

45
2.5 RECALLING THE PRE-SET RECIPES (AUTOMATIC FUNCTION BUTTONS)
Chapter 2 - Using the controls and setting the modes
Press one of the AUTO “pre-set quick cooking” buttons, as required.
(The pre-set time and temperature will flash on the display, and the
pre-set mode and power level indicators will light up).
To select the most suitable menu, refer to paragraph 3.8.
1
Press the “start cooking” button to start cooking.
2
At the end of the set time, 3 long beeps will be emitted, and the dis-
play will show the message “END”.
3
2.6 QUICK HEATING
This function is very useful for heating small amounts of food or drinks.
This function is only active if started less than 1 minute from when the food was placed in the oven.
Quick heating is also useful to complete cooking. Once cooking has started, the set time can be changed using
the “setting the time of day and cooking time” knob, up to a maximum of 60 minutes.
2.7 CHILD SAFETY
The oven is fitted with a safety device that prevents the pre-set cooking times from being tampered with while the
cooking is underway, in order to avoid accidental and dangerous extensions to the cooking time (that may cause
the food to burn!).
To activate the safety device:
• Hold the “stop cooking” button for 5 seconds.
• A short beep will be emitted: the times will no longer be able to be changed during cooking.
• To deactivate the safety device, hold the “stop cooking” button until the beep.
2.8 TURNTABLE STOP BUTTON
When using large sized containers/recipients (or containers with handles) that cannot rotate, the movement of
the turntable can be stopped. Press the “turntable stop” button, after having set a cooking mode: the LED in the
top right will start flashing.
After having pressed “start cooking”, the LED will flash a further 5 times, and will then remain on for the entire
set time; for best results, the food should be mixed/stirred a number of times during cooking.
The “turntable stop” function will also remain on for the following operation, until the “turntable stop” button is
pressed again.
In microwave only mode, the maximum power available is 750W (reduced automatically by the electronic con-
troller when the “turntable stop” button is pressed.
Press the “start cooking” button: the
oven will operate for 30 seconds at
maximum power.
Press the button again to increase
the time by 30 seconds at a time,
up to a maximum of 3 minutes
2
1
5719125700•GB 28-03-2002 17:18 Pagina 45

46
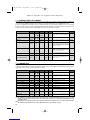
3.1 DEFROSTING
• Frozen food in plastic bags, plastic film (200°C) or cardboard packets can be placed directly in the oven for defrosting, as
long as the packet has no metal parts (e.g. metal ties or staples).
The shape of the packet affects the defrost time. Flat, rectangular packets defrost faster than higher packets.
• Certain foods, such as vegetables and fish, do not require complete defrosting before being cooked.
• Boiled foods, stews and meat sauces defrost better and more quickly if they are stirred from time to time, turned over and/or
separated.
• Meat, fish and fruit lose a certain amount of liquid during defrosting. Defrost these foods in a bowl.
• It is advisable to separate each individual piece of meat into its own bag before putting it into the freezer. This will save you
precious preparation time.
• Immediately after defrosting, before cooking, the standing times should be followed: the standing time (in minutes) is the
length of time the food must be left to stand to allow the heat to continue spreading evenly in the food.
CHAPTER 3 - USING THE OVEN: SUGGESTIONS
AND COOKING TIMES
19 - 21
4 - 6
10 - 12
5 - 7
10 - 12
5 - 7
6 - 8
25 - 27
25 - 27
13 - 15
8 - 10
7 - 9
8 - 10
10 - 12
8 - 10
4 - 6
5 - 7
7 - 9
1 - 2
2 - 4
2 - 4
2 - 4
8 - 10
5 - 7
3 - 5
MEAT
• Roasts (pork, beef, veal etc.)
•Steaks, chops, rashers
• Stew, goulash
• Minced
• Hamburgers
• Sausages
POULTRY
• Duck, turkey
• Whole chicken
• Pieces of chicken
• Chicken breast
VEGETABLES
FISH
• Fillets
• Slices
• Whole
• Prawns
MILK/DAIRY PRODUCTS
•Butter
• Cheese
• Cream
BREAD
• 2 medium-sized rolls
•4 medium-sized rolls
• Sliced bread
• Sliced wholemeal bread
FRUIT
•
Strawberries, plums, cherries, redcurrants, apricots
• Raspberries
• Blackberries
1 kg
200 gr
500 gr
250 gr
500 gr
200 gr
300 gr
1,5 kg
1,5 kg
850 gr
300 gr
300 gr
400 gr
500 gr
400 gr
250 gr
250 gr
200 ml
150 gr
300 gr
250 gr
250 gr
500 gr
300 gr
250 gr
Turn over halfway through defrosting
See note *
Turn the poultry over halfway through .
When the standing time is over, wash
under warm water to remove any ice.
Frozen vegetables do not need to be
defrosted before cooking
Turn the fish over halfway through
defrosting
Remove the aluminium foil or metallic parts
Cheese should not be defrosted completely.
Observe the standing time. The cream
should be removed from its container and
placed on a plate
Put the bread directly onto the turntable.
Stir 2-3 times
Stir 2-3 times
Stir 2-3 times
20
5
10
15
15
10
10
20
20
10
10
7
7
7
7
10
15
5
3
3
3
3
10
10
6
None
None
None
None
None
None
None
None
None
None
None
None
None
None
None
None
None
None
None
None
None
None
None
None
None
TYPE QUANTITY TIME (minutes) NOTES/SUGGESTIONS STANDING TIME
WIRE RACK
TO BE USED
TABLE OF DEFROSTING TIMES IN “AUTOMATIC DEFROSTING” MODE
*These guidelines are suitable for carrying out the Defrosting Test for mince according to IEC Regulation 705, Par. 18.3, (see par. 2). Turn the
block upside down halfway through the time set. The block which is to be defrosted should be placed directly on the turntable. Further infor-
mation, also regarding other Performance Tests according to IEC Regulation 705 is given in the table on page 2.
5719125700•GB 28-03-2002 17:18 Pagina 46
La pagina si sta caricando...
La pagina si sta caricando...
La pagina si sta caricando...
La pagina si sta caricando...
La pagina si sta caricando...
La pagina si sta caricando...
La pagina si sta caricando...
La pagina si sta caricando...
La pagina si sta caricando...
-
 1
1
-
 2
2
-
 3
3
-
 4
4
-
 5
5
-
 6
6
-
 7
7
-
 8
8
-
 9
9
-
 10
10
-
 11
11
-
 12
12
-
 13
13
-
 14
14
-
 15
15
-
 16
16
-
 17
17
-
 18
18
-
 19
19
-
 20
20
-
 21
21
-
 22
22
-
 23
23
-
 24
24
-
 25
25
-
 26
26
-
 27
27
-
 28
28
-
 29
29


Küppersbusch EMWK 1060.0 Operating Instructions Manual
- Categoria
- Microonde
- Tipo
- Operating Instructions Manual
in altre lingue
- English: Küppersbusch EMWK 1060.0
Altri documenti
-
Electrolux Mo326GXE Manuale utente
-
Candy CMXC 30 DCVB Manuale utente
-
Candy CMC 25D CS Manuale utente
-
Whirlpool AMW 755/IXL Guida utente
-
Samsung CE2927N Manuale utente
-
Candy CMC 9628 DB Manuale utente
-
-
Candy MIC 303 EX Manuale utente
-
Hoover HBM 303 EX Manuale utente
-
 SIGURO SGR-FD-C400B Manuale utente
