Hitachi CV-SJ21V Manuale utente
- Categoria
- Aspirapolvere
- Tipo
- Manuale utente

3
CV-SJ21V
INSTRUCTION MANUAL Vacuum Cleaner
§Ÿà¡◊Õ°“√„™âß“π‡§√◊ËÕߥŸ¥ΩÿÉπ
3-L0846-1D
110_3L0846_1D.p65 5/3/07, 1:27 PM3
Black

Nozzle for sash and gap
°“√ª√–°Õ∫™‘Èπà«πÀ—«¥Ÿ¥ΩÿÉπ·≈–“¬¥Ÿ¥ΩÿÉπ
To store assembly and extension pipe
°“√‡°Á∫™‘Èπà«π°—∫∑àÕ¥Ÿ¥ΩÿÉπ
Nozzle for sash and
gap
À—«¥Ÿ¥ΩÿÉπμ“¡´Õ°
Tick
¢âÕμàÕ
Rug and Floor Nozzle
À—«¥Ÿ¥ΩÿÉπ”À√—∫æ◊Èπ√“∫·≈–æ√¡
Turning brush
À—«·ª√ߪ√—∫À¡ÿπ‰¥â
Tick
¢âÕμàÕ
Tick
¢âÕμàÕ
Hose hook
μ–¢Õμ—Èß“¬¥Ÿ¥
Hook
μ–¢Õ‡°’ˬ«
Slide knob
ªÿÉ¡‡≈◊ËÕπ
Extension pipe
∑àÕ¥Ÿ¥ΩÿÉπ·∫∫
ª√—∫§«“¡¬“«‰¥â
Tick
¢âÕμàÕ
Power plug
ª≈—Í°‰ø
Power cord
“¬‰ø
Button for taking up
power cord
ªÿÉ¡¡â«π‡°Á∫“¬‰ø
Hose
∑àÕ¥Ÿ¥Ωÿ
Éπ
Upper cover
Ω“ªî¥¥â“π∫π
Hose handle
¡◊Õ®—∫À‘È«
‡§√◊ËÕߥŸ¥ΩÿÉπ
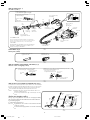
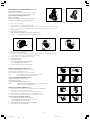
ACCESSORIES (Fig. 2)
™‘Èπà«πÕÿª°√≥å (¿“æ∑’Ë 2)
Fig. 2
¿“æ∑’Ë 2
Connector to main body
à«πμàÕ‡¢â“°—∫μ—«‡§√◊ËÕß
Hose handle
¡◊Õ®—∫
Hose socket
™àÕ߇’¬∫“¬
Tick
¢âÕμàÕ
Hose connector
à«πμàÕ“¬
Connector to main body
à«πμàÕ‡¢â“°—∫μ—«‡§√◊ËÕß
Button
ªÿÉ¡
Fig. 3
¿“æ∑’Ë 3
HOW TO ADJUST THE LENGTH OF EXTENSION PIPE (Fig. 4)
Connect the hose, extension pipe and the power head to each other, and adjust
the length of extension pipe while sliding the slide knob. Or, move grip lever up
and down by pulling the hand lever while the power head is fixed by a foot.
•
Press the button when taking off extension pipe and power head.
Caution
•
Extension pipe may be shortened if the slide knob slides or the
hand lever is pulled during use.
•
Do not insert your hands into the gap of extension pipe for safety
reason.
«‘∏’ª√—∫§«“¡¬“«∑àÕ¥Ÿ¥ΩÿÉπ (¿“æ∑’Ë 4)
μàÕ“¬¥Ÿ¥, ∑àÕ¥Ÿ¥ ·≈–À—«¥Ÿ¥‡¢â“¥â«¬°—π ®“°π—Èπ ª√—∫§«“¡¬“«¢Õß∑àÕ¥Ÿ¥ΩÿÉπ ‚¥¬‡≈◊ËÕπªÿÉ¡
‡≈◊ËÕπ ·≈–¬◊¥/À¥∑àÕ À√◊Õ„™âπ‘È«‡°’ˬ«‰°∑’˥ⓡ®—∫¢÷Èπæ√âÕ¡°—∫¥÷ߥⓡ®—∫„π¢≥–∑’Ë„™â‡∑â“°¥
À—«¥Ÿ¥‰«â‡æ◊ËÕ¬÷¥À—«¥Ÿ¥„ÀâÕ¬Ÿà°—∫∑’Ë
•
°¥ªÿÉ¡„π¢≥–∑’Ë∂Õ¥∑àÕ¥Ÿ¥ΩÿÉπ·≈–À—«¥Ÿ¥
¢âÕ§«√√–«—ß
•
∑àÕ¥Ÿ¥ΩÿÉπ·∫∫ª√—∫§«“¡¬“«Õ“®À¥—Èπ≈ß À“°π‘È«‡°’ˬ«‚¥π‰°¥â“¡®—∫ À√◊Õ¥÷ß
°â“π®—∫„π√–À«à“ß°“√„™âß“π
•
Õ¬à“Õ¥π‘È«‡¢â“‰ª„π™àÕß∑àÕ¥Ÿ¥ΩÿÉπ·∫∫ª√—∫§«“¡¬“«‰¥â‡æ◊ËÕ§«“¡ª≈Õ¥¿—¬¢Õß
∑à“π
HOW TO OPERATE (Fig. 1)
«‘∏’°“√„™âß“π (¿“æ∑’Ë 1)
Connector to main body
à«πμàÕ‡¢â“°—∫μ—«‡§√◊ËÕß
Hose connection socket
™àÕßμàÕ∑àÕ
Hose Coupling Assembly
™‘Èπà«π∑àÕ‡™◊ËÕ¡
TO ASSEMBLE HOSE
The hose and joint pipe are packaged separately. To put them together,
insert the curved joint pipe 1 into end of the hose 3 until the claws 4 of
the stopper rings 2 click into the holes 5 of the curved joint pipe.
°“√ª√–°Õ∫∑àÕ
∑àÕ·≈–™‘Èπà«π∑àÕ‡™◊ËÕ¡ ∂Ÿ°∫√√®ÿ·¬°À’∫ÀàÕ°—π „π°“√ª√–°Õ∫‡¢â“¥â«¬°—ππ—Èπ „ÀâÕ¥
™‘Èπà«π∑àÕ‡™◊ËÕ¡ 1 ‡¢â“‰ª∑’˪≈“¬¢Õß“¬‡§√◊ËÕߥŸ¥ΩÿÉπ 3 ®π‡¢’Ȭ«≈äÕ§ 4 ¢Õß
·À«π≈äÕ§ 2 ≈äÕ§‡¢â“°—∫√Ÿ 5 ®π‰¥â¬‘π‡’¬ß§≈‘Í°
Fig. 1
¿“æ∑’Ë 1
On-off switch
«‘∑™å‡ªî¥-ªî¥
5
4
3
1
2
Hose handle (1 pce)
¡◊Õ®—∫À‘È«‡§√◊ËÕߥŸ¥ΩÿÉπ (1 ™‘Èπ)
Nozzle for sash and gap (1 pce)
À—«¥Ÿ¥ΩÿÉπμ“¡´Õ° (1 ™‘Èπ)
Turning brush (1 pce)
À—«·ª√ߪ√—∫À¡ÿπ‰¥â (1 ™‘Èπ)
HOW TO ASSEMBLE çHOSE HANDLEé AND HOSE (Fig. 3)
«‘∏’ª√–°Õ∫ ç¡◊Õ®—∫é ·≈–∑àÕ¥Ÿ¥ΩÿÉπ (¿“æ∑’Ë 3)
1 Attach çHose handleé into hose connector tightly.
1 μàÕ ç¡◊Õ®—∫À‘È«‡§√◊ËÕߥŸ¥ΩÿÉπé ‡¢â“°—∫à«πμàÕ“¬„Àâ·πàπ
2 Match the hose connector with socket and insert until hearing a sound çtické.
2 ¥—πà«πμàÕ“¬‡¢â“°—∫™àÕ߇’¬∫®π‰¥â¬‘π‡’¬ß ç§≈‘Í°é
•
Press button when removing it.
•
°¥ªÿÉ¡≈ÁÕ§·≈–¥÷ßÕÕ°¢≥–∑”°“√∂Õ¥
Fig. 4
¿“æ∑’Ë 4
Button
ªÿÉ¡
Tick
¢âÕμàÕ
While sliding
¢≥–∑’ˇ≈◊ËÕπ
Slide knob
Adjustment
ªÿÉ¡‡≈◊ËÕπ°“√ª√—∫
Hand lever [Pull]
‰° (¥÷ß)
Adjustment
°“√ª√—∫
Fix a power head by a foot
„™â‡∑â“°¥À—«¥Ÿ¥‰«â°—∫æ◊Èπ
À√◊Õ
Gap
™àÕß
Tick
¢âÕμàÕ
Button
ªÿÉ¡
2
D-300
110_3L0846_1D.p65 5/3/07, 1:27 PM4
Black

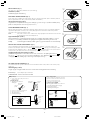
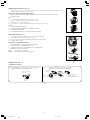
Easy Storage
1 Shorten extension pipe by sliding the slide knob or
pulling the hand lever.
°“√‡°Á∫√—°…“Õ¬à“ßßà“¬
1 ‡≈◊ËÕπªÿÉ¡‡≈◊ËÕπ¥â“πÀπâ“ À√◊Õ¥÷ß°â“π®—∫
‡æ◊ËÕÀ¥∑àÕ¥Ÿ¥ΩÿÉπ
3
Fig. 7
¿“æ∑’Ë 7
Fig. 8
¿“æ∑’Ë 8
1
2
Fig. 5
¿“æ∑’Ë 5
Fig. 6
¿“æ∑’Ë 6
ON-OFF SWITCH (Fig. 5)
Turn cleaner on or off by pushing downward on the power switch 1.
«‘∑™å‡ªî¥-ªî¥ (¿“æ∑’Ë 5)
‡ªî¥À√◊ժ§√◊ËÕߥŸ¥ΩÿÉπ‚¥¬°¥«‘∑™å‡ªî¥-ªî¥ 1
ELECTRONIC POWER CONTROL (Fig. 6)
Suction power may be regulated electronically using the dial 2. For stronger suction (thick carpets or hard floors) rotate the
dial to the right. Rotate it to the left for reduced suction (curtains, delicate fabrics).
ªÿÉ¡§«∫§ÿ¡ª√—∫√–¥—∫·√ߥŸ¥ (¿“æ∑’Ë 6)
·√ߥŸ¥¢Õ߇§√◊ËÕß“¡“√∂§«∫§ÿ¡‰¥â‚¥¬ª√—∫√–¥—∫·√ߥŸ¥ ‚¥¬°“√ª√—∫ªÿÉ¡À¡ÿπ 2 À“°μâÕß°“√·√ߥŸ¥¡“° (æ√¡‡π◊ÈÕÀπ“ À√◊Õæ◊Èπ·¢Áß) „ÀâÀ¡ÿπ
ªÿÉ¡‰ª∑“ߢ«“ À√◊ÕÀ¡ÿπ‰ª∑“ߴ⓬À“°μâÕß°“√≈¥·√ߥŸ¥≈ß (ºâ“¡à“π, ºâ“∫“ß)
FILTER MAINTENANCE SIGN (Fig. 7)
When the orange sign 3 appears in the window continuously, empty the dust case as Page 5. Check the filter maintenance
sign (with the highest power of electronic power control by lifting rug and floor nozzle from the surface being cleaned or
removing the crevice nozzle when it has been used.)
NOTE : If the cleaner is used in such a condition as the orange sign appears in the window, air to the motor will
be reduced and the motor will eventually burn out.
—≠≠“≥‡μ◊Õπ‡¡◊ËÕΩÿÉπ‡μÁ¡ (¿“æ∑’Ë 7)
‡¡◊ËÕ—≠≠“≥‡μ◊Õπ’â¡ 3 ª√“°Ø‡μÁ¡™àÕߢÕß™àÕß·¥ßª√‘¡“≥¢ÕßΩÿÉπ ·¥ß«à“∂—߇°Á∫ΩÿÉπ‡μÁ¡ „Àâ‡∑∂—߇°Á∫ΩÿÉπμ“¡«‘∏’„πÀπâ“ 5 ·≈–∑”§«“¡
–Õ“¥·ºàπ°√Õß (°“√μ√«®Õ∫—≠≠“≥‡μ◊Õπ„Àâª√—∫√–¥—∫·√ߥŸ¥∑’ËŸßÿ¥·≈–¬°∑àÕ¥Ÿ¥ΩÿÉπ¢÷Èπ®“°æ◊Èπ À√◊Õ∂Õ¥À—«¥Ÿ¥μ“¡´Õ°ÕÕ°°àÕπ)
À¡“¬‡Àμÿ : À“°¬—ß„™â‡§√◊ËÕߥŸ¥ΩÿÉπ „π¢≥–∑’ˉø—≠≠“≥’⡪√“°Ø¢÷Èπ ≈¡®–∂Ÿ°¥Ÿ¥‡¢â“¡Õ‡μÕ√剥âπâÕ¬≈ß ·≈–¡Õ‡μÕ√å®–‰À¡â„π∑’Ëÿ¥
DELUXE TYPE RUG AND FLOOR NOZZLE (Fig. 8)
The tool is fitted with a brush at the back which can either be used in the çwithdrawné or çprojectedé position. These
positions are operated by the pedal on the tool marked ç é (Carpet) 4 and ç é (Floor) 5. For cleaning rug or carpet,
keep the brush in its çwithdrawné position, i.e., with the pedal marked ç é pressed down with your toe. If you feel the tool
is heavy to slide on the carpet, please reduce the suction power by adjusting the suction control.
À—«¥Ÿ¥ΩÿÉπ”À√—∫æ◊Èπ√“∫·≈–æ√¡·∫∫‡¥Õ≈ÿ°´å (¿“æ∑’Ë 8)
Õÿª°√≥噑Èππ’È¡’·ª√ßÕ¬Ÿà∑’Ë¥â“πÀ≈—ß´÷Ëß“¡“√∂‡≈◊Õ°ª√—∫‰¥â«à“®–„Àâ·ª√ß çÀ¥‡¢â“é À√◊Õ ç¬◊ËπÕÕ°¡“é ‚¥¬°¥ªÿÉ¡∑’ËÀ—«¥Ÿ¥‰ª¬—߇§√◊ËÕßÀ¡“¬ ç é
(æ√¡) 4 ·≈– ç é (æ◊Èπ√“∫) 5 „π°“√∑”§«“¡–Õ“¥æ√¡ „Àâ°¥ªÿÉ¡‰ª∑’Ëμ”·Àπàß çÀ¥‡¢â“é ∑’Ë¡’—≠≈—°…≥å ç é ‚¥¬„™â‡∑â“°¥ À“°√Ÿâ÷°
«à“‡§√◊ËÕߥŸ¥ΩÿÉπ·√ß¡“°‡°‘π‰ª ®π‡≈◊ËÕπÀ—«¥Ÿ¥ΩÿÉ𬓰 „Àâ≈¥°”≈—ß≈¡¥Ÿ¥≈ß ‚¥¬ª√—∫ªÿÉ¡ª√—∫√–¥—∫·√ߥŸ¥
TO STORE VACUUM CLEANER (Fig. 9)
Hose, extension pipe, and rug & floor nozzle can be stored in assembled condition to two positions of the cleaner by using
nozzle hook.
«‘∏’‡°Á∫‡§√◊ËÕߥŸ¥ΩÿÉπ (¿“æ∑’Ë 9)
“¬¥Ÿ¥ΩÿÉπ, ∑àÕ¥Ÿ¥ΩÿÉπ ·≈–À—«¥Ÿ¥ΩÿÉπ”À√—∫æ◊Èπ√“∫·≈–æ√¡“¡“√∂®—¥‡°Á∫ ‚¥¬μ‘¥‡¢â“°—∫‡§√◊ËÕߥŸ¥ΩÿÉπ‰¥âÕßμ”·Àπàß¥â«¬μ—«¬÷¥À—«¥Ÿ¥
Vertical Storage Space saving storage recommended.
°“√‡°Á∫√—°…“„π·π«μ—Èß ”À√—∫«‘∏’°“√‡°Á∫√—°…“·∫∫ª√–À¬—¥‡π◊ÈÕ∑’Ë
Space saving storage
To store the cleaner more compactly than easy storage
1 Remove the manual control unit from extension pipe.
2 Wind hose around the extension pipe.
3 Insert stand hook into stand hook hole.
°“√‡°Á∫√—°…“·∫∫ª√–À¬—¥æ◊Èπ∑’Ë
«‘∏’‡°Á∫‡§√◊ËÕߥŸ¥ΩÿÉπ„Àâª√–À¬—¥æ◊Èπ∑’ˉ¥â¡“°°«à“°“√‡°Á∫Õ¬à“ßßà“¬
1 ∂Õ¥à«π™‘Èπà«πμàÕ‡™◊ËÕ¡¥â«¬¡◊ÕÕÕ°®“°∑àÕ¥Ÿ¥ΩÿÉπ
2 æ—𓬂¥¬À¡ÿπ‡¢â“°—∫∑àÕ¥Ÿ¥ΩÿÉπ
3 ‡’¬∫¢Õ‡°’ˬ«∞“πμ—È߇¢â“°—∫™àÕß∞“πμ—Èß
While pulling
„π¢≥–∑’Ë¥÷ß
Hand lever
°â“π®—∫
Slide knob
ªÿÉ¡‡≈◊ËÕπ
While sliding
¢≥–‡≈◊ËÕπ
Shorten
˴ŧ
Hose stand
∞“πμ—Èß
Assembling slit
™àÕ߇°Á∫
Hose
“¬
Extension pipe
∑àÕ¥Ÿ¥ΩÿÉπ
1
2
3
1
While pushing
¢≥–∑’Ë¥—π‡¢â“
Stand hook
¢Õ‡°’ˬ«∞“πμ—Èß
2
Left side
¥â“π´â“¬
Right side
¥â“π¢«“
Fig. 9
¿“æ∑’Ë 9
2 Insert the hose stand into the assembling slit.
3 Wind hose around the extension pipe.
2 ‡’¬∫∞“πμ—È߇¢â“°—∫™àÕ߇°Á∫
3 æ—𓬂¥¬À¡ÿπ‡¢â“°—∫∑àÕ¥Ÿ¥ΩÿÉπ
3
1
3
4
5
110_3L0846_1D.p65 5/3/07, 1:29 PM7
Black

Under çLowé operation
„π‚À¡¥°“√∑”ß“π·∫∫ çLowé
ë Curtain
¡à“π
ë Thin carpet
æ√¡‡π◊ÈÕ∫“ß
Caution ë Do not push a soft surface like piano to avoid scratches on it.
¢âÕ§«√√–«—ß ë Õ¬à“°¥≈ß∫πæ◊Èπº‘«ÕàÕππÿà¡ ‡™àπ ‡ªï¬‚π‡æ◊ËÕªÑÕß°—π°“√‡°‘¥√Õ¬¢’¥¢à«π
Fig. 10
¿“æ∑’Ë 10
Fig. 11
¿“æ∑’Ë 11
6
7
8
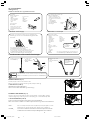
BLOWER FUNCTION (Fig. 10)
Insert the joint pipe of the hose into the blower outlet.
When you remove the hose, pull the joint pipe 6 while pressing the button 7.
°“√„™âß“πÀ—«‡ªÉ“≈¡ (¿“æ∑’Ë 10)
‡’¬∫∑àÕ‡™◊ËÕ¡μàÕ¢Õß“¬¥Ÿ¥ΩÿÉπ‡¢â“‰ª„π™àÕ߇ªÉ“≈¡
‡¡◊ËÕμâÕß°“√∂Õ¥À—«‡ªÉ“≈¡ÕÕ° „Àâ¥÷ß∑àÕ‡™◊ËÕ¡μàÕ 6 æ√âÕ¡°—∫°¥ªÿÉ¡ 7
AUTOMATIC CORD REWIND (Fig. 11)
The power cord is stored neatly inside the cleaner using an automatic cord rewind. When cleaning is
completed, unplug from the mains and press the rewind pedal 8. The cord will automatically rewind.
°“√¡â«π‡°Á∫“¬‰øÕ—μ‚π¡—μ‘ (¿“æ∑’Ë 11)
“¬‰ø®–∂Ÿ°¡â«π‡°Á∫‡¢â“‰«â„π‡§√◊ËÕߥŸ¥ΩÿÉπÕ¬à“߇ªìπ√–‡∫’¬∫¥â«¬√–∫∫¡â«π‡°Á∫“¬‰øÕ—μ‚π¡—μ‘
‡¡◊ËÕ∑”§«“¡–Õ“¥‡√Á®·≈â« ∂Õ¥ª≈—Í°ÕÕ°®“°‡μⓇ’¬∫·≈â«°¥ªÿÉ¡”À√—∫¡â«π‡°Á∫“¬ 8 “¬‰ø®–¡â«π‡°Á∫‡Õß‚¥¬Õ—μ‚π¡—μ‘
TO USE ATTACHMENTS
«‘∏’„™âÀ—«¥Ÿ¥·∫∫μà“ßÊ
For cleaning at:
”À√—∫∑”§«“¡–Õ“¥∫√‘‡«≥ :
ë Corners on stairs
¡ÿ¡∫—π‰¥
ë Gap between furniture
™àÕß√–À«à“߇øÕ√å𑇮Õ√å
ë Corners on floor
¡ÿ¡ÀâÕß
How to adjust the length of extension pipe.
«‘∏’ª√—∫§«“¡¬“«∑àÕ¥Ÿ¥ΩÿÉπ·∫∫¬“«
ë Length of extension pipe can be
adjusted easily by pulling the hand
lever while the power head is fixed
by a foot
§«“¡¬“«¢Õß∑àÕ¥Ÿ¥ΩÿÉπ
“¡“√∂ª√—∫‰¥âÕ¬à“ßßà“¬
‚¥¬°“√¥÷ß°â“π®—∫„π¢≥–∑’Ë
„™â‡∑â“°¥À—«¥Ÿ¥‰«â
çHose handleé is convenient when moving the cleaner in a small place like stairs.
ç¡◊Õ®—∫À‘È«‡§√◊ËÕߥŸ¥ΩÿÉπé ™à«¬Õ”π«¬§«“¡–¥«°„π¢≥–∑’ˇ§≈◊ËÕπ¬â“¬‡§√◊ËÕߥŸ¥ΩÿÉπ„π∫√‘‡«≥∑’Ë·§∫
‡™àπ ∫√‘‡«≥∫—π‰¥
Under çNormalé operation
„π‚À¡¥°“√∑”ß“π·∫∫ çNormalé
ë Furniture
‡øÕ√å𑇮Õ√å
ë Ceiling and wall
‡æ¥“π·≈–ºπ—ß
ë Air-conditioner
‡§√◊ËÕߪ√—∫Õ“°“»
ë Sofa
‚´ø“
HOSE HANDLE / ¡◊Õ®—∫À‘È«‡§√◊ËÕߥŸ¥ΩÿÉπ
ë Avoid dropping the cleaner and power cord damage.
ë ‰¡à§«√∑”„À⇧√◊ËÕߥŸ¥ΩÿÉπμ°À≈àπ ·≈–∑”“¬‰ø™”√ÿ¥
ë Hold çMovable leveré while cleaning and lifting up the cleaner.
Suction sound will be heard when cleaning and holding çHose handleé.
ë ®—∫ ç¡◊Õ®—∫À‘È«‡§√◊ËÕߥŸ¥ΩÿÉπé „π¢≥–∑’Ë∑”§«“¡–Õ“¥ ·≈–¬°‡§√◊ËÕߥŸ¥ΩÿÉπ
‡’¬ß≈¡¥Ÿ¥®–¥—ßÀ“°®—∫ ç¡◊Õ®—∫À‘È«‡§√◊ËÕߥŸ¥ΩÿÉπé „π¢≥–∑’Ë°”≈—ߥŸ¥ΩÿÉπÕ¬Ÿà
TURNING BRUSH / À—«·ª√ߪ√—∫À¡ÿπ‰¥â
An angle of the brush can
be changed.
“¡“√∂ª√—∫Õß»“
¢ÕßÀ—«·ª√߉¥â
Adjustment
°“√ª√—∫
Fix a power head by a foot
„™â‡∑â“°¥À—«¥Ÿ¥‰«â°—∫æ◊Èπ
Hand lever
°â“π®—∫
ë Corners in closet
¡ÿ¡μŸâ
ë Gaps in sofa
´Õ°‚´ø“
ë Slits in sashes
™àÕß∑’Ë“¬μàÕ
How to disassemble
«‘∏’°“√∂Õ¥™‘Èπà«π
Pull the nozzle for sash and gap
toward the direction of arrow
¥÷ßÀ—«¥Ÿ¥”À√—∫“¬μàÕ·≈–™àÕßμàÕμ“¡
∑‘»∑“ß≈Ÿ°»√
NOZZLE FOR SASH AND GAP / À—«¥Ÿ¥”À√—∫“¬μàÕ·≈–™àÕßμàÕ
ë Shelf
™—Èπ«“ߢÕß
ë Window shade
°—π“¥Àπâ“μà“ß
ë Lighting fixture
‚§¡‰ø
***Note : If the cord not fully rewind, pull out short length and press the pedal again. For smooth
rewinding, turn the cord inlet toward the same direction as the cord pulled out.
***À¡“¬‡Àμÿ : À“°¡â«π‡°Á∫“¬‡¢â“‡§√◊ËÕ߉¡àÀ¡¥ „Àâ¥÷ß“¬‰øÕÕ°¡“Õ’°‡≈Á°πâÕ¬·≈â«°¥ªÿÉ¡”À√—∫¡â«π‡°Á∫“¬Õ’°
§√—Èß ‡æ◊ËÕ„À⇧√◊ËÕß¡â«π‡°Á∫“¬‰¥â‡√’¬∫√âÕ¬ „ÀâÀ¡ÿ𓬉ø„ÀâÕ¬Ÿà„π∑‘»‡¥’¬«°—π°—∫‡«≈“∑’Ë¥÷ßÕÕ°¡“
4
MULTI-PURPOSE NOZZLE CONTROL TECHNIQUE / ¡◊Õ®—∫À‘È«‡§√◊ËÕߥŸ¥ΩÿÉπ
ë Cleaning the spacious floor.
ë °“√„™âß“π∫πæ◊Èπ∑’Ë°«â“ßÊ
ë To change direction,
twist your wrist.
ë ‡¡◊ËÕμâÕß°“√‡ª≈’ˬπ∑‘»∑“ß
„Àâ∫‘¥¢âÕ¡◊Õ
twist
∫‘¥
ë Cleaning the edge of wall,
corners.
ë °“√„™âß“π∫√‘‡«≥¢Õ∫°”·æß
´Õ° ¡ÿ¡
Caution: To clean the wood surface, do not use excessive force. Doing so may scratch the wood.
¢âÕ§«√√–«—ß: °√≥’∑’Ë„™â∑”§«“¡–Õ“¥∫πæ◊Èπ‰¡âÕàÕπÊ ‰¡à§«√„™â·√ß°¥¡“°‡°‘π‰ª ‡æ√“–Õ“®∑”„Àâæ◊Èπ‰¡â‡ªìπ√Õ¬‰¥â
Change direction to
left and right.
“¡“√∂‡ª≈’ˬπ∑‘»∑“߉¥â
∑—Èߴ⓬·≈–¢«“
110_3L0846_1D.p65 5/3/07, 1:29 PM8
Black

A
0
B
0
C
B
Fig. 12
¿“æ∑’Ë 12
Fig. 13
¿“æ∑’Ë 13
Fig. 14
¿“æ∑’Ë 14
Fig. 15
¿“æ∑’Ë 15
D
C
E
F
F
G
E
H
CLEAN PLEATED BLACK FILTER (Fig. 14)
1) Open the pleated black filter G to the angle of 90 degree.
2) Remove the filter downward with it opened.
When you reinstall it, put the filter by contrary way of removal.
Note : The net filter F and the pleated black filter G are washable.
After washing, let the filters dry up in the shade.
°“√∑”§«“¡–Õ“¥·ºàπ°√ÕßÕ—¥®’∫’¥” (¿“æ∑’Ë 14)
1) ‡ªî¥·ºàπ°√ÕßÕ—¥®’∫’¥” G ÕÕ°‡ªìπ¡ÿ¡ 90 Õß»“
2) ‡ªî¥§â“߉«â·≈â«¥÷ß·ºàπ°√Õß≈ß¡“
‡¡◊ËÕ®–„à°≈—∫§◊π „Àâ„à·ºàπ°√Õ߇¢â“‰ª„π∑‘»μ√ߢⓡ°—∫°“√∂Õ¥
À¡“¬‡Àμÿ :·ºàπ°√Õßμ“¢à“¬ F ·≈–·ºàπ°√ÕßÕ—¥®’∫’¥” G “¡“√∂≈â“ß∑”§«“¡–Õ“¥‰¥â
‡¡◊ËÕ≈â“ß∑”§«“¡–Õ“¥·≈â« º÷Ëß„Àâ·Àâß„π∑’Ë√à¡
CLEAN THE CYCLONE CYLINDER (Fig. 15)
1) Turn the dust case over, and turn the cyclone cylinder (yellow parts) as ∞ mark H
positioned from çcloseé on the dust case to çopené.
2) Take out the cyclone cylinder from the dust case and remove dust from it.
3) When install the cyclone cylinder to the dust case, set the ∞ mark to çcloseé.
4) Wash the cylinder with water. After washing, let the cylinder dry up in the shade.
°“√∑”§«“¡–Õ“¥°√–∫Õ°‰´‚§≈π (¿“æ∑’Ë 15)
1) ‡ªî¥Ω“∂—߇°Á∫ΩÿÉπÕÕ° ·≈â«À¡ÿπ°√–∫Õ°‰´‚§≈π (à«π’‡À≈◊Õß)
μ“¡‡§√◊ËÕßÀ¡“¬ ∞ H ¢Õß∂—߇°Á∫ΩÿÉπ ®“°μ”·Àπàß çªî¥é ¡“∑’Ë ç‡ªî¥é
2) ∂Õ¥°√–∫Õ°‰´‚§≈πÕÕ°®“°∂—߇°Á∫ΩÿÉπ ·≈⫇∑ΩÿÉπ∑‘Èß
3) ‡¡◊ËÕ„à°√–∫Õ°‰´‚§≈π°≈—∫≈ß„π∂—߇°Á∫ΩÿÉπ À¡ÿπ‡§√◊ËÕßÀ¡“¬ ∞ ‰ª∑’Ë çªî¥é
4) ≈â“ß°√–∫Õ°‰´‚§≈π¥â«¬πÈ” ·≈⫺÷Ëß„Àâ·Àâß„π∑’Ë√à¡
1) Open the dust case cover A.
2) Remove the dust case 0 while pushing the clamp B.
When the dust case is re-installed into the body, push the clamp, and confirm to hook the clamp to the dust case.
Note : Do not push the open button C of the dust case while removing the dust case from the body.
1) ‡ªî¥Ω“‡§√◊ËÕߥŸ¥ΩÿÉπ A
2) °¥μ—«¬÷¥ B ‰«â·≈â«¥÷ß∂—߇°Á∫ΩÿÉπ 0 ÕÕ°¡“
‡¡◊ËÕ„à∂—߇°Á∫ΩÿÉπ°≈—∫‡¢â“∑’Ë „Àâ°¥μ—«¬÷¥·≈⫇°’ˬ«μ—«¬÷¥‡¢â“∑’Ë∂—߇°Á∫ΩÿÉπ„Àâ‡√’¬∫√âÕ¬
À¡“¬‡Àμÿ :Õ¬à“°¥ªÿÉ¡‡ªî¥∂—߇°Á∫ΩÿÉπ C ¢≥–∂Õ¥∂—߇°Á∫ΩÿÉπÕÕ°®“°μ—«‡§√◊ËÕß
MAINTAINING YOUR VACUUM CLEANER (Fig. 12, 13)
HOW TO EMPTY DUST CASE
When suction power is weak or the filter maintenance sign operates.
Dispose of dust, remove the dust case 0 and dispose of dust.
°“√∑”§«“¡–Õ“¥‡§√◊ËÕߥŸ¥ΩÿÉπ (¿“æ∑’Ë 12, 13)
«‘∏’∑”§«“¡–Õ“¥∂—߇°Á∫ΩÿÉπ
‡¡◊ËÕ·√ߥŸ¥‡√‘Ë¡‡∫“≈ß À√◊Õ—≠≠“≥‡μ◊Õπ∑”§«“¡–Õ“¥·ºàπ°√Õß·¥ß¢÷Èπ
°“√¢®—¥ΩÿÉπ≈–ÕÕß „Àâ∂Õ¥∂—߇°Á∫ΩÿÉπ 0 ·≈â«¢®—¥ΩÿÉπ≈–ÕÕßÕÕ°„ÀâÀ¡¥
3) Move the dust removal lever D several times more.
4) Put the dust case into a big poly bag.
Turn the dust case downward and push the open button of the dust case C to release dust into a poly bag.
To remove dust inside the dust case by patting the side of dust case.
5) Clean the surface of the net filter F with the brush E.
3) ‚¬°°â“πªí¥ΩÿÉπ D À≈“¬Ê §√—Èß
4) „à∂—߇°Á∫ΩÿÉπ„π∂ÿߢ¬–„∫„À≠à
§«Ë”∂—ß≈ß·≈â«°¥ªÿÉ¡‡ªî¥∑’Ë∂—߇°Á∫ΩÿÉπ C ‡æ◊ËÕ‡∑ΩÿÉπ∑‘Èß≈ß„π∂ÿß
‡§“–¢â“ß∂—߇æ◊ËÕ„ÀâΩÿÉπ∑’ËÕ¬Ÿà¿“¬„π∂—ßÀ≈ÿ¥ÕÕ°‰ª
5) ∑”§«“¡–Õ“¥º‘«Àπâ“·ºàπ°√Õßμ“¢à“¬ F ¥â«¬·ª√ß E
5
110_3L0846_1D.p65 5/3/07, 1:29 PM9
Black

Fig. 16
¿“æ∑’Ë 16
Fig. 17
¿“æ∑’Ë 17
H
H
E
H
CLEAN THE DUST CASE ASSY (Fig. 16)
Take out the dust case assy from the cyclone room cap and wash the net filter and pleated black filter by using a brush with
water. After washing, let the filters dry up in the shade.
«‘∏’∑”§«“¡–Õ“¥à«πª√–°Õ∫¢Õß∂—߇°Á∫ΩÿÉπ (¿“æ∑’Ë 16)
∂Õ¥à«πª√–°Õ∫¢Õß∂—߇°Á∫ΩÿÉπÕÕ°®“°Ω“§√Õ∫°√–∫Õ°‰´‚§≈π·≈â«≈â“ß·ºàπ°√Õßμ“¢à“¬·≈–·ºàπ°√ÕßÕ—¥®’∫’¥”¥â«¬·ª√ß·≈–πÈ”
®“°π—Èπ∑‘Èß„Àâ·Àâß„π∑’Ë√à¡
NOTE:
1) The cleaner should be unplugged from the mains when not in use.
2) Be sure to set the dust case and each filter, and operate the cleaner.
3) Install the dust case to original position firmly.
4) Set the dust case not to make any gap between the lid of the dust case and cleaner body.
À¡“¬‡Àμÿ :
1) §«√∂Õ¥ª≈—Í°ÕÕ°‡¡◊ËÕ‰¡à„™âß“π‡§√◊ËÕߥŸ¥ΩÿÉπ
2) μ√«®Õ∫„Àâ·πà„®«à“‰¥âμ‘¥μ—Èß∂—߇°Á∫ΩÿÉπ ·≈–·ºàπ°√Õß·μà≈–™‘Èπ·≈â«°àÕπ„™âß“π
3) „à∂—߇°Á∫ΩÿÉπ≈ß„πμ”·Àπà߇¥‘¡„Àâ·πàπ
4) ¢≥–„à∂—߇°Á∫ΩÿÉπ Õ¬à“„À⇰‘¥™àÕß«à“ß√–À«à“ßΩ“ªî¥¢Õß∂—߇°Á∫ΩÿÉπ·≈–μ—«‡§√◊ËÕߥŸ¥ΩÿÉπ
HEPA CLEAN FILTER (Fig. 17)
1) Open the dust cover and take off dust case. You can see HEPA clean filter H.
2) Remove HEPA clean filter with pulling a corner in left side.
3) Remove dust around the HEPA clean filter H by patting it gently or with brush E.
4) Reinstall the HEPA clean filter.
·ºàπ°√Õß∑”§«“¡–Õ“¥ HEPA (¿“æ∑’Ë 17)
1) ‡ªî¥Ω“·≈â«¥÷ß∂—߇°Á∫ΩÿÉπÕÕ° ®–‡ÀÁπ·ºàπ°√Õß∑”§«“¡–Õ“¥ HEPA H
2) ∂Õ¥·ºàπ°√Õß∑”§«“¡–Õ“¥ HEPA ÕÕ°‚¥¬¥÷ß∑’Ë¡ÿ¡¥â“π´â“¬
3) °”®—¥ΩÿÉπ√Õ∫Ê ·ºàπ°√Õß∑”§«“¡–Õ“¥ HEPA H ‚¥¬‡§“–‡∫“Ê À√◊Õ„™â·ª√ß E
4) „à·ºàπ°√Õß∑”§«“¡–Õ“¥ HEPA °≈—∫‡¢â“∑’Ë
NOTE : HEPA clean filter is not washable.
À¡“¬‡Àμÿ : Àâ“¡π”·ºàπ°√Õß∑”§«“¡–Õ“¥ HEPA ‰ª≈â“ߥ⫬πÈ”
Take up the dust stuck in the brush by the nozzle for sash and gap.
°”®—¥ΩÿÉπ∑’Ë–¡Õ¬Ÿàμ√ß∫√‘‡«≥À—«·ª√ß‚¥¬„™âÀ—«¥Ÿ¥μ“¡´Õ°
TURNING BRUSH (Fig. 18)
°“√ª√—∫À—«·ª√ß (¿“æ∑’Ë 18)
Nozzle for sash and gap
À—«¥Ÿ¥μ“¡´Õ°
Brush
À—«·ª√ß
Enlargement
¿“梬“¬
Turning rail
√“ßÀ¡ÿπ
Guide
μ—«àß
Insertion slit
™àÕ߇’¬∫
While pushing
¢≥–¥÷ßÕÕ°
2 Will be fixed with a sound
çtické when turning
®–‡¢â“∑’ˇ¡◊ËÕÀ¡ÿπ®π‰¥â¬‘π‡’¬ß ç§≈‘Í°é
Turn
À¡ÿπ
Fig. 18
¿“æ∑’Ë 18
How to set the brush (if the brush comes off during use)
«‘∏’„àÀ—«·ª√ß (À“°À—«·ª√ßÀ≈ÿ¥ÕÕ°¡“„π¢≥–∑’Ë°”≈—ß„™âß“π)
6
110_3L0846_1D.p65 5/3/07, 1:28 PM6
Black

Fig. 19
¿“æ∑’Ë 19
VACUUM CLEANER BODY (Fig. 19)
Wipe with a soft cloth soaked with water.
μ—«‡§√◊ËÕߥŸ¥ΩÿÉπ (¿“æ∑’Ë 19)
„™âºâ“πÿà¡™ÿ∫πÈ” ‡™Á¥∑”§«“¡–Õ“¥
SAFETY DEVICES
Õÿª°√≥åªÑÕß°—𧫓¡ª≈Õ¥¿—¬
This vacuum cleaner is fitted with a thermal cut-out device which automatically turns off the cleaner to prevent overheating of the motor. When this happens, disconnect
the cleaner from main sockets and check the dust compartment and filters as they may be full or clogged with fine dust. Check for any other obstructions in the hose or
pipe. After removing the obstruction, leave the cleaner to cool down until the thermal cut-out resets after approximately 60 minutes.
‡§√◊ËÕߥŸ¥ΩÿÉππ’Èμ‘¥μ—ÈßÕÿª°√≥åªÑÕß°—𧫓¡√âÕπ´÷Ëß®–ªî¥‡§√◊ËÕßÕ—μ‚π¡—μ‘À“°‡°‘¥§«“¡√âÕπŸß∑’Ë¡Õ‡μÕ√å À“°Õÿª°√≥åªÑÕß°—𧫓¡√âÕπ∑”ß“π „Àâ∂Õ¥ª≈—Í°‰øÕÕ° ·≈â«μ√«®¥Ÿà«π‡°Á∫ΩÿÉπ·≈–·ºàπ°√Õß
«à“‡μÁ¡ À√◊Õ¡’ΩÿÉπÕÿ¥μ—πÀ√◊Õ‰¡à μ√«®¥Ÿ«à“¡’‘Ëß°’¥¢«“ß„π∑àÕ¥Ÿ¥À√◊Õ∑àÕμàÕÀ√◊Õ‰¡à ‡¡◊ËÕ°”®—¥‘Ëß°’¥¢«“ß·≈â« √Õ„À⇧√◊ËÕߥŸ¥ΩÿÉπ‡¬Áπ≈ß°àÕπ®π°√–∑—ËßÕÿª°√≥åªÑÕß°—𧫓¡√âÕπ√’‡´Áμ ª√–¡“≥ 60 π“∑’
HOW TO MAINTAIN CLEANING EFFICIENCY AND AVOID ACCIDENTS
•
If the supply cord is damaged, it must be replaced by the manufacturer or its service agent or a similarly qualified person in order to avoid a hazard.
•
Do not block the air flow.
Any blockages or obstructions to the suction inlet, rug and floor tool, extension pipe, hose, etc., or the exhaust air outlet can cause loss of power
and motor overheating.
•
Do not pick up matches, fireplace ashes, or smoking material with the cleaner, as a possible fire hazard may result.
•
Do not use the cleaner to pick up wet dirt, and avoid using the cleaner in a wet and moist place as moisture may damage the motor
mechanical parts.
•
To clean the cleaner body and attachments, wipe them with a soapsuds-soaked cloth, and avoid using spirits.
•
Avoid cleaning the switch part with wet cloth and splashing water on it as moisture may cause a short circuit.
•
Only Hitachi special composition carbon brushes must be used in this cleaner. Replacement of the brushes must be carried out by a Hitachi dealer/service centre, as this
involves using a special tool to open the casing which is secured by tamper proof screws.
•
Your vacuum cleaner is not a toy. Do not allow children to play with cleaner. Do not leave cleaner connected to an electrical outlet and leave it unattended.
•
Always disconnect cord from electrical outlet before servicing the cleaner.
•
Warning:
Electric shock could occur if used outdoors or on wet surfaces.
«‘∏’√—°…“ª√–‘∑∏‘¿“æ„π°“√∑”§«“¡–Õ“¥ ·≈–À≈’°‡≈’ˬ߰“√‡°‘¥Õÿ∫—쑇Àμÿ
•
À“°“¬‰ø™”√ÿ¥ μâÕ߇ª≈’Ë¬π“¬‰ø‡âπ„À¡à‚¥¬ºŸâº≈‘μ À√◊Õμ—«·∑π®”Àπà“¬ ‡æ◊ËÕªÑÕß°—πÕ—πμ√“¬∑’ËÕ“®‡°‘¥¢÷Èπ‰¥â
•
Õ¬à“„Àâ¡’‘Ëß°’¥¢«“ß∑“ß√–∫“¬≈¡
‘ËßÕÿ¥μ—π À√◊Õ‘Ëß°’¥¢«“ß„¥Ê ∑—Èß∑’Ë™àÕß≈¡¥Ÿ¥ À—«¥Ÿ¥ΩÿÉπ”À√—∫æ◊Èπ√“∫·≈–æ√¡ ∑àÕ¥Ÿ¥ΩÿÉ𠓬¥Ÿ¥ΩÿÉπ œ≈œ À√◊Õ
™àÕß√–∫“¬≈¡ÕÕ°®–∑”„À⇪≈◊Õ߉ø ·≈–¡Õ‡μÕ√凰‘¥§«“¡√âÕπŸß
•
Õ¬à“„™â‡§√◊ËÕߥŸ¥ΩÿÉπ¥Ÿ¥‰¡â¢’¥‰ø ∂à“π¢’ȇ∂â“®“°ª≈àÕ߉ø À√◊Õ«—¥ÿ∑’Ë¡’§«—π ‡æ√“–Õ“®∑”„À⇰‘¥Õ—§§’¿—¬‰¥â
•
Õ¬à“„™â‡§√◊ËÕߥŸ¥ΩÿÉπ¥Ÿ¥ΩÿÉπ‡ªï¬° ·≈–Õ¬à“„™â‡§√◊ËÕߥŸ¥ΩÿÉπ„π∂“π∑’Ë∑’ˇªï¬°·©– À√◊Õ¡’§«“¡™◊ÈπŸß ‡æ√“–§«“¡™◊Èπ®–∑”„Àâ¡Õ‡μÕ√å·≈–™‘Èπà«π°≈‰°Õ◊ËπÊ ‡’¬À“¬‰¥â
•
„π°“√∑”§«“¡–Õ“¥μ—«‡§√◊ËÕߥŸ¥ΩÿÉπ·≈–™‘Èπà«πÕ◊ËπÊ „À⇙Á¥¥â«¬ºâ“™ÿ∫πÈ”∫Ÿà Àâ“¡„™â“√®”æ«°πÈ”¡—π∑”§«“¡–Õ“¥
•
Õ¬à“∑”§«“¡–Õ“¥à«π∑’ˇªìπ«‘∑™å¥â«¬ºâ“‡ªï¬° À√◊Õ„™âπÈ”√¥ ‡æ√“–§«“¡™◊ÈπÕ“®∑”„À⇰‘¥‰øøÑ“≈—¥«ß®√
•
μâÕß„™â‡©æ“–·ª√ß∂à“π¢Õߌ‘μ“™‘°—∫‡§√◊ËÕߥŸ¥ΩÿÉπ
‡¡◊ËÕμâÕß°“√‡ª≈’ˬπ·ª√ß∂à“π„À≪∑’Ëμ—«·∑π®”Àπà“¬/»Ÿπ¬å∫√‘°“√¢Õߌ‘μ“™‘ ‡π◊ËÕß®“°μâÕß„™â‡§√◊ËÕß¡◊Õ摇»…„π°“√‡ªî¥
Ω“§√Õ∫¢Õ߇§√◊ËÕߥŸ¥ΩÿÉπ
•
√–«—ßÕ¬à“„À⇥Á°‡≈àπ‡§√◊ËÕߥŸ¥ΩÿÉπ ·≈–Õ¬à“‡’¬∫ª≈—Í°‰ø∑‘È߉«â‚¥¬‰¡à¡’§π¥Ÿ·≈
•
∂Õ¥ª≈—Í°ÕÕ°∑ÿ°§√—Èß°àÕπ´àÕ¡·´¡‡§√◊ËÕߥŸ¥ΩÿÉπ
•
§”‡μ◊Õπ :
À“°π”‰ª„™â°≈“ß·®âßÀ√◊Õ∫πæ◊Èπ‡ªï¬°Õ“®∑”„À⇰‘¥‰øøÑ“¥Ÿ¥‰¥â
Caution: If the supply cord is damaged, it must be replaced by the manufacturer or its service agent or a similarly qualified person in order to avoid a hazard.
¢âÕ§«√√–«—ß: À“°“¬‰ø™”√ÿ¥ μâÕ߇ª≈’Ë¬π“¬„À¡à‚¥¬ºŸâº≈‘μ À√◊Õμ—«·∑π®”Àπà“¬ ‡æ◊ËÕªÑÕß°—πÕ—πμ√“¬∑’ËÕ“®‡°‘¥¢÷Èπ‰¥â
7
çThe appliance is not intended for use by young children or infirm persons without supervision.é
‰¡à§«√„À⇥Á°À√◊ÕºŸâ∑’ˉ¡à·¢Áß·√ß„™â‡§√◊ËÕß„™â‰øøÑ“π’È‚¥¬‰¡à¡’ºŸâ§«∫§ÿ¡
Young children should be supervised to ensure that they do not play with the appliance.
‡¥Á°Ê §«√‰¥â√—∫°“√§«∫§ÿ¡¥Ÿ·≈ ‡æ◊ËÕ„Àâ·πà„®«à“æ«°‡¢“®–‰¡à‡≈àπ°—∫‡§√◊ËÕß„™â‰øøÑ“π’È
This product conforms with the protection requirements of council directives 89/336/ECC relating to electromagnetic compatibility, and 73/23/ECC
relating to electrical equipment designed for use within certain voltage limits.
º≈‘μ¿—≥±åπ’ȉ¥â¡“μ√∞“πμ“¡¢âÕ°”Àπ¥°“√ªÑÕß°—𧫓¡ª≈Õ¥¿—¬¢ÕߢâÕ°”Àπ¥¿“ 89/366/ECC «à“¥â«¬‡√◊ËÕß°“√„™âß“π°—∫Õÿª°√≥å·¡à‡À≈Á°‰øøÑ“ ·≈– 73/23/ECC «à“¥â«¬‡√◊ËÕß
‡§√◊ËÕß„™â‰øøÑ“∑’ËÕÕ°·∫∫‡æ◊ËÕ°“√„™â·∫∫®”°—¥·√ߥ—π‰øøÑ“
110_3L0846_1D.p65 5/3/07, 1:28 PM5
Black

º≈‘μ„πª√–‡∑»‰∑¬
®—¥®”Àπà“¬‚¥¬ ∫√‘…—∑ Œ‘μ“™‘‡´≈å (ª√–‡∑»‰∑¬) ®”°—¥
‡≈¢∑’Ë 994, 996 ´Õ¬∑ÕßÀ≈àÕ ∂ππÿ¢ÿ¡«‘∑ 55 ·¢«ß§≈Õßμ—π‡Àπ◊Õ ‡¢μ«—≤π“ °√ÿ߇∑æœ 10110
‚∑√»—æ∑å 0-2381-8381-98 ‚∑√“√ (622) 381-9520
www.hitachi-th.com
E-mail: [email protected]
»Ÿπ¬å∫√‘°“√À≈—°μ—ÈßÕ¬Ÿà∑’Ë ∫√‘…—∑ Œ‘μ“™‘‡´≈å (ª√–‡∑»‰∑¬) ®”°—¥
‡≈¢∑’Ë 994, 996 ´Õ¬∑ÕßÀ≈àÕ ∂ππÿ¢ÿ¡«‘∑ 55 ·¢«ß§≈Õßμ—π‡Àπ◊Õ ‡¢μ«—≤π“ °√ÿ߇∑æœ 10110
‚∑√»—æ∑å 0-2381-8381-98 ‚∑√“√ (662) 381-9520
www.hitachi-th.com
E-mail: [email protected]
√“§“·π–π”¢“¬ª≈’°√«¡¿“…’¡Ÿ≈§à“‡æ‘Ë¡ 11, 0 ∫“∑
110_3L0846_1D.p65 5/4/07, 2:55 PM2
Black
89
-
 1
1
-
 2
2
-
 3
3
-
 4
4
-
 5
5
-
 6
6
-
 7
7
-
 8
8


Hitachi CV-SJ21V Manuale utente
- Categoria
- Aspirapolvere
- Tipo
- Manuale utente
in altre lingue
- English: Hitachi CV-SJ21V User manual