Parrot CD/MP3 Hands-free Receiver Manuale utente
- Categoria
- Lettore CD
- Tipo
- Manuale utente
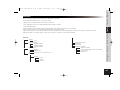
Questo manuale è adatto anche per

CD/MP3
Hands-free
Receiver
RHYTHM N’BLUE
User manual
For Bluetooth
Mobile Phone
ENG
FRA
ESP
ITA
DUT
POR
P. 3
P.15
P.27
P.39
P.51
P.63
Notice 5100 Zone A 09.01.06.qxp 10/01/2006 16:49 Page 1

Warning
The manufacturer Parrot S.A. and its affiliates should not be held liable towards end users or third parties to prejudice caused by misusage of the product, nor for usage that would
be in violation of local traffic regulations and laws.
Disclaimer
The information in this document is subject to change without notice and does not represent a commitment on the part of vendor. No warranty or representation, either expressed
or implied, is made with respect of quality, accuracy or fitness for any particular purpose of this document. The associated with it at any time without obligation to notify any per-
son or organisation of such changes. In no event will the manufacturer to liable for direct, indirect, special, incidental or consequential damages arising out of the use or inability
to use this product or documentation, even if advised of the possibility of such damages. This document contains material protected by copyright. All right are reserved. No part
of this manual may be reproduced or transmitted in any forme, by any means or for any purpose without express written consent. Product names appearing in this document are
mentioned for identification purposes only. All trademarks, product names appearing in this document are registred property of their respective owners.
FCC Compliance Statement
This device complies with part 15 of the FCC rules. Operation is subject to the following two conditions.
1. This device may not cause harmful interference.
2. This device must accept any interference received, including interference that may cause undesired operation.
Declaration of Conformity
We, Parrot S.A. of 174 quai de Jemmapes, 75010 Paris, France, declare under our sole responsibility that our product, the Parrot Rhythm n’ Blue, to which this decla-
ration relates is in conformity with appropriate standards EN300328, EN301489-17, EN 60950 following the provision of Radio Equipment and Telecommunication
Equipment directive, with requirements covering EMC directive 89/336/EEC and Low Voltage directive 73/23/EEC.
Bluetooth®
The Bluetooth® word mark and logos are owned by the Bluetooth® SIG, Inc. and any use of such marks by Parrot S.A. is under license. Other trademarks and trade names are
those of their respective owners.
Correct Disposal of This Product ( Waste Electrical & Electronic Equipment )
(Applicable in the European Union and other European countries with separate collection systems). This marking shown on the product or its literature, indica
tes that it should not be disposed with other household wastes at the end of its working life.To prevent possible harm to the environment or human health from
uncontrolled waste disposal, please separate this from other types of wastes and recycle it responsibly to promote the sustainable reuse of material resources.
Household users should contact either the retailer where they purchased this product, or their local government office, for details of where and how they can take
this item for environ, mentally safe recycling. Business users should contract their supplier and the terms and conditions of the purchase contract. This product should
not be mixed with other commercial wastes for disposal.
2
Notice 5100 Zone A 09.01.06.qxp 10/01/2006 16:49 Page 2

Français
EspañolItaliano
Deutsch
Português
3
Dutch
Rhythm n'Blue
Directions for use
English
Notice 5100 Zone A 09.01.06.qxp 10/01/2006 16:49 Page 3

4
SAFETY INFORMATION
PRECAUTIONS
Only use on a 12 V electrical system with a negative earth.
When replacing the fuse, use one with the same amp rating. Using a fuse
with a higher amp rating could damage the system.
Do not dismantle the system. The laser beam of the CD player is dange-
rous for your eyes.
Ensure that foreign objects are not inserted into the system: they could
cause the system to malfunction or jeopardise your safety, such as electro-
cutions or exposure to the laser.
If your vehicle has been exposed to very high or very low temperatures
for a prolonged period, wait until the inside of the car has returned to a
normal temperature before using the device.
The sound volume of the car stereo should not be too loud: you should be
able to hear outside warning signals or sirens.
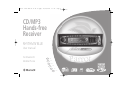
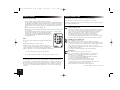
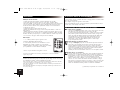
NOTES ON CDs
Playing a damaged or dusty CD could result in the disc jumping during play-
back.
Hold CDs as shown in the illustration opposite.
Do not touch the unprinted side.
Avoid getting any types of marks on the readable side of the CD.
Do not expose a CD to direct sunlight or excessive temperatures.
Wipe dirty CDs from the centre outwards with an appropriate cloth. Never use
solvents, such as benzene or alcohol.
This car stereo cannot read 3" CDs (8 cm).
Never use 3" CDs or discs with an irregular shape. They could get stuck and
cause the unit to malfunction.
BEFORE SWITCHING ON
Do not set the volume too high - doing so might prevent you from hearing
sounds outside the car.
The car must be stationary before working on the system.
CAUTION
Do not remove the unit's cover. Do not repair the system yourself. Please
contact your retailer or a specialist technician.
PRESENTATION
Thank you for choosing a Parrot car stereo.
You can now take full advantage of a Bluetooth
®
CD/MP3 car stereo with a
built-in hands-free kit. All the features sported by a top-of-the-range hands-free kit
are available: phonebook synchronisation, caller ID display, exceptional audio
quality inside the car, dual call management, compatibility with all Bluetooth
®
phones, and much more.
YOUR CAR STEREO'S BLUETOOTH® FEATURES
This system is equipped with the Bluetooth
®
technology, which enables the
wireless exchange of data between electronic systems. In the present case, your
Bluetooth® phone is connected to the car stereo. Depending on your phone
(*), this synchronises the phone's phonebook in the car stereo's memory, which
will subsequently allow you to call people directly from the phonebook, see the
caller's name displayed, and so on. You can also answer calls, hang up and
control the call volume with the car stereo's green and red buttons and the
scroll wheel. The built-in voice recognition feature allows you to use several
functions without taking your hands off the wheel.
(*): Applies to certain phones.
For further information, visit our website:
"www.parrot.biz, at the section entitled Technical Support, User Guides"
Notice 5100 Zone A 09.01.06.qxp 10/01/2006 16:49 Page 4

5
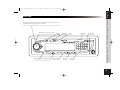
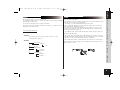
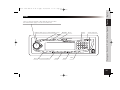
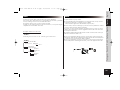
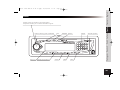
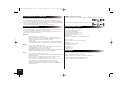
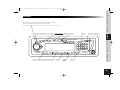
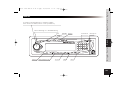
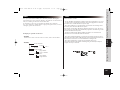
FRONT PANEL
To turn the car stereo on, press the rotary button. To turn the car stereo off,
hold down the same button for two seconds.
Infrared sensor for the remote
Tuner
CD/MP3
Phone
Fast-forward
Rewind
Pause/Play/Mute
DISP
Menu
Eject button
Keypad
Français
EspañolItaliano
Deutsch
Português
Dutch
English
Notice 5100 Zone A 09.01.06.qxp 10/01/2006 16:49 Page 5

6
ANTI-THEFT SYSTEM
Without the detachable front panel, the system cannot be used.
Removing the front panel
Press the eject button (in the top right) to tip the front panel.
Move the panel sideways to the left.
Pull the right side of the panel away from the car stereo and then the left side.
Store the panel in the carry case and take it with you.
Replacing the front panel
Insert the left side of the front panel into the car stereo.
Then insert the right side of the panel into the car stereo.
Push the panel up until you hear a click.
Removing the entire stereo
Remove the car stereo's front panel and casing.
Insert the keys into the appropriate holes until they remain stuck.
Pull the stereo towards you.
Notice 5100 Zone A 09.01.06.qxp 10/01/2006 16:49 Page 6

7
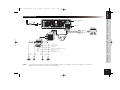
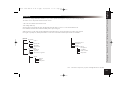
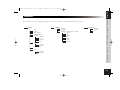
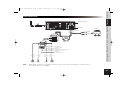
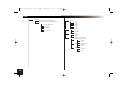
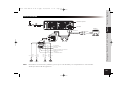
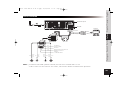
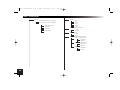
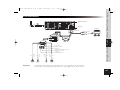
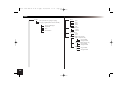
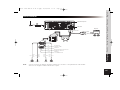
INSTALLATION GUIDE
Note: to ensure that your settings are memorised, check that the ignition 12 V and the constant 12 V supply are not reversed.
Otherwise, you will have to enter all your settings again.
Rear Line-out (Gray)
R (Red)
Amplifier
Connector
ISO Connector
Red
Black
Blue
Yellow
L (White)
B
B
A
1357
2468
57
24 8
A
Ignition key
+ 12 V DC When ON/ACC
Fuse 15A
Ground Lead
Motor/Electric Antenna relay control Lead
Amplifier relay control Lead
To car battety (+)
Continuous + 12V DC
Purple Gray White Green
Gray/
Black
Stripe
White/
Black
Stripe
Green/
Black
Stripe
Purple/
Black
Stripe
Right Speaker
(Rear)
Right Speaker
(Front)
(+) (-) (+) (-)(+) (-)
Left Speaker
(Front)
Left Speaker
(Rear)
(+) (-)
External microphone
Français
Español
Italiano
Deutsch
Português
Dutch
English
Notice 5100 Zone A 09.01.06.qxp 10/01/2006 16:49 Page 7

8
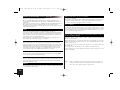
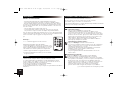
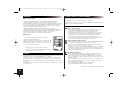
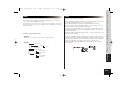
REMOTE CONTROL
Using the remote control
- The on/off button is used to turn the car stereo on and off.
- Source is used to change from one mode to another: Tuner, CD/MP3 and then Phone.
- In CD/MP3 mode, the fast-forward and rewind arrows let you skip from one track to
another by means of a quick press. They are also used to simply go for wards/back
wards in a track. In Tuner mode, they allow you to skip from one radio station to ano
ther.
- The play/pause button is used for playing CDs.
- When you receive an incoming call, press the green button to answer and the red but
ton to hang up.
- You can also dial a phone number on the remote control. To do so, change to Phone
mode (via the Source button or by pressing the Phone button
directly on the car stereo's front panel) and then dial the num
ber on the keypad. Once the number has been dialled, press
the green button to call.
Note:
the "+" prefix can be obtained by pressing the zero button for two
seconds.
Replacing the battery in the remote control
When the remote control no longer works properly or you
experience problems controlling the car stereo with the remote
control, replace the remote control's battery. Ensure that the
battery is facing the correct polarity when fitting the replacement.
1. Remove the battery cover by pressing the button.
2. Insert the new battery with the (+) side facing you. Replace the cover.
CAUTION :
The battery must be stored out of the reach of children. If a child accidentally swal-
lows the battery, seek medical advice immediately. Do not recharge, open, heat or
throw onto a heat source. Any of these actions could cause sparks and start a fire.
Do not store the battery with other metallic materials. This could cause sparks and
start a fire. Do not handle the battery with tweezers. This could cause sparks and
start a fire.
DIFFERENT FEATURES MODE
First of all, turn the car stereo on. To do so, press the rotary button.
To turn the car stereo off, hold down the same button for two seconds.
There are three major features, which can be accessed directly via the car stereo's front panel:
Tuner, CD/MP3 and Phone mode
EACH MODE ENABLES THE CAR STEREO TO BE USED IN A DIFFERENT WAY:
TUNER (OR RADIO
) MODE
Press the Tuner button to listen to the radio. The fast-forward and rewind
arrows let you search for stations on a step-by-step basis. If you hold down
either arrow, the system will automatically search for the next station.
When you are tuned into a station, hold down a number on the
front panel's keypad (long press) to assign a shortcut number.
Subsequently, to go straight to a memorised station, simply press
the corresponding number. When the station is memorised, the assigned
shortcut number is displayed at the same time as the station's frequency.
CD/MP3 (
OR DISC PLAYBACK) MODE
Press CD/MP3 to listen to a CD.
You can move from one track on the CD to another by pressing
fast-forward or rewind. To move quickly forwards or backwards in a track,
hold down the fast-forward or rewind button for more than half a second.
When playing an MP3 disc, the LCD screen successively
displays the following information: title of the song, album and artist,
and always the time elapsed.
You can also select the track directly on the CD via the keypad.
P
HONE MODE
Press Phone to change the system to phone mode.
Once connected with your Bluetooth® phone, you will be given
information on your mobile phone's battery and signal levels.
Your operator is also displayed (*).
You can access your phonebook simply by turning the scroll wheel.
You can then browse through the alphabet.
Select the corresponding letter for the required contacts.
If your contacts have more than one phone number, press the
scroll wheel again to access the numbers and then the green button to call.
To view your call records, press the rotary button.
All the calls made, missed and received are displayed.
(*) These features depend on your phone.
Notice 5100 Zone A 09.01.06.qxp 10/01/2006 16:49 Page 8

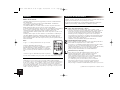
MENUS
Pressing the Menu button opens the Settings menu.
You can fully use all the car stereo's features and define the audio settings, backlight
and all the Bluetooth® features.
You can browse through the menus using the scroll wheel.
Pressing the scroll wheel opens the selected menu, allowing you to make any required
adjustments to the selected feature.
TUNER :
Some information about RDS:
- The RDS (RDS Scan) option displays the radio station's name and searches for alter-
native frequencies if the reception signal fades.
This feature is also called "RDS Alternative Frequencies (AF)".
- Once enabled, the "RDS Region" feature keeps the settings of the current station
when searching for alternative frequencies.
For example, a radio station broadcasting local programmes to a specific region
will not be replaced by the same station broadcasting national programmes when
searching for alternative frequencies.
- The "Traffic Program" indicator (RDS TP) determines whether the radio station can
broadcast traffic information.
- If the "Traffic Alert" feature (RDS TA) is enabled and the current station can broad-
cast traffic information ("Traffic Program" indicator enabled), the car stereo automati-
cally switches to Tuner mode when traffic information is broadcast.
- If the "Traffic Alert" feature is enabled and the current station does not broadcast
traffic information ("Traffic Program" indicator disabled), the following screen is dis-
played on the car stereo:
Français
EspañolItaliano
Deutsch
Português
Dutch
English
9
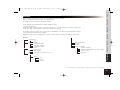
Menu description and structure
- CD/MP3 :
Used to define the way in which you wish to listen to your CDs:
search, play back options, etc.
- CD/MP3
o MP3 search
Intelligent
A B C…
o Browser
o Repeat mode
Disabled
Repeat one
o Mode aléatoire
Disabled
Enabled
Notice 5100 Zone A 09.01.06.qxp 10/01/2006 16:50 Page 9

10
TUNER
o Search
all (automatic memory store)
By type
All Program Types
Pop Music
Rock Music
...
Documentary
o Band
FM1
FM2
FM3
MW1
LW
o Tuner sensivity
Local
Distant
o Stereo / Mono
Stereo
Mono
o RDS options (Radio Data System)
RDS Scan (AF function)
Disabled
Enabled
Traffic Alert (TA feature)
Disabled
Enabled
RDS Region
Disabled
Enabled
Notice 5100 Zone A 09.01.06.qxp 10/01/2006 16:50 Page 10

11
BLUETOOTH :
This menu lets you manage all the Bluetooth features on your car stereo: phonebook management, assigning of voiceprints, display, language.
- Phonebook: access to the phonebook memorised in the car stereo.
- Call records: list of calls missed, made and received.
- In the Settings subdirectory:
The paired devices option displays the name of the Bluetooth phone with which your car stereo is connected in hands-free mode.
Once enabled, the automatic answer feature immediately answers any incoming call.
With some phones, a specific mode must be enabled before pairing (Pair a phone), so that as many features as possible can be supported.
Once again on specific phones, the Object Push feature is used to receive contacts when automatic synchronisation is not available.
Note : some functions depend on your phone and might therefore be disabled.
Bluetooth
o Phonebook
A, B, C…
o Call records
Missed calls
calls made
call received
o Voice commands
Phonebook
keywords
Select voice recognition
o Settings
Volume
Ringtone
Phone
Microphone
Automatic answer
Information
Hotline
Advanced settings
Pair a phone
Sort Order
Delete Contacts
Object Push
Français
Español
Italiano
Deutsch
Português
Dutch
English
Notice 5100 Zone A 09.01.06.qxp 10/01/2006 16:50 Page 11

12
FEATURES IN PHONE MODE: hands-free (Bluetooth)
Press Phone to change the system to Phone mode.
Phones compatible with the Bluetooth® technology use either the Hands-free or the
Headset profile for transferring the call to the car stereo. The Hands-free profile offers the
most features.
When using your car stereo in Tuner or CD/MP3 mode, the unit automatically switches to
Phone mode if someone calls you. After the call, the car stereo returns to Tuner or
CD/MP3 mode. The driver does not need to take any action. The same applies when you
make a call via the car stereo.
Pairing:
Pairing is the first connection between your Bluetooth® phone and the car
stereo. This procedure is initiated via your phone. Search for any Bluetooth® peripherals.
Once "Parrot Car Stereo" is found, select it and your phone prompts you to enter a four-
digit code. Enter 1234 and confirm. After the necessary data has been exchanged, you
are now Bluetooth® connected with the car stereo.
With some phones, a special mode needs to be enabled prior to pairing for access to
more features. Refer to Bluetooth > Settings > Pair a phone.
Synchronising the phone's phonebook:
With some Bluetooth phones, the phonebook is automatically synchronised in the kit's
memory. If your phone does not support automatic synchronisation, you can also use the
Object Push feature on your phone to send contacts from your phone to the car stereo by
Bluetooth®. When synchronising the phonebook, the Bluetooth® icon scrolls over the
screen. Refer to your phone's user guide or our website for details on how to proceed:
"www.parrot.biz, at the section entitled Technical Support, User Guides"
Answering / Hanging up :
To answer a call, press the green button above the scroll wheel. Once you have finished
your conversation, press the red button to hang up.
Discreet mode:
During a call, press the green button to switch the conversation over to the phone. Press the
green button again to return the call to hands-free mode. This feature is only available on
phones with a Hands-free profile.
Caller ID :
When an incoming call is received, the caller's name or number is displayed. This feature
is only available on certain phones.
Making a call via the car stereo's interface :
Two options are available:
Change to Phone mode. Dial the phone number directly via the keypad and then press the
green button. To dial a number with "+" as the prefix, quickly press the zero key twice.
You can also use the voice recognition feature (see below).
Voice recognition :
You can make calls using the car stereo's voice recognition
feature. To do so, contacts
must be memorised in the kit's memory (automatic synchronisation of the phonebook or contacts
sent individually from the phone). You must have first recorded the keywords: home, work, office,
and so on, as well as the magic word "phone".
Once you have recorded the names, keywords and magic word, you
can call a contact as follows:
Say: Phone… (Beep)… Anna… (Beep)… Home… and the car stereo automatically
dials Anna's home number.
Similarly, if Anna calls you, you will hear "Anna". Press the green button to answer the
call. Press the red button to end the call. The car stereo automatically returns to Tuner,
CD/MP3 or Phone mode.
You can also use the following sequence for using the voice recognition feature, but
without keywords:
Press the green button and the radio or CD is muted. You will hear a beep.
Say the required person's name after the beep and if necessary, specify house, work
or office (if available).
Note: When recording the keywords and magic word, park your vehicle in a
quiet place with the windows closed and the heater/air conditioner off.
This is necessary to obtain a higher recognition rate.
Notice 5100 Zone A 09.01.06.qxp 10/01/2006 16:50 Page 12

PREFERENCES :
This menu allows you to select your language, the display colour and all the audio features to fine-tune the hearing levels inside the vehicle.
13
Français
EspañolItaliano
Deutsch
Português
Dutch
English
o Audio o Display o Language
Contrast Automatic
Bass Brightness English
Treble Backlight colour (sky blue by default) ...
Fader balance White
Right/left balance Blue
Equaliser Yellow
Disabled Red
Rock sky blue
Classique Violet
Pop Amber
Loudness
Disabled
Enabled
Spoken menus
Beep
Disabled
Enabled
Notice 5100 Zone A 09.01.06.qxp 10/01/2006 16:50 Page 13

14
UPDATING YOUR CAR STEREO
To take advantage of the latest improvements (new compatible phones, new features,
etc.), you can update your car stereo by Bluetooth.
To do so, enable the option in Bluetooth > Settings > Advanced settings > Software
update, and then use a computer fitted with Bluetooth to download the latest version
to your car stereo (available from our website).
For further information, visit our website: www.parrot.biz
TROUBLESHOOTING
In the event of a malfunction, immediately disconnect the car stereo.
This unit must not be used in abnormal conditions, such as if there is no sound or
unpleasant smells are detected from the unit, to avoid any risk of electrocution.
On no account should you try to repair the unit yourself.
General:
The car stereo does not come on.
The car's ignition is switched off. Turn the key in the ignition to the ACC
position (on). Check the wiring. The fuse has blown. Replace the fuse.
No sound:
Check that the car stereo's volume is not at the lowest setting.
Also ensure that the Mute function has not been enabled (sound cut off).
Radio :
Excessive noise with a station:
The station that you are listening to is too far away for an optimal signal.
Choose another station with a better signal.
Preset stations lost:
The car stereo's power supply is not set up correctly.
Check that the battery wire is correctly fitted (ignition 12 V and constant 12 V).
Disc :
The disc is inserted, but it does not play.
The disc is upside-down.
The disc must be inserted with the name of the artist/CD facing upwards.
The disc is dirty or damaged. Clean the disc or change the CD.
The CD jumps or the sound quality is poor.
The disc is dirty or damaged. Clean the disc or change the CD.
Vibrations when driving the car cause the CD to jump.
The angle for fitting the car stereo must be less than 30°.
Check that the car stereo has been securely fitted in the appropriate place.
CD/MP3 : error messages.
The icon below is displayed: this means that there is no CD in the player.
The icon below is displayed: this means that your CD does not contain any files in MP3 format.
TECHNICAL SPECIFICATIONS
CD / CD-R / CD-RW / MP3, ID3 Tag.
Manual flip-down front panel.
Output power: 4x45W.
Line out: 4 channel x 4V/4ch x 2V
DSP: Classic, rock, pop, flat.
Power / Speaker wire: ISO.
Colour screen.
Bluetooth flash updates for the latest version.
External microphone.
Uses your car's speakers for greater listening comfort.
Bluetooth®.
Bluetooth® profiles supported:
- Hands-free 0.96 and 1.0.
- Headset 1.0.
- Object Push 1.0.
- Synch ML 1.0.
HOTLINE
- Our hotline is at your disposal.
You can contact the hotline by email or telephone
(open from Monday to Friday between 9 am and 6 pm - GMT+1).
- For further information, visit our website at www.parrot.biz.
Notice 5100 Zone A 09.01.06.qxp 10/01/2006 16:50 Page 14

English
EspañolItaliano
Deutsch
Português
15
Dutch
Rhythm n'Blue
Notice d'utilisation
Français
Notice 5100 Zone A 09.01.06.qxp 10/01/2006 16:50 Page 15

16
INFORMATIONS DE SECURITE
PRECAUTIONS
S'utilise uniquement sur un système électrique 12V avec mise à la terre néga-
tive.Lors du remplacement d'un fusible, utiliser un ampérage de même valeur
que le fusible à changer.
Utiliser un fusible avec un ampérage supérieur peut endommager le système.
Ne pas démonter le système. Le faisceau laser du lecteur est dangereux pour
les yeux. Assurez-vous que des objets extérieurs ne s'insèrent pas dans le sys-
tème :
ils peuvent causer un dysfonctionnement du système, ou engendrer des problè-
mes de sécurité tels que desélectrocutions ou une exposition au laser.
Si vous avez exposé votre véhicule pour une longue période à de très haute ou
de très basses températures, veuillez attendre que le rétablissement de la tem-
pérature de l'habitacle avant d'utiliser l'appareil.
Le volume sonore de l'autoradio ne doit pas être trop fort : vous devez enten-
dre les avertissements extérieurs.
NOTES SUR LES CD
Ecouter un CD abîmé ou poussiéreux peut causer des coupures pendant
l'écoute.
Tenir les CD comme illustré ci-contre.
Ne pas toucher la partie non imprimée.
Ne pas faire de marques de toutes natures sur la partie lisible du CD.
Ne pas exposer un CD à la lumière directe du soleil ou à un environnement
trop chaud.
Essuyer les CD sales du centre vers l'extérieur avec un tissu adapté. Ne jamais
utilisé des solvants tels que le benzène ou de l'alcool.
Cet autoradio ne peut pas lire les CD de 3'' (8cm).
Ne jamais utiliser un CD de 3'', ou des disques ayant une forme irrégulière. Ils
pourraient rester bloqués et provoquer des dysfonctionnements.
AVANT LA MISE EN MARCHE
Ne pas mettre le volume trop fort, cela pourrait rendre les bruits extérieurs
inaudibles.
La voiture doit être arrêtée avant toute intervention sur le système.
ATTENTION
Ne retirez pas le couvercle de l'appareil. Ne pas réparer vous-même le
système. Veuillez consulter votre revendeur ou un technicien spécialisé.
PRESENTATION
Merci d'avoir sélectionné un autoradio de marque Parrot.
Vous allez bénéficier d'un autoradio Bluetooth® CD/MP3 avec ensemble mains-
libres intégré.
Toutes les fonctions d'un kit mains-libres haut de gamme sont présentes : syn-
chronisation du répertoire, affichage du nom de l'interlocuteur, qualité audio
exceptionnelle dans l'habitacle de la voiture, gestion du double appel, compati-
bilité avec tous les téléphones Bluetooth…
LES FONCTIONNALITES BLUETOOTH® DE VOTRE AUTORADIO
Ce système est équipé de la technologie Bluetooth®, qui permet d'établir des
échanges de données sans fils entre systèmes électroniques. Dans le cas pré-
sent, votre téléphone Bluetooth® est connecté avec l'autoradio. Ceci permet,
selon votre téléphone (*), de synchroniser le répertoire de votre téléphone dans
la mémoire de l'autoradio. Cela vous permettra par la suite d'appeler les per-
sonnes directement depuis ce répertoire, de voir le nom de l'appelant s'affi-
cher...
Vous pouvez aussi décrocher, raccrocher, contrôler le volume de vos communi-
cations avec les boutons vert, rouge et la molette de l'autoradio. La reconnais-
sance vocale intégrée permet d'utiliser de nombreuses fonctions sans lâcher le
volant des mains.
(*) : Valable pour certains téléphones.
Pour plus d'informations, rendez-vous sur notre site :
" www.parrot.biz, rubrique Support Technique, Guides Utilisateurs "
Notice 5100 Zone A 09.01.06.qxp 10/01/2006 16:50 Page 16

17
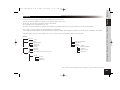
FACADE
La mise sous tension de l'autoradio se fait en appuyant sur le bouton rotateur.
Pour arrêter l'autoradio, appuyer 2 secondes sur ce même bouton.
Capteur infrarouge pour télécommande.
Tuner
CD/MP3
Phone
Avant
Arrière
Pause/Lecture/Mute
DISP
Menu
Touche d’éjection
Clavier
English
EspañolItaliano
Deutsch
Português
Dutch
Français
Notice 5100 Zone A 09.01.06.qxp 10/01/2006 16:50 Page 17

18
SYSTÈME ANTIVOL
Sans la façade détachable, le système est non fonctionnel.
Retrait de la façade:
Appuyez sur le bouton d'éjection (en haut à droite) pour faire basculer la façade.
Déplacez latéralement la façade vers la gauche.
Tirez le côté droit de la façade hors de l'autoradio puis le côté gauche.
Rangez la façade dans l'étui et emportez-là avec vous.
Mise en place de la façade:
Insérez le côté gauche de la façade dans l'autoradio.
Insérez ensuite le côté droit de la façade dans l'autoradio.
Relevez la façade jusqu'à entendre le clic de fixation
Retrait de l'appareil complet:
Retirez la façade et le contour de l'autoradio.
Introduisez les clés dans les emplacements adéquats jusqu'à ce qu'elles restent bloquées.
Tirez sur l'appareil.
Notice 5100 Zone A 09.01.06.qxp 10/01/2006 16:50 Page 18

19
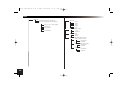
Rear Line-out (Gray)
R (Red)
Amplifier
Connector
ISO Connector
Red
Black
Blue
Yellow
L (White)
B
B
A
1357
2468
57
24 8
A
Ignition key
+ 12 V DC When ON/ACC
Fuse 15A
Ground Lead
Motor/Electric Antenna relay control Lead
Amplifier relay control Lead
To car battety (+)
Continuous + 12V DC
Purple Gray White Green
Gray/
Black
Stripe
White/
Black
Stripe
Green/
Black
Stripe
Purple/
Black
Stripe
Right Speaker
(Rear)
Right Speaker
(Front)
(+) (-) (+) (-)(+) (-)
Left Speaker
(Front)
Left Speaker
(Rear)
(+) (-)
External microphone
English
EspañolItaliano
Deutsch
Português
Dutch
Français
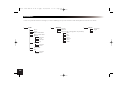
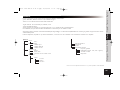
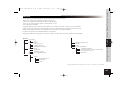
GUIDE D'INSTALLATION
Note : Afin de garder en mémoire vos paramètres, veillez à ce que le 12V clé et le 12V permanent ne soient pas inversés.
Vous auriez à refaire tous vos réglages.
Notice 5100 Zone A 09.01.06.qxp 10/01/2006 16:50 Page 19

20
TELECOMMANDE
Utilisation de la télécommande :
- Le bouton marche/arrêt permet de contrôler l'alimentation de l'autoradio.
- Source permet de passer d'un mode à l'autre : mode Tuner, CD/MP3 puis Phone.
- En mode CD/MP3, les flèches avant et arrière permettent de passer d'une chanson à
une autre avec un appui bref. Elles sont aussi utilisées pour simplement avancer/reculer
dans une chanson. En mode Tuner, elles vous permettent d'avancer ou de revenir sur le
choix de vos stations.
- Le bouton lecture/pause contrôle la lecture d'un CD.
- Lors d'un appel entrant, le bouton vert décroche, et le bouton rouge raccroche.
Vous pouvez aussi composer un numéro de téléphone depuis la télécommande.
Pour cela, passez en mode Phone (à l'aide du bouton source ou en appuyant directement
sur Phone sur la façade de l'autoradio), puis composez votre numéro en utilisant le clavier.
Une fois votre numéro composé, appuyez sur vert pour lancer l'ap-
pel.
Remarque :
le " + " s'obtient en appuyant 2 secondes sur le zéro.
Remplacement de la batterie de la télécommande :
Lorsque la télécommande ne fonctionne plus correctement ou que
vous avez des difficultés pour contrôler l'autoradio avec la télécom-
mande, remplacez la batterie de la télécommande avec une nou-
velle. Assurez-vous de la bonne polarité lors du remplacement.
1. Retirer le support de la batterie en appuyant sur le bouton.
2. Insérer la nouvelle batterie avec la face (+) vers vous. Remettre
le support en position.
ATTENTION :
La batterie doit être entreposée dans un endroit hors d'atteinte des enfants.
Si un enfant avale la batterie accidentellement, consulter immédiatement un docteur.
Ne pas recharger, ouvrir, chauffer ou jeter sur une source incandescente. Une de ces
actions peut entraîner des étincelles ou un début de feu.
Ne pas entreposer la batterie avec d'autres matériaux métallique.
Ceci peut entraîner des étincelles ou un début de feu.
Ne pas manipuler la batterie avec une pince à épiler. Ceci peut entraîner des étincelles ou
début de feu.
LES DIFFERENTS MODES DE FONCTIONNEMENT
Tout d'abord, vous devez mettre l'autoradio sous tension.
Pour cela, appuyez sur le bouton rotateur pour le mettre en marche.
Pour l'éteindre, appuyer 2 secondes sur ce même bouton.
Il existe 3 fonctionnalités majeures, accessibles directement depuis l'interface de l'autoradio:
mode Tuner, mode CD/mp3 et mode Phone.
Chaque mode permet une utilisation différente de l'autoradio :
MODE TUNER (OU
RADIO
)
Appuyez sur la touche Tuner pour écouter la radio.
Les flèches arrière et avant vous permettent de vous déplacer en pas
à pas pour la recherche de stations. Si vous restez appuyé sur une des deux
touches en continu, le système va se caler automatiquement sur la prochaine station.
Quand vous êtes sur une station, appuyez sur un chiffre du clavier de la façade
(appui long) pour lui assigner un raccourci. Ensuite, pour vous placer sur une
station mémorisée, appuyez simplement dessus pour la rappeler.
Lorsque la station est mémorisée, le chiffre raccourci attribué est affiché en
même temps que la fréquence de la station.
M
ODE CD/
MP3 (OU LECTURE DES DISQUES) :
Appuyez sur CD/mp3 pour basculer sur l'écoute d'un CD.
Vous pouvez vous déplacer de chanson en chanson sur le CD en appuyant sur
arrière ou avant. Pour un retour ou une avance rapide, maintenez arrière ou
avant appuyé pendant plus de 0,5 secondes.
Lors de la lecture d'un disque MP3, l'écran LCD affiche successivement les
informations suivantes : titre de la chanson, album et artiste,
et en permanence le temps écoulé.
Vous pouvez également sélectionner directement la chanson sur votre CD
depuis le clavier.
M
ODE PHONE (OU TÉLÉPHONIE) :
Appuyez sur Phone pour passer le système en mode téléphonie.
Une fois connecté avec votre téléphone Bluetooth®, vous retrouvez
les informations relatives au niveau de batterie et de réseau de votre portable.
Votre opérateur est aussi affiché (*).
L'accès à votre répertoire se fait simplement en
faisant tourner la molette.
Vous naviguez alors sur l'alphabet. Sélectionnez
votre lettre pour accéder aux contacts. Si vos contacts ont plus d'un numéro de
téléphone, appuyez encore sur la molette pour accéder à ces numéros,
puis bouton vert pour l'appeler. Pour consulter votre journal d'appels,
pressez le bouton rotateur. Les appels émis, manqués et reçus s'affichent.
(*) Ces fonctions dépendent de votre téléphone portable.
Notice 5100 Zone A 09.01.06.qxp 10/01/2006 16:50 Page 20
La pagina si sta caricando...
La pagina si sta caricando...
La pagina si sta caricando...
La pagina si sta caricando...
La pagina si sta caricando...
La pagina si sta caricando...
La pagina si sta caricando...
La pagina si sta caricando...
La pagina si sta caricando...
La pagina si sta caricando...
La pagina si sta caricando...
La pagina si sta caricando...
La pagina si sta caricando...
La pagina si sta caricando...
La pagina si sta caricando...
La pagina si sta caricando...
La pagina si sta caricando...
La pagina si sta caricando...
La pagina si sta caricando...
La pagina si sta caricando...
La pagina si sta caricando...
La pagina si sta caricando...
La pagina si sta caricando...
La pagina si sta caricando...
La pagina si sta caricando...
La pagina si sta caricando...
La pagina si sta caricando...
La pagina si sta caricando...
La pagina si sta caricando...
La pagina si sta caricando...
La pagina si sta caricando...
La pagina si sta caricando...
La pagina si sta caricando...
La pagina si sta caricando...
La pagina si sta caricando...
La pagina si sta caricando...
La pagina si sta caricando...
La pagina si sta caricando...
La pagina si sta caricando...
La pagina si sta caricando...
La pagina si sta caricando...
La pagina si sta caricando...
La pagina si sta caricando...
La pagina si sta caricando...
La pagina si sta caricando...
La pagina si sta caricando...
La pagina si sta caricando...
La pagina si sta caricando...
La pagina si sta caricando...
La pagina si sta caricando...
La pagina si sta caricando...
La pagina si sta caricando...
La pagina si sta caricando...
La pagina si sta caricando...
La pagina si sta caricando...
La pagina si sta caricando...
-
 1
1
-
 2
2
-
 3
3
-
 4
4
-
 5
5
-
 6
6
-
 7
7
-
 8
8
-
 9
9
-
 10
10
-
 11
11
-
 12
12
-
 13
13
-
 14
14
-
 15
15
-
 16
16
-
 17
17
-
 18
18
-
 19
19
-
 20
20
-
 21
21
-
 22
22
-
 23
23
-
 24
24
-
 25
25
-
 26
26
-
 27
27
-
 28
28
-
 29
29
-
 30
30
-
 31
31
-
 32
32
-
 33
33
-
 34
34
-
 35
35
-
 36
36
-
 37
37
-
 38
38
-
 39
39
-
 40
40
-
 41
41
-
 42
42
-
 43
43
-
 44
44
-
 45
45
-
 46
46
-
 47
47
-
 48
48
-
 49
49
-
 50
50
-
 51
51
-
 52
52
-
 53
53
-
 54
54
-
 55
55
-
 56
56
-
 57
57
-
 58
58
-
 59
59
-
 60
60
-
 61
61
-
 62
62
-
 63
63
-
 64
64
-
 65
65
-
 66
66
-
 67
67
-
 68
68
-
 69
69
-
 70
70
-
 71
71
-
 72
72
-
 73
73
-
 74
74
-
 75
75
-
 76
76


Parrot CD/MP3 Hands-free Receiver Manuale utente
- Categoria
- Lettore CD
- Tipo
- Manuale utente
- Questo manuale è adatto anche per