Braun 9595 - 5671 Pulsonic Manuale utente
- Categoria
- Rasoi da uomo
- Tipo
- Manuale utente
Questo manuale è adatto anche per

www.braun.com/register
Type 5671
9595
high
clean
eco
normal
intensive
auto select
low
empty
s
t
a
r
t
c
l
e
a
n
i
n
g
f
a
s
t
c
l
e
a
n
washable
washable
reset
9595
trimmer
trimmer
trimmer
on
off
on
off
Pulsonic
®
5671457_9595_MN_S1.indd 15671457_9595_MN_S1.indd 1 27.09.2006 11:34:30 Uhr27.09.2006 11:34:30 Uhr

Braun Infolines
D
A
00 800 27 28 64 63
00 800 BRAUNINFOLINE
CH
08 44 - 88 40 10
GB
0800 783 70 10
IRL
1 800 509 448
F
0 810 309 780
B
0 800 14 592
E
901 11 61 84
P
808 20 00 33
I
(02) 6 67 86 23
NL
0 800-445 53 88
DK
70 15 00 13
N
22 63 00 93
S
020 - 21 33 21
FIN
020 377 877
TR
0212 - 473 75 85
HK
852-25249377
(Audio Supplies Company Ltd.)
Deutsch 4, 11
English 12, 18
Français 19, 25
Español 27, 34
Português 35, 42
Italiano 43, 49
Nederlands 50, 57
Dansk 58, 64
Norsk 65, 71
Svenska 72, 78
Suomi 79, 85
Türkçe 86
∂ÏÏËÓÈο 93, 101
Braun GmbH
Frankfurter Straße 145
61476 Kronberg/Germany
5-671-457/00/X-06/M
D/GB/F/E/P/I/NL/DK/N/S/FIN/TR/GR
Printed in Germany
5671457_9595_MN_S2.indd 15671457_9595_MN_S2.indd 1 09.10.2006 9:21:34 Uhr09.10.2006 9:21:34 Uhr

washable
washable
reset
trimmer
trimmer
trimmer
reset
trimmer
trimmer
trimmer
on
off
on
off
high
clean
eco
normal
intensive
auto select
low
empty
s
t
a
r
t
c
l
e
a
n
i
n
g
f
a
s
t
c
l
e
a
n
34
6
5
1
2
4a
9000
Series
9
8
10
11
12
13
14
15
16
17
7
18
5671457_9595_MN_S3.indd 15671457_9595_MN_S3.indd 1 27.09.2006 9:27:35 Uhr27.09.2006 9:27:35 Uhr

4
Deutsch
Unsere Produkte werden hergestellt, um höchste
Ansprüche an Qualität, Funktionalität und Design
zu erfüllen. Wir wünschen Ihnen mit Ihrem Braun
Rasierer viel Freude.
Achtung
Ihr Rasierer-System ist mit einem Spezialkabel
mit integriertem Netzteil für Sicherheitsklein-
spannung ausgestattet. Es dürfen weder Teile
ausgetauscht noch Veränderungen vorgenom-
men werden, da sonst Stromschlaggefahr
besteht.
Um ein Auslaufen der Reinigungsfl üssigkeit
zu vermeiden, achten Sie beim Aufstellen der
Station auf einen sicheren, waagerechten Stand.
Die Station darf mit eingesetzter Kartusche nicht
gekippt, nicht heftig bewegt und in keiner Weise
transportiert werden.
Die Station sollte weder in Spiegelschränken
noch über Heizungen aufbewahrt, noch auf
empfi ndlichen (polierten oder lackierten) Flächen
abgestellt werden.
Die Reinigungskartusche enthält leicht entzünd-
liche Flüssigkeit. Von Zündquellen fernhalten,
in der Nähe der Station nicht rauchen. Nicht
längere Zeit direktem Sonnenlicht aussetzen.
Von Kindern fernhalten.
Die Reinigungskartusche nicht neu füllen.
Verwenden Sie ausschließlich die original
Reinigungskartusche von Braun.
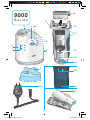
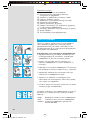
Beschreibung
Clean&Renew Station
1 Füllstands-Anzeige
2 Lift-Taste für Kartuschenwechsel
3 Kontakte Station – Rasierer
4 «start cleaning» Taste
D «fast clean» Taste (Schnellreinigung)
5 Leuchtdioden der Reinigungsprogramme
6 Steckerbuchse
7 Reinigungskartusche
Rasierer
8 Schersystem
9 Entriegelungstaste für das Schersystem
0 «lock» Taste für den Scherkopf
q Ausklappbarer Langhaarschneider
w Ein-/Ausschalter
e Reset-Taste
STOPSTOP
5671457_9595_MN_S4-102.indd 45671457_9595_MN_S4-102.indd 4 09.10.2006 10:10:37 Uhr09.10.2006 10:10:37 Uhr

5
r Rasierer-Display
t Kontakte Rasierer – Station
z Steckerbuchse (Rasierer)
u Reiseetui
i Spezialkabel
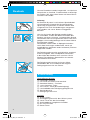
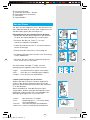
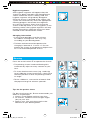
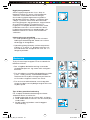
Vor der Rasur
Vor dem ersten Gebrauch muss der Rasierer mit
dem Spezialkabel i an das Netz angeschlossen
werden oder gehen Sie wie folgt vor:
Inbetriebnahme der Clean&Renew Station
• Verbinden Sie die Steckerbuchse der Station
6 über das Spezialkabel i mit dem Netz.
• Drücken Sie die Lift-Taste 2, um das
Gehäuse-Oberteil anzuheben.
• Halten Sie die Kartusche 7 auf einer ebenen,
festen Unterlage.
• Ziehen Sie den Verschluss vorsichtig ab.
• Schieben Sie die Kartusche bis zum Anschlag
in das Bodenfach.
• Drücken Sie das Gehäuse-Oberteil langsam
nach unten, bis es einrastet.
Die Füllstands-Anzeige 1 zeigt, wie viel
Reinigungsfl üssigkeit in der Kartusche ist:
«high» ausreichend Flüssigkeit vorhanden
«low» noch bis zu 7 Reinigungen möglich
«empty» neue Kartusche erforderlich
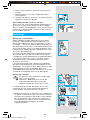
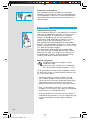
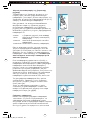
Laden und Reinigen des Rasierers
Stellen Sie den Rasierer mit dem Kopf nach
unten in die Station (die Kontakte t auf der
Rasierer-Rückseite berühren dann die Kontakte
3 in der Station).
Wenn erforderlich, wird der Rasierer jetzt
aufgeladen. Zudem wird der Reinigungsstatus
überprüft und eine der vier Leuchtdioden der
Reinigungsprogramme 5 leuchtet auf:
«clean» der Rasierer ist sauber
«eco» Sparprogramm – nur kurze Reini-
gung erforderlich
«normal» normale Reinigung erforderlich
«intensive» intensive Reinigung erforderlich
new
f
a
s
t
c
l
e
a
n
high
clean
e
co
n
orm
a
l
intensive
a
u
to
s
e
le
c
t
low
empty
s
t
a
r
t
c
l
e
a
n
i
n
g
cle
an
eco
nor
mal
in
te
n
s
ive
a
u
to
sel
e
c
t
f
a
s
t
c
l
e
a
n
high
clean
eco
normal
intensive
au
to selec
t
low
empty
s
t
a
r
t
c
l
e
a
n
i
n
g
f
a
s
t
c
l
e
a
n
high
clean
eco
normal
intensive
auto select
low
empty
s
t
a
r
t
c
l
e
a
n
i
n
g
2
1
f
a
s
t
c
l
e
a
n
f
a
s
t
c
l
e
a
n
f
a
s
t
c
l
e
a
n
high
low
empty
high
low
empty
high
low
empty
high
low
empty
high
low
empty
high
low
empty
high
clean
eco
normal
intensive
auto select
low
empty
s
t
a
r
t
c
l
e
a
n
i
n
g
w
ashable
trimm
er
reset
f
a
s
t
c
l
e
a
n
high
clean
eco
normal
intensive
auto select
low
empty
s
t
a
r
t
c
l
e
a
n
i
n
g
w
ashable
trimm
er
reset
f
a
s
t
c
l
e
a
n
auto select
intensive
normal
eco
clean
s
t
a
r
t
c
l
e
a
n
i
n
g
f
a
s
t
c
l
e
a
n
auto select
intensive
normal
eco
clean
s
t
a
r
t
c
l
e
a
n
i
n
g
f
a
s
t
c
l
e
a
n
5671457_9595_MN_S4-102.indd 55671457_9595_MN_S4-102.indd 5 09.10.2006 10:10:38 Uhr09.10.2006 10:10:38 Uhr

6
Hat die Station eines der drei Reinigungs-
programme gewählt, wird sie erst beginnen,
wenn Sie die «start cleaning» Taste
4 drücken.
Für beste Rasur-Ergebnisse empfehlen wir,
nach jeder Rasur zu reinigen.
Während das Reinigungsprogramm läuft,
blinkt die entsprechende Leuchtdiode. Jedes
Reinigungsprogramm besteht aus mehreren
Zyklen (in denen die Reinigungsfl üssigkeit
durch den Rasiererkopf gespült wird) und
einer Trocknungsphase (durch Erwärmung).
Die Gesamt-Reinigungszeit beträgt je nach
Programm zwischen 32 und 43 Minuten.
Die Reinigungsprogramme sollten nicht unter-
brochen werden. Beachten Sie, dass das Scher-
system während des Trocknens heiß und nass
sein kann.
Ist das Reinigungsprogramm beendet, leuchtet
die blaue «clean»-Diode. Ihr Rasierer ist jetzt
sauber und bereit zur Benutzung.
Schnellreinigung
Wenn Sie die «fast clean» Taste
D drücken,
wird ein Reinigungsvorgang ohne Trocknungs-
phase gestartet. Dieses Programm dauert nur
ca. 25 Sekunden und wird empfohlen, wenn Sie
keine Zeit für eines der Komplettprogramme
haben. Sollten Sie den Rasierer sofort nach
Ablauf dieses Programms entnehmen, wischen
Sie den Scherkopf mit einem Tuch ab, da er
noch tropfen kann.
Stand-by Betrieb
10 Minuten nach Beendigung des Lade- oder
Reinigungsvorgangs schaltet die Station in den
Stand-by Betrieb: Die Leuchtdioden an der
Station werden ausgeschaltet.
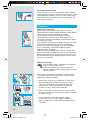
Rasierer-Display
Das Rasierer-Display r zeigt auf der linken Seite
den Akku-Ladezustand und auf der rechten
Seite den Hygiene-Status des Scherkopfes an.
Sechs dunkle Segmente werden auf jeder Seite
angezeigt, wenn der Rasierer voll geladen und
hygienisch sauber ist.
Akku-Segmente:
Während des Ladens oder beim Betrieb des
Rasierers blinkt das entsprechende Akku-
Segment. Bei Vollladung werden alle sechs
high
clean
eco
normal
inten
sive
auto select
low
washable
s
t
a
r
t
c
l
e
a
n
i
n
g
f
a
s
t
c
l
e
a
n
high
clean
eco
normal
inten
sive
auto select
low
washable
s
t
a
r
t
c
l
e
a
n
i
n
g
f
a
s
t
c
l
e
a
n
auto select
intensive
normal
eco
clean
s
t
a
r
t
c
l
e
a
n
i
n
g
f
a
s
t
c
l
e
a
n
auto select
intensive
normal
eco
clean
s
t
a
r
t
c
l
e
a
n
i
n
g
f
a
s
t
c
l
e
a
n
high
clean
eco
normal
intensive
auto select
low
empty
washable
s
t
a
r
t
c
l
e
a
n
i
n
g
f
a
s
t
c
l
e
a
n
high
clean
eco
normal
intensive
auto select
low
empty
washable
s
t
a
r
t
c
l
e
a
n
i
n
g
f
a
s
t
c
l
e
a
n
5671457_9595_MN_S4-102.indd 65671457_9595_MN_S4-102.indd 6 09.10.2006 10:10:39 Uhr09.10.2006 10:10:39 Uhr

7
Segmente permanent angezeigt. Die Segmente
verschwinden nach und nach mit abnehmender
Ladung.
Restkapazitätsanzeige:
Die Restkapazitätsanzeige im roten Rahmen
blinkt, wenn die Akku-Ladung unter 20% abge-
sunken ist. Die verbleibende Ladung reicht dann
noch für 2–3 Rasuren.
Hygiene-Segmente:
Nach einer Reinigung in der Clean&Renew
Station werden alle sechs Hygiene-Segmente
angezeigt. Wird der Rasierer benutzt, verschwin-
den die Hygiene-Segmente nach und nach
und werden erst wieder vollständig angezeigt,
nachdem der Rasierer in der Clean&Renew
Station gereinigt wurde. Je nach Hygiene-
Status wählt die Station automatisch das
geeignete Reinigungsprogramm. Die Hygiene-
Segmente werden jedoch nur dann wieder
vollständig angezeigt, wenn der Rasierer in der
Clean&Renew Station gereinigt wird, weil der
Reinigungsvorgang dort hygienischer ist als
unter fl ießendem Wasser.
Informationen zum Laden
• Voll geladen kann der Rasierer je nach
Bartstärke ca. 50 Minuten ohne Netzanschluss
betrieben werden.
• Günstige Umgebungstemperatur beim Laden:
5 °C bis 35 °C. Das Gerät nicht längere Zeit
Temperaturen über 50 °C aussetzen.
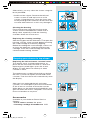
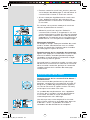
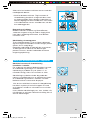
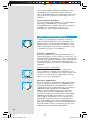
Rasieren
Drücken Sie den Ein-/Ausschalter w, um den
Rasierer einzuschalten:
• Der bewegliche Schwingkopf und die
fl exiblen Scherfolien sorgen automatisch
für eine optimale Anpassung an die
Gesichtsform.
• Für die Rasur an engen Gesichtspartien
(z.B. unter der Nase) schieben Sie die «lock»
Taste 0 nach hinten, um den Schwingkopf in
Winkelstellung zu fi xieren.
• Zum kontrollierten Trimmen von Schnauzbart
und Haaransatz schieben Sie den ausklapp-
baren Langhaarschneider («trimmer») nach
oben.
tr
reset
lock
1
2
trimmer
lock
lock
lock
on
on
off
off
tr
reset
lock
1
2
trimmer
lock
lock
lock
on
on
off
off
5671457_9595_MN_S4-102.indd 75671457_9595_MN_S4-102.indd 7 09.10.2006 10:10:40 Uhr09.10.2006 10:10:40 Uhr

8
Tipps für eine optimale Rasur
Für optimale Rasier-Ergebnisse empfehlen wir
drei einfache Schritte:
1. Rasieren Sie sich immer, bevor Sie Ihr Gesicht
waschen.
2. Rasierer stets im rechten Winkel (90°) zur
Haut halten.
3. Haut straffen und gegen die Bartwuchsrich-
tung rasieren.
Netzbetrieb
Wenn der Akku leer ist und Sie keine Zeit für das
Laden in der Clean&Renew Station haben, kann
die Rasur auch direkt über das Spezialkabel vom
Netz erfolgen.
Reinigung
Automatische Reinigung
Stellen Sie den Rasierer nach jeder Rasur in die
Station und verfahren Sie wie im Abschnitt «Vor
der Rasur» beschrieben.
Alle Reinigungs- und Ladefunktionen werden
dann automatisch durchgeführt. Bei täglicher
Reinigung reicht eine Kartusche für ca. 30 Reini-
gungsvorgänge.
Aus hygienischen Gründen enthält die Reini-
gungsfl üssigkeit Alkohol, der sich nach dem
Öffnen der Kartusche langsam verfl üchtigt.
Daher sollte eine Kartusche, falls sie nicht
täglich verwendet wird, nach ca. 8 Wochen
ausgetauscht werden.
Die Reinigungsfl üssigkeit enthält ölige
Substanzen, die Rückstände auf dem Scherkopf
hinterlassen können. Wischen Sie eventuelle
Rückstände einfach mit einem weichen Tuch ab.
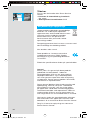
Manuelle Reinigung
Der Scherkopf ist geeignet zur Reinigung
unter fl ießendem Wasser.
Achtung: Der Rasierer ist vom Anschluss-
kabel zu trennen, bevor der Scherkopf
mit Wasser gereinigt wird.
releaserelease
high
clean
eco
normal
in
ten
sive
auto select
low
empty
s
t
a
r
t
c
l
e
a
n
i
n
g
washable
trimmer
rese
t
f
a
s
t
c
l
e
a
n
high
clean
eco
normal
in
ten
sive
auto select
low
empty
s
t
a
r
t
c
l
e
a
n
i
n
g
washable
trimmer
rese
t
f
a
s
t
c
l
e
a
n
5671457_9595_MN_S4-102.indd 85671457_9595_MN_S4-102.indd 8 09.10.2006 10:10:40 Uhr09.10.2006 10:10:40 Uhr

9
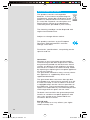
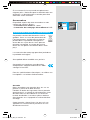
Das Reinigen des Scherkopfs unter fl ießendem
Wasser ist eine alternative Reinigungsmethode,
die wir vor allem empfehlen, wenn Sie auf Reisen
sind:
• Rasierer einschalten (kabellos)
w und den
Scherkopf unter heißes, fl ießendes Wasser
halten. Gelegentlich Flüssigseife (ohne
Scheuermittel) benutzen. Schaum vollständig
abspülen und den Rasierer noch einige
Sekunden laufen lassen.
• Dann den Rasierer ausschalten, die Entriege-
lungstaste
9 drücken, das Schersystem 8
abnehmen und trocknen lassen.
• Bei regelmäßiger Nassreinigung sollten Sie
wöchentlich einen Tropfen Leichtmaschinenöl
auf der Oberfl äche des Schersystems
verteilen.
Alternativ können Sie den Rasierer mit der
mitgelieferten Bürste reinigen:
• Rasierer ausschalten. Das Schersystem 8
abnehmen und ausklopfen. Mit der Bürste
die Scherkopf-Innenseite reinigen. Das
Schersystem darf nicht mit der Bürste gereinigt
werden.
Reinigung des Gehäuses
Von Zeit zu Zeit das Gehäuse des Rasierers und
der Station mit einem feuchten Tuch abwischen,
insbesondere die Mulde in der Station, in der der
Rasierer sitzt.
Kartuschenwechsel
Nach dem Drücken der Lift-Taste 2 zum Öffnen
des Gehäuses einige Sekunden warten, bevor
die gebrauchte Kartusche herausgenommen
wird.
Schließen Sie vor dem Entsorgen der gebrauch-
ten Kartusche die Öffnungen mit dem Verschluss
der neuen Kartusche, denn die gebrauchte
Kartusche enthält verschmutzte Reinigungs-
fl üssigkeit.
oil
w
ashable
trim
mer
on
washable
er
re
le
a
s
e
washable
trimmer
re
le
a
s
e
re
le
a
s
e
click!
oil
w
ashable
trim
mer
on
washable
er
re
le
a
s
e
washable
trimmer
re
le
a
s
e
re
le
a
s
e
click!
washable
re
le
a
s
e
washable
re
le
a
s
e
washable
re
le
a
s
e
washable
re
le
a
s
e
washable
re
le
a
s
e
washable
re
le
a
s
e
new
old
new
old
5671457_9595_MN_S4-102.indd 95671457_9595_MN_S4-102.indd 9 09.10.2006 10:10:41 Uhr09.10.2006 10:10:41 Uhr

10
So halten Sie Ihren Rasierer in Bestform
Wechselanzeige für das Schersystem/Reset
Um 100 % der Rasierleistung zu erhalten,
wechseln Sie das Schersystem 8, wenn die
Wechselanzeige auf dem Display r aufl euchtet
(nach ca. 18 Monaten) oder wenn es Verschleiß-
erscheinungen zeigt.
Die Wechselanzeige leuchtet noch während der
nächsten 7 Rasuren, um Sie an den Scher-
systemwechsel zu erinnern. Danach erfolgt ein
automatisches Reset der Anzeige.
Wenn Sie das Schersystem gewechselt haben,
drücken Sie die Reset-Taste
e mindestens
3 Sekunden lang, um die Wechselanzeige
manuell zurückzustellen. Dabei blinkt die
Wechselanzeige zunächst noch und erlischt,
sobald das Reset abgeschlossen ist. Die
Wechselanzeige kann zu jeder Zeit manuell
zurückgesetzt werden.
Zubehör
Im Handel oder beim Braun Kundendienst
erhältlich:
• Schersystem No. 9000
• Reinigungskartusche Clean&Renew CCR
Informationen zum Umweltschutz
Dieses Gerät enthält Akkus. Im Sinne des
Umweltschutzes darf dieses Gerät am
Ende seiner Lebensdauer nicht mit dem
Hausmüll entsorgt werden. Die Entsor-
gung kann über den Braun Kundendienst
oder lokal verfügbare Rückgabe- und
Sammelstellen erfolgen.
Die Kartusche kann im Hausmüll entsorgt
werden.
Änderungen vorbehalten.
Dieses Gerät entspricht den EU-Richtlinien
EMV 89/336/EWG und Niederspannung
73/23/EWG.
Elektrische Angaben siehe Bedruckung auf dem
Spezialkabel.
360°Complete
9000
Series
9000
Series
washable
m
er
re
le
a
s
e
360°Complete
9000
Series
9000
Series
washable
m
er
re
le
a
s
e
360°Complete
9000
Series
9000
Series
360°Complete
9000
Series
9000
Series
5671457_9595_MN_S4-102.indd 105671457_9595_MN_S4-102.indd 10 09.10.2006 10:10:42 Uhr09.10.2006 10:10:42 Uhr

11
Garantie
Als Hersteller übernehmen wir für dieses Gerät
– nach Wahl des Käufers zusätzlich zu den
gesetzlichen Gewährleistungsansprüchen
gegen den Verkäufer – eine Garantie von
2 Jahren ab Kaufdatum. Innerhalb dieser
Garantiezeit beseitigen wir nach unserer Wahl
durch Reparatur oder Austausch des Gerätes
unentgeltlich alle Mängel, die auf Material- oder
Herstellungsfehlern beruhen. Die Garantie kann
in allen Ländern in Anspruch genommen werden,
in denen dieses Braun Gerät von uns autorisiert
verkauft wird.
Von der Garantie sind ausgenommen: Schäden
durch unsachgemäßen Gebrauch (Knickstellen
an der Scherfolie, Bruch), normaler Verschleiß
(z.B. Schersystem) sowie Mängel, die den
Wert oder die Gebrauchstauglichkeit des
Gerätes nur unerheblich beeinfl ussen. Bei Ein-
griffen durch nicht von uns autorisierte Braun
Kundendienstpartner sowie bei Verwendung
anderer als Original Braun Ersatzteile erlischt
die Garantie.
Im Garantiefall senden Sie das Gerät mit
Kaufbeleg bitte an einen autorisierten Braun
Kundendienstpartner. Die Anschrift für
Deutschland können Sie kostenlos unter
00800/27 28 64 63 erfragen.
5671457_9595_MN_S4-102.indd 115671457_9595_MN_S4-102.indd 11 09.10.2006 10:10:44 Uhr09.10.2006 10:10:44 Uhr

12
Our products are designed to meet the highest
standards of quality, functionality and design.
We hope you enjoy your new Braun Shaver.
Warning
Your Pulsonic shaving system is provided with
a special cord set, which has an integrated
Safety Extra Low Voltage power supply. Do not
exchange or tamper with any part of it, otherwise
there is risk of an electric shock.
To prevent the cleaning fl uid from leaking, ensure
that the Clean&Renew station is placed on a fl at
surface. When a cleaning cartridge is installed,
do not tip, move suddenly or transport the
station in any way as cleaning fl uid might spill
out of the cartridge. Do not place the station
inside a mirror cabinet, nor place it on a polished
or lacquered surface.
The cleaning cartridge contains a highly
fl ammable liquid so keep it away from sources
of ignition. Do not expose to direct sunlight and
cigarette smoking nor store it over a radiator.
Keep it out of reach of children.
Do not refi ll the cartridge and use only original
Braun refi ll cartridges.
Description
Clean&Renew station
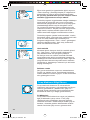
1 Cleaning fl uid display
2 Lift button for cartridge exchange
3 Station-to-shaver contacts
4 «start cleaning» button
D «fast clean» button
5 Cleaning program diodes
6 Station power socket
7 Cleaning cartridge
Shaver
8 Foil & cutter cassette
9 Cassette release button
0 Shaver head «lock» switch
q Pop-out long hair trimmer
w On/off switch
e Reset button
r Shaver display
t Shaver-to-station contacts
z Shaver power socket
u Travel case
i Special cord set
STOPSTOP
English
5671457_9595_MN_S4-102.indd 125671457_9595_MN_S4-102.indd 12 09.10.2006 10:10:44 Uhr09.10.2006 10:10:44 Uhr

13
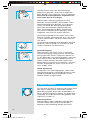
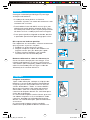
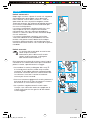
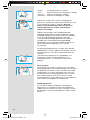
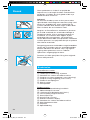
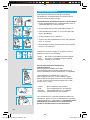
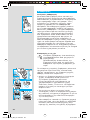
Before shaving
Prior to fi rst use you must connect the shaver to
an electrical outlet using the special cord set i
or alternatively proceed as below.
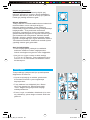
Installing the Clean&Renew station
• Using the special cord set i, connect the
station power socket 6 to an electrical outlet.
• Press the lift button
2 to open the housing.
• Hold the cleaning cartridge 7 down on a fl at,
stable surface (e.g. table).
• Carefully remove the lid from the cartridge.
• Slide the cartridge into the base of the station
as far as it will go.
• Slowly close the housing by pushing it down
until it locks.
The cleaning fl uid display 1 will show how much
fl uid is in the cartridge:
«high» up to 30 cleaning cycles available
«low» up to 7 cleaning cycles remaining
«empty» new cartridge required
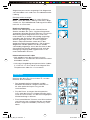
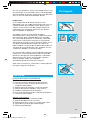
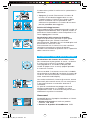
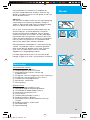
Charging and cleaning the shaver
Insert the shaver head down into the cleaning
station. (The contacts t on the back of the
shaver will align with the contacts 3 in the
cleaning station).
If required, the Clean&Renew station will now
charge the shaver. The hygiene status of the
shaver will also be analyzed and one of the
following cleaning program diodes 5 will light
up:
«clean» shaver is clean
«eco» short economical cleaning required
«normal» normal level of cleaning required
«intensive» high intensive cleaning required
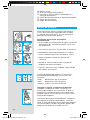
If the station selects one of the required cleaning
programs, it will not start unless you press the
«start cleaning» button 4. For best shaving
results, we recommend cleaning after each
shave.
new
f
a
s
t
c
l
e
a
n
high
clean
e
co
norm
a
l
intensive
a
u
to
s
e
le
c
t
low
empty
s
t
a
r
t
c
l
e
a
n
i
n
g
cle
an
eco
nor
mal
in
te
n
s
ive
a
u
to
sel
e
c
t
f
a
s
t
c
l
e
a
n
high
clean
eco
normal
intensive
au
to select
low
empty
s
t
a
r
t
c
l
e
a
n
i
n
g
f
a
s
t
c
l
e
a
n
high
clean
eco
normal
intensive
auto select
low
empty
s
t
a
r
t
c
l
e
a
n
i
n
g
2
1
f
a
s
t
c
l
e
a
n
f
a
s
t
c
l
e
a
n
f
a
s
t
c
l
e
a
n
high
low
empty
high
low
empty
high
low
empty
high
low
empty
high
low
empty
high
low
empty
high
clean
eco
normal
intensive
auto select
low
empty
s
t
a
r
t
c
l
e
a
n
i
n
g
w
ashable
trim
mer
reset
f
a
s
t
c
l
e
a
n
high
clean
eco
normal
intensive
auto select
low
empty
s
t
a
r
t
c
l
e
a
n
i
n
g
w
ashable
trim
mer
reset
f
a
s
t
c
l
e
a
n
auto select
intensive
normal
eco
clean
s
t
a
r
t
c
l
e
a
n
i
n
g
f
a
s
t
c
l
e
a
n
auto select
intensive
normal
eco
clean
s
t
a
r
t
c
l
e
a
n
i
n
g
f
a
s
t
c
l
e
a
n
high
clean
eco
normal
intensive
auto select
low
washable
s
t
a
r
t
c
l
e
a
n
i
n
g
f
a
s
t
c
l
e
a
n
high
clean
eco
normal
intensive
auto select
low
washable
s
t
a
r
t
c
l
e
a
n
i
n
g
f
a
s
t
c
l
e
a
n
5671457_9595_MN_S4-102.indd 135671457_9595_MN_S4-102.indd 13 09.10.2006 10:10:45 Uhr09.10.2006 10:10:45 Uhr

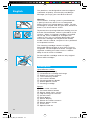
14
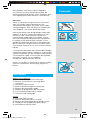
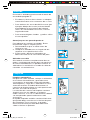
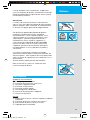
Whilst cleaning is in progress, the respective
cleaning program diode will blink. Each cleaning
program consists of several cycles, where
cleaning fl uid is fl ushed through the shaver head
and a heat drying process dries the shaver.
Depending on the program selected the total
cleaning time will range from 32 to 43 minutes.
The cleaning programs should not be
interrupted. Please note that whilst the shaver is
drying, the shaving head may be hot and wet.
When the program is fi nished, the blue «clean»
diode will light up. Your shaver is now clean and
ready for use.
Fast cleaning
Push the «fast clean» button
D to activate
the fast clean program without drying. This
program takes about 25 seconds only and is
recommended when you do not have time to
wait for one of the automatic cleaning programs.
If you remove the shaver just after the program
has fi nished, wipe off the shaver head with a
tissue to avoid dripping.
Stand-by mode
10 minutes after completing the charging or
cleaning session, the Clean&Renew station
switches to the stand-by mode: The diodes of
the Clean&Renew station turns off.
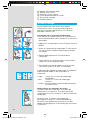
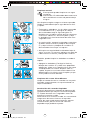
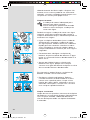
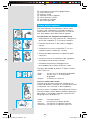
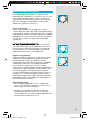
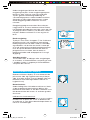
Shaver display
The shaver display r shows the charge status of
the battery on the left, and the hygiene status on
the right. (6 dark segments are shown on each
side when the battery is fully charged and the
shaver is hygienically clean).
Battery segments:
During charging or when using the shaver, the
respective battery segments will blink. When
fully charged all 6 segments are shown. With
decreasing charge the segments gradually
disappear.
Low charge indicator:
The low charge segment provided with a red
frame blinks to indicate that the charge has
dropped below 20%. The remaining capacity is
suffi cient for 2 to 3 shaves.
auto select
intensive
normal
eco
clean
s
t
a
r
t
c
l
e
a
n
i
n
g
f
a
s
t
c
l
e
a
n
auto select
intensive
normal
eco
clean
s
t
a
r
t
c
l
e
a
n
i
n
g
f
a
s
t
c
l
e
a
n
high
clean
eco
normal
intensive
auto select
low
empty
washable
s
t
a
r
t
c
l
e
a
n
i
n
g
f
a
s
t
c
l
e
a
n
high
clean
eco
normal
intensive
auto select
low
empty
washable
s
t
a
r
t
c
l
e
a
n
i
n
g
f
a
s
t
c
l
e
a
n
5671457_9595_MN_S4-102.indd 145671457_9595_MN_S4-102.indd 14 09.10.2006 10:10:45 Uhr09.10.2006 10:10:45 Uhr

15
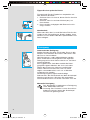
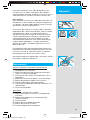
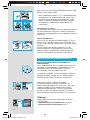
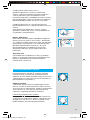
Hygiene segments:
All 6 hygiene segments will appear after the
shaver has been cleaned in the Clean&Renew
station. When the shaver is being used, the
hygiene segments will gradually disappear.
Once the shaver is returned to the station, the
system will automatically select the appropriate
cleaning program and restore the segments
to maximum hygiene. Given that rinsing the
shaver under tap water is not as hygienic as the
cleaning station, the hygiene segments will only
restore themselves when the shaver has been
cleaned in the Clean&Renew station.
Charging information
• A full charge provides up to 50 minutes
of cordless shaving time. This may vary
according to your beard growth.
• The best environmental temperature for
charging is between 5 °C to 35 °C. Do not
expose the shaver to temperatures higher than
50 °C for extended periods of time.
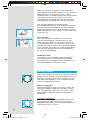
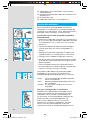
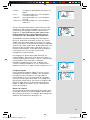
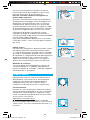
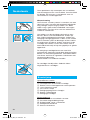
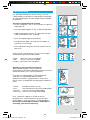
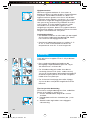
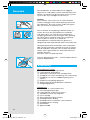
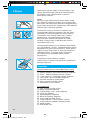
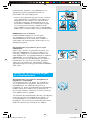
Shaving
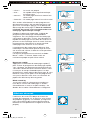
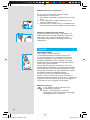
Press the on/off switch w to operate the shaver:
• The pivoting shaver head and fl oating foils
automatically adjust to every contour of your
face.
• To shave hard to reach areas (e.g. under the
nose) slide the shaver head «lock» switch 0 to
the back position to lock the pivoting head at
an angle.
• To trim sideburns, moustache or beard, slide
the pop-out long hair trimmer upwards.
Tips for the perfect shave
For best shaving results, Braun recommends you
follow 3 simple steps:
1. Always shave before washing your face.
2. At all times, hold the shaver at right angles
(90°) to your skin.
3. Stretch your skin and shave against the
direction of your beard growth.
tr
reset
lock
1
2
trimmer
lock
lock
lock
on
on
off
off
tr
reset
lock
1
2
trimmer
lock
lock
lock
on
on
off
off
relea
se
relea
se
5671457_9595_MN_S4-102.indd 155671457_9595_MN_S4-102.indd 15 09.10.2006 10:10:46 Uhr09.10.2006 10:10:46 Uhr

16
Shaving with the cord
If the shaver has run out of power (discharged),
and you do not have the time to recharge it in the
Clean&Renew station, you may also shave with
the shaver connected to an electrical outlet via
the special cord set.
Cleaning
Automatic cleaning
After each shave, return the shaver to the
Clean&Renew station and proceed as described
above in the section «Before shaving».
All charging and cleaning needs are then
automatically taken care of. With daily use, a
cleaning cartridge should be suffi cient for about
30 cleaning cycles.
The hygienic cleaning cartridge contains alcohol,
which once opened will naturally evaporate
slowly into the surrounding air. Each cartridge,
if not used daily, should be replaced after
approximately 8 weeks.
The cleaning cartridge also contains lubricates,
which may leave residual marks on the outer foil
frame after cleaning. However, these marks can
be removed easily by wiping gently with a cloth
or soft tissue paper.
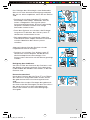
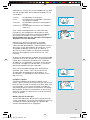
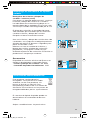
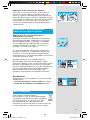
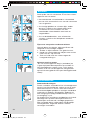
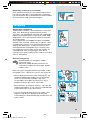
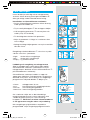
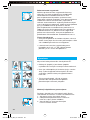
Manual cleaning
The shaver head is suitable for cleaning
under running tap water.
Warning: Detach the shaver from the
power supply before cleaning the shaver
head in water.
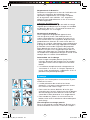
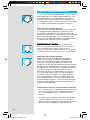
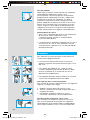
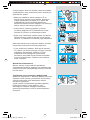
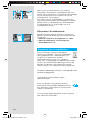
Rinsing the shaving head under running water
is an alternative way to keep the shaver clean,
especially when travelling:
• Switch the shaver on (cordless) w and rinse
the shaving head under hot running water.
You may use liquid soap without abrasive
substances. Rinse off all foam and let the
shaver run for a few more seconds.
• Next, switch off the shaver, press the release
button 9 to remove the foil and cutter cassette
8 and let it dry.
• If you regularly clean the shaver under
water, then once a week apply a drop of
light machine oil on top of the foil and cutter
cassette.
high
clean
eco
normal
inten
sive
auto select
low
empty
s
t
a
r
t
c
l
e
a
n
i
n
g
washable
trimmer
re
s
e
t
f
a
s
t
c
l
e
a
n
high
clean
eco
normal
inten
sive
auto select
low
empty
s
t
a
r
t
c
l
e
a
n
i
n
g
washable
trimmer
re
s
e
t
f
a
s
t
c
l
e
a
n
oil
washable
trim
mer
on
washable
er
re
le
a
s
e
washable
trimmer
re
le
a
s
e
re
le
a
s
e
click!
oil
washable
trim
mer
on
washable
er
re
le
a
s
e
washable
trimmer
re
le
a
s
e
re
le
a
s
e
click!
5671457_9595_MN_S4-102.indd 165671457_9595_MN_S4-102.indd 16 09.10.2006 10:10:46 Uhr09.10.2006 10:10:46 Uhr

17
Alternatively, you may clean the shaver using the
brush provided:
• Switch off the shaver. Remove the foil and
cutter cassette 8 and tap it out on a fl at
surface. Using the brush, clean the inner area
of the pivoting head. However, do not clean the
cassette with the brush as this may damage it.
Cleaning the housing
From time to time clean the housing of the
shaver and the Clean&Renew station with a
damp cloth, especially inside the cleaning
chamber where the shaver rests.
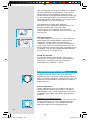
Replacing the cleaning cartridge
After having pressed the lift button 2 to open the
housing, wait for a few seconds before removing
the used cartridge to avoid any dripping.
Before discarding the used cartridge, make sure
to close the openings using the lid of the new
cartridge, since the used cartridge will contain
contaminated cleaning solution.
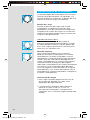
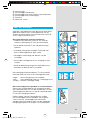
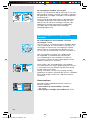
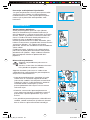
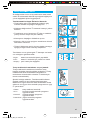
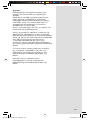
Keeping your shaver in top shape
Replacing the foil and cutter cassette
/
reset
To maintain 100% shaving performance, re-
place the foil and cutter cassette 8, when the
replacement symbol lights up on the shaver
display r (after about 18 months) or when
cassette is worn.
The replacement symbol will remind you during
the next 7 shaves to replace the foil and cutter
cassette. Then the shaver will automatically reset
the display.
After you have replaced the foil and cutter
cassette, use a ball-pen to push the reset button
e for at least 3 seconds to reset the counter.
While doing so, the replacement light blinks and
goes off when the reset is complete. The manual
reset can be done at any time.
Accessories
Available at your dealer or Braun Service
Centres:
• Foil & cutter cassette No. 9000
• Cleaning cartridge Clean&Renew CCR
washable
re
le
a
s
e
washable
re
le
a
s
e
washable
re
le
a
s
e
washable
re
le
a
s
e
washable
re
le
a
s
e
washable
re
le
a
s
e
new
old
new
old
360°Complete
9000
Series
9000
Series
washable
m
er
re
le
a
s
e
360°Complete
9000
Series
9000
Series
washable
m
er
re
le
a
s
e
360°Complete
9000
Series
9000
Series
360°Complete
9000
Series
9000
Series
5671457_9595_MN_S4-102.indd 175671457_9595_MN_S4-102.indd 17 09.10.2006 10:10:47 Uhr09.10.2006 10:10:47 Uhr

18
Environmental notice
This product contains rechargeable
batteries. In the interest of protecting the
environment, please do not dispose of the
product in household waste at the end of
its useful life. Disposal can take place at a
Braun Service Centre or at appropriate
collection points provided in your country.
The cleaning cartridge can be disposed with
regular household waste.
Subject to change without notice.
This product conforms to the European
Directives EMC 89/336/EEC and Low
Voltage 73/23/EEC.
For electric specifi cations, see printing on the
special cord set.
Guarantee
We grant 2 years guarantee on the product
commencing on the date of purchase. Within
the guarantee period we will eliminate, free of
charge, any defects in the appliance resulting
from faults in materials or workmanship, either
by repairing or replacing the complete appliance
as we may choose.
This guarantee extends to every country where
this appliance is supplied by Braun or its
appointed distributor.
This guarantee does not cover: damage due
to improper use, normal wear and tear (e.g. foil
& cutter cassette) as well as defects that have
a negligible effect on the value or operation of
the appliance. The guarantee becomes void if
repairs are undertaken by unauthorised persons
and if original Braun parts are not used.
To obtain service within the guarantee period,
hand in or send the complete appliance with
your sales receipt to an authorised Braun
Customer Service Centre.
For UK only:
This guarantee in no way affects your rights
under statutory law.
5671457_9595_MN_S4-102.indd 185671457_9595_MN_S4-102.indd 18 09.10.2006 10:10:48 Uhr09.10.2006 10:10:48 Uhr

19
Nos produits sont conçus pour répondre
aux normes les plus élevées de qualité, de
fonctionnalité et de design. Nous espérons que
vous apprécierez votre nouveau rasoir Braun.
Attention
Votre système de rasage Pulsonic est fournit
avec un cordon spécial présentant une
alimentation électrique sécurisée à très faible
voltage intégrée. Tout échange ou modifi cation
vous expose à un risque d’électrocution.
Pour éviter toute fuite du liquide de nettoyage,
veillez à ce que la station Clean&Renew soit
posée sur une surface plane. Lorsqu’une
cartouche de nettoyage est installée, ne pas
basculer, bouger brusquement ou transporter
la station d’une quelconque manière, car le
liquide de nettoyage pourrait se répandre hors
de la cartouche. Ne pas mettre la station dans
une armoire à glace, ni sur une surface cirée ou
laquée.
La cartouche de nettoyage contient des liquides
hautement infl ammables, gardez-la à l’écart des
sources d’ignition. Ne pas l’exposer directement
à la lumière du soleil et à la fumée de cigarette,
et ne pas la poser sur un radiateur.
Garder hors de portée des enfants.
Ne pas re-remplir la cartouche et utiliser unique-
ment les cartouches de recharge originales
Braun.
Description
Station Clean&Renew
1 Indicateur du liquide de nettoyage
2 Bouton curseur pour l’échange de la
cartouche
3 Contacts station-rasoir
4 Bouton de démarrage du nettoyage
D Bouton de nettoyage rapide
5 Diodes du programme de nettoyage
6 Fiche d’alimentation de la station
7 Cartouche de nettoyage
Rasoir
8 Cassette Foil & Cutter
9 Bouton d’éjection de la cassette
0 Bouton de verrouillage de la tête du rasoir
q Tondeuse rétractable pour poils longs
w Interrupteur marche/arrêt
STOPSTOP
Français
5671457_9595_MN_S4-102.indd 195671457_9595_MN_S4-102.indd 19 09.10.2006 10:10:48 Uhr09.10.2006 10:10:48 Uhr

20
e Bouton de réinitialisation
r Affi cheur du rasoir
t Contacts rasoir-station
z Fiche d’alimentation du rasoir
u Trousse de voyage
i Cordon spécial
Avant le rasage
Avant la première utilisation, vous devez
connecter le rasoir à une prise électrique en
utilisant le cordon spécial i ou, en variante,
procéder comme suit.
Installation de la station Clean&Renew
• En utilisant le cordon spécial i, connectez la
fi che d’alimentation de la station 6 à une prise
électrique.
• Appuyez sur le bouton curseur 2 pour ouvrir le
boîtier.
• Tenez la cartouche de nettoyage 7 vers le bas
sur une surface stable et plane (par exemple
une table).
• Retirez délicatement le couvercle de la
cartouche.
• Faites glisser la cartouche dans la base de la
station aussi loin que possible.
• Fermez doucement le boîtier en le poussant
vers le bas jusqu'à ce qu’il se verrouille.
L’indicateur du liquide de nettoyage 1 indiquera
la quantité de fl uide se trouvant dans la
cartouche :
« high » Jusqu’à 30 cycles de nettoyage
disponibles
« low » Jusqu’à 7 cycles de nettoyage
restants
« empty » Une nouvelle cartouche de nettoyage
est nécessaire
Chargement et nettoyage du rasoir
Insérez la tête du rasoir dans la station de
nettoyage. (Les contacts t au dos du rasoir
s’aligneront avec les contacts 3 de la station de
nettoyage).
Si nécessaire, la station Clean&Renew
rechargera le rasoir. Le niveau de propreté
du rasoir sera également analysé et une des
diodes de programme 5 de nettoyage suivantes
s’allumera :
new
f
a
s
t
c
l
e
a
n
high
clean
e
c
o
no
rm
a
l
intensive
a
u
to
s
e
le
c
t
low
empty
s
t
a
r
t
c
l
e
a
n
i
n
g
cle
an
eco
nor
mal
in
te
n
s
ive
a
u
to
sel
e
c
t
f
a
s
t
c
l
e
a
n
high
clean
eco
normal
intensive
auto select
low
empty
s
t
a
r
t
c
l
e
a
n
i
n
g
f
a
s
t
c
l
e
a
n
high
clean
eco
normal
intensive
auto select
low
empty
s
t
a
r
t
c
l
e
a
n
i
n
g
2
1
f
a
s
t
c
l
e
a
n
f
a
s
t
c
l
e
a
n
f
a
s
t
c
l
e
a
n
high
low
empty
high
low
empty
high
low
empty
high
low
empty
high
low
empty
high
low
empty
high
clean
eco
normal
intensive
auto select
low
empty
s
t
a
r
t
c
l
e
a
n
i
n
g
w
ashable
trim
m
er
reset
f
a
s
t
c
l
e
a
n
high
clean
eco
normal
intensive
auto select
low
empty
s
t
a
r
t
c
l
e
a
n
i
n
g
w
ashable
trim
m
er
reset
f
a
s
t
c
l
e
a
n
5671457_9595_MN_S4-102.indd 205671457_9595_MN_S4-102.indd 20 09.10.2006 10:10:49 Uhr09.10.2006 10:10:49 Uhr
La pagina sta caricando ...
La pagina sta caricando ...
La pagina sta caricando ...
La pagina sta caricando ...
La pagina sta caricando ...
La pagina sta caricando ...
La pagina sta caricando ...
La pagina sta caricando ...
La pagina sta caricando ...
La pagina sta caricando ...
La pagina sta caricando ...
La pagina sta caricando ...
La pagina sta caricando ...
La pagina sta caricando ...
La pagina sta caricando ...
La pagina sta caricando ...
La pagina sta caricando ...
La pagina sta caricando ...
La pagina sta caricando ...
La pagina sta caricando ...
La pagina sta caricando ...
La pagina sta caricando ...
La pagina sta caricando ...
La pagina sta caricando ...
La pagina sta caricando ...
La pagina sta caricando ...
La pagina sta caricando ...
La pagina sta caricando ...
La pagina sta caricando ...
La pagina sta caricando ...
La pagina sta caricando ...
La pagina sta caricando ...
La pagina sta caricando ...
La pagina sta caricando ...
La pagina sta caricando ...
La pagina sta caricando ...
La pagina sta caricando ...
La pagina sta caricando ...
La pagina sta caricando ...
La pagina sta caricando ...
La pagina sta caricando ...
La pagina sta caricando ...
La pagina sta caricando ...
La pagina sta caricando ...
La pagina sta caricando ...
La pagina sta caricando ...
La pagina sta caricando ...
La pagina sta caricando ...
La pagina sta caricando ...
La pagina sta caricando ...
La pagina sta caricando ...
La pagina sta caricando ...
La pagina sta caricando ...
La pagina sta caricando ...
La pagina sta caricando ...
La pagina sta caricando ...
La pagina sta caricando ...
La pagina sta caricando ...
La pagina sta caricando ...
La pagina sta caricando ...
La pagina sta caricando ...
La pagina sta caricando ...
La pagina sta caricando ...
La pagina sta caricando ...
La pagina sta caricando ...
La pagina sta caricando ...
La pagina sta caricando ...
La pagina sta caricando ...
La pagina sta caricando ...
La pagina sta caricando ...
La pagina sta caricando ...
La pagina sta caricando ...
La pagina sta caricando ...
La pagina sta caricando ...
La pagina sta caricando ...
La pagina sta caricando ...
La pagina sta caricando ...
La pagina sta caricando ...
La pagina sta caricando ...
La pagina sta caricando ...
La pagina sta caricando ...
-
 1
1
-
 2
2
-
 3
3
-
 4
4
-
 5
5
-
 6
6
-
 7
7
-
 8
8
-
 9
9
-
 10
10
-
 11
11
-
 12
12
-
 13
13
-
 14
14
-
 15
15
-
 16
16
-
 17
17
-
 18
18
-
 19
19
-
 20
20
-
 21
21
-
 22
22
-
 23
23
-
 24
24
-
 25
25
-
 26
26
-
 27
27
-
 28
28
-
 29
29
-
 30
30
-
 31
31
-
 32
32
-
 33
33
-
 34
34
-
 35
35
-
 36
36
-
 37
37
-
 38
38
-
 39
39
-
 40
40
-
 41
41
-
 42
42
-
 43
43
-
 44
44
-
 45
45
-
 46
46
-
 47
47
-
 48
48
-
 49
49
-
 50
50
-
 51
51
-
 52
52
-
 53
53
-
 54
54
-
 55
55
-
 56
56
-
 57
57
-
 58
58
-
 59
59
-
 60
60
-
 61
61
-
 62
62
-
 63
63
-
 64
64
-
 65
65
-
 66
66
-
 67
67
-
 68
68
-
 69
69
-
 70
70
-
 71
71
-
 72
72
-
 73
73
-
 74
74
-
 75
75
-
 76
76
-
 77
77
-
 78
78
-
 79
79
-
 80
80
-
 81
81
-
 82
82
-
 83
83
-
 84
84
-
 85
85
-
 86
86
-
 87
87
-
 88
88
-
 89
89
-
 90
90
-
 91
91
-
 92
92
-
 93
93
-
 94
94
-
 95
95
-
 96
96
-
 97
97
-
 98
98
-
 99
99
-
 100
100
-
 101
101


Braun 9595 - 5671 Pulsonic Manuale utente
- Categoria
- Rasoi da uomo
- Tipo
- Manuale utente
- Questo manuale è adatto anche per
in altre lingue
Documenti correlati
-
Braun 9565, Pulsonic Manuale utente
-
-
-
-
-
Braun 790CC-4 Manuale utente
-
-
-
-