Illy X9 Manuale utente
- Categoria
- Accessori per la preparazione del caffè
- Tipo
- Manuale utente

MANUALE DI ISTRUZIONI - INSTRUCTION MANUAL


MANUALE DI ISTRUZIONI - INSTRUCTION MANUAL ................................................ 4IT EN

4
ENIT
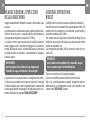
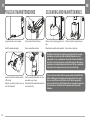
REGOLE GENERALI PER L’USO
DELLA MACCHINA
Leggere attentamente il libretto di istruzioni e le limitazioni sulla
garanzia.
La macchina deve essere allacciata ad una regolare presa di corren-
te fornita di messa a terra. La macchina deve essere allacciata ad
un impianto con impedenza massima di 0,31Ohm.
La macchina deve essere mantenuta pulita lavando frequente-
mente il poggia tazze, la vaschetta raccogli gocce, la vaschetta di
raccolta delle capsule usate, il serbatoio dell’acqua e la sede pog-
gia tazze superiore in alluminio. La manutenzione va eseguita a
macchina spenta.
IMPORTANTE:
mai immergere la macchina o le sue componenti
rimovibili in acqua o introdurla in lavastoviglie.
L’acqua contenuta nel serbatoio deve essere regolarmente sostitu-
ita. Non usare la macchina senza acqua nel serbatoio. Si consiglia
di utilizzare almeno ogni 2 mesi un prodotto per la rimozione del
calcare appositamente studiato per le macchine per espresso se-
condo le indicazioni del capitolo “DECALCIFICAZIONE”.
GENERAL OPERATING
RULES
Carefully read the instruction manual and warranty limitations.
The machine must be connected to a grounded power outlet. The
machine must be connected to a distribution system having a
maximum impedence of 0,31Ohm.
The machine must be kept clean by frequently washing the cup
holder, the drip tray, the used capsule tray, the water tank and the
aluminium cup holder seat.
Any maintenance operation shall be carried out when the ma-
chine is o.
IMPORTANT:
never immerse the machine or its removable compo-
nents in water or put it in the dishwasher.
The water in the tank must be replaced regularly.
Do not use the coee machine without water in the tank.
The use of a descaling product especially designed for espresso
coee machines is recommended at least every 2 months as de-
scribed in the “DESCALING” chapter.

5
ENIT
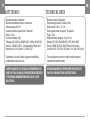
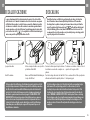
DATI TECNICI
Materiale macchina: Alluminio
Materiale scambiatore termico: Acciaio inox
Serbatoio acqua: 0,7 litri
Capacità vaschetta capsule usate: 10 capsule
Pompa: 15 bar
Peso senza imballo: 4 Kg
Voltaggio: 220-240 Vac, 50/60 Hz (EU); 120 Vac, 60 Hz (USA)
Potenza: 1200 W (EU-USA) - Con funzionalità “Power Save”
Dimensioni (L x P x A) (mm): 123 x 269 x 267
Il produttore si riserva il diritto d’apportare modiche o
miglioramenti senza preavviso.
SCOPRI E ACQUISTA LE CAPSULE ILLY IPERESPRESSO SU
SHOP.ILLY.COM, NEI BAR ILLY RIVENDITORI AUTORIZZATI
O TELEFONA AL NUMERO VERDE 800-821021 (SOLO
DALL’ITALIA)
TECHNICAL DATA
Machine material: Aluminium
Heat exchange material: Stainless steel
Water tank: 0.7 liters / 23.7 oz
Used capsule container capacity: 10 capsules
Pump: 15 bar
Weight without packaging: 4 Kg / 141 oz
Voltage: 220-240 V, 50/60 Hz (EU); 120 V, 60 Hz (USA)
Power: 1200 W (EU-USA) - With “Power Save” function
Size (W x D x H): 123 x 269 x 267 (mm) / 4.8 x 10.6 x 10.5 (inch)
The manufacturer reserves the right to make changes or
improvements without notice.
DISCOVER AND BUY ILLY IPERESPRESSO CAPSULES AT
SHOP.ILLY.COM OR AT OUR FINEST RETAILERS.

6
ENIT
SOMMARIO
REGOLE GENERALI PER L’USO DELLA MACCHINA ............................................4
DATI TECNICI ............................................................................................... 5
PARTI DELLA MACCHINA ............................................................................... 7
IMPORTANTI MISURE DI SICUREZZA .............................................................. 8
INSTALLAZIONE E MESSA IN FUNZIONE DELLA MACCHINA ............................ 13
PREPARAZIONE DEL CAFFÈ ......................................................................... 14
REGOLAZIONE QUANTITÀ DI CAFFÈ IN TAZZA ............................................... 17
PULIZIA E MANUTENZIONE ......................................................................... 18
DECALCIFICAZIONE .................................................................................... 19
LIMITAZIONI SULLA GARANZIA ................................................................... 23
SEGNALAZIONE STATO MACCHINA ............................................................. 25
PROBLEMA CAUSA SOLUZIONE ................................................................ 26
SMALTIMENTO ........................................................................................... 28
CONTENTS
GENERAL OPERATING RULES ........................................................................ 4
TECHNICAL DATA.......................................................................................... 5
MACHINE PARTS .......................................................................................... 7
IMPORTANT SAFEGUARDS ............................................................................ 8
INSTALLATION AND STARTUP OF THE MACHINE .......................................... 13
PREPARING COFFEE ................................................................................... 14
ADJUSTING COFFEE QUANTITY IN THE CUP ................................................... 17
CLEANING AND MAINTENANCE ................................................................... 18
DESCALING ................................................................................................ 19
WARRANTY LIMITATIONS ........................................................................... 23
WARNINGS MACHINE STATUS ................................................................... 25
TROUBLESHOOTING ................................................................................... 26
DISPOSAL .................................................................................................. 28

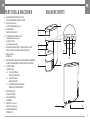
7
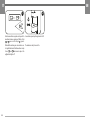
ENIT
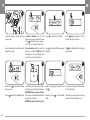
H1 H2
H3
A
B
D
E
F
J
C
K
G
I
H
L
PARTI DELLA MACCHINA
A LEVA APERTURA/CHIUSURA VANO CAPSULE
CAPSULE COMPARTMENT OPEN/CLOSED LEVER
B VANO CAPSULE (interno)
CAPSULE COMPARTMENT (internal)
C EROGATORE CAFFÈ
COFFEE DISPENSING SPOUT
D VASCHETTA RACCOLTA CAPSULE USATE
(residui liquidi di ne erogazione)
USED CAPSULE TRAY
(post-brewing liquid residues)
E PIANO POGGIA TAZZINA ESPRESSO / PIANO POGGIA TAZZA MUG
ESPRESSO CUP HOLDER SURFACE / MUG HOLDER SURFACE
F SERBATOIO ACQUA
WATER TANK
G FINESTRE CONTROLLO LIVELLO ACQUA / PRESA PER ESTRAZIONE SERBATOIO
WATER LEVEL CHECK WINDOW / WATER TANK EXTRACTION HANDLE
H TASTIERA COMANDI
CONTROL KEYPAD
H1 TASTO CAFFÈ ESPRESSO
ESPRESSO COFFEE BUTTON
H2 TASTO CAFFÈ LUNGO
LONG COFFEE BUTTON
H3 SPIA SEGNALAZIONE STATI MACCHINA
MACHINE STATUS INDICATOR LIGHT
I PIANO POGGIA TAZZE
CUP HOLDER SURFACE
J CAVO ALIMENTAZIONE
POWER CORD
K TARGA DATI (sotto la base)
DATA PLATE (under the base)
L INTERRUTTORE GENERALE
POWER BUTTON
MACHINE PARTS

8
ENIT
IMPORTANTI MISURE DI SICUREZZA
Nell’utilizzo di apparecchiature elettriche devono essere sempre
osservate le seguenti misure di sicurezza.
Utilizzo dell’apparecchio
• Leggere tutte le istruzioni.
• Questa macchina è costruita per “fare il caè espresso”: fare at-
tenzione a non scottarsi con getti d’acqua o con uso improprio
della stessa.
• L’apparecchiatura è intesa per uso domestico e per applicazioni
simili, quali:
- o cucine per il personale di negozi, uci ed altri ambienti
lavorativi;
- o agriturismo;
- o clienti in alberghi, motel ed altri alloggi di tipo residenziale;
- o ambienti tipo bed & breakfast.
• Utilizzare l’apparecchio solo per l’uso a cui è destinato. Ogni altro
uso è vietato e da considerarsi improprio e quindi pericoloso.
• L’apparecchio va acceso esclusivamente per il solo tempo neces-
sario al suo utilizzo, dopodiché va spento portando l’interrut-
tore generale su “0” (Fig.1) e la spina va staccata dalla presa di
corrente.
• Non toccare mai una supercie calda. Le erogazioni di acqua/caf-
fè della macchina possono causare ustioni.
• L’apparecchio non è destinato ad essere utilizzato da persone
(compresi i bambini) con ridotte capacità siche, mentali o sen-
soriali o con esperienza e/o competenze insucienti, a meno
IMPORTANT SAFEGUARDS
When using electrical appliances always follow the safety precau-
tions below.
Using the espresso machine
• Read all Instructions.
• This machine is manufactured to make espresso coee: use care
to prevent scalding due to water jets or any improper use of the
machine.
• This appliance is intended to be used in household and similar
applications such as:
- o sta kitchen areas in shops, oces and other working
environments;
- o farm houses;
- o hotels, motels and other residential type environments;
- o bed and breakfast type environments.
• This machine is intended for household use only. Any other use is
considered improper and therefore dangerous.
• The machine must be turned on only when being used. After use,
it must be turned o by moving
the main on/o switch to the
“0” position (Fig.1) and discon-
necting the plug from the pow-
er outlet.
• Do not touch hot surfaces. The
water/coee dispensed from
the machine may cause burns.
1

9
ENIT
che non siano sotto la supervisione di una persona responsa-
bile della loro sicurezza o non vengano da essa istruite sull’uso
dell’apparecchio.
• Tenere i bambini sotto supervisione, per evitare che giochino con
l’apparecchio.
• Le operazioni di pulizia e manutenzione non devono essere ese-
guite da bambini, a meno che non abbiano un’età superiore agli
8 anni e siano supervisionati. Tenere l’apparecchio e il relativo
cavo fuori dalla portata dei bambini di età inferiore a 8 anni.
• Utilizzare l’apparecchio esclusivamente in luoghi chiusi e protetti
da agenti atmosferici esterni. Non utilizzare all’aperto.
• Per proteggersi dal fuoco, scosse elettriche o lesioni non immer-
gere il cavo, la spina ed il corpo della macchina in acqua o altro
liquido.
• Non appoggiare l’apparecchio su fornelli elettrici o a gas, o den-
tro un forno caldo.
• L’utilizzo di accessori non raccomandati dal produttore può pro-
vocare incendi, scosse elettriche o lesioni alle persone.
• Prima di disinserire la spina accertarsi che l’interruttore generale
sia sulla posizione “0” (Fig.1).
• Non estrarre la spina tirandola per il cavo e non toccarla con le
mani bagnate.
• Non portare o tirare la macchina per caè tenendola per il cavo.
• Per ridurre il pericolo di ferite, non lasciare penzolare il cavo da
tavoli o banconi in quanto i bambini potrebbero tirarlo o inciam-
pare involontariamente.
• In caso d’incendio utilizzare estintori ad anidride carbonica (CO2).
• Non utilizzare acqua o estintori a polvere.
• The machine is not designed to be used by people (including
children) with limited physical, mental or sensory abilities or in-
sucient experience and/or skills, unless they are supervised by
a person responsible for their safety, who provides instructions
on how to use the appliance.
• Children must be kept under supervision to prevent them from
playing with the appliance.
• Cleaning and user maintenance shall not be made by children
unless they are older than 8 and supervised. Keep the appliance
and its cord out of reach of children aged less than 8 years.
• Use the machine only indoors, protected from weather. Do not
use outdoors.
• To protect against re, electric shock or personal injury do not
immerse the cord, plug or the body of the machine in water or
any other liquid.
• Do not place the machine on, or near, electrical or gas burners or
inside a hot oven.
• Using attachments not recommended by the manufacturer may
result in re, electric shocks or personal injury.
• Before unplugging the machine make sure that the ON/OFF
switch is in the “0” position (Fig.1).
• Do not pull the plug out by the cord and never touch it with wet
hands.
• Do not carry or pull the coee machine by the cord.
• To reduce the risk of injury, do not drape cord over the counter
top or table top where it can be pulled on by children or tripped
over unintentionally.
• In case of re, extinguish with carbon dioxide (CO2). Do not use

10
ENIT
• Non bloccare mai le griglie di aerazione poste sulla base
dell’apparecchio.
Installazione dell’apparecchio
• Leggere attentamente le istruzioni.
• Non installare mai la macchina in un ambiente che può rag-
giungere una temperatura inferiore o uguale a 0°C (se l’acqua
si ghiaccia, l’apparecchio può danneggiarsi) o superiore a 40°C.
• Vericare che la tensione della rete elettrica corrisponda a quella
indicata nella targa dati dell’apparecchio. Collegare l’apparecchio
solo ad una presa di corrente avente una portata minima di 6A
per i modelli alimentati a 230Vac e 15A per i modelli a 120Vac
e dotati di un’eciente messa a terra.
• In caso di incompatibilità tra la presa di corrente e la spina
dell’apparecchio, fare sostituire la spina con un’altra di tipo adat-
to, da centro assistenza autorizzato.
• Posizionare l’apparecchio sopra un piano di lavoro lontano da ru-
binetti dell’acqua e lavelli.
• Dopo aver tolto l’imballaggio, assicurarsi dell’integrità dell’appa-
recchio prima della sua installazione.
• Non lasciare alla portata dei bambini i materiali utilizzati per im-
ballare la macchina.
Pulizia dell’apparecchio
• Disinserire la spina dall’impianto elettrico quando si esegue la
pulizia.
• Lasciare rareddare l’apparecchio prima della pulizia.
• Estrarre il serbatoio dell’acqua tirandolo leggermente verso l’alto
water or powder extinguishers.
• Never obstruct the vents on the base of the machine.
Installation of the espresso machine
• Read the instructions carefully.
• Do not install the machine in an area where the temperature may
reach 0°C/32°F or lower (if water freezes, the appliance may be
damaged) or higher than 40°C/104°F.
• Check that the mains electric voltage corresponds to the require-
ments indicated on the machine data plate. Connect the ma-
chine only to a properly grounded power outlet with a minimum
rating of 6A for models powered at 230Vac, and 15A for models
powered at 120Vac.
• If the plug and the outlet are not compatible, have the plug re-
placed with a proper one by an authorized service center.
• Place the machine on a countertop away from water taps and
sinks.
• After removing the packaging, check that the appliance is in per-
fect condition before installation.
• Do not leave the packaging materials within children’s reach.
Cleaning the espresso machine
• Unplug the machine before cleaning.
• Wait until the machine is cool before cleaning.
• Remove the water tank by pulling it up slightly and then outward.
• Clean the body and attachments with a wet cloth and then wipe

11
ENIT
e poi verso l’esterno.
• Pulire la carrozzeria e gli accessori con un panno umido ed asciu-
gare successivamente con un panno asciutto non abrasivo. È
sconsigliato l’uso di detergenti.
• Non sottoporre l’apparecchio ad abbondanti getti d’acqua o ad
immersioni parziali o totali.
In caso di guasto dell’apparecchio
Non utilizzare l’apparecchio nel caso in cui il cavo o la spina siano
danneggiati, dopo un malfunzionamento della macchina o dopo
un danno di qualunque natura. Portare l’apparecchio al più vicino
centro di assistenza autorizzato per un controllo, riparazione o una
verica sul corretto funzionamento.
Se il cavo d’alimentazione è danneggiato, deve essere cambiato
dal produttore o dal suo servizio assistenza.
In caso di guasto o di cattivo funzionamento dell’apparecchio, spe-
gnerlo e non manometterlo.
Per eventuali riparazioni, rivolgersi solamente ad un Centro di As-
sistenza Tecnica autorizzato dal costruttore e richiedere l’utilizzo di
ricambi originali. Il mancato rispetto di quanto sopra può compro-
mettere la sicurezza dell’apparecchio e fare perdere il diritto alla
garanzia.
Uso improprio dell’apparecchio
• Il costruttore non può essere considerato responsabile per even-
tuali incidenti causati dalla mancanza o dalla non conformità alle
leggi vigenti dell’impianto di messa a terra.
• Il costruttore non può essere considerato responsabile per even-
tuali danni derivanti da usi impropri, erronei ed irragionevoli.
with a non-abrasive dry cloth. Do not use detergents.
• Do not expose the machine to extended jets of water or immerse
it in water, partially or fully.
In case of malfunctioning
Do not use the appliance if the cord or plug are damaged or if the
appliance shows signs of malfunctioning or has been damaged in
any way. Take the machine to the nearest authorized service center
for checks or repairs.
If the power cord is damaged it must be replaced by the manufac-
turer or an authorized service center.
In case of damage or malfunction, turn o the appliance and do
not tamper with it.
For repairs contact a service center authorised by the manufactur-
er and request the use of original spare parts only. Failure to com-
ply with these instructions may compromise the safe operation of
the machine and will result in the forfeiture of warranty rights.
Improper use of the appliance
• The manufacturer is not liable for accidents caused by non-com-
pliance with existing legislation on electrical grounding systems.
• The manufacturer is not liable for possible damage caused by
improper, incorrect or unreasonable use.

12
ENIT
Istruzioni per il cavo di alimentazione
a) Utilizzare un cavo di alimentazione corto per evitare di rimanere
impigliati o inciampare su un cavo più lungo.
b) È possibile utilizzare prolunghe a condizione che si presti parti-
colare attenzione durante l’uso.
c) Qualora venga utilizzata una prolunga:
1) Vericare che la potenza elettrica della prolunga sia almeno
pari a quella dell’apparecchio;
2) Se l’apparecchio è del tipo con messa a terra, vericare che la
prolunga sia a tre li e provvista di messa a terra;
3) Posizionare il cavo più lungo in modo tale che non penda dal
piano di lavoro o dal tavolo per evitare che i bambini lo tirino
o inciampino.
ATTENZIONE: CONSERVARE
QUESTE ISTRUZIONI.
Power-supply cord instructions
a) A short power-supply cord is to be provided to reduce risks result-
ing from becoming entangled in or tripping over a longer cord.
b) Extension cords are available and may be used if care is exercised
in their use.
c) If extension cord is used:
1) The marked electrical rating of extension cord should be at
least as great as the electrical rating of the appliance;
2) If the appliance is of the grounded type, the extension cord
should be a grounding-type 3-wire cord; and
3) The longer cord should arranged so that it will not drape over
the counter top or table top where it can be pulled on by chil-
dren or tripped over.
IMPORTANT: SAVE THESE
INSTRUCTIONS.

13
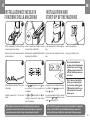
ENIT
INSTALLATION AND
START-UP OF THE MACHINE
INSTALLAZIONE E MESSA IN
FUNZIONE DELLA MACCHINA
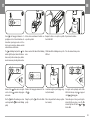
1234
Estrarre completamente il serbatoio dell’acqua
usando le apposite nestre laterali.
Lavare e sciacquare bene. Riempire con acqua
fresca potabile no al livello MAX.
Inserire completamente il serbatoio nella mac-
china.
Inserire la spina nella presa.
Remove the water tank completely using the
special side windows.
Wash and rinse thoroughly. Fill with fresh drink-
ing water up to the MAX level.
Insert the water tank completely into the ma-
chine.
Insert power cord into the socket.
567Dopo 30 minuti d’inutilizzo la
macchina entra automaticamente in
modalità Power Save ed i tasti
e lampeggiano lentamente. Per
riattivare la macchina premere uno
dei due tasti.
After 30 minutes of inactivity, the
machine goes automatically into
Power Save mode and the and
buttons blink slowly. Press any
of the two buttons to turn on the
machine again.
Portare l’interruttore generale su “I” per accende-
re la macchina.
I tasti , lampeggiano, la spia rima-
ne accesa ssa per 15sec e poi si spegne: fase di
riscaldamento.
Un segnale acustico indica che la macchina è pron-
ta per l’utilizzo. I tasti e sono accesi ssi.
La spia è spenta.
Switch the power button to “I” to turn on the
machine.
The and buttons blink, the indi-
cator light is steady on for 15 seconds and then
turns o: warming up.
An acoustic alarm indicates that the he machine
is ready for use. and buttons are steady
on. The indicator light is o.
NOTA: alla prima accensione e nel caso di inattività per più giorni, dopo aver
posizionato un contenitore di capacità adeguata sotto l’erogatore, si suggerisce di
erogare almeno mezzo serbatoio d’acqua con la macchina priva di capsule.
NOTE: at rst start-up and in case of several days of inactivity, it is recommended
to dispense at list half of the water tank without putting any capsules in the
machine, after placing a suitably sized container under the dispensing spout.

14
ENIT
PREPARING COFFEEPREPARAZIONE DEL CAFFÈ
1234
Usare solo capsule Iperespresso per uso dome-
stico.
Vericare il livello dell’acqua tramite le apposite
nestre.
Estrarre il serbatoio no alla posizione di blocco. Riempire con acqua fresca potabile no al livello
MAX.
Use only Iperespresso capsules for domestic use. Check the water level using the special windows. Remove the water tank up to the lock position. Fill with fresh drinking water up to the MAX level.
5678
Inserire completamente il serbatoio nella mac-
china.
I tasti e sono accesi ssi. La spia
è spenta.
Sganciare la leva. Sollevare la leva.
Insert the water tank completely into the ma-
chine.
and buttons are steady on. The
indicator light is o.
Disengage the lever. Lift the lever.
Il serbatoio dell’acqua consente il riempimento senza la necessità di estrarlo
completamente dalla sede ma mantenendo la possibilità di erogare caè. La
posizione di riempimento è segnalata da una leggera resistenza allo scorrimento
a circa metà corsa. Non possono essere usati altri tipi di capsule perchè potrebbero
danneggiare la macchina.
NOTA: se è presente una capsula nel vano verrà automaticamente rimossa all’aper-
tura del vano stesso. La capsula deve entrare nel vano facilmente; in caso contrario
estrarla e riposizionarla correttamente.
The water tank allows lling without removing it completely from its seats so that
brewing coee is possible during this operation. The lling position is indicated by
a slight sliding resistance at about halfway. Never use other types of capsules as
they may damage the machine.
NOTE: if there is a capsule in the compartment it will be automatically removed
when opening the compartment. The capsule should t into the compartment
easily, otherwise remove and reposition it correctly.

15
ENIT
910 11 12
Inserire la capsula. Abbassare la parte mobile. Bloccare abbassando la leva.
Insert the capsule. Lower the moving part. Lock into place by lowering the lever.
13 14
Posizionare la tazzina espresso. O abbassare il supporto poggia tazzina e posizio-
nare una tazza grande o mug.
Premere per erogare un espresso. O premere per erogare un caè lungo.
Place the espresso cup in position. Or lower the cup holder support and place a mug
in position.
Press to brew an espresso coee. Or press to brew long coee.
ATTENZIONE: assicurarsi che il vano capsule sia chiuso correttamente prima di
premere il tasto di erogazione caè.
WARNING: make sure that the capsule compartment is correctly closed before
pressing the brew button.

16
ENIT
15 Attendere che i tasti e siano accesi ssi prima di preparare il caè successivo.
Wait until the buttons and are steady on before brewing next coee.
L’erogazione termina automaticamente.
Brewing will stop automatically.
Se il volume della bevanda è ritenuto insuciente, è possibile erogare altro caè
premendo nuovamente il tasto appena utilizzato, senza cambiare capsula. Per
arrestare l’erogazione è necessario premere ancora lo stesso tasto.
ATTENZIONE: in ogni caso l’erogazione terminerà automaticamente dopo circa
70secondi, ma in questo caso potrebbe vericarsi la fuoriuscita del caè dalla
tazzina. NOTA: l’erogazione di un espresso lungo potrebbe provocare fuoriuscita di
caè dalla tazzina se questa non è abbastanza capiente.
RACCOMANDAZIONI
Per gustare un espresso di elevata qualità ricordare di:
• Cambiare giornalmente l’acqua nel serbatoio.
• Usare preferibilmente acqua con durezza totale inferiore a 12 gradi francesi per ridurre i depositi
all’interno della macchina.
• Utilizzare tazzine calde.
If the amount of the beverage is considered insucient, you can brew more coee
by pressing the same button without changing the capsule. The brewing process
can be stopped by pressing the same button again.
WARNING: Brewing will always stop automatically after about 70seconds, but
in this case coee may ow out of the cup. NOTE: when brewing a long espresso,
coee may ow out of the cup if this is not large enough.
RECOMMENDATIONS
To enjoy a high quality espresso, remember to:
• Change the water in the tank daily.
• If possible, use water with a hardness of less than 12 French degrees to reduce the deposits inside
the machine.
• Use warmed cups.

17
ENIT
ADJUSTING COFFEE QUANTITY IN
THE CUP
REGOLAZIONE QUANTITÀ DI CAFFÈ
IN TAZZA
1234
Inserire la capsula. Bloccare abbassando la leva. Mantenere premuto il tasto o per me-
morizzare il volume in tazza per caè espresso o
caè lungo, per tutta la durata dell’erogazione.
Rilasciare il tasto al raggiungimento della quan-
tità di caè desiderata.
Insert the capsule. Lock into place by lowering the lever. Press and hold the or button during the
whole brewing process to store the amount of
espresso or long coee in the cup.
Release the button when the desired quantity of
coee is reached.
5La macchina consente di regolare la quantità/volume di caè desiderato in tazza
per entrambi i tasti d’erogazione e . NOTA: per semplicità sarà mostrato
come programmare il solo tasto ; per programmare il tasto eseguire la
medesima procedura premendo .
The machine allows you to set the desired quantity/volume of coee in a cup for
both brew buttons and . NOTE: for purposes of simplication only the
programming of the button will be explained; for the programming of the
button proceed the same way, press the button.
Il livello è memorizzato. La macchina è ora programmata. Al prossimo utilizzo del tasto verrà erogata
la quantità di caè appena memorizzata.
This level is stored. The machine is now programmed. The next time the button is pressed, the stored
quantity of coee will be brewed.
Le impostazioni di fabbrica rispecchiano dei parametri medi per preparare il mi-
glior caè illy con le capsule Iperespresso. NOTA: per la preparazione di caè lungo
si consiglia di usare le capsule Iperespresso di colore blu.
The machine has been preset in the factory with standard parameters suitable to
prepare the best illy coee with “Iperespresso” capsules. NOTE: For long coees, we
recommend using the blue “Iperespresso” capsules.

18
ENIT
CLEANING AND MAINTENANCEPULIZIA E MANUTENZIONE
1234
Spegnere la macchina e staccare la spina. Estrarre e lavare il serbatoio dell’acqua. Sollevare ed estrarre il piano poggia tazze e la-
varlo.
Estrarre la vaschetta raccogli capsule usate.
Turn o the machine and unplug it. Remove and wash the water tank. Lift and remove the cup holder surface and wash it. Remove the used capsule tray.
56Non utilizzare l’acqua rimasta nel serbatoio per alcuni giorni; lavarlo e riempirlo
giornalmente con acqua fresca potabile. La pulizia della macchina e dei suoi
componenti deve essere eseguita almeno una volta alla settimana. Non utilizzare
alcool etilico, solventi, spugne abrasive o agenti chimici aggressivi. Non asciugare
la macchina o i suoi componenti in un forno a microonde o un forno convenzionale.
La macchina ed i suoi componenti non si possono lavare in lavastoviglie.
Do not use the water left in the tank for some days; wash the tank and ll it daily
with fresh drinking water. The machine and its components must be cleaned at
least once a week. Do not use ethyl alcohol, solvents, abrasive sponges and/or
aggressive chemicals. Do not dry the machine and/or it components in a microwave
or conventional oven. The machine and its components cannot be put in the
dishwasher.
Vuotare la vaschetta dai residui (capsule usate/
caè) e lavarla.
Pulire la carrozzeria della macchina solo con un
panno umido e un po’ d’acqua.
Empty the tray from any residues (used cap-
sules/coee) and wash it.
Clean the body of the machine with a damp cloth
and some water only.

19
ENIT
DESCALING
Read all instructions carefully before performing the descaling cycle. Duration:
about 15 minutes. Limescale normally builds up with the use of the machine.
Descaling allows to optimize cleaning and to remove limescale deposits from the
inside. The indicator light between the two coee buttons will automat-
ically start blinking (yellow colour) when the machine needs to be descaled. It is
recommended to descale the machine every 2 months by using a descaling product
especially designed for coee machines.
DECALCIFICAZIONE
Leggere attentamente tutte le istruzioni prima d’eseguire il ciclo di decalcica-
zione. Durata: circa 15minuti. La formazione di calcare è la naturale conseguenza
dell’utilizzo della macchina. La decalcicazione consente di ottimizzare la pulizia
e di rimuovere i residui di calcare dal suo interno. La macchina segnala automati-
camente quando necessita decalcicazione, facendo lampeggiare la spia in giallo
posta tra i due tasti caè . Si consiglia di decalcicare la macchina ogni 2
mesi con un prodotto specico per macchine da caè.
123
1 L
4
Spegnere la macchina. Estrarre e riempire il serbatoio con acqua fresca
potabile no al livello MAX.
Versare nel serbatoio pieno d’acqua la soluzione
decalcicante e mescolare no a completo scio-
glimento.
Posizionare un contenitore di almeno 1 litro di
capacità sotto l’erogatore di caè.
Turn o the machine. Remove and ll the tank with fresh drinking wa-
ter up to the MAX level.
Pour the descaling solution into the tank lled
with water and stir until it is completely dissolved.
Place a container of at least 1 litre capacity under
the dispensing spout.
Per la procedura di decalcicazione, fare riferimento a quanto riportato nel relati-
vo capitolo di questo manuale. Utilizzare solo prodotti decalcicanti per macchine
da caè, disciolti secondo le modalità di diluizione riportate sulle istruzioni del
prodotto. Se il ciclo di decalcicazone non è portato a termine regolarmente, la
macchina lo segnala nel modo descritto nel paragrafo “SEGNALAZIONE - STATO
MACCHINA”. NOTA: Se durante la procedura di decalcicazione dovesse mancare
tensione di rete, una volta ripristinata la corrente il ciclo riprenderà da dove si
è interrotto. Non bere il liquido erogato durante il processo di decalcicazione;
la macchina può essere utilizzata per erogare caè solo quando il processo di
decalcicazione è terminato.
For the descaling procedure, refer to that indicated in the corresponding chapter
in this manual. Use only descaling products for coee machines, dissolved
according to the procedures indicated in the instructions for the product. If the
descaling cycle is not completed correctly, the machine signals it as described in
section “WARNINGS - MACHINE STATUS”. NOTE: Should a power failure occur during
the descaling procedure, the cycle will resume from where it stopped when power
is restored. Do not drink the liquid dispensed during the descaling process. The
machine can be used to brew coee only when the descaling process has been
completed.

20
ENIT
5678
Accendere la macchina e vericare che il vano
capsule sia vuoto.
Accendere la macchina: entro 15 secondi
dall’accensione, premere e mantenere premuto
il tasto no all’emissione di 4 segnali acu-
stici (3 suoni corti e 1 lungo). Rilasciare il tasto.
La spia si accende ssa di colore giallo. Il tasto lampeggia lentamente. Il ciclo di
decalcicazione può essere avviato.
Turn on the machine and check that the capsule
compartment is empty.
Turn on the machine: within 15 seconds from
power on, press and hold the button until
the machine gives out 4 acoustic signals (3 short
ones and 1 long one). Release the button.
The indicator light will blink a permanent
yellow light.
The button blinks slowly. The descaling cycle
can be activated.
910
1 L
11 12
Premere il tasto e questo inizierà a lampeg-
giare velocemente.
La macchina erogherà acqua in modo intermit-
tente dal gruppo erogatore (durata 13 minuti).
ATTENZIONE: l’acqua erogata è molto calda.
Durante il ciclo lampeggia velocemente il tasto
caè .
Un segnale acustico ripetuto indica la ne della
fase di decalcicazione.
Press the button. It will start blinking quickly. Water is dispensed intermittently from the brew
group (duration: 13 minutes).
WARNING: the dispensed water is very hot.
During the cycle the coee button blinks
quickly.
The machine gives out a repeated acoustic signal
to indicate that the descaling phase is over.
La pagina si sta caricando...
La pagina si sta caricando...
La pagina si sta caricando...
La pagina si sta caricando...
La pagina si sta caricando...
La pagina si sta caricando...
La pagina si sta caricando...
La pagina si sta caricando...
La pagina si sta caricando...
La pagina si sta caricando...
-
 1
1
-
 2
2
-
 3
3
-
 4
4
-
 5
5
-
 6
6
-
 7
7
-
 8
8
-
 9
9
-
 10
10
-
 11
11
-
 12
12
-
 13
13
-
 14
14
-
 15
15
-
 16
16
-
 17
17
-
 18
18
-
 19
19
-
 20
20
-
 21
21
-
 22
22
-
 23
23
-
 24
24
-
 25
25
-
 26
26
-
 27
27
-
 28
28
-
 29
29
-
 30
30


Illy X9 Manuale utente
- Categoria
- Accessori per la preparazione del caffè
- Tipo
- Manuale utente
in altre lingue
- English: Illy X9 User manual