Casio SR-S500 Manuale utente
- Categoria
- Registratori di cassa
- Tipo
- Manuale utente

Complete Manual
SR-S500
Electronic Cash Register
(S size drawer)
MA1808-BSRS500CM*E

E-2
Introduction
Thank you very much for purchasing this CASIO electronic cash register. START-UP is QUICK and
EASY!
For the basic settings of your cash register, please see “Quick Start Guide”.
Original Carton/Package
If for any reason, this product is to be returned to the store where purchased, it must be packed in the
original carton/package.
Location
Locate the Cash register on a at, stable surface, away from heaters or areas exposed to direct sunlight,
humidity or dust.
Power Supply
Your cash register is designed to operate on standard household current (120 V, 220 V, 230 V, 240 V;
50/60 Hz). Do not overload the outlet by plugging in too many appliances.
The mains plug on this equipment must be used to disconnect mains power. Please ensure that the
socket outlet is installed near the equipment and shall be easily accessible.
Trademark
SD and SDHC Logos are trademarks of SD-3C, LLC.
The Bluetooth wordmark and logo are registered trademarks of Bluetooth SIG,
Inc. and are used by permission granted to Casio Computer as a certied logo
user.
Interference with the Operation of Other Equipment (Using Wireless Data Communication)
+• Keep your Cash Register well away from anyone wearing a pacemaker. Radio waves
emitted by the Cash Register can aect the operation of a pacemaker.

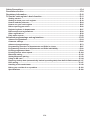
E-3
Safety Precautions ..................................................................................................................E-4
Precautions for Use .................................................................................................................E-8
Regulatory Information ......................................................................................................... E-10
To use the cash register’s basic function ........................................................................... E-11
Getting started ................................................................................................................................ E-12
Getting to know your cash register .............................................................................................. E-19
How to read the printouts ..............................................................................................................E-24
How to use your cash register ......................................................................................................E-25
Before opening your store .............................................................................................................E-26
Registering items in departments ................................................................................................E-27
Basic setups and registrations .....................................................................................................E-30
Other registrations .........................................................................................................................E-38
Daily sales reports..........................................................................................................................E-49
Advanced programmings and registrations ....................................................................... E-52
Advanced registrations ..................................................................................................................E-54
Character settings ..........................................................................................................................E-65
Advanced programmings ..............................................................................................................E-73
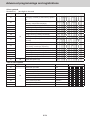
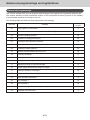
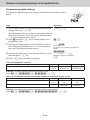
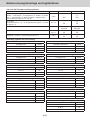
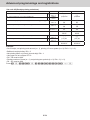
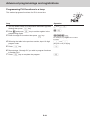
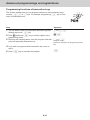
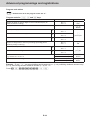
Programming functions of departments and PLUs in a lump ...................................................E-87
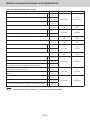
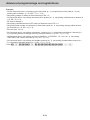
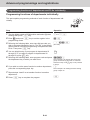
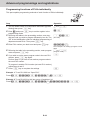
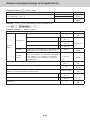
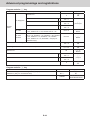
Programming functions of departments and PLUs individually ...............................................E-90
Printing programmed data .............................................................................................................E-99
Printing various sales reports ..................................................................................................... E-104
Bluetooth setting ......................................................................................................................... E-112
Setting Bluetooth pairing............................................................................................................. E-112
Using an SD card .......................................................................................................................... E-114
Restoring backup data (automatically backed up setting data) from built in ash memory E-117
POP setting ................................................................................................................................... E-117
Handling of the cash drawer ....................................................................................................... E-118
Before you consider it as a problem .......................................................................................... E-120
Specications ............................................................................................................................... E-126

E-4
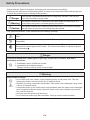
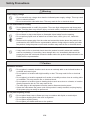
Safety Precautions
• Please read this “Safety Precautions” thoroughly and use the product accordingly.
• Please pay due attention to the following symbols to help you use the product safely and properly and
to avoid any personal injury or damage to the product.
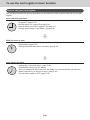
*Danger If this symbol is ignored and the product consequently misused, it can result in
serious personal injury and/or death.
*Warning This symbol indicates the contents that may cause death or serious injury to a
person when the product is misused ignoring this symbol.
*Caution This symbol indicates the contents that may cause injury to a person or property
damage when the product is misused ignoring this symbol.
• The “pictorial indications” in this manual have the following meanings.
’/ This symbol means “to be careful = caution”. The example at left is “caution for electrical
shock”.
!- This symbol means “must not do = prohibited”. The example at left is “prohibited to
disassemble”.
$0 This symbol means “something must be done = instruction”. The example at left is
“disconnect the power plug from the outlet”. The “instructions dicult to express in picture”
are indicated by +.
*Danger
If liquid that leaked from a battery gets in your eye, on your skin or clothes, deal with it
immediately as follows.
-1. Immediately rinse it o with lots of water.
2. Immediately get medical treatment.
Failing to act may result in a rash or loss of sight.
*Warning
Power Cords and Plugs
-
’
• Do not twist, pull, heat, modify, or place anything heavy on the power cord. This may
damage the power cord and result in re or electrical shock.
• Refrain from routing cords under this product. If the power cord is damaged, it may cause
a re or an electrical shock.
• Contact the dealer or the CASIO service representative when the power cord is damaged
(wire is exposed or disconnected). Using the power cord in such condition may result in
re or electrical shock.
• Securely insert the power plug all the way.
• Do not touch the power plug with wet hands. This may result in electrical shock.

E-5
Safety Precautions
*Warning
Power supply voltage
-• Do not use with any voltage other than the indicated power supply voltage. This may result
in re or electrical shock.
• Do not overload the outlet with wires. This may result in re or electrical shock.
Do not disassemble or modify
!• Do not disassemble or modify the product. There are high voltage parts and sharp parts
inside. Touching them may result in injury or electric shock, or cause a malfunction or re.
Do not let any foreign object or water get inside
-
$
• Do not insert or drop metal object or ammable object inside from the opening.
• Do not spill any liquid such as water from a ower vase, coee, juice, etc., inside this
product.
• Disconnect the power plug from the outlet and contact the dealer where the product was
purchased or the CASIO service representative when a foreign object or water got inside
the product. Using the power cord in such condition may result in re or electrical shock.
Do not use the product in abnormal condition
-• It may result in re or electrical shock when the product is used in abnormal condition
such as overheating, it is smoking, have strange odor, etc. Immediately disconnect the
power plug from the outlet and contact the dealer where the product was purchased or the
CASIO service representative.
*Caution
Installation location
-• Do not place in unstable locations such as on an unsteady table or an inclined location. It
could fall and cause injure.
• Do not place in a location with high humidity or dust. This may result in re or electrical
shock.
• Do not place in a location exposed to oil smoke or humidity such as close to cooking table
or humidier. This may result in re or electrical shock.
• Do not place in a location close to heating devices such as a stove or a heater, or location
directly exposed to hot air. This may result in re.
• The main plug on this equipment must be used to disconnect mains power.
• Select the outlet where the power cord of this product is easily reached, and plug/unplug
of the power plug can easily be performed.
Do not place anything on top
-• Do not place ower vase or ower pot, cup or container with liquid, or metal object.
• Do not place anything that is hot such as cigarette.
• Do not place anything heavy.
• Do not place your hands and lean on the product.

E-6
Safety Precautions
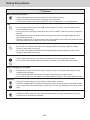
*Caution
When moving the product
$• Always disconnect the power plug from the outlet before moving.
• Always hold onto the plug when unplugging the power plug.
• Pulling on the power cord may damage the cord, resulting to re or electrical shock.
LCD
-• Do not press hard on the LCD or apply strong impact. This may crack the glass on the
LCD, resulting to injury.
• Never touch the liquid from inside when the LCD is cracked. This may result in irritation to
the skin.
• Immediately rinse the mouth and contact the physician when the liquid inside the LCD
gets inside the mouth.
• Rinse for minimum of 15 minutes with clean running water and contact the physician when
the liquid inside the LCD gets in the eye or on the skin.
Adjustment of display
-• Do not put your hands at the back of the display while it is moving to adjust its angle.
Doing so may result in an injury.
• Do not put your ngers between the sub display and the product when you put it back.
Doing so may result in an injury.
Drawer
+
-
• Take caution with the face of a child or pregnant person when opening a drawer.
• Do not lean on the drawer when the drawer is opened. It could fall and cause injure.
When changing the roll paper
-• Beware of your hair or scarf not to get caught in a gear or the platen arm while you are
changing the roll paper.
• Do not touch the head of the printer. Doing so may result in an injury or burn.
• Do not oils to adhere to the paper roll or paper holder. Doing so may cause printing errors.
Cleaning
$
+
• Unplug the power plug from the outlet for safety when cleaning.
• Clean the blades and surrounding of the blades of the power plug with a dry cloth at least
once a year. Dust accumulation may result in re. Do not use detergent to clean the power
plug.
When not using for a long period
$• Unplug the power plug from the outlet for safety when not using this product for a long
period such as consecutive holidays.

E-7
Safety Precautions
*Caution
Only use the specied batteries.
-• Do not disassemble, modify or short-circuit them.
• Do not put them in re or water or heat them.
• Do not mix new and old batteries or dierent types of batteries.
• Orient the terminals +- correctly.
• Remove the batteries if the system will not be used for a long time.
• After batteries are spent, dispose of them as per local regulations.
• Do not try to recharge dry cell batteries.
Disposing of batteries:
-• Make sure that you dispose of used batteries in accordance with the rules and regulations
in your local area.

E-8
Read the following items thoroughly and use this product properly. CASIO bears no responsibility
whatsoever for malfunction or damage caused by handling not following below contents. Please note that
it will also result in charged repair, and actual cost required for repair will be charged, even if it is within
the warranty period.
Installation Location
Do not place in a hot or dusty location, or in any location exposed to oily smoke or water. Never store
or leave in following locations. This could erase the memory and cause a malfunction or result in
deformation of the case.
• Temperature of 0°C or lower
• Inside vehicles in summer
• Close to air conditioner
• Under direct sunlight
• Temperature of 40°C or higher
Avoid using this product in following locations.
• Outdoor
• Close to equipment that will become hot such as range, electrical heater, etc.
• Location exposed to water or steam
• Location with severe change in environment such as temperature, humidity, etc.
• Location where corrosive gas or saline matter is generated
• Location where dirt or dust is generated
• Location with vibration
• Location prone to static electricity
Others
• Prepare separate AC power supply from the power line for motor, ice maker, microwave oven, etc.,
which may generate noise.
• Do not touch the power switch with wet hands. This may result in electrical shock.
• Wipe thoroughly with dry cloth, etc., when there is any water droplet on the device.
• Do not use any volatile chemical such as thinner, benzine, cosmetics, etc., for cleaning. Wipe with dry
soft cloth when this product gets dirty. The display section may be scratched when scued strongly with
a cloth.
• When the capacity of the internal memory protection battery is insucient and there is no power supply
available due to a power outage, malfunction or other reason, the memory content might be erased.
Precautions for Use

E-9
Take Advance Notice of the Following
• The content of this manual may be changed without prior notice due to improvement or specication
change of the product.
• Please note that CASIO bears no responsibility for damage, loss of prot, or any claim from third party
due to loss or change of data caused by usage, malfunction, or repair of this product.
• The copyright for this manual and all rights related to the software described in this manual are the
property of CASIO Computer Co., Ltd. The unauthorized reproduction of this manual in whole or part is
prohibited without the written permission of CASIO.
• The content of this manual was created with all possible care, but please contact us if there is any
unclear point, mistake, omission, etc., in this manual.
• The screen or illustration used in this manual may be dierent from the actual product. The keys and
icons are described in simplied manner.
• Weld Line
The line on the exterior of the product is called “weld line”, which is created at the time of plastic
forming, and it is not a crack or a scratch. This will not interrupt the usage.
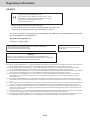
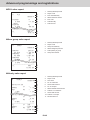
When the cash drawer does not open!
In case of power failure or the machine is in malfunction,
the cash drawer does not open automatically. Even in
these cases, you can open the cash drawer by pulling
drawer release lever (see the gure on the right).
Important: The drawer will not open, if it is locked with a
drawer lock key.
S size drawer
Drawer release lever
M size drawer
Drawer release lever
Precautions for Use

E-10
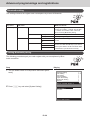
SR-S500
Manufacturer:CASIO COMPUTER CO., LTD.
6-2, Hon-machi 1-chome, Shibuya-ku, Tokyo 151-8543, Japan
Responsible within the European Union:CASIO Europe GmbH
CASIO-Platz 1, 22848 Norderstedt, Germany
http://www.casio-europe.com
• Please keep all information for future reference.
• The declaration of conformity may be consulted at http://doc.casio.com/
• Products are for distribution within all member states of the EU.
For Europe models are SR-S500SB-SR, SR-S500MB-SR, SR-S500M1B-SR, SR-S500MD-SR (SR-S500SG-
SR, SR-S500MK-SR, SR-S500MG-SR).
Maximum radio output power
• Bluetooth: 2.4GHz ≦0dBm.
This product is also designed for IT power
distribution system with phase-to-phase
voltage 230 V.
WARNING
THIS IS A CLASS A PRODUCT. IN A DOMESTIC ENVIRONMENT THIS
PRODUCT MAY CAUSE RADIO INTERFERENCE IN WHICH CASE THE USER
MAY BE REQUIRED TO TAKE ADEQUATE MEASURES.
Laite on liitettävä suojamaadoituskostkettimilla vaurstettuun pistorasiaan
Apparatet må tilkoples jordet stikkontakt
Apparaten skall anslutas till jordat nätuttag.
[EN] Hereby, CASIO COMPUTER CO., LTD. declares that the radio equipment type SR-S500 is in compliance with Directive 2014/53/EU.The
full text of the EU declaration of conformity is available at the following internet address: http://www.casio-europe.com
[DA] Hermed erklærer CASIO COMPUTER CO., LTD., at radioudstyrstypen SR-S500 er i overensstemmelse med direktiv 2014/53/EU.
EU-overensstemmelseserklæringens fulde tekst kan ndes på følgende internetadresse: http://www.casio-europe.com
[DE] Hiermit erklärt CASIO COMPUTER CO., LTD., dass der Funkanlagentyp SR-S500 der Richtlinie 2014/53/EU entspricht. Der vollständige
Text der EU-Konformitätserklärung ist unter der folgenden Internetadresse verfügbar: http://www.casio-europe.com
[ES] Por la presente, CASIO COMPUTER CO., LTD., declara que el tipo de equipo radioeléctrico SR-S500 es conforme con la Directiva
2014/53/UE. El texto completo de la declaración UE de conformidad está disponible en la dirección Internet siguiente: http://www.
casio-europe.com
[FR] Le soussigné, CASIO COMPUTER CO.,LTD., déclare que l’équipement radioélectrique du type SR-S500 est conforme à la directive
2014/53/UE. Le texte complet de la déclaration UE de conformité est disponible à l’adresse internet suivante: http://www.casio-europe.
com
[NL] Hierbij verklaar ik, CASIO COMPUTER CO.,LTD., dat het type radioapparatuur SR-S500 conform is met Richtlijn 2014/53/EU. De volledi-
ge tekst van de EU-conformiteitsverklaring kan worden geraadpleegd op het volgende internetadres: http://www.casio-europe.com
[PT] O(a) abaixo assinado(a) CASIO COMPUTER CO.,LTD. declara que o presente tipo de equipamento de rádio SR-S500 está em confor-
midade com a Diretiva 2014/53/UE. O texto integral da declaração de conformidade está disponível no seguinte endereço de Internet:
http://www.casio-europe.com
[FI] CASIO COMPUTER CO.,LTD. vakuuttaa, että radiolaitetyyppi SR-S500 on direktiivin 2014/53/EU mukainen. EU-vaatimustenmukaisuus-
vakuutuksen täysimittainen teksti on saatavilla seuraavassa internetosoitteessa: http://www.casio-europe.com
[SV] Härmed försäkrar CASIO COMPUTER CO.,LTD. att denna typ av radioutrustning SR-S500 överensstämmer med direktiv 2014/53/EU.
Den fullständiga texten till EU-försäkran om överensstämmelse nns på följande webbadress: http://www.casio-europe.com
Regulatory Information

E-11
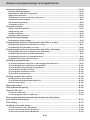
To use the cash register’s basic function
Getting started ....................................................................................................................... E-12
Name of Parts ................................................................................................................................. E-12
Loading memory protection batteries .......................................................................................... E-13
Installing paper roll ........................................................................................................................ E-14
To set the language (country), date, time, tax rates and Bluetooth pairing ............................. E-15
Setting paper roll as journal records ............................................................................................ E-17
Getting to know your cash register ..................................................................................... E-19
To adjust the main display ............................................................................................................. E-20
To set the customer display ..........................................................................................................E-20
Display .............................................................................................................................................E-21
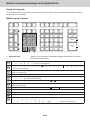
Keyboard .........................................................................................................................................E-22
How to read the printouts ..................................................................................................... E-24
How to use your cash register ............................................................................................. E-25
Before opening your store .................................................................................................... E-26
Checking the time and date ...........................................................................................................E-26
Preparing bills and coins for change ...........................................................................................E-26
Registering items in departments .......................................................................................E-27
Basic setups and registrations ............................................................................................E-30
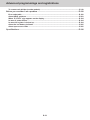
To program basic settings .............................................................................................................E-30
Programming departments ...........................................................................................................E-33
Registering departments’ preset data ..........................................................................................E-34
Programming PLUs ........................................................................................................................E-35
Registering PLUs’ preset data .......................................................................................................E-36
Other registrations ................................................................................................................E-38
Discount ..........................................................................................................................................E-38
Reduction ........................................................................................................................................E-39
Registering various payment methods ........................................................................................E-40
Registering returned goods ..........................................................................................................E-42
Registrations without transactions ..............................................................................................E-44
Corrections .....................................................................................................................................E-45
Daily sales reports ................................................................................................................E-49
Print out of daily sales report ........................................................................................................ E-50

E-12
To use the cash register’s basic function
Getting started
This chapter shows how to setup the cash register and get it ready to operate.
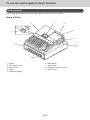
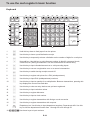
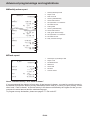
Name of Parts
1
345
6
7
8
9
2
1Drawer 6Main display
2 SD card slot cover 7 Mode switch
3Printer cover 8 COM port connector cover
4Printer 9Drawer lock
5 Customer display

E-13
To use the cash register’s basic function
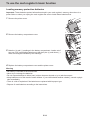
Loading memory protection batteries
Important: These batteries protect information stored in your cash register’s memory when there is a
power failure or when you unplug the cash register. Be sure to install these batteries rst.
1 Remove the printer cover.
2 Remove the battery compartment cover.
3 Note the (+) and (–) markings in the battery compartment. Load a set of
two new “AA” type alkaline batteries so that their plus (+) and minus (–)
ends are facing as indicated by the markings.
4 Replace the battery compartment cover and the printer cover.
Warning
• No battery is included in the accessories.
• Never try to recharge the batteries.
• Do not expose batteries to direct heat, let them become shorted or try to take them apart.
• Keep batteries out of the reach of small children. If your child should swallow a battery, consult a physi-
cian immediately.
• There is a risk of explosion if the batteries are replaced with improper type.
• Dispose of used batteries according to the instructions.

E-14
To use the cash register’s basic function
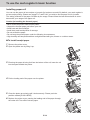
Installing paper roll
You can use the paper roll as receipts or journals (for business records). By default, your cash register is
set as receipt printing. Please see pages E-17 and E-18 if you wish to use the paper roll for journals.
The setting methods of the paper roll dier by the usage. Please follow the instructions below in accor-
dance with your usage of the paper roll.
Caution (in handling the thermal paper)
• Never touch the printer head and the platen.
• Unpack the thermal paper just before your use.
• Avoid heat and direct sunlight.
• Avoid dusty and humid places for storage.
• Do not scratch the paper.
• Do not keep the printed paper under the following circumstances:
• High humidity and temperature/direct sunlight/contact with glue, thinner or a rubber eraser.
To install receipt paper
1 Remove the printer cover.
2 Open the platen arm by lifting it up.
3 Ensuring the paper is being fed from the bottom of the roll, lower the roll
into the space behind the printer.
4 Put the leading end of the paper over the printer.
5 Close the platen arm slowly until it locks securely. Please push the
position marked [PUSH HERE].
6 Replace the printer cover, passing the leading end of the paper through
the cutter slot. Tear o the excess paper.

E-15
To use the cash register’s basic function
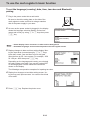
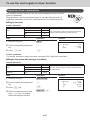
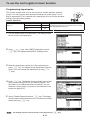
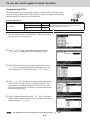
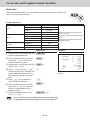
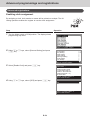
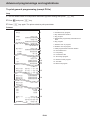
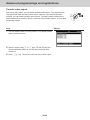
To set the language (country), date, time, tax rates and Bluetooth
pairing
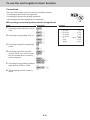
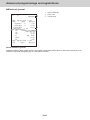
1 Plug in the power socket into a wall outlet.
Be sure to check the rating plate on the side of the
cash register to make sure that its voltage matches
that of the power supply in your area.
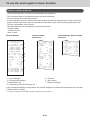
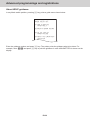
2 As soon as the power socket is plugged in, the display
shows the language selection display. Choose lan-
guage and country by using ? or > keys then press
F key.
Select & <CA/AMT TEND> or
Cancel <SUB TOTAL>
Dansk
Deutsh
Deutsh(GDPdU/GoBD)
English
Español
PLEASE SELECT LANGUAGE.
<CA/AMT TEND> :SELECT
• Actual display shows characters in white on blue background.
• Selectable languages and countries depend on the cash register model.
3 Display changes to date and time setting display. Mov-
ing the input area (reversed area) by ? or > keys,
input date, month, year and time from ten key pad.
Input the time by 24 - hour system. For example, 1356
for 1:56 pm. After then press F key.
Depending on the language and country you selected,
the cash register may asks if you use tax system/GST
or rounding system. Please follow the instructions
shown on the display.
The followings are operation examples for inputting tax rates.
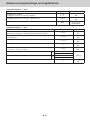
4 Display then changes to tax table setting screen. Us-
ing ten key pad, input tax rates. You can set four kinds
of tax rates.
5 Press F key. Replace the printer cover.

E-16
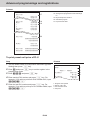
To use the cash register’s basic function
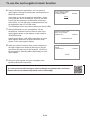
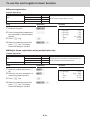
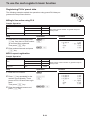
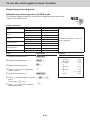
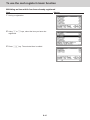
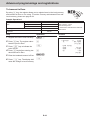
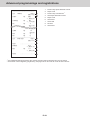
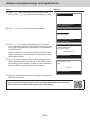
6 Using a smartphone application, you can perform
cash register settings by pairing with a smartphone via
Bluetooth connection.
If you wish to use the smartphone application, select
[YES] and pair with a smartphone. If you do not wish
to pair with a smartphone via Bluetooth connection,
select [NO]. You can pair with a smartphone and use
the application later on in PGM mode.
Do you want to connect
mobile via Bluetooth?
<CA/AMT TEND> :ENTER
[YES]
[NO]
The followings are the procedures when you select [YES].
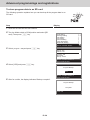
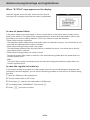
7 Activate Bluetooth on your smartphone. On the
smartphone, nd and select the device code of the
cash register shown on the display. In this example,
12345678901234.
Note that the device code diers depending on each
cash register. Make sure to select the same code
shown on the cash register display.
Activate Bluetooth on
mobile and select below
device on the mobile.
<SUBTOTAL> :CANCEL
12345678901234
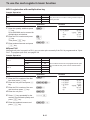
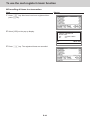
8 After you select the device code on the smartphone,
the cash register then shows a pass key on the dis-
play. Enter the pass key (in this example, 123456) on
the smartphone. Pass key diers depending on each
cash register.
Enter pass key on your
mobile.
<SUBTOTAL> :CANCEL
123456
9 Now your cash register and your smartphone are
paired by Bluetooth connection.
You can perform detail settings or data exchange using Bluetooth connection.
Please refer to the website http://web.casio.com/ecr/app/.

E-17
To use the cash register’s basic function
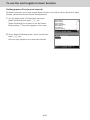
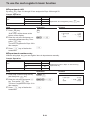
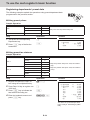
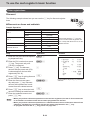
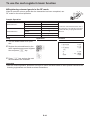
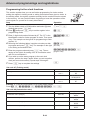
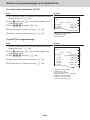
Setting paper roll as journal records
By default, the printer of your cash register issues receipts. If you wish to use the printouts for sales
journals, please follow the procedures described below.
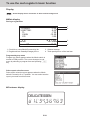
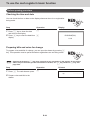
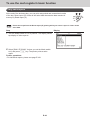
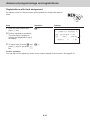
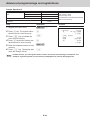
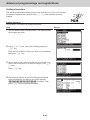
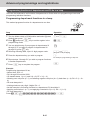
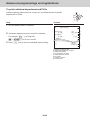
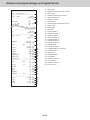
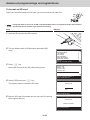
1 Turn the Mode switch to PGM position and select
[Paper Roll Setting] then press F key.
[Paper Roll Setting] is not shown on the rst screen.
Keep pressing > key until it appears on the screen.
PGM
[Key Setting ]
[Date Setting ]
[Clerk Setting ]
[Message Setting ]
[POP Setting ]
[Tax Setting ]
[General Setting ]
[Paper Roll Setting ]
Select & <CA/AMT TEND>
2 On the Paper Roll Setting screen, select “Journal” and
press F key.
Now your cash register is set to print sales journals.

E-18
To use the cash register’s basic function
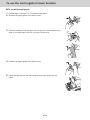
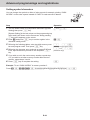
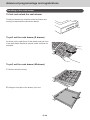
To install journal paper
1 Repeat steps 1 through 5 of “To install receipt paper”.
2 Remove the paper guide of the take-up reel.
3 Slide the leading end of the paper into the groove on the spindle of the
take-up reel and wind it onto the reel two or three turns.
4 Replace the paper guide of the take-up reel.
5 Place the take-up reel into place behind the printer, above the roll
paper.

E-19
To use the cash register’s basic function
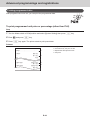
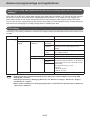
Getting to know your cash register
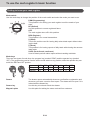
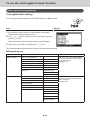
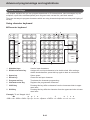
Mode switch
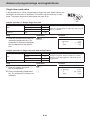
Use the mode keys to change the position of the mode switch and select the mode you want to use.
PGM (Programming)
This position is for setting your cash register to suit the needs of your
store.
RF (Refund)
Use this position to correct registered items.
OFF
The cash register turns o in this position.
REG (Register)
This position is for normal transactions.
X (Read)
This is the position used for issuing daily sales totals report without clear-
ing the data.
Z (Reset)
This position is for issuing reports of daily totals with clearing the accumu-
lated totals.
X2/Z2 (Periodic sale read/reset)
Used to obtain periodic sales reports without resetting total data.
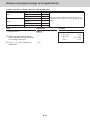
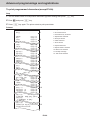
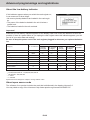
Mode keys
There are two types of mode keys: the program key (marked “PGM”) and the operator key (marked
“OP”). The program key can be used to set the mode switch to any position, while the operator key can
select the REG and OFF position.
PGM
OP
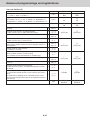
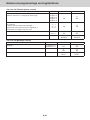
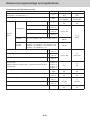
PGM RF OFF REG X Z X2/Z2
OP key - - ¡ ¡ ---
PGM key ¡¡¡¡¡¡¡
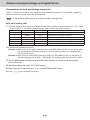
Drawer The drawer opens automatically whenever you nalize a registration and
whenever you issue a read or reset report. The drawer will not open if it is
locked with the drawer key.
Drawer key Use this key to lock and unlock the drawer.
Magnetic plate Use this plate for tacking the notes received from customer.

E-20
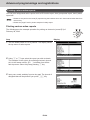
To use the cash register’s basic function
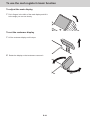
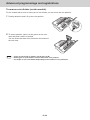
To adjust the main display
1 Put in ngers in the ditch of the main display and tilt it
to the angle you can see clearly.
To set the customer display
1 Lift the customer display until it stops.
2 Rotate the display so that customers can see it.
La pagina sta caricando ...
La pagina sta caricando ...
La pagina sta caricando ...
La pagina sta caricando ...
La pagina sta caricando ...
La pagina sta caricando ...
La pagina sta caricando ...
La pagina sta caricando ...
La pagina sta caricando ...
La pagina sta caricando ...
La pagina sta caricando ...
La pagina sta caricando ...
La pagina sta caricando ...
La pagina sta caricando ...
La pagina sta caricando ...
La pagina sta caricando ...
La pagina sta caricando ...
La pagina sta caricando ...
La pagina sta caricando ...
La pagina sta caricando ...
La pagina sta caricando ...
La pagina sta caricando ...
La pagina sta caricando ...
La pagina sta caricando ...
La pagina sta caricando ...
La pagina sta caricando ...
La pagina sta caricando ...
La pagina sta caricando ...
La pagina sta caricando ...
La pagina sta caricando ...
La pagina sta caricando ...
La pagina sta caricando ...
La pagina sta caricando ...
La pagina sta caricando ...
La pagina sta caricando ...
La pagina sta caricando ...
La pagina sta caricando ...
La pagina sta caricando ...
La pagina sta caricando ...
La pagina sta caricando ...
La pagina sta caricando ...
La pagina sta caricando ...
La pagina sta caricando ...
La pagina sta caricando ...
La pagina sta caricando ...
La pagina sta caricando ...
La pagina sta caricando ...
La pagina sta caricando ...
La pagina sta caricando ...
La pagina sta caricando ...
La pagina sta caricando ...
La pagina sta caricando ...
La pagina sta caricando ...
La pagina sta caricando ...
La pagina sta caricando ...
La pagina sta caricando ...
La pagina sta caricando ...
La pagina sta caricando ...
La pagina sta caricando ...
La pagina sta caricando ...
La pagina sta caricando ...
La pagina sta caricando ...
La pagina sta caricando ...
La pagina sta caricando ...
La pagina sta caricando ...
La pagina sta caricando ...
La pagina sta caricando ...
La pagina sta caricando ...
La pagina sta caricando ...
La pagina sta caricando ...
La pagina sta caricando ...
La pagina sta caricando ...
La pagina sta caricando ...
La pagina sta caricando ...
La pagina sta caricando ...
La pagina sta caricando ...
La pagina sta caricando ...
La pagina sta caricando ...
La pagina sta caricando ...
La pagina sta caricando ...
La pagina sta caricando ...
La pagina sta caricando ...
La pagina sta caricando ...
La pagina sta caricando ...
La pagina sta caricando ...
La pagina sta caricando ...
La pagina sta caricando ...
La pagina sta caricando ...
La pagina sta caricando ...
La pagina sta caricando ...
La pagina sta caricando ...
La pagina sta caricando ...
La pagina sta caricando ...
La pagina sta caricando ...
La pagina sta caricando ...
La pagina sta caricando ...
La pagina sta caricando ...
La pagina sta caricando ...
La pagina sta caricando ...
La pagina sta caricando ...
La pagina sta caricando ...
La pagina sta caricando ...
La pagina sta caricando ...
La pagina sta caricando ...
La pagina sta caricando ...
La pagina sta caricando ...
La pagina sta caricando ...
La pagina sta caricando ...
-
 1
1
-
 2
2
-
 3
3
-
 4
4
-
 5
5
-
 6
6
-
 7
7
-
 8
8
-
 9
9
-
 10
10
-
 11
11
-
 12
12
-
 13
13
-
 14
14
-
 15
15
-
 16
16
-
 17
17
-
 18
18
-
 19
19
-
 20
20
-
 21
21
-
 22
22
-
 23
23
-
 24
24
-
 25
25
-
 26
26
-
 27
27
-
 28
28
-
 29
29
-
 30
30
-
 31
31
-
 32
32
-
 33
33
-
 34
34
-
 35
35
-
 36
36
-
 37
37
-
 38
38
-
 39
39
-
 40
40
-
 41
41
-
 42
42
-
 43
43
-
 44
44
-
 45
45
-
 46
46
-
 47
47
-
 48
48
-
 49
49
-
 50
50
-
 51
51
-
 52
52
-
 53
53
-
 54
54
-
 55
55
-
 56
56
-
 57
57
-
 58
58
-
 59
59
-
 60
60
-
 61
61
-
 62
62
-
 63
63
-
 64
64
-
 65
65
-
 66
66
-
 67
67
-
 68
68
-
 69
69
-
 70
70
-
 71
71
-
 72
72
-
 73
73
-
 74
74
-
 75
75
-
 76
76
-
 77
77
-
 78
78
-
 79
79
-
 80
80
-
 81
81
-
 82
82
-
 83
83
-
 84
84
-
 85
85
-
 86
86
-
 87
87
-
 88
88
-
 89
89
-
 90
90
-
 91
91
-
 92
92
-
 93
93
-
 94
94
-
 95
95
-
 96
96
-
 97
97
-
 98
98
-
 99
99
-
 100
100
-
 101
101
-
 102
102
-
 103
103
-
 104
104
-
 105
105
-
 106
106
-
 107
107
-
 108
108
-
 109
109
-
 110
110
-
 111
111
-
 112
112
-
 113
113
-
 114
114
-
 115
115
-
 116
116
-
 117
117
-
 118
118
-
 119
119
-
 120
120
-
 121
121
-
 122
122
-
 123
123
-
 124
124
-
 125
125
-
 126
126
-
 127
127
-
 128
128


Casio SR-S500 Manuale utente
- Categoria
- Registratori di cassa
- Tipo
- Manuale utente
in altre lingue
- English: Casio SR-S500 User manual