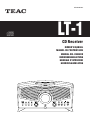
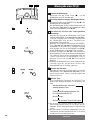
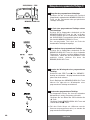
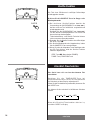
TEAC LT-1CD Manuale utente
- Categoria
- Lettore CD
- Tipo
- Manuale utente
Questo manuale è adatto anche per

9A09896900
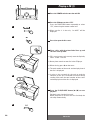
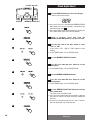
LT-1
CD Receiver
OWNER’S MANUAL
MANUEL DU PROPRIÉTAIRE
MANUAL DEL USUARIO
BEDIENUNGSANLEITUNG
MANUALE D’ISTRUZIONI
GEBRUIKSAANWIJZING
Z
?

2
ENGLISH
IMPORTANT(for U.K.Customers)
DO NOT cut off the mains plug from this equipment. If
the plug fitted is not suitable for the power points in
your home or the cable is too short to reach a power
point, then obtain an appropriate safety approved
extension lead or consult your dealer.
If nonetheless the mains plug is cut off, remove the
fuse and dispose of the plug
immediately, to avoid a
possible shock hazard by inadvertent connection to
the mains supply.
If this product is not provided with a mains plug, or
one has to be fitted, then follow the instructions given
below:
IMPORTANT. DO NOT make any connection to the
larger terminal which is marked with the letter E or by
the safety earth symbol |
or coloured GREEN or
GREEN-and-YELLOW.
The wires in the mains lead on this product are
coloured in accordance with the following code:
BLUE : NEUTRAL
BROWN : LIVE
As these colours may not correspond with the
coloured markings identifying the terminals in your
plug proceed as follows:
The wire which is coloured BLUE must be connected
to the terminal which is marked with the letter N or
coloured BLACK.
The wire which is coloured BROWN must be
connected to the terminal which is marked with the
letter L or coloured RED.
When replacing the fuse only a correctly rated
approved type should be used and be sure to re-fit the
fuse cover.
IF IN DOUBT — CONSULT A COMPETENT
ELECTRICIAN.
VARING: APPARATEN INNEHÅLLER LASER KOMPONENT
MED STRÅLNING ÖVERSTIGANDE KLASS 1.
“ADVARSEL: USYNLIG LASERSTRÅLING VED ÅBNING
NAR SIKKERHEDSAFBRYDERE ER UDE AF FUNKTION.
UNDGÅ UDSAETTELSE FOR STRÅLING”
“VAROITUS! SUOJAKOTELOA EI SAA AVATA. LAITE
SISÄLTÄÄ LASERDIODIN. JOKA LÄHETTÄ
(NÄKYMÄTÖNTÄ) SILMILLE VAARALLISTA
LASERSÄTEILYÄ”.
ADVARSEL: USYNLIG LASERBESTRÅLING NÅR DENNE
DELEN ER ÅPEN OG SIKKERHETSSPERREN ER
UTKOBLET UNNGÅ UTSETTELSE FOR STRÅLING.
Contents
Thank you for choosing TEAC. Read this manual
carefully to get the best performance from this unit.
Before Use . . . . . . . . . . . . . . . . . . . . . . . . . . . . . . . . . . . . . 4
RESET Switch . . . . . . . . . . . . . . . . . . . . . . . . . . . . . . . . 6
Compact Disc . . . . . . . . . . . . . . . . . . . . . . . . . . . . . . . . . . . 8
Names of Each Control . . . . . . . . . . . . . . . . . . . . . . . . . . 12
Remote Control Unit . . . . . . . . . . . . . . . . . . . . . . . . . . . . 18
CD
Playing a CD . . . . . . . . . . . . . . . . . . . . . . . . . . . . . . . . . . . 20
Programmed Playback . . . . . . . . . . . . . . . . . . . . . . . . . . 24
Repeat Playback . . . . . . . . . . . . . . . . . . . . . . . . . . . . . . . 28
Shuffle Playback . . . . . . . . . . . . . . . . . . . . . . . . . . . . . . . 30
Sleep Timer . . . . . . . . . . . . . . . . . . . . . . . . . . . . . . . . . . . 30
TUNER
Listening to the Radio . . . . . . . . . . . . . . . . . . . . . . . . . . . 32
How to Preset Stations . . . . . . . . . . . . . . . . . . . . . . . . . . 34
How to select Preset Stations . . . . . . . . . . . . . . . . . . . . 34
Clock Adjustment . . . . . . . . . . . . . . . . . . . . . . . . . . . . . . 36
Timer . . . . . . . . . . . . . . . . . . . . . . . . . . . . . . . . . . . . . . . . . . 38
Troubleshooting . . . . . . . . . . . . . . . . . . . . . . . . . . . . . . . . 42
Specifications . . . . . . . . . . . . . . . . . . . . . . . . . . . . . . . . . 42

3
FRANÇAIS ESPAÑOL
ENGLISH/ FRANÇAIS/ESPAÑOL
Indice
Enhorabuena por la adquisición de un TEAC. Lea
detenidamente este manual a fin de obtener el mejor
rendimiento de esta unidad.
Sommaire
Nous vous remercions pour l’achat d’un appareil
TEAC. Lire ce manuel avec attention pour obtenir les
meilleures performances possibles de cet appareil.
Avant Utilisation . . . . . . . . . . . . . . . . . . . . . . . . . . . . . . . . 5
Commutateur RESET . . . . . . . . . . . . . . . . . . . . . . . . . . 7
Disques Compacts . . . . . . . . . . . . . . . . . . . . . . . . . . . . . . .
9
Nomenclatur . . . . . . . . . . . . . . . . . . . . . . . . . . . . . . . . . . 14
Boîtier de télécommande . . . . . . . . . . . . . . . . . . . . . . . . 19
CD
Lecture de CD . . . . . . . . . . . . . . . . . . . . . . . . . . . . . . . . . 21
Lecture programmée . . . . . . . . . . . . . . . . . . . . . . . . . . . 25
Lecture répétitive . . . . . . . . . . . . . . . . . . . . . . . . . . . . . . 29
Lecture aléatoire . . . . . . . . . . . . . . . . . . . . . . . . . . . . . . . 31
Minuterie sommeil . . . . . . . . . . . . . . . . . . . . . . . . . . . . . 31
TUNER
Ecoute radio . . . . . . . . . . . . . . . . . . . . . . . . . . . . . . . . . . . 33
Comment prérégle une station . . . . . . . . . . . . . . . . . . . 35
Sélection des préréglées . . . . . . . . . . . . . . . . . . . . . . . . .35
Réglage de l’horloge . . . . . . . . . . . . . . . . . . . . . . . . . . . . 37
Minuterie . . . . . . . . . . . . . . . . . . . . . . . . . . . . . . . . . . . . . . 39
Guide de dépannage . . . . . . . . . . . . . . . . . . . . . . . . . . . . 43
Spécifications . . . . . . . . . . . . . . . . . . . . . . . . . . . . . . . . . 43
Previo al empleo . . . . . . . . . . . . . . . . . . . . . . . . . . . . . . . . 5
Interruptor RESET . . . . . . . . . . . . . . . . . . . . . . . . . . . . 7
Discos . . . . . . . . . . . . . . . . . . . . . . . . . . . . . . . . . . . . . . . . . 9
Nombres de cada control . . . . . . . . . . . . . . . . . . . . . . . 16
Unidad de control remoto . . . . . . . . . . . . . . . . . . . . . . . 19
CD
Reproducción de CD . . . . . . . . . . . . . . . . . . . . . . . . . . . . 21
Reproducción programada . . . . . . . . . . . . . . . . . . . . . . 25
Reproducción repetida . . . . . . . . . . . . . . . . . . . . . . . . . . 29
Reproducción aleatoria . . . . . . . . . . . . . . . . . . . . . . . . . 31
Contador de tiempo Sleep (dormir) . . . . . . . . . . . . . . . 31
TUNER
Cómo escuchar la radio . . . . . . . . . . . . . . . . . . . . . . . . . 33
Cómo Preestablecer estaciones . . . . . . . . . . . . . . . . . 35
Cómo seleccionar las estaciones preestablecidas . . 35
Ajuste de reroj . . . . . . . . . . . . . . . . . . . . . . . . . . . . . . . . . 37
Despertador . . . . . . . . . . . . . . . . . . . . . . . . . . . . . . . . . . . 39
Corrección de fallas . . . . . . . . . . . . . . . . . . . . . . . . . . . . 44
Especificaciones . . . . . . . . . . . . . . . . . . . . . . . . . . . . . . . 44

4
ENGLISH
Before Use (1)
Obs! nätströmställaren skiljer ej hela apparaten fran
nätet.
Read this before operation
<
As the unit may become warm during operation,
always leave sufficient space around the unit for
ventilation.
<
The voltage supplied to the unit should match the
voltage as printed on the rear panel. If you are in
any doubt regarding this matter, consult an
electrician.
<
Choose the installation location of your unit
carefully. Avoid placing it in direct sunlight or close
to a source of heat. Also avoid locations subject to
vibrations and excessive dust, heat, cold or
moisture.
<
Do not place the unit on any high heat-producing
units like your amplifier/receiver.
<
Do not use the unit in the hot place (over 85°F/30°C).
<
Do not open the cabinet as this might result in
damage to the circuitry or electrical shock. If a
foreign object should get into the set, contact your
dealer or service agency.
<
When removing the power plug from the wall outlet,
always pull directly on the plug, never yank the
cord.
<
To keep the laser pickup clean, do not touch it, and
do not forget to close the flap lid when not using the
CD player.
<
Do not attempt to clean the unit with chemical
solvents as this might damage the finish. Use a
clean, dry cloth.
<
Keep this manual in a safe place for future
reference.
DO NOT MOVE THE UNIT DURING CD PLAYBACK
During playback, the disc rotates at high speed. Do
NOT lift or move the unit during playback. Doing so
may damage the disc.
WHEN MOVING THIS UNIT
When changing places of installation or packing the
unit for moving, be sure to remove the disc. Then,
press the power switch to turn the power off, and
disconnect the power cord. Moving this unit with the
disc loaded may result in damage to this unit.
CAUTION
The product shall not be exposed to dripping or
splashing and that no object filled with liquids, such
as vases, shall be placed on the product.
Do not install this equipment in a confined space
such as a book case or similar unit.
ATTENTION
Ne pas exposer l’appareil à l’humidité ou aux
projections d’eau; ne pas poser d’objets contenant
de l’eau, tels qu’un vase, ou un liquide quelconque,
sur l’appareil.
Ne pas installer l’appareil dans un endroit clos tel
qu’une bibliothèque ou un meuble fermé.
PRECAUCIÓN
El producto no deberá quedar expuesto a goteos o
salpicaduras, ni servir de base para objetos que
contengan líquido (jarrones, etc.).
No instale este equipo en espacios cerrados tales
como estantes de libros o similares.

5
FRANÇAIS ESPAÑOL
ENGLISH/ FRANÇAIS/ESPAÑOL
Avant Utilisation (1) Previo al empleo (1)
Lire ceci avant de faire fonctionner l’appareil
<
L’appareil pouvant dégager de la chaleur lorsqu’il
fonctionne, laisser un dégagement suffisant au-
dessus de l’appareil afin de permettre une
ventilation naturelle.
<
La tension d’alimentation de l’appareil doit être celle
indiquée à l’arrière de l’appareil. En cas de doute,
contacter un électricien.
<
Choisir avec soin l’endroit où vous placerez votre
appareil. Eviter de le placer directement au soleil ou
près d’une source de chaleur. Eviter aussi les
endroits sujets à des vibrations, à de la poussière
excessive, à la chaleur, au froid ou à l’humidité.
<
Ne pas placer l’unité sur des unités produisant
de fortes chaleurs tels que votre
amplificateur/récepteur.
<
Ne pas utiliser l’unité dans un endroit surchauffé
(plus de 85°F/30°C).
<
Ne pas ouvrir le coffret car ceci risquerait de
provoquer des dommages aux circuits ou des chocs
électriques. Si un objet rentre dans l’appareil,
contacter votre revendeur.
<
Lors du débranchement du cordon d’alimentation de
la prise murale, toujours tirer sur la fiche et non sur
le cordon.
<
Pour garder le capteur laser propre, ne pas y
toucher et ne pas oublier de fermer le tiroir du
disque.
<
Ne pas essayer de nettoyer l’appareil avec des
solvants chimiques car ceci pourrait endommager
le fini de l’appareil. Utiliser un chiffon propre et sec.
<
Garder soigneusement ce manuel d’instructions
pour une référence ultérieure.
NE DEPLACEZ PAS CET APPAREIL PENDANT L’ECOUTE
D’UN DISQUE
Pendant une écoute, le disque tourne à grande
vitesse. Ne soulevez pas cet appareil et ne le
déplacez pas pendant l’écoute d’un disque. En effet,
vous risqueriez d’endommager ce disque.
CONSIGNES DE DEPLACEMENT DE CET APPAREIL
Lorsque vous changez de lieu d’installation ou
lorsque vous emballez cet appareil pour le déplacer,
n’oubliez pas de retirer le disque. Ensuite, appuyez
sur le bouton POWER pour couper la chaîne.
Débranchez le câble électrique. Si vous déplacez cet
appareil alors qu’il contient un disque, vous risquez
d’endommager cet appareil.
Leer antes de la operación
<
Debido a que la unidad puede calentarse durante la
operación, siempre deje espacio suficiente encima
de la unidad para ventilación.
<
El voltaje administrado a la unidad debe coincidir
con el voltaje impreso en el tablero posterior. Si
tiene dudas con respecto a esto, consulte con un
electricista.
<
Elija la ubicación de la instalación para su unidad de
manera cuidadosa. Evite colocarla expuesta
directamente a la luz del sol o cerca de una fuente
de calor. Así mismo, evite ubicaciones sujetas a
vibraciones y a polvo, calor o humedad excesivos.
<
No coloque la unidad en unidades productoras de
calor, como amplificador/receptor.
<
No utilice la unidad en un lugar caluroso (más de
85°F/30°C).
<
No abra el gabinete ya que esto podría dar como
resultado un daño a los circuitos o una descarga
eléctrica. Si un objeto extraño se llegara a
introducir en el aparato, contacte a su distribuidor.
<
Al retirar la conexión de energía de la salida de
pared, siempre jale directamente de la clavija,
nunca tire del cable.
<
Para mantener el sensor óptico láser limpio, no lo
toque y no se olvide de cerrar la charola de discos.
<
No intente limpiar la unidad con solventes químicos
ya que podrían dañar el acabado. Utilice una tela
limpia y seca.
<
Mantenga este manual en un lugar seguro para
referencias futuras.
NO MUEVA LA UNIDAD DURANTE LA REPRODUCCIÓN
Durante la reproducción, el disco gira una velocidad
alta. NO levante o mueva la unidad durante la
reproducción. El hacerlo puede dañar el disco.
AL MOVER ESTA UNIDAD
Al cambiar los lugares de instalación o empaque de
la unidad para moverla, asegúrarse de retirar el
disco. Después, oprima el interruptor de energía
para desactivar la energía y desconecte el cable de
energía. El mover esta unidad con el disco cargado
puede dar como resultado un daño a la unidad.

6
ENGLISH
Before Use (2)
Beware of condensation
When the unit (or a disc) is moved from a cold to a
warm place, or used after a sudden temperature
change, there is a danger of condensation; vapor in
the air could condense on the internal mechanism,
making correct operation impossible. To prevent
this, or if this occurs, leave the unit for one or two
hours with the power turned on. The unit will
stabilize at the temperature of its surroundings.
Maintenance
If the surface of the unit gets dirty, wipe with a soft
cloth or use diluted neutral cleaning liquid. Be sure
to remove any fluid completely. Do not use thinner,
benzine or alcohol as they may damage the surface
of the unit.
RESET Switch
In the following cases, function buttons may not
work properly.
M
When the system is damaged by some electrical
shock.
M
When the power is irregular or has electrical
noise.
In these cases, press the RESET switch once or
twice lightly with a pencil or a ball-point pen when
the unit is on.

7
FRANÇAIS ESPAÑOL
ENGLISH/ FRANÇAIS/ESPAÑOL
Avant Utilisation (2) Previo al empleo (2)
Risque de condensation
En cas de déplacement de l’appareil (ou d’un disque)
d’un endroit froid vers un endroit chaud, ou en cas
d’utilisation après un changement de température
brutale, il y a un risque de condensation. La vapeur
contenue dans l’air peut se condenser sur le
mécanisme interne et affecter le bon
fonctionnement de l’appareil. Pour éviter ceci, ou au
cas où cela venait à se produire, laisser l’appareil
sous tension pendant une heure ou deux. Ceci lui
permettra de se stabiliser à la température
ambiante.
Entretien
Si la surface de l’appareil devient sale, nettoyer
celle-ci à l’aide d’un chiffon doux ou utiliser un
liquide de nettoyage neutre. La nettoyer entièrement.
Ne pas utiliser de diluant, de benzine ou d’alcool car
ils risquent d’endommager la surface de l’appareil.
Cuidado con la condensación
Cuando la unidad (o un disco) se mueve de un lugar
frío a un lugar cálido o cuando está en uso después
de un cambio repentino en la temperatura, existe el
peligro de condensación; el vapor en el aire se
puede condensar en los mecanismos internos,
haciendo que la operación correcta sea imposible.
Para evitar esto, o si esto ocurre, deje la unidad por
una o dos horas con la energía activada. Después la
unidad se estabilizará a la temperatura de su
ambiente.
Mantenimiento
Si se ensucia la superficie de la unidad, frótela con
una tela suave o utilice un líquido limpiador neutral
diluido. Asegúrese de retirar cualquier fluido
completamente. No utilice thinner, bencina o
alcohol, ya que podrían dañar la superficie de la
unidad.
Commutateur RESET
Dans les cas suivants, les boutons de fonctions
peuvent ne pas fonctionner correctement.
1) Quand le système est endommagé par un choc
électrique.
2) Quand l’alimentation est irrégulière ou bruyante.
Dans ces cas, appuyer la touche RESET une ou deux
fois avec un crayon ou un stylo.
Interruptor RESET
En los siguientes casos, los botones de función
podrían no funcionar adecuadamente.
M
Cuando el sistema queda dañado debido a una
descarga eléctrica.
M
Cuando la corriente es irregular o se producen
interferencias en el suministro.
En estos casos, pulse el interruptor RESET una o dos
veces con suavidad con un lápiz o bolígrafo cuando
la unidad esté conectada.

8
ENGLISH
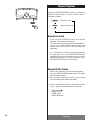
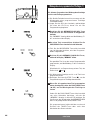
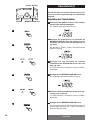
Compact Disc (1)
Discs which can be played on this unit:
• Conventional audio CDs bearing the CD-DA logo
on the label:
?
• Properly finalized CD-R discs
Note:
<
Depending on the quality of the disc and/or the
condition of the recording, some CD-R discs may not
be playable.
<
CD-RW discs cannot be played on this unit.
<
Copy-protected discs and other discs which do not
conform to the CD standard may not play back
correctly in this player.
If you use such discs in this unit, TEAC Corporation
and its subsidiaries cannot be responsible for any
consequences or guarantee the quality of
reproduction. If you experience problems with such
non-standard discs, you should contact the
producers of the disc.
< Always place the disc on the disc tray with the label
side uppermost. (Compact discs can be played or
recorded only on one side.)
<
To remove a disc from its storage case, press down
on the center of the case and lift the disc out,
holding it carefully by the edges.
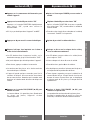
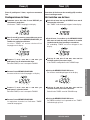
How to remove the disc
How to hold the disc
<
Should the disc become dirty, wipe the surface
radially with a soft, dry cloth.

9
FRANÇAIS ESPAÑOL
ENGLISH/ FRANÇAIS/ESPAÑOL
Disques Compacts (1)
Disques pouvant être lus avec ce lecteur :
• CD audio classiques, portant le logo CD-DA sur
l’étiquette :
?
• Disques CD-R correctement finalisés
Note :
<
Selon la qualité du disque et/ou la qualité de
l’enregistrement, certains disques CD-R risquent de
ne pas pouvoir être lus.
<
Cet appareil ne permet pas de lire les disques CD-
RW.
<
Les disques protégés contre la reproduction, ainsi
que les disques non-conformes à la norme CD
risquent de ne pas pouvoir être lus correctement
par ce lecteur.
Si vous utilisez de tels disques dans cette unité,
TEAC Corporation et ses filiales ne sont pas tenues
pour responsables de toute conséquence ou de la
garantie de la qualité de la reproduction. En cas de
problèmes avec ce type de disque non standardisé,
contactez le fabricant du disque.
< Placer toujours le disque sur le plateau, la face
imprimée sur le dessus (les disques compacts ne
sont enregistrés que sur une seule face.)
<
Pour sortir un disque de son emballage, appuyer sur
la partie centrale de l’étui et sortir le disque en
veillant à bien le tenir par les bords.
Comment sortir un disque de son emballage
Comment tenir le disque
<
Si la surface du disque est sale, l’essuyer
soigneusement à l’aide d’un chiffon doux et sec.
Discos (1)
Discos que se pueden reproducir en esta unidad:
• CD-Audio convencionales con el logotipo CD-DA
en la etiqueta:
?
• Discos CD-R debidamente grabados (con cierre
de sesión)
Nota:
<
Según la calidad del disco y el estado de la
grabación, algunos CD-R es posible que no se
puedan reproducir.
<
Los discos CD-RW no se pueden reproducir en esta
unidad.
<
Los discos protegidos contra copia y otros discos
que no se ajusten al estándar de los CD es posible
que no se reproduzcan correctamente en esta
unidad.
Si utiliza tales dicos en esta unidad, TEAC
Corporation y sus subsidiarias no pueden hacerse
responsable de ninguna consecuancia, ni garantizar
la calidad de reproducción. Si experimenta
problemas con tales discos no estándar, debe
ponerse en contacto con el fabricante de los discos.
< Coloque siempre el disco en la bandeja con la cara
de la etiqueta hacia arriba.
(Los discos compactos sólo se reproducen y graban
por una cara).
<
Para extraer un disco de su estuche, presione el
centro de la caja y levante con cuidado el disco
sosteniéndolo por los bordes.
Extracción del disco
Así se sostiene el disco
<
Si se ensucia el disco, pase un paño seco y suave
por la superficie, en sentido radial.

10
ENGLISH
Compact Disc (2)
< Never use such chemicals as record sprays,
antistatic sprays or fluid, benzine or thinner to clean
the discs. Such chemicals will do irreparable
damage to the disc’s plastic surface.
<
Discs should be returned to their cases after use to
avoid dust and scratches that could cause the laser
pickup to “skip.”
<
Do not expose discs to direct sunlight or high
humidity and temperature for extended periods.
Long exposure to high temperatures will warp the
disc.
<
CD-R discs are more sensitive to the effects of heat
and ultraviolet rays than ordinary CDs. It is
important that they are not stored in a location
where direct sunlight will fall on them, and which is
away from sources of heat such as radiators or
heat-generating electrical devices.
<
Printable CD-R discs aren’t recommended, as the
label side might be sticky and damage the unit.
<
Do not stick papers or protective sheets on the
discs and do not use any protective coating spray.
<
Use a soft oil-based felt-tipped pen to write the
information on the label side. Never use a ball-point
or hard-tipped pen, as this may cause damage to
the recorded side.
<
Never use a stabilizer. Using commercially available
CD stabilizers with this unit will damage the
mechanisms and cause them to malfunction.
<
Do not use irregular shape CDs (octagonal, heart-
shape, etc.). CDs of this sort can damage the unit.
< If you are in any doubt as to the care and handling
of a CD-R disc, read the precautions supplied with
the disc, or contact the disc manufacturer directly.

11
FRANÇAIS ESPAÑOL
ENGLISH/ FRANÇAIS/ESPAÑOL
Disques Compacts (2)
< Ne jamais utiliser de produits chimiques, tels que
des sprays, des liquides antistatiques, de l’essence
ou des diluants pour nettoyer les disques. Ces
produits chimiques risquent de provoquer des
dégâts irréparables sur la surface en plastique du
disque.
<
Ranger les disques dans leur étui après utilisation
afin d’éviter de les rayer ou que de la poussière ne
se dépose, ceci pouvant compromettre la lecture
par la tête laser.
<
Ne pas exposer les disques à la lumière directe du
soleil, à une température élevée ou à une humidité
excessive pendant une période prolongée. De telles
expositions risquent de provoquer une déformation
du disque.
<
Les disques CD-R sont plus sensibles aux effets de
la chaleur et aux rayons ultraviolets que les disques
compacts ordinaires. Il est donc particulièrement
important de les ranger dans un endroit à l’abri de la
lumière directe du soleil et de toute source de
chaleur, telle que des radiateurs ou des appareils
électriques, susceptibles de dégager de la chaleur.
<
Il est déconseillé d’utiliser des disques CD-R
inscriptibles, la face portant l’étiquette risquant
d’être collante et d’endommager l’appareil.
<
Ne jamais coller d’étiquette ou de feuille de
protection sur le disque; ne pas utiliser de spray
destiné à déposer sur le disque une couche de
protection.
<
Utiliser, pour écrire des informations sur la face
portant l’étiquette, un feutre utilisant une encre à
base d’huile. Ne jamais utiliser de stylo bille ou de
stylo à pointe dure, qui risquerait d’abîmer la
surface enregistrée du disque.
<
Ne jamais utiliser de stabilisateurs. L’utilisation,
avec cet appareil, de stabilisateurs pour CD
disponibles dans le commerce, pourrait
endommager les mécanismes de l’appareil et
provoquer son dysfonctionnement.
<
Ne pas utiliser de CD ayant une forme irrégulière
(octogonale, en forme de coeur, etc.), ceux-ci
risquant d’endommager l’appareil.
< En cas de doute quant à la manipulation des CD-R,
lire les instructions fournies avec le disque ou
contacter directement le fabricant du disque.
Discos (2)
< No utilice nunca productos químicos como los
aerosoles para discos de vinilo o antiestáticos,
bencina o aguarrás para limpiar los discos. Tales
sustancias causarán daños irreparables en la
superficie de plástico del disco.
<
Los discos deberán devolverse a sus estuches
después de usarlos para evitar la acumulación de
polvo y los rayados, que podrían producir “saltos”
en el lector láser.
<
No exponga los discos a la luz solar directa ni a
niveles elevados de temperatura o humedad
durante períodos prolongados. Las altas
temperaturas deforman los discos con el tiempo.
<
Los discos CD-R son más sensibles a los efectos del
calor y los rayos ultravioleta que los CD normales.
No conviene guardarlos en lugares donde puedan
quedar expuestos a la luz solar directa, y deberán
mantenerse alejados de fuentes de calor como los
radiadores o los aparatos eléctricos que
desprendan calor.
<
No se recomiendan los CD-R imprimibles, ya que el
lado de la etiqueta puede tener restos de adhesivo y
dañar la unidad.
<
No adhiera papeles ni láminas de protección a los
discos, ni aplique ningún tipo de aerosol de
revestimiento.
<
Utilice un rotulador de punta blanda para escribir en
el lado de la etiqueta. No emplee nunca bolígrafos
ni lápices de punta dura, ya que podría dañar la
cara grabada del disco.
<
No utilice nunca estabilizadores. Los estabilizadores
de CD existentes en el mercado producirán daños
en los mecanismos y anomalías en su
funcionamiento.
<
No utilice discos de diseño irregular (octogonales,
forma de corazón, etc.), ya que pueden dañar la
unidad.
< Si tiene alguna duda sobre el cuidado y
manipulación de un disco CD-R, lea las
instrucciones facilitadas con el disco o póngase
directamente en contacto con el fabricante.

12
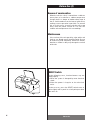
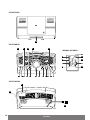
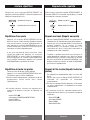
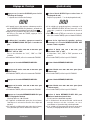
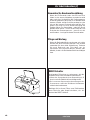
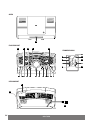
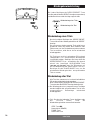
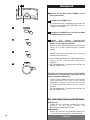
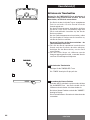
ENGLISH
A
B
V
FEC GD
T S R Q L K J IP MO N
H H
C
K
Q
G
M
D
W
X
U
E
P
TOP
FRONT
REAR
REMOTE CONTROL

ENGLISH/ FRANÇAIS/ESPAÑOL
13
ENGLISH
Names of Each Control
Disc cover
Press the L mark on the disc cover to open it.
SNOOZE button
After the on time is reached, use this button to turn
the unit off for 5 minutes.
POWER switch
Press this switch to turn the unit on and off.
CD, TUNER buttons (FUNCTION button)
Press the CD button to play a disc.
Press the TUNER button to listen to the radio.
Press the FUNCTION button repeatedly when using
the remote control unit.
BAND button
Use this button to select FM or AM.
Display
CD operation buttons
When TUNER is selected, these buttons won’t work.
STOP button (H)
Use this button to stop playback.
PLAY/PAUSE button (y/J)
Use this button to start or pause playback.
SKIP/SEARCH buttons
(.
m
/
,
/)
Press these buttons to skip tracks.
Hold down these buttons to search for a part of a
track.
Speakers (stereo)
Remote sensor
SHUFFLE button
Use this button to select shuffle playback mode.
REPEAT/PRESET button
Use this button to change the repeat mode or select
a preset number and station.
MEMORY/CLOCK ADJ button
Use this button to program tracks or to adjust the
clock.
L
K
J
I
H
G
F
E
D
C
B
A
VOLUME knob
Turn this knob to adjust the volume.
Subwoofer
BASS CONTROL knob
Use this control knob to adjust the subwoofer level.
TUNING knob
Turn this knob to tune in a station.
MUTING button
To cut the sound temporarily, press the MUTING
button. Press the MUTING button again to restore
the sound. If you change the volume during the
muting, the muting will be canceled.
DISPLAY button
Use this button to change the display mode.
TIMER/SLEEP button
Use this button to set the timer or sleep timer.
PHONES
Insert the headphones plug into the PHONES jack,
and adjust the volume.
Both stereo and monaural earphones can be used
with this unit.
SLEEP button
Use this button to set the sleep timer.
Holder for Remote Control Unit
Place the remote control unit when not in use.
You can detach the holder by using a screw driver,
if you don’t need it.
FM feeder antenna
Tune in an FM station and extend the lead to find the
best position for the reception. Then fix it to the wall
with thumb tacks or the like.
AC Power Cord
Plug this AC power cord into an AC wall socket.
X
W
V
U
T
S
R
Q
P
O
N
M
The equipment draws nominal nonoperating
power from the AC outlet with its POWER switch
in the OFF position.

14
FRANÇAIS
A
B
V
FEC GD
T S R Q L K J IP MO N
H H
C
K
Q
G
M
D
W
X
U
E
P
DESSUS
DEVANT
DERRIÈRE
TÉLÉCOMMANDE

ENGLISH/ FRANÇAIS/ESPAÑOL
15
FRANÇAIS
Nomenclature
Couvercle du disque
Appuyez sur la marque L située sur le couvercle du
disque pour l’ouvrir.
Touche SNOOZE
Après que l’appareil s’est allumé, utilisez cette
touche pour l’éteindre pour 5 minutes.
Commutateur POWER
Appuyer sur cette touche pour allumer ou éteindre
l’appareil.
Touches CD, TUNER (Touche FUNCTION)
Appuyer sur la touche CD pour jouer un disque.
Pour l’écoute du radio, appuyer sur la touche AM ou
FM.
Appuyez sur la touche FUNCTION répététivement
quand vous utilisez la télécommande.
Touche BAND
Utilisez cette touche pour choisir le AM ou le FM.
Afficheur
Touches d’opération du CD
Si le TUNER est choisi, ces touches ne fonctionnent
pas.
Touche STOP (H)
Utiliser cette touche pour arrêter la lecture.
Touche PLAY/PAUSE (y/J)
Utiliser cette touche pour débuter ou pausé la
lecture.
Touches SKIP/SEARCH
(.
m
/
,
/)
Appuyer sur ces touches pour sauter des pistes.
Tenir appuyer ces touches pour chercher une
section d’une piste.
Haut-parleurs (stéréo)
Capteur de télécommande
Touche SHUFFLE
Utilisez cette touche pour choisir le mode de lecture
aléatoire.
Touche REPEAT/PRESET
Utilisez cette touche pour changer le répétage ou
choisir un numéro préréglé et une station.
K
J
I
H
G
F
E
D
C
B
A
Touche MEMORY/CLOCK ADJ
Utilisez cette touche pour programmer les pistes ou
régler l’horloge.
Commande VOLUME
Utiliser ce commande pour régler le volume.
Subwoofer
Commande BASS CONTROL
Utilisez ce commande pour régler le niveau du
subwoofer.
Commande TUNING
Utiliser ce commande pour la syntonisation d’un
poste.
Touche MUTING
Pour couper le son provisoirement, appuyer sur la
touche MUTING. Pour rétablir le son, appuyer à
nouveau sur cette même touche. Le fait de modifier
le volume sonore alors que la fonction MUTING est
activée a pour effet d’annuler la fonction MUTING.
Touche d’affichage
Utilisez cette touche pour changer le mode
d’affichage.
Touche TIMER/SLEEP
Utiliser cette touche pour régler le minuteur ou le
minuteur de mise en veille.
ÉCOUTEURS
Insérer la prise des écouteurs dans cette prise et
régler le volume.
Les écouteurs stéréos et monos peuvent être
utiliser avec cet appareil.
Touche SLEEP
Utiliser cette touche pour régler le minuteur de mise
en veille.
Support de la télécommande
Placer la télécommande sur son support lorsqu’elle
n’est pas utilisée. Il est possible de détacher le
support à l’aide d’un tournevis si besoin est.
Antenne FM
Syntoniser un poste FM et étendre l’antenne pour
trouver lameilleure position de réception. Ensuite
tenir en place sur le mur en utilisant des punaises
ou autre.
Cordon d’alimentation
Brancher ce cordon d’alimentation dans une prise
murale CA.
X
W
V
U
T
S
R
Q
P
O
N
M
L
Cet appareil consume du courant même quand il
est éteint.

16
ESPAÑOL
A
B
V
FEC GD
T S R Q L K J IP MO N
H H
C
K
Q
G
M
D
W
X
U
E
P
VISTA SPERIOR
VISTA FRONTAL
VISTA TRASERA
MANDO A DISTANCIA

ENGLISH/ FRANÇAIS/ESPAÑOL
17
ESPAÑOL
Nombres de cada control
Cubierta del disco
Oprima la marca L en la cubierta del disco para
abrirlo.
Botón SNOOZE
Después de que se llega a la hora, utilice este botón
para apagarla durante 5 minutos.
Interruptor POWER
Oprima este interruptor para encender y apagar la
unidad.
Botones CD, TUNER (botón FUNCTION)
Oprima el botón CD para reproducir un disco.
Para escuchar la radio, oprima el botón TUNER.
Oprima el botón FUNCTION de manera repetida
cuando utilice la unidad de control remoto.
Botón BAND
Utilice este botón para seleccionar FM o AM.
Pantalla
Botones de operación de CD
Cuando se selecciona TUNER o AUX, estos botones
no trabajarán.
Botón STOP (H)
Utilice este botón para detener la reproducción.
Botón PLAY/PAUSE (y/J)
Utilice este botón para iniciar o hacer pausa en la
reproducción.
Botones SKIP/SEARCH (.m/ ,/)
Oprima estos botones para saltar las pistas.
Mantenga oprimidos estos botones para buscar una
parte de una pista.
Bocinas (estereo)
Sensor remoto
Botón SHUFFLE
Utilice este botón para seleccionar el modo de
reproducción al azar.
Botón REPEAT/PRESET
Utilice este botón para cambiar el modo de
repetición o seleccione el número preestablecido y
una estación.
K
J
I
H
G
F
E
D
C
B
A
Botón MEMORY/CLOCK ADJ
Utilice este botón para programar las pistas o
ajustar el reloj.
Perilla VOLUME
Gire esta perilla para ajustar el volumen.
Subwoofer
Perilla BASS CONTROL
Utilice esta perilla de control para ajustar el nivel de
subwoofer.
Perilla TUNING
Gire esta perilla para sintonizar una estación.
Botón MUTING
Para cortar el sonido temporalmente, oprima el
botón MUTING. Oprima el botón MUTING otra vez
para restaurar el sonido. Si cambia el volumen
cuando está en estado de MUTING, se cancelará la
condición de silencio.
Botón DISPLAY
Utilice este botón para cambiar el modo de
desplegado.
Botón TIMER/SLEEP
Utilice este botón para ajustar el tiempo de
despertar o dormir.
ÉCOUTEURS
Insérer la prise des écouteurs dans cette prise et
régler le volume.
Les écouteurs stéréos et monos peuvent être
utiliser avec cet appareil.
Botón SLEEP
Utilice este botón para ajustar el tiempo de dormir.
Soporte para la unidad de control remoto
Coloque la unidad de control remoto cuando no se
utilice. Puede separar el soporte usando un
destornillador, si no lo necesita.
Antena alimentadora de FM
Sintonice una estación FM y extienda el conductor
para encontrar la mejor posición para la recepción.
Después fíjela en la pared con tachuelas o algún
objeto similar.
Cable de energía CA
Conecte este cable de energía CA a una conexión
de pared CA.
X
W
V
U
T
S
R
Q
P
O
N
M
L
El equipo toma energía no operacional nominal de
la salida CA con su interruptor POWER en la
posición OFF (APAGADO).

18
ENGLISH
Remote Control Unit
The provided Remote Control Unit allows the unit to be
operated from a distance.
When operating the remote control unit, point it
towards the REMOTE SENSOR on the front panel of the
unit.
<
Even if the remote control unit is operated within the
effective range, remote control operation may be
impossible if there are any obstacles between the
unit and the remote control.
<
If the remote control unit is operated near other
appliances which generate infrared rays, or if other
remote control devices using infrared rays are used
near the unit, it may operate incorrectly. Conversely,
the other appliances may operate incorrectly.
Battery Installation
Remove the battery compartment cover.
Insert two “AAA“ (R03, SUM-4) dry batteries. Make
sure that the batteries are inserted with their
positive “+
“ and negative “_“ poles positioned
correctly.
Close the cover.
Battery Replacement
If the distance required between the remote control
unit and main unit decreases, the batteries are
exhausted. In this case replace the batteries with new
ones.
Precautions concerning batteries
< Be sure to insert the batteries with correct positive
“+
“ and negative “_“ polarities.
<
Use batteries of the same type. Never use different
types of batteries together.
<
Rechargeable and non-rechargeable batteries can
be used. Refer to the precautions on their labels.
<
When the remote control unit is not to be used for a
long time (more than a month), remove the batteries
from the remote control unit to prevent them from
leaking. If they leak, wipe away the liquid inside the
battery compartment and replace the batteries with
new ones.
<
Do not heat or disassemble batteries and never
dispose of old batteries by throwing them in a fire.
3
2
1

19
FRANÇAIS ESPAÑOL
ENGLISH/ FRANÇAIS/ESPAÑOL
Boîtier de télécommande Unidad de control remoto
Le boîtier de télécommande fourni permet la
commande à distance defourni permet la commande à
distance de l’appareil. Pour l’utilisation du boîtier de
télécommande, le diriger vers le détecteusation du
boîtier de télécommande, le diriger vers le détecteur de
télécommande du panneau avant de l’appareil.
<
Même si le boîtier de télécommande est activé dans
la zone de fonctionnement, la commande à distance
peut être impossible s’il y a des obstacles entre le
lecteur et le boîtier de télécommande.
<
Si le boîtier de télécommande fonctionne dans le
voisinage d’autres appareils générant des rayons
infrarouges, ou si d’autres télécommandes utilisant
des rayons infrarouges sont utilisées près du
lecteur, le lecteur peut de ne pas bien fonctionner.
Dans la situation inverse, les autres apaareils
peuvent ne pas bien fonctionner.
Mise en place des piles
Retirer le couvercle du compartiment des piles.
Introduire deux piles “AAA“ (R03, SUM-4). S’assurer
que les piles sont correctement mises en respectant
les polarités plus +
et moins _ .
Fermer le couvercle jusqu’au déclic.
Remplacement des piles
Si vous remarquez que la distance entre le boîtier de
télécommande et le lecteur devient plus courte pour un
fonctionnement correct, ceci indique que les piles sont
usées. Dans ce cas, remplacer les piles par des
nouvelles.
Précautions à observer concernant les
piles
< Bien placer les piles en respectant les polarités plus
+
et moins _ .
<
Utiliser des piles du même type. Ne jamais essayer
d’utiliser des types de pile différents ensemble.
<
Des piles ou des batteries peuvent être utilisées. Se
référer à leurs étiquettes pour les précautions à
respecter.
<
Si le boîtier de télécommande n’est pas utilisé
pendant une longue période (pluss d’un mois),
retirer les piles du boîtier de télécommande pour
éviter des fuites de pile. Si elles coulent, essuyer le
liquide dans le compartiment des piles et remplacer
les piles par des neuves.
<
Ne pas chauffer, démonter les piles ni les mettre au
feu.
3
2
1
La unidad de control remoto suministrada le permite
controlar el aparato a distancia.
Cuando opere con el control remoto, diríjalo hacia el
sensor remoto en el panel frontal del aparato.
<
Aunque se utilice la unidad dentro del margen de
funcionamiento efectivo, es imposible el control a
distancia si hay obstáculos entre el reproductor y el
control remoto.
<
Si se utiliza la unidad cerca de otros aparatos que
generen rayos infrarrojos o si se emplean otros
aparatos de control remoto por rayos infrarrojos
cerca del reproductor, es posible que éste no
funcione correctamente. Del mismo modo, es
posible que los otros aparatos tampoco funcionen
correctamente.
Instalación de las pilas
Abra la tapa del compartimiento de las pilas.
Coloque dos pilas “AAA“ (R03, SUM-4).
Asegúrese de que las pilas queden ubicadas con
sus polos positivo +
y negativo _ correctamente
posicionados.
Cierre la tapa hasta que se trabe.
Cambio de pilas
Si nota que ha disminuido la distancia necesaria para
un control correcto entre el control remoto y el
reproductor, significa que las pilas están gastadas. En
este caso, reemplácelas por nuevas.
Precauciones con las pilas
< Asegúrese de insertar las pilas con sus polaridades
positiva +
y negativa _ correctas.
<
Utilice el mismo tipo de pilas. Nunca utilice
diferentes tipos de pilas juntas.
<
Pueden utilizarse pilas recargables y no
recargables. Refiérase a las precauciones en sus
rótulos.
<
Si no va a utilizar el control remoto por mucho
tiempo (más de un mes), retire las pilas para evitar
pérdidas. Si se produce pérdidas, limpie el líquido
en el interior del compartimiento y cambie las pilas
por nuevas.
<
No caliente ni desarme las pilas y nunca arroje pilas
gastadas al fuego.
3
2
1

20
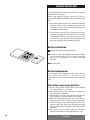
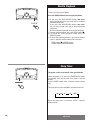
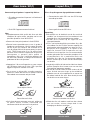
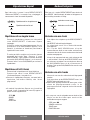
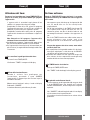
ENGLISH
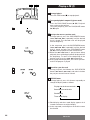
Playing a CD (1)
1 52
Press the POWER switch to turn the unit ON.
Press the CD button to select “CD”.
Press the FUNCTION button repeatedly to select
“CD”, when using the remote control unit.
<
When no disc is in the unit, “no dISC” will be
displayed.
Press L to open the disc cover.
Place a disc with the printed label face up, and
close the cover by hand.
<
CD’s must be pressed securely onto the Spindle,
until a “CLICK” is heard.
<
Never place more than one disc in the CD player.
<
When closing, press L on the cover.
<
The total number of the tracks and total play time of
the disc is displayed.
<
It takes a few seconds for the unit to read the
contents of the disc. No button will work during
reading. Wait until the total number of the tracks
and total play time of the disc is displayed.
Press the PLAY/PAUSE button (y /J ) to start
playback.
Playback starts from the first track.
When playback of all the tracks has finished, the
unit stops automatically.
5
4
3
2
1
1
2
4
5
3
La pagina si sta caricando...
La pagina si sta caricando...
La pagina si sta caricando...
La pagina si sta caricando...
La pagina si sta caricando...
La pagina si sta caricando...
La pagina si sta caricando...
La pagina si sta caricando...
La pagina si sta caricando...
La pagina si sta caricando...
La pagina si sta caricando...
La pagina si sta caricando...
La pagina si sta caricando...
La pagina si sta caricando...
La pagina si sta caricando...
La pagina si sta caricando...
La pagina si sta caricando...
La pagina si sta caricando...
La pagina si sta caricando...
La pagina si sta caricando...
La pagina si sta caricando...
La pagina si sta caricando...
La pagina si sta caricando...
La pagina si sta caricando...
La pagina si sta caricando...
La pagina si sta caricando...
La pagina si sta caricando...
La pagina si sta caricando...
La pagina si sta caricando...
La pagina si sta caricando...
La pagina si sta caricando...
La pagina si sta caricando...
La pagina si sta caricando...
La pagina si sta caricando...
La pagina si sta caricando...
La pagina si sta caricando...
La pagina si sta caricando...
La pagina si sta caricando...
La pagina si sta caricando...
La pagina si sta caricando...
La pagina si sta caricando...
La pagina si sta caricando...
La pagina si sta caricando...
La pagina si sta caricando...
La pagina si sta caricando...
La pagina si sta caricando...
La pagina si sta caricando...
La pagina si sta caricando...
La pagina si sta caricando...
La pagina si sta caricando...
La pagina si sta caricando...
La pagina si sta caricando...
La pagina si sta caricando...
La pagina si sta caricando...
La pagina si sta caricando...
La pagina si sta caricando...
La pagina si sta caricando...
La pagina si sta caricando...
La pagina si sta caricando...
La pagina si sta caricando...
La pagina si sta caricando...
La pagina si sta caricando...
La pagina si sta caricando...
La pagina si sta caricando...
La pagina si sta caricando...
La pagina si sta caricando...
La pagina si sta caricando...
La pagina si sta caricando...
-
 1
1
-
 2
2
-
 3
3
-
 4
4
-
 5
5
-
 6
6
-
 7
7
-
 8
8
-
 9
9
-
 10
10
-
 11
11
-
 12
12
-
 13
13
-
 14
14
-
 15
15
-
 16
16
-
 17
17
-
 18
18
-
 19
19
-
 20
20
-
 21
21
-
 22
22
-
 23
23
-
 24
24
-
 25
25
-
 26
26
-
 27
27
-
 28
28
-
 29
29
-
 30
30
-
 31
31
-
 32
32
-
 33
33
-
 34
34
-
 35
35
-
 36
36
-
 37
37
-
 38
38
-
 39
39
-
 40
40
-
 41
41
-
 42
42
-
 43
43
-
 44
44
-
 45
45
-
 46
46
-
 47
47
-
 48
48
-
 49
49
-
 50
50
-
 51
51
-
 52
52
-
 53
53
-
 54
54
-
 55
55
-
 56
56
-
 57
57
-
 58
58
-
 59
59
-
 60
60
-
 61
61
-
 62
62
-
 63
63
-
 64
64
-
 65
65
-
 66
66
-
 67
67
-
 68
68
-
 69
69
-
 70
70
-
 71
71
-
 72
72
-
 73
73
-
 74
74
-
 75
75
-
 76
76
-
 77
77
-
 78
78
-
 79
79
-
 80
80
-
 81
81
-
 82
82
-
 83
83
-
 84
84
-
 85
85
-
 86
86
-
 87
87
-
 88
88


TEAC LT-1CD Manuale utente
- Categoria
- Lettore CD
- Tipo
- Manuale utente
- Questo manuale è adatto anche per
in altre lingue
- français: TEAC LT-1CD Manuel utilisateur
- español: TEAC LT-1CD Manual de usuario
- Deutsch: TEAC LT-1CD Benutzerhandbuch
- Nederlands: TEAC LT-1CD Handleiding
Documenti correlati
-
TEAC PD-D2410 Manuale del proprietario
-
-
-
-
-
-
-
-
-