LXE VX3Plus Manuale utente
- Categoria
- Computer portatili palmari
- Tipo
- Manuale utente

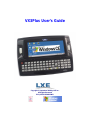
VX3Plus User’s Guide
Copyright © September 2008 by LXE Inc.
All Rights Reserved
E-EQ-VX3PLUSOGWW-B

LANGUAGE: ENGLISH
Notices
Notice:
LXE Inc. reserves the right to make improvements or changes in the products described in this manual at any time
without notice. While reasonable efforts have been made in the preparation of this document to assure its
accuracy, LXE assumes no liability resulting from any errors or omissions in this document, or from the use of the
information contained herein. Further, LXE Incorporated, reserves the right to revise this publication and to make
changes to it from time to time without any obligation to notify any person or organization of such revision or
changes.
Copyright Notice:
This manual is copyrighted. All rights are reserved. This document may not, in whole or in part, be copied,
photocopied, reproduced, translated or reduced to any electronic medium or machine-readable form without prior
consent, in writing, from LXE Inc.
Copyright © 2008 by LXE Inc. An EMS Technologies Company.
125 Technology Parkway, Norcross, GA 30092 U.S.A. (770) 447-4224
Trademarks:
LXE® is a registered trademark of LXE Inc. RFTerm® is a registered trademark of EMS Technologies, Norcross, GA.
Microsoft, Windows and the Windows logo are registered trademarks of Microsoft Corporation in the United States and/or
other countries.
Java® and Java-based trademarks and logos are trademarks or registered trademarks of Sun Microsystems, Inc. in the U.S. or
other countries, and are used under license.
Intel and Intel XScale are trademarks or registered trademarks of Intel Corporation or its subsidiaries in the United States and
other countries.
RAM® and RAM Mount™ are both trademarks of National Products Inc., 1205 S. Orr Street, Seattle, WA 98108.
Summit Data Communications, Inc. Summit Data Communications, the Summit logo, and “The Pinnacle of Performance” are
trademarks of Summit Data Communications, Inc. All rights reserved.
The Bluetooth® word mark and logos are owned by the Bluetooth SIG, Inc. and any use of such marks by LXE, Inc. is under
license.
Wavelink® and Wavelink Avalanche® are registered trademarks and the Wavelink logo, tagline and Avalanche MC are
trademarks of Wavelink Corporation, Kirkland, WA.
All other brand or product names are trademarks or registered trademarks of their respective companies or organizations.
When this manual is in PDF format: “Acrobat® Reader® Copyright © 2008 Adobe Systems Incorporated. All rights reserved.
Adobe®, the Adobe logo, Acrobat®, and the Acrobat logo are registered trademarks of Adobe Systems Incorporated.” applies.
!
The user is strongly cautioned to read Appendix B, “Regulatory Notices and Safety
Information”. Important safety cautions, warnings and regulatory information is contained in
Appendix B.
Important: This symbol is placed on the product to remind users to dispose of Waste Electrical
and Electronic Equipment (WEEE) appropriately, per Directive 2002-96-EC. In most areas, this
product can be recycled, reclaimed and re-used when properly discarded. Do not discard labeled
units with trash. For information about proper disposal, contact LXE through your local sales
representative, or visit www.lxe.com.

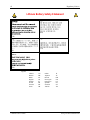
Revision Notice
VX3Plus User’s Guide
Upgrade From Revision A to Revision B
Section Explanation
Appendix B Regulatory Notices and
Safety Information
Update approvals for 802.11 a/b/g radio.
Remove Summit Declaration of Compliance for consistency.
Note: A complete revision history is included in Appendix B, “Regulatory Notices and Safety Information”.


E-EQ-VX3PLUSOGWW-B VX3Plus User’s Guide
Table of Contents
THE VX3PLUS VEHICLE MOUNT COMPUTER 1
Introduction...............................................................................................................1
Identifying the VX3Plus Computer..........................................................................................2
Document Conventions ............................................................................................................3
Environmental Specifications...................................................................................................3
VX3Plus without Touchscreen................................................................................. 4
Quick Start.................................................................................................................4
Troubleshooting........................................................................................................................5
Components..............................................................................................................6
Microsoft Windows CE Control Panel..................................................................... 8
The Half-Screen Display...........................................................................................8
AppLock and the VX3Plus........................................................................................ 9
Single Application AppLock ....................................................................................................9
Multi Application AppLock .....................................................................................................9
Using the Touchscreen ...........................................................................................................9
Using the Keypad .................................................................................................................10
The QWERTY Keyboard .........................................................................................11
IBM 3270 Overlay..................................................................................................................11
IBM 5250 Overlay..................................................................................................................11
Key Functions.........................................................................................................................12
CAPS Key and CapsLock Mode ............................................................................................13
Keypad Shortcuts....................................................................................................................13
Keypress Sequences................................................................................................................
13
Custom Key Maps ..................................................................................................................13
LED Functions........................................................................................................................14
General Windows CE Keyboard Shortcuts ............................................................................15
Input Panel (Virtual Keyboard) ..............................................................................................
16
Enabling the Input Panel ......................................................................................................
16
Power Supply..........................................................................................................17
Backup Battery .......................................................................................................................17
Getting Help.............................................................................................................
18
Manuals and Accessories...................................................................................... 18
Manuals...................................................................................................................................
18
Accessories .............................................................................................................................
18
INSTALLATION 23

ii Table of Contents
VX3Plus User’s Guide E-EQ-VX3PLUSOGWW-B
Install Mounting Brackets ......................................................................................23
RAM Mount System ................................................................................................ 24
Components ............................................................................................................................24
Torque Measurements ............................................................................................................24
Procedure ................................................................................................................................
25
Step 1 – Mount Vehicle RAM Clamp Mount ......................................................................
25
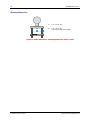
Mounting Dimensions.................................................................................................................... 26
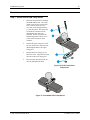
Step 2 – Attach RAM Mount Ball to the VX3Plus ..............................................................27
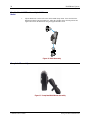
Step 3 – Attach VX3Plus Assembly to RAM Mount...........................................................28
Completed Assembly..............................................................................................................28
Strain Relief Cable Clamps ....................................................................................29
Install Stylus Tether and Sleeve (Optional) ..........................................................30
Install/Remove Touchscreen Protective Film Optional)...................................... 30
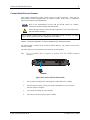
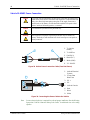
Connect Serial Barcode Scanner ..........................................................................31
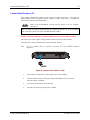
Connect Serial Printer or PC.................................................................................. 33
USB-C Port ..............................................................................................................34
USB-H Port ..............................................................................................................35
Connect External Headset...................................................................................... 36
LXE Headsets .........................................................................................................................36
Other Headsets........................................................................................................................37
Connect Antenna .................................................................................................... 38
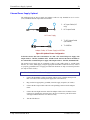
Connect Power Cable.............................................................................................38
External Power Supply, Optional........................................................................... 39
Vehicle 12-80VDC Power Connection ...................................................................40
OPERATION 43
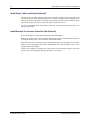
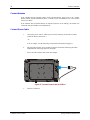
Power Button........................................................................................................... 43
Power Management ................................................................................................................43
Restart Sequence.....................................................................................................................
43
Display and Touchscreen....................................................................................... 44
Set the Display Backlight Timer ............................................................................................44
Set the Display Brightness......................................................................................................44
Cleaning the Display ..............................................................................................................
45
Disabling the Touchscreen .....................................................................................................
45
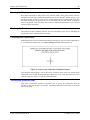
Calibrating the Touchscreen...................................................................................................45
Touchscreen Protective Film ..................................................................................................45
Adjust Speaker Volume..........................................................................................46
Using the Keypad ...................................................................................................................46

Table of Contents iii
E-EQ-VX3PLUSOGWW-B VX3Plus User’s Guide
Using the Touchscreen ...........................................................................................................46
Microsoft Windows CE Event Sounds...................................................................................46
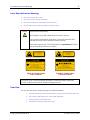
Laser Barcode Scanner Warnings......................................................................... 47
Enter Data................................................................................................................47
Keyboard Entry.......................................................................................................................
48
Touchscreen Entry..................................................................................................................
48
Right Click ...........................................................................................................................48
Tethered Scanner Entry ..........................................................................................................49
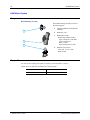
Aiming the Barcode Scanner................................................................................................49
Distance from Label .............................................................................................................49
Successful Scan ....................................................................................................................
49
Unsuccessful Scan................................................................................................................49
Bluetooth Scanners .................................................................................................................
50
Voice Data ..............................................................................................................................
50
Bluetooth Devices...................................................................................................
51
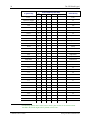
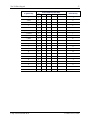
APPENDIX A KEY MAPS 53
The VX3Plus Keypad ..............................................................................................53
Key Map 101-Key Equivalencies...........................................................................................53
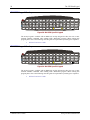
IBM 3270 Keypad Overlay ....................................................................................................58
IBM 5250 Keypad Overlay ....................................................................................................58
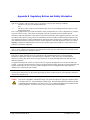
APPENDIX B REGULATORY NOTICES AND SAFETY INFORMATION 59
Approvals ................................................................................................................ 60
Revision History...................................................................................................... 65
I
NDEX 67

iv Table of Contents
VX3Plus User’s Guide E-EQ-VX3PLUSOGWW-B
Illustrations
Figure 1 VX3Plus Components, Top View .........................................................................................................6
Figure 2 VX3Plus Components, Front View.......................................................................................................6
Figure 3 VX3Plus Components, Back View .......................................................................................................7
Figure 4 Switchpad Menu....................................................................................................................................9
Figure 5 QWERTY Keyboard Standard Overlay ..............................................................................................11
Figure 6 QWERTY Keyboard with IBM 3270 Overlay....................................................................................11
Figure 7 QWERTY Keyboard with IBM 5250 Overlay....................................................................................11
Figure 8 LED Functions.....................................................................................................................................14
Figure 9 Virtual Keyboard .................................................................................................................................16
Figure 10 RAM Clamp Mount Components......................................................................................................25
Figure 11 Assembled RAM Clamp Mount ........................................................................................................25
Figure 12 RAM Clamp Mount - Mounting Dimensions (Not To Scale) ...........................................................26
Figure 13 Attach RAM Mount to VX3Plus.......................................................................................................27
Figure 14 RAM Assembly .................................................................................................................................28
Figure 15 Completed RAM Mount Assembly ...................................................................................................28
Figure 16 Strain Relief Cable Clamps ...............................................................................................................29
Figure 17 Slide Clamp Over Cable....................................................................................................................29
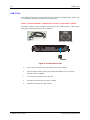
Figure 18 Connect Serial Scanner Cable ...........................................................................................................31
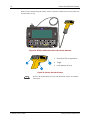
Figure 19 VX3Plus with Generic Barcode Scanner Attached ...........................................................................32
Figure 20 Generic Barcode Scanner ..................................................................................................................32
Figure 21 Connect Serial Cable to COM3 .........................................................................................................33
Figure 22 Connect USB-C Cable.......................................................................................................................34
Figure 23 Connect USB-H Cable ......................................................................................................................35
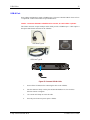
Figure 24 Connect External Headset .................................................................................................................36
Figure 25 Headset Adapter Cable Components.................................................................................................36
Figure 26 Headset Quick Disconnect Connector...............................................................................................37
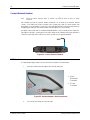
Figure 27 Connect Power Cable to VX3Plus.....................................................................................................38
Figure 28 Optional Power Configuration ..........................................................................................................39
Figure 29 Vehicle Power Connection Cable (Fuse Not Shown)........................................................................40
Figure 30 Connecting the Power Cable to the Vehicle......................................................................................40
Figure 31 Vehicle Connection Wiring Color Codes..........................................................................................41
Figure 32 Location of the Power (PWR) Button ...............................................................................................43
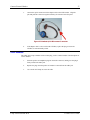
Figure 33 Touchscreen Calibration, Calibration Targets...................................................................................45
Figure 34 Caution Labels Class II Scanner........................................................................................................47
Figure 35 Caution Labels Class IIIA Scanner ...................................................................................................47
Figure 36 Scan Beam.........................................................................................................................................49
Figure 37 VX3Plus QWERTY Keyboard..........................................................................................................53
Figure 38 IBM 3270 Specific Keypad ...............................................................................................................58
Figure 39 IBM 5250 Specific Keypad ...............................................................................................................58

E-EQ-VX3PLUSOGWW-B VX3Plus User’s Guide
The VX3Plus Vehicle Mount Computer
Introduction
The VX3Plus Vehicle Mount Computer (VMC) is a rugged, vehicle-mounted, Microsoft
®
Windows
®
CE equipped computer. The VX3Plus is capable of wireless data communications
from a fork-lift truck or any properly configured vehicle. The unit uses an 802.11radio for
wireless data communications.
The mobile device is horizontally oriented and features backlighting for the display. The touch-
screen display supports graphic features and Windows CE icons that the Windows CE operating
system supports. The keys on the keypad are constructed of a phosphorescent material that can
easily be seen in dimly lighted areas.
The VX3Plus provides the power and functionality of a desktop computer in a vehicle mounted
unit, with a wide range of options:
• 400MHz Intel
®
PXA255 CPU
• Windows 5.0 Operating System
• An active transmissive display optimized for indoor viewing, or an active
transflecive display optimized for outdoor viewing.
• Wireless LAN radios with internal antenna or external remote mount antenna
• USB Client port
• Available touch screen protective film
• Available Bluetooth
®
module supports LXE Bluetooth printers and scanners.
• Available RAM Mount
TM
Note: The “VX3Plus Reference Guide” contains VX3Plus technical information and advanced
functions.

2 Introduction
VX3Plus User’s Guide E-EQ-VX3PLUSOGWW-B
Identifying the VX3Plus Computer
VX3Plus
The VX3Plus is identified by the “VX3Plus” logo located at the bottom right of the keypad.
The VX3Plus is covered in this document and the VX3Plus Reference Guide.
VX3X
The VX3X is identified by the “VX3X” logo located above the keypad.
The VX3X is not covered in this document. Please refer to the VX3X User’s Guide and the VX3X
Reference Guide for information on the VX3X.

Introduction 3
E-EQ-VX3PLUSOGWW-B VX3Plus User’s Guide
Document Conventions
This reference guide uses the following document conventions:
ALL CAPS All caps are used to represent disk directories, file names, and application
names.
Menu|Choice Rather than use the phrase “choose the Save command from the File menu”,
this manual uses the convention “choose File|Save”.
“Quotes” Indicates the title of a book, chapter or a section within a chapter (for
example, “Document Conventions”).
< > Indicates a key on the keyboard (for example, <Enter> ).
Indicates a reference to other documentation.
Differences in operation or commands due to radio type.
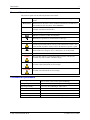
ATTENTION
Keyword that indicates vital or pivotal information to follow.
!
Attention symbol that indicates vital or pivotal information to follow. Also,
when marked on product, means to refer to the manual or operator’s guide.
International fuse replacement symbol. When marked on the product, the
label includes fuse ratings in volts (v) and amperes (a) for the product.
Note: Keyword that indicates immediately relevant information.
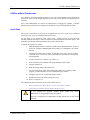
Caution
!
Keyword that indicates a potentially hazardous situation, which, if not
avoided, may result in minor or moderate injury.
WARNING
!
Keyword that indicates a potentially hazardous situation, which, if not
avoided, could result in death or serious injury.
DANGER
!
Keyword that indicates an imminent hazardous situation, which, if not
avoided, will result in death or serious injury.
Environmental Specifications
Operating Temperature
14°F to 122°F (-10°C to 50°C) [non-condensing]
Storage Temperature -22°F to 158°F (-30°C to 70°C) [non-condensing]
Operating Humidity 5% to 95% non-condensing at 104°F (40°C)
Vibration Based on MIL Std 810D
ESD 8 kV air, 4kV contact
Shock 75G, 5ms duration, 100 shock impacts
Bluetooth Range 32.8 feet (10 meters) Direct line of sight only.

4 VX3Plus without Touchscreen
VX3Plus User’s Guide E-EQ-VX3PLUSOGWW-B
VX3Plus without Touchscreen
If a VX3Plus is not equipped with a touchscreen of if your system administrator has disabled the
touchscreen, please see the Keypad Shortcuts section, later in this manual, for helpful keypress
sequences.
Your system administrator may need to use LXEConnect to configure the VX3Plus. Complete
details on using LXEConnect to configure theVX3Plus are in the VX3Plus Reference Guide.
Quick Start
This section’s instructions are based on the assumption that your new system is pre-configured
and requires only accessory installation and a power source.
Use this guide as you would any other source book -- reading portions to learn about the
VX3Plus, and then referring to it when you need more information about a particular subject. This
guide takes you through installation and operation of the LXE VX3Plus.
In general, the sequence of events is:
1. Install RAM ball on back of VX3Plus. Install Vehicle Mounting Bracket on vehicle
and secure VX3Plus in Mounting Bracket Assembly (see “Installation”, later in this
manual).
2. Connect power cable to the VX3Plus. If using DC power, please refer to “Vehicle
12-80VDC Power Connection”, later in this manual, for instructions, warnings and
fuse information.
3. Connect accessories to VX3Plus, e.g. scanner, etc.
4. Secure all cables to the VX3Plus with the Strain Relief Cable Clamps.
5. Turn the VX3Plus on.
6. When instructed, calibrate the touchscreen.
7. The screen may appear white while applications and drivers are loading. When
complete, set Date and Time (see the “VX3Plus Reference Guide”).
8. Configure radio (see the “VX3Plus Reference Guide”).
9. Warmboot to ensure all registry settings are saved.
10. Device is ready for use.
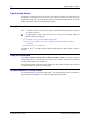
The VX3Plus should be mounted in an area in the vehicle where it:
• Does not obstruct the vehicle driver’s vision or safe vehicle operation.
• Can be easily accessed by anyone seated in the driver’s seat.
!
If your VX3Plus has AppLock installed, please contact your system
administrator for setup and processing information.
AppLock is configured by an administrator to limit general users to only certain
programs.

Quick Start 5
E-EQ-VX3PLUSOGWW-B VX3Plus User’s Guide
Troubleshooting
Can’t calibrate the touch
screen, change the date/time or
adjust the volume.
AppLock is installed and running on the mobile device.
AppLock restricts User access to running programs. Changes
or modifications require Administrator access.
Refer to AppLock in the VX3Plus Reference Guide for setup
and processing information.
RFterm opens and runs upon
each cold reset and warm reset.
Tap File | Exit to close the RFTerm application.
The VX3Plus seems to lockup
as soon as it is warm booted.
There may be small delays while the wireless client connects to
the network, authorization for Voxware-enabled applications
complete, Wavelink Avalanche management of the VX3Plus
startup completes, and Bluetooth relationships establish or re-
establish.

6 Components
VX3Plus User’s Guide E-EQ-VX3PLUSOGWW-B
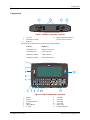
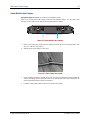
Components
RS-232
USB-C
3
21
4
Figure 1 VX3Plus Components, Top View
1 Left Port 4 Audio or Antenna Connector
2 Strain Relief Clamps (Audio Connector shown)
3 Right Port
The following combinations are offered for the VX3Plus Endcap
Left Port Right Port
COM3 (RS-232) USB-Client (USB-C)
COM3 (RS-232) COM1 (RS-232)
USB-Host (USB-H) COM1 (RS-232)
USB-Host (USB-H) USB-Client (USB-C)
VX3Plus
Figure 2 VX3Plus Components, Front View
1 Endcap 7 Alt LED
2 Display 8 Ctrl LED
3 Programmable Key 9 Shift LED
4 Beeper 10 Caps LED
5 On/Off Button 11 Status LED
6 2
nd
LED 12 Programmable Key

Components 7
E-EQ-VX3PLUSOGWW-B VX3Plus User’s Guide
1
2
3
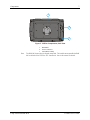
Figure 3 VX3Plus Components, Back View
1 RAM Ball
2 Power Connector
3 Strain Relief Clamp
Note: The RAM ball shown above is shipped unattached. The installer must assemble the RAM
ball to the back of the VX3Plus. See “Installation” later in this manual for details.

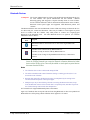
8 Microsoft Windows CE Control Panel
VX3Plus User’s Guide E-EQ-VX3PLUSOGWW-B
Microsoft Windows CE Control Panel
The Microsoft Windows CE Control Panel provides standard Windows CE options for
configuring the VX3Plus, such as:
• Sounds and volume control
• Display configuration (including backlight power management)
Please consult your System Administrator or refer to commercially available
Microsoft Windows CE user guides or the on-line Help application for these standard
configuration options.
The Half-Screen Display
The VX3Plus has a half screen LCD color display capable of supporting VGA graphics mode.
The resolution is 640 x 240 pixels. The display type is either:
• An active transmissive display optimized for indoor viewing, or
• An active transflecive display optimized for outdoor viewing. A VX3Plus with this
display includes a “sun” logo to the bottom left of the keypad.

AppLock and the VX3Plus 9
E-EQ-VX3PLUSOGWW-B VX3Plus User’s Guide
AppLock and the VX3Plus
AppLock may be installed and running on the mobile device. AppLock restricts access to
programs and the Windows CE Control Panel. Please contact your system administrator for
details.
Single Application AppLock
Single application AppLock restricts a user to one application. The user is unable to exit the
application (or if the application exits, it immediately restarts).
Note: Single application AppLock is obsolete. Please contact your LXE representative if you
desire to upgrade to multi application AppLock.
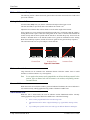
Multi Application AppLock
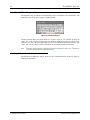
Switchpad Menu
Switchpad Icon in
Taskbar
Figure 4 Switchpad Menu
A checkmark indicates applications currently active or available for Launching by the user. When
Keyboard is selected, the VX3Plus default input method (Input Panel, Transcriber, or custom
input method) is activated.
Note: If “Keyboard” is not present in the window, an older version of AppLock is installed.
Please contact your LXE representative for upgrade information, if desired.
Using the Touchscreen
Note: The touch screen must be enabled.
When the mobile device enters end-user mode, a Switchpad icon (it looks like three tiny windows
one above the other) is displayed in the taskbar. The taskbar is always visible on top of the
application in focus.
When the user taps the Switchpad icon, a menu is displayed showing the applications available to
the user. The user can tap an application name in the popup menu and the selected application is
brought to the foreground. The previous application continues to run in the background. Stylus
taps affect the application in focus only. When the user needs to use the Input Panel, they tap the
Keyboard option. Input Panel taps affect the application in focus only.

10 AppLock and the VX3Plus
VX3Plus User’s Guide E-EQ-VX3PLUSOGWW-B
The figure shown above is an example and is shown only to aid in describing how the user can
switch between applications using a stylus.
Using the Keypad
One switch key sequence (or hotkey) is defined by the administrator for the end-user to use when
switching between locked applications. This is known as the Activation key. When the switch
key sequence is pressed on the keypad, the next application in the AppLock configuration is
moved to the foreground and the previous application moves to the background. The previous
application continues to run in the background. End-user key presses affect the application in
focus only.
See the VX3Plus Reference Guide for AppLock setup instruction.

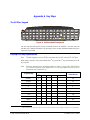
The QWERTY Keyboard 11
E-EQ-VX3PLUSOGWW-B VX3Plus User’s Guide
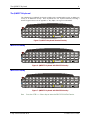
The QWERTY Keyboard
The VX3Plus has a QWERTY keyboard, available with a standard ANSI overlay, an IBM 3270
overlay or an IBM 5250 overlay. These keyboards have 101 keyboard functions, including a
numeric keypad. Please refer to Appendix A, “Key Maps”, for keypress combinations.
WERTY
U
IO P
ASDFGH
J
KL
ZXCVBNM
Q
!
@
#
$
%
^
&
*
()
|\
:; ,
.
?
Esc
Ctrl
Alt
Shft
Spc
2nd
~
`
_
Enter
PgUp
PgDn
Home
End
789
4
5
6
1
2
3
0
/
-
+
=
{}
[]
>
<
Del
Ins
BkSp
BkLt
Break
CAPS
F1 F2
F3
F4
F5 F6
F7
F8 F9 F10
2nd
ALT
CTRL SHFT CAPS STAT
Figure 5 QWERTY Keyboard Standard Overlay
IBM 3270 Overlay
WERTY
U
IO P
ASDFGH
J
KL
ZXCVBNM
Q
!
@
#
$
%
^
&
*
()
|\
:; ,
.
?
Esc
Ctrl
Alt
Shft
Spc
2nd
~
`
_
Enter
PgUp
PgDn
Home
End
789
4
5
6
1
2
3
0
/
-
+
=
{}
[]
>
<
Del
Ins
BkSp
BkLt
Break
CAPS
F1 F2
F3
F4
F5 F6
F7
F8 F9 F10
2nd
ALT
CTRL SHFT CAPS STAT
PA1 PA2 PA3
Rst
Del
Clr
Attn
SysReq
Ins
NL
E - Inp
Figure 6 QWERTY Keyboard with IBM 3270 Overlay
IBM 5250 Overlay
WERTY
U
IO P
ASDFGH
J
KL
ZXCVBNM
Q
!
@
#
$
%
^
&
*
()
|\
:; ,
.
?
Esc
Ctrl
Alt
Shft
Spc
2nd
~
`
_
Enter
PgUp
PgDn
Home
End
789
4
5
6
1
2
3
0
/
-
+
=
{}
[]
>
<
Del
Ins
BkSp
BkLt
Break
CAPS
F1 F2
F3
F4
F5 F6
F7
F8 F9 F10
2nd
ALT
CTRL SHFT CAPS STAT
Del
Clr
Attn
SysReq
Ins
NL
E - Inp
Fld +
Fld -
Dup
Figure 7 QWERTY Keyboard with IBM 5250 Overlay
Note: Press the <CTRL> + <Enter> keys to initiate the IBM 5250 Field Exit Function.

12 The QWERTY Keyboard
VX3Plus User’s Guide E-EQ-VX3PLUSOGWW-B
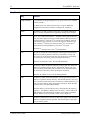
Key Functions
Key Function
Programmable
For information on programming these keys, please refer to the “VX3Plus
Reference Guide”.
By default, these keys function as Enter keys, except for IBM 5250
configurations where the left button is configured as “Field Exit”.
Enter
The Enter key is used to confirm a form entry or to transmit information.
How it is used is determined by the application running on the computer.
2
nd
The 2
nd
key is used to activate the 2
nd
functions of the keypad. Printed on
many keys at the upper left corner are small characters that represent the 2
nd
function of that key. Using the 2
nd
key activates the second key function.
Note that the 2
nd
key only stays active for one keystroke. Each time you
need to use the 2
nd
function you must press the 2
nd
key. To cancel a 2
nd
function before pressing another key, press the 2
nd
key again.
When the 2
nd
function is active, the 2
nd
LED illuminates.
Ctrl
The Ctrl key enables the control functions of the keypad. This function is
similar to a regular keyboard’s Control key. Note that the Ctrl key only
stays active for one keystroke. Each time you need to use a Ctrl function,
you need to press the Ctrl key before pressing the desired key.
When the Ctrl function is active, the Ctrl LED illuminates.
Alt
The Alt key enables the alternate functions of the keypad. This function is
similar to a regular keyboard’s Alt key. Note that the Alt key only stays
active for one keystroke. Each time you need to use an alternate function,
you need to press the Alt key before pressing the desired key.
When the Alt function is active, the Alt LED illuminates.
Shft
The Shft key enables the shifted functions of the keypad. This function is
similar to a regular keyboard’s Shift key. Note that the Shift key only stays
active for one keystroke. Each time you need to use a Shifted function, you
need to press the Shft key before pressing the desired key. When the Shft
function is active, the Shft LED illuminates.
When the Shft key is pressed the next key is determined by the major key
legends, i.e., the alpha keys display lower case letters – when CAPS is On
alpha characters are capitalized. For example, when CAPS is on and the
Shft key and the G key are pressed, a lower case g is displayed.
Spc
The Spc key adds a space to the line of data on the display. This function is
similar to a regular keyboard’s Spacebar. Note that the Spc key only stays
active for one keystroke.
La pagina sta caricando ...
La pagina sta caricando ...
La pagina sta caricando ...
La pagina sta caricando ...
La pagina sta caricando ...
La pagina sta caricando ...
La pagina sta caricando ...
La pagina sta caricando ...
La pagina sta caricando ...
La pagina sta caricando ...
La pagina sta caricando ...
La pagina sta caricando ...
La pagina sta caricando ...
La pagina sta caricando ...
La pagina sta caricando ...
La pagina sta caricando ...
La pagina sta caricando ...
La pagina sta caricando ...
La pagina sta caricando ...
La pagina sta caricando ...
La pagina sta caricando ...
La pagina sta caricando ...
La pagina sta caricando ...
La pagina sta caricando ...
La pagina sta caricando ...
La pagina sta caricando ...
La pagina sta caricando ...
La pagina sta caricando ...
La pagina sta caricando ...
La pagina sta caricando ...
La pagina sta caricando ...
La pagina sta caricando ...
La pagina sta caricando ...
La pagina sta caricando ...
La pagina sta caricando ...
La pagina sta caricando ...
La pagina sta caricando ...
La pagina sta caricando ...
La pagina sta caricando ...
La pagina sta caricando ...
La pagina sta caricando ...
La pagina sta caricando ...
La pagina sta caricando ...
La pagina sta caricando ...
La pagina sta caricando ...
La pagina sta caricando ...
La pagina sta caricando ...
La pagina sta caricando ...
La pagina sta caricando ...
La pagina sta caricando ...
La pagina sta caricando ...
La pagina sta caricando ...
La pagina sta caricando ...
La pagina sta caricando ...
La pagina sta caricando ...
La pagina sta caricando ...
La pagina sta caricando ...
La pagina sta caricando ...
-
 1
1
-
 2
2
-
 3
3
-
 4
4
-
 5
5
-
 6
6
-
 7
7
-
 8
8
-
 9
9
-
 10
10
-
 11
11
-
 12
12
-
 13
13
-
 14
14
-
 15
15
-
 16
16
-
 17
17
-
 18
18
-
 19
19
-
 20
20
-
 21
21
-
 22
22
-
 23
23
-
 24
24
-
 25
25
-
 26
26
-
 27
27
-
 28
28
-
 29
29
-
 30
30
-
 31
31
-
 32
32
-
 33
33
-
 34
34
-
 35
35
-
 36
36
-
 37
37
-
 38
38
-
 39
39
-
 40
40
-
 41
41
-
 42
42
-
 43
43
-
 44
44
-
 45
45
-
 46
46
-
 47
47
-
 48
48
-
 49
49
-
 50
50
-
 51
51
-
 52
52
-
 53
53
-
 54
54
-
 55
55
-
 56
56
-
 57
57
-
 58
58
-
 59
59
-
 60
60
-
 61
61
-
 62
62
-
 63
63
-
 64
64
-
 65
65
-
 66
66
-
 67
67
-
 68
68
-
 69
69
-
 70
70
-
 71
71
-
 72
72
-
 73
73
-
 74
74
-
 75
75
-
 76
76
-
 77
77
-
 78
78


LXE VX3Plus Manuale utente
- Categoria
- Computer portatili palmari
- Tipo
- Manuale utente
in altre lingue
- English: LXE VX3Plus User manual
Documenti correlati
Altri documenti
-
Monarch 6030TM Manuale utente
-
Stanley STHT1-77142N Manuale utente
-
Datalogic Formula 8500 Manuale utente
-
DeWalt DW03050 Manuale utente
-
Zebra RW 420 Guida utente
-
 AstroStart DSP615 Manuale del proprietario
-
Ingersoll-Rand ETW-E75 Manuale utente
-
Smart-AVI SKM-04 Manuale utente
-
UBI EasyCoder 101 Technical Manual
-
