
MX7 Cradle Reference Guide
Copyright © 2008 by LXE Inc.
All Rights Reserved
E-EQ-MX7DKRG-C

Notices
LXE Inc. reserves the right to make improvements or changes in the products described in this document at any
time without notice. While reasonable efforts have been made in the preparation of this document to assure its
accuracy, LXE assumes no liability resulting from any errors or omissions in this document, or from the use of the
information contained herein. Further, LXE Incorporated, reserves the right to revise this document and to make
changes to it from time to time without any obligation to notify any person or organization of such revision or
changes.
Copyright:
This manual is copyrighted. All rights are reserved. This document may not, in whole or in part, be copied,
photocopied, reproduced, translated or reduced to any electronic medium or machine-readable form without prior
consent, in writing, from LXE Inc. Further, LXE Incorporated, reserves the right to revise this publication and to
make changes to it from time to time without any obligation to notify any person or organization of such revision or
changes.
Copyright © 2008 by LXE Inc. An EMS Technologies Company.
125 Technology Parkway, Norcross, GA 30092 U.S.A. (770) 447-4224
Trademarks:
LXE® and Spire® are registered trademarks of LXE Inc.
RAM® and RAM Mount™ are both trademarks of National Products Inc., 1205 S. Orr Street, Seattle, WA 98108.
The Bluetooth® word mark and logos are owned by the Bluetooth SIG, Inc. and any use of such marks by LXE,
Inc. is under license.
PowerScan® is a registered trademark of Datalogic Scanning, Inc., located in Eugene, OR.
Symbol® is a registered trademark of Symbol Technologies. MOTOROLA® and the Stylized M Logo are
registered trademarks of Motorola®, Inc.
All other brand or product names are trademarks or registered trademarks of their respective companies or
organizations.
When this manual is in PDF format: “Acrobat ® Reader Copyright © 1987-2008 Adobe Systems Incorporated. All
rights reserved. Adobe, the Adobe logo, Acrobat, and the Acrobat logo are trademarks of Adobe Systems
Incorporated.” Applies.
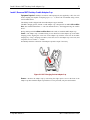
Important: This symbol is placed on the product to remind users to dispose of Waste Electrical and Electronic
Equipment (WEEE) appropriately, per Directive 2002-96-EC. In most areas, this product can be recycled,
reclaimed and re-used when properly discarded. Do not discard labeled units with trash. For information about
proper disposal, contact LXE through your local sales representative, or visit www lxe com.
Caution
RISK OF EXPLOSION IF BATTERY IS REPLACED BY AN INCORRECT TYPE.
DISPOSE OF USED BATTERIES ACCORDING TO THE INSTRUCTIONS.
Attention
II y a danger d’explosion s’il y a remplacement incorrect de la batterie. Remplacer
uniquement avec une batterie du même type ou d’un type equivalent
recommandé par le constructeur. Mettre au rebut les batteries usagées
conformément aux instructions du fabricant.
Revision Notice - Rev C: The MX7 Passive Cradle does not secure an MX7 with a boot, but will secure an MX7
with a handle or a strap.
Revision Notice - Rev B: Added Powered Vehicle Mount Cradle and related Accessories. Updated Regulatory
Notices and Safety Statements.

E-EQ-MX7DKRG-C MX7 Cradle Reference Guide
Table of Contents
MX7 CRADLES 1
Introduction............................................................................................................................................1
Suggestions / Notes ..............................................................................................................................1
Desktop Cradle.......................................................................................................................................2
Powered Vehicle Mounted Cradle........................................................................................................2
Passive Vehicle Mounted Cradle..........................................................................................................3
Desktop Cradle LEDs ............................................................................................................................4
MX7 Docked LED................................................................................................................................................4
Spare Battery LED................................................................................................................................................4
MX7 Mobile Device System Status LED .............................................................................................................4
Powered Vehicle Mount Cradle LEDs..................................................................................................5
Vehicle Cradle LED..............................................................................................................................................5
MX7 Mobile Device System Status LED .............................................................................................................5
Tethered Scanners and the MX7 Cradles............................................................................................6
Maintenance...........................................................................................................................................7
Desktop Cradles....................................................................................................................................................7
Vehicle Mounted Cradles .....................................................................................................................................7
Cleaning ................................................................................................................................................................7
MX7 Base Plate Replacement...............................................................................................................................8
Identify Your MX7 Base Plate...........................................................................................................................8
Upgrade The Base Plate.....................................................................................................................................8
Getting Help..........................................................................................................................................10
Manuals...............................................................................................................................................................10
Accessories .........................................................................................................................................................10
DESKTOP CRADLE 13
Quick Start - Desktop Cradle..............................................................................................................13
Suggestions / Notes.............................................................................................................................................13
Components.........................................................................................................................................14
Desktop Mounting Footprint...............................................................................................................16
Preparing the Desktop Cradle for Use...............................................................................................16
Install / Remove MX7 Desktop Cradle Adapter Cup.........................................................................17
Cabling the Desktop Cradle................................................................................................................18
Assemble/Attach the AC Power Adapter............................................................................................................18
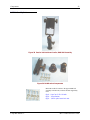
Attach a Serial or I/O Connector.........................................................................................................................19
Serial Cable ......................................................................................................................................................19
I/O Cable..........................................................................................................................................................19
Pinout - RS-232 Connector ..............................................................................................................................20
Docking and Undocking the MX7.......................................................................................................21
Battery Charging in a Desktop Cradle...............................................................................................21
Technical Specifications – Desktop Cradle......................................................................................21
Insert / Remove a Spare Battery.........................................................................................................22
POWERED VEHICLE MOUNT CRADLE 23
Introduction..........................................................................................................................................23
Quick Start - Powered Vehicle Cradle ...............................................................................................24
Components.........................................................................................................................................24
Install / Remove Vehicle Cradle Adapter Cup and Top Adapter.....................................................26

ii Table of Contents
MX7 Cradle Reference Guide E-EQ-MX7DKRG-C
Install Adapter Assembly....................................................................................................................................26
Remove Adapter Assembly ................................................................................................................................28
Docking and Undocking the MX7.......................................................................................................29
RAM Bracket Mounting .......................................................................................................................30
RAM Circular Base Footprint.............................................................................................................................31
Vehicle Cradle RAM Ball Assembly...................................................................................................32
Connect Power Supply to Vehicle......................................................................................................33
Vehicle 12V Bare Wire Adapter.........................................................................................................................33
Connect Power Supply to Vehicle Cradle.........................................................................................36
Vehicle Cradle LED............................................................................................................................................36
Attach a Serial or I/O Connector ........................................................................................................37
Serial Interface....................................................................................................................................................37
MX7 I/O Port ......................................................................................................................................................37
Vehicle Cradle Strain Relief Cable Clamp.........................................................................................38
Technical Specifications.....................................................................................................................39
Powered Vehicle Cradle .....................................................................................................................................39
Cradle Power Connector Port .............................................................................................................................39
Pinout - RS-232 Connector.................................................................................................................................40
PASSIVE VEHICLE MOUNT CRADLE 41
Introduction..........................................................................................................................................41
Quick Start - Passive Vehicle Cradle..................................................................................................................41
Components.........................................................................................................................................42
U-Bracket.........................................................................................................................................................42
U-Bracket Footprint ......................................................................................................................................42
RAM Ball and Cylinder ...................................................................................................................................43
RAM Assembly Footprint.............................................................................................................................44
Install.....................................................................................................................................................44
How to Install the Cradle U-Bracket...................................................................................................................44
How to Install the RAM Bracket ........................................................................................................................46
APPENDIX A REGULATORY NOTICES AND SAFETY INFORMATION 49
Cradle Approvals.................................................................................................................................49
INDEX 53

E-EQ-MX7DKRG-C MX7 Cradle Reference Guide
Illustrations
Figure 1 Desktop Cradle ......................................................................................................................................2
Figure 2 Powered Vehicle Mounted Cradle.........................................................................................................2
Figure 3 Passive Vehicle Mounted Cradle...........................................................................................................3
Figure 4 Desktop Cradle Front Label ..................................................................................................................4
Figure 5 Powered Vehicle Cradle Front Label ....................................................................................................5
Figure 6 LXE Tethered Scanners (w/o cable)......................................................................................................6
Figure 7 Desktop Components...........................................................................................................................14
Figure 8 Top.......................................................................................................................................................15
Figure 9 Table Mounting Hole Guides .............................................................................................................16
Figure 10 MX7 Charging Pocket Adapter Cup ................................................................................................17
Figure 11 AC/DC 12V External Power Supply and 3-prong Cable ..................................................................18
Figure 12 Connect Power Cable to the Cradle...................................................................................................18
Figure 13 Serial Connector and I/O Connector .................................................................................................19
Figure 14 Desktop Cradle RS-232 and Pinout....................................................................................................20
Figure 15 Spare Battery Charging Bay ..............................................................................................................22
Figure 16 Vehicle Mount Cradle – Front...........................................................................................................24
Figure 17 Vehicle Mount Cradle – Back ...........................................................................................................25
Figure 18 Charging Pocket Adapter Cup...........................................................................................................26
Figure 19 Retainer Insert ...................................................................................................................................27
Figure 20 Adapter Assembly .............................................................................................................................28
Figure 21 MX7 Docking and Undocking ..........................................................................................................29
Figure 22 RAM Bracket Mounting Points – Cradle Back .................................................................................30
Figure 23 RAM Base Dimensions .....................................................................................................................31
Figure 24 RAM Bracket Components ...............................................................................................................32
Figure 25 Vehicle Power Connection Cable (Fuse Not Shown)........................................................................33
Figure 26 Connecting the Power Cable to the Vehicle......................................................................................34
Figure 27 Vehicle Connection Wiring Color Codes..........................................................................................35
Figure 28 Connect Power Adapter Cable to the Vehicle Cradle........................................................................36
Figure 29 Powered Vehicle Cradle Front Label ................................................................................................36
Figure 30 Serial Connector, Power and MX7 I/O Connector............................................................................37
Figure 31 Vehicle Cradle Strain Relief Cable Clamps ......................................................................................38
Figure 32 Slide Clamp Over Cable....................................................................................................................38
Figure 33 Cradle Power Connector Port............................................................................................................39
Figure 34 Power Connector Pinout....................................................................................................................39
Figure 35 Vehicle Cradle RS-232 and Pinout....................................................................................................40
Figure 36 Passive Vehicle Mount Cradle and U-Bracket ..................................................................................42
Figure 37 U-Bracket Mounting Dimensions......................................................................................................42
Figure 38 Passive Vehicle Mount Cradle / RAM Ball Assembly......................................................................43
Figure 39 RAM Bracket Components ...............................................................................................................43
Figure 40 RAM Assembly Dimensions .............................................................................................................44
Figure 41 Installing the Cradle U-Bracket.........................................................................................................44
Figure 42 Installing the RAM Assembly ...........................................................................................................46

iv Table of Contents
MX7 Cradle Reference Guide E-EQ-MX7DKRG-C

E-EQ-MX7DKRG-C MX7 Cradle Reference Guide
MX7 Cradles
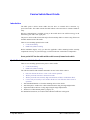
Introduction
MX7 docking cradles restrain the MX7, re-charge batteries, and enable serial, audio or USB
communication with a PC, scanner, printer or other peripheral device. MX7 keypad data entries
can be mixed with cradle-tethered scanner barcode data entries while the MX7 is in a powered
cradle. Bluetooth device connection and use, while the MX7 is docked, are managed by the MX7
Control Panel Bluetooth program, not the cradle.
Using a wall AC adapter the desktop cradle can also recharge a spare MX7 battery in
approximately 4 hours. The MX7 battery recharging is managed by the docked MX7 power
management configuration. The MX7 can be either On or in Suspend Mode while in the cradles.
The MX7 Vehicle Mount cradles do not have spare battery charging capabilities. Special purpose
and power cables are available from LXE®.
Wireless host/client communications can occur whether the cradles are receiving external power
or not as wireless functions draw power from the main battery in the MX7.
The powered cradles are designed to secure an MX7 with or without a protective
boot
(MX7A490PROTBOOTBLK or MX7A491PROTBOOTYEL), a handstrap and/or a
trigger handle.
Important: Use the power cables provided with the MX7 cradle power supply
adapters. The adapters are incompatible with other MX7 power cables.
MX7 Cradles are not certified for use in Hazardous Locations.
Suggestions / Notes
• Remove cables from the base of the MX7 before docking it in a desktop or powered
vehicle cradle.
• Review the Maintenance section titled MX7 Base Plate Replacement and install a new
base plate on the MX7 if necessary.
• Allow clearance above and behind the cradles for inserting an MX7 with a trigger handle.
• Allow clearance behind the cradles for cable connection ease. Allow clearance in front of
desktop cradles for serial and I/O cable connection ease.
• Route cradle cables to ensure they are protected from jostling, tugging or being
disconnected by objects moving nearby.
• Install the pocket insert in the powered cradle charging well for use with an MX7 without
a boot enclosure.
• Remove the cradle insert for use with an MX7 with a boot enclosure.
• Use care when inserting the spare battery into the desktop charging bay. Do not slam the
battery into the bay, as this action could damage the contacts at the base of the charging
bay.
• Keep dirt and foreign objects out of the cradle. Do not short circuit any of the charging
terminals (pins), as this action could result in injury or property damage.
• Refer to the MX7 Reference Guide for information and instruction when using Bluetooth
scanning or printing devices with an MX7 docked in a powered or non-powered cradle.

2 Desktop Cradle
MX7 Cradle Reference Guide E-EQ-MX7DKRG-C
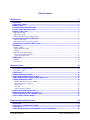
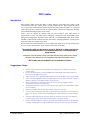
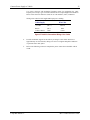
Desktop Cradle
The MX7 Desktop Cradle requires external
power before battery charging and tethered
scanning can commence. The cradle can
charge both the main battery in the docked
MX7 and a spare main battery at the same
time.
Figure 1 Desktop Cradle
See section titled Desktop Cradle, for more information and installation instruction.
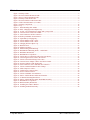
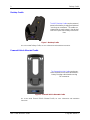
Powered Vehicle Mounted Cradle
The Powered Vehicle Cradle requires an
external power source before docked MX7
battery charging and tethered scanning
can commence.
Figure 2 Powered Vehicle Mounted Cradle
See section titled Powered Vehicle Mounted Cradle, for more information and installation
instruction.

Passive Vehicle Mounted Cradle 3
E-EQ-MX7DKRG-C MX7 Cradle Reference Guide
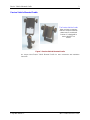
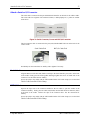
Passive Vehicle Mounted Cradle
The Passive Vehicle Cradle
does not have connectors
that can accept an external
power source or tethered
scanner. It is designed to
secure the MX7 in a
vehicle.
Figure 3 Passive Vehicle Mounted Cradle
See chapter titled Passive Vehicle Mounted Cradle for more information and installation
instruction.

4 Desktop Cradle LEDs
MX7 Cradle Reference Guide E-EQ-MX7DKRG-C
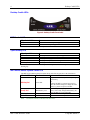
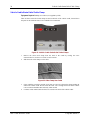
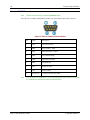
Desktop Cradle LEDs
Figure 4 Desktop Cradle Front Label
MX7 Docked LED
When Docked LED is … It means ….
Off
MX7 not inserted or no power applied
Red
MX7 docked and power applied.
The cradle must be connected to AC power.
Spare Battery LED
When Spare LED is … It means ….
Off
Battery pack not inserted or no power applied
Green
Battery pack fully charged
Red
Battery pack charging
Yellow / Amber
Battery pack temperature out of range
Flashing Red
Battery pack fault or failure
The cradle must be connected to AC power. This process does not require an MX7 be in the
docking bay.
MX7 Mobile Device System Status LED
The MX7 System Status LED is located at the top left of the keypad, above the Scan button.
When the LED is . . . The Status is . . . Comment
Blinking Red
Power Fail
Replace the main battery with a fully charged
main battery.
Or
Connect the MX7 to external AC power to
allow the internal charger to charge the main
battery e.g. dock in a powered cradle.
Steady Red
Main Battery Low
Low Battery Warning. Replace the main
battery with a fully charged main battery. Or
dock the MX7 in a powered cradle.
Blinking Green
Display Off No user intervention required.
No Color
Good No user intervention required.
Note: The Passive Vehicle Cradle does not have LEDs.

Powered Vehicle Mount Cradle LEDs 5
E-EQ-MX7DKRG-C MX7 Cradle Reference Guide
Powered Vehicle Mount Cradle LEDs
On Off
Figure 5 Powered Vehicle Cradle Front Label
Vehicle Cradle LED
When Cradle LED is … It means ….
Off
1. MX7 is docked. Cradle does not have power.
2. MX7 is not docked. Cradle may have power. Check the
power connector at the back of the cradle.
Red
MX7 is docked and external power is available.
MX7 Mobile Device System Status LED
The MX7 System Status LED is located at the top left of the keypad, above the Scan button.
When the LED is . . . The Status is . . . Comment
Blinking Red
Power Fail
Replace the main battery with a fully charged
main battery.
Or
Connect the MX7 to external AC power to
allow the internal charger to charge the main
battery e.g. insert in a powered cradle.
Steady Red
Main Battery Low
Low Battery Warning. Replace the main
battery with a fully charged main battery. Or
dock the MX7 in a powered cradle.
Blinking Green
Display Off No user intervention required.
No Color
Good No user intervention required.
Note: The Passive Vehicle Cradle does not have LEDs.

6 Tethered Scanners and the MX7 Cradles
MX7 Cradle Reference Guide E-EQ-MX7DKRG-C
Tethered Scanners and the MX7 Cradles
An MX7 powered cradle supports tethered scanner attachment. A powered cradle provides 5V
power to a tethered scanner. The MX7 passive vehicle cradle cannot support tethered scanner
attachment.
Note: The MX7 Scan button has no effect on tethered barcode scanners connected to a
powered desktop cradle. Tethered scanners read barcode scans only when the trigger on
the tethered scanner is pressed.
MX7 powered cradles support an accessory barcode label reading device. A tethered scanner can
be connected to the 9-pin RS-232 Serial Interface port on the front of the desktop cradle or to the
Serial Interface port on the back of the vehicle cradle.
MX7 keypad data entries can be mixed with tethered scanner barcode data entries. Any tethered
scanner that decodes the barcode internally and outputs an RS-232 data stream may be used. It
sends the data to the MX7 in ASCII format.
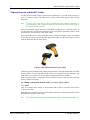
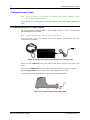
Figure 6 LXE Tethered Scanners (w/o cable)
LXE 8300 (Symbol) and 8500 (PowerScan) tethered scanners will send scanned data to the MX7
when the MX7 is in a powered cradle and the scanners are connected to the Serial Interface port
on the cradle. See “Accessories” for LXE approved tethered scanners for the MX7.
When a tethered scanner is connected to the Serial Interface port on a powered cradle, the MX7
must be configured as follows:
| Settings | Control Panel | Scanner | Main | either Port 1, Port 2 or Port 3
Select Port 2.
There is no software in the desktop or vehicle mount cradles. There is no software in the passive
vehicle mount cradle.
Bluetooth device connection and use, while the MX7 is docked, are managed by the MX7 Control
Panel Bluetooth program, not the cradle.
Note: The cradle must be powered by an external power source to enable tethered scanner use.

Maintenance 7
E-EQ-MX7DKRG-C MX7 Cradle Reference Guide
Maintenance
There are no serviceable parts in the desktop or vehicle cradles. Do not attempt to open the units.
Desktop Cradles
Inspect the rubber feet and replace them if missing, broken or cracked. If the cradle is broken or
cracked, the cradle must be taken out of service and replaced. If the cradle is mounted to a flat
surface (i.e. desk, table, etc) examine the fasteners and re-tighten if necessary.
Contact LXE Customer Service (see Getting Help).
Vehicle Mounted Cradles
Check the vehicle bracket fasteners and re-tighten if necessary. If the vehicle bracket, cradle or
connections are broken, loose or cracked, the cradle must be taken out of service and replaced.
Contact LXE Customer Service (see Getting Help).
Cleaning
Do not use paper towels or harsh-chemical-based cleaning fluids since they may result in damage
to the surfaces and/or battery connectors.
Use a clean soft cloth to wipe any dirt, moisture or grease from the MX7, spare battery pack,
charging contacts or the cradle. Do not use any liquid to clean the cradle, battery pack, MX7, or
charging terminals (pins). If possible, clean only those areas which are soiled. Lint/particulates
can be removed from the connectors and charging pockets with clean, filtered canned air. If the tip
of the stylus is dirty, clean the tip with a water moistened cloth before touching the screen with the
stylus.

8 Maintenance
MX7 Cradle Reference Guide E-EQ-MX7DKRG-C
MX7 Base Plate Replacement
The base plate, and the gasket underneath the base plate, on the MX7 may have to be upgraded
before the MX7 is docked in a cradle. In rare cases in which the MX7 will never be docked in an
MX7 cradle, the MX7 does not require a base plate upgrade.
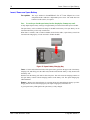
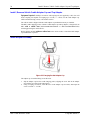
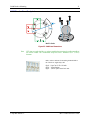
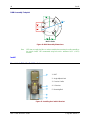
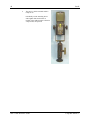
Identify Your MX7 Base Plate
If your MX7 has a stainless steel base plate with a pinhole above and below the screws next to the
input/output port, similar to the picture shown below:
Then the MX7 can be docked in a cradle without requiring the base plate upgrade.
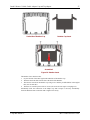
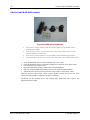
If your MX7 has a base plate that looks like either of these two pictures (and without the
pinholes):
The base plate must be upgraded with the contents of this kit before the MX7 is placed in a cradle.
See Upgrade the Base Plate for instruction.
MX7 Base Plate Kit Part Number – MX7A586RPLCENDPLATE
Upgrade The Base Plate
Equipment Required: Phillips screwdriver (not supplied by LXE)
• You will need a torquing tool capable of torquing up to 2.5 in/lb
• LXE recommends the upgrade be performed on a clean, well-lit stable surface.
• Protect the MX7 internal components from static discharge.
• The base plate should not be replaced in a harsh, wet, or dirty environment.
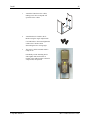
Remove the Base Plate and Gasket
1. If the MX7 is On, place the MX7 in Suspend mode by quickly pressing and releasing the
Power button or by tapping Start | Suspend with the stylus on the touchscreen.
2. Using a phillips screwdriver, remove the four screws holding the base plate to the bottom of
the MX7. Set the screws aside in the order in which they were removed. Referring to the
photos on the previous page, the flat head screws are on either side of the input/output port
and the pan head screws are beside the plastic rim.

Maintenance 9
E-EQ-MX7DKRG-C MX7 Cradle Reference Guide
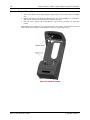
3. Remove the base plate, and the gasket underneath the base plate, and set them aside. Note: Do
not use destructive force or move the input/output connector when removing the original base
plate.
Do not remove anything else from the base of the MX7.
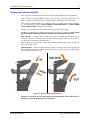
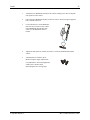
Install the Upgrade
1. Place the gasket in the base plate opening.
2. Place the base plate on top of the gasket in the base plate opening.
3. The flat head screws are on either side of the input/output port and the pan head screws are
beside the plastic rim.
4. Using a torquing screwdriver, insert the screws in the correct screw holes, torquing each to
1.5 in/lb (0.168 n/M) to 2.5 in/lb (0.282 n/M).
The MX7 is ready for use.
Periodically check the connection of the base plate to the MX7 and re-torque if necessary.

10 Getting Help
MX7 Cradle Reference Guide E-EQ-MX7DKRG-C
Getting Help
LXE user guides are now available on CD and they can also be viewed/downloaded from the LXE
ServicePass website. Contact your LXE representative to obtain the LXE Manuals CD or access
to the LXE ServicePass website. You can also check the LXE ServicePass website for the latest
manual releases.
Note: Obsolete/archived manuals are not available on the LXE Manuals CD. They are
available for download from the ServicePass website only.
You can get help from LXE by calling the telephone numbers listed on the LXE Manuals CD, in
the file titled Contacting LXE. This information is also available on the LXE website.
Explanations of terms and acronyms used in this guide are located in the file titled LXE Technical
Glossary on the LXE Manuals CD and on the LXE website.
Manuals
MX7 User’s Guide
MX7 Reference Guide
LXEbook – MX7 User’s Guide (can be downloaded to the MX7 device from the LXE Manuals
CD.)
MX7 Multi-charger User’s Guide
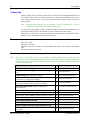
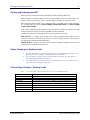
Accessories
Note: Items with a Green letter R in the second column are ROHS-compliant. Please contact your LXE
representative when ordering ROHS-compliant items as the part number may have changed. Items without
the letter R may have received ROHS-compliance after this guide was published. E designator means the
accessory is RoHS Exempt.
MX7 Cradle Accessories Part Numbers
Desktop Cradle Power Supply, AC/DC, US, with power cord
R
9000A321PSACUS
Desktop Cradle Power Supply, AC/DC, WW, without power
cord
R
9000A322PSACWW
Cradle, Desktop with spare battery charging
R
MX7A388DESKCRADLEWW
MX7 Passive vehicle cradle. Does not support charging or
communication. U-Bracket kit included.
R
MX7A007VMCRADLE
RAM mount kit for MX7 Passive Vehicle Bracket. This kit
does NOT include the Cradle. Attaches to U-Bracket.
R
MX7A001RAMBRKT
MX7 Active vehicle cradle. Supports charging and
communication.
R
MX7A008ACTIVEVMCRADLE
MX7 Main Battery, Lithium Ion
R
MX7A380BATT
Black rubber protective boot, designed for Desktop Cradle use.
R
MX7A490PROTBOOTBLK
Yellow rubber protective boot, designed for Desktop Cradle use.
R
MX7A491PROTBOOTYEL
MX7 Base Plate Kit
R
MX7A586RPLCENDPLATE
Power Supply (Vehicle Cradle)
Power Adapter, Bare Wire, 12VDC, 12 ft.
R
9000A079CBL12ML3
Cables (Cradle RS-232 or I/O Port connection only)
MX7 Charge/Comm Interface Cable, USB Client for
ActiveSync
R
MX7A052MULTICBLUSB

Getting Help 11
E-EQ-MX7DKRG-C MX7 Cradle Reference Guide
MX7 Charge/Comm Interface Cable, RS-232 Serial ActiveSync,
D9 Female
R
MX7A055MULTICBLDA9F
RS-232 Serial Adapter Cable, 6 in., for use with printers that
provide their own source of power
R
MX7A058ADPTCBLPER
MX7 Headset coiled adapter cable, includes quick disconnect
headset connector. A headset is still required.
R
MX7A060ADPTCBLVOICE
Tethered Scanners (Cradle connection only)
Scanner, Powerscan SR, 8’ Cbl, WW
R
8300A326SCNRPWRSR8DA9F
Scanner, Powerscan SR, 12’ Cbl, US
-
8300A327SCNRPWRSR12DA9F
Scanner, Powerscan LR, 8’ Cbl, WW
R
8310A326SCNRPWRLR8DA9F
Scanner, Powerscan LR, 12’ Cbl, US
R
8310A327SCNRPWRLR12DA9F
Scanner, Powerscan XLR, 8’ Cbl, WW
R
8320A326SCNRPWRXLR8DA9F
Scanner, Powerscan XLR, 12’ Cbl, US
-
8320A327SCNRPWRXLR12DA9F
Scanner, LS3408ER, 9’ Cbl, US See Note
R
8520A326SCNRERDA9F
Scanner, LS3408FZ, Fuzzy Logic, 9’ Cbl, US. See Note
R
8510A326SCNRFZYDA9F
Note: When using the 8500 Series tethered scanners (LS3408), the tethered scanner Power Mode must be
set to “Reduced Power Mode” to conserve the device’s main battery life. The reduced power mode setting
will not impact performance of the 8500 series scanner. The default mode is “Continuous On”. Please refer
to the tethered scanner manufacturer’s user guide for instruction.

12 Getting Help
MX7 Cradle Reference Guide E-EQ-MX7DKRG-C

E-EQ-MX7DKRG-C MX7 Cradle Reference Guide
Desktop Cradle
LXE recommends placing the desktop cradle on a stable, horizontal surface out of the way of:
• inclement weather conditions,
• extremely high concentrations of dust or wind blown debris,
• accidental knocks, bumps or other shocks to the MX7 and the cradle.
Allow clearance above the cradle for an MX7 with a trigger handle. Allow clearance behind the
cradle for power cable connection ease. Allow clearance in front of the cradle for serial and I/O
cable connect/disconnect ease.
Quick Start - Desktop Cradle
1. Refer to Install / Remove MX7 Desktop Cradle Adapter Cup.
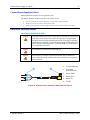
2. Connect the cradle end of the power adapter cable to the Power port on the back of the cradle.
Refer to Cabling the Desktop Cradle.
3. Attach the AC power connector to a dependable power source. Refer to Cabling the Desktop
Cradle.
4. Attach any desired external cabled devices to the ports on the front of the cradle, if required.
Refer to Cabling the Desktop Cradle.
5. The desktop cradle is ready for use. Refer to Docking and Undocking the MX7 and
Insert/Remove a Spare Battery.
Suggestions / Notes
• Remove cables from the base of the MX7 before inserting it in a cradle’s docking bay.
Refer to the MX7 User’s Guide for instruction.
• Route cradle cables to ensure they are protected from jostling, tugging or being
disconnected by items passing by.
• Remove the adapter cup from the powered cradle before docking an MX7 with a rubber
boot (MX7A490PROTBOOTBLK or MX7A491PROTBOOTYEL) installed.
• Use care when inserting the spare battery into the charging pocket. Do not slam the
battery into the pocket, this could damage the contacts at the base of the charging pocket.
• Keep dirt and foreign objects out of the cradle pockets. Do not short circuit any of the
contacts in the charging pockets, as this could result in injury or property damage.

14 Components
MX7 Cradle Reference Guide E-EQ-MX7DKRG-C
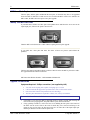
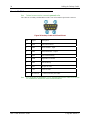
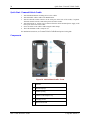
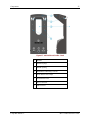
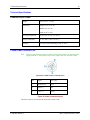
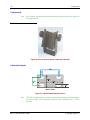
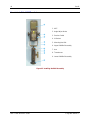
Components
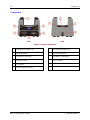
Front Back
Figure 7 Desktop Components
1 Charging Pocket Adapter Cup 1 Charging Pocket Adapter Cup
2 MX7 Docked LED 2 MX7 Cradle Connector
3 Serial Interface Connector 3 Spare Battery Charging Bay
4 Spare Battery LED 4 Power Connector
5 I/O Connector
6 Table Mounting Hole Guides
La pagina si sta caricando...
La pagina si sta caricando...
La pagina si sta caricando...
La pagina si sta caricando...
La pagina si sta caricando...
La pagina si sta caricando...
La pagina si sta caricando...
La pagina si sta caricando...
La pagina si sta caricando...
La pagina si sta caricando...
La pagina si sta caricando...
La pagina si sta caricando...
La pagina si sta caricando...
La pagina si sta caricando...
La pagina si sta caricando...
La pagina si sta caricando...
La pagina si sta caricando...
La pagina si sta caricando...
La pagina si sta caricando...
La pagina si sta caricando...
La pagina si sta caricando...
La pagina si sta caricando...
La pagina si sta caricando...
La pagina si sta caricando...
La pagina si sta caricando...
La pagina si sta caricando...
La pagina si sta caricando...
La pagina si sta caricando...
La pagina si sta caricando...
La pagina si sta caricando...
La pagina si sta caricando...
La pagina si sta caricando...
La pagina si sta caricando...
La pagina si sta caricando...
La pagina si sta caricando...
La pagina si sta caricando...
La pagina si sta caricando...
La pagina si sta caricando...
La pagina si sta caricando...
La pagina si sta caricando...
-
 1
1
-
 2
2
-
 3
3
-
 4
4
-
 5
5
-
 6
6
-
 7
7
-
 8
8
-
 9
9
-
 10
10
-
 11
11
-
 12
12
-
 13
13
-
 14
14
-
 15
15
-
 16
16
-
 17
17
-
 18
18
-
 19
19
-
 20
20
-
 21
21
-
 22
22
-
 23
23
-
 24
24
-
 25
25
-
 26
26
-
 27
27
-
 28
28
-
 29
29
-
 30
30
-
 31
31
-
 32
32
-
 33
33
-
 34
34
-
 35
35
-
 36
36
-
 37
37
-
 38
38
-
 39
39
-
 40
40
-
 41
41
-
 42
42
-
 43
43
-
 44
44
-
 45
45
-
 46
46
-
 47
47
-
 48
48
-
 49
49
-
 50
50
-
 51
51
-
 52
52
-
 53
53
-
 54
54
-
 55
55
-
 56
56
-
 57
57
-
 58
58
-
 59
59
-
 60
60


in altre lingue
- English: LXE MX7 Reference guide
Documenti correlati
Altri documenti
-
Zebra CRD Guida Rapida
-
Zebra RW 420 Guida utente
-
Panasonic NVMX1EG Istruzioni per l'uso
-
Datalogic PowerScan M8300 Quick Reference Manual
-
Intermec 5020 Guida d'installazione
-
BIXOLON SPP-R200III Manuale utente
-
BIXOLON SPP-R200II Manuale utente
-
-
i-PRO i-PRO WV-S71300-F3 Network Camera Manuale utente
-