
Quick Start Owner’s Manual
(ENGLISH)
Manual de inicio rápido para el usuario
(ESPAÑOL)
Schnellbedienungsanleitung
(DEUTSCH)
Manuel d’utilisation du propriétaire
(FRANÇAIS)
Manuale rapido di utilizzazione
(ITALIANO)
CONTENIDO DE LA CAJ
A
• MÁQUINA DE RITMOS SR-16
• SUMINSTRO DE ALIMENTACIÓN
• MANUALES
CONTENU DE LA BOÎT
E
• BOÎTE À RYTHME SR-16
• ADAPTATEUR CA :
•
GUIDES D
'
UTILISATION
INHALT DER VERPACKUN
G
• SR-16 SCHLAGZEUGMASCHINE
• NETZADAPTER
• ANLEITUNG
BOX CONTENT
S
• SR-16 DRUM MACHINE
• POWER ADAPTER
• MANUALS
CONTENUTO DELLA CONFEZION
E
• DRUM MACHINE SR-16
• ADATTATORE ALIMENTAZIONE
• MANUALI

2

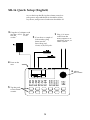
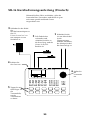
SR-16 Quick Setup (English)
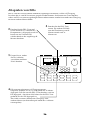
As you hook up the SR-16, the volume control on
your power amp and the SR-16 should be all the
way down, and power to both units should be off.
VOLUME
3 Plug the AC adapter cord
into the 9V AC jack and
the adapter into a wall
socket. 2 If you have a couple of
footswitches, plug
them into the
Start/Stop and
Count/A/B/Fill jacks.
1 Plug 1/4" mono
cords from the
main outputs to an
amplifier, mixer, or
stereo system.
4 Turn on the
unit.
5 Tap the pads
to hear drum
sounds.
6 Adjust
the volume.
3
12VDC

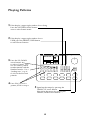
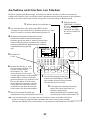
5 Speed up the tempo by pressing the
TEMPO/UP arrow button.
Slow down the tempo by pressing the
TEMPO/DOWN arrow button.
4 Press PLAY to start a
pattern, STOP to stop it.
3 Press the UP/DOWN
arrow buttons
to select a Pattern. You
can also enter a pattern
number (00-49) with the
Number buttons. Use a
“leading zero” (e.g. 01,
02, 03) for the first nine
patterns.
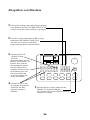
2 If the display's upper right window shows
USER, press the PRESET/USER button
to select Preset Patterns.
1 If the display's upper right window shows Song,
Press the PATTERN/SONG button
once to select Pattern mode.
Playing Patterns
VOLUME
PATTERN
A
PRESS PLAY
TEMPO
PERFORM
ROCKIN 1
4

3 You can call up a
different Pattern
number if desired.
Press the UP/DOWN
arrow buttons
to select a Pattern or
enter a Pattern number
(00-49) with the
number buttons.
2 If an A Pattern is playing, press
the B button (or press A if a B
Pattern is playing).
The alternate Pattern will begin
playing as soon as the currently-
selected Pattern reaches its end.
1 Begin by selecting a Pattern and pressing
PLAY.
Each Pattern number, Preset and User, includes A and B "sub-Patterns." The Preset A and B
variations complement each other. For example, in a Rock Pattern, A could play the verse, and B
the chorus. In fact, you may construct many songs just by switching back and forth between the
A and B variations.
Playing Sequences of Patterns
VOLUME
PATTERN
A
PRESS PLAY
TEMPO
PERFORM
ROCKIN 1
5

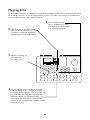
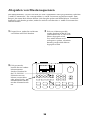
4 Fills do not always have to be transitional
Patterns. Suppose an A Pattern is playing. If
you press the FILL button, a fill will start—but
this time, keep the FILL button held down
until after the fill has finished playing.
This cancels the transition to the alternate
pattern (in this example, the A pattern would
continue playing).
3 Press the FILL button
again. A different fill will
transition from the B pattern
back into the A pattern.
2 Press and release the FILL button
while the main A Pattern is playing.
You'll hear a drum fill that leads
right into the associated B pattern.
1 Begin by selecting an
A Pattern then
pressing PLAY.
Each A and B variation also includes associated Fill Patterns, which can play transitions between
the A and B variations. You can push a button to have a Fill take over from its associated main
Pattern and transition to the alternate Pattern.
Playing Fills
VOLUME
PATTERN
A
PRESS PLAY
TEMPO
PERFORM
ROCKIN 1
6

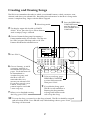
9 If you like the Song, great!
The SR-16 will remember it.
Entering the Song number
in Song and Perform mode
will call up the Song.
8 To hear your Song, press
PERFORM/COMPOSE
to select Perform mode.
Then press PLAY.
10 To erase the Song, you must have the Song selected. The SR-16 should be stopped
and in Perform mode. Press ERASE and, while holding it down, press PLAY.
The Song will be erased.
7 When you've finished creating
the Song, press STOP.
6 Choose Patterns, A and B
variations, and Fills as
described in the previous
pages. Each selection will
be remembered as
another Song step, and
the SR-16 will also
remember the exact
instant you selected a Fill.
If you don't specify a new
Pattern, every time a
pattern repeats it will add
a new song step.
5 Press PLAY.
4 Choose a Pattern for Song step 1 by entering a
Pattern number and A or B variation. This step can
be a Fill if you press Fill along with A or B. User
Patterns should not be selected for now.
3 Press the PERFORM/
COMPOSE button
until the display's
lower middle shows
COMPOSE.
2 The display upper left should say EMPTY
SONG. If not, press the Up or Down buttons
until an empty song is selected.
1 Select Song mode.
The SR-16 can remember the order in which you selected Patterns, which variations were
selected, and when you selected fills. Recording this information in the SR-16's Song mode
creates a complete Song. Begin with the SR-16 stopped.
Creating and Erasing Songs
VOLUME
PRESS PLAY
TEMPO
STEP 01
END
SONG
USER
COMPOSE
7

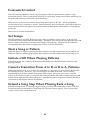
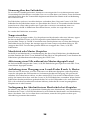
Footswitch Control
Now that we have the basics down, let's investigate some live performance options using
footswitch control. This is particularly useful if you're playing along with Patterns and Songs on
the pads and can't use your hands to punch buttons.
There are two jacks for footswitches (Start/Stop and Count/A/B/Fill). Always plug these
footswitches in before turning on power. Either normally open or normally closed types (the two
most common footswitch types) can be used; the SR-16 determines which kind is in use during
power-up.
Here's how to use the footswitches.
Set Tempo
The SR-16 must be stopped. Before playing a Song or Pattern, tap the Count/A/B/Fill jack
footswitch several times at the desired tempo. The SR-16 will average the time between taps and
derive a tempo, the display will update the tempo with each tap. Tapping the STOP button
accomplishes the same result as tapping the Count/A/B/Fill footswitch.
Start a Song or Pattern
When the SR-16 is stopped, pressing the Start/Stop footswitch is equivalent to pressing PLAY.
When the SR-16 is running, pressing the Start/Stop footswitch is equivalent to pressing STOP.
Initiate a Fill When Playing Patterns
In Perform mode, the Count/A/B/Fill footswitch duplicates the FILL button function when
playing Patterns.
Cancel a Transition From A to B, or B to A, Patterns
When you initiate a Fill, an A Pattern will transition to a B pattern (or vice-versa) when the Fill
has finished playing. However, you can cancel this transition if desired. We've already
explained how to do this with the front panel FILL button. However, you can also use the
Count/A/B/Fill footswitch. If you press the footswitch before the fill has finished playing and
hold it down until after the fill has played (i.e, past the downbeat of the next Pattern), the SR-16
will return to the original MainA or B Pattern.
Extend a Song Step When Playing Back a Song
In Song Perform mode (i.e, during song playback), pressing and holding the Count/A/B/Fill
footswitch until past the end of a Song Step will cause that step to repeat. This is great if the
soloist wants to take a few more bars.
8

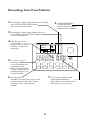
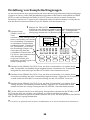
7 If you make a mistake, hold
down the ERASE button,
then hold down the drum pad of
the sound you want to erase.
6 Play the pads.
The SR-16 will shift your playing to the
nearest rhythmic value shown in the
lower-left corner of the quantize
window.
5 Press PLAY to start
recording.
You will probably hear
a metronome click.
When a Pattern reaches
its end, it will loop back
to the beginning so you
can do overdubs.
4 Press the Up/Down
arrow buttons
until you find an EMPTY
PATTern, as shown on
the display.
3 Push the PERFORM/
COMPOSE button
until the display's lower
middle shows COMPOSE.
1 If the display's upper right window shows SONG,
press the PATTERN/SONG button
once to select Pattern mode.
2 If the display's upper right window does not
show USER, press the PRESET/USER button
to select User Patterns.
Recording Your Own Patterns
VOLUME
PATTERN
A
PRESS PLAY
TEMPO
EMPTY
PATT
COMPOSE
USER
9

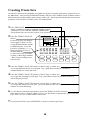
7 If you pressed PLAY, press DRUM SET to return to normal operation.
6 To save the new Drum Set parameters, press the TEMPO/PAGE UP button
three times to choose Page 8, where you can save the drum set parameters you've selected.
Press PLAY to save, or DRUM SET to back out.
3 Press the TEMPO/PAGE UP button to choose Page 3, where you
can assign different levels for each pad. Tap a pad, then use the UP/DOWN or
number buttons to select the level.
4 Press the TEMPO/PAGE UP button to choose Page 4, where you
can assign the panning for each pad. Tap a pad, then use the UP/DOWN buttons to
select the pan position.
5 Press the TEMPO/PAGE UP button to choose Page 5, where you
can assign the tuning for each pad. Tap a pad, then use the UP/DOWN or number
buttons to select the tuning.
2 Press the TEMPO/PAGE UP
button
to choose Page 2 (see display
lower right), where you can
assign different drum sounds
to different pads. Press the
pad to be assigned
then use the Up/Down or
number buttons
to select one of the available
sounds (a three-digit number
– don’t forget leading zeroes
if necessary).
1 Press DRUM SET.
Select a number from 00-49 with the number buttons,
and Preset or User with the PRESET/USER button.
Preset Drum Sets can only be saved to User locations.
The SR-16 has 50 Preset and 50 editable User Drum Sets (groups of sounds) which can be assigned to any of
the 100 Patterns. After pressing the DRUM SET button, each press of the TEMPO/PAGE UP button selects a
different kind of parameter (drum sound, tuning, volume, etc.) Tap the pad to be edited, then enter the new
parameter value with the UP/DOWN, arrow, or number buttons.
Creating Drum Sets
VOLUME
PAGE
DRUMSET
SELECT
DRUM SET
DRUM
USER
SET
10

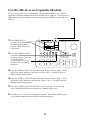
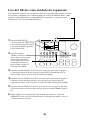
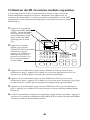
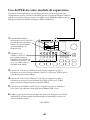
6 The SR-16 is now set up as an expander module. Press MIDI SETUP again
to exit MIDI setup mode and return to normal operation.
3 Press the TEMPO/PAGE UP BUTTON three times to choose Page 5. Press
the Down Arrow button so that the Clock In is Off (i.e., the SR-16 ignores
MIDI synchronization data).
4 Press the TEMPO/PAGE UP BUTTON three times to choose Page 8. Press
the Down Arrow button so that the Prg Chng is Off (i.e., the SR-16 ignores
MIDI program change data).
5 Press the TEMPO/PAGE UP BUTTON to choose Page 9. Press the Up
Arrow button so that the Note Map shows D00-09, D10-19, etc.
2 Press the TEMPO/PAGE
UP button
to choose Page 2. Press the
UP arrow button
so that Drum In is on (i.e.,
the SR-16 receives MIDI
note data).
1 Press MIDI SETUP.
Use the UP/DOWN buttons
to select Omni mode or a
specific MIDI channel for
Poly mode.
You can use the SR-16 as a tone module, where different drums will sound in
response to different MIDI notes received at the SR-16's MIDI in. You must run a
MIDI cable from the sequencer or electronic drum set's MIDI out to the SR-16's
MIDI in.
Use the SR-16 as an Expander Module
VOLUME
DRUM IN
PAGE
ON
SETUP
MIDI
11

12

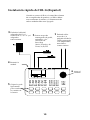
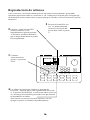
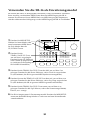
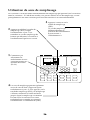
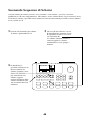
Instalación rápida del SR-16(Español)
Cuando se conecta el SR-16, el control de volumen
de su amplificador de potencia y el SR-16 deben
estar totalmente al mínimo y la alimentación de
ambas unidades debe estar apagada.
VOLUME
3 Enchufe el cable del
adaptador de CA al
conector de CA de 9 V y el
adaptador al
tomacorriente.
2Si tiene un par de
interruptores de pedal,
enchúfelos a los
conectores de
Start/Stop
(Inicio/Parada) y de
Count/A/B/Fill.
1 Enchufe cables
mono de 1/4
pulgadas desde las
salidas principales
a un amplificador,
mezclador o
sistema estéreo.
4 Encienda la
unidad.
5 Golpee los pads
ligeramente
para escuchar
los sonidos de
la batería.
6 Ajuste el
volumen.
13
CC de 12V

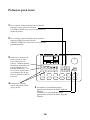
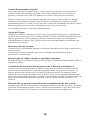
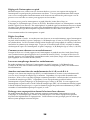
5 Aumente la velocidad del tempo
presionando el botón de flecha arriba de
TEMPO.
Disminuya la velocidad del tempo
presionando el botón de flecha abajo de
TEMPO.
4 Presione PLAY para
iniciar un patrón, STOP
para pararlo.
3 Presione los botones de
flechas arriba y abajo
para seleccionar un
patrón. También puede
introducir un número de
patrón (00-49) con los
botones numéricos. Use
un "cero no significativo"
(por ejemplo, 01, 02, 03)
para los primeros nueve
patrones.
2 Si la ventana superior derecha de la pantalla
muestra USER, presione el botón
PRESET/USER para seleccionar el los patrones
predeterminados.
1 Si la ventana superior derecha de la pantalla
muestra "Song", presione el botón
PATTERN/SONG una vez para seleccionar el
modo de patrón.
Patrones para tocar
VOLUME
PATTERN
A
PRESS PLAY
TEMPO
PERFORM
ROCKIN 1
14

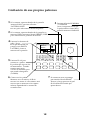
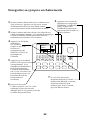
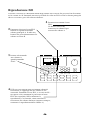
3 Puede llamar a un
número diferente de
patrón si usted desea.
Presione los botones de
flecha arriba / abajo
para seleccionar un
patrón o introducir un
número de patrón (00-
49) usando los botones
numéricos
2Si está tocando un Patrón A,
presione el botón B (o presione A
si está tocando un patrón B).
El patrón alternativo comenzará a
reproducir en cuanto termine el
patrón actualmente seleccionado.
1 Comience seleccionando un patrón y
presione PLAY.
Cada número de patrón, predeterminado y de usuario, incluye los "sub-patrones" A y B. Las
variaciones predeterminadas A y B se complementan entre sí. Por ejemplo, en un patrón de
rock, A podría tocar el verso, y B el coro. De hecho, puede construir varias canciones sólo
conmutando entre las variaciones A y B.
Secuencias de sonidos de patrones
VOLUME
PATTERN
A
PRESS PLAY
TEMPO
PERFORM
ROCKIN 1
15

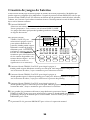
4 Los rellenos no tienen que siempre ser patrones de
transición. Suponga que se está reproduciendo un patrón
A. Si presiona el botón FILL, se iniciará un relleno -pero esta
vez, mantenga el botón FILL presionado hasta que termine
de reproducirse el relleno.
Esto cancela la transición al patrón alternativo (en este
ejemplo, el patrón A continuará reproduciéndose).
3 Presione el botón FILL otra
vez. Un relleno diferente
realizará la transición del
patrón B de vuelta al patrón
A.
2 Presione y suelte el botón FILL
(relleno) mientras se está
reproduciendo el patrón principal
A. Escuchará un relleno de batería
que se dirige directamente al patrón
B correspondiente.
1 Comience
seleccionando un
patrón A y presione
PLAY.
Cada variación A y B incluye también patrones de relleno correspondientes, que pueden
reproducir transiciones entre las variaciones A y B. Puede pulsar un botón para conseguir que
un relleno(Fill) asuma control sobre su patrón principal asociado y realice la transición al patrón
alternativo.
Reproducción de rellenos
VOLUME
PATTERN
A
PRESS PLAY
TEMPO
PERFORM
ROCKIN 1
16

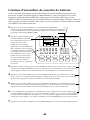
9 ¡Si le gusta la canción, magnífico! El
SR-16 la guarda. Introduciendo el
número de la canción en el modo de
canción (Song) y de tocar (Perform),
recuperará la canción.
8 Para escuchar su canción, presione
PERFORM/COMPOSE para
seleccionar el modo "Perform".
Luego, presione PLAY.
10 Para borrar la canción, debe seleccionarla. El SR-16 debe estar parado y en el modo
de tocar (Perform). Presione ERASE (borrar) y, mientras lo sostiene, presione
PLAY. Se borrará la canción.
7 Cuando haya terminado de crear
la canción, presione STOP.
6 Elija los patrones, las
variaciones A y B y los
llenados como se describe en
las páginas anteriores. Cada
selección se guarda como
otro paso de canción y el SR-
16 recordará también el
instante exacto en que
seleccionó un relleno (Fill). Si
no especifica un nuevo
patrón, cada vez que se repite
un patrón se añadirá un
nuevo paso para la canción.
5 Presione PLAY.
4 Elija un patrón para el paso 1 de la canción
introduciendo un número de patrón y variación A o
B. Este paso puede ser un relleno si presiona "Fill"
junto con A o B. Los patrones de usuarios no
debieran seleccionarse por el
momento.
3 Presione el botón
PERFORM /
COMPOSE
(tocar/componer)
hasta que la parte
inferior central de la
pantalla muestre
COMPOSE.
2 La parte superior izquierda de la pantalla debe
indicar EMPTY SONG(canción vacía). De lo
contrario, presione los botones de subir y bajar
hasta que se seleccione una canción vacía.
1 Seleccione el modo de canción (Song).
El SR-16 puede recordar el orden en que el usuario seleccionó los patrones, qué variaciones
fueron seleccionadas y cuándo se seleccionaron los rellenos. Al grabarse esta información en el
modo de canción del SR-16, se crea una canción completa. Comience con SR-16 parado.
Creación y Borrado de canciones
VOLUME
PRESS PLAY
TEMPO
STEP 01
END
SONG
USER
COMPOSE
17

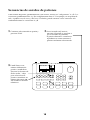
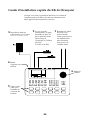
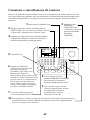
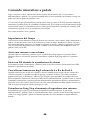
Control de interruptor de pedal
Ahora que conocemos los puntos básicos, veamos algunas opciones de espectáculo en vivo
usando el control del interruptor de pedal. Esto es especialmente útil si está tocando con
patrones y canciones en los pads y no puede usar las manos para presionar los botones.
Hay dos conectores para los interruptores de pedal (Start/Stop y Count/A/B/Fill). Siempre
enchufe estos interruptores de pedal antes de conectar la alimentación. Puede usar los tipos
normalmente abiertos o cerrados (los dos tipos más comunes de interruptores de pedal); el SR-16
determina qué tipo se está usando al momento de conectarse la alimentación.
Los interruptores de pie se usan de la siguiente manera.
Ajuste del Tempo
Se debe parar el SR-16. Antes de tocar una canción o patrón, dele un golpecito al interruptor de
pie de Count/A/B/Fill varias veces al tempo deseado. El SR-16 calculará el promedio de tiempo
entre los golpecitos y creará un tempo, la pantalla actualizará el tempo con cada golpecito.
Dándole golpecitos al botón STOP, logrará el mismo resultado que dándolos al interruptor de
pedal de Count/A/B/Fill.
Inicie una canción o patrón
Cuando el SR-16 se ha detenido, presionar el interruptor de pedal de Start/Stop es equivalente a
presionar PLAY.
Cuando el SR-16 está funcionando, presionar el interruptor de pedal de Start/Stop es
equivalente a presionar STOP.
Iniciación de un relleno cuando se reproducen patrones
En modo Perform, el interruptor Count/A/B/Fill duplica la función de relleno del botón FILL al
reproducir patrones.
Cancelación de una transición de patrones de A hasta B, o de B hasta A
Cuando inicia un relleno, un patrón A cambiará a un patrón B (o viceversa) cuando el relleno
haya terminado de reproducirse. Sin embargo, puede cancelar esta transición si lo desea. Ya
hemos explicado cómo hacer esto con el botón FILL del panel frontal. Sin embargo, puede
también usar el interruptor de pedal Count/A/B/Fill. Si presiona el interruptor de pedal antes
de que haya terminado de reproducirse el relleno y lo mantiene presionado hasta que termine (es
decir, pasado el downbeat del patrón siguiente), el SR-16 volverá al patrón principal A o al
patrón B.
Extensión de un paso de canción durante la reproducción de una canción
En modo Song Perform (es decir, durante la reproducción de una canción), presionar y mantener
presionado el interruptor de pedal Count/A/B/Fill hasta que termine un paso de canción, hace
que ese paso se repita. Esto es bueno si el solista quiere tomar unas pocas barras más.
18

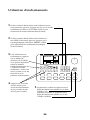
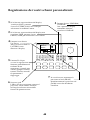
7 Si comete un error, mantenga
presionado el botón ERASE
(borrar) y luego presione el pad
de la batería del sonido que
quiere borrar.
6 Cómo tocar los pads.
Mientras toca su música, el SR-16
moverá sus ritmos al valor rítmico más
cercano que se muestra en la esquina
inferior izquierda de la ventana de
cuantificación.
5 Presione PLAY para
comenzar a grabar.
Es posible que oiga un clic
de metrónomo. Cuando
termina un patrón,
volverá al comienzo para
que pueda sobregrabar
(overdub).
4 Presione los botones de
subir / bajar
hasta que encuentre un
patrón vacío (EMPTY
PATTERN), como se
muestra en la pantalla.
3 Presione el botón PERFORM
/ COMPOSE
(tocar/componer) hasta que
la parte inferior central de la
pantalla muestre COMPOSE.
1 Si la ventana superior derecha de la pantalla
muestra SONG, presione el botón
PATTERN/SONG
una vez para seleccionar el modo de patrón.
2 Si la ventana superior derecha de la pantalla no
muestra USER, presione el botón PRESET/USER
para seleccionar los patrones de usuario.
Grabación de sus propios patrones
VOLUME
PATTERN
A
PRESS PLAY
TEMPO
EMPTY
PATT
COMPOSE
USER
19

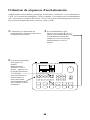
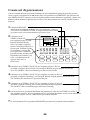
7 Si presionó PLAY, presione DRUM SET para volver a la operación normal.
6 Para guardar los parámetros del nuevo juego de batería, presione el botón
TEMPO/PAGE UP tres veces para seleccionar la página 8, donde puede guardar los
parámetros del juego de batería que ha seleccionado. Presione PLAY para guardarlo o
DRUM SET para volver.
3 Presione el botón TEMPO/PAGE UP para elegir la página 3,
donde puede asignar diferentes niveles para cada pad. dele un golpecito a un pad y
use los botones de subir / bajar o numéricos para seleccionar el nivel.
4 Presione el botón TEMPO/PAGE UP para elegir la página 4,
donde puede asignar la función panning para cada pad. dele un golpecito a un pad y
use los botones de subir / bajar para seleccionar la posición de panning.
5 Presione el botón TEMPO/PAGE UP para elegir la página 5,
donde puede asignar la afinación para cada pad. dele un golpecito a un pad, y use los
botones de subir / bajar o numéricos para seleccionar la afinación.
2 Presione el botón
TEMPO/PAGE UP para
seleccionar la página 2 (vea la
parte inferior derecha de la
pantalla), donde puede asignar
diferentes sonidos de batería a
diferentes pads. Presione el
pad que va asignar y use los
botones de subir / bajar o
numéricos para seleccionar uno
de los sonidos disponibles (un
número de tres dígitos - no se le
olvide usar los ceros no
significativos si es necesario).
1 Presione DRUM SET.
Seleccione un número de 00-49 usando los botones numéricos, y
Preset (preajuste) o User (usuario) con el botón PRESET/USER.
Los juegos de batería preajustados pueden guardarse solamente
en lugares de usuario.
El SR-16 cuenta con 50 juegos de batería (grupos de sonidos) del usuario preajustados y 50 editables que
pueden asignarse a cualquiera de los 100 patrones. Después de presionar el botón DRUM SET, cada vez que
presiona el botón TEMPO/PAGE UP selecciona un diferente tipo de parámetro (sonido de batería, afinación,
volumen, etc.). Presione el pad a editar e introduzca el nuevo valor del parámetro usando la flecha de subir /
bajar o con los botones numéricos.
Creación de juegos de baterías
VOLUME
PAGE
DRUMSET
SELECT
DRUM SET
DRUM
USER
SET
20
La pagina si sta caricando...
La pagina si sta caricando...
La pagina si sta caricando...
La pagina si sta caricando...
La pagina si sta caricando...
La pagina si sta caricando...
La pagina si sta caricando...
La pagina si sta caricando...
La pagina si sta caricando...
La pagina si sta caricando...
La pagina si sta caricando...
La pagina si sta caricando...
La pagina si sta caricando...
La pagina si sta caricando...
La pagina si sta caricando...
La pagina si sta caricando...
La pagina si sta caricando...
La pagina si sta caricando...
La pagina si sta caricando...
La pagina si sta caricando...
La pagina si sta caricando...
La pagina si sta caricando...
La pagina si sta caricando...
La pagina si sta caricando...
La pagina si sta caricando...
La pagina si sta caricando...
La pagina si sta caricando...
La pagina si sta caricando...
La pagina si sta caricando...
La pagina si sta caricando...
La pagina si sta caricando...
La pagina si sta caricando...
-
 1
1
-
 2
2
-
 3
3
-
 4
4
-
 5
5
-
 6
6
-
 7
7
-
 8
8
-
 9
9
-
 10
10
-
 11
11
-
 12
12
-
 13
13
-
 14
14
-
 15
15
-
 16
16
-
 17
17
-
 18
18
-
 19
19
-
 20
20
-
 21
21
-
 22
22
-
 23
23
-
 24
24
-
 25
25
-
 26
26
-
 27
27
-
 28
28
-
 29
29
-
 30
30
-
 31
31
-
 32
32
-
 33
33
-
 34
34
-
 35
35
-
 36
36
-
 37
37
-
 38
38
-
 39
39
-
 40
40
-
 41
41
-
 42
42
-
 43
43
-
 44
44
-
 45
45
-
 46
46
-
 47
47
-
 48
48
-
 49
49
-
 50
50
-
 51
51
-
 52
52


in altre lingue
- français: Alesis SR-16 Guide de démarrage rapide
- español: Alesis SR-16 Guía de inicio rápido
- Deutsch: Alesis SR-16 Schnellstartanleitung