House IPMAX

PNI House IPMAX Manuale utente

  • Ciao, sono il tuo assistente. Ho letto il manuale utente per il sistema di videosorveglianza PNI IPMAX POE 3LR e sono pronto a rispondere alle tue domande. Questo sistema supporta la registrazione multicanale 4K e offre funzionalità di rilevamento volti e backup USB. Fammi sapere se hai bisogno di aiuto!
  • Quanti canali supporta il sistema?
    Qual è la massima risoluzione supportata dal sistema?
    Il sistema supporta il rilevamento del volto?
PNI HOUSE IPMAX POE 3LR
POE video surveillance system / POE система за видеонаблюдение / POE-
Videoüberwachungssystem / Sistema de videovigilancia POE / Système
de vidéosurveillance POE / POE videó meggyelő rendszer / Sistema di
videosorveglianza POE / POE videobewakingssysteem / System nadzoru
wideo POE / Kit supraveghere video POE
EN User manual ......................................................... 3
BG Ръководство за употреба ............................. 28
DE Benutzerhandbuch .............................................. 54
ES Manual de usuario ............................................... 80
FR Manuel utilisateur ............................................... 105
HU Használati utasítás .............................................. 130
IT Manuale utente .................................................. 155
NL Handleiding ........................................................ 180
PL Instrukcja obsługi ............................................... 205
RO Manual de utilizare ............................................. 230
3User manual
English
Main functions
Simultaneous real-time multi-channel recording, remote playback and
configuration
Supports up to 9 channels with a maximum 4K (8MP) resolution.
Backup on USB flash memory and external HDD.
Supports face and human shape detection (depending on the camera)
Possibility to connect external speaker.
Technical specifications
NVR
Video inputs 4 x RJ45 POE
Video output 1 x VGA / 1 x HDMI
Audio output 1 x 3.5mm
Number of channels 9 x max. 4K (8MP)
Playback resolution Max. 2K (2560 x 1440) on HDMI output
Max. 1080P (1920 x x1080) on VGA output
Ethernet 1 x RJ45 100/100Mbps
Video compression H.265AI/H.265+
Audio compression G.711A
Recording mode Manual, alarm, motion detection, programmed
USB 2 x USB2.0
HDD 1 x HDD SATA (max. 8Tb)
ONVIF Yes
Power voltage 48V / 2A
Dimensions 255 x 220 x 43 mm mm
Working temperature -26°C ~ +80°C
Camera
Resolution 3MP (2304 x 1296)
Lens 3.6mm
LED 4 IR LEDs and floodlight
Power supply POE
User manual 4
English
Dimensions 70 x 190 x 65 mm
Working temperature -26°C ~ +80°C
Instructions for use
Installing the storage unit
Before first use, please install the storage unit. Only one SATA HDD with a
maximum capacity of 14TB can be installed inside the recording unit (HDD is
not included in the package).
Loosen the screws and open the NVR housing
Connect the data cables and secure the hard drive with the screws
Close back the NVR housing
Connect the power and internet cable to the NVR
Turn on the device
Plug the power cord into a 230V outlet. The NVR will start. The indicator LED
will light up.
If the start time is within the preset schedule for recording, then the recording
function will start automatically.
Notes:
1. Check that the input voltage corresponds to the recommended voltage of the
device. The supply voltage is 230V ± 10% / 50 Hz 2A.
2. We suggest using a UPS device to protect the device from voltage fluctuations.
Turn o the device
There are two ways to turn o the device.
1. Access the main menu (right click on the screen) and select the option
Logout - Shutdown
2. Turn o the power supply.
Special warnings:
1. Restart after power failure. If the device is closed abnormally, it creates a
5User manual
English
backup and restarts from that status after power is restored.
2. Replace the battery on the system board. Before replacing the battery, you
must backup your system settings (see chapter Advanced-Import / Export)
and turn o the power supply. The device time and date must be set again after
the battery is replaced. We recommend that you replace the battery every
year.
Remote control of the device
The NVR can be controlled locally or remotely from both smartphones and
computers with Windows operating system.
Operating system Application Download
Android, iOS XMEye
Android iOS
Windows General CMS
The installation file can
be downloaded from
the CD included in the
package or from the
Download section on the
product web page (www.
pni.ro)
System authentication
After turning on the device, log in to the system.
By default, the admin user is password protected by 1234. If the password is
entered incorrectly 5 times in a row, the account will be blocked. By restarting
the device or after half an hour, the account will be unlocked automatically.
Note: For the security of your system, please change the password after the first
login.
User manual 6
English
Quick setup guide
After starting the device, the quick setup guide will start.
Note: We recommend configuring the system before installing the NVR and
cameras in the final location.
Stept to follow:
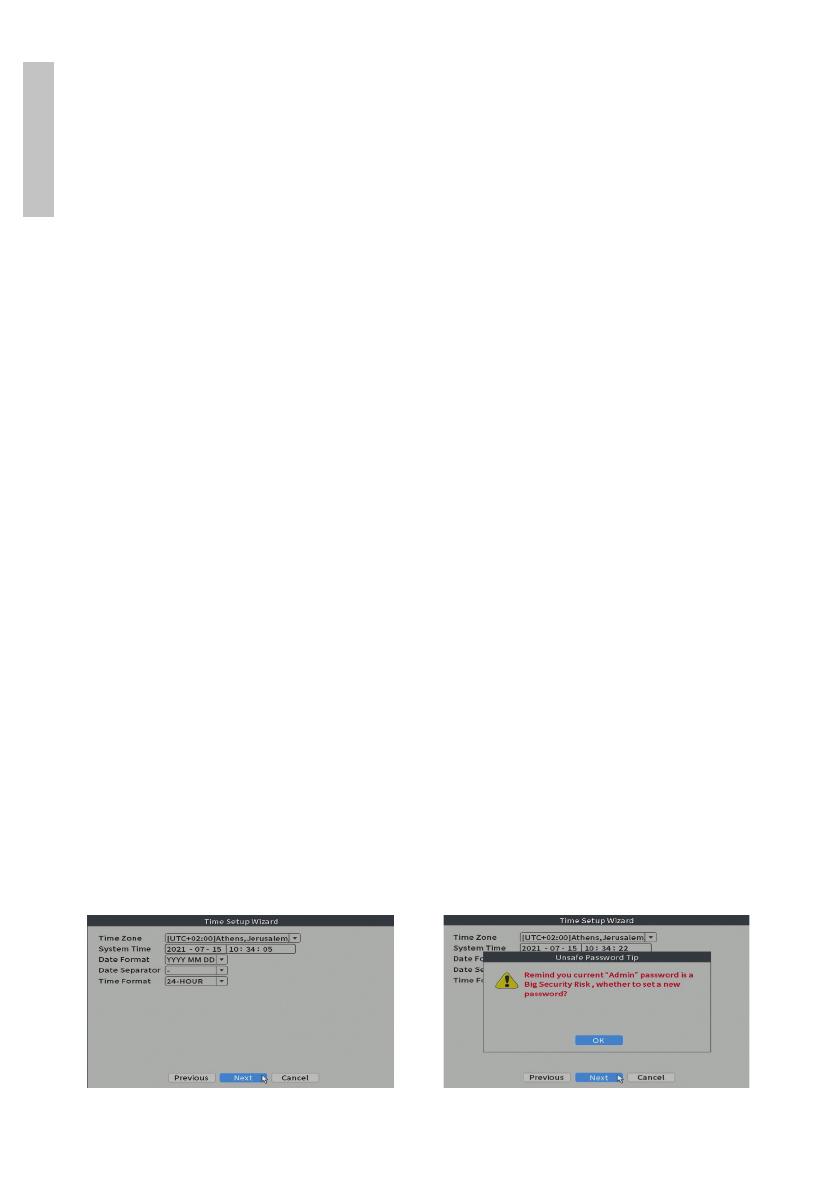
1. Set the time, date and time zone.
2. Soon, a popup window will appear on the screen asking you to change the
authentication password in the system. Follow the steps on the screen or
press the ESC key on the NVR to exit the password setting interface.
Note: For the security of your system, we recommend changing the password after
the first login in the system.
3. Set the network parameters manually or activate the DHCP option for
automatic download.
4. Scan the QR code on the screen to install the XMEye application on your
mobile phone. Scan the QR code with the serial number to add the system
to the application.
5. Set the display options and resolution of the monitor connected to the
NVR. Maximum supported resolution 2560x1440 (2K).
Note: Before changing the resolution, make sure that your monitor supports that
resolution. If the set resolution is higher than the resolution of your monitor, nothing
will appear on the monitor and you will not be able to access the menu. If this
happens, however, connect the NVR to a lower resolution monitor, access the menu,
and change the resolution.
6. Press the OK key to complete the basic system configuration.
7. Right click on the screen and access the NetDetect option. Click Diagnose
to test the network configuration.
Note: For the settings to take eect, restart the system. Right click on the screen
- Logout - Reboot.
7User manual
English
The menu
In the main preview interface, right-
click with the mouse to access the
menu.
Main Menu
Options: Playback, Record Conf, Network, Date Time.
User manual 8
English
Playback
The system oers numerous filters and options for identifying the desired
record. You can search by channel number, date and time interval or by file
type.
Record Conf.
The interface allows you to make the following settings: the length of a recording
file, the recording mode (programmed or manual), the period (day and time
interval) and the recording type (normal, motion detection and alarm).
9User manual
English
Network
Manually set the network parameters (IP address, gateway, DNS, port, etc.)
or check the DHCP option for automatic parameter retrieval.
Note: For the settings to take eect, restart the system. Right click on the screen
- Logout - Reboot.
Date time
Set the time zone, date, time and format.
User manual 10
English
System
Options: General, Encode, Backup, Snapshot Config., Display, Account.
General
The interface will allow the following settings: the menu display language, the
behavior in case of a full hard disk (overwrite or stop recording), the session
duration and enable / disable quick configuration guide at system startup.
11 User manual
English
Encode
Displays the technical parameters of the connected cameras (resolution,
frame rate, video compression, quality, etc.).
Backup
The USB memory or external HDD must be installed in the NVR before
starting the backup. Press the Detect button to identify the storage device,
then the Backup button to perform the backup.
User manual 12
English
Snapshot Config
Set to take cyclic captures at a certain time and send them by email, FTP or
store them on your hard disk.
Display
In the local preview mode can be displayed: time, channel name, recording
status, alarm status, transparency and display resolution.
Note: Before changing the resolution, make sure that your monitor supports that
resolution. If the set resolution is higher than the resolution of your monitor, nothing
will appear on the monitor and you will not be able to access the menu. If this
happens, however, connect the NVR to a lower resolution monitor, access the menu,
and change the resolution.
13 User manual
English
Account
The interface allows managing users who have access to the system, adding
users, changing user rights, changing the password, creating user groups and
setting an account security level by registering answers to certain predefined
questions. In case of password reset, the verification code can be sent in the
mobile application or at the set email address. To increase security, you can set
a pattern for accessing the system.
User manual 14
English
Alarm
Options: Intelligent Alert, Abnormality and Traditional alarm (No image, No
video signal, etc.). Alarm input and Intelligent options are not available for this
model.
Intelligent Alert
Set the system behavior in case of motion detection: registration and / or
notification in the application. Also set the level of sensitivity to movement
and the area of action.
15 User manual
English
Abnormality
Set the system behavior in case of: storage device error, lack of space on the
storage device, lack of internet connection or IP conflict. In such situations you
can set to send a notification in the application or an email.
Traditional alarm
Set the system behavior in case of missing image or missing video signal. In
such situations you can set to send a notification in the application or an email,
start recording, make captures or save the alarm recording on an FTP server.
User manual 16
English
Advanced
Options: HDD info, Upgrade, AutoMaintain, Restore, Import / Export,
Digital, LOG, BPS and Version.
HDD info
Set how the hard drive works (read-only or read-write).
Note: In order to save recordings to the hard disk, it must be set to read / write
mode.
17 User manual
English
Upgrade
Insert a USB stick into the NVR that should contain the update file in the
root folder. Select the storage drive and file from the NVR menu and click the
Upgrade button.
AutoMaintain
Set the system to restart on a certain day and time or set the automatic
deletion of files older than a certain period.
Restore
Select the options you want to reset.
User manual 18
English
Import/Export
Export or import system settings.
19 User manual
English
Digital
Options: Digital channels, Channel status and Channel Type.
Digital channels
Add a camera on a specific channel. Click the Add button, then Search to find
all the cameras connected in the same network (same router) with the NVR.
User manual 20
English
Channel status
Displays the status (connected, unconnected or unconfigured) for all 9
channels.
Channel type
Displays the maximum number of cameras and the resolution of the cameras
that can be connected to the system. The PNI IPMAX POE 3 NVR supports
a maximum of 9 IP cameras with a maximum resolution of 4K (8MP).
/