
If you have questions or comments, contact us
www.DEWALT.com
SAVE THESE INSTRUCTIONS
NEVER LEAVE THE HEATER UNATTENDED WHILE BURNING!NEVER LEAVE THE HEATER UNATTENDED WHILE BURNING!NEVER LEAVE THE HEATER UNATTENDED WHILE BURNING!
INSTRUCTION MANUAL
2797/20
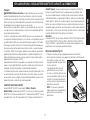
PORTABLE PROPANE (G31) AND BUTANE/PROPANE MIXTURE (G30 + G31) HEATER FOR
RECREATIONAL, COMMERCIAL AND EMERGENCY INDOOR USE DXRH012E
LANGUAGES INCLUDED: ENGLISH, GERMAN, FRENCH, ITALIAN
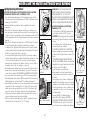
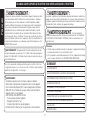
WARNING: READ INSTRUCTIONS CAREFULLY: Read and follow all instructions. Place instructions in a safe place for future reference. Do not
allow anyone who has not read these instructions to assemble, adjust or operate the heater.
EN 449:2002+A1:2007
EN 521:2006
TP 6.39
EN 60335-1:2012+A13:2017
EN 60335-2-102:2006+A2:2016

English
2
NEVER LEAVE THE HEATER UNATTENDED WHILE BURNING!NEVER LEAVE THE HEATER UNATTENDED WHILE BURNING!NEVER LEAVE THE HEATER UNATTENDED WHILE BURNING!
CONTENTS
WARNINGS 2
HEATER SPECIFICATIONS 3
Odour FADE WARNINGS 4
SAFETY PRECAUTIONS 5
LIGHTING AND OPERATION 6
MAINTENANCE AND STORAGE 7
BATTERY CHARGER PRECAUTIONS 9
BATTERY CHARGER INSTRUCTIONS 11
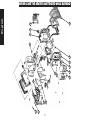
EXPLODED VIEW 15
PARTS LIST 16
WARNING:
Early signs of carbon monoxide poisoning resemble the u, with headache,
dizziness and/or nausea. If you have these signs, heater may not be working
properly. Get fresh air at once! Have heater serviced.
Caution:
• Some carpets or linoleum surfaces may discolor if heater is placed directly
on these oor coverings.
• When operating the heater at altitudes over 2.13 km above sea level the
heater may shut off. (Please read the GENERAL INFORMATION)
WARNING:
- Do not store or use gasoline or other flammable vapors and
liquids in the vicinity of this or any other appliance.
- A Propane (G31) or Butane/Propane mixture (G30+G31)
cartridge not connected for use shall not be stored in the
vicinity of this or any other appliance.
- WHAT TO DO IF YOU SMELL GAS
• Do not try to light appliance.
• Extinguish any open flame.
• Shut off gas to appliance.
- Service must be performed by a qualified service agency.
This is an unvented gas-red portable heater. It uses air (oxygen) from the
area in which it is used. Adequate combustion and ventilation air must be
provided. Refer to page 5.
WARNING:
Every time a cartridge is connected to unit, connection must be checked
for leaks in one or more ways: Apply soapy water to connection, look for
bubbles, listen for hiss of escaping gas, feel for extreme cold, smell for rotten
egg odour. If there is a leak on your appliance (smell of gas), take it outside
immediately into a well ventilated ame free location where the leak may be
detected and stopped. If you wish to check for leaks on your appliance, do
it outside. Do not try to detect leaks using a ame, use soapy water. Any
changes to this heater or its controls can be dangerous. DO NOT modify
appliance.
WARNING: If the recreational or commercial enclosure
does not have a window or roof vent, DO NOT USE THIS HEATER
INSIDE. Use only in a well ventilated area.
WARNING: This appliance shall only be used with Vapor Pressure
Propane 100%(G31) and Propane Butane Mixture 70/30 (G30+G31) fuels It
may be hazardous to attempt to t other types of gas cartridges.

3
English
NEVER LEAVE THE HEATER UNATTENDED WHILE BURNING!NEVER LEAVE THE HEATER UNATTENDED WHILE BURNING!NEVER LEAVE THE HEATER UNATTENDED WHILE BURNING!
Specications
MODEL NO.: .................................................................................... DXRH012E
GAS TYPE: ....................................... Propane (G31) Gas shall only be used with
Coleman and Primus Power Gas 70/30 Butane/ Propane (G30+G31)
INPUT (kW): .............................................................................2.2 kW (158 G/H)
2.8kW (200 G/H)
INJECTION SIZE ...................................................................................1.01 mm
WARNING: CERTIFIED FOR USE WITH PROPANE ONLY
WARNING: CERTIFIED FOR USE WITH DEWALT RECHARGEABLE BATTERY
PACKS. REFER TO LIST BELOW A LIST OF APPROVED BATTERIES.
DEWALT 18V MAX batteries
• 1.3 Ah
• 1.5 Ah
• 2.0Ah
BATTERIES AND CHARGER ARE NOT INCLUDED.
Electronic Features (requires battery)
• 400 Lumens Light embedded in adjustable handle
• 135 CFM Fan
• 3 USB Power Outlets (5 Volts DC current, 2 Amps)
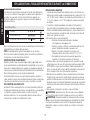
From outlet .......................................................................................... 60.96 cm
From top ...............................................................................................76.2 cm
From Sides .......................................................................................... 15.24 cm
From Rear ..................................................................................................0 cm
Minimum Clearances from normal combustible material
General Information
The DXRH012E is safe for indoor use in small recreational enclosures having means
for providing combustion air and ventilation, such as enclosed porches, cabins, shing
huts, trailers, tent trailers, tents, truck caps and vans. It may be used for emergency
indoor heating when connected disposable 465g propane (G31) OR 450g Butane/
Propane mixture (G30+G31) cartridge and for indoor use in commercial enclosures,
provided that there is sufcient air for combustion and ventilation (specied in OPERATING
PRECAUTIONS page 5).
NOTE: This heater can be used outdoors, but may experience nuisance shutoffs in certain
wind conditions.
• A DEWALT battery is necessary only for Fan, USB Power Outlets, and Light operation.
• A Propane gas supply is necessary only for Heating operation.
• When the heater is cold or at room temperature, it will take a few minutes for the burner
tile to turn bright orange. This is normal and the heater is working properly. If burner tile
is visibly aming, turn heater off and call a qualied service technician.
• When the unit is lit, there should be about a quarter inch (.635 cm) border around the
tile that will not turn bright orange. This is normal.
• When operating the heater for the rst time, the top area of the reector may discolor.
This is also normal and is no reason for concern.
• The protective grill on the front of this heater is coated with a special high-temperature
resistant paint. When the heater is used for the rst time, the grill may give off noticeable
smoke or fumes. This is normal and will not occur during subsequent uses. The fumes
are not harmful.
• When operating the heater at altitudes over 2.13km above sea level, the unit may not
burn as bright as in lower altitudes. This is normal. At higher altitudes the heater may
shut off. If this happens provide fresh air, wait 5 minutes, and then re-light. Due to local
atmospheric conditions heater may not re-light.
• When moving heater when lit or bumping heater setting it down, the tip over switch may
shut off heater. If this happens, relight.
• Due to natural operation of small cartridges, condensation may build up on cartridge
and drip on surface under heater. Sometimes this condensation may freeze due to the
extreme cold caused when propane (G31) vaporizes. This is normal and no reason for
alarm.
• Operating time will vary depending on the heater setting and the supply cartridge size.
Up to 1.5 to 3.5 hours on a 450G 70/30 Butane/Propane mixture (G30+G31) cartridge.
Due to the properties of Propane gas (G31), run times can be signicantly reduced
when operating continuously at temperatures below -6.6 C.
WARNING: If the information in this manual is not followed
exactly, a re or explosion may result causing injury or loss of life.

English
4
NEVER LEAVE THE HEATER UNATTENDED WHILE BURNING!NEVER LEAVE THE HEATER UNATTENDED WHILE BURNING!NEVER LEAVE THE HEATER UNATTENDED WHILE BURNING!
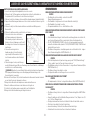
WARNING
Asphyxiation Hazard
• Do not use in unventilated areas
• The ow of combustion and ventilation air must not be obstructed
• Proper ventilation air must be provided to support the combustion air
requirements of the heater being used.
• Refer to the specication section of the heater’s manual, heater
dataplate, or contact the factory to determine combustion air ventilation
requirements of the heater.
• Lack of proper ventilation air will lead to improper combustion
• Improper combustion can lead to carbon monoxide poisoning leading
to serious injury or death. Symptoms of carbon monoxide poisoning can
include headaches, dizziness and difculty in breathing.
Fuel Gas Odour
Propane gas(G31) and butane/propane mixture (G30+G31) gases have man-made
odourants added specically for detection of fuel gas leaks. If a gas leak occurs
you should be able to smell the fuel gas. Since Propane (G31) is heavier than air
you should smell for the gas odour low to the oor. ANY GAS Odour IS YOUR
SIGNAL TO GO INTO IMMEDIATE ACTION!
• Do not take any action that could ignite the fuel gas.
• Do not operate any electrical switches.
• Do not pull any power supply or extension cords.
• Do not light matches or any other source of ame.
• Do not use your telephone.
• Get everyone out of the building and away from the area immediately. Close all propane
gas (G31) tank or cylinder fuel supply valves, or the main fuel supply valve located at the
meter if you use natural gas.
• Propane gas (G31) is heavier than air and may settle in low areas. When you have
reason to suspect a propane leak, keep out of all low areas.
• Use a telephone remote from the area of the leak and call your fuel gas supplier and
your re department. Do not re-enter the building or area.
• Stay out of the building and away from the area until declared safe by the reghters
and your fuel gas supplier.
• FINALLY, let the fuel gas service person and the reghters check for escaped gas.
Have them air out the building and area before you return. Properly trained service
people must repair any leaks, check for further leakages, and then relight the appliance
for you.
Odour Fading - No Odour Detected
• Some people cannot smell well. Some people cannot smell the odour of the man-
made chemical added to propane gas (G31). You must determine if you can smell the
odourant in these fuel gases.
• Learn to recognize the odour of propane gas (G31).
• Smoking can decrease your ability to smell. Being around an odour for a period of time
can affect your sensitivity to that particular odour. Odours present in animal connement
buildings can mask fuel gas odour.
• The odourant in propane gas (G31) is colorless and the intensity of its odour
can fade under some circumstances. If there is an underground leak, the movement
of gas through the soil can lter the odourant.
• Propane gas (G31) odour may differ in intensity at different levels. Since Propane gas
(G31) is heavier than air, there may be more odour at lower levels.
• Always be sensitive to the slightest gas odour. If you continue to detect any gas
odour, no matter how small, treat it as a serious leak. Immediately go into action as
discussed previously.
ATTENTION - Critical Points to Remember!
• Propane gas (G31) or Butane/Propane mixture (G30+G31) has a distinctive odour.
Learn to recognize these odours. (Reference Fuel Gas Odour and Odour Fading
sections on this same page)
• Even if you are not properly trained in the service and repair of the heater, ALWAYS be
consciously aware of the odours of propane gas(G31) and natural gas.
• If you have not been properly trained in repair and service of propane gas(G31) or
Butane/Propane mixture(G30+G31) then do not attempt to light heater, perform service
or repairs, or make any adjustments to the heater on the propane (G31) or Butane/
Propane mixture(G30+G31) gas fuel system.
• A periodic sniff test around the heater or at the heater’s joints; i.e. hose, connections,
etc., is a good safety practice under any conditions. If you smell even a small amount of
gas, CONTACT YOUR FUEL GAS SUPPLIER IMMEDIATELY. DO NOT WAIT!

5
English
NEVER LEAVE THE HEATER UNATTENDED WHILE BURNING!NEVER LEAVE THE HEATER UNATTENDED WHILE BURNING!NEVER LEAVE THE HEATER UNATTENDED WHILE BURNING!
THIS IS A HEATING APPLIANCE. DO NOT OPERATE THIS APPLIANCE WITHOUT
THE FRONT WIRE GUARD INSTALLED. DO NOT ATTEMPT TO WARM OR COOK
FOOD ON THIS HEATER.
1. REGULATOR IN HEATER MUST ALWAYS BE IN PLACE DURING OPERATION.
2. Due to high temperatures, the appliance should be located out of trafc and away
from combustible materials. (See Specications on page 3.)
3. CAUTION: Accessible parts may become very hot. Keep young children away from
the appliance Children and adults should be alerted to the hazard of high surface
temperatures and should stay away to avoid burns or clothing ignition.
4. Young children should be carefully supervised when they are near the appliance.
5. Do not place clothing or other ammable material on or near the appliance.
6. If the wire guard is removed for servicing, it must be replaced prior to operating the
heater.
7. Do not use non-approved attachments on this heater. Do not modify appliance.
8. The appliance should be inspected before each use. Frequent cleaning may be
required. The control compartments, burner and circulating air passageways of the
appliance must be kept clean. (See MAINTENANCE on page 7.)
9. Do not use this heater is any part has been under water. Immediately call a qualied
service technician to inspect the heater and to replace any part of the control system
and any gas control which has been under water.
10. This heater can only be used in a recreational or commercial enclosure with a window
or roof vent. It may also be used outdoors.
11. This heater requires a well ventilated location of 77 cm2 (example 7.62 cm x 10.16 cm
opening) minimum for adequate ventilation during operation which is in accordance
with national requirements for the supply of combustion air. Do not use other fuel
burning appliances inside.
12. GAS PRESSURE AT HEATER IS REGULATED AND FIXED AT 2.74 kPa. IN ANY
CASE DO NOT REGULATE OR REDUCE PROPANE(G31) OR BUTANE/PROPANE
MIXTURE(G30+G31) CARTRIDGE SUPPLY PRESSURE TO HEATER!
13. When used without adequate combustion and ventilation air, this heater may give off
excessive CARBON MONOXIDE, an odourless, poisonous gas.
14. Some people - pregnant women, persons with heart or lung disease, anemia, those
under the inuence of alcohol, those at high altitudes - are more affected by carbon
monoxide than others.
15. Do not operate heater in any moving vehicle such as leisure vehicles like caravans and
auto caravans. Do not use in high rise ats, basements, bathrooms or bedrooms.
General Safety Instructions
16. When heater is placed on the ground, make sure the ground is level and keep
any objects at least 60.96 cm from the front of the heater. DO NOT MOVE THE
APPLIANCE WHEN OPERATING, SHOCKS AND BUMPS MAY ACTIVATE THE
SAFETY TIP OVER DEVICE. DO NOT LEAVE HEATER UNATTENDED OR WHERE
CHILDREN MAY CAUSE THE HEATER TO TIP OVER. NEVER OPERATE THE HEATER
WHILE SLEEPING!
Preparation for Operation
WARNING: Always inspect propane cylinder and heater propane connections for
damage, dirt, and debris before attaching propane cylinder. Do not use if head of cylinder
is damaged, punctured or deteriorated.
ALWAYS ATTACH OR DETACH CYLINDER OUTDOORS AWAY FROM FLAMES, OTHER
IGNITION SOURCES, AND ONLY WHEN HEATER IS COOL TO TOUCH. NEVER SMOKE
WHEN ATTACHING OR REMOVING PROPANE CYLINDER OR MAKING REMOTE
CONNECTIONS!
• Propane cylinder(s) must be disconnected from heater when not in use.
Pulse Ignition
The Pulse Ignition Button is located at the bottom of the USB Compartment (Figure 4,
page 6). Unscrew the button cap to install the “AAA” battery (included), with positive
end toward the button.

English
6
NEVER LEAVE THE HEATER UNATTENDED WHILE BURNING!NEVER LEAVE THE HEATER UNATTENDED WHILE BURNING!NEVER LEAVE THE HEATER UNATTENDED WHILE BURNING!
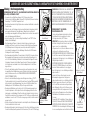
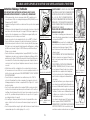
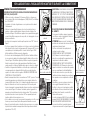
Lighting/Operating Instructions
USE WITH DISPOSABLE 465G PROPANE OR 450G 70/30 BUTANE
PROPANE MIXTURE(G30+G31) CARTRIDGES: START
• Use only 465g disposable propane (G31) cartridges that mate with No.
600 valve connection or butane/propane (70/30) (G30+G31) mixtures with
thread type 7/16-28 EN417.
• Heater and attached cylinder must be in an upright position during
operation.
• Check that seals (between the appliance and the gas cartridge ) are in
place and in good condition before connecting to the gas cartridge. Refer
to Figure 3. Do not use an appliance which has damaged or worn seals. Do
not use an appliance which is leaking, damaged or which does not operate
properly.
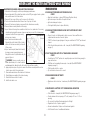
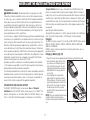
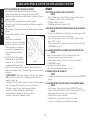
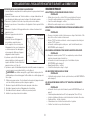
• Make sure the four-position Control Knob is in “OFF” position. See Figure 1.
• To use with propane: Swivel regulator outward for easy cartridge
installation. Screw 465g disposable Propane-gas (G31) supply cartridge
clockwise (from bottom) into portable heater until hand-tight. See Figure 2.
DO NOT use thread sealant on this connection.
• To use with Butane/Propane mixture (G30+G31): Screw brass adapter
clockwise into portable heater regulator (from bottom) until tight. See Figure
3. Do not use thread sealant on this connection. Screw 450g butane
propane mixture cartridge into the adapter (clockwise), once the shaft on
the adapter starts to turn, the cartridge is connected.
• Check adapter and cartridge connection for leaks with soapy water at the
threaded connection under the domed plastic cover where the cylinder
screws into the regulator. SEE WARNING! ON DOMED PLASTIC COVER.
• Turn control knob counterclockwise to “PILOT” position and depress.
While holding knob down, depress the pulse ignition button located in the
USB Compartment, see Figure 4 and 5. The pilot should remain lit.
• After pilot lights, hold down for 30-60 seconds and then release knob. Knob
should return to fully extended position, see Figure 6. To operate heater,
slightly depress knob and gently turn to lock in the “HI” position to light
burner tile. Leave on “HI” position until burner tile turns bright orange.
• If heater does not light, hold knob down for approximately 30 seconds;
release and depress again. Repeat until pilot lights.
• After burner tile has turned bright orange, adjust heat output by turning
control knob to desired position (“LO” or “HI” setting).
HI
LO
PILOT
OFF
Figure 1: Control Knob
Figure 2: Attach Fuel
Cartridge
WARNING: DO NOT OPERATE HEATER
UNLESS CONTROL KNOB IS LOCKED IN A
POSITION MARKED “HI”, “LO” OR “PILOT”.
NEVER SET CONTROL KNOB BETWEEN LOCKED
POSITIONS. POOR COMBUSTION AND HIGHER
LEVELS OF CARBON MONOXIDE MAY RESULT.
USE WITH DISPOSABLE 465g PROPANE
CYLINDER(S): STOP
• To shut off heater, slightly push down and turn
control knob clockwise to “OFF” position
• CAUTION: After turning heater off, wire guard
will remain hot. Allow to thoroughly cool before
storing.
• Check that burners are extinguished before
disconnecting the gas cartridge.
• TO REMOVE PROPANE (G31) CARTRIDGE:
Remove cartridge from stand and turn cartridge
counterclockwise until it is fully unscrewed off of
heater.
• TO REMOVE BUTANE/PROPANE MIXTURE
(G30+G31) CARTRIDGE: Remove cartridge from
stand and turn cartridge counterclockwise until it
is fully unscrewed off of adapter.
• Once Cartridge is removed then the
Butane adapter can be unscrewed turning
counterclockwise until it is fully unscrewed off of
the heater.
• Do not operate, store or remove cartridge near
ammable items or ignition sources. Only change
cartridges in a well ventilated location, preferably
outside, away from any sources of ignition such
as naked ames, pilots, electric res and away
from other people.
• Propane-GAS (G31) or Butane/Propane
mixture (G30+G31) cartridges MUST BE
DISCONNECTED FROM HEATER WHEN NOT
IN USE! Make sure to check the seals before
connecting a new gas cartridge to the appliance.
Figure 5: Depressed
Control Knob
Figure 6: Released
Control Knob
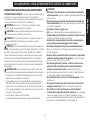
USB Power Outlets
Pulse Igniter
Figure 4: USB Compartment
Adapter
shaft
Seals
Figure 3: Butane Adapter

7
English
NEVER LEAVE THE HEATER UNATTENDED WHILE BURNING!NEVER LEAVE THE HEATER UNATTENDED WHILE BURNING!NEVER LEAVE THE HEATER UNATTENDED WHILE BURNING!
Status Light Diagnostics: Steady On/Off Blinking
If the Status Light is blinking on and off steadily this is an indication that the DEWALT battery
is low on charge. See Battery Charging Precautions and Instructions, starting on page 9.
The battery must be removed from the heater in order to charge.
Status Light Diagnostics: Double Flash
(2 Blinks, 1 Pause)
If the Status Light is “Double Flashing” (repetition of 2 rapid blinks followed by a pause) this
is an indication that the battery is outside of its operating temperature range.
Maintenance
Always keep the heater area clear and free from combustible materials, gasoline and other
ammable vapors and liquids.
Keep the vent areas (slots in the bottoms and the top at the front and rear of heater) clear
at all times.
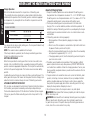
Visually inspect the pilot ame and burner periodically during use. The pilot ame should be
blue in color (not yellow) and will extend beyond the thermocouple. The ame will surround
the thermocouple just below the tip, see Figure 8.
A slight yellow ame may occur where the pilot ame and main burner ame meet. The
burner should be bright orange (with a slight blue color around the border, a red-orange
haze that is visible on the ceramic tile is acceptable) and without a noticeable ame. A blue
ame that rolls out at the top of the ceramic tile indicates an accumulation of dust, lint or
spider webs inside the casing assembly and main burner assembly. If the pilot is yellow or
the burner has a noticeable ame, cleaning may be required. Use the following procedure
to inspect the casing assembly and main burner assembly. It is necessary to periodically
check the burner orice and burner venturi tube to make sure they are clear of insects/
nests or spider webs that may accumulate over time. A clogged tube can lead to a re.
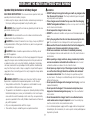
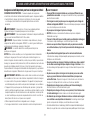
Electronic Operation
When a charged DEWALT battery is inserted into the battery
dock, Figure 7, the heater may activate the following electronic
features. The battery inserts into the battery dock upright, with
contacts facing the roof of the dock. These Electronic features
may be used individually or simultaneously. When any of them are
in use the status light, Figure 8, will illuminate with a steady green
glow to visually signal that an electronic feature is active. If the
status light is blinking see the diagnostics section below.
Lights
Toggling the Light control button on the back of the heater
activates/deactivates the lights in the handle bar. The Lights
operate with any orientation of the heater and handle.
Fan
Toggling the Fan control button on the back of the heater
activates/deactivates the fan. Using the fan while the heater is
active enhances the heaters convective heating ability. Using the
fan while the heater is inactive will make the heater into a fan,
meaning that you may enjoy the DXRH012E no matter the season!
USB Power Outlets
Inside the USB Compartment which houses the pulse igniter are
also 3 USB Power Outlets, a power button, and a status light.
Toggling the power button will activate/deactivate the USB Power
Outlets with 5 Volts of DC current at 2 amps rating, signaled by
illumination of the status light. The USB Power Outlets facilitate
the charging or powering of up to three USB devices. NOTICE:
The USB power should be shut off when not in use. Failure to do
so may cause battery to drain.
Figure 8:
Electronic Status LED,
USB Power Button,
USB Power Outlets
STATUS LIGHT
USB
Power
Outlets
USB
Power
Button
Figure 7:
Back Controls
LIGHTS
BATTERY DOCK
FAN

English
8
NEVER LEAVE THE HEATER UNATTENDED WHILE BURNING!NEVER LEAVE THE HEATER UNATTENDED WHILE BURNING!NEVER LEAVE THE HEATER UNATTENDED WHILE BURNING!
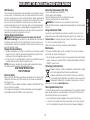
MAINTENANCE CLEANING AND INSPECTION PROCEDURE
1. Allow heater to thoroughly cool before performing any maintenance.
2. Remove disposable 465g cylinder from heater or turn OFF gas supply at remote cylinder
valve, and disconnect hose from heater.
3. Remove (4) four screws that secure the rear cover to the Heater.
4. Pivot cover outward from bottom. Release from 2 top clips. Set aside.
5. Remove (4) four burner retaining screws and fuel line from burner assembly.
6. Remove burner assembly from back of housing.
7. Inspect interior of housing for accumulation of dust, insect or spider webs. If necessary,
clean interior housing with a vacuum cleaner or apply air pressure. Do not damage any
components within the housing assembly
when you are cleaning.
8. Inspect and clean main burner orice
(threaded into orice holder). Orice holder is
attached to the burner assembly venturi with
(2) two screws.
9. Inspect and clean pilot (mounted to bracket)
by using a vacuum or apply air pressure
through the holes in the pilot indicated by the
arrows in Figure 9.
WARNING: Never use needles, wires, or
similar cylindrical objects to clean the pilot to
avoid damaging the calibrated orice that controls the gas ow assembly.
10. Apply air pressure (max. 30 psi) into ceramic tile of burner assembly and the venture
tube to remove dust, lint or spider webs.
11. Reassemble main burner orice holder onto the burner.
12. Reinstall burner assembly into the heater housing.
13. Reinstall fuel line and check for leaks.
14. Install heater back cover.
TROUBLESHOOTING
IF SPARK ELECTRODE DOES NOT PRODUCE SPARK
CHECK
• Spark electrode broken - replace ODS (Oxygen Depletion Sensor)
• Igniter wire may not be attached to spark electrode
• Igniter wire damaged - replace
• Pulse Igniter Battery dead - replace AA battery
IF SPARK ELECTRODE PRODUCES SPARK BUT PILOT DOES NOT LIGHT.
CHECK
• No gas to heater - install disposable cylinder or connect hose and lter where
required and turn on valve at remote cylinder.
• “PILOT” position not properly aligned - turn gas control knob to “PILOT” position and
depress.
• Pilot is blocked from spider web or dirt - clean pilot (See MAINTENANCE beginning
on page 7.)
IF PILOT FLAME DOES NOT STAY LIT WHEN KNOB IS RELEASED
CHECK
• Control knob in “PILOT” position not completely depressed or held in long enough to
purge air from lines.
• Pilot ame not surrounding thermocouple - clean pilot (See MAINTENANCE
beginning on page 7.)
• Pilot Assembly defective - replace
• Tip switch wires disconnected - connect
IF MAIN BURNER DOES NOT IGNITE
CHECK
• Main burner orice is blocked - clean burner (See MAINTENANCE beginning on page
7.)
IF HEATER KEEPS SHUTTING “OFF” DURING NORMAL OPERATION
CHECK
• Pilot is blocked - clean pilot (See MAINTENANCE beginning on page 7.)
• Provide minimum fresh air opening of 77 cm2 (example 7.62 cm x 10.16 cm
opening)
• Tip over switch activated from bumping heater. Re-light.
• Regulator defective - Replace regulator.
• Internal contamination - Replace control valve and regulator
• Call Technical Services for additional information.
Figure 9
Pilot Flame
Oxygen Depletion
Sensor

9
English
NEVER LEAVE THE HEATER UNATTENDED WHILE BURNING!NEVER LEAVE THE HEATER UNATTENDED WHILE BURNING!NEVER LEAVE THE HEATER UNATTENDED WHILE BURNING!
Important Safety Instructions for all Battery Chargers
SAVE THESE INSTRUCTIONS: This manual contains important safety and
operating instructions for battery chargers.
• Before using the charger, read all instructions and cautionary markings on
the charger, battery pack and product using the battery pack.
WARNING: Shock hazard. Do not allow any liquid to get inside the char-
ger. Electric shock may result.
WARNING: We recommend the use of a residual current device with a
residual current rating of 30mA or less.
CAUTION: Burn hazard. To reduce the risk of injury, charge only DEWALT
rechargeable batteries. Other types of batteries may burst causing personal
injury and damage.
CAUTION: Children should be supervised to ensure that they do not
play with the appliance.
NOTICE: Under certain conditions, with the charger plugged into the power
supply, the charger can be shorted by foreign material. Foreign materials of
a conductive nature, such as, but not limited to, grinding dust, metal chips,
steel wool, aluminum foil or any buildup of metallic particles should be kept
away from the charger cavities. Always un-plug the charger from the power
supply when there is no battery pack in the cavity. Unplug the charger before
attempting to clean.
WARNING: DO NOT let children come into contact with the charger.
Supervision is required when inexperienced operators use this charger.
• Young children and the inrm. This appliance is not intended for use by
young children or inrm persons without supervision.
• This product is not intended for use by persons (including children) suffering
from diminished physical, sensory or mental abilities, or for lack of experi-
ence and/or for want of knowledge or skills unless they are supervised by
a person responsible for their safety. Children should never be left alone to
play with this product.
• Only use rechargeable batteries with this charger.
• These battery chargers and battery packs are professional tools.
WARNING:
• DO NOT attempt to charge the battery pack with any chargers other
than the ones in this manual. The charger and battery pack are speci-
cally designed to work together.
• These chargers are not intended for any uses other than charging
DEWALT rechargeable batteries. Any other uses may result in risk of re,
electric shock or electrocution.
• Do not expose the charger to rain or snow.
• DO NOT use under wet conditions or in presence of ammable liquids or
gases.
• Pull by the plug rather than the cord when disconnecting the char-
ger. This will reduce the risk of damage to the electric plug and cord.
• Make sure that the cord is located so that it will not be stepped on,
tripped over or otherwise subjected to damage or stress.
• Do not use an extension cord unless it is absolutely necessary.
Use of improper extension cord could result in risk of re, electric shock or
electrocution.
• When operating a charger outdoors, always provide a dry location
and use an extension cord suitable for outdoor use. Use of a cord
suitable for outdoor use reduces the risk of electric shock.
• Do not place any object on top of the charger or place the charger
on a soft surface that might block the ventilation slots and result
in excessive internal heat. Place the charger in a position away from
any heat source. The charger is ventilated through slots in the top and the
bottom of the housing.
• Do not operate the charger with a damaged cord or plug - have them
replaced immediately.
• Do not operate the charger if it has received a sharp blow, been
dropped or otherwise damaged in any way. Take it to an authorized
service center.
• Do not disassemble the charger; take it to an authorized service
center when service or repair is required. Incorrect reassembly may
result in a risk of electric shock, electrocution or re.
• In case of damaged power supply cord the supply cord must be replaced
immediately by the manufacturer, its service agent or similar qualied person
to prevent any hazard.

English
10
NEVER LEAVE THE HEATER UNATTENDED WHILE BURNING!NEVER LEAVE THE HEATER UNATTENDED WHILE BURNING!NEVER LEAVE THE HEATER UNATTENDED WHILE BURNING!
• Disconnect the charger from the outlet before attempting any
cleaning. This will reduce the risk of electric shock. Removing the
battery pack will not reduce this risk.
• NEVER attempt to connect 2 chargers together.
• The charger is designed to operate on standard 230V household
electrical power. Do not attempt to use it on any other voltage. This
does not apply to the vehicular charger.
• Take care to ensure that the charger is standing in a steady, secure
position. A falling battery or charger may present a risk of injury to yourself
and/or others.
IMPORTANT SAFETY INSTRUCTIONS FOR ALL BATTERY
PACKS
When ordering replacement battery packs, be sure to include the catalog
number and voltage. Consult the chart at the end of this manual for compati-
bility of chargers and battery packs.
The battery pack is not fully charged out of the carton. Before using the
battery pack and charger, read the safety instructions below and then follow
charging procedures outlined.
READ ALL INSTRUCTIONS
WARNING:
• Do not charge or use the battery pack in explosive atmospheres,
such as in the presence of ammable liquids, gases or dust. Inserting
or removing the battery pack from the charger may ignite the dust or fumes.
• NEVER force the battery pack into the charger. DO NOT modify
the battery pack in any way to t into a non-compatible charger as
battery pack may rupture causing serious personal injury.
• Charge the battery packs only in designated DEWALT chargers.
• DO NOT splash or immerse in water or other liquids.
• Do not store or use the tool and battery pack in locations where the
temperature may reach or exceed 40 °C (such as outside sheds or
metal buildings in summer). For best life store battery packs in a cool,
dry location. NOTE: Do not store the battery pack in a tool with the
trigger switch locked on. Never tape the trigger switch in the ON
position.
WARNING: Never attempt to open the battery pack for any reason. If the
battery pack case is cracked or damaged, do not insert into the charger. Do
not crush, drop or damage the battery pack. Do not use a battery pack or
charger that has received a sharp blow, been dropped, run over or damaged
in any way (e.g., pierced with a nail, hit with a hammer, stepped on). Damaged
battery packs should be returned to the service center for recycling.
WARNING: Fire hazard. Do not store or carry the battery pack so
that metal objects can contact exposed battery terminals. For exam-
ple, do not place the battery pack in aprons, pockets, tool boxes, product kit
boxes, drawers, etc., with loose nails, screws, keys, etc.
CAUTION: When not in use, place tool on its side on a stable sur-
face where it will not cause a tripping or falling hazard. Some tools with
large battery packs will stand upright on the battery pack but may be easily
knocked over.
SPECIFIC SAFETY INSTRUCTIONS FOR LITHIUM ION (Li-Ion)
• Do not incinerate the battery pack even if it is severely damaged
or is completely worn out. The battery pack can explode in a re. Toxic
fumes and materials are created when lithium ion battery packs are burned.
• If battery contents come into contact with the skin, immediately
wash area with mild soap and water. If battery liquid gets into the eye,
rinse water over the open eye for 15 minutes or until irritation ceases. If
medical attention is needed, the battery electrolyte is composed of a mix-
ture of liquid organic carbonates and lithium salts.
• Contents of opened battery cells may cause respiratory irritation.
Provide fresh air. If symptoms persist, seek medical attention.
WARNING: Burn hazard. Battery liquid may be ammable if exposed to
spark or ame.

11
English
NEVER LEAVE THE HEATER UNATTENDED WHILE BURNING!NEVER LEAVE THE HEATER UNATTENDED WHILE BURNING!NEVER LEAVE THE HEATER UNATTENDED WHILE BURNING!
Transportation
WARNING: Fire hazard. Transporting batteries can possibly cause res
if the battery terminals inadvertently come in contact with conductive materi-
als such as keys, coins, hand tools and the like. When transporting individual
battery packs, make sure that the battery terminals are protected and well
insulated from materials that could contact them and cause a short circuit.
Dangerous Goods by Road (ADR). Lithium-ion cells and batteries have been
tested to section 38.3 of the UN Recommendations on the Transport of Dan-
gerous Goods Manual of Tests and Criteria.
In most instances, shipping a DEWALT battery pack will be excepted from being
classied as a fully regulated Class 9 Hazardous Material. In general, only ship-
ments containing a lithium-ion battery with an energy rating greater than 100
Watt Hours (Wh) will require being shipped as fully regulated Class 9. All lithi-
um-ion batteries have the Watt Hour rating marked on the pack. Furthermore,
due to regulation complexities, DEWALT does not recommend air shipping lithi-
um-ion battery packs alone regardless of Watt Hour rating. Shipments of tools
with batteries (combo kits) can be air shipped as excepted if the Watt Hour
rating of the battery pack is no greater than 100 Whr.
Regardless of whether a shipment is considered excepted or fully regulated,
it is the shipper’s responsibility to consult the latest regulations for packaging,
labeling/marking and documentation requirements.
The information provided in this section of the manual is provided in good faith
and believed to be accurate at the time the document was created. However,
no warranty, expressed or implied, is given. It is the buyer’s responsibility to
ensure that its activities comply with the applicable regulations.
TRANSPORTING THE FLEXVOLT BATTERY
The DEWALT FLEXVOLT battery has two modes: Use and Transport.
Use Mode: When the FLEXVOLT battery stands alone or is in a DEWALT 18V
product, it will operate as an 18V battery. When the FLEXVOLT battery is in a
54V or a 108V (two 54V batteries) product, it will operate as a 54V battery.
Transport Mode: When the cap is attached to the FLEXVOLT battery, the
battery is in transport mode. Keep the cap for shipping. When in Transport
mode, strings of cells are electrically disconnected within the pack resulting in
3 batteries with a lower Watt hour (Wh) rating as compared to 1 battery with
a higher Watt hour rating. This increased quantity of 3 batteries with the lower
Watt hour rating can exempt the pack from certain shipping regulations that
are imposed
upon the higher Watt hour batteries.
Transport Wh rating indicates 3 x 36 Wh, meaning 3 batteries of 36 Watt hours
each. The Use Wh rating indicates 108 Watt hours (1 battery implied).
Chargers
The DCB118 charger accepts 18V Li-Ion XR and XR FLEXVOLT battery packs
(DCB180, DCB181, DCB182, DCB183, DCB183B, DCB184, DCB184B,
DCB185 and DCB546).
DEWALT chargers require no adjustment and are designed to be as easy as
possible to operate.
Charging a Battery (Fig. 10)
1. Plug the charger into an appropriate outlet before inserting battery pack.
2. Insert the battery pack into the char-
ger, making sure the battery pack is
fully seated in the charger. The red
(charging) light will blink continuously
indicating that the charging process
has started.
3. The completion of charge will be
indicated by the red light remaining
ON continuously. The battery pack is
fully charged and may be used at this
time or left in the charger. To remove
the battery pack from the charger,
push the battery release button on the
battery pack.
NOTE: To ensure maximum performance
and life of lithium-ion battery packs,
charge the battery pack fully before rst
use.
Figure 10

English
12
NEVER LEAVE THE HEATER UNATTENDED WHILE BURNING!NEVER LEAVE THE HEATER UNATTENDED WHILE BURNING!NEVER LEAVE THE HEATER UNATTENDED WHILE BURNING!
Charger Operation
Refer to the indicators below for the charge status of the battery pack.
* The red light will continue to blink, but a yellow indicator light will be illumi-
nated during this operation. Once the battery pack has reached an appropri-
ate temperature, the yellow light will turn off and the charger will resume the
charging procedure.
The charger will not charge a faulty battery pack. The charger will indicate faulty
battery pack by refusing to light.
NOTE: This could also mean a problem with a charger.
If the charger indicates a problem, take the charger and battery pack to be
tested at an authorized service center.
HOT/COLD PACK DELAY
When the charger detects a battery pack that is too hot or too cold, it auto-
matically starts a Hot/Cold Pack Delay, suspending charging until the battery
pack has reached an appropriate temperature. The charger then automatically
switches to the pack charging mode. This feature ensures maximum battery
pack life.
A cold battery pack will charge at a slower rate than a warm battery pack. The
battery pack will charge at that slower rate throughout the entire charging cycle
and will not return to maximum charge rate even if the battery pack warms.
LITHIUM-ION BATTERY PACKS ONLY
XR Li-Ion tools are designed with an Electronic Protection System that will pro-
tect the battery pack against overloading, overheating or deep discharge.
The tool will automatically turn off if the Electronic Protection System engages.
If this occurs, place the lithium-ion battery pack on the charger until it is fully
charged.
Important Charging Notes
1. Longest life and best performance can be obtained if the battery pack is
charged when the air temperature is between 18° – 24 °C. DO NOT charge
the battery pack in an air temperature below +4.5 °C, or above +40 °C. This
is important and will prevent serious damage to the battery pack.
2. The charger and battery pack may become warm to the touch while
charging. This is a normal condition, and does not indicate a problem. To
facilitate the cooling of the battery pack after use, avoid placing the charger
or battery pack in a warm environment such as in a metal shed or an unin-
sulated trailer.
3. If the battery pack does not charge properly:
• Check operation of the receptacle by plugging in a lamp or other
appliance;
• Check to see if the receptacle is connected to a light switch which turns
the power off when you turn out the lights;
• Move the charger and battery pack to a location where the surrounding
air temperature is approximately 18° – 24 °C;
• If charging problems persist, take the tool, battery pack and charger to
your local service center.
4. The battery pack should be recharged when it fails to produce sufcient
power on jobs which were easily done previously. DO NOT CONTINUE to
use it under these conditions. Follow the charging procedure. You may also
charge a partially used pack whenever you desire with no adverse effect on
the battery pack.
5. Foreign materials of a conductive nature such as, but not limited to, grind-
ing dust, metal chips, steel wool, aluminum foil, or any buildup of metallic
particles should be kept away from charger cavities. Always unplug the
charger from the power supply when there is no battery pack in the cavity.
Unplug the charger before attempting to clean it.
6. Do not freeze or immerse the charger in water or any other liquid.
WARNING: Shock hazard. Don’t allow any liquid to get inside the charger.
Electric shock may result.
WARNING: Burn hazard. Do not submerge the battery pack in any liquid or
allow any liquid to enter the battery pack. Never attempt to open the bat-
tery pack for any reason. If the plastic housing of the battery pack breaks or
cracks, return it to a service center for recycling.
CHARGE INDICATORS
CHARGING
FULLY CHARGED
HOT/COLD PACK DELAY

13
English
NEVER LEAVE THE HEATER UNATTENDED WHILE BURNING!NEVER LEAVE THE HEATER UNATTENDED WHILE BURNING!NEVER LEAVE THE HEATER UNATTENDED WHILE BURNING!
Wall Mounting
These chargers are designed to be wall mountable or to sit upright on a table
or work surface. If wall mounting, locate the charger within reach of an electri-
cal outlet, and away from a corner or other obstructions which may impede air
ow. Use the back of the charger as a template for the location of the mount-
ing screws on the wall. Mount the charger securely using drywall screws
(purchased separately) at least 25.4 mm long, with a screw head diameter of
7–9 mm, screwed into wood to an optimal depth leaving approximately 5.5
mm of the screw exposed. Align the slots on the back of the charger with the
exposed screws and fully engage them in the slots.
Charger Cleaning Instructions
WARNING: Shock hazard. Disconnect the charger from the AC
outlet before cleaning. Dirt and grease may be removed from the exterior of
the charger using a cloth or soft non-metallic brush. Do not use water or any
cleaning solutions. Never let any liquid get inside the tool; never immerse any
part of the tool into a liquid.
Storage Recommendations
1. The best storage place is one that is cool and dry, away from direct sunlight
and excess heat or cold. For optimum battery performance and life, store
battery packs at room temperature when not in use.
2. For long storage, it is recommended to store a fully charged battery pack in
a cool dry place out of the charger for optimal results.
NOTE: Battery packs should not be stored completely depleted of charge.
The battery pack will need to be recharged before use.
SAVE THESE INSTRUCTIONS
FOR FUTURE USE
Electrical Safety
Always check that the battery pack voltage corresponds to the voltage on the
rating plate. Also make sure that the voltage of your charger corresponds to
that of your mains.
Your DEWALT charger is double insulated in accordance with EN60335; there-
fore no earth wire is required.
If the supply cord is damaged, it must be replaced by a specially prepared
cord available through the DEWALT service organisation.
Mains Plug Replacement (U.K. Only)
If a new mains plug needs to be tted:
• Safely dispose of the old plug.
• Connect the brown lead to the live terminal in the plug.
• Connect the blue lead to the neutral terminal.
WARNING: No connection is to be made to the earth terminal.
Follow the tting instructions supplied with good quality plugs. Recommended
fuse: 3 A.
Using an Extension Cable
An extension cord should not be used unless absolutely necessary. Use an
approved extension cable suitable for the power input of your charger (see
Technical Data in see Battery Charger manual). The minimum conductor size
is 1 mm2; the maximum length is 30 m.
When using a cable reel, always unwind the cable completely.
Maintenance
The charger and battery pack are not serviceable. There are no serviceable
parts inside the charger or battery pack.
• Do not attempt to repair the charger. To assure product safety and reliability,
repairs, maintenance, and adjustments should be performed by authorized
DEWALT service centers.
Protecting the Environment
Separate collection. Products and batteries marked with this symbol
must not be disposed of with normal household waste.
Products and batteries contain materials that can be recovered or
recycled reducing the demand for raw materials. Please recycle elec-
trical products and batteries according to local provisions. Further
information is available at www.2helpU.com.
Rechargeable Battery Pack
This long life battery pack must be recharged when it fails to produce sufcient
power on jobs which were easily done before. At the end of its technical life,
discard it with due care for our environment:
• Run the battery pack down completely, then remove it from the tool.
• Li-Ion cells are recyclable. Take them to your dealer or a local recycling sta-
tion. The collected battery packs will be recycled or disposed of properly.

English
14
NEVER LEAVE THE HEATER UNATTENDED WHILE BURNING!NEVER LEAVE THE HEATER UNATTENDED WHILE BURNING!NEVER LEAVE THE HEATER UNATTENDED WHILE BURNING!
1
2 3
4
5678
9
10
11
12
13
14
15
16
17
18

15
English
NEVER LEAVE THE HEATER UNATTENDED WHILE BURNING!NEVER LEAVE THE HEATER UNATTENDED WHILE BURNING!NEVER LEAVE THE HEATER UNATTENDED WHILE BURNING!
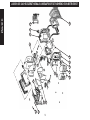
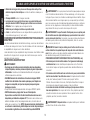
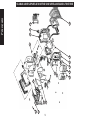
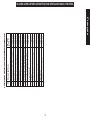
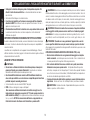
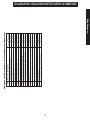
DXRH012E REPLACEMENT PARTS LIST
# Description Part #
1 Regulator Assy. 32126
2 Right Side Housing
32148
3 Knob 32123
4 Right Gas Door 32150
5 Wire Guard 32181
6 Burner Assy.
32151
7 Left Side Housing 32152
8 Pulse Igniter 32153
9 USB Compartment Door 32154
10 Left Gas Door 32155
11 Heater Control Board 32156
12 ODS 78422
13 Control Valve Assy. 32124
14 Fan Cover
32157
15 Back Cover 32158
16 Fan 32159
17 Button 32160
18 Button Cover 32162

English
16
NEVER LEAVE THE HEATER UNATTENDED WHILE BURNING!NEVER LEAVE THE HEATER UNATTENDED WHILE BURNING!NEVER LEAVE THE HEATER UNATTENDED WHILE BURNING!
This product is covered by one or more patents/patents pending. Please
visit http://www.enercogroupinc.com/patents for more information
NEVER LEAVE THE HEATER UNATTENDED WHILE BURNING!NEVER LEAVE THE HEATER UNATTENDED WHILE BURNING!NEVER LEAVE THE HEATER UNATTENDED WHILE BURNING!
DEWALT®, GUARANTEED TOUGH® and the yellow
and black color scheme are trademarks of the
DEWALT Industrial Tool Co., used under license.
©2020 DEWALT. EGI/Enerco Group Inc. Under
license from DEWALT Industrial Tool Co
Warning
USE ONLY MANUFACTURER’S REPLACEMENT PARTS. USE OF ANY
OTHER PARTS COULD CAUSE INJURY OR DEATH. REPLACEMENT PARTS
ARE ONLY AVAILABLE DIRECT FROM THE FACTORY AND MUST BE
INSTALLED BY A QUALIFIED SERVICE AGENCY.
PARTS ORDERING INFORMATION:
PURCHASING: Accessories may be purchased at any DEWALT® local dealer
or direct from the factory.
FOR INFORMATION REGARDING SERVICE:
www.DEWALT.com
www.2helpU.com
Please include the model number, date of purchase, and description of
problem in all communication.
LIMITED WARRANTY
DEWALT® warrants its heaters and accessories to be free from defects in
material and workmanship for a period of 2 years from date of purchase.
D
EWALT® will repair or replace this product free of charge if it has been
proven to be defective within the 2 year period, and is returned at customer
expense with proof of purchase to DEWALT® within the warranty period.
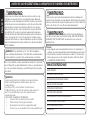
DK
SE
FI
NO
GB
DE
FR IT NL
DK NO
SE
FI
For Sale in the following countries:
OPERATING INSTRUCTIONS AND OWNERS MANUAL
PORTABLE PROPANE (G31) AND BUTANE/PROPANE MIXTURE
(G30 + G31) HEATER FOR RECREATIONAL, COMMERCIAL AND
EMERGENCY INDOOR USE DXRH012E
2797/20
EN 449:2002+A1:2007
EN 521:2006
TP 6.39
EN 60335-1:2012+A13:2017
EN 60335-2-102:2006+A2:2016

Kontaktieren Sie uns bitte, falls Sie Fragen oder Anmerkungen haben
www.DEWALT.com
BEWAHREN SIE DIESE ANWEISUNGEN BITTE AUF
BEDIENUNGSANLEITUNG
MOBILES PROPAN (G31) UND BUTAN / PROPAN-GEMISCH (G30 + G31)-HEIZGERÄT FÜR
FREIZEIT-, GEWERBE- UND NOTFALLGEBRAUCH FÜR DEN INNENBEREICH DXRH012E
INBEGRIFFENE SPRACHEN: ENGLISCH, DEUTSCH, FRANZÖSISCH,
ITALIENISCH
WARNUNG: LESEN SIE DIE ANWEISUNGEN SORGFÄLTIG DURCH: Lesen und beachten Sie alle Anweisungen. Bewahren Sie die
Anweisungen zum Nachschlagen an einem sicheren Ort auf. Erlauben Sie keinem, der diese Anweisungen nicht gelesen hat, das Heizgerät zu
installieren, einzustellen oder zu betreiben.
LASSEN SIE DAS HEIZGERÄT NIEMALS UNBEAUFSICHTIGT WÄHREND ES IN BETRIEB IST!
2797/20
EN 449:2002+A1:2007
EN 521:2006
TP 6.39
EN 60335-1:2012+A13:2017
EN 60335-2-102:2006+A2:2016

Deutch
2
E THE HEAT
LASSEN SIE DAS HEIZGERÄT NIEMALS UNBEAUFSICHTIGT WÄHREND ES IN BETRIEB IST!
INHALTSVERZEICHNIS
WARNHINWEISE 2
HEIZGERÄT-SPEZIFIKATIONEN 3
GERUCHSVERLUST-WARN-
MELDUNGEN
4
SICHERHEITSVORKEHRUNGN 5
ZÜNDUNG UND BEDIENUNG 6
WARTUNG UND LAGERUNG 7
AKKU-LADEGERÄT-VOR-
SICHTSMASSNAHMEN
9
AKKU-LADEGERÄT-ANLEITUNGEN 11
EXPLOSIONSDARSTELLUNG 15
STÜCKLISTE 16
WARNUNG:
Frühe Anzeichen einer Kohlenmonoxidvergiftung ähneln einer Grippe mit
Kopfschmerzen, Schwindel und / oder Übelkeit. Sollten Sie diese Symptome
aufweisen, funktioniert das Heizgerät möglicherweise nicht richtig. Gehen Sie
sofort an die frische Luft! Lassen Sie das Heizgerät überprüfen.
Vorsicht:
• Einige Teppiche oder Linoleumoberächen können sich möglicherweise
verfärben, wenn das Heizgerät direkt auf diese Bodenbelege gestellt wird.
• Beim Einsatz des Heizgeräts in Höhenlagen von über 2,13 km über dem
Meeresspiegel, kann sich das Heizgerät abschalten. (Bitte lesen Sie die
ALLGEMEINEN INFORMATIONEN)
WARNUNG:
- Lagern oder benutzen Sie kein Benzin oder andere brennbare
Dämpfe und Flüssigkeiten in der Nähe dieses oder eines
anderen Gerätes.
- Eine Propan (G31)- oder eine Butan / Propan-Gemisch
(G30+G31)-Patrone, die nicht zum Gebrauch angeschlossen ist,
darf nicht in der Nähe dieses oder eines anderen Gerätes
aufbewahrt werden.
- WAS SIE BEI GASGERUCH TUN MÜSSEN
• Versuchen Sie nicht, das Gerät einzuschalten.
• Offene Flammen müssen gelöscht werden.
• Die Gaszufuhr zum Gerät muss abgedreht werden
-
Der Service muss von einer qualifizierten Servicestelle durchgeführt werden.
Dies ist ein ungelüftetes, mobiles, gasbetriebenes Heizgerät. Es verwendet
die Luft (Sauerstoff) aus dem Betriebsbereich, in dem es verwendet wird. Es
muss für ausreichende Verbrennungs- und Entlüftungsluft gesorgt werden.
Siehe Seite 5.
WARNUNG:
Immer, wenn eine Patrone an das Gerät angeschlossen wird, muss die
Verbindung auf eine oder mehrere Lecks überprüft werden: Geben Sie
Seifenwasser auf die Verbindung und achten Sie auf Blasen, lauschen Sie
auf das Geräusch von entweichendem Gas, achten Sie auf extreme Kälte
oder den Geruch von faulen Eiern. Sollte das Gerät ein Leck aufweisen
(Gasgeruch), bringen Sie es sofort nach draußen an einen gut belüfteten,
brennstofffreien Ort, wo das Leck gefunden und beseitigt werden kann.
Wenn Sie Ihr Gerät auf Undichtigkeiten überprüfen wollen, tun Sie dies im
Freien. Versuchen Sie nicht, Lecks mit einer Flamme zu nden, sondern
verwenden Sie Seifenwasser. Jegliche Modikationen an diesem Heizgerät
und seinen Bedienelementen können gefährlich sein. Sie dürfen das Gerät
NICHT modizieren.
WARNUNG:
Falls der Freizeit- oder Geschäftsbereich
nicht über ein Fenster oder, einen Dachlüfter verfügt, BENUTZEN SIE DIESES
HEIZGERÄT NICHT IN EINEM RAUM. Verwenden Sie es nur in einem gut
belüfteten Raum.
WARNUNG: Dieses Gerät darf nur mit 100% (G31) Dampfdruck-
Propan und Propan-Butan-Gemisch 70/30 (G30+G31) verwendet werden.
Es könnte gefährlich sein andere Arten von Gaspatronen zu installieren.
GERUCHSVERLUST-WARNMELDUNGEN
AKKULADEGERÄT-VORSICHTSMASSNAHMEN

3
Deutch
LASSEN SIE DAS HEIZGERÄT NIEMALS UNBEAUFSICHTIGT WÄHREND ES IN BETRIEB IST!
Spezikationen
MODELL-NR.: ................................................................................ DXRH012E
GASART: .................................................................
Propan (G31)-Gas darf nur mit
Coleman und Primus Power Gas 70 / 30 Butan / Propan (G30+G31) verwendet werden
EINGANG (KW): .......................................................................2,2 kW (158 G/H)
2,8 kW (200 G/H)
INJEKTIONSGRÖSSE .........................................................................1,01 mm
WARNUNG: NUR FÜR DEN GEBRAUCH MIT PROPAN ZERTIFIZIERT
WARNUNG: FÜR DIE VERWENDUNG MIT DEWALT AKKUPACKS ZERTIFIZIERT
EINE LISTE DER ZUGELASSENEN BATTERIEN FINDEN SIE IN DER
NACHSTEHENDEN TABELLE.
DEWALT 18 V MAX-Akkus
• 1,3 Ah
• 1,5 Ah
• 2,0 Ah
BATTERIEN UND LADEGERÄT SIND NICHT IM LIEFERUMFANG ENTHALTEN.
Elektronische Funktionen (benötigen ein Akku)
• Im verstellbaren Griff sind 400 Lumen Licht eingebaut
• 135 CFM Ventilator
• 3 USB-Steckdosen (5 Volt Gleichstrom, 2 Ampere)
Von der Steckdose .............................................................................60,96 cm
Von der Oberseite .................................................................................76,2 cm
Von den Seiten ...................................................................................15,24 cm
Von der Rückseite ......................................................................................0 cm
Mindestabstände von normal entammbarem Material
Allgemeine Informationen
Der DXRH012E ist sicher für den Innengebrauch in kleinen Freizeitbereichen, die mit einer
Verbrennungsluftversorgung und Ventilation ausgestattet sind, wie z. B. in verschlossenen Veranden,
Hütten, Fischerhütten, Wohnwagen, Faltwohnwagen, Zelten, Lkw-Kabinen und Kleintransportern.
Es kann zur Notbeheizung von Innenräumen eingesetzt werden, wenn es an eine Einwegpatrone mit 465 g
Propan (G31) ODER mit 450 g Butan / Propan-Gemisch (G30+G31) angeschlossen ist, ebenso
für den Einsatz in Gewerberäumen, vorausgesetzt, dass ausreichend Luft zur Verbrennung und
Belüftung vorhanden ist (wie angegeben in BETRIEBSVORSCHRIFTEN auf Seite 5).
ANMERKUNG: Dieses Heizgerät kann im Freien eingesetzt werden, wobei es aber bei bestimmten
Windverhältnissen zu lästigen Abschaltungen kommen kann.
• Eine DEWALT-Batterie ist nur für den Ventilator-, die USB-Steckdosen- und den Lichtbetrieb
erforderlich.
• Eine Propangaszufuhr ist nur für den Heizbetrieb notwendig.
• Wenn das Heizgerät kalt ist oder Raumtemperatur hat, dauert es einige Minuten, bis sich die
Brennkachel orange färbt. Dies ist normal, wenn das Heizgerät ordnungsgemäß funktioniert. Falls
die Brennkachel sichtbar brennt, verständigen Sie einen qualizierten Service-Techniker.
• Wenn das Gerät eingeschaltet ist, sollte ein 0,635 cm (0,25 Zoll) Rand um die Kachel vorhanden
sein, der nicht orange leuchtet. Das ist normal.
• Bei Erstinbetriebnahme des Heizgeräts kann sich der obere Bereich des Reektors verfärben. Das
ist auch völlig normal und kein Grund zur Besorgnis.
• Das Schutzgitter an der Vorderseite dieses Heizgeräts ist mit einem speziellen
hochtemperaturbeschichteten Lack beschichtet. Bei Erstinbetriebnahme kann der Grill merklich
Rauch oder Dämpfe freisetzen. Das ist normal und wird bei zukünftigem Betrieb nicht mehr
vorkommen. Die Dämpfe sind nicht schädlich.
• Wenn das Heizgerät in Höhenlagen über 2,13 km über dem Meeresspiegel betrieben wird, brennt
das Gerät möglicherweise nicht so hell wie in niedrigeren Höhenlagen. Das ist normal. In höheren
Lagen kann sich das Heizgerät abschalten. Sollte dies eintreten, sorgen Sie für frische Luft, warten
Sie 5 Minuten und zünden Sie es wieder an. Aufgrund
von örtlich atmosphärischen Bedingungen ist es möglich, dass das Heizgerät nicht wieder zündet.
• Beim Umsetzen oder Anstoßen des eingeschalteten Heizgeräts, kann der Kippschalter das Gerät
ausschalten. In dem Fall muss das Heizgerät wieder eingeschaltet werden.
• Aufgrund des normalen Betriebs kleiner Patronen kann sich Kondenswasser auf der Patrone
bilden und auf die Oberäche unter der Heizung tropfen. Zuweilen kann die Kondensierung
aufgrund der Kälte, die beim Verdampfen von Propan (G31) erzeugt wird, einfrieren. Dies ist
normal und kein Grund zur Besorgnis.
• Die Betriebszeit hängt von der Einstellung und des Heizgeräts sowie der Größe der Zufuhrpatrone
ab. Mit einer 450G 70 / 30 Butan / Propan-Gemisch (G30+G31)-Patrone beträgt die Betriebszeit
zwischen 1,5 bis 3,5 Stunden. Infolge der Eigenschaften von Propangas (G31) kann die
Betriebszeit bei kontinuierlichem Einsatz bei Temperaturen unter -6,6 C erheblich verkürzt werden.
WARNUNG:
Sollten die Informationen in diesem Handbuch nicht genau
befolgt werden, könnte dies einen Brand oder eine Explosion verursachen,
die zu Verletzungen oder zum Verlust von Leben führen kann.

Deutch
4
E THE HEAT
LASSEN SIE DAS HEIZGERÄT NIEMALS UNBEAUFSICHTIGT WÄHREND ES IN BETRIEB IST!
WARNUNG
Erstickungsgefahr
• Nicht in ungelüfteten Bereichen verwenden
• Die Zirkulation der Verbrennungs- und Ventilationsluft darf nicht
beeinträchtigt werden
• Um den Verbrennungsluftbedarf des verwendeten Heizgeräts
sicherzustellen, muss für ausreichende Belüftung gesorgt werden.
• Verweisen Sie auf den Spezikations-Abschnitt im Heizgerät-Handbuch,
das Datenschild des Geräts oder wenden Sie sich an den Hersteller, um
die Belüftungserfordernisse des Heizgeräts zu erfragen.
• Ein Mangel an ausreichender Ventilationsluft führt zu unsachgemäßer
Verbrennung
• Unsachgemäße Verbrennung kann eine Kohlenmonoxidvergiftung her-
vorrufen, die zu schweren Verletzungen oder Tod führen kann. Symptome
einer Kohlenmonoxidvergiftung können sich in Kopfschmerzen,
Schwindel und Atembeschwerden äußern.
Brenngasgeruch
Propangas (G31) und Butan / Propan-Gemisch (G30+G31)-Gasen werden
künstliche Geruchsmittel beigefügt, die speziell zur Ermittlung von
Brennstoffgaslecks entwickelt wurden. Falls ein Gasleck auftreten sollte, müssten
Sie in der Lage sein das Brenngas zu riechen. Da Propan (G31) schwerer als Luft
ist, sollten Sie den Gasgeruch bis auf den Boden riechen können. JEGLICHER
GASGERUCH IST IHR SIGNAL, SOFORT IN ACTION ZU TRETEN!
• Tun Sie nichts, was das Brenngas entzünden könnte.
• Betätigen Sie keine elektrischen Schalter.
• Ziehen Sie an keinen Stromversorgungs- oder Verlängerungskabeln.
• Zünden Sie keine Streichhölzer oder andere Zündquellen an.
• Benutzen Sie nicht Ihr Telefon.
• Stellen Sie sicher, dass alle sofort das Gebäude und Umfeld verlassen. Schließen Sie
alle Propan (G31)-Gastankventile oder das Hauptbrennstoff-Versorgungsventil am
Gaszähler, falls Sie Erdgas verwenden.
• Propangas (G31) ist schwerer als Luft und kann sich in niedrigen Bereichen absetzen.
Halten Sie sich von allen niedrigen Bereichen fern, wenn Sie ein Propanleck vermuten.
• Benutzen Sie ein Telefon, dass sich nicht in der Nähe vom Leck-Bereich bendet, und
rufen Sie Ihren Brennstofieferanten und Ihre Feuerwehr an. Betreten Sie das Gebäude
oder Umfeld nicht wieder.
• Bleiben Sie dem Gebäude und Umfeld fern, bis die Feuerwehr und Ihr Brennstofieferant es für
sicher erklärt.
• Lassen Sie SCHLIESSLICH die Person vom Brennstoffservice und die Feuerwehrleute auf
entwichenes Gas prüfen. Lassen Sie das Gebäude und Umfeld lüften, bevor Sie zurückkehren.
Fachgemäß ausgebildetes Servicepersonal muss jegliche Lecks beheben, auf weitere
Lecks
prüfen und das Gerät dann wieder für Sie anzünden.
Geruchsverlust - Kein Geruch festgestellt
• Manche Leute haben keinen guten Geruchssinn. Manche Leute können das künstliche
Zusatzmittel im Propangas(G31) nicht riechen. Sie müssen feststellen, ob Sie das Geruchsmittel
im Brenngas riechen können.
• Machen Sie sich mit dem Geruch von Propangas gas (G31) vertraut.
• Rauchen kann Ihren Geruchssinn vermindern. Wenn Sie sich eine Zeitlang einem gewissen
Geruch aussetzen, kann dies Ihre Empndlichkeit für diesen Geruch beeinträchtigen. Gerüche in
Gebäuden mit Tieren, können den Brenngasgeruch überdecken.
• Das Geruchmittel im Propangas (G31) ist farblos und kann unter bestimmten
Umständen schwächer werden. Bei einem unterirdischen Leck, kann der Gasstrom durch das
Erdreich das Geruchsmittel ltern.
• Der Propangas (G31)-Geruch kann auf verschiedenen Ebenen unterschiedlich stark sein. Da
Propangas (G31) schwerer als Luft ist, kann der Geruch auf niedrigeren Ebenen intensiver sein.
• Beachten Sie immer den geringsten Gasgeruch. Wenn der Gasgeruch anhält, egal wie
schwach, betrachten Sie dies als ernsthaftes Leck. Treten Sie sofort in Aktion, wie oben
angegeben.
ACHTUNG - Kritische Punkte, die zu beachten sind!
• Propangas (G31) oder ein Butan / Propan-Gemisch (G30+G31) haben einen unverkennbaren
Geruch. Machen Sie sich mit den Gerüchen vertraut. (Beziehen Sie sich auf den Brenngas-
Geruch- und den Geruchsverlustabschnitt auf derselben Seite).
• Auch wenn Sie in der Wartung und Reparatur des Heizgeräts nicht fachgerecht geschult sind,
sollten Sie sich des Geruchs von Propangas (G31) und Erdgas IMMER bewusst sein.
• Wenn Sie nicht fachgerecht in der Reparatur und Wartung von Propangas (G31) oder von
Butan / Propan-Gemisch (G30+G31) geschult sind, versuchen Sie auf keinem Fall das Heizgerät
anzuzünden, Wartungs- oder Reparaturarbeiten vorzunehmen oder Einstellungen am Heizgerät,
am Propan (G31) oder Butan / Propan-Gemisch (G30+G31)-Gasbrennstoffsystem zu ändern.
• Ein regelmäßiger Riechtest um das Heizgerät herum oder an den Verbindungsstellen, d.h. an
Schläuchen, Anschlüssen usw., ist unter allen Bedingungen eine gute Sicherheitsvorkehrung.
Selbst wenn Sie nur geringfügig Gas riechen, WENDEN SIE SICH UMGEHEND AN IHREN
BRENNSTOFFLIEFERANTEN. WARTEN SIE AUF KEINEN FALL!
La pagina si sta caricando...
La pagina si sta caricando...
La pagina si sta caricando...
La pagina si sta caricando...
La pagina si sta caricando...
La pagina si sta caricando...
La pagina si sta caricando...
La pagina si sta caricando...
La pagina si sta caricando...
La pagina si sta caricando...
La pagina si sta caricando...
La pagina si sta caricando...
La pagina si sta caricando...
La pagina si sta caricando...
La pagina si sta caricando...
La pagina si sta caricando...
La pagina si sta caricando...
La pagina si sta caricando...
La pagina si sta caricando...
La pagina si sta caricando...
La pagina si sta caricando...
La pagina si sta caricando...
La pagina si sta caricando...
La pagina si sta caricando...
La pagina si sta caricando...
La pagina si sta caricando...
La pagina si sta caricando...
La pagina si sta caricando...
La pagina si sta caricando...
La pagina si sta caricando...
La pagina si sta caricando...
La pagina si sta caricando...
La pagina si sta caricando...
La pagina si sta caricando...
La pagina si sta caricando...
La pagina si sta caricando...
La pagina si sta caricando...
La pagina si sta caricando...
La pagina si sta caricando...
La pagina si sta caricando...
La pagina si sta caricando...
La pagina si sta caricando...
La pagina si sta caricando...
La pagina si sta caricando...
-
 1
1
-
 2
2
-
 3
3
-
 4
4
-
 5
5
-
 6
6
-
 7
7
-
 8
8
-
 9
9
-
 10
10
-
 11
11
-
 12
12
-
 13
13
-
 14
14
-
 15
15
-
 16
16
-
 17
17
-
 18
18
-
 19
19
-
 20
20
-
 21
21
-
 22
22
-
 23
23
-
 24
24
-
 25
25
-
 26
26
-
 27
27
-
 28
28
-
 29
29
-
 30
30
-
 31
31
-
 32
32
-
 33
33
-
 34
34
-
 35
35
-
 36
36
-
 37
37
-
 38
38
-
 39
39
-
 40
40
-
 41
41
-
 42
42
-
 43
43
-
 44
44
-
 45
45
-
 46
46
-
 47
47
-
 48
48
-
 49
49
-
 50
50
-
 51
51
-
 52
52
-
 53
53
-
 54
54
-
 55
55
-
 56
56
-
 57
57
-
 58
58
-
 59
59
-
 60
60
-
 61
61
-
 62
62
-
 63
63
-
 64
64


DeWalt DXPH125E Manuale utente
- Tipo
- Manuale utente
- Questo manuale è adatto anche per
in altre lingue
- English: DeWalt DXPH125E User manual
- français: DeWalt DXPH125E Manuel utilisateur
- Deutsch: DeWalt DXPH125E Benutzerhandbuch
Documenti correlati
Altri documenti
-
Sharp CP-LSBP1 Manuale del proprietario
-
Ryobi CHV182 Manuale utente
-
VonHaus 3500197 Manuale utente
-
Johnson FUNGO INOX GAS Manuale utente
-
Nilfisk-ALTO Patio Heater Range Manuale utente
-
-
Campingaz Sun Force Advantage Manuale utente
-
MONESSEN VFI Series Vent Free Gas Fireplace VFI33L & VFI33C Manuale utente
-
-
Whirlpool GMA 7414/IXL Program Chart