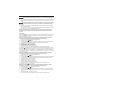
PEAK PKC0VER Owner's Manual And Warranty Information
- Tipo
- Owner's Manual And Warranty Information


2
CONTENTS
SAFETY PRECAUTIONS ................................................................................................................2
Dash Cam Safety ....................................................................................................................2
Vehicle Installation Warnings ...................................................................................................3
INTRODUCTION .............................................................................................................................3
FEATURES ......................................................................................................................................3
QUICK START GUIDE .....................................................................................................................5
INSTALLATION ................................................................................................................................6
Initial Setup .............................................................................................................................6
General Settings .....................................................................................................................7
Simple Operation ....................................................................................................................7
SETUP .............................................................................................................................................7
Video Mode .............................................................................................................................7
Camera Mode .........................................................................................................................8
General Setup .........................................................................................................................8
OPERATION ....................................................................................................................................9
CHARGING GUIDELINES AND PRECAUTIONS .......................................................................... 11
CARE AND MAINTENANCE ......................................................................................................... 11
Storage .................................................................................................................................11
Cleaning ................................................................................................................................11
Fuse Replacement ................................................................................................................11
Disposal ................................................................................................................................11
SPECIFICATIONS .........................................................................................................................11
FCC INFORMATION ......................................................................................................................12
Notice to Drivers in California and Minnesota: .......................................................................12
TROUBLESHOOTING ...................................................................................................................13
SAFETY PRECAUTIONS
This product contains chemicals known to the State of California to
cause cancer or birth defects or other reproductive harm.
This safety alert symbol indicates that a potential personal injury hazard is present. The symbol
is usually used with a signal word (e.g., WARNING) which designates the degree or level of hazard
seriousness.
The signal word WARNING indicates a hazardous situation which, if not avoided, could result in death
or serious injury.
The signal word NOTICE indicates a situation which can cause damage to the product, other personal
property and/or to the environment, or cause the product to operate improperly.
The combination of the safety alert symbol and signal word is used in safety messages throughout this
manual and on safety labels on this product.
All safety messages that follow have WARNING level hazards. Failure to
comply could result in death or serious injury.
Dash Cam Safety
x ¾»¹ÁͿʾÏÅËÈÂŹ·Â·ÄºÉÊ·Ê»·ËʾÅÈ¿Ê¿»ÉÊŹÅÄŰÈÃ;·Ê¿É»½·ÂÈ»½·Èº¿Ä½Ê¾»ÃÅËÄʿĽżʾ»
Dash Cam to your vehicle. It is the responsibility of the vehicle owner to understand state and
municipal regulations and ensure compliance.
x ¾»Ä¿ÄÉʷ¿Ľʾ»·É¾·ÃƑʾ»Ì»¾¿¹Â»ÃËÉʸ»ÊËÈÄ»ºÅŮͿʾʾ»Ì»¾¿¹Â»¿ÄÆ·ÈÁ·ÄºÊ¾»
parking brake applied.
x Do not modify the wiring in any way.
x Only install the Dash Cam to a 12-volt or 24-volt DC system or with supplied micro USB charge/
download cable. Connecting to anything other than a 12-volt or 24-volt DC system may damage the
Dash Cam components or the vehicle electrical system.
x Keep all power cords and wires away from the vehicle’s mechanical controls.
x Do not use any charging cables that are not approved or supplied with this Dash Cam. Doing so may
damage the Dash Cam.
x Do not remove the non-replaceable battery from the product.
x Do not operate the Dash Cam outside the temperature ranges of -4°F to 122°F (-20°C to 50°C).
x Do not store the Dash Cam outside the temperature ranges of -22°F to 140°F (-30°C to 60°C).

3
Vehicle Installation Warnings
x Do not mount the Dash Cam in any position where it can obstruct or interfere with your vision or view
of the road while driving.
x Do not adjust Dash Cam settings while operating the vehicle.
x Do not place the Dash Cam near any airbags, as this will hinder the functionality of the airbags.
x Find a mounting surface inside the vehicle for the Dash Cam where it can be easily seen, but is not
near the rearview mirror assembly or in any other position where it can obstruct your vision when
driving.
INTRODUCTION
The PEAK® Dash Cam is a video recording camera intended to capture incidents while driving. It
provides video evidence when you need it the most.The recorded footage can be played back on the 2.4
inch screen or downloaded to be reviewed on another device.The video footage can be protected after it
¿ÉÈ»¹ÅȺ»ºÊÅ·ÌÅ¿º·¹¹¿º»ÄÊÂÏÅÌ»ÈÍȿʿĽʾ»ÅºŰ»Ɣ
FEATURES
x 2.4-inch LCD screen displays footage being recorded
x Night vision – 4 infrared LEDs for clear capture at night
x 4 gigabyte micro SD card included to store recorded video
x Programmable date and time to display on recorded video
x 360-degree swivel ball joint suction mount provides the ability to rotate camera to desired position
x Built-in microphone to record audio
x Can be used with rechargeable battery or plugged into a 12/24-volt DC power socket
x Can record video or take a still image picture
x Anti-shake setting to allow clear pictures under vibration
x ƖÉ»ÄÉÅÈƯ¿¼·Ä¿Ä¹¿º»ÄÊŹ¹ËÈÉƑʾ¿É¼»·ÊËÈ»·¹Ê¿Ì·Ê»ÉÊÅÂŹÁ·ÄºÉ·Ì»Ì¿º»ÅŰ»
x Park Mode – if an incident occurs when the car is parked, this feature activates to record and save
Ű»É
x Micro USB charging provides versatility in charging with laptops and cell phones
x ʸʹʷƖº»½È»»Ì¿»Í¿Ä½·Ä½Â»ÆÈÅÌ¿º»ÉÅÆʿ÷ÂŰ»ÂºÅ¼Ì¿É¿ÅļÅÈÌ¿»Í¿Ä½
x Auto ON/OFF feature turns the Dash Cam on with engine start
x Power ON/OFF LED – when in screen saver mode, this LED blinks to let the user know recording is
in progress

4
SETTINGS RW / UP
SELECT
FW / DOWN BACK MODE
20
1
2
9
15 14 13 12 11 10
3
4
6
7
5
8
18
17
16
19
Legend
1. Power ON/OFF Button
2.
360-Degree Swivel Ball
Joint Suction Mount
3. Night Vision Infrared LEDs
4.
120-Degr
ee Viewing Angle
Lens
5. Micro SD Card Slot
6. Micro USB Charging Port
7. Power ON/OFF LED
8. Micro USB Charge/
Download Cable
9. 12/24-volt DC Charge
Cable
10.
Mode
Button
11.
Back
Button
12. Fast Forward/Scroll Down
Button
13.
Select
Button
14. Rewind/Scroll Up Button
15.
Settings
Button
16.
Micr
ophone
17. Built-in Park Mode Sensor
18.
R
eset Button
19. 2.4-inch LCD Screen
20.
Built-in
G-Sensor

5
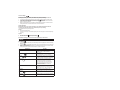
QUICK START GUIDE
Buttons Description Function
Power ON/OFF ËÈÄÉʾ»·É¾·ÃÅķĺÅŮ
Settings Allows you to set up video and
camera settings
Rewind/Scroll UP In Playback Mode the RW/UP
button allows you scroll to select
the video to view.
In Playback Mode when playing
video, the RW/UP button will
rewind the current video.
When in the Settings menu it
allows you to scroll up through
the menus.
SELECT In Video Mode – the Select
button allows you to start or stop
recording.
In Picture Mode – the Select
button allows you to take a
picture by pressing the button.
In any other mode – It allows you
ÊŹÅÄŰÈÃÏÅËÈɻ»¹Ê¿ÅļÈÅÃ
the menu.
Fast Forward/Scroll DOWN In Playback Mode: the FW/
DOWN button allows you to
select the video to view.
In Playback Mode when playing
video, the FW/DOWN button fast
forwards the current video.
In the Settings menu it allows
you to scroll down through the
menus.
BACK Pressing the Back button will
take you back to the previous
page.
Mode Pressing the Mode button allows
you to choose between Video,
Picture, and Playback Mode.
Reset Helps device to restart

6
INSTALLATION
Please review the Vehicle Installation Warnings prior to installing the Dash Cam in
your vehicle.
1. Find a mounting surface inside the vehicle for the Dash Cam where it can be easily seen, but is not
near the r
earview mirror assembly or in any other position where it can obstruct your vision when
driving.
Å÷οÿлʾ»»Ů»¹Ê¿Ì»Ä»ÉÉżʾ»É˹ʿÅÄÃÅËÄÊƑʾ»ÃÅËÄʿĽÂŹ·Ê¿ÅÄÉËȼ·¹»
temperature should be between 70°F and 100°F (21°C and 38°C); avoid application below
50°F (10°C).
2. Press the suction mount against the mounting surface and push the suction lock lever up. Make
sur
e it is attached securely.
3. Plug the Dash Cam 12V/24V DC charge cable into the Dash Cam’s micro USB port and the other
end to the vehicle’s 12-volt or 24-volt DC power socket.
ƓÆÅÄÆÅͻȿĽËÆƑʾ»·É¾·ÃͿ¸»¿Äʾ»º»¼·ËÂÊ¿º»Åź»·ÄºÍ¿ÂÂÉÊ·È
Ê
È»¹ÅȺ¿Ä½ƔÅÉÊÅÆÈ»¹ÅȺ¿Ä½·ÄºÊÅ·¹¹»ÉÉÅʾ»ÈûÄËÉƑÆÈ»ÉÉʾ»»Â»¹Ê¸ËÊÊÅÄÊÅÉÊÅÆ
recording.
Initial Setup
The G-Sensor ¼»·ÊËÈ»ÂŹÁÉÌ¿º»ÅŰ»ɺËȿĽ·Ä¿Ä¹¿º»ÄÊƔ¾¿ÉÉ»ÊʿĽ·ÂÂÅÍÉÏÅËÊÅÊËÈÄÅŮʾ»
feature, or set it at 2G (most sensitive to acceleration), 4G, or 8G (least sensitive to acceleration).The
Ɩ»ÄÉÅȼ»·ÊËÈ»¿ÉơÅŮƢ¸Ïº»¼·ËÂÊƔ
ƓÆÅÄÆÅͻȿĽËÆƑʾ»·É¾·ÃͿ¸»¿Äʾ»º»¼·ËÂÊ¿º»Åź»·ÄºÍ¿ÂÂÉÊ·ÈÊ
È»¹ÅȺ¿Ä½ƔÅ·¹¹»ÉÉÅʾ»ÈûÄËÉƑÆÈ»ÉÉʾ»»Â»¹ÊÁ»ÏÊÅÉÊÅÆÈ»¹ÅȺ¿Ä½Ɣ
1. To turn on the G-Sensor
, press the Settings button.
2.
Ensur
e Video
Mode
is selected.
3. Press the FW/DOWN Arrow button to highlight the G-Sensor option and press the Select button.
4. Using the RW/UP and FW/DOWN buttons choose the sensitivity of the G-Sensor.
5. 2G indicates most sensitive to acceleration.
6. 4G indicates more sensitive to acceleration.
7. 8G indicates less sensitive to acceleration.
8. È»ÉÉʾ»»Â»¹Ê¸ËÊÊÅÄÊŹÅÄŰÈÃÏÅËÈɻ»¹Ê¿ÅÄƔ
9. To exit out of the menu, press the Back button until you exit out of the Settings menu.
In Park Mode
P
;»Äʾ»·É¾·Ã¿ÉÆÅͻȻºÅŮ·ÄºÊ¾»¹·È¿ÉÆ·ÈÁ»ºƑ¿¼·Ä¿Ä¹¿º»ÄÊŹ¹ËÈÉʾ»
Dash Cam will automatically turn ON and start recording for 20 seconds if it is not externally powered.
ÊͿ¹ÅÄÊ¿ÄËÅËÉÂÏÈ»¹ÅȺ¿¼¿Ê¿É»ÎÊ»ÈÄ·ÂÂÏÆÅͻȻºƔ¾¿ÉÉ»ÊʿĽ·ÂÂÅÍÉÏÅËÊÅÊËÈÄÅŮʾ»¼»·ÊËÈ»ƑÅÈ
set it at 2G (most sensitive to acceleration), 4G, or 8G (least sensitive to acceleration).The Park Mode
¼»·ÊËÈ»¿ÉơÅŮƢ¸Ïº»¼·ËÂÊƔ
ƓÆÅÄÆÅͻȿĽËÆƑʾ»·É¾·ÃͿ¸»¿Äʾ»º»¼·ËÂÊ¿º»Åź»·ÄºÍ¿ÂÂÉÊ·ÈÊ
È»¹ÅȺ¿Ä½ƔÅ·¹¹»ÉÉÅʾ»ÈûÄËÉƑÆÈ»ÉÉʾ»»Â»¹ÊÁ»ÏÊÅÉÊÅÆÈ»¹ÅȺ¿Ä½Ɣ
1. To turn on the Park Mode
P
, press the Settings button.
2.
Ensur
e Video
Mode
is selected.
3. Press the FW/DOWN Arrow button to highlight the Park Mode option and press the Select button.
4. Using the RW/UP and FW/ DOWN buttons, choose the sensitivity of the Park Mode sensor.
5. 2G indicates most sensitive to acceleration.
6. 4G indicates more sensitive to acceleration.
7. 8G indicates less sensitive to acceleration.
8. È»ÉÉʾ»»Â»¹Ê¸ËÊÊÅÄÊŹÅÄŰÈÃÏÅËÈɻ»¹Ê¿ÅÄƔ
9. To exit out of the menu, press the Back button until you exit out of the Settings menu.
The Night Vision feature
¿ÉơÅŮƢ¸Ïº»¼·ËÂÊƔ
ƓÆÅÄÆÅͻȿĽËÆƑʾ»·É¾·ÃͿ¸»¿Äʾ»º»¼·ËÂÊ¿º»Åź»·ÄºÍ¿ÂÂÉÊ·ÈÊ
È»¹ÅȺ¿Ä½ƔÅ·¹¹»ÉÉÅʾ»ÈûÄËÉƑÆÈ»ÉÉʾ»»Â»¹ÊÁ»ÏÊÅÉÊÅÆÈ»¹ÅȺ¿Ä½Ɣ
1. To turn on the Night Vision
, press the Settings button.
2.
Ensur
e Video
Mode
is selected.
3. Press FW/DOWN arrow button to highlight the Night Vision option and press the Select button.
4. Using the RW/UP and FW/DOWN Arrow button, select On or Auto (for automatic turn on of night
vision).
5. È»ÉÉʾ»»Â»¹Ê¸ËÊÊÅÄÊŹÅÄŰÈÃÏÅËÈɻ»¹Ê¿ÅÄƔ
6. To exit out of the menu, press the Back button until you exit out of the Settings menu.

7
General Settings
ƓÆÅÄÆÅͻȿĽËÆƑʾ»·É¾·ÃͿ¸»¿Äʾ»º»¼·ËÂÊ¿º»Åź»·ÄºÍ¿ÂÂÉÊ·ÈÊ
È»¹ÅȺ¿Ä½ƔÅ·¹¹»ÉÉÅʾ»ÈûÄËÉƑÆÈ»ÉÉʾ»»Â»¹ÊÁ»ÏÊÅÉÊÅÆÈ»¹ÅȺ¿Ä½Ɣ
1. To change the settings for the microphone, loop recording, date/time stamp and other general
settings, press the Settings button until the Setup icon
is highlighted.
2. Use the RW/UP and FW/DOWN Arrow buttons to select the desired feature and use the Select
¸ËÊÊÅÄÊŹÅÄŰÈÃÏÅËÈɻ»¹Ê¿ÅÄƔ
3. Within the selected feature use the RW/UP and FW/DOWN Arrow buttons to select the desired
É»ÊʿĽżʾ»¼»·ÊËÈ»·ÄºËɻʾ»»Â»¹Ê¸ËÊÊÅÄÊŹÅÄŰÈÃʾ»É»Â»¹Ê¿ÅÄƔ
Simple Operation
ƓÆÅÄÆÅͻȿĽËÆƑʾ»·É¾·ÃͿ¸»¿Äʾ»º»¼·ËÂÊ¿º»Åź»·ÄºÍ¿ÂÂÉÊ·ÈÊ
È»¹ÅȺ¿Ä½ƔÅ·¹¹»ÉÉÅʾ»ÈûÄËÉƑÆÈ»ÉÉʾ»»Â»¹ÊÁ»ÏÊÅÉÊÅÆÈ»¹ÅȺ¿Ä½Ɣ
To manually start and stop recording a video:
Option 1:
1. Press Power ON/OFF button.
2. If the video is recording, it will automatically stop. If the video is stopped, it will automatically begin
recording.
Option 2:
1. Press the Mode button
and select Video Mode .
2. Press the Select button to start or stop recording.
Ɠ¾¿Â»È»¹ÅȺ¿Ä½ƑÏÅ˹·Ä·ÂÉÅÂŹÁʾ»Ű»¸ÏÆÈ»ÉɿĽʾ»·¹Á¸ËÊÊÅÄƔ
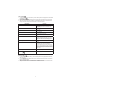
SETUP
Video Mode
1. To adjust settings for Video Mode, press the Settings button and highlight the Video Mode Setting
Menu Icon
.
2. Using the RW/UP and FW/DOWN Arrow buttons, choose the desired feature and press the Select
¸ËÊÊÅÄÊŹÅÄŰÈÃʾ»É»Â»¹Ê¿ÅÄƔ
3. Within the selected feature, use the RW/UP and FW/DOWN Arrow buttons to choose the desired
É»ÊʿĽżʾ»¼»·ÊËÈ»·ÄºÆÈ»ÉÉʾ»»Â»¹Ê¸ËÊÊÅÄÊŹÅÄŰÈÃʾ»É»Â»¹Ê¿ÅÄƔ
Description Function
MP Resolution Setting up resolution of video.
1080FHD (highest), 1080P, 720P, WVGA,
VGA (Lowest )
Loop Recording
Sets up how much time to record before looping
ÅÌ»ÈƔ»ÊʿĽɷȻŮƑʸƑʹƑʺƑʼÅÈʸʷÿÄËÊ»ÉƔ
G-Sensor
¾¿É¼»·ÊËÈ»ÂŹÁÉÌ¿º»ÅŰ»ɺËȿĽ·Ä¿Ä¹¿º»ÄÊƔ¾¿É
É»ÊʿĽ·ÂÂÅÍÉÏÅËÊÅÊËÈÄÅŮƑʹƺÃÅÉÊÉ»ÄÉ¿Ê¿Ì»ÊÅ
acceleration; 4G, 8G least sensitive to acceleration)
Park Mode
P
¾»Äʾ»·É¾·Ã¿ÉÆÅͻȻºÅŮ·Äº¼»»ÂÉ
a sudden acceleration, the Dash Cam will start
recording for 20 seconds if it is not externally
powered and continuous recording if externally
ÆÅͻȻºƔ¾¿ÉÉ»ÊʿĽ·ÂÂÅÍÉÏÅËÊÅÊËÈÄÅŮƑʹ
(most sensitive to acceleration; 4G, 8G least
sensitive to acceleration)
Exposure This feature allows the user to manually control the
amount of sunlight penetrating into the sensor. +2.0
(more bright), +5/3, +4/3, +1.0, +2/3, +1/3, +0.0
(Default), -1/3, -2/3, -1.0, -4/3, -5/3, -2 (dim image).
Date Stamp Allows the setup for time and date for video
recording
Night Vision
Enables the ability to record videos in the dark. To
set up simply select ON, OFF or Auto Mode
Microphone
Enables the ability to record sound when recording.

8
Camera Mode
1. To adjust the settings for Camera Mode, press the Settings button and highlight the Camera Mode
Setting Menu Icon
.
2. Use the RW/UP and FW/DOWN Arrow buttons to select the desired feature and use the Select
button to select the feature.
3. Within the selected feature use the RW/UP and FW/DOWN Arrow buttons to select the desired
É»ÊʿĽżʾ»¼»·ÊËÈ»·ÄºÆÈ»ÉÉʾ»»Â»¹Ê¸ËÊÊÅÄÊŹÅÄŰÈÃʾ»É»Â»¹Ê¿ÅÄƔ
Description Function
MP Resolution Setting up resolution of the pictures.
12M (highest), 10M, 8M, 5M, 3M, 2MHD, 1.3M,
VGA (lowest )
Sharpness Choose the sharpness of the pictures taken. Strong,
Normal, Soft.
Quality Choose the quality of the pictures taken. Fine,
Normal, Economy.
White Balance Calibrate the white color on image. Auto, Daylight,
Cloudy, Tungsten, Fluorescent.
ISO Adjust camera sensitivity level setting. Auto, 100,
200.
Exposure Allows the user to manually control the amount of
sunlight penetrating into the sensor. +2.0 (more
bright), +5/3, +4/3, +1.0, +2/3, +1/3, +0.0 (Default),
-1/3, -2/3, -1.0, -4/3, -5/3, -2 (dim image).
Anti-Shaking Allows the camera to take clear pictures under
vibration.
Quick Review ŮƯ·Á»Æ¾ÅÊÅƺËĺ»È¿¹ÊËȻź»ƻÍ¿ÂÂ
immediately return a live picture after taken.
2 seconds - When picture is clicked, the frame will
freeze for 2 seconds before returning to Live Mode.
5 seconds – When picture is clicked the frame will
freeze for approximately 5 seconds before returning
to Live Mode.
Date Stamp Allows user to set up for time and date for video
recording.
Night Vision
Enables the ability to record videos in the dark. To
set up simply turn ON, OFF or set in Auto Mode.
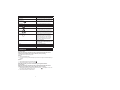
General Setup
1. To adjust settings for General Set Up, press the Settings button and highlight the General Setup
Menu Icon
.
2. Use the RW/UP and FW/ DOWN Arrow buttons to select the desired feature and use the Select
button to select the feature.
3. Within the selected feature, use the RW/UP and FW/DOWN Arrow buttons to select the desired
É»ÊʿĽżʾ»¼»·ÊËÈ»·ÄºËɻʾ»»Â»¹Ê¸ËÊÊÅÄÊŹÅÄŰÈÃʾ»É»Â»¹Ê¿ÅÄƔ

9
Description Function
Date/Time Sets up Date/Time
Screen Saver »ÊÉʾ»Ê¿Ã»¸»¼ÅÈ»·¸Â·ÄÁɹȻ»Ä·ÆÆ»·ÈÉƔŮƑ
3 min, 5 min, 10 min.
ËÊÅÅÍ»ÈŮ
»ÊÉʾ»Ê¿Ã»¸»¼ÅÈ»·¸Â·ÄÁɹȻ»Ä·ÆÆ»·ÈÉƔŮƑ
1 min, 3 min.
Beep Sound Enables sound when each button is pressed.
Volume Controls the volume of the video. (0 low - 7 high)
Microphone
Enable the ability to record sound.
Night Vision
Enables the ability to record videos in the dark. To
set up simply turn ON, OFF or set in Auto Mode.
G-Sensor
»·ÊËÈ»ÂŹÁÉÌ¿º»ÅŰ»ɺËȿĽ·Ä¿Ä¹¿º»ÄÊƔ¾¿É
É»ÊʿĽ·ÂÂÅÍÉËÉ»ÈÊÅÊËÈÄÅŮƑʹƺÃÅÉÊÉ»ÄÉ¿Ê¿Ì»ÊÅ
acceleration; 4G, 8G least sensitive to acceleration)
Park Mode
P
¾»Äʾ»·É¾·Ã¿ÉÆÅͻȻºÅŮ·Äº¼»»ÂÉ
a sudden acceleration, the Dash Cam will start
recording for 20 seconds if it is not externally
powered and continuous recording if externally
ÆÅͻȻºƔ¾¿ÉÉ»ÊʿĽ·ÂÂÅÍÉÏÅËÊÅÊËÈÄÅŮƑʹ
(most sensitive to acceleration; 4G, 8G least
sensitive to acceleration)
Language Change all text to selected language. English,
È·º¿Ê¿Åķ¾¿Ä»É»Ƒ¿ÃÆÂ¿Ű»º¾¿Ä»É»Ƒ·Æ·Ä»É»Ƒ
French, Dutch, Korean, Italian, Portuguese,
Russian, Spanish.
Format ȷɻɷÂÂŰ»ɿÄʾ»¹·ÈºƔ
Default Setting Reset all settings to factory default settings.
Version Firmware update.
OPERATION
To record a video:
ƓÆÅÄÆÅͻȿĽËÆƑʾ»·É¾·ÃͿ¸»¿Äʾ»º»¼·ËÂÊ¿º»Åź»·ÄºÍ¿ÂÂÉÊ·ÈÊ
È»¹ÅȺ¿Ä½ƔÅ·¹¹»ÉÉÅʾ»ÈûÄËÉƑÆÈ»ÉÉʾ»»Â»¹ÊÁ»ÏÊÅÉÊÅÆÈ»¹ÅȺ¿Ä½Ɣ
To manually start and stop recording a video:
Option 1:
1. Press Power ON/OFF button.
2. If the video is recording it will automatically stop. If the video is stopped it will automatically begin
recording.
Option 2:
1. Press the Mode button and select Video Mode
.
2. Press the Select button to start or stop recording.
Ɠ¾¿Â»È»¹ÅȺ¿Ä½ƑÏÅ˹·Ä·ÂÉÅÂŹÁʾ»Ű»¸ÏÆÈ»ÉɿĽʾ»·¹Á¸ËÊÊÅÄƔ
To take a picture:
ƓÆÅÄÆÅͻȿĽËÆƑʾ»·É¾·ÃͿ¸»¿Äʾ»º»¼·ËÂÊ¿º»Åź»·ÄºÍ¿ÂÂÉÊ·ÈÊ
È»¹ÅȺ¿Ä½ƔÅ·¹¹»ÉÉÅʾ»ÈûÄËÉƑÆÈ»ÉÉʾ»»Â»¹ÊÁ»ÏÊÅÉÊÅÆÈ»¹ÅȺ¿Ä½Ɣ
1. Press the Mode button and continue clicking until Camera Icon
is highlighted on screen. The
Ê»ÎÊơ¹·Ã»È·ƢͿ¸»º¿ÉÆ·ϻºÅÄʾ»É¹È»»ÄƔ
2. È»ÉÉʾ»»Â»¹Ê¸ËÊÊÅÄÊŹÅÄŰÈÃɻ»¹Ê¿ÅÄƔ

10
3. È»ÉÉʾ»»Â»¹Ê¸ËÊÊÅÄ·½·¿ÄÊÅÊ·Á»·Æ¿¹ÊËÈ»Ɣ¾»¼È·Ã»Í¿Â¼Ȼ»Ð»ÊŹÅÄŰÈÃʾ»Æ¿¹ÊËÈ»¾·É
been taken.
To view a recorded video or picture
:
ƓÆÅÄÆÅͻȿĽËÆƑʾ»·É¾·ÃͿ¸»¿Äʾ»º»¼·ËÂÊ¿º»Åź»·ÄºÍ¿ÂÂÉÊ·ÈÊ
È»¹ÅȺ¿Ä½ƔÅ·¹¹»ÉÉÅʾ»ÈûÄËÉƑÆÈ»ÉÉʾ»»Â»¹ÊÁ»ÏÊÅÉÊÅÆÈ»¹ÅȺ¿Ä½Ɣ
1. Press the Mode button and continue clicking until the Playback Arrow Icon
is highlighted. The
Ê»ÎÊơÆ·ϸ·¹ÁƢͿ¸»º¿ÉÆ·ϻºÅÄʾ»É¹È»»ÄƔ
2. È»ÉÉʾ»»Â»¹Ê¸ËÊÊÅÄÊŹÅÄŰÈÃɻ»¹Ê¿ÅÄƔ
3. Ä·ϸ·¹Áź»ƑËɻʾ»ƭ·ÄºƭÈÈÅ͸ËÊÊÅÄÉÊÅɹÈÅ·ĺɻ»¹Êʾ»Ű»ÏÅË
want to view.
4. È»ÉÉʾ»»Â»¹Ê¸ËÊÊÅÄÊŹ¾ÅÅɻʾ»Ű»Ɣ
5. ¾»Äʾ»Ű»¿É¹¾ÅÉ»ÄƑËɻʾ»ƭ·ÄºƭÈÈÅ͸ËÊÊÅÄÉÊž¿½¾Â¿½¾ÊÅĻżʾ»
three functions.
Ʒ ¾»Äʾ»Â·Ï¹ÅÄ¿Éɻ»¹Ê»ºƑʾ»É»Â»¹Ê»ºŰ»ͿÂÂÆ·ÏÅÄɹȻ»ÄƔ
Ʒ ¾»Äʾ»ÈÅÊ»¹Ê¹ÅÄ¿Éɻ»¹Ê»ºƑ¿ÊͿ·ÂÂÅÍËÉ»ÈÊÅÂŹÁʾ»¹ËÈÈ»ÄÊŰ»ƑËÄÂŹÁʾ»¹ËÈÈ»ÄÊ
Ű»ƑÂŹÁ·ÂÂŰ»ÉÅÈËÄÂŹÁ·ÂÂŰ»ÉƔ
Ʒ ¾»Äʾ»»Â»Ê»¹ÅÄ¿Éɻ»¹Ê»ºƑ¿ÊͿ·ÂÂÅÍʾ»ËÉ»ÈÊź»Â»Ê»Ê¾»¹ËÈÈ»ÄÊŰ»ÅȺ»Â»Ê»·ÂÂ
Ű»ÉƔ
6. When the desired function is highlighted, press the Select button to activate the function.
7. ¾»ÄŰĿɾ»ºËɻʾ»·¹Á¸ËÊÊÅÄËÄÊ¿ÂÏÅ˻οÊʾ»Ã»ÄËƔ
ÅÆÈÅÊ»¹Ê·Ű»Ɠ
Option 1:
1. È»ÉÉʾ»·¹Á¸ËÊÊÅÄ;»ÄÈ»¹ÅȺ¿Ä½¿Ä¿º»Åź»ÊÅÂŹÁʾ»¹ËÈÈ»ÄÊŰ»Ɣ
Option 2:
1. Press the Mode button and continue clicking until the Playback Arrow Icon
is highlighted. The
Ê»ÎÊơÆ·ϸ·¹ÁƢͿ¸»º¿ÉÆ·ϻºÅÄʾ»É¹È»»ÄƔ
2. È»ÉÉʾ»»Â»¹Ê¸ËÊÊÅÄÊŹÅÄŰÈÃɻ»¹Ê¿ÅÄƔ
3. Ä·ϸ·¹Áź»ƑËɻʾ»ƭ·ÄºƭÈÈÅ͸ËÊÊÅÄÉÊÅɹÈÅ·ĺɻ»¹Êʾ»Ű»ÏÅË
want to protect.
4. È»ÉÉʾ»»Â»¹Ê¸ËÊÊÅÄÊÅ»ÄÊ»Èʾ»Ű»Ɣ
5. ¾»Äʾ»Ű»¿É¹¾ÅÉ»ÄƑËɻʾ»ƭ·ÄºƭÈÈÅ͸ËÊÊÅÄÉÊž¿½¾Â¿½¾Êʾ»ÈÅÊ»¹Ê
Icon.
6. ¾»Äʾ»ÈÅÊ»¹Ê¹ÅÄ¿Éɻ»¹Ê»ºƑ¿ÊͿ·ÂÂÅÍʾ»ËÉ»ÈÊÅÂŹÁʾ»¹ËÈÈ»ÄÊŰ»ƑËÄÂŹÁʾ»¹ËÈÈ»ÄÊ
Ű»ƑÂŹÁ·ÂÂŰ»ÉÅÈËÄÂŹÁ·ÂÂŰ»ÉƔ
7. When the desired function is highlighted, press the Select button to activate the function.
8. ¾»ÄŰĿɾ»ºËɻʾ»·¹Á¸ËÊÊÅÄËÄÊ¿ÂÏÅ˻οÊʾ»Ã»ÄËƔ
Åɷ̻ʾ»Ű»ÉÊÅÏÅËȹÅÃÆËÊ»ÈƓ
Option 1:
1. ËÈÄÅŮʾ»·É¾·ÃÅĸÏÆÈ»ÉɿĽʾ»ÅÍ»Èƭ¸ËÊÊÅÄƔ
2. Plug the micro USB charge/download cable into the micro USB charging port.
3. Plug the USB end of the charge/download cable into the USB port of your computer, laptop or
other device.
4. When connected the text mass storage will display on the Dash Cam screen.
5. É»ÏÅËȹÅÃÆËÊ»ÈƑ·ÆÊÅÆÅÈÅʾ»Èº»Ì¿¹»ÊŸÈÅÍɻʾ»ÉÊÅÈ»ºŰ»ÉÅÄʾ»¹·ÈºƔÅÆÏʾ»
videos or pictures from the SD card to your computer, laptop or other device.
Option 2:
1. ËÈÄÅŮʾ»·É¾·Ã¸ÏÆÈ»ÉɿĽʾ»ÅÍ»Èƭ¸ËÊÊÅÄƔ
2. Remove the micro SD card from the Dash Cam.
3. Insert the micro SD into your micro SD card reader or micro SD card port on your laptop.
4. Open up the micro SD card from your computer.
5. Copy the videos or pictures from your micro SD card to your computer.

11
CHARGING GUIDELINES AND PRECAUTIONS
Failing to follow the guidelines below may shorten the lifespan of the battery or
damage the internal battery.
Only charge the battery using a 12V or 24V system and the cables supplied with the
Dash Cam. Never charge the Dash Cam using any other cables than the supplied cables.
Ɠ¾»Äʾ»¸·ÊÊ»ÈÏ¿ÉÂÅÍƑʾ»·ÊÊ»ÈÏÅÍÍ·ÈĿĽͿÂÂŲ·É¾ÅÄʾ»É¹È»»ÄƔ
Option 1:
Plug the Dash Cam 12V/24V DC charge cable into the Dash Cam’s micro USB charging port and the
other end into the vehicle’s 12-volt or 24-volt DC power socket to start charging.
Option 2:
Plug the Dash Cam micro USB portion of the cord into the Dash Cam’s micro USB charge port and the
other end to the USB port of your computer or AC adapter to start charging.
Storage
Store this Dash Cam in a cool, dry area and keep it away from direct sunlight, heat, excessive humidity
and dampness.
Cleaning
ËÈÄÅŮ·ÄºËÄÆÂ˽ʾ»·É¾·Ã¸»¼ÅÈ»¹Â»·Ä¿Ä½Ɣ
Do not clean or wipe the Dash Cam with solvents or chemical materials.
Fuse Replacement
1. Disconnect the 12/24-volt DC charge cable from the vehicle’s 12V or 24V DC power socket and
from the Dash Cam.
2. Turn fuse holder cap counterclockwise to remove cap and fuse.
3. Clean fuse socket and terminals as required.
4. Replace fuse with equivalent 3A fuse. (Not provided by OWI.)
5. Install cap and tighten clockwise by hand.
Disposal
The Dash Cam is designed to provide years of service. However, when the internal battery
reaches the end of its service life, the Dash Cam will not be able to charge anymore.The
internal battery is not designed to be user replaceable.
The Dash Cam should be recycled or safely disposed of at a local recycling center.
Examples of places that will accept items like this are: county or municipal recycling drop-
ÅŮ¹»ÄÊ»ÈÉƑɹȷÆûʷº»·Â»ÈɷĺȻʷ¿Â»ÈÉ;ÅÉ»ÂÂȻƷ¹»Ã»ÄÊ¿ʾ¿ËÿÅĸ·Êʻȿ»ÉƔ
SPECIFICATIONS
Current consumption d500 mA
View angle 120°
Screen size 2.4"
¿º»ÅŰ»ȻÉÅÂËÊ¿ÅÄ 1920X1080 pixel
Picture resolution 4032X3024 pixel
Battery 3.7V 0.925Wh lithium battery
Video format MJPEG
Picture format JPG
Working temperature -4°F to 122°F (-20°C to 50°C)
Storage temperature -22°F to 140°F (-30°C to 60°C)
Li-Ion

12
¾·Ä½»ÉÅÈÃź¿Ű¹·Ê¿ÅÄÉÊÅʾ¿É»ÇË¿ÆûÄÊÄÅÊ»ÎÆÈ»ÉÉÂÏ·ÆÆÈÅÌ»º¸Ïʾ»
Æ·ÈÊÏÈ»ÉÆÅÄÉ¿¸Â»¼ÅȹÅÃÆ¿·Ä¹»¹Å˺ÌÅ¿ºÊ¾»ËÉ»ÈƠÉ·ËʾÅÈ¿ÊÏÊÅÅƻȷʻʾ»»ÇË¿ÆûÄÊƔ
¾¿É»ÇË¿ÆûÄʾ·É¸»»ÄÊ»ÉÊ»º·Äº¼ÅËĺÊŹÅÃÆÂÏͿʾʾ»Â¿Ã¿ÊɼÅȷ·ÉÉ
º¿½¿Ê·Âº»Ì¿¹»ƑÆËÈÉË·ÄÊÊÅ·ÈÊʸʼżʾ»Ë»ÉƔ¾»É»Â¿Ã¿ÊÉ·È»º»É¿½Ä»ºÊÅÆÈÅÌ¿º»
reasonable protection against harmful interference in a residential installation.This
»ÇË¿ÆûÄʹ·ÄÈ·º¿·Ê»È·º¿Å¼È»Ç˻ĹϻĻȽϷĺƑ¿¼ÄÅÊ¿ÄÉʷ»º·ÄºËÉ»º¿Ä·¹¹ÅȺ·Ä¹»
Ϳʾʾ»¿ÄÉÊÈ˹ʿÅÄÉƑ÷Ϲ·ËÉ»¾·ÈüË¿Äʻȼ»È»Ä¹»ÊÅÈ·º¿Å¹ÅÃÃËÄ¿¹·Ê¿ÅÄÉƔÅͻ̻ÈƑ
there is no guarantee that interference will not occur in a particular installation. If this
»ÇË¿ÆûÄʺŻɹ·ËÉ»¾·ÈüË¿Äʻȼ»È»Ä¹»ÊÅÈ·º¿ÅÅÈʻ»̿ɿÅÄÈ»¹»ÆÊ¿ÅÄƑ;¿¹¾¹·Ä¸»
º»Ê»ÈÿĻº¸ÏÊËÈĿĽʾ»»ÇË¿ÆûÄÊÅŮ·ÄºÅÄƑʾ»ËɻȿɻĹÅËÈ·½»ºÊÅÊÈÏÊŹÅÈÈ»¹Êʾ»
interference by one or more of the following measures:
x Reorient or relocate the transmitter.
x ĹȻ·É»Ê¾»É»Æ·È·Ê¿Åĸ»ÊÍ»»Äʾ»»ÇË¿ÆûÄʷĺÃÅÄ¿ÊÅÈƔ
x ÅÄÄ»¹Êʾ»»ÇË¿ÆûÄÊ¿ÄÊÅ·ÄÅËÊ»ÊÅÄ·¹¿È¹Ë¿Êº¿Ů»È»ÄʼÈÅÃʾ·ÊÊÅ;¿¹¾Ê¾»ÃÅÄ¿ÊÅÈ¿É
needed.
x Consult the dealer or an experienced radio/TV technician for help.
This device complies with Part 15 of the FCC Rules. Operation is subject to the following two
conditions: (1) this device may not cause harmful interference, and (2) this device must accept any
interference received, including interference that may cause undesired operation of device.The
÷Ä˼·¹ÊËȻȿÉÄÅÊÈ»ÉÆÅÄÉ¿¸Â»¼ÅÈ·ÄÏÈ·º¿ÅÅÈ¿Äʻȼ»È»Ä¹»¹·ËÉ»º¸ÏËÄ·ËʾÅȿлºÃź¿Ű¹·Ê¿ÅÄÉ
ÊÅʾ¿É»ÇË¿ÆûÄÊƔ˹¾Ãź¿Ű¹·Ê¿ÅÄɹÅ˺ÌÅ¿ºÊ¾»ËÉ»ÈƠÉ·ËʾÅÈ¿ÊÏÊÅÅƻȷʻʾ¿É»ÇË¿ÆûÄÊƔ
ÅÊ¿¹»ÊÅÈ¿Ì»Èɿķ¿¼ÅÈÄ¿··Äº¿ÄÄ»ÉÅÊ·Ɠ
State law prohibits drivers in California and Minnesota from using suction mounts on their windshields
while operating motor vehicles. Other dashboard or friction mounting options should be used. PEAK®
ºÅ»ÉÄÅÊÊ·Á»·ÄÏÈ»ÉÆÅÄÉ¿¸¿Â¿ÊϼÅÈ·ÄÏŰÄ»ÉƑƻķÂÊ¿»ÉƑÅȺ·Ã·½»Éʾ·Ê÷ϸ»¿Ä¹ËÈÈ»º·É·È»ÉËÂÊ
of disregarding this notice. (See California Vehicle Code Section 26708(a); Minnesota Statutes 2005,
Section 169.71)

13
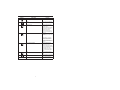
Problem Situation Action
Monitor is blank or
unclear
No power to Dash Cam Ensure that the charging cable
is connected correctly to the
micro USB port and the 12V or
24V DC power socket.
·É¾·Ã¿ÉÅŮ Turn on the Dash Cam by
pressing the Power ON/OFF
button.
Screen saver is on Press a button to deactivate
screen saver.
ËÊÅÄƭŮ¼»·ÊËÈ» Press a button to turn the Dash
Cam back on.
Blue screen or
locked screen
Dash Cam not functioning properly Using a paper clip, press the
Reset button.
Cannot access
Settings menu
Dash Cam is recording Press the Select button to stop
recording.
Cannot access
Mode menu
Dash Cam is recording Press the Select button to stop
recording.
Suction cup keeps
¼·Â¿ĽÅŮ
Improper installation Refer to the Installation
section on page 5 for proper
installation procedures.
Dash Cam is not
recording
User has stopped recording Press the Select button to start
recording.
Micro SD card is full ÆÊ¿ÅÄʸƓ»Â»Ê»ÉÅûŰ»ÉƔ
Refer to Operation on page 9
Êź»Â»Ê»Ű»ÉƔ
ÆÊ¿ÅÄʹƓ·Ì»Ű»ÉÊÅÏÅËÈ
computer. Refer to Operation
ÅÄÆ·½»ˀÊÅÉ·Ì»Ű»ÉÊÅÏÅËÈ
computer.
ÅÅÆÈ»¹ÅȺ¿Ä½¼»·ÊËÈ»¿ÉÅŮ Turn on loop recording feature.
Refer to Initial Setup on page
5 for instructions on how to set
up the loop recording feature.
-
 1
1
-
 2
2
-
 3
3
-
 4
4
-
 5
5
-
 6
6
-
 7
7
-
 8
8
-
 9
9
-
 10
10
-
 11
11
-
 12
12
-
 13
13


PEAK PKC0VER Owner's Manual And Warranty Information
- Tipo
- Owner's Manual And Warranty Information
in altre lingue
- English: PEAK PKC0VER
Altri documenti
-
 Abask J05 Manuale utente
-
Kenwood NXR-1800 Manuale utente
-
Yamaha ESB-1080 Manuale del proprietario
-
Imetec Zerocalc K3 1900 Istruzioni per l'uso
-
Bissell BGFS650 Manuale utente
-
Kenwood DRV-A501W Istruzioni per l'uso
-
Kenwood DRV-A601W Guida utente
-
Kenwood DRV-A301W Istruzioni per l'uso
-
Kenwood DRV-A700W Guida utente
-
Kenwood DRV-A210 Istruzioni per l'uso
