Belling FARMHOUSE 110 CHIM BLACK Manuale del proprietario
- Categoria
- Cappe da cucina
- Tipo
- Manuale del proprietario

Belling Cooker Hood
User Manual
EN

Contents
Introduction . . . . . . . . . . . . . . . . . . . . . . . . . . . . . . . . . . . . . . . . . . . . . . . . 2
Safety Precaution . . . . . . . . . . . . . . . . . . . . . . . . . . . . . . . . . . . . . . . . . . . . . 3
Installation Instructions. . . . . . . . . . . . . . . . . . . . . . . . . . . . . . . . . . . . . . . . . 4
Using the Hood . . . . . . . . . . . . . . . . . . . . . . . . . . . . . . . . . . . . . . . . . . . . . . 6
Care and Cleaning . . . . . . . . . . . . . . . . . . . . . . . . . . . . . . . . . . . . . . . . . . . 7
Technical Data . . . . . . . . . . . . . . . . . . . . . . . . . . . . . . . . . . . . . . . . . . . . . . 8
Belling Customer Care . . . . . . . . . . . . . . . . . . .. . . . . . . .. . . . . . . . . . . . . . 9
EN-1

Introduction
Thank you for buying this high quality hood from Belling
Our policy is one of constant development and improvement. Strict accuracy of illustrations and specifications
is not guaranteed. Modification to design and materials may be necessary subsequent to publication.
Before using the appliance for the first time, remove all packaging and protective polythene film.
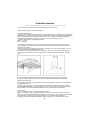
This appliance has been designed for use as an exhausting (air evacuation to the outside) or filtering (indoor
air re-cycling) hood.
Note: This appliance does not come supplied with a ducting kit, or carbon filters. Details for ordering these
parts are at the back of the handbook.
Because of the complexity and weight of the appliance, it is recommended that the installation be carried out
by specialist personnel.
The manufacturer declines all responsibility for damage caused by improper or installation.
Please read this handbook carefully and keep it for future reference.
Your first year Guarantee
To fulfil the conditions of your guarantee, this appliance must be correctly installed and operated in accordance
with these instructions and only be used for normal domestic purposes.
Please refer to your guarantee card for further details.
Please note that the guarantee and Service availability only apply to the UK and Republic of Ireland.
EN-2

SAFETY PRECAUTION
1. Take care when the cooker hood is operating simultaneously with an open fireplace or burner that depends
on the air in the environment. The cooker hood removes the air from the environment which a burner or
fireplace needs for combustion.
The negative pressure in the environment must not exceed 4Pa (4x10⁻⁵ bar). Provide adequate ventilation in
the environment for a safe operation of the cooker hood. Follow the local laws applicable for external air
evacuation.
Before connecting the model to the electricity network review the data plate (positioned inside the appliance)
to confirm that the voltage and power correspond to the network and the socket is suitable. If in doubt ask a
qualified electrician.
If the power supply cable is damaged it must be replaced. This can be obtained direct from the manufacturer.
This device must be connected to the supply network through either a plug fused 3A or hardwired to a 2 phase
spur protected by 3A fuse.
2. Warning!
In certain circumstances electrical appliances may be a danger hazard.
A) Do not check the status of the filters while the cooker hood is operating.
B) Do not touch bulbs or adjacent areas during or straight after prolonged use of the lighting installation.
C) Flambè cooking is prohibited underneath the cooker hood.
D) Avoid free flame as it is damaging for the filters and a fire hazard.
E) Do not leave food frying unattended as the overheated oil may become a fire hazard.
F) Disconnect the electrical connection prior to any maintenance.
G) This appliance is not intended for use by young children or infirm persons without supervision.
H) Young children should be supervised to ensure they do not play with the appliance.
I) There shall be adequate ventilation of the room when the hood is used at the same time as appliances
burning gas or other fuels other than electric.
L) There is a risk of fire if cleaning is not carried out in accordance with the instructions.
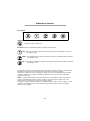
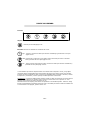
This appliance conforms to the European Directive EC/2002/96, Waste Electrical and Electronic Equipment
(WEEE).
The symbol on the product or on the accompanying paperwork indicates that the appliance should not be
treated as domestic waste, but should be delivered to a suitable electric and electronic appliance recycling
collection point.
Follow local guidelines when disposing of waste.
For more information on the treatment, re-use and recycling of this product, please contact your local authority,
domestic waste collection service or the retailor where the appliance was purchased.
EN-3

INSTALLATION INSTRUCTIONS
• Assembly and electrical connections must be carried out by specialised personnel.
• Wear protective gloves before proceeding with the installation.
• Electric Connection:
- The appliance has been manufactured as a class II, therefore no earth cable is necessary. The power point
must be easily accessible after the installation of the appliance. If the appliance is equipped with power cord
without plug, a suitably dimensioned omnipolar switch with 3 mm minimum opening between contacts must be
fitted between the appliance and the electricity supply in compliance with the load and current regulations.
- The connection to the mains is carried out as follows:
BROWN = L line
BLUE = N neutral.
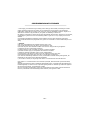
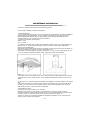
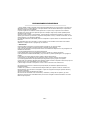
• If the hob is electric, gas, or induction, the minimum distance between the same and the lower part of the
hood must be at least 65 cm. If a connection tube composed of two parts is used, the upper part must be
placed outside the lower part.
Do not connect the cooker hood exhaust to the same conductor used to circulate hot air or for evacuating
fumes from other appliances generated by other than an electrical source.
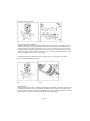
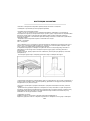
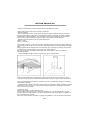
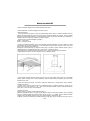
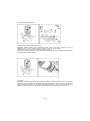
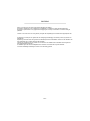
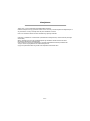
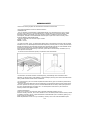
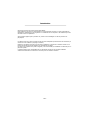
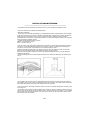
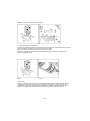
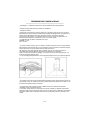
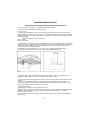
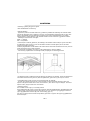
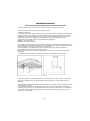
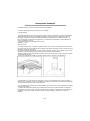
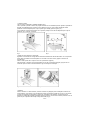
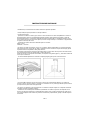
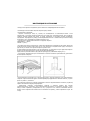
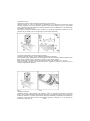
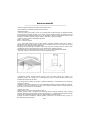
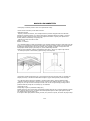
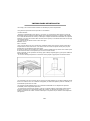
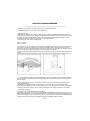
Before proceeding with the assembly operations, remove the anti-grease filter(s) (Fig.1) so that the unit is
easier to handle.
- In the case of assembly of the appliance in the suction version prepare the hole for evacuation of the air.
Fig.1
Fig.2
• We recommend the use of an air exhaust tube which has the same diameter as the air exhaust outlet hole. If
a pipe with a smaller diameter is used, the efficiency of the product may be reduced and its operation may
become noisier.
• If your appliance has been designed for use in habitations supplied with a centralised suction device perform
the following operations:
- The switch controls opening and closure of a valve using a thermo electrical device. By placing the switch in
the ON position, after a minute, the valve opens rotating 90° allowing suction of the stale air. By placing the
switch in the OFF position, the valve closes after 100 seconds.
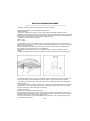
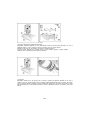
• Fixing to the wall:
Drill the holes A respecting the distances indicated (Fig.2).
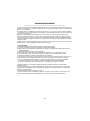
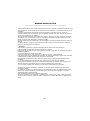
Fix the appliance to the wall and align it in horizontal position to the wall units. When the appliance has been
adjusted, definitely fix the hood using the screws A (Fig.3). For the various installations use screws and screw
anchors suited to the type of wall (e.g. reinforced concrete, plasterboard, etc.).
If the screws and screw anchors are provided with the product, check that they are suitable for the type of wall
EN-4

on which the hood is to be fixed.
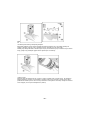
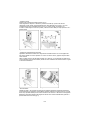
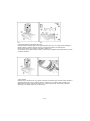
Fig.3 Fig.4
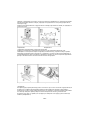
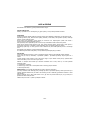
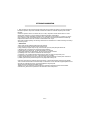
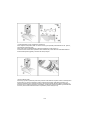
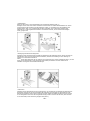
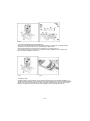
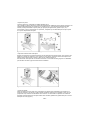
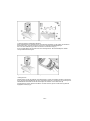
• Fixing the decorative telescopic flue:
Arrange the electrical power supply within the dimensions of the decorative flue. If your appliance is to be
installed in the ducting version or in the version with external motor, prepare the air exhaust opening. Fix
the support bracket to the ceiling using the screw A (Fig.4) in such a way that it is in line with your hood and
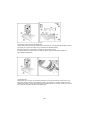
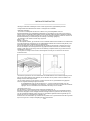
respecting the distance from the ceiling indicated in Fig.2. Connect the flange C to the air exhaust hole using a
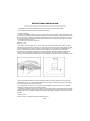
connection pipe (Fig.5). Insert the upper flue into the lower flue and rest above the frame.
Extract the upper
flue up to the bracket and fix it with the screw B (Fig.4).
To transform the ho
od from a ducting version into a filtering version, ask your dealer for the charcoal
filters and follow the installation
instructions.
Fig.5 Fig.6
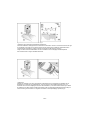
• Filtering version:
Install the hood and the two flues as described in the paragraph for installation of the hood in ducting version.
To assemble the filtering flue refer to the instructions contained in the kit. If the kit is not provided, order it
from your dealer as accessory. The filters must be applied to the suction unit positioned inside the hood. They
must be centred by turning them 90 degrees until the stop catch is tripped (Fig.6).
EN-5

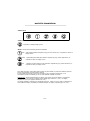
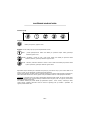
USING THE HOOD
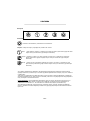
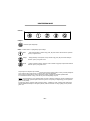
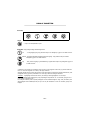
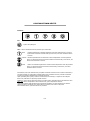
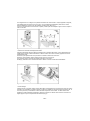
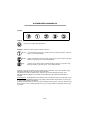
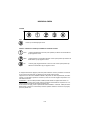
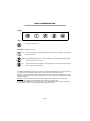
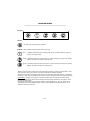
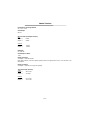
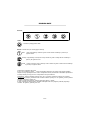
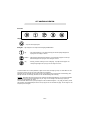
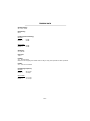
Controls
Lamp
– Depress to turn on/off light
Speed –select speed to suit cooking conditions
Low - Light frying/boiling. Depress this button to enter into low speed and again to turn off motor.
Medium - Frying/wok cooking/heavy boiling. Depress this button to enter into medium speed and again
to turn off motor
High - Grilling, intensive frying and wok cooking. Depress this button to enter into high speed and
again to turn off motor
EN-6
We recommend that you switch on the hood for a few minutes before you start cooking, and then leave it
running for approximately 8 minutes afterwards to ensure that all odours are extracted.
The appliance is not to be used by children or persons with reduced physical, sensory or mental capabilities, or
lack of experience and knowledge, unless they have been given supervision or instruction.
WARNING - Accessible parts may become hot when used with cooking appliances. To illuminate the cooking
area underneath the hood, push the light control button in to the “on” position. To switch off, press again to
return to the “off” position.
To operate the hood, press the button for the required speed - select: 1 low, 2 medium, or 3 high speed. The
neon indicator light will light up to show when the fan is operating. To switch off, press the “off” button.

CARE & CLEANING
Before cleaning or maintenance, switch off the electricity supply.
Replacing the LED Lights
If the appliance version is with LED lamps, the intervention of a specialised technician is necessary to replace
them
Outer Casing
All external parts of the outer casing can be safely cleaned with a clean cloth wrung out in hot soapy water.
Do not use caustic pastes, abrasive cleaning powders, wire wool, hard implements, or any products containing
chlorides as they will damage the surfaces.
Stubborn marks can be removed using a stainless steel cleaner. We recommend that you clean the whole of
the stainless steel area to maintain a uniform finish.
Sharp objects can mark the surface of stainless steel, but marks will become less noticeable with time.
To maintain the finish of the stainless steel, or to remove any greasy marks, wipe the stainless steel surface
sparingly with a minimum amount of Baby Oil and kitchen paper.
Do not use cooking oils, as these may contain salt, which can damage the stainless steel surface.
Before cleaning or maintenance, switch off the electricity supply.
To avoid any fire risk, the following cleaning instructions must be followed:
Grease Filters
The grease filters absorb grease and dust from cooking fumes, which would otherwise damage the inside of
the hood.
The grease filters should be removed and cleaned regularly - with normal use, this should be every 2 months.
To clean use warm soapy water, or wash in a dishwasher. The grease filters may slightly change colour
following washing, however this does not affect their performance.
Important: Frequent washing is essential to prevent a build-up of grease in the filters which could become a
fire hazard.
1. Remove the filters from the hood.
2. Carefully wash the grease filters in hot soapy water and dry with a clean towel.
3. Refit the clean filters.
Carbon Filters (models installed for use with the re-circulation method only)
The carbon filters absorb cooking odours and need renewing after about 6 months of normal use. Replacement
carbon filters can be obtained from our Customer Care (details at the rear of the handbook).
Saturation of the activated charcoal in the filter will depend on how often the hood is used, the type of kitchen
and the regularity of cleaning the grease filter.
The carbon filters cannot be washed - renew every 6 months.
EN-7

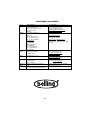
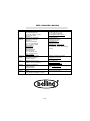
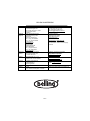
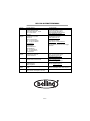
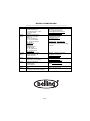
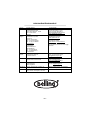
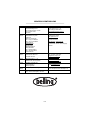
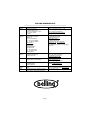
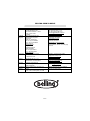
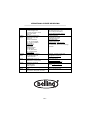
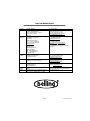
TECHNICAL DATA
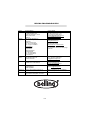
Electricity Supply
230 - 240V ~ 50Hz
Classification
class I
Noise Level (External Venting)
Flat Hood
Position 3 6 dBA 1
Position 1 5 dBA 4
Chimney Hood
Position 3 60 dBA
Position 1 53 dBA
Light Lulbs
2 x 1.5W LED
Motor Rating
110W
Grease Filters
3 Off - Aluminium panel
Note: After cleaning, grease filters may lose their colour slightly - this does not affect their performance.
Carbon Filters
2 Off - Available as Spares
Extraction Rate (External)
Flat Hood
Position 3 481.3 m3/H
Position 1 305 m3/H
Chimney Hood
Position 3 512.1 m3/H
Position 1 311.2 m3/H
EN-8

BELLING CUSTOMER CARE
Please keep this handbook in a safe place.
Please fill in the model number
and serial number in the spaces provided below as they will assist us should you
need to call.
0844 815 3746
When you dial this number you will hear a recorded message and be given a
number of options. This indicates that your call has been accepted and is being
held in a queue. Calls are answered in strict rotation as our Customer Care
Representatives become available.
Enter appliance numbers here for future reference:
These numbers can be found on your appliances.
Outside the UK and Northern Ireland, refer to your local supplier.
Stoney Lane, Prescot, Merseyside, L35 2XW
Model No
Serial No
EN-9

Аспиратор Belling
Ръководство на потребителя
BG

Съдържание
Въведение . . . . . . . . . . . . . . . . . . . . . . . . . . . . . . . . . . . . . . . . . . . . 2
Мерки за безопасност . . . . . . . . . . . . . . . . . . . . . . . . . .. . . . . . . . . . . 3
Инструкции за монтаж . . . . . . . . . . . . . . . . . . . . . . . . . .. . . . . . . . . . . 4
Употреба . . . . . . . . . . . . . . . . . . . . . . . . . . . . . . . . . . . . . . . . . . . . . . 6
Грижи и почистване . . . . . . . . . . . . . . . . . . . . . . . . . . . . . . . . . . . . 7
Технически данни . . . . . . . . . . . . . . . . . . . . . . . . . . . . . . . . . . . . . . . 8
Обслужване на клиенти . . . . . . . . . . . . . . . . . . .. . . . . . . .. . . . . . . . . 9
BG-1

Въведение
Благодарим Ви, че закупихте този висококачествен аспиратор от Belling
Нашата политика е за непрекъснато развитие и усъвършенстване. Абсолютната точност на изложените
илюстрации и спецификации не е гарантирана. Възможно е след публикуването на настоящото
ръководство да бъдат извършвани промени върху дизайна и материалите.
Преди първоначалната употреба на уреда отстранете всички опаковки и защитно полиетиленово фолио.
Уредът е проектиран за използване като аспиратор (извеждане на въздуха извън помещението) или
абсорбатор (рециклиране на въздуха в помещението).
Забележка: Уредът не се предоставя заедно с въздуховоди или карбонови филтри. Подробности относно
набавянето на тези части можете да намерите в края на този наръчник.
Поради сложността на действието и тежестта на уреда се препоръчва монтажът да бъде изпълнен от
специализиран персонал.
Производителят не поема отговорност за повреди, причинени вследствие на неправилен монтаж.
Моля прочетете внимателно това ръководство и го пазете за бъдещи справки.
BG-2

МЕРКИ ЗА БЕЗОПАСНОСТ
1. Погрижете се аспираторът да бъде включен едновременно с камината или уреда за готвене, които
могат да замърсят въздуха в помещението. Уредът премахва въздуха, който газовия котлон или
камината отработват при горене.
Отрицателното налягане в околната среда не трябва да надвишава 4Pa (4x10⁻⁵ бара). За безопасното
функциониране на аспиратора е необходимо да осигурите добра вентилация. Спазвайте местните
закони относно отвеждане на въздух в околната среда.
Преди да свържете уреда разгледайте табелката (във вътрешността му), за да се уверите, че
напрежението и силата на тока съвпадат с тези на местната електрическа мрежа. В случай че имате
съмнения, се свържете с квалифициран електротехник.
Ако захранващият кабел е повреден, трябва да бъде заменен. Можете да получите такъв направо от
производителя.
Уредът трябва да бъде свързан към електрическата мрежа посредством щепсел, или двуфазно
свързване, обезопасени с предпазител от 3А.
2. Предупреждение!
При определени обстоятелства електрическите уреди могат да представляват опасност.
A) Не проверявайте състоянието на филтъра, докато аспираторът работи.
Б) Не докосвайте крушките или съседните на тях зони по време или веднага след като осветителната
система е работила.
В) Готвенето чрез фламбиране непосредствено под аспиратора е забранено.
Г) Избягвайте открити пламъци, тъй като те могат да увредят филтъра и представляват заплаха от
пожар.
Д) При пържене не оставяйте храната без наблюдение. Нагорещеното масло може да се възпламени.
Е) Преди всяко действие по поддръжка и обслужване изключвайте електрическото захранване.
Ж) Този уред не е предназначен за използване без надзор от деца или лица с ограничени възможности.
З) Малките деца не трябва да бъдат оставяни да си играят с уреда.
И) При използване на абсорбатора заедно с уреди на газ или друго гориво, различно от електрическо, е
необходимо в помещението да бъде осигурена подходяща вентилация.
Й) Ако почистването не бъде изпълнено съгласно указанията, съществува риск от пожар.
Този уред отговаря на Европейска директива EО/2002/96 за Отпадъци от електрическо и електронно
оборудване (ОЕЕО).
Символът върху продукта или придружаващата го документация показва, че той не може да бъде
третиран като битов отпадък, а трябва да бъде транспортиран до местата за събиране на отпадъци за
рециклиране на електрическо и електронно оборудване.
При изхвърлянето на отпадъци спазвайте местните разпоредби.
По-подробна информация относно ползване, повторна употреба и рециклиране на този продукт можете
да получите от представителите на местните власти, фирмите за извозване на битови отпадъци или в
магазина, от който сте закупили продукта.
BG-3

ИНСТРУКЦИИ ЗА МОНТАЖ
• Монтажът и електрическото свързване трябва да бъдат изпълнени от специалист.
• Необходимо е при монтажа да носите предпазни ръкавици.
• Свързване към електрическата мрежа:
- Уредът е от клас II, следователно не е необходимо заземяване. Необходимо е след монтажа да
съществува лесен достъп до електрическия вход. В случай че уредът е предоставен със захранващ кабел
без щепсел, между уреда и електрическия вход трябва да бъде поставен подходящо оразмерен
еднополюсен прекъсвач с 3 мм минимално разстояние между контактите в съответствие с действащата
нормативна уредба.
- Свързването към електрическата мрежа се изпълнява както следва:
КАФЯВ = L проводник
СИН = N неутрален
• Ако готварският плот е електрически, газов или индукционен, минималното разстояние между него и
долната част на аспиратора трябва да бъде 65 см. В случай че се използва тръбно свързване от две
части, горната част трябва да бъде поставена извън долната.
Не свързвайте аспиратора за отвеждане на отработени газове със същия въздуховод, използван за
циркулиране на топъл въздух или за отвеждане на дима от други уреди с източник, различен от
електричество.
За Ваше улеснение, преди да пристъпите към сглобяването, свалете филтъра (филтрите) за мазнини
(изображение 1).
- Ако монтирате уреда заедно с аспирация, пригответе отвор за отвеждане на въздуха.
изображение 1 изображение 2
• Препоръчваме използването на въздуховодна тръба със същия диаметър, като отвора на аспиратора. В
случай че бъде използвана тръба с по-малък диаметър, ефективността на продукта ще бъде намалена, а
същевременно ще се увеличи и шумът.
• Ако уредът е проектиран за употреба в помещения с централна вентилационна система, изпълнете
следното:
- Превключвателят управлява отварянето и затварянето на клапа, използвана от термо-електрическо
устройство. При поставяне на превключвателя в положение ON, след минута клапата се завърта на 90°,
позволявайки засмукване на въздуха. Ако превключвателят бъде поставен в положение OFF, след
изминаване на 100 секунди клапата се затваря.
• Прикрепяне за стената:
Пробийте отвори А в съответствие с указаните разстояния (изображение 2).
Прикрепете уреда към стената и го изравнете хоризонтално с шкафовете. Когато уредът е нивелиран
BG-4

правилно, го фиксирайте към стената с помощта на винтове А (изображение 3). При различните видове
монтажи използвайте винтове и анкери, подходящи за определения тип стена (напр. армиран бетон,
гипсокартон и др.).
Проверете дали предоставените с продукта винтове и анкери (при наличие на такива) са подходящи за
съответната стена.
изображение 3
изображение 4
• Прикрепяне на декоративния телескопичен димоотвод:
Подредете електрическите проводници във вътрешността на декоративния димоотвод. При
необходимост от монтиране на версия с въздуховод или външен мотор, подгответе отвор за тръбата.
Издърпайте горния димоотвод до
конзолата и го прикрепете с помощта на винтове В (изображение 4).
За трансформиране на уреда от
аспиратор в абсорбатор, поискайте от местния търговски представител
филтри от активен въглен и
изпълнете монтажа съгласно инструкциите.
изображение 5 изображение 6
• Абсорбатор:
Монтирайте уреда и двата димоотвода, както е описано по-горе в частта за монтаж на уреда във вид на
аспиратор. За сглобяване на филтриращия димоотвод разгледайте инструкциите, предоставени с
комплекта. В случай че нямате предоставен комплект, го поръчайте от местния търговски представител
като аксесоар. Филтрите трябва да бъдат поставени в смукателния елемент, разположен във
вътрешността на уреда. Те трябва да се центрират чрез завъртане на 90 градуса, докато зъбът бъде
захванат (изображение 6).
BG-5

УПОТРЕБА
Контроли
Осветление
– Натиснете за включване / изключване на осветлението
Скорост – избор на скорост, подходяща за условията на готвене
Ниска - Леко пържене / варене. С натискане на този бутон можете да включите уреда на ниска
скорост или да го изключите (при повторно натискане).
Средна - Пържене / готвене с уок тиган / варене на силен огън. С натискане на този бутон
можете да включите уреда на средна скорост или да го изключите (при повторно
натискане).
Висока - Печене на грил, интензивно пържене или готвене с уок тиган. С натискане на този
бутон можете да включите уреда на висока скорост или да го изключите (при повторно
натискане).
BG-6
За по-добро премахване на миризмите, Ви препоръчваме да включвате аспиратора няколко минути
преди да започнете да готвите и да го оставяте да работи приблизително 8 минути, след като готвенето
е приключило.
Този уред не е предназначен да бъде използван от деца или лица с намалени физически, сетивни или
умствени способности или с липса на опит и познания, освен ако са под надзор или са инструктирани от
лице, отговорно за тяхната безопасност.
ПРЕДУПРЕЖДЕНИЕ - При едновременно използване с уред за готвене, достъпните части могат да се
нагорещят. За осветяване зоната на готвене под аспиратора, натиснете бутона за управление на
осветлението в положение "on". За изключване го натиснете още веднъж (положение “off”).
За да включите аспиратора, натиснете бутона с желаната скорост: 1 ниска, 2 средна или 3 висока
скорост. Неоновият светлинен индикатор показва кога уредът функционира. За изключване натиснете
бутон “off”.

ГРИЖИ И ПОЧИСТВАНЕ
Преди да предприемете действия по почистване и поддръжка, изключете уреда от електрическата
мрежа.
Смяна на LED светлини
В случай че уредът разполага с LED светлини, за тяхната смяна е необходимо да се обърнете към
квалифициран техник.
Външен корпус
Всички части на външния корпус могат да бъдат почистени с чиста кърпа, навлажнена в гореща
сапунена вода.
Не използвайте разяждащи кремове, абразивни почистващи прахове, търкане с телена вата или твърди
инструменти, както и продукти със съдържание на хлориди, тъй като могат да наранят повърхностите.
Упоритите петна могат да бъдат премахнати с препарат за почистване на неръждаема стомана. За
поддържане на добър естетичен вид, препоръчваме да почиствате цялата стоманена повърхност.
Възможно е повърхността от неръждаема стомана да бъде издраскана от остри предмети, но с течение
на времето белезите ще избледнеят.
За поддържане на корпуса от неръждаема стомана, както и за премахване на мазни петна, избършете
леко повърхността с малко количество бебешко олио и кухненска хартия.
Не използвайте олио за готвене, тъй като може да съдържа сол, която би увредила неръждаемата
стомана.
Преди да предприемете действия по почистване и поддръжка, изключете уреда от електрическата
мрежа.
За избягване на възможните рискове, спазвайте инструкциите за почистване по-долу:
Филтри за мазнини
Тези филтри абсорбират мазнини и прах от парата на готвената храна, които в противен случай биха
увредили вътрешността на аспиратора.
Филтрите за мазнини трябва редовно да бъдат изваждани и почиствани (при нормална употреба - на
всеки два месеца).
За почистване използвайте топла сапунена вода или измийте в съдомиялна машина. Възможно е след
измиване филтрите за мазнини леко да изменят цвета си. Това по никакъв начин не се отразява на
функционалността им.
Важно: Редовното почистване е от изключителна важност за предотвратяване натрупването на мазнини
във филтрите, което с течение на времето може да стане опасно.
1. Извадете филтрите от уреда.
2. Внимателно измийте филтрите в гореща сапунена вода, след което ги избършете с чиста кърпа.
3. Поставете ги обратно на местата им.
Въглеродни филтри (само при моделите, използвани за вътрешна циркулация на въздуха)
Въглеродните филтри абсорбират миризмите от готвене и при нормална употребя трябва да бъдат
сменяни на всеки шест месеца. Можете да получите резервни въглеродни филтри от нашия Център за
обслужване на клиенти (за подробности вижте гърба на книжката).
Степента на насищане на активния въглен във филтъра зависи от честотата на употреба на уреда, вида
на кухнята и редовното почистване на филтъра за мазнини.
Въглеродните филтри не могат да бъдат измивани. Сменяйте ги на всеки шест месеца.
BG-7

ТЕХНИЧЕСКИ ДАННИ
Електрическо захранване
230 - 240V ~ 50Hz
Класификация
клас I
Ниво на шума (външно вентилиране)
Плосък тип аспиратор
Положение 3 61 dBA
Положение 1 54 dBA
Каминен тип аспиратор
Положение 3 60 dBA
Положение 1 53 dBA
Крушки за осветление
2 x 1.5W LED
Мощност на мотора
110W
Филтри за мазнини
3 - Алуминиев панел
Забележка: Възможно е след измиване филтрите за мазнини леко да изменят цвета си. Това не се
отразява на функционалността им.
Въглеродни филтри
2 - Предлагат се като резервни части
Норма на извличане (външно)
Плосък тип аспиратор
Положение 3 481.3 m3/H
Положение 1 305 m3/H
Каминен тип аспиратор
Положение 3 512.1 m3/H
Положение 1 311.2 m3/H
BG-8

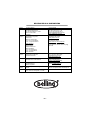
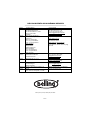
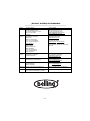
ОБСЛУЖВАНЕ НА КЛИЕНТИ
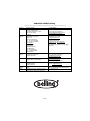
Country
Contact Address
Contact details
France
Glen Dimplex France
ZI petite Montagne Sud
12 rue des Cévennes - Lisses
91017 EVRY cedex
FRANCE
Service Number: 01 69 11 11 85
Tel: 00 33 (0)1 69 11 11 91
Fax: 00 33 (0)1 60 86 28 37
direction@glendimplex-france.fr
www.glendimplex-france.fr
Holland/
Belgium
Glen Dimplex Benelux B.V.
Nederland/Le Pays Bas
Saturnus 8
8448 CC Heerenveen
Tel: +31 (0) 513-656500
Fax: +31 (0) 513-656501
www.stoves.nl
België/Belgique
Burgemeester
Maenhautstraat 64
9820 Merelbeke
Tel: +32 (0)92100210
Fax: +32 (0)92100212
www.stoves.be
Productregistratie/
Registration de produit
www.gdbservice.com
Serviceaanvraag/
Demande de service
www.stoves.nl / www.stoves.be
zie banner ‘service’ homepagina
voir la banniere ‘service’ sur notre page
d’accueil
Germany/
Austria
ELESCO EUROPA GmbH
Karl-Wiechert-Allee 74a
D-30625 Hannover
Poland
OPTIDATA Sp. z o. o., ul.
Wielicka 50/5, 30-552 Kraków
+48 12 383 39 30
www.kuchniestoves.pl
service.stoves@optidata.pl
Sweden
Lindström & Sondén AB
Havsbadsvägen 1
26263 Ängelholm
Republic of
Ireland
Dimpco, Airport Road, Cloghran, Co.
Dublin
Service Telephone No.’ (01) 8428222
Service and Spare Parts.
www.dimpco.ie
Other
Glen Dimplex Home Appliances, Stoney
Lane, Prescot, Merseyside, L35 2XW
Tel: 0844 815 3740
BG-9
La pagina sta caricando ...
La pagina sta caricando ...
La pagina sta caricando ...
La pagina sta caricando ...
La pagina sta caricando ...
La pagina sta caricando ...
La pagina sta caricando ...
La pagina sta caricando ...
La pagina sta caricando ...
La pagina sta caricando ...
La pagina sta caricando ...
La pagina sta caricando ...
La pagina sta caricando ...
La pagina sta caricando ...
La pagina sta caricando ...
La pagina sta caricando ...
La pagina sta caricando ...
La pagina sta caricando ...
La pagina sta caricando ...
La pagina sta caricando ...
La pagina sta caricando ...
La pagina sta caricando ...
La pagina sta caricando ...
La pagina sta caricando ...
La pagina sta caricando ...
La pagina sta caricando ...
La pagina sta caricando ...
La pagina sta caricando ...
La pagina sta caricando ...
La pagina sta caricando ...
La pagina sta caricando ...
La pagina sta caricando ...
La pagina sta caricando ...
La pagina sta caricando ...
La pagina sta caricando ...
La pagina sta caricando ...
La pagina sta caricando ...
La pagina sta caricando ...
La pagina sta caricando ...
La pagina sta caricando ...
La pagina sta caricando ...
La pagina sta caricando ...
La pagina sta caricando ...
La pagina sta caricando ...
La pagina sta caricando ...
La pagina sta caricando ...
La pagina sta caricando ...
La pagina sta caricando ...
La pagina sta caricando ...
La pagina sta caricando ...
La pagina sta caricando ...
La pagina sta caricando ...
La pagina sta caricando ...
La pagina sta caricando ...
La pagina sta caricando ...
La pagina sta caricando ...
La pagina sta caricando ...
La pagina sta caricando ...
La pagina sta caricando ...
La pagina sta caricando ...
La pagina sta caricando ...
La pagina sta caricando ...
La pagina sta caricando ...
La pagina sta caricando ...
La pagina sta caricando ...
La pagina sta caricando ...
La pagina sta caricando ...
La pagina sta caricando ...
La pagina sta caricando ...
La pagina sta caricando ...
La pagina sta caricando ...
La pagina sta caricando ...
La pagina sta caricando ...
La pagina sta caricando ...
La pagina sta caricando ...
La pagina sta caricando ...
La pagina sta caricando ...
La pagina sta caricando ...
La pagina sta caricando ...
La pagina sta caricando ...
La pagina sta caricando ...
La pagina sta caricando ...
La pagina sta caricando ...
La pagina sta caricando ...
La pagina sta caricando ...
La pagina sta caricando ...
La pagina sta caricando ...
La pagina sta caricando ...
La pagina sta caricando ...
La pagina sta caricando ...
La pagina sta caricando ...
La pagina sta caricando ...
La pagina sta caricando ...
La pagina sta caricando ...
La pagina sta caricando ...
La pagina sta caricando ...
La pagina sta caricando ...
La pagina sta caricando ...
La pagina sta caricando ...
La pagina sta caricando ...
La pagina sta caricando ...
La pagina sta caricando ...
La pagina sta caricando ...
La pagina sta caricando ...
La pagina sta caricando ...
La pagina sta caricando ...
La pagina sta caricando ...
La pagina sta caricando ...
La pagina sta caricando ...
La pagina sta caricando ...
La pagina sta caricando ...
La pagina sta caricando ...
La pagina sta caricando ...
La pagina sta caricando ...
La pagina sta caricando ...
La pagina sta caricando ...
La pagina sta caricando ...
La pagina sta caricando ...
La pagina sta caricando ...
La pagina sta caricando ...
La pagina sta caricando ...
La pagina sta caricando ...
La pagina sta caricando ...
La pagina sta caricando ...
La pagina sta caricando ...
La pagina sta caricando ...
La pagina sta caricando ...
La pagina sta caricando ...
La pagina sta caricando ...
La pagina sta caricando ...
La pagina sta caricando ...
La pagina sta caricando ...
La pagina sta caricando ...
La pagina sta caricando ...
La pagina sta caricando ...
La pagina sta caricando ...
La pagina sta caricando ...
La pagina sta caricando ...
La pagina sta caricando ...
La pagina sta caricando ...
La pagina sta caricando ...
La pagina sta caricando ...
La pagina sta caricando ...
La pagina sta caricando ...
La pagina sta caricando ...
La pagina sta caricando ...
La pagina sta caricando ...
La pagina sta caricando ...
La pagina sta caricando ...
La pagina sta caricando ...
La pagina sta caricando ...
La pagina sta caricando ...
La pagina sta caricando ...
La pagina sta caricando ...
La pagina sta caricando ...
La pagina sta caricando ...
La pagina sta caricando ...
La pagina sta caricando ...
La pagina sta caricando ...
La pagina sta caricando ...
La pagina sta caricando ...
La pagina sta caricando ...
La pagina sta caricando ...
La pagina sta caricando ...
La pagina sta caricando ...
La pagina sta caricando ...
La pagina sta caricando ...
La pagina sta caricando ...
La pagina sta caricando ...
La pagina sta caricando ...
La pagina sta caricando ...
La pagina sta caricando ...
La pagina sta caricando ...
La pagina sta caricando ...
La pagina sta caricando ...
La pagina sta caricando ...
La pagina sta caricando ...
La pagina sta caricando ...
La pagina sta caricando ...
La pagina sta caricando ...
La pagina sta caricando ...
La pagina sta caricando ...
La pagina sta caricando ...
La pagina sta caricando ...
La pagina sta caricando ...
La pagina sta caricando ...
La pagina sta caricando ...
La pagina sta caricando ...
La pagina sta caricando ...
La pagina sta caricando ...
La pagina sta caricando ...
La pagina sta caricando ...
La pagina sta caricando ...
La pagina sta caricando ...
La pagina sta caricando ...
La pagina sta caricando ...
La pagina sta caricando ...
La pagina sta caricando ...
La pagina sta caricando ...
La pagina sta caricando ...
La pagina sta caricando ...
La pagina sta caricando ...
La pagina sta caricando ...
La pagina sta caricando ...
La pagina sta caricando ...
La pagina sta caricando ...
La pagina sta caricando ...
La pagina sta caricando ...
La pagina sta caricando ...
La pagina sta caricando ...
-
 1
1
-
 2
2
-
 3
3
-
 4
4
-
 5
5
-
 6
6
-
 7
7
-
 8
8
-
 9
9
-
 10
10
-
 11
11
-
 12
12
-
 13
13
-
 14
14
-
 15
15
-
 16
16
-
 17
17
-
 18
18
-
 19
19
-
 20
20
-
 21
21
-
 22
22
-
 23
23
-
 24
24
-
 25
25
-
 26
26
-
 27
27
-
 28
28
-
 29
29
-
 30
30
-
 31
31
-
 32
32
-
 33
33
-
 34
34
-
 35
35
-
 36
36
-
 37
37
-
 38
38
-
 39
39
-
 40
40
-
 41
41
-
 42
42
-
 43
43
-
 44
44
-
 45
45
-
 46
46
-
 47
47
-
 48
48
-
 49
49
-
 50
50
-
 51
51
-
 52
52
-
 53
53
-
 54
54
-
 55
55
-
 56
56
-
 57
57
-
 58
58
-
 59
59
-
 60
60
-
 61
61
-
 62
62
-
 63
63
-
 64
64
-
 65
65
-
 66
66
-
 67
67
-
 68
68
-
 69
69
-
 70
70
-
 71
71
-
 72
72
-
 73
73
-
 74
74
-
 75
75
-
 76
76
-
 77
77
-
 78
78
-
 79
79
-
 80
80
-
 81
81
-
 82
82
-
 83
83
-
 84
84
-
 85
85
-
 86
86
-
 87
87
-
 88
88
-
 89
89
-
 90
90
-
 91
91
-
 92
92
-
 93
93
-
 94
94
-
 95
95
-
 96
96
-
 97
97
-
 98
98
-
 99
99
-
 100
100
-
 101
101
-
 102
102
-
 103
103
-
 104
104
-
 105
105
-
 106
106
-
 107
107
-
 108
108
-
 109
109
-
 110
110
-
 111
111
-
 112
112
-
 113
113
-
 114
114
-
 115
115
-
 116
116
-
 117
117
-
 118
118
-
 119
119
-
 120
120
-
 121
121
-
 122
122
-
 123
123
-
 124
124
-
 125
125
-
 126
126
-
 127
127
-
 128
128
-
 129
129
-
 130
130
-
 131
131
-
 132
132
-
 133
133
-
 134
134
-
 135
135
-
 136
136
-
 137
137
-
 138
138
-
 139
139
-
 140
140
-
 141
141
-
 142
142
-
 143
143
-
 144
144
-
 145
145
-
 146
146
-
 147
147
-
 148
148
-
 149
149
-
 150
150
-
 151
151
-
 152
152
-
 153
153
-
 154
154
-
 155
155
-
 156
156
-
 157
157
-
 158
158
-
 159
159
-
 160
160
-
 161
161
-
 162
162
-
 163
163
-
 164
164
-
 165
165
-
 166
166
-
 167
167
-
 168
168
-
 169
169
-
 170
170
-
 171
171
-
 172
172
-
 173
173
-
 174
174
-
 175
175
-
 176
176
-
 177
177
-
 178
178
-
 179
179
-
 180
180
-
 181
181
-
 182
182
-
 183
183
-
 184
184
-
 185
185
-
 186
186
-
 187
187
-
 188
188
-
 189
189
-
 190
190
-
 191
191
-
 192
192
-
 193
193
-
 194
194
-
 195
195
-
 196
196
-
 197
197
-
 198
198
-
 199
199
-
 200
200
-
 201
201
-
 202
202
-
 203
203
-
 204
204
-
 205
205
-
 206
206
-
 207
207
-
 208
208
-
 209
209
-
 210
210
-
 211
211
-
 212
212
-
 213
213
-
 214
214
-
 215
215
-
 216
216
-
 217
217
-
 218
218
-
 219
219
-
 220
220
-
 221
221
-
 222
222
-
 223
223
-
 224
224
-
 225
225
-
 226
226
-
 227
227
-
 228
228
-
 229
229
-
 230
230


Belling FARMHOUSE 110 CHIM BLACK Manuale del proprietario
- Categoria
- Cappe da cucina
- Tipo
- Manuale del proprietario
in altre lingue
Documenti correlati
Altri documenti
-
Samsung HDC6C55TX User Instructions
-
Whirlpool AKR 757 IX Guida utente
-
HOTPOINT/ARISTON HAHTT 64 X Guida utente
-
Candy CFT610/5S Manuale del proprietario
-
Whirlpool WHSS 92F LT K Manuale del proprietario
-
Dimplex DVF1200 Manuale del proprietario
-
ATEN CS74A Guida Rapida
-
AKO HC 200 TS Operating Instructions Manual
-