ORANGE Butler E300 Manuale del proprietario
- Categoria
- Telefoni
- Tipo
- Manuale del proprietario

BUTLER E300
USER GUIDE / HANDLEIDING / MANUEL D’UTILISATEUR
GEBRAUCHSANWEISUNG / MANUAL DE USUARIO
BRUKSANVISNING / BRUGERVEJLEDNING /
ANVÄNDARHANDBOK / KÄYTTÖOHJE / MANUALE D’USO
MANUAL DO UTILIZADOR /
INSTRUKCJA OBSUGI / KULLANICI KILAVUZU
1.1

Important
To use ‘Caller ID’ (display caller), this service has to be activated on your phone line.
Normally you need a separate subscription from your telephone company to activate this
function. If you don’t have the Caller ID function on your phone line, the incoming telephone
numbers will NOT be shown on the display of your telephone.
Belangrijk
Om de ‘Nummerweergave’ te kunnen gebruiken, moet deze dienst geactiveerd
zijn op uw telefoonlijn. Om deze dienst te activeren, hebt U hiervoor meestal een apart
abonnement van uw telefoonmaatschappij nodig. Indien U geen nummerweergavefunctie
hebt op uw telefoonlijn, zullen de inkomende telefoonnummers NIET op
de display van uw toestel verschijnen.
Important
Pour utiliser la fonction ‘Caller ID/Clip’ (affichage de l’appelant), ce service doit être activé sur
votre ligne téléphonique. Généralement, vous avez besoin d’un abonnement séparé de votre
compagnie de téléphone pour activer cette fonction. Si vous n’avez pas la fonction
‘Caller ID - Affichage Appelant’ sur votre ligne téléphonique, les numéros de téléphone
entrants n’apparaîtront PAS sur l’écran de votre téléphone.
Wichtig
Zur Verwendung der ‘Rufnummernanzeige’ muss dieser Dienst erst für Ihre Telefonleitung
freigegeben werden. Zur Aktivierung dieser Dienstleistung benötigen Sie meistens ein
separates Abonnement Ihrer Telefongesellschaft.Wenn Sie für Ihre Telefonleitung keine
Rufnummernanzeigefunktion haben, erscheinen die eingehenden
Telefonnummern NICHT im Display Ihres Gerätes.
Importante
Para poder usar la función “Identificación de llamadas,este servicio tiene que estar dado de
alta en su línea telefónica. Normalmente es necesario abonarse a dicho serviciopara que la
compañía telefónica active esta función. Si su línea telefónica no dispone de la
funciónIdentificación de llamadas, la pantalla del aparato no mostrará los números de
teléfono de las llamadas entrantes.
Viktigt
För att använda funktionen "nummervisning" måste tjänsten vara aktiverad för din
telefonlinje. Normalt behöver du ett separat abonnemang från ditt telefonbolag för att kunna
aktivera funktionen. Om nummervisningsfunktionen inte finns för din telefonlinje kommer
inkommande telefonnummer INTE visas på din telefons display.
Vigtigt
For at kunne anvende "Caller ID" (gengivelse af opkalderens nummer) skal denne tjeneste
først aktiveres på Deres telefonlinie. For at aktivere denne tjeneste har De normalt brug for
et separat abonnemenet fra Deres telefonselskab.Hvis De ikke råder over en
Caller ID-anordning på Deres telefonlinie, vises opkalderens telefonnummer IKKE på
displayet på Deres apparat.
Viktig
Før du kan bruke funksjonen "Hvem ringer" må denne service aktiveres på din telefonlinje.
Kontakt din teleoperatør for å abonnere på "Hvem ringer".Dersom du ikke har funksjonen
"Hvem ringer" på di n telefonlinje, vil IKKE telefonnummeret til anropet som kommer
inn vises på skjermen.

Tärkeää
Voidaksesi käyttää soittajan numeron näyttötoimintoa (Caller ID), tämä palvelu on
aktivoitava puhelinlinjaasi. Yleensä se on tilattava erikseen puhelinyhtiöltä ennen kuin
toimintoa voidaan käyttää. Ellei sinulla ole soittajan numeron näyttötoimintoa
puhelinlinjassasi, soittajan numero ei näy puhelimen näytössä.
Importante
Per utilizzare la funzione „Caller ID" (visualizzazione chiamante), è necessario che questo
servizio sia attivato sulla propria linea telefonica. Generalmente, è necessario sottoscrivere
un abbonamento separato con la propria società telefonica, per poter attivare questa
funzione. Se la propria linea telefonica non è dotata della funzione „Caller ID", i numeri
telefonici delle chiamate in arrivo NON verranno visualizzati sul display del proprio telefono.
In caso di chiamata entrante, suona soltanto il ricevitore e non la base.
Importante
Para utilizar a função "ID Chamador" (visualizar Chamador), este serviço terá de ser
activado na sua linha telefónica. Normalmente necessita de subscrever este serviço, à parte,
com o seu operador de telecomunicações, para poder activar esta função. Se não tiver
contratado este serviço a função ID do Chamador não estará disponível e por isso os
números de telefone das chamadas entrantes não aparecerão no seu telefone.
,
.
.
,
.
Uwaga
Aby urzdzenie prezentowao numer przychodzcy, niezbdna jest usuga prezentacji
numeru. Usug t naley aktywowa u lokalnego operatora telekomunikacyjnego.
Jeeli usuga prezentacji numeru nie jest wczona, numery przychodzcych pocze nie
bd prezentowane.
Önemli
’Caller ID’ (arayani gösterme) hizmetinden yararlanabilmek için, telefon hattinda bu servisin
etkinlestirilmis olmasi gerekir. Normalde, bu fonksiyonu etkinlestirmek için telefon
sirketinden ayri bir abonelik almaniz gerekir. Telefon hattinizda Caller ID fonksiyonu yoksa,
gelen telefon numaralari telefonunuzun ekraninda GÖSTERILMEZ.
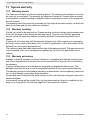
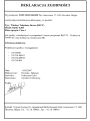
This product is in compliance with the essential requirements and other relevant provisions of the R&TTE directive 1999/5/EC.
The Declaration of conformity can be found on :
http://www.topcom.net/support/cedeclarations.php

UK The features described in this manual are published with reservation to
modifications.
NL De in deze handleiding beschreven mogelijkheden worden gepubliceerd
onder voorbehoud van wijzigingen.
F Les possibilités décrites dans ce manuel sont publiées sous réserve de
modifications.
D Die in dieser Bedienungsanleitung umschriebenen Möglichkeiten, werden
vorbehaltlich Änderungen publiziert.
ES Las características descritas en este manual pueden ser objeto de futuras
modificaciones.
S Funktionerna i denna bruksanvisning publiceras med reservation för ändringar.
DK Vi forbeholder os retten til ændringer af de specifikationer, der er beskrevet i
denne brugsanvisning.
N Funksjoner beskrevet i denne manualen kan endres uten nærmere informasjon.
SF Tässä ohjekirjassa julkaissut tiedot voivat muuttua ilman ennakkoilmoitusta.
IT Le caratteristiche descritte nel presente manuale vengono pubblicate con riserva
di modifica.
PT As características descritas neste manual são publicadas sob reserva de
modificação.
GR ,
.
PL Waciwoci opisane w niniejszej instrukcji obsugi s publikowane z
zatrzeeniem prawa wprowadzenia zmian.
TR Bu kullanim kilavuzunda açiklanan özellikler, degisiklik hakki sakli tutularak
yayinlanmaktadir.

Topcom Butler ME300/Twin/Triple/Quattro 1
Topcom Butler E300/Twin/Triple/Quattro
ENGLISH
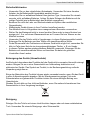
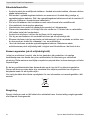
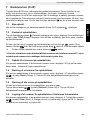
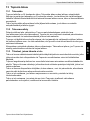
Safety Instructions
• Only use the charger plug supplied. Do not use other chargers, as this may damage the
battery cells.
• Only insert rechargeable batteries of the same type. Never use ordinary,
non-rechargeable batteries. Insert rechargeable batteries so they connect to the right
poles (indicated in the battery compartment of the handset).
• Do not touch the charger and plug contacts with sharp or metal objects.
• The operation of some medical devices may be affected.
• The handset may cause an unpleasant buzzing sound in hearing aids.
• Do not place the basic unit in a damp room or at a distance of less than 1.5 m away from
a water source. Keep water away from the handset.
• Do not use the telephone in environments where there is a risk of explosions.
• Dispose of the batteries and maintain the telephone in an environment-friendly manner.
• As this telephone cannot be used in case of a power cut, you should use a
mains-independent telephone for emergency calls, e.g. a mobile phone.
• This telephone uses rechargable batteries. You have to dispose of the batteries in an
environment friendly manner according to your country regulations.
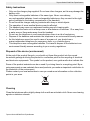
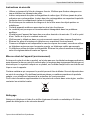
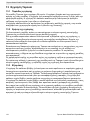
Disposal of the device (environment)
At the end of the product lifecycle, you should not throw this product into the normal
household garbage but bring the product to a collection point for the recycling of electrical
and electronic equipments. The symbol on the product, user guide and/or box indicate this.
Some of the product materials can be re-used if you bring them to a recycling point. By re-
using some parts or raw materials from used products you make an important contribution to
the protection of the environment.
Please contact your local authorities in case you need more information on the collection
points in your area.
Cleaning
Clean the telephone with a slightly damp cloth or with an anti-static cloth. Never use cleaning
agents or abrasive solvents.

2 Topcom Butler E300/Twin/Triple/Quattro
Topcom Butler E300/Twin/Triple/Quattro
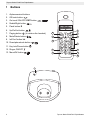
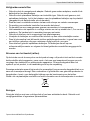
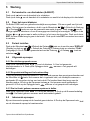
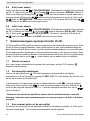
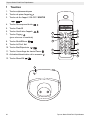
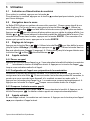
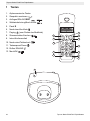
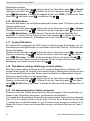
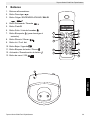
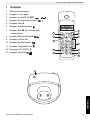
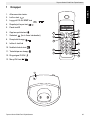
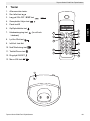
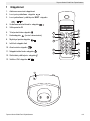
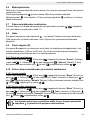
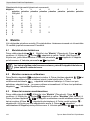
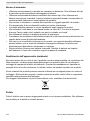
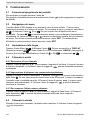
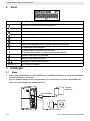
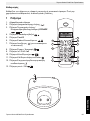
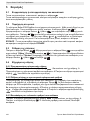
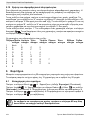
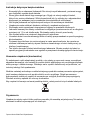
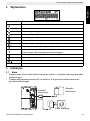
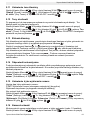
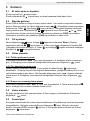
1 Buttons
1. Alphanumerical buttons
2. Off-hook button
3. On-hook/ ON-OFF/ EXIT button
4. Redial/Right button
5. Flash button R
6. Up/Call list button
7. Paging button (to retrieve the handset)
8. Mute/Delete button
9. Int/Conf button Int
10. Down/phonebook button
11. Key lock/Pause button
12. Ringer ON/OFF
13. Menu/OK button
1
2
4
5
9
6
10
8
3
11
12
13
7

Topcom Butler ME300/Twin/Triple/Quattro 3
Topcom Butler E300/Twin/Triple/Quattro
ENGLISH
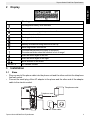
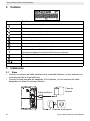
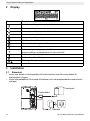
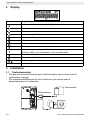
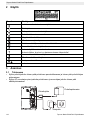
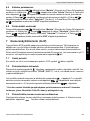
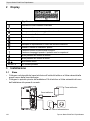
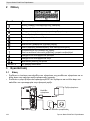
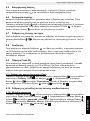
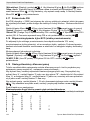
2Display
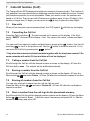
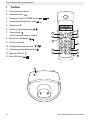
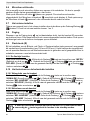
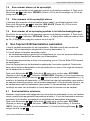
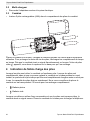
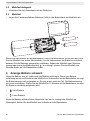
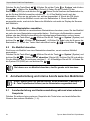
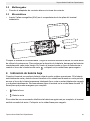
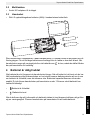
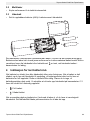
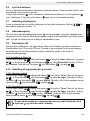
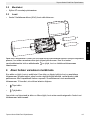
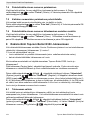
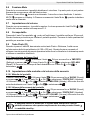
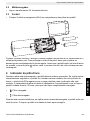
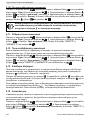
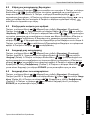
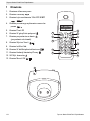
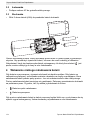
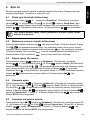
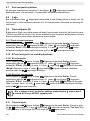
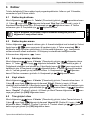
3Installation
3.1 Base
• Plug one end of the phone cable into the phone unit and the other end into the telephone
line wall socket.
• Connect the small plug of the AC adaptor to the phone and the other end of the adapter
cable to the electric socket.
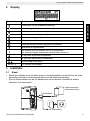
Icon: Meaning:
Rechargeable battery level indicator
You are online
There are new messages in your voice mail
New numbers in call list
The keypad is locked
Microphone is muted
Memory records are being retrieved or set up
When ring buzzer is turned off
The antenna indicates the quality of reception.
The antenna blinks when the handset is out of range!
There are more digits on the left
There are more digits on the right
Scroll direction in the menu
BE300 - x x = handset number
Telephone socket
Telephone cord
Power cable

4 Topcom Butler E300/Twin/Triple/Quattro
Topcom Butler E300/Twin/Triple/Quattro
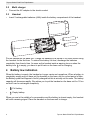
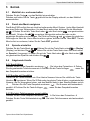
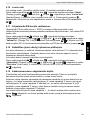
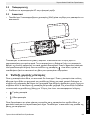
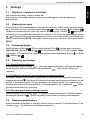
3.2 Multi charger
• Connect the AC adaptor to the electric socket
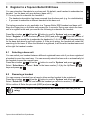
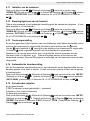
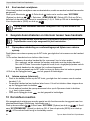
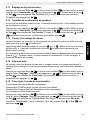
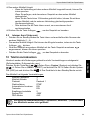
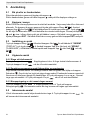
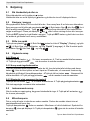
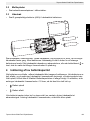
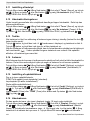
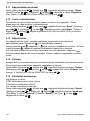
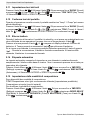
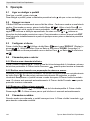
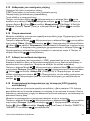
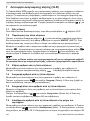
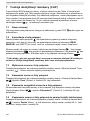
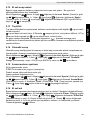
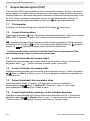
3.3 Handset
• Insert 2 rechargeable batteries (AAA) inside the battery compartment of the handset.
Put the handset on the base unit. Charge the handset for a period of 24 hours before using
the handset for the first time. To extend the battery life time, discharge the batteries
completely from time to time. As soon as the handset emits a warning tone or when the
battery icon is empty, you have to put it back on the base unit for charging.
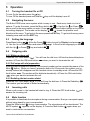
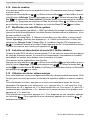
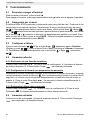
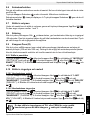
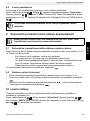
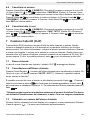
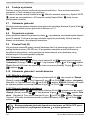
4 Battery low indication
When the battery is empty, the handset no longer carries out operations. When a battery is
completely empty and you have put the handset on the base unit for a short period of time,
the Battery symbol will appear to be fully charged but this is actually not the case. The battery
capacity will decrease rapidly. We advise you to put the handset on the base unit for 12 hrs
so that it can be recharged completely.
• Full battery
• Empty battery
When you are in the middle of a conversation and the battery is almost empty, the handset
will emit a warning signal. Place the handset on the base unit to charge.
+
-
+
-
Butler E300
ME84
Butler E300

Topcom Butler ME300/Twin/Triple/Quattro 5
Topcom Butler E300/Twin/Triple/Quattro
ENGLISH
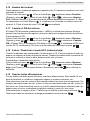
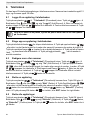
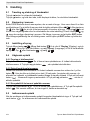
5Operation
5.1 Turning the handset On or Off
To turn On the handset press the key
To turn Off the handset press and hold the key until the display turns off.
5.2 Navigating the menu
The Butler E300 has a menu system which is easy to use. Each menu leads to a list of
options. To enter the menu, press the Menu button Æ Use the Up or Down
key to scroll to the menu option you want. Press to select further options or to confirm
the setting displayed. The arrows on the display and shows the possible scroll
direction in the menu. To go back in the menu press the EXIT key. To go back from any menu
instantly press and hold the EXIT key.
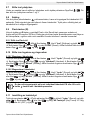
5.3 Setting the language
Press Menu button ÆUse the Down button to scroll to ‘Display’ and press
Æ Use the Up or Down button and select ‘Language’ Æ Scroll to the language you want
with the Up or Down key and select .
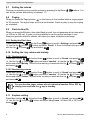
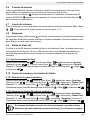
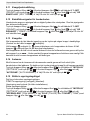
5.4 Outgoing calls
5.4.1 Making a phone call
Press the OFF-hook button . You will hear the dial tone Æ Enter the desired telephone
number Æ Press the ON-hook button when you want to terminate the call.
5.4.2 Call setup with dial preparation
Enter the desired telephone number. An incorrect number can be corrected by means of the
Mute button . When you haven’t pressed a button for 20 seconds, the number you’ve
already entered will disappear and the handset returns to standby mode ÆPress the OFF-
hook button . The number will be dialled automatically Æ Press the ON-hook button
when you want to terminate the call.
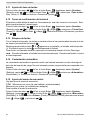
5.4.3 Redialing the last number dialed
Press the OFF-hook button Æ You will hear the dial tone Æ Press the Redial key .
The number you last called is dialled automatically.
5.5 Incoming calls
When a call comes in, the handset will start to ring Æ Press the OFF-hook button to
answer the incoming call.
5.6 Mute function
It is possible to deactivate the microphone during a conversation. Now you can speak openly
without being heard by your correspondent.
Press the Mute button during a conversation. The microphone will be deactivated. The
MUTE symbol . appears on the display Æ Press the Mute button
again when you
want to continue the conversation.

6 Topcom Butler E300/Twin/Triple/Quattro
Topcom Butler E300/Twin/Triple/Quattro
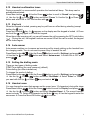
5.7 Setting the volume
During a conversation you can set the volume by pressing the Up/Down / buttons. You
can set the volume alternatively in between 1-3.
5.8 Paging
When you press the Paging button on the base unit, the handset emits a ringing signal
for 20 seconds. This signal helps you find a lost handset. Press any key to stop the ringing
on a handset.
5.9 Flash button (R)
When you press the R button, also called flash or recall, the unit generates a line interruption
(of 100 ms or 250 ms). It gives you the possibility to use the special services of your
telephone provider and/or to transfer calls when you have a telephone exchange.
5.9.1 Setting the Flash time
Press Menu button ÆUse the Down button to scroll to ‘Settings’ and press
Æ Use the Up or Down button and select ‘Recall’ Æ Scroll to the flash time you want
with the Up or Down key and select .
5.10 Setting the ring volume and melody
5.10.1 Handset melody
Press Menu button ÆUse the Down button to scroll to ‘Sound’ and press
Æ Use the Up or Down button and select ‘handset’ Æ Use the Up or Down
button and select ‘Melody’ ÆScroll to the melody you want with the Up or Down key
and select .
5.10.2 Handset ring volume
Press Menu button ÆUse the Down button to scroll to ‘Sound’ and press
Æ Use the Up or Down button and select ‘handset’ Æ Use the Up or Down
button and select ‘Volume’ ÆScroll to the volume you want with the Up or Down key
and select .
5.11 Keytone setting
Press Menu button ÆUse the Down button to scroll to ‘Sound’ and press
Æ Use the Up or Down button and select ‘Key Tones’ Æ Select ON or OFF and
press .
You can turn the ringer volume of each individual handset ON or OFF by
simply press and hold the key in standby.

Topcom Butler ME300/Twin/Triple/Quattro 7
Topcom Butler E300/Twin/Triple/Quattro
ENGLISH
5.12 Handset confirmation tones
During successfull or unsuccessfull operation the handset will beep. This beep can be
activated/deactivated:
Press Menu button ÆUse the Down button to scroll to ‘Sound’ and press
Æ Use the Up or Down button and select ‘Tones’ Æ Use the Up or Down
button and select ON or OFF and confirm with .
5.13 Key lock
When the keypad is locked, pressing any key will have no effect during standby (except
holding the key).
Press and hold the key Æ
appears on the display and the keypad is locked Æ Press
and hold the key again to un-lock the keypad.
When there is an incoming call, you can still answer the call by pressing the OFF-hook button
. During the call, the keypad functions as normal. When the call is ended, the keypad
will be locked again.
5.14 Auto answer
Auto answer enables you to answer an incoming call by simply picking up the handset from
the charging cradle. You do not need to press a key to answer the call.
Press Menu button ÆUse the Down button to scroll to ‘Settings’ and press
Æ Use the Up or Down button and select ‘Autoanswer’ Æ Select ON or OFF and
press .
5.15 Setting the dialling mode
There are two types of dialling mode:
DTMF/Tone dialling (the most common) (default)
Pulse dialling (for older installations)
To change the mode of dialling:
Press Menu button ÆUse the Down button to scroll to ‘Settings’ and press
Æ Use the Up or Down button and select ‘Dial Mode’ Æ Select ‘Pulse’ or ‘TONE’
you want with the Up or Down key and select .
5.16 Handset name
You can change the name that appears on the sceen (max. 10 characters) during idle stage:
Press Menu button ÆUse the Down button to scroll to ‘Display’ and press
Æ Use the Up or Down button and select ‘Handset Name’ Æ The currect handset
name is shown Æ Delete the character by the Mute -key Æ Use the keypad to enter the
new name Æ Press the Menu/OK button to confirm.

8 Topcom Butler E300/Twin/Triple/Quattro
Topcom Butler E300/Twin/Triple/Quattro
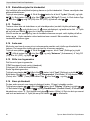
5.17 Changing the system PIN
The system PIN code (default = ‘0000’) is used to protect various settings like register rights,
access right to some menu’s in the phone. You can change the PIN:
Press Menu button ÆUse the Down button to scroll to ‘System’ and press
Æ Use the Up or Down button and select ‘Change Pin’ Æ Enter the old pin and press
Æ Enter the new PIN and press OK Æ Enter the new PIN again to confirm and press
.
5.18 Switching the ECO (low radiation) mode ON/OFF
When low radiation is activated the base will emit 10% less during standby compared to the
normal power mode. During communication the handset power will be reduced depending
on the distance between handset and base.
You can turn this function ON or OFF:
Press Menu button ÆUse the Down button to scroll to ‘System’ and press
Æ Use the Up or Down button and select ‘Low Power’ Æ Select ON or OFF and
press to confirm.
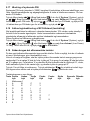
5.19 Using the alphanumerical keypad
With your telephone you can also enter alphanumeric characters. This is useful for entering
a name into the phonebook, giving a name to a hand-set, …
To select a letter, press the corresponding key as many times as is necessary. For example
to select an ‘A’, press ‘2’ once, to select a ‘B’, press ‘2’ twice and so on. To select ‘A’ and then
B consecutively, select ‘A’, wait until the cursor moves on to the next character, then press
‘2’ twice.
To select a space, press 1. To erase a single character press the delete key. To delete
all characters press and hold the delete key.
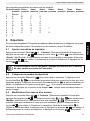
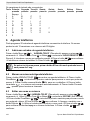
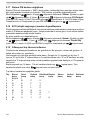
The keypad characters are as follows:
Key First Second Third Fourth Fifth Sixth Seventh Eighth
press press press press press press press press
1 Space 1
2A B C 2
3D E F 3
4G H I 4
5J K L 5
6M N O 6
7P Q R S 7
8T U V 8
9W X Y Z 9
00

Topcom Butler ME300/Twin/Triple/Quattro 9
Topcom Butler E300/Twin/Triple/Quattro
ENGLISH
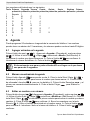
6 Phonebook
You can program 20 phonebook entries in the phone’s memory. Names can be up to 12
characters long and numbers up to 20 digits.
6.1 Add a phonebook entries
Press Menu button Æ‘Phonebook’ appears and press again Æ Use the Up
or Down button and select ‘Add Record’ Æ Enter the name you whish to store Æ
Press the button to confirm Æ Enter the telephone number Æ Press the button
to confirm.
6.2 Dial a Phonebook entry
Press the Phonebook button to enter the phonebook Æ Press the Up/Down key /
or enter the first character to search the name you want to dial Æ Press the redial/right
button to view details Æ Press the OFF-hook button and the number will be
dialled automatically Æ Press the ON-hook button when you want to terminate the call.
6.3 Edit name or number
Press Menu button Æ‘Phonebook’ appears and press again Æ Use the Up
or Down button and select ‘Edit Record’ Æ Press the Up/Down key / or enter
the first character to search the name you want to change ÆPress the button to
confirm Æ Delete the character by the Mute -key Æ Use the keypad to enter the new
name Æ Press the button to confirmÆEnter/delete the telephone number Æ Press
the button to confirm.
6.4 Delete an entry
Press Menu button Æ‘Phonebook’ appears and press OK again Æ Use the Up
or Down button and select ‘Delete’ Æ Press the Up/Down key / or enter the first
character to search the name you want to delete ÆPress the button to show the
telephonenumber Æ Press the button and ‘Confirm?’ appears Æ Press the Menu/
OK button to delete or EXIT-button to skip back.
6.5 Delete all entries
Press Menu button Æ‘Phonebook’ appears and press OK again Æ Use the Up
or Down button and select ‘Delete All’ Æ Press button and ‘Confirm?’ appears
Æ Press the button to delete all or EXIT-button to skip back.
If you wish to insert a pause, press the #/II button on the location where you
want a pause of 2 sec.

10 Topcom Butler E300/Twin/Triple/Quattro
Topcom Butler E300/Twin/Triple/Quattro
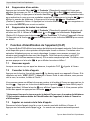
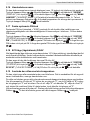
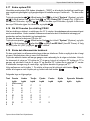
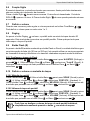
7 Caller-ID function (CLIP)
The Topcom Butler E300 displays the telephone numbers of incoming calls. This function is
only possible if you are subscribed to a telephone operator that provides this service. Contact
your telephone provider for more information. When you receive a call, the numbers are
saved in a Call list. This list can hold 20 telephone numbers (each of max. 20 digits). If the
number is longer then 12 digits, you can press the key to show the other digits!
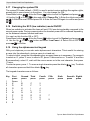
7.1 New calls
When you’ve received a new unanswered call, the CLIP symbol will blink on the display.
7.2 Consulting the Call list
Press the Call Log button . The last received call is shown on the display. If the list is
empty, ‘EMPTY’ is shown on the display. If not, You can see the name, number and date/
time.*
You can scroll from name to number and date time by pressing the button. Use the left
scroll key to scroll to the previous call. Use the button to show the next call Æ You
can leave the Call list by pressing the button.
* Only when the network sends the time/date together with the telephone number!!! On
some networks with caller ID, time and date will not be displayed
7.3 Calling a number from the Call list
Scroll through the Call list until the desired number is shown on the display Æ Press the
Off-hook button . The number will be dialled automatically.
7.4 Erasing a number from the Call list
Scroll through the Call list until the desired number is shown on the display Æ Press the
Menu button and select ‘Delete’ Æ Press OK after the confirmation request to confirm.
7.5 Erasing all numbers from the Call list
You can only erase all numbers from the call list if all are read.
Press the Menu button and select ‘Delete All’ Æ Press OK after the confirmation
request to confirm.
7.6 Store a number from the call log into the phonebook memory
Scroll through the Call list until the desired number is shown on the display Æ Press the Menu
button and select ‘Save’. Æ Edit the name if nessesary and press OK Æ Edit the
number if nessesary and press OK.

Topcom Butler ME300/Twin/Triple/Quattro 11
Topcom Butler E300/Twin/Triple/Quattro
ENGLISH
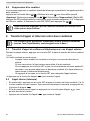
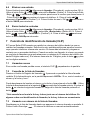
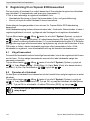
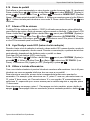
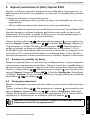
8 Register to a Topcom Butler E300 base
You can subscribe 4 handsets to one base unit. By default, each handset is subscribed as
handset 1 on the base unit upon delivery (base unit 1).
!!! You only need to subscribe the handset if:
• The handset subscription has been removed from the base unit (e.g. for reinitialisation)
• If you want to subscribe a different handset to this base unit.
The below procedure is only applicable to a Topcom Butler E300 handset and base unit!!
Keep the Paging key on the base unit pressed for 4 seconds. During one minute the base
unit is in register mode and you must do the following to subscribe the handset:
Press Menu button ÆUse the button to scroll to ‘System’ and press Æ
Select ‘Register’ Æ Enter the base pin code (0000) and press . Enter the number of
the base unit you would like to subscribe the handset to (1-4) Æ The unit will start searching
for the base and when found it will register Æ If the pin is wrong, the handset will restart the
searching for the base Æ When the handset is registered, it will show the handset name and
at the right the handset number.
8.1 Selecting a base unit
You can switch your handset between different registered base units if you have registered
a handset to more then one base. You can manually select the base unit or automatically let
the handset choose the nearest base.
Press Menu button ÆUse the button to scroll to ‘System’ and press Æ
Select ‘Select base. Æ Select ‘Auto’ or the base number (1-4) by the Up/Down /
keys and press .
8.2 Removing a handset
You can remove a handset from a base to allow another handset to be registered:
Press Menu button ÆUse the button to scroll to ‘System’ and press Æ
Select ‘Delete HS’. Press OK and select the handset you which to remove (1-4) Æ Press
OK to confirm Æ Enter the pin code (0000) and press .
You can only remove existing handsets and others then the one you are
using.

12 Topcom Butler E300/Twin/Triple/Quattro
Topcom Butler E300/Twin/Triple/Quattro
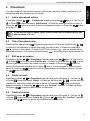
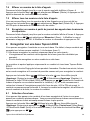
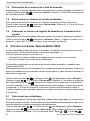
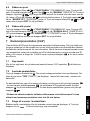
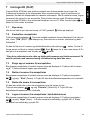
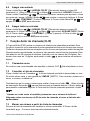
9 Call transfer and Intercom between two handsets
9.1 Call transfer and conference call during an external call
During an external call, press the INT key followed by the number (1-4) of the other handset.
Æ The other handset will start to ring:
– When the other handset takes the line you can talk internally.
If you hang up, the external line will be connected with the other handset.
If you press and hold the INT key for 3 seconds you can talk with the 2nd handset
and external line at the same time (conference call)
– Or press the INT key again to return to the external call.
Æ Press ON-hook button to end the call.
9.2 Internal call (intercom)
• In standby press the INT key followed by the number (1-4) of the other handset.
• The other handset will start to ring. You can stop the ringing by pressing the ON-hook
button .
• If the other handset answers the call by pressing the OFF-hook button you can talk
internally.
• Press the ON-hook button to end the call.
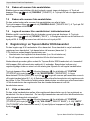
10 Reset of the phone
This will undo all changes and set back all default settings (ringer volume, ringer melody,
etc...).
Press Menu button ÆScroll to ‘System’ and press Æ Scroll to ‘RESET’ and
press OK Æ Enter the pin code (0000) and press Æ The unit will go back to standby.
Default handset settings are:
Handset volume 3
Handset melody 3
Flash time Recall 1
Dial mode Tone
AutoAnswer ON
Keypad tone ON
Receiver volume 2
Pin code ‘0000’
ECO mode OFF
These functions only work when more then one handset (like a Twin/Triple/
Quattro version) is registered to the base!
All memories (redial, phonebook, call log,...) and handset name will not be
erased!

Topcom Butler ME300/Twin/Triple/Quattro 13
Topcom Butler E300/Twin/Triple/Quattro
ENGLISH
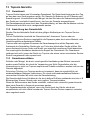
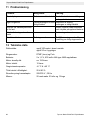
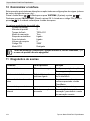
11 Troubleshooting
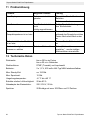
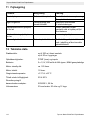
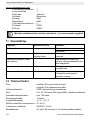
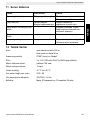
12 Technical Data
Range: up to 300 m in open space
up to 50 m in buildings
Dialling options: DTMF (tone) and Pulse
Batteries: 2 x 1.2V, 650 mAh AAA Type NiMH rechargeable
Max. standby time: approx. 120 hours
Max. talk time: 12 hours
Ambient temperature: +5 °C to +45 °C
Permitted relative air humidity: 25 to 85 %
Power supply base adapter: 220/230V , 50 Hz
Memories: 20 with max. 20 digits and 12 characters
Problem Possible cause Solution
No Display Batteries not charged Check the position of the
batteries
Recharge the batteries
No dialling tone Telephone cable not
properly connected
Check the connection
of the telephone cable
Volume of conversation
partner too low
Adjust the volume during the
conversation by pressing the
Up/Down keys
Handset ringer volume too low Adjust the ringer volume
Not possible to dial a number Wrong dial mode See “Setting dial mode”
to set
the correct dial mode

14 Topcom Butler E300/Twin/Triple/Quattro
Topcom Butler E300/Twin/Triple/Quattro
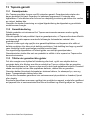
13 Topcom warranty
13.1 Warranty period
The Topcom units have a 24-month warranty period. The warranty period starts on the day
the new unit is purchased. The warranty on batteries is limited to 6 months after purchase.
Consumables or defects causing a negligible effect on operation or value of the equipment
are not covered.
The warranty has to be proven by presentation of the original purchase receipt, on which the
date of purchase and the unit-model are indicated.
13.2 Warranty handling
A faulty unit needs to be returned to a Topcom service centre including a valid purchase note.
If the unit develops a fault during the warranty period, Topcom or its officially appointed
service centre will repair any defects caused by material or manufacturing faults free of
charge.
Topcom will at its discretion fulfil its warranty obligations by either repairing or exchanging
the faulty units or parts of the faulty units. In case of replacement, colour and model can be
different from the original purchased unit.
The initial purchase date shall determine the start of the warranty period. The warranty period
is not extended if the unit is exchanged or repaired by Topcom or its appointed service
centres.
13.3 Warranty exclusions
Damage or defects caused by incorrect treatment or operation and damage resulting from
use of non-original parts or accessories not recommended by Topcom are not covered by
the warranty.
Topcom cordless phones are designed to work with rechargeable batteries only. The
damage caused by the use of non-rechargeable batteries is not covered under warranty.
The warranty does not cover damage caused by outside factors, such as lightning, water and
fire, nor any damage caused during transportation.
No warranty can be claimed if the serial number on the units has been changed, removed or
rendered illegible.
Any warranty claims will be invalid if the unit has been repaired, altered or modified by the
buyer or by unqualified, non-officially appointed Topcom service centres.

Topcom Butler ME300/Twin/Triple/Quattro 15
Topcom Butler E300/Twin/Triple/Quattro
NEDERLANDS
Veiligheidsvoorschriften
• Gebruik enkel de meegeleverde adapter. Gebruik geen andere adapters, omdat dit de
batterijcellen kan beschadigen.
• Gebruik enkel oplaadbare batterijen van hetzelfde type. Gebruik nooit gewone, niet-
oplaadbare batterijen. Let bij het plaatsen van de oplaadbare batterijen op de polariteit
(aangeduid in de batterijruimte van de handset).
• Raak de laad- en stekkercontacten niet aan met scherpe en metalen voorwerpen.
• De werking van medische toestellen kan worden beïnvloed.
• De handset kan een onaangenaam gezoem veroorzaken in hoorapparaten.
• Het basisstation niet opstellen in vochtige ruimten en niet op minder dan 1,5 m van een
waterbron. De handset niet in aanraking brengen met water.
• Gebruik de telefoon niet in omgevingen met explosiegevaar.
• Verwijder de batterijen en onderhoud de telefoon op een milieuvriendelijke manier.
• Daar bij stroomuitval met dit toestel niet kan getelefoneerd worden, in geval van nood
een telefoon gebruiken die geen netstroom nodig heeft bvb. een gsm.
• Deze telefoon gebruikt oplaadbare batterijen. De batterijen dienen op een
milieuvriendelijke manier en volgens de lokaal geldende voorschriften weggegooid te
worden.
Afvoeren van het toestel (milieu)
Op het einde van de levenscyclus van het product mag u dit product niet met het normale
huishoudelijke afval weggooien, maar moet u het naar een inzamelpunt brengen voor de
recyclage van elektrische en elektronische apparatuur. Dit wordt aangeduid door het
symbool op het product, in de handleiding en/of op de verpakking.
Sommige materialen waaruit het product is vervaardigd, kunnen worden hergebruikt als u ze
naar een inzamelpunt brengt. Door onderdelen of grondstoffen van gebruikte producten te
hergebruiken, levert u een belangrijke bijdrage aan de bescherming van het milieu.
Wend u tot uw plaatselijke overheid voor meer informatie over de inzamelpunten in uw buurt.
Reinigen
Reinig de telefoon met een vochtige doek of met een antistatische doek. Gebruik nooit
reinigingsmiddelen of agressieve oplosmiddelen.

16 Topcom Butler E300/Twin/Triple/Quattro
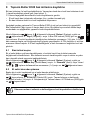
Topcom Butler E300/Twin/Triple/Quattro
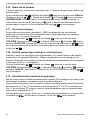
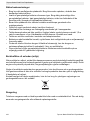
1 Toetsen
1. Alfanumerieke toetsen
2. Opnemen-toets
3. Opleggen / AAN-UIT/ EXIT-toets
4. Nummerherhaling/Rechts-toets
5. Flash-toets 'R'
6. Omhoog-/Oproeplijst-toets
7. Paging-toets
(om de handset terug te vinden)
8. Microfoon uit/Wistoets
9. Int/Conf-toets Int
10. Omlaag/Telefoonboek-toets
11. Toetsvergrendeling/Pauzetoets
12. Beltoon AAN/UIT
13. Menu/OK-toets
1
2
4
5
9
6
10
8
3
11
12
13
7
La pagina sta caricando ...
La pagina sta caricando ...
La pagina sta caricando ...
La pagina sta caricando ...
La pagina sta caricando ...
La pagina sta caricando ...
La pagina sta caricando ...
La pagina sta caricando ...
La pagina sta caricando ...
La pagina sta caricando ...
La pagina sta caricando ...
La pagina sta caricando ...
La pagina sta caricando ...
La pagina sta caricando ...
La pagina sta caricando ...
La pagina sta caricando ...
La pagina sta caricando ...
La pagina sta caricando ...
La pagina sta caricando ...
La pagina sta caricando ...
La pagina sta caricando ...
La pagina sta caricando ...
La pagina sta caricando ...
La pagina sta caricando ...
La pagina sta caricando ...
La pagina sta caricando ...
La pagina sta caricando ...
La pagina sta caricando ...
La pagina sta caricando ...
La pagina sta caricando ...
La pagina sta caricando ...
La pagina sta caricando ...
La pagina sta caricando ...
La pagina sta caricando ...
La pagina sta caricando ...
La pagina sta caricando ...
La pagina sta caricando ...
La pagina sta caricando ...
La pagina sta caricando ...
La pagina sta caricando ...
La pagina sta caricando ...
La pagina sta caricando ...
La pagina sta caricando ...
La pagina sta caricando ...
La pagina sta caricando ...
La pagina sta caricando ...
La pagina sta caricando ...
La pagina sta caricando ...
La pagina sta caricando ...
La pagina sta caricando ...
La pagina sta caricando ...
La pagina sta caricando ...
La pagina sta caricando ...
La pagina sta caricando ...
La pagina sta caricando ...
La pagina sta caricando ...
La pagina sta caricando ...
La pagina sta caricando ...
La pagina sta caricando ...
La pagina sta caricando ...
La pagina sta caricando ...
La pagina sta caricando ...
La pagina sta caricando ...
La pagina sta caricando ...
La pagina sta caricando ...
La pagina sta caricando ...
La pagina sta caricando ...
La pagina sta caricando ...
La pagina sta caricando ...
La pagina sta caricando ...
La pagina sta caricando ...
La pagina sta caricando ...
La pagina sta caricando ...
La pagina sta caricando ...
La pagina sta caricando ...
La pagina sta caricando ...
La pagina sta caricando ...
La pagina sta caricando ...
La pagina sta caricando ...
La pagina sta caricando ...
La pagina sta caricando ...
La pagina sta caricando ...
La pagina sta caricando ...
La pagina sta caricando ...
La pagina sta caricando ...
La pagina sta caricando ...
La pagina sta caricando ...
La pagina sta caricando ...
La pagina sta caricando ...
La pagina sta caricando ...
La pagina sta caricando ...
La pagina sta caricando ...
La pagina sta caricando ...
La pagina sta caricando ...
La pagina sta caricando ...
La pagina sta caricando ...
La pagina sta caricando ...
La pagina sta caricando ...
La pagina sta caricando ...
La pagina sta caricando ...
La pagina sta caricando ...
La pagina sta caricando ...
La pagina sta caricando ...
La pagina sta caricando ...
La pagina sta caricando ...
La pagina sta caricando ...
La pagina sta caricando ...
La pagina sta caricando ...
La pagina sta caricando ...
La pagina sta caricando ...
La pagina sta caricando ...
La pagina sta caricando ...
La pagina sta caricando ...
La pagina sta caricando ...
La pagina sta caricando ...
La pagina sta caricando ...
La pagina sta caricando ...
La pagina sta caricando ...
La pagina sta caricando ...
La pagina sta caricando ...
La pagina sta caricando ...
La pagina sta caricando ...
La pagina sta caricando ...
La pagina sta caricando ...
La pagina sta caricando ...
La pagina sta caricando ...
La pagina sta caricando ...
La pagina sta caricando ...
La pagina sta caricando ...
La pagina sta caricando ...
La pagina sta caricando ...
La pagina sta caricando ...
La pagina sta caricando ...
La pagina sta caricando ...
La pagina sta caricando ...
La pagina sta caricando ...
La pagina sta caricando ...
La pagina sta caricando ...
La pagina sta caricando ...
La pagina sta caricando ...
La pagina sta caricando ...
La pagina sta caricando ...
La pagina sta caricando ...
La pagina sta caricando ...
La pagina sta caricando ...
La pagina sta caricando ...
La pagina sta caricando ...
La pagina sta caricando ...
La pagina sta caricando ...
La pagina sta caricando ...
La pagina sta caricando ...
La pagina sta caricando ...
La pagina sta caricando ...
La pagina sta caricando ...
La pagina sta caricando ...
La pagina sta caricando ...
La pagina sta caricando ...
La pagina sta caricando ...
La pagina sta caricando ...
La pagina sta caricando ...
La pagina sta caricando ...
La pagina sta caricando ...
La pagina sta caricando ...
La pagina sta caricando ...
La pagina sta caricando ...
La pagina sta caricando ...
La pagina sta caricando ...
La pagina sta caricando ...
La pagina sta caricando ...
La pagina sta caricando ...
La pagina sta caricando ...
La pagina sta caricando ...
La pagina sta caricando ...
La pagina sta caricando ...
La pagina sta caricando ...
La pagina sta caricando ...
La pagina sta caricando ...
La pagina sta caricando ...
La pagina sta caricando ...
La pagina sta caricando ...
La pagina sta caricando ...
La pagina sta caricando ...
La pagina sta caricando ...
La pagina sta caricando ...
La pagina sta caricando ...
La pagina sta caricando ...
La pagina sta caricando ...
La pagina sta caricando ...
-
 1
1
-
 2
2
-
 3
3
-
 4
4
-
 5
5
-
 6
6
-
 7
7
-
 8
8
-
 9
9
-
 10
10
-
 11
11
-
 12
12
-
 13
13
-
 14
14
-
 15
15
-
 16
16
-
 17
17
-
 18
18
-
 19
19
-
 20
20
-
 21
21
-
 22
22
-
 23
23
-
 24
24
-
 25
25
-
 26
26
-
 27
27
-
 28
28
-
 29
29
-
 30
30
-
 31
31
-
 32
32
-
 33
33
-
 34
34
-
 35
35
-
 36
36
-
 37
37
-
 38
38
-
 39
39
-
 40
40
-
 41
41
-
 42
42
-
 43
43
-
 44
44
-
 45
45
-
 46
46
-
 47
47
-
 48
48
-
 49
49
-
 50
50
-
 51
51
-
 52
52
-
 53
53
-
 54
54
-
 55
55
-
 56
56
-
 57
57
-
 58
58
-
 59
59
-
 60
60
-
 61
61
-
 62
62
-
 63
63
-
 64
64
-
 65
65
-
 66
66
-
 67
67
-
 68
68
-
 69
69
-
 70
70
-
 71
71
-
 72
72
-
 73
73
-
 74
74
-
 75
75
-
 76
76
-
 77
77
-
 78
78
-
 79
79
-
 80
80
-
 81
81
-
 82
82
-
 83
83
-
 84
84
-
 85
85
-
 86
86
-
 87
87
-
 88
88
-
 89
89
-
 90
90
-
 91
91
-
 92
92
-
 93
93
-
 94
94
-
 95
95
-
 96
96
-
 97
97
-
 98
98
-
 99
99
-
 100
100
-
 101
101
-
 102
102
-
 103
103
-
 104
104
-
 105
105
-
 106
106
-
 107
107
-
 108
108
-
 109
109
-
 110
110
-
 111
111
-
 112
112
-
 113
113
-
 114
114
-
 115
115
-
 116
116
-
 117
117
-
 118
118
-
 119
119
-
 120
120
-
 121
121
-
 122
122
-
 123
123
-
 124
124
-
 125
125
-
 126
126
-
 127
127
-
 128
128
-
 129
129
-
 130
130
-
 131
131
-
 132
132
-
 133
133
-
 134
134
-
 135
135
-
 136
136
-
 137
137
-
 138
138
-
 139
139
-
 140
140
-
 141
141
-
 142
142
-
 143
143
-
 144
144
-
 145
145
-
 146
146
-
 147
147
-
 148
148
-
 149
149
-
 150
150
-
 151
151
-
 152
152
-
 153
153
-
 154
154
-
 155
155
-
 156
156
-
 157
157
-
 158
158
-
 159
159
-
 160
160
-
 161
161
-
 162
162
-
 163
163
-
 164
164
-
 165
165
-
 166
166
-
 167
167
-
 168
168
-
 169
169
-
 170
170
-
 171
171
-
 172
172
-
 173
173
-
 174
174
-
 175
175
-
 176
176
-
 177
177
-
 178
178
-
 179
179
-
 180
180
-
 181
181
-
 182
182
-
 183
183
-
 184
184
-
 185
185
-
 186
186
-
 187
187
-
 188
188
-
 189
189
-
 190
190
-
 191
191
-
 192
192
-
 193
193
-
 194
194
-
 195
195
-
 196
196
-
 197
197
-
 198
198
-
 199
199
-
 200
200
-
 201
201
-
 202
202
-
 203
203
-
 204
204
-
 205
205
-
 206
206
-
 207
207
-
 208
208


ORANGE Butler E300 Manuale del proprietario
- Categoria
- Telefoni
- Tipo
- Manuale del proprietario
in altre lingue
- français: ORANGE Butler E300 Le manuel du propriétaire
- Deutsch: ORANGE Butler E300 Bedienungsanleitung
- português: ORANGE Butler E300 Manual do proprietário
- dansk: ORANGE Butler E300 Brugervejledning
- svenska: ORANGE Butler E300 Bruksanvisning
Altri documenti
-
Topcom TE-5851 Manuale utente
-
Topcom Butler 920 Manuale utente
-
SwissVoice ePure2 ブラック & ホワイト Manuale utente
-
Topcom Butler 930 Guida utente
-
Tristar Butler 901 Combo Manuale del proprietario
-
Topcom Ultra SR1200c Manuale utente
-
Topcom fidelity 142 Manuale utente
-
Topcom Fidelity 1010 Manuale utente
-
-