Toro 50cm Mulching/Rear Bagging/Side Discharge Lawn Mower Manuale utente
- Categoria
- Tosa erba
- Tipo
- Manuale utente

FormNo.3388-481RevB
50cmMulching/Rear
Bagging/SideDischarge
LawnMower
29645
Tondeusemulching/àbac
arrière/éjectionlatéralede50
cm
29645
Tosaerbaconpiattoda50cm
eopzionemulching/raccolta
posteriore/scaricolaterale
29645
www.T oro.com.
*3388-481*B

CV
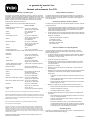
FormNo.3388-478RevB
50cmMulching/RearBagging/SideDischargeLawn
Mower
ModelNo.29645—SerialNo.315000001andUp
Operator'sManual
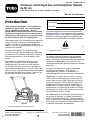
Introduction
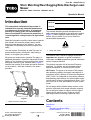
Thisrotary-blade,walk-behindlawnmoweris
intendedtobeusedbyresidentialhomeowners
orprofessional,hiredoperators.Itisdesigned
primarilyforcuttinggrassonwell-maintained
lawnsonresidentialorcommercialproperties.It
isnotdesignedforcuttingbrushorforagricultural
uses.
Readthisinformationcarefullytolearnhowtooperate
andmaintainthismachineproperlyandtoavoid
bothinjuryanddamagetothemachine.Youare
responsibleforoperatingthemachineproperlyand
safely.
YoumaycontactT orodirectlyatwww.T oro.comfor
productandaccessoryinformation,helpndinga
dealer,ortoregisteryourproduct.
Wheneveryouneedservice,genuineToroparts,or
additionalinformation,contactanAuthorizedService
DealerorT oroCustomerServiceandhavethemodel
andserialnumbersofyourmachineready.Figure1
identiesthelocationofthemodelandserialnumbers
onthemachine.Writethenumbersinthespace
provided.
g024150
Figure1
1.Modelandserialnumberplate
ModelNo.
SerialNo.
Thismanualidentiespotentialhazardsandhas
safetymessagesidentiedbythesafetyalertsymbol
(Figure2),whichsignalsahazardthatmaycause
seriousinjuryordeathifyoudonotfollowthe
recommendedprecautions.
g000502
Figure2
1.Safetyalertsymbol
Thismanualuses2wordstohighlightinformation.
Importantcallsattentiontospecialmechanical
informationandNoteemphasizesgeneralinformation
worthyofspecialattention.
ThisproductcomplieswithallrelevantEuropean
directives.Fordetails,seetheseparateproduct
specicDeclarationofConformity(DOC)sheet.
NetTorque:Thegrossornettorqueofthisengine
waslaboratoryratedbytheenginemanufacturerin
accordancewiththeSocietyofAutomotiveEngineers
(SAE)J1940.Asconguredtomeetsafety,emission,
andoperatingrequirements,theactualenginetorque
onthisclassofmowerwillbesignicantlylower.Goto
www.T oro.comtoviewspecicationsonyourmower
model.
Donottamperwithordisablesafetydevicesonthe
machine,andchecktheirproperoperationregularly.
Donotattempttoadjustortamperwiththeengine
speedcontrol;doingsomaycreateanunsafe
operatingcondition,resultinginpersonalinjury.
Contents
Introduction...............................................................1
Safety.......................................................................2
GeneralLawnMowerSafety...............................2
SoundPressure.................................................4
©2017—TheToro®Company
8111LyndaleAvenueSouth
Bloomington,MN55420
Registeratwww.T oro.com.
OriginalInstructions(EN)
PrintedinMexico
AllRightsReserved
*3388-478*B

SoundPower.....................................................4
Hand/ArmVibration............................................4
SafetyandInstructionalDecals..........................4
Setup........................................................................5
1AttachingtheHandle........................................5
2InstallingtheRecoil-StarterRopeinthe
RopeGuide.....................................................6
3FillingtheEnginewithOil.................................6
4AssemblingtheGrassBag...............................7
ProductOverview.....................................................8
Specications....................................................8
Operation..................................................................8
Attachments/Accessories...................................8
FillingtheFuelT ank............................................8
CheckingtheEngine-OilLevel............................9
AdjustingtheCuttingHeight...............................9
StartingtheEngine...........................................10
StoppingtheEngine.........................................10
MulchingtheClippings......................................10
BaggingtheClippings.......................................10
Side-DischargingtheClippings..........................11
OperatingTips.................................................12
Maintenance...........................................................13
RecommendedMaintenanceSchedule(s)...........13
PreparingforMaintenance...............................13
ServicingtheAirCleaner..................................14
ChangingtheEngineOil...................................14
LubricatingtheUpperHandle...........................15
AdjustingtheSelf-PropelDrive.........................15
ReplacingtheBlade..........................................16
CleaningundertheMachine.............................17
Storage...................................................................17
PreparingtheMachineforStorage...................17
FoldingtheHandle...........................................17
RemovingtheMachinefromStorage................18
Safety
Thismachinehasbeendesignedinaccordancewith
ENISO5395:2013.
Improperlyusingormaintainingthismowercan
resultininjury.Toreducethepotentialforinjury,
complywiththesesafetyinstructions.
Toensuremaximumsafety,bestperformance,and
togainknowledgeoftheproduct,itisessential
thatyouandanyotheroperatorofthemowerread
andunderstandthecontentsofthismanualbefore
theengineiseverstarted.Payparticularattention
tothesafetyalertsymbol(Figure2),whichmeans
Caution,Warning,orDanger—“personalsafety
instruction.”Readandunderstandtheinstruction
becauseithastodowithsafety.Failuretocomply
withtheinstructionmayresultinpersonalinjury.
GeneralLawnMowerSafety
Thiscuttingmachineiscapableofamputatinghands
andfeetandofthrowingobjects.Failuretoobserve
thefollowingsafetyinstructionscouldresultinserious
injuryordeath.
Training
•Readtheinstructionscarefully.Befamiliarwiththe
controlsandtheproperuseoftheequipment.
•Neverallowchildrenorpeopleunfamiliarwith
theseinstructionstousethemachine.Local
regulationscanrestricttheageoftheoperator.
•Keepinmindthattheoperatororuseris
responsibleforaccidentsorhazardsoccurringto
otherpeopleortheirproperty.
•Understandexplanationsforallpictogramsused
onthemachineorintheinstructions.
Gasoline
WARNING-Gasolineishighlyammable.T akethe
followingprecautions.
•Storefuelincontainersspecicallydesignedfor
thispurpose.
•Refueloutdoorsonlyanddonotsmokewhile
refueling.
•Addfuelbeforestartingtheengine.Neverremove
thecapofthefueltankoraddgasolinewhilethe
engineisrunningorwhentheengineishot.
•Ifgasolineisspilled,donotattempttostartthe
enginebutmovethemachineawayfromthe
areaofspillageandavoidcreatinganysourceof
ignitionuntilgasolinevaporshavedissipated.
•Replaceallfueltankandcontainercapssecurely.
Preparation
•Whilemowing,alwayswearsubstantial,
slip-resistantfootwearandlongtrousers.Donot
operatetheequipmentwhenbarefootorwearing
opensandals.
•Thoroughlyinspecttheareawheretheequipment
istobeusedandremoveallstones,sticks,wires,
bonesandotherforeignobjects.
•Beforeusing,alwaysvisuallyinspecttoseethat
guardsandsafetydevices,suchasdeectors
and/orgrasscatchers,areinplaceandworking
correctly.
•Beforeusing,alwaysvisuallyinspecttoseethat
theblades,bladeboltsandcutterassemblyare
notwornordamaged.Replacewornordamaged
bladesandboltsinsetstopreservebalance.
2

Starting
•Donottiltthemachinewhenstartingtheengine
unlessthemachinemustbetiltedforstarting.
Inthiscase,donottiltitmorethanabsolutely
necessaryandliftonlythepartwhichisawayfrom
theoperator.
•Starttheenginecarefullyaccordingtoinstructions
andwithfeetwellawayfromtheblade(s)andnot
infrontofthedischargechute.
Operation
•Donotoperatethemachinewhileill,tired,or
undertheinuenceofalcoholordrugs.
•Nevermowwhilepeople,especiallychildren,or
petsarenearby.
•Mowonlyindaylightoringoodarticiallight.
•Stayalertforholesintheterrainandotherhidden
hazards.
•Donotputhandsorfeetnearorunderrotating
parts.Keepclearofthedischargeopeningatall
times.
•Neverpickuporcarryalawnmowerwhilethe
engineisrunning.
•Useextremecautionwhenreversingorpullinga
pedestrian-controlledmowertowardyou.
•Walk,neverrun.
•Slopes:
–Donotmowexcessivelysteepslopes.
–Exerciseextremecautionwhenonslopes.
–Mowacrossthefaceofslopes,neverupand
down,andexerciseextremecautionwhen
changingdirectiononslopes.
–Alwaysbesureofyourfootingonslopes.
•Reducespeedonslopesandinsharpturnsto
preventoverturningorlossofcontrol.
•Stopthebladeifthemachinemustbetiltedfor
transportationwhencrossingsurfacesotherthan
grassandwhentransportingthemachinetoand
fromtheareatobemowed.
•Donotoperatetheengineinaconnedspace
wheredangerouscarbonmonoxideandother
exhaustgassescancollect.
•Stoptheengine
–wheneveryouleavethemachine.
–beforerefueling.
–beforeremovingthegrasscatcher.
–beforemakingheightadjustmentunless
adjustmentcanbemadefromtheoperating
position.
•Stoptheengineanddisconnectthespark-plug
wire.
–beforeclearingblockagesoruncloggingchute.
–beforechecking,cleaningorworkingonthe
machine.
–afterstrikingaforeignobject,inspectthe
machinefordamageandmakerepairsbefore
restartingandoperatingthemachine.
–ifthemachinestartstovibrateabnormally
(checkimmediately).
•Lightningcancausesevereinjuryordeath.Ifyou
seelightningorhearthunderinthearea,donot
operatethemachine;seekshelter.
•Watchoutfortrafcwhencrossingornear
roadways.
MaintenanceandStorage
•Keepallnuts,bolts,andscrewstighttobesure
thattheequipmentisinsafeworkingcondition.
•Donotusepressure-cleaningequipmentonthe
machine.
•Neverstoretheequipmentwithgasolineinthe
tankandinsideabuildingwherefumescanreach
anopenameorspark.
•Allowtheenginetocoolbeforestoringinany
enclosure.
•Toreducetherehazard,keeptheengine,
silencer,batterycompartmentandgasoline
storageareafreeofgrass,leaves,orexcessive
grease.
•Checkgrasscatchercomponentsandthe
dischargeguardfrequentlyandreplacewith
manufacturer'srecommendedparts,when
necessary.
•Replacewornordamagedpartsforsafety.
•Replacefaultysilencers.
•Ifthefueltankhastobedrained,dothisoutdoors.
•Donotchangetheenginegovernorsettingsor
overspeedtheengine.Operatinganengineat
excessivespeedcanincreasethehazardof
personalinjury.
•Becarefulwhileadjustingthemachinetoprevent
entrapmentofthengersbetweenmovingblades
andxedpartsofthemachine.
•Toensurethebestperformanceandsafety,
purchaseonlygenuineTororeplacementparts
andaccessories.Donotusewilltpartsand
accessories;theymaycauseasafetyhazard.
Hauling
•Usecarewhenloadingorunloadingthemachine
intoatraileroratruck.
•Usefull-widthrampsforloadingthemachineinto
atraileroratruck.
•Tiethemachinedownsecurelyusingstraps,
chains,cable,orropes.Boththefrontandtherear
3

strapsshouldbedirecteddownandoutwardfrom
themachine.
SoundPressure
Thisunithasasoundpressurelevelattheoperator’s
earof88dBA,whichincludesanUncertaintyValue
(K)of1dBA.
Thesoundpressurelevelwasdeterminedaccording
totheproceduresoutlinedinENISO5395:2013.
SoundPower
Thisunithasaguaranteedsoundpowerlevelof98
dBA,whichincludesanUncertaintyValue(K)of1
dBA.
Thesoundpowerlevelwasdeterminedaccordingto
theproceduresoutlinedinISO11094.
CAUTION
Long-termexposuretonoisewhileoperating
themachinemaycausesomehearingloss.
Wearadequatehearingprotectionwhenever
youoperatethemachineforanextended
periodoftime.
Hand/ArmVibration
Measuredvibrationlevelforrighthand=1.8m/s
2
Measuredvibrationlevelforlefthand=2.5m/s
2
UncertaintyValue(K)=1.2m/s
2
Measuredvaluesweredeterminedaccordingtothe
proceduresoutlinedinENISO5395:2013.
CAUTION
Long-termexposuretovibrationwhile
operatingthemachinemaycausesome
numbnessinthehandsandwrists.
Wearglovesthatdampenthevibration
wheneveryouoperatethemachineforan
extendedperiodoftime.
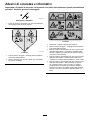
SafetyandInstructionalDecals
Important:Safetyandinstructiondecalsarelocatednearareasofpotentialdanger.Replacedamaged
decals.
decaloemmarkt
Manufacturer'sMark
1.Indicatesthebladeisidentiedasapartfromtheoriginal
machinemanufacturer.
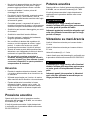
decal112-8760
112-8760
1.Thrownobjecthazard—keepbystandersasafedistance
fromthemachine.
2.Cutting/dismembermentofhandorfoot—stayawayfrom
movingparts.
4

decal117-4143
117-4143
1.Warning—readtheOperator'sManual.
2.Thrownobjecthazard—keepbystandersasafedistance
fromthemachine.
3.Cutting/dismembermenthazardofhandorfoot,mower
blade—disconnectthesparkplugwireandreadthe
instructionsbeforeservicingorperformingmaintenance.
4.Cutting/dismembermenthazardofhandorfoot,mower
blade—stayawayfrommovingpartsandkeepallguards
andshieldsinplace.
5.Cutting/dismembermenthazardofhandorfoot,mower
blade—donotmowupanddownslopes,onlymowacross;
stopthemowerandengine,pickupdebrisbeforeoperating;
lookbehindanddownwhenreversing.
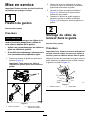
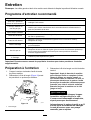
Setup
Important:Removeanddiscardtheprotective
plasticsheetthatcoverstheengine.
1
AttachingtheHandle
NoPartsRequired
Procedure
WARNING
Foldingorunfoldingthehandleimproperly
candamagethecables,causinganunsafe
operatingcondition.
•Donotdamagethecableswhenfoldingor
unfoldingthehandle.
•Ifacableisdamaged,contactan
AuthorizedServiceDealer.
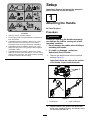
1.Removethehandleknobsfromthemachine
housing(Figure3).
Important:Routethecablestotheoutside
ofthehandleasyouinstallthehandle.
g024151
Figure3
1.Handleknobs2.Upperhandleknob
2.Aligntheholesintheendsofthehandlewith
thoseinthemachinehousing,andlooselyscrew
thehandleknobsbackin.
5

3.Movethehandletotheoperatingposition
(Figure3),andtightenthe2handleknobsas
tightlyasyoucan.
4.Loosentheupperhandleknob,movetheupper
handletotheoperatingposition(Figure3),and
tightentheupperhandleknob.
2
InstallingtheRecoil-Starter
RopeintheRopeGuide
NoPartsRequired
Procedure
Important:Tostarttheenginesafelyandeasily
wheneveryouusethemachine,installthe
recoil-starterropeintheropeguide.
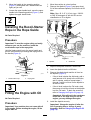
Holdtheblade-controlbartotheupperhandleand
pulltherecoil-starterropethroughtheropeguideon
thehandle(Figure4).
g024155
Figure4
1.Recoil-starterrope2.Ropeguide
3
FillingtheEnginewithOil
NoPartsRequired
Procedure
Important:Yourmachinedoesnotcomewithoil
intheengine.Beforestartingtheengine,llthe
enginewithoil.
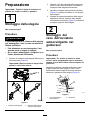
1.Movethemachinetoalevelsurface.
2.Removethedipstick(Figure5)andpourabout
3/4ofthecrankcasecapacityofoilintotheoil-ll
tube.
Note:Max.ll:0.47L(16oz),type:10W-30
orSAE30detergentoilwithanAPIservice
classicationofSJorhigher.
g024156
Figure5
1.Dipstick
2.Oil-lltube
3.Wipeoffthedipstickendwithacleancloth.
4.Insertthedipstickintotheoil-lltube.
5.Removethedipstickandreadtheoillevelon
thedipstick(Figure5).
•IftheoillevelisbelowtheAddmark,adda
smallamountofoilslowlytotheoil-lltube,
wait3minutes,andthenrepeatsteps3
through5untiltheoillevelonthedipstickis
attheFullmark.
•IftheoillevelisabovetheFullmark,drain
theexcessoiluntiltheoillevelonthedipstick
isattheFullmark.T odraintheexcessoil,
refertoChangingtheEngineOil(page14).
Important:Iftheoillevelinthecrankcase
istoolowortoohighandyourunthe
engine,youmaydamagetheengine.
6.Installthedipsticksecurely.
Important:Changetheengineoilafterthe
rst5operatinghours;changeityearly
thereafter.RefertoChangingtheEngineOil
(page14).
6

4
AssemblingtheGrassBag
NoPartsRequired
Procedure
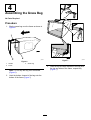
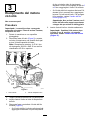
1.Slipthegrassbagovertheframeasshownin
Figure6.
g027257
Figure6
1.Handle
3.Grassbag
2.Frame
Note:Donotslipthebagoverthehandle
(Figure6).
2.Hookthebottomchannelofthebagontothe
bottomoftheframe(Figure7).
g027258
Figure7
3.Hookthetopandsidechannelsofthebagonto
thetopandsidesoftheframe,respectively
(Figure7).
7

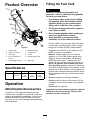
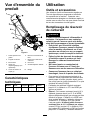
ProductOverview
g024157
Figure8
1.Upperhandle6.Blade-controlbar
2.Recoil-starthandle7.Fuel-tankcap
3.Grassbag8.Airlter
4.Oilll/Dipstick(not
shown)
9.Side-dischargechute
5.Cutting-heightlever(4)10.Sparkplug
Specications
ModelWeightLengthWidthHeight
2964530kg
(67lb)
150cm
(59
inches)
54cm
(21
inches)
117cm
(46
inches)
Operation
Attachments/Accessories
AselectionofToroapprovedattachmentsand
accessoriesisavailableforusewiththemachineto
enhanceandexpanditscapabilities.Contactyour
AuthorizedServiceDealerorDistributororgoto
www.T oro.comforalistofallapprovedattachments
andaccessories.
FillingtheFuelTank
DANGER
Gasolineisextremelyammableand
explosive.Areorexplosionfromgasoline
canburnyouandothers.
•Topreventastaticchargefromigniting
thegasoline,placethecontainerand/or
machinedirectlyonthegroundbefore
lling,notinavehicleoronanobject.
•Fillthetankoutdoorswhentheengineis
cold.Wipeupspills.
•Donothandlegasolinewhensmokingor
aroundanopenameorsparks.
•Storegasolineinanapprovedfuel
container,outofthereachofchildren.
•Forbestresults,useonlyclean,fresh(lessthan
30daysold),unleadedgasolinewithanoctane
ratingof87orhigher((R+M)/2ratingmethod).
•Oxygenatedfuelwithupto10%ethanolor15%
MTBEbyvolumeisacceptable.
•Ethanol:Gasolinewithupto10%ethanol
(gasohol)or15%MTBE(methyltertiarybutyl
ether)byvolumeisacceptable.Ethanoland
MTBEarenotthesame.Gasolinewith15%
ethanol(E15)byvolumeisnotapprovedforuse.
Neverusegasolinethatcontainsmorethan
10%ethanolbyvolume,suchasE15(contains
15%ethanol),E20(contains20%ethanol),orE85
(containsupto85%ethanol).Usingunapproved
gasolinemaycauseperformanceproblemsand/or
enginedamagewhichmaynotbecoveredunder
warranty.
•Donotusegasolinecontainingmethanol.
•Donotstorefueleitherinthefueltankorinfuel
containersoverthewinterunlessafuelstabilizer
isused.
•Donotaddoiltogasoline.
Important:Toreducestartingproblems,addfuel
stabilizertothefuelallseason,mixingitwith
gasolinelessthan30daysold.
8

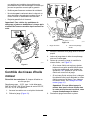
g027531
Figure9
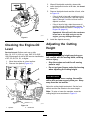
CheckingtheEngine-Oil
Level
ServiceInterval:Beforeeachuseordaily
Max.ll:0.55L(18.6oz),type:SAE30orSAE
10W-30detergentoilwithanAPIserviceclassication
ofSF,SG,SH,SJ,SL,orhigher.
1.Movethemachinetoalevelsurface.
2.Removethedipstick(Figure10).
g024156
Figure10
1.Dipstick
2.Oil-lltube
3.Wipeoffthedipstickendwithacleancloth.
4.Insertthedipstickintotheoil-lltube,butdonot
screwitin.
5.Removethedipstickandreadtheoillevel;refer
toFigure10.
•Iftheoillevelislow,addasmallamountof
oilslowlytotheoil-lltube,andthenrepeat
steps3through5untiltheoillevelonthe
dipstickiscorrect.
•Iftheoillevelishigh,draintheexcessoil
untiltheoillevelonthedipstickiscorrect.T o
draintheexcessoil,refertoChangingthe
EngineOil(page14).
Important:Iftheoillevelinthecrankcase
istoolowortoohighandyourunthe
engine,youmaydamagetheengine.
6.Installthedipsticksecurely.
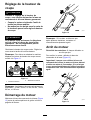
AdjustingtheCutting
Height
WARNING
Adjustingthecuttingheightmaybringyou
intocontactwiththemovingblade,causing
seriousinjury.
•Stoptheengineandwaitforallmoving
partstostop.
•Donotputyourngersunderthehousing
whenadjustingthecuttingheight.
CAUTION
Iftheenginehasbeenrunning,themufer
willbehotandcanseverelyburnyou.Keep
awayfromthehotmufer.
Adjustthecuttingheightasdesired.Setthefront
wheelsandtherearwheelstothesameheight.
Note:Toraiseorlowerthemachine,movethe
cutting-heightleversasshowninFigure11.
9

g024176
Figure11
1.Raisethemachine2.Lowerthemachine
Note:Thecuttingheightsettingsare25mm(1
inch);38mm(1-1/2inches);51mm(2inches);64
mm(2-1/2inches);76mm(3inches);89mm(3-1/2
inches);and102mm(4inches).
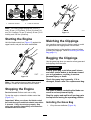
StartingtheEngine
Holdtheblade-controlbar(Figure12)againstthe
upperhandle,andpulltherecoil-starthandle.
g024177
Figure12
Note:Ifthemachinedoesnotstartafterseveral
attempts,contactanAuthorizedServiceDealer.
StoppingtheEngine
ServiceInterval:Beforeeachuseordaily
Tostoptheengine,releasetheblade-controlbar
(Figure13).
Important:Whenyoureleasetheblade-control
bar,boththeengineandbladeshouldstopwithin
3seconds.Iftheydonotstopproperly,stop
usingyourmachineimmediatelyandcontactan
AuthorizedServiceDealer.
g024178
Figure13
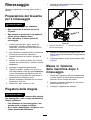
MulchingtheClippings
Yourmachinecomesfromthefactoryreadytomulch
thegrassandleafclippingsbackintothelawn.
Ifthegrassbagisonthemachine,removeitbefore
mulchingtheclippings.RefertoRemovingtheGrass
Bag(page11).
BaggingtheClippings
Usethegrassbagwhenyouwanttocollectgrassand
leafclippingsfromthelawn.
WARNING
Aworngrassbagcouldallowsmallstones
andothersimilardebristobethrowntoward
youorbystanders,resultinginserious
personalinjuryordeath.
Checkthegrassbagfrequently.Ifitis
damaged,installanewTororeplacementbag.
WARNING
Thebladeissharp;contactingthebladecan
resultinseriouspersonalinjury.
Stoptheengineandwaitforallmovingparts
tostopbeforeleavingtheoperatingposition.
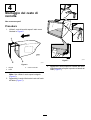
InstallingtheGrassBag
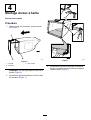
1.Liftupthereardeector(Figure14).
10

g024183
Figure14
1.Reardeector3.Rodend(2)
2.Notchinthehandle
bracket(2)
4.Grassbag
2.Inserttherodendsofthegrassbagintothe
notchesinthehandlebrackets(Figure14).
3.Allowthereardeectortorestonthebag.
RemovingtheGrassBag
1.Liftupthereardeector(Figure14).
2.Liftthegrass-baghandleoutfromthenotches
onthehandlebracketsandremovethebagfrom
themachine.
3.Closethereardeector.
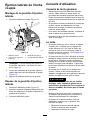
Side-Dischargingthe
Clippings
InstallingtheSide-Discharge
Chute
1.Liftupthereardeector(Figure15).
g024182
Figure15
1.Reardeector3.Rodend(2)
2.Notchinthehandle
bracket(2)
4.Side-dischargechute
Note:Ifthegrassbagisonthemachine,
removeit;refertoRemovingtheGrassBag
(page11).
2.Inserttherodendsoftheside-dischargechute
intothenotchesonthehandlebrackets(Figure
15).
3.Allowthereardeectortorestonthechute.
RemovingtheSide-Discharge
Chute
1.Liftupthereardeector(Figure15).
2.Lifttheside-dischargechuteoutfromthe
notchesonthehandlebracketsandremovethe
chutefromthemachine.
3.Closethereardeector.
11

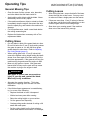
OperatingTips
GeneralMowingTips
•Cleartheareaofsticks,stones,wire,branches,
andotherdebristhatthebladecouldhit.
•Avoidstrikingsolidobjectswiththeblade.Never
deliberatelymowoveranyobject.
•Ifthemachinestrikesanobjectorstartstovibrate,
immediatelystoptheengine,disconnectthewire
fromthesparkplug,andexaminethemachinefor
damage.
•Forbestperformance,installanewbladebefore
thecuttingseasonbegins.
•ReplacethebladewhennecessarywithaT oro
replacementblade.
CuttingGrass
•Cutonlyaboutathirdofthegrassbladeatatime.
Donotcutbelowthe51mm(2inch)settingunless
thegrassissparseoritislatefallwhengrass
growthbeginstoslowdown.RefertoAdjusting
theCuttingHeight(page9).
•Whencuttinggrassover15cm(6inches)tall,
mowatthehighestcuttingheightsettingandwalk
slower;thenmowagainatalowersettingforthe
bestlawnappearance.Ifthegrassistoolong,the
machinemayplugandcausetheenginetostall.
•Mowonlydrygrassorleaves.Wetgrassand
leavestendtoclumpontheyardandcancause
themachinetoplugortheenginetostall.
WARNING
Wetgrassorleavescancauseserious
injuryifyouslipandcontacttheblade.
Mowonlyindryconditions.
•Alternatethemowingdirection.Thishelps
dispersetheclippingsoverthelawnforeven
fertilization.
•Ifthenishedlawnappearanceisunsatisfactory,
try1ormoreofthefollowing:
–Replacethebladeorhaveitsharpened.
–Walkataslowerpacewhilemowing.
–Raisethecuttingheightonyourmachine.
–Cutthegrassmorefrequently.
–Overlapcuttingswathsinsteadofcuttingafull
swathwitheachpass.
–Setthecuttingheightonthefrontwheelsa
notchlowerthantherearwheels.Forexample,
setthefrontwheelsat57mm(2-1/4inches)
andtherearwheelsat70mm(2-3/4inches).
CuttingLeaves
•Aftercuttingthelawn,ensurethathalfofthelawn
showsthroughthecutleafcover.Youmayneed
tomakemorethanasinglepassovertheleaves.
•Iftherearemorethan13cm(5inches)ofleaves
onthelawn,setthefrontcuttingheightoneortwo
notcheshigherthantherearcuttingheight.
•Slowdownyourmowingspeedifthemachine
doesnotcuttheleavesnelyenough.
12

Maintenance
Note:Determinetheleftandrightsidesofthemachinefromthenormaloperatingposition.
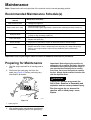
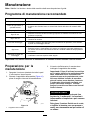
RecommendedMaintenanceSchedule(s)
MaintenanceService
Interval
MaintenanceProcedure
Aftertherst5hours
•Changetheengineoil.
Beforeeachuseordaily
•Checktheengineoillevel.
•Ensurethattheenginestopswithin3secondsafterreleasingtheblade-controlbar.
Aftereachuse
•Cleangrassclippingsanddirtfromunderthemachine.
Every25hours
•Replacetheaircleanerelement(morefrequentlywhenoperatingthemachine
industyordirtyoperatingconditions).
Every100hours
•Cleanthecoolingsystem(refertoyourengineowner'smanual).
•Replacethesparkplug.
Beforestorage
•Emptythefueltankbeforerepairsasdirectedandbeforeannualstorage.
Yearly
•Changetheengineoil.
•Replacethebladeorhaveitsharpened(morefrequentlyiftheedgedullsquickly).
•Refertoyourengineowner'smanualforanyadditionalyearlymaintenance
procedures.
Yearlyorbeforestorage
•Lubricatetheupperhandle.
Important:Refertoyourengineowner’smanualforadditionalmaintenanceprocedures.
PreparingforMaintenance
1.Stoptheengineandwaitforallmovingpartsto
stop.
2.Disconnectthespark-plugwirefromthe
sparkplug(Figure16)beforeperformingany
maintenanceprocedure.
g024185
Figure16
1.Spark-plugwire
3.Afterperformingthemaintenanceprocedure(s),
connectthespark-plugwiretothesparkplug.
Important:Beforetippingthemachineto
changetheoilorreplacetheblade,allowthe
fueltanktorundrythroughnormalusage.If
youmusttipthemachinepriortorunning
outoffuel,useahandfuelpumptoremove
thefuel.Alwaystipthemachineontoitsside
withthedipstickdown.
WARNING
Tippingthemachinemaycausethe
fueltoleak.Gasolineisammableand
explosiveandcancausepersonalinjury.
Runtheenginedryorremovethe
gasolinewithahandpump;never
siphon.
13

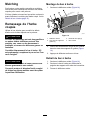
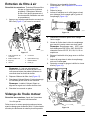
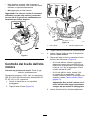
ServicingtheAirCleaner
ServiceInterval:Every25hours/Yearly(whichever
comesrst)—Replacetheair
cleanerelement(morefrequently
whenoperatingthemachinein
dustyordirtyoperatingconditions).
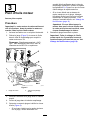
1.Pressthetoptabontheaircleanercover(Figure
17)andopenthecover.
g024187
Figure17
1.Toptabonthecover
5.Cover
2.Air-cleanerbody
6.Bottomtab(2)
3.Post(2)
7.Air-cleanerelement
4.Latch
8.Slot(2)
Note:Youdonotneedtoremovethecover
fromtheair-cleanerbody;youcanleavethe
bottomtabsofthecoverintheslotsofthe
air-cleanerbody.
2.Removetheair-cleanerelement(Figure17).
3.Iftheair-cleanerelementisdamagedoriswet
withoilorfuel,replaceit.
Note:Installtheair-cleanerelementbyaligning
itwiththepostsontheair-cleanerbody.
4.Installthecover.
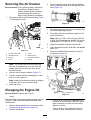
ChangingtheEngineOil
ServiceInterval:Aftertherst5hours
Yearly
Runtheengineafewminutesbeforechangingtheoil
towarmit.Warmoilowsbetterandcarriesmore
contaminants.
1.Performthepre-maintenanceprocedures;refer
toPreparingforMaintenance(page13).
2.Removethedipstick.
3.Tipthemachineontoitsside,withthedipstick
down,todraintheusedoiloutthroughtheoil-ll
tube(Figure18).
g024186
Figure18
4.Afterdrainingtheusedoil,returnthemachineto
thenormaloperatingposition.
5.Pourabout3/4ofthecrankcasecapacityofoil
intotheoil-lltube.
Note:Max.ll:0.55L(18.6oz),type:SAE30
orSAE10W-30detergentoilwithanAPIservice
classicationofSF ,SG,SH,SJ,SL,orhigher.
6.Wipeoffthedipstickendwithacleancloth.
7.Insertthedipstickintotheoil-lltube,butdonot
screwitin.
8.Removethedipstickandreadtheoillevelon
thedipstick(Figure19).
g024156
Figure19
•Iftheoillevelislow,addasmallamountof
oilslowlytotheoil-lltube,andthenrepeat
steps6through8untiltheoillevelonthe
dipstickiscorrect.
•Iftheoillevelishigh,draintheexcessoil
untiltheoillevelonthedipstickiscorrect.
14

Important:Iftheoillevelinthecrankcase
istoolowortoohighandyourunthe
engine,youmaydamagetheengine.
9.Installthedipsticksecurely.
10.Recycletheusedoilproperly.
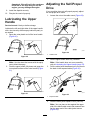
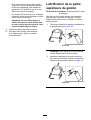
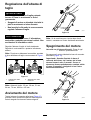
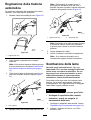
LubricatingtheUpper
Handle
ServiceInterval:Yearlyorbeforestorage
Lubricatetheleftandrightsidesoftheupperhandle
withalow-viscositysiliconespraylubricantyearlyor
asneeded.
1.Spraytheouterplasticendoftheinnerhandle
(Figure20).
g010349
Figure20
Note:Usethestrawthatcomeswiththespray
cantodirectthespray.
2.Pushtheupperhandlefullydownandspraythe
innerplasticsurfaceoftheouterhandle(Figure
21).
g010350
Figure21
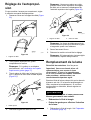
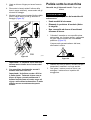
AdjustingtheSelf-Propel
Drive
Ifyourmachinedoesnotself-propelproperly,adjust
theself-propeldrivecable.
1.Loosenthenutonthecablemount(Figure22).
g010351
Figure22
1.Cablemount
2.Pulltheupperhandlebackfullyrearward.
Note:Ifthehandledoesnotmovesmoothly,
refertoLubricatingtheUpperHandle(page15).
3.Pullthecablejacketdownwarduntilyouremove
theslackintheexposedcable(Figure23).
g007744
Figure23
1.Exposedcable
4.Pushthecablejacketupward3mm(1/8inch).
Note:Youcanplacearuleragainsttheupper
sideoftheblackcablemountandmeasurehow
fartheupperendofthecablejacketmoves
(Figure24).
15

g007745
Figure24
1.Cablemount2.Cablejacket
Note:Movingthecablejacketupward
decreasesthegroundspeed;movingthejacket
downwardincreasesthegroundspeed.
5.Tightenthenutrmly.
6.Startthemachineandchecktheadjustment.
Note:Iftheself-propeldriveisnotproperly
adjusted,repeatthisprocedure.
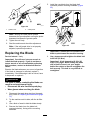
ReplacingtheBlade
ServiceInterval:Yearly
Important:Youwillneedatorquewrenchto
installthebladeproperly.Ifyoudonothavea
torquewrenchorareuncomfortableperforming
thisprocedure,contactanAuthorizedService
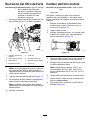
Dealer.
Examinethebladewheneveryourunoutofgasoline.
Ifthebladeisdamagedorcracked,replaceit
immediately.Ifthebladeedgeisdullornicked,have
itsharpenedorreplaceit.
WARNING
Thebladeissharp;contactingthebladecan
resultinseriouspersonalinjury.
•Disconnectthewirefromthesparkplug.
•Weargloveswhenservicingtheblade.
1.Disconnectthespark-plugwirefromthespark
plug.RefertoPreparingforMaintenance(page
13).
2.Tipthemachineontoitsside,withtheairlter
up.
3.Useablockofwoodtoholdthebladesteady.
4.Removetheblade(turnthebladebolt
counterclockwise),savingallthemounting
hardware.
5.Installthenewblade(turnthebladebolt
clockwise)andallmountinghardware(Figure
25).
g002599
Figure25
Important:Positionthecurvedendsofthe
bladetopointtowardthemachinehousing.
6.Useatorquewrenchtotightenthebladebolt
to60ft-lb(82N-m).
Important:Abolttorquedto60ft-lb(82
N-m)isverytight.Whileholdingtheblade
withablockofwood,putyourweight
behindtheratchetorwrenchandtightenthe
boltsecurely.Thisboltisverydifcultto
overtighten.
16

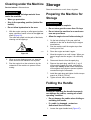
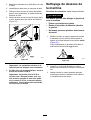
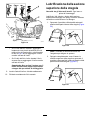
CleaningundertheMachine
ServiceInterval:Aftereachuse
WARNING
Themachinemaydislodgematerialfrom
underthemachine.
•Weareyeprotection.
•Stayintheoperatingposition(behindthe
handle).
•Donotallowbystandersinthearea.
1.Withtheenginerunningonaatpavedsurface,
sprayastreamofwaterinfrontoftherightrear
wheel(Figure26).
Thewaterwillsplashintothepathoftheblade,
cleaningouttheclippings.
g002600
Figure26
2.Whennomoreclippingscomeout,stopthe
waterandmovethemachinetoadryarea.
3.Runtheengineforafewminutestodrythe
undersideofthemachinetopreventitfrom
rusting.
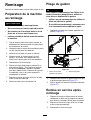
Storage
Storethemachineinacool,clean,dryplace.
PreparingtheMachinefor
Storage
WARNING
Gasolinevaporscanexplode.
•Donotstoregasolinemorethan30days.
•Donotstorethemachineinanenclosure
nearanopename.
•Allowtheenginetocoolbeforestoringit.
1.Onthelastrefuelingoftheyear,addfuel
stabilizertothefuelasdirectedbytheengine
manufacturer.
2.Runthemachineuntiltheenginestopsfrom
runningoutoffuel.
3.Primetheengineandstartitagain.
4.Allowtheenginetorununtilitstops.Whenyou
cannolongerstarttheengine,itissufciently
dry.
5.Disconnectthewirefromthesparkplug.
6.Removethesparkplug,add30ml(1oz)of
oilthroughthesparkplughole,andpullthe
starterropeslowlyseveraltimestodistribute
oilthroughoutthecylindertopreventcylinder
corrosionduringtheoff-season.
7.Installthesparkplugandtightenitwithatorque
wrenchto20N-m(15ft-lb).
8.Tightenallnuts,bolts,andscrews.
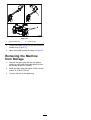
FoldingtheHandle
WARNING
Foldingorunfoldingthehandleimproperly
candamagethecables,causinganunsafe
operatingcondition.
•Donotdamagethecableswhenfoldingor
unfoldingthehandle.
•Ifacableisdamaged,contactan
AuthorizedServiceDealer.
1.Loosentheupperhandleknob(Figure27).
17

g024195
Figure27
1.Upperhandleknob2.Handleknobs
2.Loosenthehandleknobsuntilyoucanmovethe
handlefreely(Figure27).
3.MovethehandleforwardasshowninFigure27.
RemovingtheMachine
fromStorage
1.Removethesparkplugandspintheengine
rapidlybypullingtherecoil-starthandletoblow
theexcessoilfromthecylinder.
2.Installthesparkplugandtightenitwithatorque
wrenchto20N-m(15ft-lb).
3.Connectthewiretothesparkplug.
18

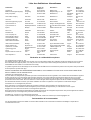
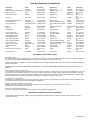
InternationalDistributorList
Distributor:
Country:
PhoneNumber:Distributor:
Country:
Phone
Number:
AgrolancKft
Hungary3627539640
MaquiverS.A.Colombia
5712364079
BalamaPrimaEngineeringEquip.HongKong85221552163
MaruyamaMfg.Co.Inc.
Japan81332522285
B-RayCorporation
Korea82325512076
Mountelda.s.CzechRepublic
420255704
220
CascoSalesCompany
PuertoRico7877888383
Mountelda.s.Slovakia
420255704
220
CeresS.A.CostaRica
5062391138
MunditolS.A.
Argentina54114821
9999
CSSCTurfEquipment(pvt)Ltd.SriLanka
94112746100
NormaGarden
Russia74954116120
CyrilJohnston&Co.
NorthernIreland442890813121
OslingerTurfEquipmentSA
Ecuador59342396970
CyrilJohnston&Co.RepublicofIreland
442890813121
OyHakoGroundandGarden
Ab
Finland35898700733
EquiverMexico525553995444ParklandProductsLtd.NewZealand6433493760
FemcoS.A.Guatemala
5024423277
Perfetto
Poland48618208416
ForGarderOU
Estonia3723846060
PratoverdeSRL.
Italy390499128
128
G.Y .K.CompanyLtd.
Japan81726325861
Prochaska&Cie
Austria4312785100
GeomechanikiofAthensGreece
30109350054
RTCohen2004Ltd.
Israel97298617979
GolfinternationalTurizm
Turkey902163365993Riversa
Spain
34952837500
GuandongGoldenStarChina
862087651338
LelyTurfcare
Denmark4566109200
HakoGroundandGardenSweden
4635100000
SolvertS.A.S.
France331308177
00
HakoGroundandGarden
Norway4722907760
SpyprosStavrinidesLimitedCyprus
35722434131
HayterLimited(U.K.)
UnitedKingdom441279723444
SurgeSystemsIndiaLimited
India911292299901
HydroturfInt.CoDubai
UnitedArabEmirates97143479479T-MarktLogisticsLtd.Hungary3626525500
HydroturfEgyptLLC
Egypt2025194308ToroAustraliaAustralia61395807355
IrrimacPortugal351212388260ToroEuropeNVBelgium3214562960
IrrigationProductsInt'lPvtLtd.India0091442449
4387
ValtechMorocco21253766
3636
JeanHeybroekb.v.Netherlands31306394611VictusEmakPoland48618238369
EuropeanPrivacyNotice
TheInformationT oroCollects
ToroWarrantyCompany(Toro)respectsyourprivacy.Inordertoprocessyourwarrantyclaimandcontactyouintheeventofaproductrecall,weaskyou
tosharecertainpersonalinformationwithus,eitherdirectlyorthroughyourlocalT orocompanyordealer.
TheT orowarrantysystemishostedonserverslocatedwithintheUnitedStateswhereprivacylawmaynotprovidethesameprotectionasapplies
inyourcountry.
BYSHARINGYOURPERSONALINFORMATIONWITHUS,YOUARECONSENTINGTOTHEPROCESSINGOFYOURPERSONALINFORMATION
ASDESCRIBEDINTHISPRIVACYNOTICE.
TheWayT oroUsesInformation
Toromayuseyourpersonalinformationtoprocesswarrantyclaims,tocontactyouintheeventofaproductrecallandforanyotherpurposewhichwetell
youabout.T oromayshareyourinformationwithT oro'safliates,dealersorotherbusinesspartnersinconnectionwithanyoftheseactivities.Wewillnot
sellyourpersonalinformationtoanyothercompany.Wereservetherighttodisclosepersonalinformationinordertocomplywithapplicablelawsand
withrequestsbytheappropriateauthorities,tooperateoursystemsproperlyorforourownprotectionorthatofotherusers.
RetentionofyourPersonalInformation
Wewillkeepyourpersonalinformationaslongasweneeditforthepurposesforwhichitwasoriginallycollectedorforotherlegitimatepurposes
(suchasregulatorycompliance),orasrequiredbyapplicablelaw.
Toro'sCommitmenttoSecurityofYourPersonalInformation
Wetakereasonableprecautionsinordertoprotectthesecurityofyourpersonalinformation.Wealsotakestepstomaintaintheaccuracyandcurrent
statusofpersonalinformation.
AccessandCorrectionofyourPersonalInformation
Ifyouwouldliketorevieworcorrectyourpersonalinformation,pleasecontactusbyemailat[email protected].
AustralianConsumerLaw
AustraliancustomerswillnddetailsrelatingtotheAustralianConsumerLaweitherinsidetheboxoratyourlocalT oroDealer.
374-0269RevH
La pagina si sta caricando...
La pagina si sta caricando...
La pagina si sta caricando...
La pagina si sta caricando...
La pagina si sta caricando...
La pagina si sta caricando...
La pagina si sta caricando...
La pagina si sta caricando...
La pagina si sta caricando...
La pagina si sta caricando...
La pagina si sta caricando...
La pagina si sta caricando...
La pagina si sta caricando...
La pagina si sta caricando...
La pagina si sta caricando...
La pagina si sta caricando...
La pagina si sta caricando...
La pagina si sta caricando...
La pagina si sta caricando...
La pagina si sta caricando...
La pagina si sta caricando...
La pagina si sta caricando...
La pagina si sta caricando...
La pagina si sta caricando...
La pagina si sta caricando...
La pagina si sta caricando...
La pagina si sta caricando...
La pagina si sta caricando...
La pagina si sta caricando...
La pagina si sta caricando...
La pagina si sta caricando...
La pagina si sta caricando...
La pagina si sta caricando...
La pagina si sta caricando...
La pagina si sta caricando...
La pagina si sta caricando...
La pagina si sta caricando...
La pagina si sta caricando...
La pagina si sta caricando...
La pagina si sta caricando...
La pagina si sta caricando...
La pagina si sta caricando...
La pagina si sta caricando...
La pagina si sta caricando...
La pagina si sta caricando...
La pagina si sta caricando...
-
 1
1
-
 2
2
-
 3
3
-
 4
4
-
 5
5
-
 6
6
-
 7
7
-
 8
8
-
 9
9
-
 10
10
-
 11
11
-
 12
12
-
 13
13
-
 14
14
-
 15
15
-
 16
16
-
 17
17
-
 18
18
-
 19
19
-
 20
20
-
 21
21
-
 22
22
-
 23
23
-
 24
24
-
 25
25
-
 26
26
-
 27
27
-
 28
28
-
 29
29
-
 30
30
-
 31
31
-
 32
32
-
 33
33
-
 34
34
-
 35
35
-
 36
36
-
 37
37
-
 38
38
-
 39
39
-
 40
40
-
 41
41
-
 42
42
-
 43
43
-
 44
44
-
 45
45
-
 46
46
-
 47
47
-
 48
48
-
 49
49
-
 50
50
-
 51
51
-
 52
52
-
 53
53
-
 54
54
-
 55
55
-
 56
56
-
 57
57
-
 58
58
-
 59
59
-
 60
60
-
 61
61
-
 62
62
-
 63
63
-
 64
64
-
 65
65
-
 66
66


Toro 50cm Mulching/Rear Bagging/Side Discharge Lawn Mower Manuale utente
- Categoria
- Tosa erba
- Tipo
- Manuale utente
in altre lingue
Documenti correlati
-
Toro Emotion 21080 Manuale utente
-
Toro 55cm Recycler Lawn Mower Manuale utente
-
Toro 55cm Recycler SmartStow Lawn Mower Manuale utente
-
Toro 53cm Recycler Lawn Mower Manuale utente
-
-
-
Toro 53cm Mulching/Rear Bagging/Side Discharging Lawn Mower Manuale utente
-
-
-