OASE 20000/ 12V Aquarius Eco Expert Manuale utente
- Tipo
- Manuale utente

DE
EN
FR
NL
ES
PT
IT
DA
NO
SV
FI
HU
PL
CS
SK
SL
HR
RO
BG
UK
RU
CN
Aquarius Eco Expert
20000 / 12 V
DE
Inbetriebnahme
HU
Üzembe helyezés
EN
Commissioning
PL
Uruchomienie
FR
Mise en service
CS
Uvedení do provozu
NL
Inbedrijfstelling
SK
Uvedenie do prevádzky
ES
Puesta en marcha
SL
Zagon
PT
Comissionamento
HR
Stavljanje u pogon
IT
Messa in servizio
RO
Punerea în funcţiune
DA
Idrifttagning
BG
Въвеждане в експлоатация
NO
Idriftssettelse
UK
Уведення в експлуатацію
SV
Driftstart
RU
Ввод в эксплуатацию
FI
Käyttöönotto
CN
调试

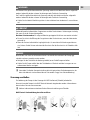
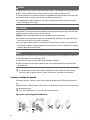
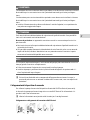
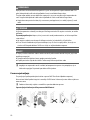
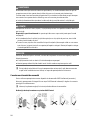
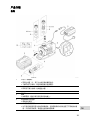
A
AMX0157
B
ARS0027
C
AMX0074

DE
3
Original-Anleitung. Die Anleitung gehört zum Gerät und muss bei Weitergabe des Geräts stets
mitgegeben werden.
DE
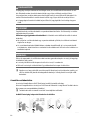
WARNUNG
WARNUNG
Trennen Sie alle elektrischen Geräte im Wasser vom Stromnetz, bevor
Sie ins Wasser greifen. Andernfalls drohen schwere Verletzungen
oder Tod durch Stromschlag.
Dieses Gerät kann von Kindern ab 8 Jahren und darüber sowie von
Personen mit verringerten physischen, sensorischen oder mentalen
Fähigkeiten oder Mangel an Erfahrung und Wissen benutzt werden,
wenn sie beaufsichtigt oder bezüglich des sicheren Gebrauchs des
Gerätes unterwiesen wurden und die daraus resultierenden Gefahren
verstehen. Kinder dürfen nicht mit dem Gerät spielen. Reinigung und
Benutzerwartung dürfen nicht von Kindern ohne Beaufsichtigung
durchgeführt werden.
Inhaltsverzeichnis
Sicherheitshinweise ....................................................................................................................................... 4
Bestimmungsgemäße Verwendung ............................................................................................................ 4
Produktbeschreibung ....................................................................................................................................5
Aufstellen und Anschließen ......................................................................................................................... 6
Inbetriebnahme ............................................................................................................................................. 9
Die weiterführende Gebrauchsanleitung finden Sie im Internet als PDF zum
Download:
www.oase.com/manual
Diese zusätzlichen Themen finden Sie in der Gebrauchsanleitung:
• Symbole auf dem Gerät
• Pumpe trocken aufstellen
• Reinigung und Wartung, Lagern/Überwintern, Störungsbeseitigung
• Technische Daten, Verschleißteile, Ersatzteile, Entsorgung

4
Sicherheitshinweise
Elektrischer Anschluss
• Für die Elektroinstallation im Außenbereich gelten spezielle Vorschriften. Die Elektroinstalla-
tion darf nur von einer Elektrofachkraft ausgeführt werden.
– Die Elektrofachkraft ist aufgrund ihrer fachlichen Ausbildung, Kenntnisse und Erfahrungen
qualifiziert und darf Elektroinstallationen im Außenbereich durchführen. Sie kann mögliche
Gefahren erkennen und beachtet die regionalen und nationalen Normen, Vorschriften und
Bestimmungen.
– Bei Fragen und Problemen wenden Sie sich an eine Elektrofachkraft.
• Schließen Sie das Gerät nur an, wenn die elektrischen Daten von Gerät und Stromversorgung
übereinstimmen.
• Schließen Sie das Gerät nur an einer vorschriftsmäßig installierten Steckdose an. Das Gerät
muss über eine Fehlerstrom-Schutzeinrichtung mit einem Bemessungsfehlerstrom von maxi-
mal 30 mA abgesichert sein.
• Verlängerungsleitungen und Stromverteiler (z. B. Steckdosenleisten) müssen für die Verwen-
dung im Freien geeignet sein (spritzwassergeschützt).
• Schützen Sie offene Stecker und Buchsen vor Feuchtigkeit.
Sicherer Betrieb
• Verwenden Sie das Gerät nicht, wenn elektrische Leitungen oder Gehäuse beschädigt sind.
• Eine beschädigte Anschlussleitung kann nicht ersetzt werden. Entsorgen Sie das Gerät.
• Die Laufeinheit im Gerät enthält einen Magneten mit starkem Magnetfeld, das Herzschrittma-
cher oder implantierte Defibrillatoren (ICD) beeinflussen kann. Halten Sie zwischen Implantat
und Magnet einen Abstand von mindestens 0,2 m ein.
• Tragen oder ziehen Sie das Gerät nicht an der elektrischen Leitung.
• Verlegen Sie Leitungen so, dass sie vor Beschädigungen geschützt sind und dass niemand dar-
über fallen kann.
• Nehmen Sie niemals technische Änderungen am Gerät vor.
• Führen Sie nur die Arbeiten am Gerät durch, die in dieser Anleitung beschrieben sind.
• Verwenden Sie nur Original-Ersatzteile und -Zubehör.
• Wenden Sie sich bei Problemen an den autorisierten Kundendienst oder an OASE.
Bestimmungsgemäße Verwendung
Verwenden Sie das in dieser Anleitung beschriebene Produkt ausschließlich wie folgt:
• Zum Pumpen von normalem Teichwasser für Filtersysteme, Wasserfallsysteme und Bach-
laufsysteme.
• Für den Einsatz in Schwimm- und Badeteichen unter Einhaltung der nationalen Errichtervor-
schriften.
• Nur mit dem Original-Schaltnetzteil betreiben.
• Unter Einhaltung der technischen Daten.
• Unter Einhaltung der zulässigen Wasserwerte.

DE
5
Für das Gerät gelten folgende Einschränkungen:
• Niemals mit anderen Flüssigkeiten als Wasser betreiben.
• Niemals ohne Wasserdurchfluss betreiben.
• Nicht in Verbindung mit Chemikalien, Lebensmitteln, leicht brennbaren oder explosiven Stof-
fen einsetzen.
• Nicht an die Hauswasserversorgung anschließen.
• Nicht für gewerbliche oder industrielle Zwecke verwenden.
• Nach EMV (Elektromagnetische Verträglichkeit) ist dies ein Gerät der Klasse A. In Wohnumge-
bungen kann das Gerät Funkstörungen verursachen. Es obliegt dem Anwender, angemessene
Maßnahmen zu ergreifen.
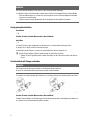
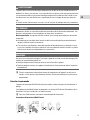
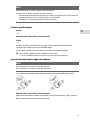
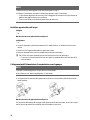
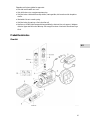
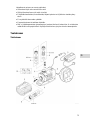
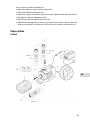
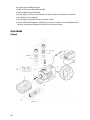
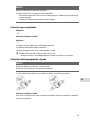
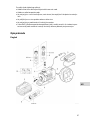
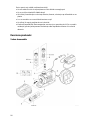
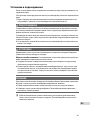
Produktbeschreibung
Übersicht
ARS0049

6
1
Eingang (Saugseite)
•
Mit Filterkorb (3) zur Teichbodenfiltrierung bei getauchter Aufstellung.
• Mit Schlauchtülle zum Anschluss eines Schlauchs bei Trockenaufstellung.
2
Ausgang (Druckseite)
•
Anschluss des Rücklaufs in den Teich (z. B. über einen Bachlauf).
3
Filterkorb
4
Standfuß
•
Mit Montagebohrungen für eine Festinstallation am Boden bei Bedarf.
5
Schaltnetzteil mit Netzkabel
•
Stromversorgung der Pumpe
6
Schalter zum Einschalten/Ausschalten der Dynamic Function
•
Für ein dynamisches Fontänenbild, welches sich in Höhe und Durchmesser ändert, sind in der
Pumpensteuerung unterschiedliche Werte für Fördermengen vorprogrammiert. Bei eingeschal-
teter Dynamikfunktion wird die Pumpe mit diesen Werten kontinuierlich angesteuert.
7
Anschluss Steuerung
•
Zur Bedienung der Pumpe ist das Steuergerät OASE Eco Control (Zubehör) erforderlich.
•
Alternativ kann die Pumpe in ein OASE Control-Netzwerk eingebunden werden.
• Informationen zu OASE Control finden Sie unter www.oase.com.
8
Schlauchtülle ∅ 50 mm
9
Schlauchtülle ∅ 38 mm
10
Schlauchschellen zur Fixierung von Schläuchen auf den
Schlauchtüllen.
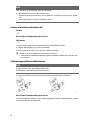
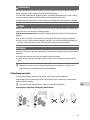
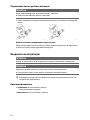
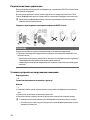
Installationsvarianten
A
• Variante (a): Pumpe getaucht aufstellen
– Die Pumpe wird im Teich positioniert.
– Das Wasser wird über den Filterkorb angesaugt (Teichbodenfiltrierung).
• Variante (b): Pumpe trocken aufstellen
– Die Pumpe wird ohne Filterkorb außerhalb des Teiches aber unterhalb des Wasserspiegels
aufgestellt.
– Das Wasser wird über einen Satellitenfilter oder Skimmer angesaugt.
Aufstellen und Anschließen
Die Pumpe kann getaucht (im Wasser) oder trocken (außerhalb vom Wasser) aufgestellt werden.
Die Verwendung der Pumpe ist nur unter Einhaltung der angegebenen Wasserwerte zulässig.
• Poolwasser oder Salzwasser können die Optik des Geräts beeinträchtigen. Diese Beeinträchti-
gungen sind von der Garantie ausgeschlossen.

DE
7
WARNUNG
Das Netzteil führt gefährliche elektrische Spannung und darf nicht direkt am Wasser aufgestellt
werden. Andernfalls drohen schwere Verletzungen oder Tod durch Stromschlag.
Der Trafo führt gefährliche elektrische Spannung und darf nicht direkt am Wasser aufgestellt
werden. Andernfalls drohen schwere Verletzungen oder Tod durch Stromschlag.
Stellen Sie das Netzteil überflutungssicher in einem Abstand von mindestens 2 m zum Wasser
auf.
VORSICHT
Drehende Bauteile im Bereich des Saugstutzens und des Druckstutzens. Verletzungen sind mög-
lich, wenn Sie in die Stutzen hineingreifen.
Beachten Sie insbesondere: Ein aufgrund Überlast gestopptes Gerät kann unerwartet anlaufen!
Fassen Sie nicht in die Öffnung des Saugstutzens oder Druckstutzens, wenn der Netzstecker
gesteckt ist.
Wenn die Stutzen im Betrieb frei zugänglich sind, z. B. wenn keine Schläuche angeschlossen
sind, sichern Sie die Stutzen mit einem Berührschutz. Der Berührschutz ist als Zubehör erhält-
lich.
HINWEIS
Beim Fördern von stark verschlammtem Wasser verschleißt die Laufeinheit der Pumpe ggf.
schneller und muss vorzeitig ersetzt werden.
Reinigen Sie den Teich bzw. das Becken gründlich, bevor Sie die Pumpe aufstellen.
Stellen Sie die Pumpe erhöht über den Teichboden auf. Dadurch wird das Ansaugen von ver-
schlammtem Wasser verringert.
Vermeiden Sie direkte Sonneneinstrahlung bei nicht getauchten Gerätekomponenten, da
diese sich dadurch stark aufheizen können. Verwenden Sie ggf. eine Schutzabdeckung.
Steuerung anschließen
Zur Bedienung der Pumpe ist das Steuergerät OASE Eco Control (Zubehör) erforderlich.
Alternativ kann die Pumpe in ein OASE Control-Netzwerk eingebunden werden. Informationen
dazu erhalten Sie unter www.oase.com.
Weitere Informationen entnehmen Sie der Gebrauchsanleitung zum Zubehör.
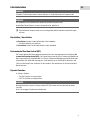
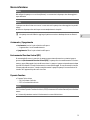
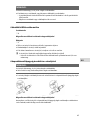
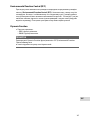
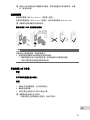
OASE Control-Steckverbindung herstellen und lösen
PLX0004

8
HINWEIS
Das Gerät wird beschädigt, wenn Wasser in den Steckverbinder eindringt.
• Schließen Sie den Steckverbinder an oder setzen Sie die Schutzkappe auf den Steckverbinder.
– Die Gummidichtung muss sauber sein und passgenau sitzen. Eine beschädigte Gummidich-
tung muss ersetzt werden.
– Sichern Sie den Steckverbinder oder die Schutzkappe mit den beiden Schrauben.
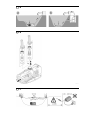
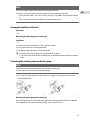
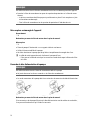
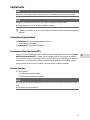
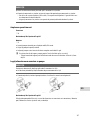
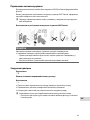
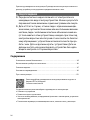
Gerät getaucht aufstellen
Anschließen
B
Stecken Sie noch nicht den Netzstecker in die Steckdose!
Aufstellen
C
• Stellen Sie die Pumpe waagerecht auf einem festen, schlammfreien Untergrund auf.
• Sorgen Sie für einen sicheren Stand der Pumpe.
• Betreiben Sie die Pumpe nur, wenn sie vollständig unter Wasser getaucht ist.
Mittels Zugseil können Sie die Pumpe einfach aus dem Wasser ziehen.
− Ziehen Sie das Zugseil durch die runden Öffnungen an der Filterunterschale und verkno-
ten es.
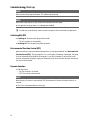
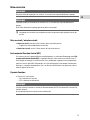
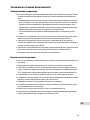
Schaltnetzteil mit Pumpe verbinden
HINWEIS
Die Pumpe wird zerstört, wenn Wasser in die Steckverbinder eindringt.
Lösen Sie niemals die Überwurfmuttern auf den Steckverbindern.
• Die Nase am Steckverbinder der Pumpe muss im Steckverbinder des Schaltnetzteils einrasten.
AMX0077
AMX0077
Stecken Sie noch nicht den Netzstecker in die Steckdose!
Sind die Steckverbinder von Filterpumpe und Schaltnetzteil gesteckt und eingerastet, können sie
nur mittels eines Schraubendrehers gelöst werden.

DE
9
Inbetriebnahme
HINWEIS
Schließen Sie die Pumpe niemals an einen Dimmer an. Andernfalls wird die Pumpe zerstört.
HINWEIS
Die Pumpe darf nicht trockenlaufen. Andernfalls wird die Pumpe zerstört.
Betreiben Sie die Pumpe nur, wenn sie getaucht bzw. geflutet ist.
Eine fabrikneue Pumpe erreicht erst nach einigen Betriebsstunden die maximale Pumpen-
leistung.
Einschalten / Ausschalten
• Einschalten: Stecken Sie den Netzstecker in die Steckdose.
– Das Gerät schaltet sich sofort ein.
• Ausschalten: Ziehen Sie den Netzstecker aus der Steckdose.
Environmental Function Control (EFC)
Die Pumpe vollzieht bei Inbetriebnahme automatisch einen vorprogrammierten Selbsttest (En-
vironmental Function Control (EFC)). Die Pumpe erkennt, ob sie sich im Trockenlauf/Blockierung
oder im getauchten Zustand befindet. Im Falle von Trockenlauf/Blockierung schaltet die Pumpe
automatisch nach 60 bis 120 Sekunden aus. Unterbrechen Sie im Störfall die Stromzufuhr und
"fluten Sie die Pumpe" bzw. entfernen Sie das Hindernis. Danach können Sie das Gerät wieder in
Betrieb nehmen.
Dynamic Function
• Schalter schieben.
– ON: Die Funktion ist eingeschaltet.
– OFF: Die Funktion ist ausgeschaltet.
HINWEIS
Bei eingeschalteter Dynamic Function arbeitet EFC (Environmental Function Control) einge-
schränkt.
Der Schutz gegen Trockenlauf ist deaktiviert.

10
Original operating manual. This operating manual belongs with the unit and must always be
handed over together with the unit.
EN
WARNING
WARNING
Disconnect all electrical units in the water from the power supply be-
fore reaching into the water. Otherwise there is a risk of injuries or
death by electrocution.
This unit can be used by children aged 8 and above and by persons
with reduced physical, sensory or mental capabilities or lack of expe-
rience and knowledge if they are supervised or have been instructed
on how to use the unit in a safe way and they understand the hazards
involved. Do not allow children to play with the unit. Only allow chil-
dren to carry out cleaning and user maintenance under supervision.
Table of Contents
Safety information ........................................................................................................................................ 11
Intended use .................................................................................................................................................. 11
Product description ..................................................................................................................................... 12
Installation and connection........................................................................................................................ 13
Commissioning/start-up ............................................................................................................................ 16
A more detailed operating manual is available for download as a PDF online:
www.oase.com/manual
The following additional topics are addressed in the operating manual:
• Symbols on the unit
• Dry installation of the pump
• Cleaning and maintenance, storage/winter-proofing, malfunction repair
• Technical data, wear parts, spare parts, disposal

EN
11
Safety information
Electrical connection
• Special regulations apply to electrical installation in outdoor areas. Only allow a qualified elec-
trician to perform the electrical installation.
– The qualified electrician has the required professional training, knowledge and skills to per-
form electrical installations in outdoor areas. The qualified electrician can detect potential
risks and adheres to regional and national standards, regulations and directives.
– For your own safety, please consult a qualified electrician.
• Only connect the unit if the electrical data of the unit and the power supply match.
• Only plug the unit into a correctly installed outlet. Ensure that the unit is fused for a rated
fault current of max. 30 mA by means of a fault current protection device.
• Extension cables and power distributors (e.g. outlet strips) must be suitable for outdoor use
(splash-proof).
• Protect open plugs and sockets from moisture.
Safe operation
• Do not use the unit, if electrical lines or the housing are damaged.
• A damaged connection cable cannot be replaced. Dispose of the unit.
• The impeller unit inside the unit contains a magnet with a strong magnetic field that may af-
fect the operation of pacemakers or implantable cardioverter defibrillators (ICDs). Keep the
magnet at least 0.2 m away from any implant.
• Do not carry or pull the unit by its power cable.
• Route lines so that they are protected from damage and nobody can trip over them.
• Never make technical modifications to the unit.
• Only carry out work on the unit that is described in this manual.
• Only use original spare parts and accessories.
• Should problems occur, please contact the authorized customer service or OASE.
Intended use
Only use the product described in this manual as follows:
• For pumping normal pond water for filter systems, waterfall systems and water course sys-
tems.
• For use in swimming ponds if the national regulations for installers are met.
• Only operate with the original switching power pack.
• In compliance with the technical specifications.
• Only subject to adherence to the permissible water quality values.

12
The following restrictions apply to the unit:
• Never use the unit with fluids other than water.
• Never run the unit without water.
• Do not use in conjunction with chemicals, foodstuff, easily flammable or explosive substances.
• Do not connect to the domestic water supply.
• Do not use for commercial or industrial purposes.
• According to EMC (Electromagnetic Compatibility), this is a class A unit. The unit may cause
malfunctions in living environments. It is the user's responsibility to take suitable counter-
measures.
Product description
Overview
ARS0049

EN
13
1
Inlet (suction side)
•
With filter cage (3) for pond bottom filtration for submerged installation.
• With hose sleeve for connecting a hose for dry installation.
2
Outlet (pressure side)
•
Connection of the return flow to the pond (e.g. via a water course).
3
Filter cage
4
Foot
•
With mounting holes for firm installation on the ground, if required.
5
Switching power pack with power cable
•
Pump power supply
6
Switch for switching on/off the dynamic function
•
Different conveyed volumes are pre-programmed in the pump controls for a dynamic fountain
pattern with changing heights and diameters. When the dynamic function is switched on, the
pump is continuously controlled using these values.
7
Control system connection
•
The control unit OASE Eco Control (accessories) is required to operate the pump.
•
Alternatively, the pump can be integrated in an OASE Control network.
• For information on OASE control, visit www.oase.com.
8
Hose sleeve ∅ 50 mm
9
Hose sleeve ∅ 38 mm
10
Hose clips for
fastening hoses on the hose sleeves.
Installation variants
A
• Variant (a): Submerged installation of the pump
– The pump is positioned in the pond.
– Water is drawn in via the filter cage (pond bottom filtration).
• Variant (b): Dry installation of the pump
– The pump is installed without a filter cage outside the pond but lower than the water level.
– Water is drawn in via a satellite filter or skimmer.
Installation and connection
The pump can be installed submerged (in water) or dry (outside the water).
The use of the pump is only permitted subject to adherence to the specified water quality.
• Pool water or salt water can impair the appearance of the unit. Such impairments are excluded
from the warranty.

14
WARNING
The power supply carries dangerous electrical voltage and must not be placed directly near wa-
ter. Otherwise, there is a risk of serious injury or death from electric shock.
The transformer is subject to dangerous voltage and must not be installed directly adjacent to
the water. Otherwise there is a risk of severe injuries or death by electrocution.
Install the power supply in a flood-protected position at least 2 m (6.6 ft) from the water.
CAUTION
Rotating components in the area of the intake connection and the pressure connection. Reach-
ing into the connections can lead to injuries.
Please note in particular: If a unit has stopped due to overload, it can start up unexpectedly!
Do not reach into the opening of the inlet connection or outlet connection while the power
plug is connected.
If the connections are freely accessible, e.g. if no hoses are connected, secure the connections
with a finger guard. The finger guard is available as an accessory.
NOTE
If the pump is used for conveying excessively muddy water, the impeller unit will be subject to
increased wear and will require earlier replacement.
Thoroughly clean the pond or pool before installing the pump.
Install the pump at a raised level above the bottom of the pond. This reduces intake of muddy
water.
Avoid direct sunlight when the components of the unit are not immersed, as this can cause
them to heat up considerably. Use a protective cover if necessary.
Connecting the control system
The control unit OASE Eco Control (accessories) is required to operate the pump.
Alternatively, the pump can be integrated in an OASE Control network. For information on this
topic, visit www.oase.com.
For further information refer to the manual for the accessories.
Connecting and disconnecting the OASE Control plug connection
PLX0004

EN
15
NOTE
The unit will be destroyed if water penetrates the plug connector.
• Connect the plug connector or place the protective cap on the plug connector.
– Ensure that the rubber seal is clean and fits precisely. If the rubber seal is damaged, replace
it.
– Secure the plug connector or protective cap with the two screws.
Submerged installation of the unit
Connection
B
Do not plug the power plug into the outlet yet!
Installation
C
• Position the pump horizontally on a firm, mud-free surface.
• Ensure that the pump is securely positioned.
• Only operate the pump when it is fully submerged.
A pull rope allows you to simply pull the pump out of the water.
− Pull the pull rope through the round openings on the bottom pan of the filter and make a
knot.
Connecting the switching power pack to the pump
NOTE
If water penetrates the plug connectors, this will destroy the pump.
Never undo the union nuts on the plug connectors.
• The stud on the plug connector of the pump must engage with the plug connector of the
switching power pack.
AMX0077
AMX0077
Do not plug the power plug into the outlet yet!
Once the plug connectors of the filter pump and switching power pack have been inserted and
have engaged, they can only be disconnected by means of a screw driver.

16
Commissioning/start-up
NOTE
Never connect the pump to a dimmer. This will destroy the pump
NOTE
Never allow the pump to run dry. Otherwise the pump will be destroyed.
Only operate the pump when it is submerged or flooded.
A brand-new pump will only reach its maximum capacity after several hours of operation.
Switching ON/OFF
• Switching on: Plug the power plug into the outlet.
– The unit switches on immediately.
• Switching off: Pull the power plug from the outlet.
Environmental Function Control (EFC)
When started up, the pump automatically performs a pre-programmed self-test (Environmental
Function Control (EFC)). The pump detects if it is running dry / blocked or submerged. The pump
turns off automatically after 60 to 120 seconds if it runs dry/is blocked. In the event of a mal-
function, disconnect the power supply and “flood the pump” or remove the obstacle. Afterwards,
the unit can be restarted.
Dynamic Function
• Slide the switch.
– ON: The function is activated.
– OFF: The function is deactivated.
NOTE
When Dynamic Function is activated, the EFC (Environmental Function Control) function is re-
stricted.
The unit is not protected from running dry.

FR
17
Traduction de la notice d'emploi d'origine. La notice d’emploi fait partie de l'appareil et doit par
conséquent lui être toujours jointe lorsqu’il est transféré.
FR
AVERTI SSEM ENT
AVERTISSEMENT
Débrancher tous les appareils électriques immergés avant de péné-
trer dans l'eau afin de prévenir tout risque de blessures ou un danger
de mort par électrocution.
Dans le cas où cet appareil serait utilisé par des mineurs de moins de
8 ans ainsi que par des personnes souffrant d'un handicap mental ou
plus généralement par des personnes manquant d'expérience, un
adulte averti devra être présent, qui renseignera le mineur ou la per-
sonne fragilisée concernée sur le bon emploi de ce matériel. Les en-
fants ne doivent pas jouer avec cet appareil. Ne pas laisser un enfant
sans surveillance pour le nettoyage ou l'entretien.
Table des matières
Consignes de sécurité ................................................................................................................................. 18
Utilisation conforme à la finalité ............................................................................................................... 18
Description du produit ................................................................................................................................ 19
Mise en place et raccordement ................................................................................................................. 20
Mise en service ............................................................................................................................................ 23
Vous pouvez télécharger le notice
d'emploi en format PDF sur Internet :
www.oase.com/manual
Vous trouverez ces thèmes supplémentaires dans la notice d’emploi :
• Symboles sur l'appareil
• Mise en place de la pompe hors de l’eau
• Nettoyage et entretien, stockage/hivernage, dépannage
• Caractéristiques techniques, pièces d’usure, pièces de rechange, élimination

18
Consignes de sécurité
Raccordement électrique
• Des dispositions particulières s'appliquent aux installations électriques en extérieur. Seul un
électricien qualifié peut réaliser l’installation électrique.
– En raison de sa formation professionnelle, de ses connaissances et de son expérience, l'élec-
tricien qualifié possède les connaissances nécessaires et a le droit de réaliser des installa-
tions électriques en extérieur. Il est capable d’identifier d'éventuels dangers et respecte les
normes, règlements et dispositions régionaux et nationaux en vigueur.
– En cas de questions et de problèmes, prière de vous adresser à un électricien qualifié.
• Ne brancher l'appareil que lorsque les caractéristiques électriques de l'appareil et de l'alimen-
tation correspondent.
• Raccorder l'appareil uniquement à une prise installée de manière réglementaire. Veiller à ce
que l'appareil soit absolument protégé par fusible par le biais d’une protection différentielle
avec un courant assigné de 30 mA maximum.
• Les câbles de rallonge et le distributeur de courant (p. ex. blocs multiprises) doivent être con-
çus pour une utilisation en extérieur (protégé contre les projections d'eau).
• Protégez les fiches et les douilles ouvertes contre l'humidité.
Exploitation sécurisée
• Ne pas utiliser l'appareil en cas d'endommagement des câbles électriques ou du boîtier.
• Un câble de raccordement endommagé ne peut pas être remplacé. Mettre l'appareil au rebut.
• L'unité de fonctionnement dans l'appareil contient un aimant à champ magnétique puissant
qui risque d'avoir un impact sur les stimulateurs cardiaques ou les défibrillateurs implantés
(ICD). Maintenir une distance minimale de 0,2 m entre l'implant et l'aimant.
• Ne pas soulever ni tirer l'appareil par le câble électrique.
• Poser les câbles de manière à éviter tout risque d'endommagement et de trébuchement.
• Ne jamais procéder à des modifications techniques sur l'appareil.
• Exécuter des travaux sur l'appareil uniquement si ces derniers sont décrits dans la notice
d'emploi.
• N’utiliser que des pièces de rechange et des accessoires d’origine.
• En cas de problèmes, adressez-vous au service après-vente autorisé ou contactez OASE.
Utilisation conforme à la finalité
Utilisez le produit décrit dans cette notice uniquement de la manière suivante :
• Pour le pompage d'eau normale d'étang pour filtres, cascades et cours d'eau.
• Utilisation dans des bassins et des piscines dans le respect de prescriptions nationales de
construction.
• Utiliser uniquement le bloc d’alimentation d’origine.
• Dans le respect des caractéristiques techniques.
• Dans le respect des valeurs d'eau admissibles.

FR
19
Les restrictions suivantes sont valables pour l'appareil :
• Ne jamais utiliser dans d'autres liquides que de l'eau.
• Ne jamais utiliser sans débit d'eau.
• Ne pas utiliser en relation avec des produits chimiques, des produits alimentaires, des maté-
riaux facilement inflammables ou explosifs.
• A ne pas raccorder à l'alimentation en eau potable.
• Ne pas utiliser à des fins commerciales ou industrielles.
• Selon la classification de la compatibilité électromagnétique, la pompe est un appareil de caté-
gorie A. Dans les logements, l'appareil peut causer des interférences. L'utilisateur doit prendre
des mesures appropriées.
Description du produit
Vue d'ensemble
ARS0049

20
1
Entrée (côté aspiration)
•
Avec panier de filtration (3) pour la filtration du fond du bassin en cas d'installation immergée.
• Avec embout à olive pour le raccordement d'un tuyau en cas d'installation à sec.
2
Sortie (côté refoulement)
•
Raccordement de la conduite de retour dans le bassin (par ex. via un cours d'eau).
3
Panier de filtration
4
Pied-support
•
Avec des trous de montage pour une installation fixe au sol si nécessaire.
5
Bloc d'alimentation à commutation avec câble secteur
•
Alimentation en électricité de la pompe
6
Interrupteur pour activer/désactiver la fonction Dynamic
•
Différents débits sont préprogrammés dans la commande de la pompe pour une image dyna-
mique de la fontaine dont la hauteur et le diamètre varient. Lorsque la fonction Dynamique est
activée, la pompe est commandée en continu avec ces valeurs.
7
Raccordement de la commande
•
L'appareil de commande OASE Eco Control (accessoire) est nécessaire pour faire fonctionner la
pompe.
•
Il est également possible d'intégrer la pompe dans un réseau-OASE Control.
• Vous trouverez des informations sur OASE Control sur le site www.oase.com.
8
Embout à olive ∅ 50 mm
9
Embout à olive ∅
38 mm
10
Collier de serrage pour la fixation des tuyaux sur les embouts à olive.
Variantes d’installation
A
• Variante (a) : Installer la pompe immergée
– La pompe est positionnée dans le bassin.
– L'eau est aspirée par le panier de filtration (filtration au fond du bassin).
• Variante (b) : Installer la pompe hors de l’eau
– La pompe est placée sans panier de filtration à l'extérieur du bassin mais en dessous du ni-
veau de l'eau.
– L'eau est aspirée par un filtre satellite ou un skimmer.
Mise en place et raccordement
La pompe peut être installée en immersion (dans l’eau) ou au sec (hors de l’eau).
L’utilisation de la pompe est autorisée uniquement dans le respect des valeurs d'eau admissibles.
• L'eau de piscine ou l'eau de mer risquent de nuire à l'aspect de l'appareil. Ces altérations sont
exclues de la garantie.
La pagina sta caricando ...
La pagina sta caricando ...
La pagina sta caricando ...
La pagina sta caricando ...
La pagina sta caricando ...
La pagina sta caricando ...
La pagina sta caricando ...
La pagina sta caricando ...
La pagina sta caricando ...
La pagina sta caricando ...
La pagina sta caricando ...
La pagina sta caricando ...
La pagina sta caricando ...
La pagina sta caricando ...
La pagina sta caricando ...
La pagina sta caricando ...
La pagina sta caricando ...
La pagina sta caricando ...
La pagina sta caricando ...
La pagina sta caricando ...
La pagina sta caricando ...
La pagina sta caricando ...
La pagina sta caricando ...
La pagina sta caricando ...
La pagina sta caricando ...
La pagina sta caricando ...
La pagina sta caricando ...
La pagina sta caricando ...
La pagina sta caricando ...
La pagina sta caricando ...
La pagina sta caricando ...
La pagina sta caricando ...
La pagina sta caricando ...
La pagina sta caricando ...
La pagina sta caricando ...
La pagina sta caricando ...
La pagina sta caricando ...
La pagina sta caricando ...
La pagina sta caricando ...
La pagina sta caricando ...
La pagina sta caricando ...
La pagina sta caricando ...
La pagina sta caricando ...
La pagina sta caricando ...
La pagina sta caricando ...
La pagina sta caricando ...
La pagina sta caricando ...
La pagina sta caricando ...
La pagina sta caricando ...
La pagina sta caricando ...
La pagina sta caricando ...
La pagina sta caricando ...
La pagina sta caricando ...
La pagina sta caricando ...
La pagina sta caricando ...
La pagina sta caricando ...
La pagina sta caricando ...
La pagina sta caricando ...
La pagina sta caricando ...
La pagina sta caricando ...
La pagina sta caricando ...
La pagina sta caricando ...
La pagina sta caricando ...
La pagina sta caricando ...
La pagina sta caricando ...
La pagina sta caricando ...
La pagina sta caricando ...
La pagina sta caricando ...
La pagina sta caricando ...
La pagina sta caricando ...
La pagina sta caricando ...
La pagina sta caricando ...
La pagina sta caricando ...
La pagina sta caricando ...
La pagina sta caricando ...
La pagina sta caricando ...
La pagina sta caricando ...
La pagina sta caricando ...
La pagina sta caricando ...
La pagina sta caricando ...
La pagina sta caricando ...
La pagina sta caricando ...
La pagina sta caricando ...
La pagina sta caricando ...
La pagina sta caricando ...
La pagina sta caricando ...
La pagina sta caricando ...
La pagina sta caricando ...
La pagina sta caricando ...
La pagina sta caricando ...
La pagina sta caricando ...
La pagina sta caricando ...
La pagina sta caricando ...
La pagina sta caricando ...
La pagina sta caricando ...
La pagina sta caricando ...
La pagina sta caricando ...
La pagina sta caricando ...
La pagina sta caricando ...
La pagina sta caricando ...
La pagina sta caricando ...
La pagina sta caricando ...
La pagina sta caricando ...
La pagina sta caricando ...
La pagina sta caricando ...
La pagina sta caricando ...
La pagina sta caricando ...
La pagina sta caricando ...
La pagina sta caricando ...
La pagina sta caricando ...
La pagina sta caricando ...
La pagina sta caricando ...
La pagina sta caricando ...
La pagina sta caricando ...
La pagina sta caricando ...
La pagina sta caricando ...
La pagina sta caricando ...
La pagina sta caricando ...
La pagina sta caricando ...
La pagina sta caricando ...
La pagina sta caricando ...
La pagina sta caricando ...
La pagina sta caricando ...
La pagina sta caricando ...
La pagina sta caricando ...
La pagina sta caricando ...
La pagina sta caricando ...
La pagina sta caricando ...
La pagina sta caricando ...
La pagina sta caricando ...
La pagina sta caricando ...
La pagina sta caricando ...
La pagina sta caricando ...
La pagina sta caricando ...
La pagina sta caricando ...
La pagina sta caricando ...
La pagina sta caricando ...
La pagina sta caricando ...
La pagina sta caricando ...
La pagina sta caricando ...
-
 1
1
-
 2
2
-
 3
3
-
 4
4
-
 5
5
-
 6
6
-
 7
7
-
 8
8
-
 9
9
-
 10
10
-
 11
11
-
 12
12
-
 13
13
-
 14
14
-
 15
15
-
 16
16
-
 17
17
-
 18
18
-
 19
19
-
 20
20
-
 21
21
-
 22
22
-
 23
23
-
 24
24
-
 25
25
-
 26
26
-
 27
27
-
 28
28
-
 29
29
-
 30
30
-
 31
31
-
 32
32
-
 33
33
-
 34
34
-
 35
35
-
 36
36
-
 37
37
-
 38
38
-
 39
39
-
 40
40
-
 41
41
-
 42
42
-
 43
43
-
 44
44
-
 45
45
-
 46
46
-
 47
47
-
 48
48
-
 49
49
-
 50
50
-
 51
51
-
 52
52
-
 53
53
-
 54
54
-
 55
55
-
 56
56
-
 57
57
-
 58
58
-
 59
59
-
 60
60
-
 61
61
-
 62
62
-
 63
63
-
 64
64
-
 65
65
-
 66
66
-
 67
67
-
 68
68
-
 69
69
-
 70
70
-
 71
71
-
 72
72
-
 73
73
-
 74
74
-
 75
75
-
 76
76
-
 77
77
-
 78
78
-
 79
79
-
 80
80
-
 81
81
-
 82
82
-
 83
83
-
 84
84
-
 85
85
-
 86
86
-
 87
87
-
 88
88
-
 89
89
-
 90
90
-
 91
91
-
 92
92
-
 93
93
-
 94
94
-
 95
95
-
 96
96
-
 97
97
-
 98
98
-
 99
99
-
 100
100
-
 101
101
-
 102
102
-
 103
103
-
 104
104
-
 105
105
-
 106
106
-
 107
107
-
 108
108
-
 109
109
-
 110
110
-
 111
111
-
 112
112
-
 113
113
-
 114
114
-
 115
115
-
 116
116
-
 117
117
-
 118
118
-
 119
119
-
 120
120
-
 121
121
-
 122
122
-
 123
123
-
 124
124
-
 125
125
-
 126
126
-
 127
127
-
 128
128
-
 129
129
-
 130
130
-
 131
131
-
 132
132
-
 133
133
-
 134
134
-
 135
135
-
 136
136
-
 137
137
-
 138
138
-
 139
139
-
 140
140
-
 141
141
-
 142
142
-
 143
143
-
 144
144
-
 145
145
-
 146
146
-
 147
147
-
 148
148
-
 149
149
-
 150
150
-
 151
151
-
 152
152
-
 153
153
-
 154
154
-
 155
155
-
 156
156
-
 157
157
-
 158
158
-
 159
159
-
 160
160


OASE 20000/ 12V Aquarius Eco Expert Manuale utente
- Tipo
- Manuale utente
in altre lingue
Documenti correlati
-
OASE 56793 Product Instructions
-
OASE 46180 Product Instructions
-
-
-
-
-
-
 Toast BioSmart Set 7000 Istruzioni per l'uso
-
OASE AquaMax Manuale utente
-


