
Quickstart Guide English ( 3 – 11 )
Guía de inicio rápido Español ( 12 – 20 )
Guide d’utilisation rapide Français ( 21 – 29 )
Guida rapida Italiano ( 30 – 38 )
Schnellstart-Anleitung Deutsch ( 39 – 47 )
Snelstartgids Nederlands ( 48 – 56 )
Appendix English ( 58 )

2

3
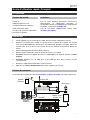
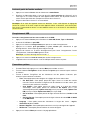
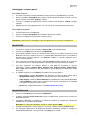
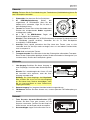
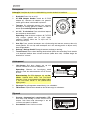
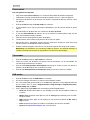
Bluetooth
device
FM Antenna
Power
Powered
Speakers
USB Flash Drive
Tablet, MP3
Player, etc.
Quickstart Guide (English)
Introduction
Box Contents
Octave LP
45 RPM Adapter
Remote Control (with battery)
Quickstart Guide
Safety & Warranty Manual
Support
For the latest information about this product
(documentation, technical specifications, system
requirements, compatibility information, etc.) and
product registration, visit ionaudio.com.
For additional product support, visit
ionaudio.com/support.
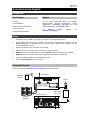
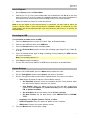
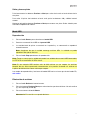
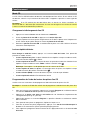
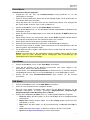
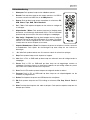
Setup
1. Place the unit on a stable, level surface, away from any strong magnetic fields.
2. Lift the cabinet lid to access the turntable. The turntable is secured during shipment with the
transit screw. Use a screwdriver to turn the transit screw clockwise (so it lowers). This will
allow the turntable to "float."
3. Remove the plastic stylus cover from the cartridge.
4. Remove the twist-tie used to secure the tonearm during shipment.
5. Optional: Connect an output device to the Line Output and an input device to the Aux In.
6. Optional: Connect a USB flash drive to the USB Port for playback and recording.
7. Connect the power cable to an available power outlet.
8. Press the power button to turn the unit on.
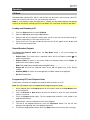
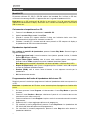
Connection Diagram
Items not listed under Introduction > Box Contents are sold separately.

4
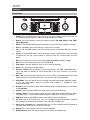
Features
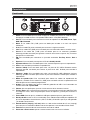
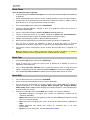
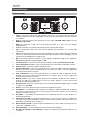
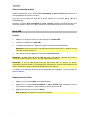
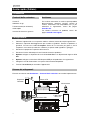
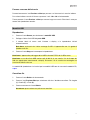
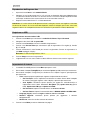
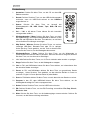
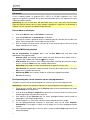
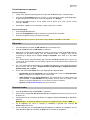
Front Panel
1
2
4
6
3
5
7
8
9
10
11
12
13
14
15 16
17
18
19
20
21
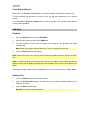
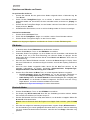
1. Power: Press this button to turn the unit on or put it into standby mode. Do not turn the
unit off during media playback—doing so could damage your media.
2. Source: Press this button to select the playback source: CD, USB, Phono, Tape, DAB,
FM, or Bluetooth.
3. Menu: In FM and DAB Modes, press this button to view a Menu with additional settings.
4. Scan: In FM Mode, press this button to scan for the next station.
5. Info: In FM and DAB modes, press this button to view information about the current
station.
6. Preset: In FM and DAB modes, press this button to view saved stations. Press and hold
this button to save the current station as a preset. There are 10 preset slots for each
mode.
7. EQ: Press this button to select an EQ setting: Flat, Pop, Classic, Rock, or Jazz.
8. Eject: Press this button to eject the CD in the CD Tray.
9. Play/Pause: Press this button to start, resume, or pause playback.
10. Stop: Press this button to stop playback.
11. Previous / Down: Press this button to skip to the previous CD, USB, or Bluetooth track.
Press and hold this button to search backward in the track. Release it to resume
playback.
12. Next / Up: Press this button to skip to the next CD, USB, or Bluetooth track. Press and
hold this button to search forward in the track. Release it to resume playback.
13. Play Mode: Pr
ess this button to cycle through the repeat and random playback modes.
In CD and USB Modes, press this button while playback is stopped to enter
programming mode.
14. Record: Press this button to enter USB recording mode if a USB flash drive is connected
to the USB Port.
15. Volume: Turn this knob to adjust the sound level for the internal speakers.
16. Tuning / Enter: Turn this knob to select the FM or DAB radio station frequency. When
navigating menus, use this knob to browse options, and press it to confirm a selection.
17. USB Port: Connect your USB flash drive here to play tracks or record files.
18. CD Tray: Insert a CD into this tray. This unit is designed to play commercially available
CDs, properly burned and finalized CD-Rs and CD-RWs, and MP3 CDs.
19. Aux In (1/8" / 3.5 mm): Use a standard stereo 1/8" (3.5 mm) cable to connect an optional
line-level audio source to this stereo auxiliary input.
20. Display: This screen indicates the unit's current operation.
21. Remote Sensor: Point the remote control at this sensor when operating it.

5
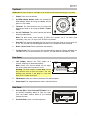
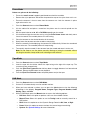
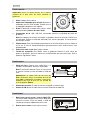
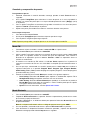
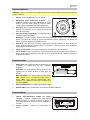
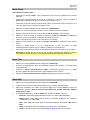
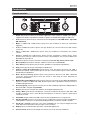
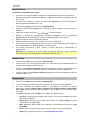
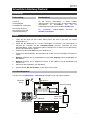
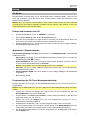
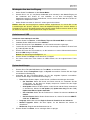
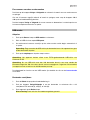
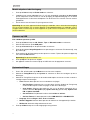
Top Panel
Important: Remove the plastic cartridge cover (needle cover) before operating the turntable.
1. Platter: Place your record here.
2. 45 RPM Adapter Holder: Holds the included 45
RPM adapter. When not using the adapter, please
place it in this holder.
3. Tonearm: The fixed tonearm can be raised and
lowered by hand, or by using the Raise / Lower
Lever.
4. 33 / 45 / 78 Switch: This switch controls the speed
of the turntable platter.
Note: For best results when playing 78 RPM vinyl records, use a 78 stylus (sold
separately). Only use a 78 stylus with 78 RPM vinyl records.
5. Arm Clip: This specially designed arm clip secures the tonearm while at rest or when not
in use. The arm clip has been designed to remain in the up position while unlocked.
6. Raise / Lower Lever: Raises and lowers the tonearm.
7. Transit Screw: This screw secures the turntable during shipment. Before operating the
turntable, turn this screw clockwise (so it lowers). This will allow the turntable to "float."
Rear Panel
1. Line Output: Connect this RCA output to a
receiver, amplifier, or powered speakers.
Note: Octave LP’s volume control will not adjust
the volume when the line output is in use.
Warning: The RCA outputs are Line level. Please
only connect these to Line level inputs. You may
damage your receiver if you plug in a Line level
device into a Phono level input.
2. FM Antenna: Adjust this antenna for better FM radio reception.
3. Power Input: The integrated power cable is connected here.
Side Panel
1. Cassette Eject / Fast Forward (FF) Button: Push
this button completely down to eject the tape.
Push the button halfway down to fast forward
through the tape.
2. Cassette Door: Insert a cassette tape here.
1
2
3
2
3
6
5
1
4
7
2
1

6
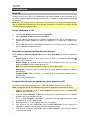
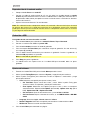
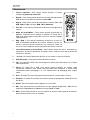
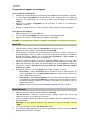
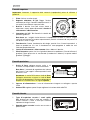
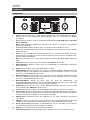
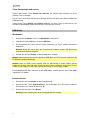
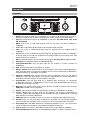
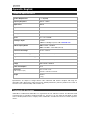
Remote Control
1. Eject: Press this button to eject the CD in the CD Tray.
2. Record: Press this button to enter USB recording mode if a USB
flash drive is connected to the USB Port.
3. Source: Press this button to select the playback source: CD, USB,
Phono, Tape, DAB, FM, or Bluetooth.
4. Vol - / Vol +: Press these buttons to decrease or increase the
volume.
5. Play Mode / Menu: Press this button to cycle through the repeat
and random playback modes. In FM and DAB Modes, press this
button to view a Menu with additional settings.
6. Skip Previous / Next: Press these buttons to skip to the previous
or next CD, USB, or Bluetooth track. Press and hold these buttons
to search in the track. Release it to resume playback.
7. Play/Pause / Enter: Press this button to start, resume, or pause
playback. When navigating menus, press this button to confirm a
selection.
8. -10 / +10: Press these buttons to jump backward or forward by 10 tracks.
9. Stop: Press this button to stop playback.
10. Info: In FM and DAB modes, press this button to view information about the current
station.
11. Preset: In FM and DAB modes, press this button to view saved stations. Press and hold
this button to save the current station as a preset. There are 10 preset slots for each
mode.
12. Scan: In FM Mode, press this button to scan for the next station.
13. Program: In CD or USB Modes, press this button to program the playback order for
tracks.
14. Delete: P
ress this button to delete a USB file.
15. EQ: Press this button to select an EQ setting: Flat, Pop, Classic, Rock, or Jazz.
16. Mute: Press this button to mute all audio. Press it again to unmute.
P. M O D E
MENU

7
Operation
CD Mode
Standard audio and data CDs, CD-Rs, and CD-RWs can be used. If you are using a data CD,
make sure it contains MP3 files. The unit cannot play other files.
Note:
If a CD contains more than 999 files in a folder, the files above 999 will not appear
correctly on the display. Arrange your files into folders with a maximum of 999 files per folder.
Loading and Unloading a CD
1. Press the Source button to select CD Mode.
2.
Open the CD Tray by pressing the Eject button.
3.
When the CD tray has opened, carefully place the CD in the tray with the label facing up.
Position smaller discs in the center of the CD tray.
4.
Close the CD tray. The total number of tracks on the CD will appear on the display and
the CD will play automatically.
Repeat/Random Playback
To change the playback mode, press the Play Mode button. It will cycle through the
following modes:
• Repeat (One): The current track is repeated. When active, the Repeat symbol (
) will
appear in the display.
• Repeat Folder: All tracks in the current folder are repeated. When active, Folder will
appear next to the Repeat symbol.
Note: This mode is only available when using MP3 discs.
• Repeat All: All tracks are repeated. When active, All will appear next to the Repeat
symbol.
• Random (RDM): All tracks are rearranged into a random sequence for playback.
• Off: Normal operation.
Programming CD Track Playback Order
Follow these instructions to program the playback order for tracks on a CD.
Note: The CD playback must be stopped before programming track order.
1. While stopped, press the Program button on the remote control or the Play Mode button
on the front panel.
2. Press the Previous or Next buttons to select the location in which the track should be
stored, i.e. track 03.
3. Press the Program button again. The first programmed selection is now stored in the
programmed memory.
4. Repeat Steps 2 and 3 to add more tracks to the program.
5. To listen to the programmed tracks, press the Play/Pause button. The CD will start
playing at the beginning of the first programmed track.
6. To clear the programmed memory, press the Stop button twice while the disc is playing.

8
Track Skip and Search
Briefly press the Previous or Next buttons to skip to backward or forward to another track.
To skip backward and forward by 10 tracks, press the -10 and +10 buttons on the remote
control.
Press and hold the Previous or Next buttons to search through a track. Release the button to
resume normal playback.
USB Mode
Playback
1. Press the Source button to select USB Mode.
2. Connect your USB flash drive to the USB Port.
3. The total number of tracks will be shown on the display, and playback will begin
automatically.
Note: Make sure the drive contains MP3 files. The unit cannot play other files.
4. Press the Stop button to stop playing.
Note: Please note that the unit can only read FAT32 format USB flash drives that are 32 GB or
less.
Note:
If a USB flash drive contains more than 999 files in a folder, the files above 999 will not
appear correctly on the display. Arrange your files into folders with a maximum of 999 files per
folder.
The playback modes and functions for USB Mode are the same as those for CD Mode, above.
Deleting Files
1. Press the Delete button on the remote control.
2. Press the Previous/Next buttons to select what you would like to delete: Single File (1),
Folder (F), or All (A).
3. Press the Delete button again.
Warning: This action cannot be undone.

9
Phono Mode
Before use, please do the following:
•
Ensure the
transit screw
is properly positioned to unlock the turntable.
•
Remove the stylus protector. Reconnect the protective cap on the stylus when not in use.
• Ensure the tonearm is free to move from the tonearm rest. Lock the tonearm in place
again when not in use.
1.
Press the
Source
button to select
Phono Mode
.
2.
Lift the cabinet lid and place a record on the platter over the central spindle on the
slipmat.
3.
Set the speed selector to
33
,
45
, or
78 RPM
depending on the record.
4.
Lift the tonearm from the tonearm rest by using the
Raise/Lower Lever
and slowly move
it over the record. The turntable platter will start turning.
5.
Place the tonearm on the desired location of the record.
6.
Gently lower the tonearm onto the record to start playing.
7.
When the record is finished playing, the tonearm will automatically lift from the record and
return to the rest. The turntable platter will stop turning.
8.
To manually stop the record, lift the tonearm from the record and return it to the rest.
Note: Do not stop or turn the platter manually. Moving or jarring the turntable without
securing the tonearm clamp could result in damage to the tonearm.
Tape Mode
1. Press the Source button to select Tape Mode.
2. Insert the tape with the thicker side of the tape facing to the right of the tape tray. The
cassette will play automatically.
3. Push the Eject/Fast Forward button halfway down to toggle between fast forward and
playback. Release the FF button to start playback.
4. Push the Eject/Fast Forward button completely down to eject the tape.
DAB Mode
1. Press the Source button to select DAB Mode.
2. Octave LP will automatically scan for available stations.
3. When you have selected a station, you can press the Info button to view the following
information in the display: Program Name, Program Type, Program Number, Audio
Setting, Time, and Date.
4. While in DAB Mode, press the Menu button to access the following options:
• Full Scan: Select this option to perform a full scan for available stations.
• Manual Tune: Select this option to use the Tuning knob to manually search for a
DAB station.
• DRC: Select this option to set the Dynamic Range Control to Off, Low, or High.
• Prune: Select this option to remove stations that are no longer transmitting.
• System: See System Settings for more information.

10
Saving and Recalling Presets
To save a preset:
1. While tuned to the desired station, press and hold the Preset button for 2 seconds.
2. Turn the Tuning/Enter knob to choose which Preset slot the station will be saved to.
Preset slots that have not been used will appear as "(Empty)" in the display.
3. Press the Tuning/Enter knob to save the station to the preset slot. "Stored" will appear in
the display.
4. Repeat these steps to add up to 10 of your favorite stations as presets.
To recall a preset:
1. Briefly press the Preset button.
2. Turn the Tuning/Enter knob to select which preset you would like to load.
3. Press the Tuning/Enter knob to load the preset.
Note: The process for saving and recalling presets is the same for FM Mode.
FM Mode
1. For best results, extend the FM Antenna on the rear panel.
2. Press the Source button to select FM Mode.
3. Use the Tuning knob to manually select a station, or press the Scan button to jump to the
next station depending on the Scan Setting. To change the direction of the Scan, press
the Previous or Next buttons. Scan will now search in that direction.
4. If you tune to a stereo FM station, the Stereo indicator will appear in the display. If you
tune to an FM station with a weaker signal, the reception will automatically switch to
Mono.
5. When you have selected a station, you can press the Info button to view the following
information in the display: Program Name, Program Type, Program Number, Audio
Setting, Time, and Date.
6. While in FM Mode, press the Menu button to access the following options:
• Scan Setting: Select All Stations to scan the entire FM range or Strong Stations
Only to scan for stations with a strong signal.
• Audio Setting: Select Stereo Allowed for stereo playback when available or
Forced Mono to limit all stations to mono. You can also press the Tuning knob to
switch between stereo and mono.
• System: See System Settings for more information.
Bluetooth Mode
1. Press the Source button to select BT Mode.
2. The display will flash BT Disconnected. When pairing, remain within 10 meters (33 feet)
of Octave LP.
3. Turn on Bluetooth on your phone or tablet to pair. Select Octave LP as the Bluetooth
device.
Note: If your Bluetooth device prompts for a pairing code, enter “0000”.
4. When successfully paired and connected, the display will show BT Connected.
5. To disconnect from the currently paired Bluetooth device and pair to another Bluetooth
device, hold the Stop button for 2 seconds.

11
Aux In Playback
1. Set the Source button to Phono Mode.
2. Connect an 1/8” (3.5 mm) stereo audio cable (not included) from the Aux In on the front
panel of Octave LP to the line output or headphone output of your external audio device
to be able to listen to the external source through Octave LP’s internal speakers.
3. Adjust the volume on Octave LP to the desired level.
Note: If the line output of your external device is connected, you only need to adjust the
system’s volume control. If your external device’s headphone output is connected, you may
need to adjust the volume control on both your external device and Octave LP to achieve the
desired volume.
Recording to USB
To record from an audio source to USB:
1. Press the Source button to select CD, Phono, Tape, or Bluetooth Modes.
2. Connect your USB flash drive to the USB Port.
3. Press the Record button to enter recording mode.
4. Press the Previous/Next buttons to select the recording type: Single File (1), Folder (F),
or All (A).
5. Press the Record button again to begin recording. During recording, the USB indicator
will flash in the display.
Note: The recording speed is 1:1.
6. Press Stop to stop the recording.
7. The unit will create a new folder in the USB drive that contains all recorded tracks.
System Settings
1. While in FM or DAB Modes, press the Menu button to open the menu.
2. Use the Tuning/Enter knob to select System, then press it to confirm.
3. Use the Tuning/Enter knob to select from the options below, then press it to confirm.
• Time: Select this option to adjust the time and date settings.
o Set Time/Date: Manually set the time and date. Use the Tuning knob to adjust
the values on the display, and press it to confirm.
o Auto Update: Select this option to have the time and date automatically
update. Select No Update (Off), Update from Any (FM or DAB), Update from
FM, or Update from DAB.
o Set 12/24 Hour: Set the time format, either 12 Hour or 24 Hour.
o Set Date Format: Set the date format, either MM-DD-YYYY or DD-MM-
YYYY.
• Language: Select English, German, French, or Italian.
• Software Upgrade: Select this option to update the unit's software.
• SW Version: Displays the current software version.
4. Press the Menu button to move back a page.

12
Dispositivo
Bluetooth
Antena de FM
Suministro
eléctrico
Altavoces
alimentados
Unidad flash USB
Tableta, reproductor
de MP3, etc.
Guía de inicio rápido (Español)
Introducción
Contenido de la caja
Octave LP
Adaptador para 45 rpm
Control remoto (con la batería)
Guía de inicio rápido
Manual sobre la seguridad y garantía
Soporte
Para obtener la información más reciente acerca de
este producto (documentación, especificaciones
técnicas, requisitos de sistema, información de
compatibilidad, etc.) y registrarlo, visite
ionaudio.com.
Para obtener soporte adicional del producto, visite
ionaudio.com/support.
Instalación
1. Coloque la unidad sobre una superficie estable y nivelada alejada de todo campo magnético
fuerte.
2. Levante la tapa del gabinete para acceder al giradiscos. El giradiscos está sujetado durante el
envío con el tornillo de transporte. Utilice un destornillador para girar el tornillo de transporte
en sentido horario (de forma que baje). Esto le permitirá al giradiscos "flotar".
3. Retire la cubierta plástica de la púa de la cápsula.
4. Retire el precinto utilizado para sujetar el brazo de lectura durante el envío.
5. Opcional: Conecte un dispositivo de salida a la salida de línea en dispositivo de entrada a la
entrada auxiliar.
6. Opcional: Conecte una unidad flash USB al puerto USB para reproducción y grabación.
7. Conecte este cable de corriente a una toma de corriente disponible.
8. Pulse el botón de encendido para encender la unidad.
Diagrama de conexión
Los elementos que no se enumeran en Introducción > Contenido de la caja se venden por separado.

13
Características
Panel frontal
1
2
4
6
3
5
7
8
9
10
11
12
13
14
15 16
17
18
19
20
21
1. Power: Pulse este botón para encender o apagar la unidad o para ponerla en modo de espera.
No apague la unidad mientras esté reproduciendo medios—esto podría dañarlos.
2. Source: Pulse este botón para seleccionar la fuente de reproducción: CD, USB, Phono, Tape,
DAB, FM o Bluetooth.
3. Menu: En los modos FM y DAB, pulse este botón para acceder a un menú con ajustes
adicionales.
4. Scan: En el modo FM, pulse este botón para avanzar a la siguiente estación.
5. Info: En los modos FM y DAB, pulse este botón para ver información sobre la estación actual.
6. Preset: En los modos FM y DAB, pulse este botón para ver las estaciones guardadas.
Mantenga pulsado este botón para guardar la estación actual como un preset. Hay 10 ranuras
para presets en cada modo.
7. EQ: Pulse este botón para seleccionar un ajuste del ecualizador. Flat, Pop, Classic, Rock o
Jazz.
8. Expulsar: Pulse este botón para expulsar el CD de la bandeja de CD.
9. Reproducir/Pausa: Pulse este botón para iniciar, reanudar o poner en pausa la reproducción.
10. Parar: Pulse este botón para detener la reproducción.
11. Anterio
r / Abajo: Pulse este botón para saltar a la pista de CD, USB o Bluetooth anterior.
Mantenga pulsado este botón para recorrer la pista hacia atrás. Suéltelo para reanudar la
reproducción.
12. Siguiente / Arriba: Pulse este botón para saltar a la pista de CD, USB o Bluetooth siguiente.
Mantenga pulsado este botón para recorrer la pista hacia adelante. Suéltelo para reanudar la
reproducción.
13. Modo de reproducción: Pulse este botón para alternar los modos de reproducción de
repetición y aleatorio: En los modos CD y USB, pulse este botón mientras la reproducción está
detenida para entrar al modo de programación.
14. Grabar: Pulse este botón para entrar al modo de grabación de USB si está conectada una
memoria flash USB al puerto USB.
15. Volume: Gire esta perilla para ajustar el nivel de volumen de los altavoces internos.
16. Tuning / Enter: Gire esta perilla para seleccionar la frecuencia de estación de radio FM o DAB.
Al navegar los menús, utiliza esta perilla para recorrer las opciones y púlsela para confirmar su
selección.
17. Puerto USB: Conecte aquí su unidad flash USB para reproducir pistas o grabar archivos.
18. Bandeja de CD: Inserte un CD en esta bandeja. Esta unidad está diseñada para reproducir CD
que están disponibles comercialmente y CD-R, CD-RW y CD de MP3 que hayan sido grabados
y finalizados correctamente.
19. Entrada Auxiliar (1/8 pulg. / 3,5 mm): Utilice un cable estéreo estándar de 3,5 mm (1/8 pulg.)
para conectar una fuente de audio de nivel de línea opcional a esta entrada estéreo auxiliar.
20. Pantalla: Esta pantalla indica el funcionamiento actual de la unidad.
21. Sensor del control remoto: Apunte el control remoto hacia este sensor al utilizarlo.

14
Panel superior
Importante: Retire la cubierta plástica de la cápsula
(cubierta de la púa) antes de hacer funcionar el
giradiscos.
1. Plato: Coloque aquí su disco.
2. Soporte del adaptador para 45 rpm: Sostiene el
adaptador para 45 RPM incluido. Cuando no use
el adaptador, póngalo en este soporte.
3. Brazo: El brazo fijo se puede subir y bajar a mano
o presionando la palanca de subir / bajar.
4. Conmutador de 33 / 45 / 78: Este conmutador controla la velocidad del plato del
giradiscos.
Nota: Para obtener los mejores resultados al reproducir discos de vinilo de 78 RPM, use
una púa para 78 (que se vende por separado). Use sólo una púa para 78 con los discos
de vinilo de 78 RPM.
5. Clip del brazo: Este clip diseñado especialmente fija el brazo mientras está en reposo o
no se usa. El clip ha sido diseñado para que permanezca hacia arriba mientras está
desbloqueado.
6. Palanca de subir / bajar: Sube y baja el brazo.
7. Tornillo de transporte: Este tornillo sujeta el giradiscos durante el envío. Antes de
operar el giradiscos, gire este tornillo en sentido horario (de forma que baje). Esto le
permitirá al giradiscos "flotar".
Panel trasero
1. Salida de línea: Conecte esta salida RCA a su
receptor, amplificador o altavoces alimentados.
Nota: El control de volumen Octave LP no ajustará
el volumen cuando se esté utilizando la salida de
línea.
Advertencia: Las salidas RCA son para nivel de
línea. Conéctelas sólo a las entradas de nivel de
línea (Line). Puede dañar el receptor si enchufa un
dispositivo de nivel de línea en una entrada de
nivel fonográfico (Phono).
2. Entrada de corriente: El cable de corriente integrado se conecta aquí.
3. Antena de FM: Ajuste de cable para una mejor recepción de radio FM.
Panel lateral
1. Botón para eyectar casete / avance rápido (FF):
Pulse este botón completamente hasta abajo para
expulsar el casete. Pulse este botón a mitad de
camino para avanzar rápidamente por la cinta.
2. Ranura para casetes: Inserte aquí un casete.
2
3
6
5
1
4
7
1
2
3
2
1

15
Control remoto
1. Expulsar: Pulse este botón para expulsar el CD de la bandeja de
CD.
2. Record: Pulse este botón para entrar al modo de grabación de
USB si está conectada una memoria flash USB al puerto USB.
3. Source: Pulse este botón para seleccionar la fuente de
reproducción: CD, USB, Phono, Tape, DAB, FM o Bluetooth.
4. Vol - / Vol +: Pulse estos botones para reducir o aumentar el
volumen.
5. Modo de reproducción / Menu: Pulse este botón para alternar
los modos de reproducción de repetición y aleatorio: En los
modos FM y DAB, pulse este botón para acceder a un menú con
ajustes adicionales.
6. Skip Anterior / Siguiente: Pulse estos botones para saltar a la
pista de CD, USB o Bluetooth anterior o siguiente. Mantenga
pulsado estos botones para recorrer la pista. Suéltelo para
reanudar la reproducción.
7. Reproducción/pausa / Enter: Pulse este botón para iniciar, reanudar o poner en pausa
la reproducción. Al navegar por los menús, pulse este botón para confirmar una
selección.
8. -10 / +10: Pulse estos botones para saltar 10 pistas hacia delante o hacia atrás.
9. Parar: Pulse este botón para detener la reproducción.
10. Info: En los modos FM y DAB, pulse este botón para ver información sobre la estación
actual.
11. Preset: En los modos FM y DAB, pulse este botón para ver las estaciones guardadas.
Mantenga pulsado este botón para guardar la estación actual como un preset. Hay 10
ranuras para presets en cada modo.
12. Scan: En el modo FM, pulse este botón para avanzar a la siguiente estación.
13. Program: En los modos CD o USB, pulse este botón para programar el orden de
reproducción de las pistas.
14. De
lete: Pulse este botón para eliminar un archivo USB.
15. EQ: Pulse este botón para seleccionar un ajuste del ecualizador. Flat, Pop, Classic,
Rock o Jazz.
16. Mute: Pulse este botón para silenciar todo el audio. Púlselo nuevamente para anular el
silenciamiento.
P. M O D E
MENU

16
Funcionamiento
Modo CD
Pueden utilizarse CD, CD-R y CD-RW de datos o de audio estándar. Si está utilizando un CD
de datos, asegúrese de que contenga archivos MP3. La unidad no puede reproducir otro tipo
de archivos.
Nota: Si un CD contiene más de 999 archivos en una carpeta, los archivos después del nro.
999 no aparecerán correctamente en la pantalla. Acomode sus archivos en carpetas de 999
archivos como máximo por carpeta.
Cargar y descargar un CD
1. Pulse el botón Source para seleccionar el modo CD.
2. Abra la bandeja de CD pulsando el botón Eject.
3. Una vez abierta la bandeja de CD, coloque cuidadosamente el CD en la bandeja con la
etiqueta hacia arriba. Coloque los discos más pequeños en el centro de la bandeja para
CD.
4. Cierre la bandeja de CD. La cantidad total de pistas en el CD aparecerá en la pantalla y el
CD se reproducirá automáticamente.
Repetición de reproducción/Reproducción aleatoria
Para cambiar el modo de reproducción, pulse el botón Play Mode. Alternará los siguientes
modos:
• Repeat (One): Se repite la pista actual. Una vez activo, el símbolo de repetición (
)
aparecerá en la pantalla.
• Repeat Folder: Se repetirán todas las pistas de la carpeta actual. Una vez activo,
aparecerá Folder junto al símbolo de repetición.
Nota: Este modo sólo está disponible cuando se utilizan discos MP3.
• Repeat All: Se repetirán todas las pistas. Una vez activo, aparecerá All junto al símbolo
de repetición.
• Random (RDM): Todas las pistas se re ordenan en una secuencia aleatoria para la
reproducción.
• Off: Funcionamiento normal.
Programación del orden de reproducción de las pistas de un CD
Siga estas instrucciones para programar el orden de reproducción de las pistas de CD.
Nota: La reproducción del CD debe detenerse antes de programar el orden de las pistas.
1. Mientras esté detenido, pulse el botón Program del control remoto o el botón Play
Mode del panel delantero.
2. Pulse los botones Previous o Next para seleccionar la ubicación en la cual se deberá
guardar la pista, por ejemplo, pista 03.
3. Pulse el botón Program nuevamente. La primera selección programada está ahora
guardada en la memoria programada.
4. Repita los pasos 2 y 3 para agregar más pistas al programa.
5. Para escuchar una pista programada, pulse el botón Play/Pause. El CD comenzará a
reproducirse desde el comienzo de la primera pista programada.
6. Para eliminar la memoria programada, pulse el botón Stop dos veces mientras el disco
se está reproduciendo.

17
Saltar y buscar pistas
Pulse brevemente los botones Previous o Next para saltar hacia atrás o hacia delante hacia
otra pista.
Para saltar 10 pistas hacia delante o hacia atrás, pulse los botones -10 y +10 del control
remoto.
Mantenga pulsado los botones Previous o Next para recorrer una pista. Suelte el botón para
reanudar la reproducción normal.
Modo USB
Reproducción
1. Pulse el botón Source para seleccionar el modo USB.
2. Conecte su memoria flash USB en el puerto USB.
3. La cantidad total de pistas se mostrará en la pantalla y se comenzarán a reproducir
automáticamente.
Nota: Asegúrese de que la unidad contenga archivos MP3. La unidad no puede
reproducir otro tipo de archivos.
4. Pulse el botón Stop para detener la reproducción.
Nota: Tenga en cuenta que la unidad solo puede leer unidades de memoria USB formateadas
en FAT32 de un tamaño de 32 GB o menos.
Nota: Si una memoria USB contiene más de 999 archivos en una carpeta, los archivos
después del nro. 999 no aparecerán correctamente en la pantalla. Acomode sus archivos en
carpetas de 999 archivos como máximo por carpeta.
Los modos de reproducción y funciones del modo USB son las mismas que las del modo CD,
más arriba.
Eliminación de archivos
1. Pulse el botón Delete del control remoto.
2. Pulse los botones Previous/Next para seleccionar lo que desea eliminar: Un solo archivo
(1), una carpeta (F) o todo (A).
3. Pulse nuevamente el botón Delete.
Advertencia: Esta acción no se puede deshacer.

18
Modo Phono
Antes de utilizarlo, haga lo siguiente:
•
Asegúrese de que el
tornillo de transporte
esté correctamente posicionado para desbloquear
el giradiscos.
•
Retirar el protector de la púa. Volver a colocar la tapa protectora en la púa cuando no lo utilice.
• Asegúrese de que el brazo de lectura puede moverse libremente desde su soporte. Trabe el
brazo de lectura en su lugar nuevamente cuando no lo utilice.
1.
Pulse el botón
Source
para seleccionar el
modo Phono
.
2.
Levante la tapa del gabinete y coloque un disco en el giradiscos sobre el eje central en la
almohadilla antideslizante.
3.
Ajuste el selector de velocidad a
33
,
45
o
78 RPM
dependiendo del disco.
4.
Levante el brazo de lectura de su soporte utilizando la
palanca de elevación/bajada
y
muévalo lentamente sobre el disco. El plato del giradiscos comenzará a girar.
5.
Coloque el brazo de lectura sobre la ubicación deseada del disco.
6.
Baje lentamente el brazo de lectura sobre el disco para que comience a reproducirlo.
7.
Una vez que se termine de reproducir el disco, el brazo de lectura se levantará
automáticamente del disco y regresará a su soporte. El plato del giradiscos dejará de girar.
8.
Para detener el disco manualmente, levante el brazo de lectura del disco y regréselo a su
soporte.
Nota: No detenga ni gire el plato manualmente. Mover o sacudir el giradiscos sin sujetar la
abrazadera del brazo de lectura puede dar como resultado daños en el brazo.
Modo Tape
1. Pulse el botón Source para seleccionar el modo Tape.
2. Inserte el casete con su lado más grueso hacia la derecha de la bandeja. El casete se
reproducirá automáticamente.
3. Pulse el botón Eject/Fast Forward hasta la mitad para alternar entre el modo de avance
rápido y la reproducción. Suelte el botón de avance rápido para comenzar la reproducción.
4. Pulse el botón Eject/Fast Forward completamente hasta abajo para expulsar el casete.
Modo DAB
1. Pulse el botón Source para seleccionar el modo DAB.
2. Octave LP buscará automáticamente las estaciones disponibles.
3. Una vez que haya seleccionado una estación, puede pulsar el botón Info para visualizar la
siguiente información en la pantalla: Program Name, Program Type, Program Number,
Audio Setting, Time y Date (nombre de programa, tipo de programa, número de programa,
ajuste de audio, hora y fecha).
4. Estando en modo DAB, pulse el botón Menu para acceder a las siguientes opciones:
• Full Scan: Seleccione esta opción para realizar una exploración completa de las
estaciones disponibles.
• Manual Tune: Seleccione esta opción para utilizar la perilla Tuning manualmente a fin de
buscar una estación de DAB.
• DRC: Selecciona esta opción para ajustar el control del rango dinámico a Off, Low o
High.
• Prune: Seleccione esta opción para eliminar las estaciones que ya no están
transmitiendo.
• System: Para más información, consulte Ajustes del sistema.

19
Guardado y recuperación de presets
Para guardar un preset:
1. Habiendo sintonizado la estación deseada, mantenga pulsado el botón Preset durante 2
segundos.
2. Gire la perilla Tuning/Enter para seleccionar la ranura de preset en la cual se guardará la
estación. Las ranuras de preset que no se hayan utilizado aparecerán como "(Empty)" (vacía)
en la pantalla.
3. Pulse la perilla Tuning/Enter nuevamente para guardar la estación en esa ranura de preset.
Aparecerá "Stored" (almacenada) en la pantalla.
4. Repita estos pasos para añadir hasta 10 de sus estaciones favoritas como presets.
Para recuperar un preset:
1. Pulse brevemente el botón Preset.
2. Gire la perilla Tuning/Enter para seleccionar el preset que desea cargar.
3. Pulse la perilla Tuning/Enter para cargar el preset.
Nota: El proceso para guardar y recuperar presets es el mismo que para el modo FM.
Modo FM
1. Para obtener mejores resultados, extienda la antena de FM en el panel trasero.
2. Pulse el botón Source para seleccionar el modo FM.
3. Utilice la perilla Tuning para seleccionar una estación de forma manual o pulse el botón Scan
para saltar a la siguiente estación en función del ajuste de exploración. Para cambiar la
dirección de la exploración, pulse los botones Previous o Next. La exploración ahora se
realizará en esa dirección.
4. Si sintoniza una estación de FM estéreo, el indicador Stereo aparecerá en la pantalla. Si
sintoniza una estación de FM con una señal débil, la recepción pasará automáticamente a
mono.
5. Una vez que haya seleccionado una estación, puede pulsar el botón Info para visualizar la
siguiente información en la pantalla: Program Name, Program Type, Program Number,
Audio Setting, Time y Date (nombre de programa, tipo de programa, número de programa,
ajuste de audio, hora y fecha).
6. Estando en modo FM, pulse el botón Menu para acceder a las siguientes opciones:
• Scan Setting: Seleccione All Stations para explorar la totalidad del espectro FM o
Strong Stations Only para explorar estaciones con una señal fuerte.
• Audio Setting: Seleccione Stereo Allowed para reproducir en estéreo de ser posible o
Forced Mono para limitar todas las estaciones a mono. También puede pulsar la perilla
Tuning para alternar entre estéreo y mono.
• System: Para más información, consulte Ajustes del sistema.
Modo Bluetooth
1. Pulse el botón Source para seleccionar el modo BT.
2. Parpadeará BT Disconnected en la pantalla. Durante el apareamiento, permanezca a menos
de 10 metros (33 pies) del Octave LP.
3. Encienda el Bluetooth en su teléfono o tableta para aparearlo. Seleccione Octave LP como el
dispositivo Bluetooth.
Nota: Si su dispositivo Bluetooth solicita un código de apareamiento, ingrese “0000”.
4. Una vez apaleado y conectado exitosamente, aparecerá BT Connected en la pantalla.
5. Para desconectar el dispositivo Bluetooth actualmente apareado y aparear otro dispositivo
Bluetooth mantenga pulsado el botón Stop durante 2 segundos.

20
Reproducción de la entrada auxiliar
1. Coloque el botón Source en modo BT.
2. Conecte un cable de audio estéreo de 3,5 mm (1/8 pulg.) (no incluido) desde la entrada
auxiliar del panel delantero Octave LP hasta la salida de línea o salida para auriculares de su
dispositivo de audio externo para poder escuchar esa fuente externa a través de los altavoces
internos del Octave LP.
3. Ajuste el volumen del Octave LP al nivel deseado.
Nota: Si la salida de línea de su dispositivo externo está conectada, sólo necesitará ajustar el control
de volumen del sistema. Si la salida para auriculares de su dispositivo externo está conectada,
puede que necesite ajustar el control de volumen tanto en su dispositivo externo como en el Octave
LP para lograr el volumen deseado.
Grabación a USB
Para grabar desde una fuente de audio a un USB:
1. Pulse el botón Source para seleccionar el modo CD, Phono, Tape o Bluetooth.
2. Conecte su memoria flash USB en el puerto USB.
3. Pulse el botón Grabar para entrar al modo de grabación.
4. Pulse los botones Previous/Next para seleccionar el tipo de grabación: Un solo archivo (1),
una carpeta (F) o todo (A).
5. Pulse el botón Record nuevamente para comenzar la grabación. Durante la grabación, el
indicador USB parpadeará en la pantalla.
Nota: La velocidad de grabación es 1:1.
6. Pulse Stop para parar la grabación.
7. La unidad creará una carpeta nueva en la unidad USB que contendrá todas las pistas
grabadas.
Ajustes del sistema
1. Estando en el modo FM o DAB, pulse el botón Menu para abrir el menú.
2. Utilice la perilla Tuning/Enter para seleccionar System y luego púlsela para confirmar.
3. Utilice la perilla Tuning/Enter para seleccionar una de las opciones a continuación y luego
púlsela para confirmar.
• Time: Seleccione esta opción para ajustar la hora y fecha.
o Set Time/Date: Ajuste manual de la hora y fecha. Utilice la perilla Tuning para
ajustar los valores en la pantalla y púlsela para confirmarlos.
o Auto Update: Seleccione esta opción para que la hora y fecha se actualicen
automáticamente. Seleccione No Update (desactivada), Update from Any (FM o
DAB), Update from FM, o Update from DAB.
o Set 12/24 Hour: Ajuste el formato de la hora, ya sea 12 Hour o 24 Hour.
o Set Date Format: Ajuste el formato de la fecha, ya sea MM-DD-AAAA o DD-MM-
AAAA.
• Language: Seleccione inglés, alemán, francés o italiano.
• Software Upgrade: Seleccione esta opción para actualizar el software de la unidad.
• SW Version: Muestra la versión actual del software.
4. Pulse el botón Menu para retroceder una página.
La pagina si sta caricando...
La pagina si sta caricando...
La pagina si sta caricando...
La pagina si sta caricando...
La pagina si sta caricando...
La pagina si sta caricando...
La pagina si sta caricando...
La pagina si sta caricando...
La pagina si sta caricando...
La pagina si sta caricando...
La pagina si sta caricando...
La pagina si sta caricando...
La pagina si sta caricando...
La pagina si sta caricando...
La pagina si sta caricando...
La pagina si sta caricando...
La pagina si sta caricando...
La pagina si sta caricando...
La pagina si sta caricando...
La pagina si sta caricando...
La pagina si sta caricando...
La pagina si sta caricando...
La pagina si sta caricando...
La pagina si sta caricando...
La pagina si sta caricando...
La pagina si sta caricando...
La pagina si sta caricando...
La pagina si sta caricando...
La pagina si sta caricando...
La pagina si sta caricando...
La pagina si sta caricando...
La pagina si sta caricando...
La pagina si sta caricando...
La pagina si sta caricando...
La pagina si sta caricando...
La pagina si sta caricando...
La pagina si sta caricando...
La pagina si sta caricando...
La pagina si sta caricando...
La pagina si sta caricando...
-
 1
1
-
 2
2
-
 3
3
-
 4
4
-
 5
5
-
 6
6
-
 7
7
-
 8
8
-
 9
9
-
 10
10
-
 11
11
-
 12
12
-
 13
13
-
 14
14
-
 15
15
-
 16
16
-
 17
17
-
 18
18
-
 19
19
-
 20
20
-
 21
21
-
 22
22
-
 23
23
-
 24
24
-
 25
25
-
 26
26
-
 27
27
-
 28
28
-
 29
29
-
 30
30
-
 31
31
-
 32
32
-
 33
33
-
 34
34
-
 35
35
-
 36
36
-
 37
37
-
 38
38
-
 39
39
-
 40
40
-
 41
41
-
 42
42
-
 43
43
-
 44
44
-
 45
45
-
 46
46
-
 47
47
-
 48
48
-
 49
49
-
 50
50
-
 51
51
-
 52
52
-
 53
53
-
 54
54
-
 55
55
-
 56
56
-
 57
57
-
 58
58
-
 59
59
-
 60
60


in altre lingue
- English: iON Octave LP Quick start guide
- français: iON Octave LP Guide de démarrage rapide
- español: iON Octave LP Guía de inicio rápido
- Deutsch: iON Octave LP Schnellstartanleitung
- Nederlands: iON Octave LP Snelstartgids
Documenti correlati

Altri documenti
-
Tangent ALIO BAZE MONO CD/DAB+/FM/BT White High Gloss Manuale utente
-
-
 ION Audio Superior LP Guida utente
-
Denver MRD-51 Manuale utente
-
-
Roadstar HIF-1993D+BT Manuale utente
-
Makita DMR115 Manuale utente
-
Makita DMR104 Manuale utente
-
-
TechniSat DIGITRADIO 1980 Manuale utente
