
ENGLISH
FRANÇAISESPAÑOLDEUTSCHITALIANO
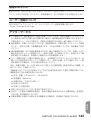
日本語
D01378300D
US-2x2HR
US-4x4HR
USB Audio/MIDI Interface
OWNER’S MANUAL
MODE D’EMPLOI
MANUAL DEL USUARIO
BEDIENUNGSANLEITUNG
MANUALE DI ISTRUZIONI
取扱説明書

oTASCAM is a registered trademark of TEAC Corporation.
oMicrosoft and Windows are either registered trademarks or trademarks
of Microsoft Corporation in the United States and/or other countries.
oApple, Mac, macOS, iPad and iPadOS are trademarks of Apple Inc. in the
United States and other countries.
oLightning is a trademark of Apple Inc.
oApp Store is a service mark of Apple Inc.
oIOS is a trademark or registered trademark of Cisco in the U.S. and other
countries and is used under license.
oASIO is a trademark of Steinberg Media Technologies GmbH.
oOther company names, product names and logos in this document are
the trademarks or registered trademarks of their respective owners.
2 TASCAM US-2x2HR/US-4x4HR

OWNER’S MANUAL
Introduction
Thank you for your purchase of the TASCAM US-2x2HR/US-4x4HR USB Audio/MIDI Interface.
Before connecting and using this unit, please take time to read this manual
thoroughly to ensure you understand how to properly set it up and connect it, as
well as how to use its many useful and convenient functions. After you have nished
reading this manual, please keep it in a safe place for future reference.
You can also download this Owner’s Manual from the TEAC Global Site (https://teac-
global.com/).
Before connecting this unit to a computer, you must download and install a
dedicated driver.
Note about the Reference Manual
This Owner’s Manual explains each of the functions of this unit.
Please see the Reference Manual for detailed information about each of the functions.
You can download the Reference Manual from the TEAC Global Site (https://teac-
global.com/).
Included items
This product includes the following items. Take care when opening the package to
avoid damaging the items. Keep the box and packing materials for transportation
in the future. Please contact the store where you purchased this unit if any of these
items are missing or have been damaged during transportation.
o Main unit.............................................................................................................................................x 1
o AC adapter (PS-P1220E, only included with US-4x4HR) .................................................... x 1
o USB cables (Type-A to Type-C) ...................................................................................................x 1
o Set of DAW software installation guides .................................................................................x 1
o Set of DAW plug-in software installation guides .................................................................x 1
o Owner’s Manual (this document) including warranty .......................................................x 1
ATTENTION
Always use the included AC adapter (PS-P1220E, DC12 V) with the US-4x4HR. Never
use the included AC adapter with any other device. Doing so could cause damage,
re or electric shock.
NOTE
The AC adapter (PS-P1220E, DC12 V) included with the US-4x4HR has alternate
outlet plugs. Please see “Changing the outlet plug” in “4 – Preparation” of the
Reference Manual for instructions.
ENGLISH
TASCAM US-2x2HR/US-4x4HR 3

IMPORTANT SAFETY INSTRUCTIONS
WARNING: TO PREVENT FIRE OR
SHOCK HAZARD, DO NOT EXPOSE
THIS APPLIANCE TO RAIN OR
MOISTURE.
For U.S.A.
Declaration of Conformity
Model Number:
US-2x2HR / US-4x4HR
Trade Name: TASCAM
Responsible party: TEAC AMERICA, INC.
Address: 10410 Pioneer Blvd. Suite #1
Santa Fe Springs, California
90670, U.S.A.
Telephone number: 1-323-726-0303
This device complies with Part 15 of
the FCC Rules. Operation is subject
to the following two conditions: (1)
this device may not cause harmful
interference, and (2) this device must
accept any interference received,
including interference that may cause
undesired operation.
INFORMATION TO THE USER
This equipment has been tested
and found to comply with the
limits for a Class B digital device,
pursuant to Part 15 of the FCC
Rules. These limits are designed
to provide reasonable protection
against harmful interference in a
residential installation. This equipment
generates, uses, and can radiate radio
frequency energy and, if not installed
and used in accordance with the
instruction manual, may cause harmful
interference to radio communications.
However, there is no guarantee
that interference will not occur
in a particular installation. If this
equipment does cause harmful
interference to radio or television
reception, which can be determined
by turning the equipment o and on,
the user is encouraged to try to correct
the interference by one or more of the
following measures.
a) Reorient or relocate the receiving
antenna.
b) Increase the separation between
the equipment and receiver.
c) Connect the equipment into
an outlet on a circuit dierent
from that to which the receiver is
connected.
d) Consult the dealer or an
experienced radio/TV technician for
help.
CAUTION
Changes or modications to this
equipment not expressly approved by
TEAC CORPORATION for compliance
could void the user’s authority to
operate this equipment.
For Canada
THIS CLASS B DIGITAL APPARATUS
COMPLIES WITH CANADIAN ICES-003.
CET APPAREIL NUMERIQUE DE LA
CLASSE B EST CONFORME A LA NORME
NMB-003 DU CANADA.
This product complies with
the European Directives
request and the other
Commission Regulations.
4 TASCAM US-2x2HR/US-4x4HR

1. Read these instructions.
2. Keep these instructions.
3. Heed all warnings.
4. Follow all instructions.
5. Do not use this apparatus near
water.
6. Clean only with dry cloth.
7. Do not block any ventilation
openings. Install in accordance with
the manufacturer’s instructions.
8. Do not install near any heat sources
such as radiators, heat registers,
stoves, or other apparatus (including
ampliers) that produce heat.
9. Do not defeat the safety purpose
of the polarized or grounding-type
plug. A polarized plug has two
blades with one wider than the
other. A grounding type plug has
two blades and a third grounding
prong. The wide blade or the third
prong are provided for your safety.
If the provided plug does not t into
your outlet, consult an electrician for
replacement of the obsolete outlet.
10. Protect the power cord from being
walked on or pinched particularly at
plugs, convenience receptacles, and
the point where they exit from the
apparatus.
11. Only use attachments/accessories
specied by the manufacturer.
12. Use only with the cart, stand,
tripod, bracket, or table specied
by the manufacturer, or sold with
the apparatus. When a cart is used,
use caution when moving the cart/
apparatus combination to avoid
injury from tip-over.
13. Unplug this apparatus during
lightning storms or when unused for
long periods of time.
14. Refer all servicing to qualied service
personnel. Servicing isrequired when
the apparatus has been damaged in
any way, such as power-supply cord
or plug is damaged, liquid has been
spilled or objects have fallen into the
apparatus, the apparatus has been
exposed to rain or moisture, does
not operate normally, or has been
dropped.
• The apparatus draws nominal non-
operating power from the AC outlet
with its POWER or STANDBY/ON switch
not in the ON position.
• The mains plug is used as the
disconnect device, the disconnect
device shall remain readily operable.
• Caution should be taken when using
earphones or headphones with the
product because excessive sound
pressure (volume) from earphones or
headphones can cause hearing loss.
• If you are experiencing problems with
this product, contact TEAC for a service
referral. Do not use the product until it
has been repaired.
WARNING
• To prevent possible hearing
damage, do not listen at
high volume levels for long
periods
ENGLISH
TASCAM US-2x2HR/US-4x4HR 5

CAUTION
• Do not expose this apparatus to
drips or splashes.
• Do not place any objects lled
with liquids, such as vases, on the
apparatus.
• Do not install this apparatus in a
conned space such as a book case
or similar unit.
• The apparatus should be located
close enough to the AC outlet so
that you can easily grasp the power
cord plug at any time.
• If the product uses batteries
(including a battery pack or
installed batteries), they should
not be exposed to sunshine, re or
excessive heat.
• CAUTION for products that use
replaceable lithium batteries: there
is danger of explosion if a battery is
replaced with an incorrect type of
battery. Replace only with the same
or equivalent type.
For European Customers
Disposal of electrical and
electronic equipment
(a) All electrical and electronic
equipment should be disposed
of separately from the municipal
waste stream via designated
collection facilities appointed
by the government or the local
authorities.
(b) By disposing of the electrical and
electronic equipment correctly, you
will help save valuable resources
and prevent any potential negative
eects on human health and the
environment.
(c) Improper disposal of waste
equipment can have serious eects
on the environment and human
health as a result of the presence of
hazardous substances in electrical
and electronic equipment.
(d) The crossed out wheeled
dust bin symbol indicates
that electrical and
electronic equipment
must be collected and
disposed of separately from
household waste.
(e) The return and collection systems
are available to the end users.
For more detailed information
about disposal of old electrical
and electronic equipment, please
contact your city oce, waste
disposal service or the shop where
you purchased the equipment.
6 TASCAM US-2x2HR/US-4x4HR

CAUTION
• DO NOT REMOVE THE EXTERNAL
CASES OR CABINETS TO EXPOSE THE
ELECTRONICS. NO USER SERVICEABLE
PARTS ARE INSIDE.
• IF YOU ARE EXPERIENCING PROBLEMS
WITH THIS PRODUCT, CONTACT THE
STORE WHERE YOU PURCHASED THE
UNIT FOR A SERVICE REFERRAL. DO
NOT USE THE PRODUCT UNTIL IT HAS
BEEN REPAIRED.
• USE OF CONTROLS OR ADJUSTMENTS
OR PERFORMANCE OF PROCEDURES
OTHER THAN THOSE SPECIFIED
HEREIN MAY RESULT IN HAZARDOUS
RADIATION EXPOSURE.
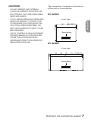
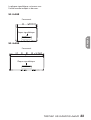
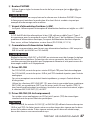
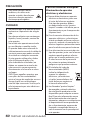
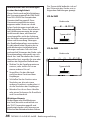
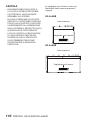
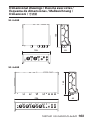
The nameplate is located on the bottom
of the unit as shown below.
US-2x2HR
Front side
Nameplate
US-4x4HR
Front side
Nameplate
ENGLISH
TASCAM US-2x2HR/US-4x4HR 7

Conventions used in this manual
In this manual, we use the following conventions:
o Information shown on a computer display is written like this: “OK”.
o References to “iOS” in this document also include “iPad OS”.
o As necessary, additional information is provided under TIP, NOTE and CAUTION
headings.
TIP
These are tips about how to use the unit.
NOTE
These provide additional explanations and describe spe cial cases.
ATTENTION
Failure to follow these instructions could result in damage to equipment or lost
data, for example.
VCAUTION
Failure to follow these instructions could result in injury.
Precautions for placement and use
o The operating temperature range of this unit is 5 - 35 °C.
o Do not install this unit in the following types of locations. Doing so could make the
sound quality worse or cause malfunction.
Places with signicant vibrations
Next to a window or in another location exposed to direct sunlight
Near heaters or other extremely hot places
Extremely cold places
Very humid or poorly ventilated places
Very dusty places
o To enable good heat dissipation, do not place anything on top of the unit.
o Do not place this unit on top of a power amplier or other device that generates
heat.
Beware of condensation
Condensation could occur if the unit is moved from a cold place to a warm place, it is
used immediately after a cold room has been heated or it is otherwise exposed to a
sudden temperature change.
To prevent this, or if this occurs, let the unit sit for one or two hours at the new room
temperature before using it.
8 TASCAM US-2x2HR/US-4x4HR

Cleaning the unit
Use a dry soft cloth to wipe the unit clean. Do not wipe with chemical cleaning cloths,
thinner, alcohol or other chemical agents. Doing so could damage the surface or
cause discoloration.
Using the TEAC Global Site
You can download updates for this unit from the TEAC Global Site:
i https://teac-global.com/
In the TASCAM Downloads section, select the desired language to open the
Downloads website page for that language.
Product registration
Customers in the USA, please visit the following TASCAM website to register your
TASCAM product online.
https://tascam.com/us/
About TASCAM customer support service
TASCAM products are supported and warrantied only in their country/region of
purchase.
To receive support after purchase, on the TASCAM Distributors list page of the TEAC
Global Site (https:// teac-global.com/), search for the local company or representative
for the region where you purchased the product and contact that organization.
When making inquiries, the address (URL) of the shop or web shop where it was
purchased and the purchase date are required.
Moreover, the warranty card and proof of purchase might also be necessary.
ENGLISH
TASCAM US-2x2HR/US-4x4HR 9

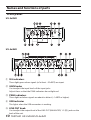
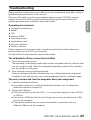
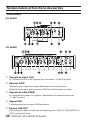
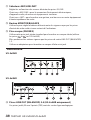
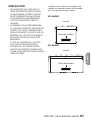
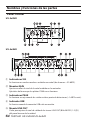
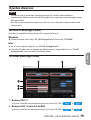
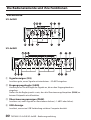
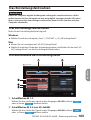
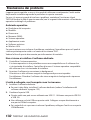
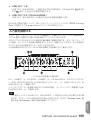
Names and functions of parts
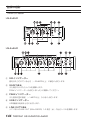
Front panel
US-2x2HR
US-4x4HR
1 SIG indicators
These light green when signals (of at least −32 dBFS) are input.
2 GAIN knobs
Use to adjust the input levels of the input jacks.
Adjust these so that the PEAK indicators do not light red.
3 PEAK indicators
These light red when signals are about to distort (−1 dBFS or higher).
4 USB indicator
This lights when the USB connection is working.
5 LINE OUT knob
Use to adjust the output level of the LINE OUT (BALANCED) 1-2 (t) jacks on the
back of the unit.
10 TASCAM US-2x2HR/US-4x4HR

6 PHONES knob
Use to adjust the output level of the PHONES jack ( and jacks on US-
4x4HR).
VCAUTION
Before connecting headphones, minimize the volume with the PHONES knob.
Failure to do so could result in a sudden loud noise that could harm hearing, for
example.
7 Phantom power indicator
The indicator lights when the phantom power switch is set to +48V.
ATTENTION
When operating the US-4x4HR with USB bus power, use a commercially-available
Type-C–Type-C cable to connect it to a USB Type-C port on the computer. If there
is a problem with the power supply, the phantom power indicator will blink. In this
case, use the included AC adapter (PS-P1220E, DC12 V).
8 Phantom power switch
Use this switch to provide +48 V phantom power to the IN1 and IN2 XLR jacks
(and IN3/IN4 on the US-4x4HR).
VCAUTION
Set the LINE OUT and PHONES knobs to their minimum values before changing the
phantom power setting. Depending on the connected mics, sudden loud noises
from monitoring equipment could occur, and this could damage the equipment or
harm hearing.
9 IN1/IN2 jacks
On the US-2x2HR, these are XLR/TRS combo jacks for analog input.
On the US-4x4HR, these are separate XLR and standard TRS jacks for analog input.
These support high impedance input, including direct guitar input.
Use the MIC/LINE INST switches (q) to select balanced line (MIC/LINE) or
unbalanced (INST) input for the TRS jacks.
When directly connecting a guitar, bass or other instrument, set the MIC/LINE
INST switch (q) to INST.
0 IN3/IN4 jacks (US-4x4HR only)
These XLR analog mic input and standard line level TRS jacks are balanced input
jacks.
ATTENTION
On the US-4x4HR, IN1/IN2 (9) and IN3/IN4 (0) inputs each have two jacks (XLR
and TRS). Do not input signals through both jacks of the same input at the same
time. If signals are input through both at the same time, neither signal will be
received properly.
ENGLISH
TASCAM US-2x2HR/US-4x4HR 11

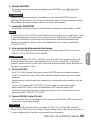
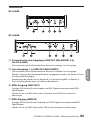
q MIC/LINE INST switches
Set according to the IN1/IN2 jack input sources.
Set to “MIC/LINE” when connecting electronic instruments, audio devices, mics
and similar equipment. Set to “INST” when connecting a guitar, bass or other
equipment with high output impedance.
w MONITOR BALANCE knob
Use this to adjust the monitoring balance between the signals from this unit’s
input jacks and the output signals from the computer.
e PHONES jack
Use this standard stereo jack to connect stereo headphones. (Use and jacks
on US-4x4HR.)
These output the same signals as the LINE OUT (BALANCED) 1-2 jacks.
Use an adapter to connect headphones with a mini plug.
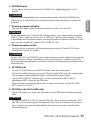
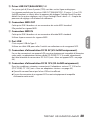
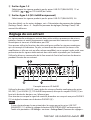
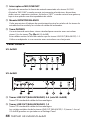
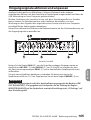
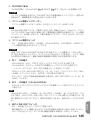
Rear panel
US-2x2HR
US-4x4HR
r LINE OUT (BALANCED) 3-4 jacks (US-4x4HR only)
These standard TRS jacks are analog line outputs.
t LINE OUT (BALANCED) 1-2 jacks
These standard TRS jacks are analog line outputs.
The signals output from the LINE OUT (BALANCED) 1-2 jacks (1-4 jacks on US-
4x4HR) can be set in the Settings Panel.
12 TASCAM US-2x2HR/US-4x4HR

For details about other settings, see “Settings Panel screen” in “5 – Using the
Settings Panel” of the Reference Manual.
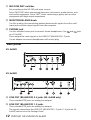
y MIDI OUT connector
This 5-pin DIN is a standard MIDI output connector.
This outputs MIDI signals.
u MIDI IN connector
This 5-pin DIN is a standard MIDI input connector.
Use this to input MIDI signals.
i USB port
This is a USB Type-C port.
Use a USB cable to connect the unit to a computer or an iOS device.
o DC IN 5V connector (US-2x2HR only)
When connected to an iOS device or other equipment that cannot power this
unit, a dedicated AC adapter (PS-P520E, DC5V, sold separately) with power supply
must be connected to the DC IN 5V connector. (see “When using an iOS device”
on page 17)
p DC IN 12V connector (US-4x4HR only)
Under the following conditions, connect the included DC12V AC adapter (PS-
P1220E, DC12V) here. (see “Using with an AC adapter” on page 17)
iWhen the USB bus power supply current is insucient
iWhen connected to an iOS device or other equipment that cannot power this
unit
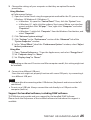
Installing the dedicated software
To use this unit, a dedicated software must be installed on a computer.
The dedicated software might be updated at any time. Download the latest software
for the operating system you are using from the TEAC Global Site (https://teac-global.
com/).
o When you install the dedicated software on a Windows computer, the Windows
driver and the Settings Panel application will be installed.
o When you install the dedicated software on a Mac, only the Mac Settings Panel
application will be installed. The standard OS driver will be used.
o With an iOS device, the standard OS driver will be used, so there is no need to
install any.
ATTENTION
Before starting to install software, quit other applications.
ENGLISH
TASCAM US-2x2HR/US-4x4HR 13

Installing the Windows dedicated software
ATTENTION
i Complete installation of the Windows dedicated software on the computer before
connecting the unit to it with the USB cable.
i If you connected the unit to the computer using the USB cable before installing the
Windows dedicated software and the “Found New Hardware Wizard” launched,
close the Wizard and disconnect the USB cable.
Windows dedicated software installation procedures
1. Download the latest Windows dedicated software from the TEAC Global Site
(https://teac-global.com/) and save it on the computer to be used with the unit.
2. Uncompress the saved software (zip le) on the computer desktop or another
location.
3. Double-click the “TASCAM_US-HR_Installer_x.xx.exe” le in the folder that
appears after uncompression to automatically launch the installation software.
ATTENTION
If you open a zip le without decompressing it and doubleclick the “TASCAM_US-
HR_Installer_x.xx.exe” le in the folder that opens, installation will not start.
Right-click the zip le and select “Extract All”, for example, to decompress it and
then try again.
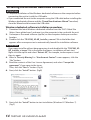
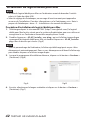
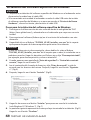
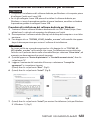
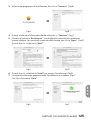
4. When a “Security Warning” or “User Account Control” screen appears, click the
“Yes” button.
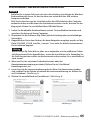
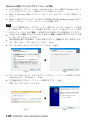
5. Read the contents of the User License Agreement, and select “I accept the
agreement” if you agree to the terms.
Then, click the “Next >” button. (Fig.A)
6. Next, click the “Install” button. (Fig.B)
e
Fig.A Fig.B
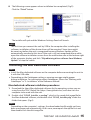
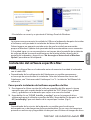
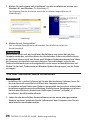
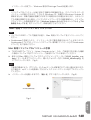
7. Next, click the “Install” button to start installation (Windows 8.1/Windows 7).
(Fig.C)
14 TASCAM US-2x2HR/US-4x4HR

8. The following screen appears when installation has completed. (Fig.D)
Click the “Finish” button.
e
Fig.C Fig.D
The installer will quit and the Windows Settings Panel will launch.
NOTE
The rst time you connect the unit by USB to the computer after installing the
software, installation of the device driver will be executed. Some time might
be necessary before the unit is recognized because Windows Update will be
automatically searched at this time. If the unit is still not recognized after a while,
open the software installation screen from the notication area at the bottom right
of the computer display, and click “Skip obtaining driver software from Windows
Update” to stop the search.
Installing the Mac dedicated software
NOTE
i Install the Mac dedicated software on the computer before connecting the unit to
it with the USB cable.
i Depending on the Gatekeeper setting, a warning message might appear
during installation. For information about Gatekeeper, Please see “Working with
Gatekeeper” in “3–Installation” of the Reference Manual.
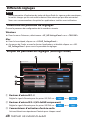
Mac dedicated software installation procedures
1. Download the latest Mac dedicated software for the operating system you are
using from the TEAC Global Site (https://teac-global.com/) and save it on the
computer to be used with the unit.
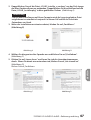
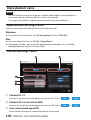
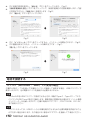
2. Double-click “US-HR_Installer_x.xx.dmg”, which is the saved disk image le for
the Mac dedicated software, and double-click “US-HR_Installer.pkg” inside the
folder that opens. (Fig.A)
NOTE
Depending on the computer’s settings, the downloaded zip le might not have
been uncompressed automatically. In this case, uncompress the zip le rst and
then double-click the disk image le.
ENGLISH
TASCAM US-2x2HR/US-4x4HR 15

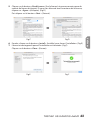
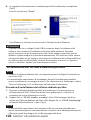
3. When the installer starts, click the “Continue” button. (Fig.B)
e
Fig.A Fig.B
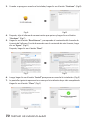
4. Next, select the desired language and click the “Continue” button. (Fig.C)
5. Click the “Read License” button and check the contents of the Software License
Agreement. If you agree to the contents of the license, click “Agree”. (Fig.D)
Then, click the “Next” button.
e
Fig.C Fig.D
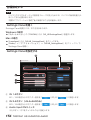
6. Next, click the “Install” button to start installation. (Fig.E)
7. The following screen appears when installation has completed. (Fig.F)
Click the “Close” button.
e
Fig.E Fig.F
16 TASCAM US-2x2HR/US-4x4HR

Connecting the power
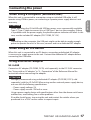
When using a computer (Windows/Mac)
When this unit is connected to a computer using an included USB cable, it will
operate using USB bus power, so connecting a separate power supply device is not
necessary.
ATTENTION
When operating the US-4x4HR with USB bus power, use a commercially-available
Type-C–Type-C cable to connect it to a USB Type-C port on the computer. If there
is a problem with the power supply, the phantom power indicator will blink. In this
case, use the included AC adapter (PS-P1220E, DC12 V).
NOTE
Depending on the computer, the USB port might not be able to supply enough
power to operate the unit. In this case, connect and use a dedicated AC adapter.
When using an iOS device
When this unit is connected to an iOS device, connecting a dedicated AC adapter
is necessary to supply power to the unit. Connect the dedicated AC adapter before
connecting the USB cable.
Using with an AC adapter
US-2x2HR
Connect an AC adapter (PS-P520E, DC5V, sold separately) to the DC IN 5V connector.
See “Using with an AC adapter” in “4 – Preparation” of the Reference Manual for
instructions about connecting the adapter.
ATTENTION
We highly recommend using a dedicated AC adapter (PS-P520E, DC5 V, sold
separately) with the US-2x2HR. When using another external power supply device,
use one with the following specications.
• Power supply voltage: 5 V
• Power supply current: 700 mA or more
Using a power supply device with specications other than the above could cause
malfunction, overheating, re or other problems.
If trouble should occur, stop using the unit and contact the retailer where you
purchased it or a TEAC service center to request repair.
ENGLISH
TASCAM US-2x2HR/US-4x4HR 17

US-4x4HR
Under the following conditions, connect the included DC12V AC adapter (PS-P1220E,
DC12 V) to the DC IN 12V connector.
o When the USB bus power supply current is insucient
o When connected to an iOS device or other equipment that cannot power this unit
See “Using with an AC adapter” in “4 – Preparation” of the Reference Manual for
instructions about connecting the adapter.
ATTENTION
Always use the dedicated AC adapter (PS-P1220E, DC12 V) that was shipped with
the unit. Using a dierent AC adapter could cause malfunction, overheating, re or
other problems.
NOTE
The included dedicated AC adapter (PS-P1220E, DC12 V) is shipped with 2 types of
outlet plugs. Attach the type of plug that matches the power outlet that you are
using. Please see “Changing the outlet plug” in “4 – Preparation” of the Reference
Manual for instructions.
18 TASCAM US-2x2HR/US-4x4HR

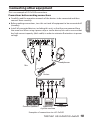
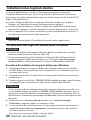
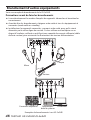
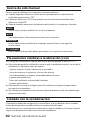
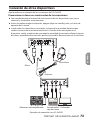
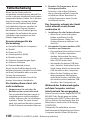
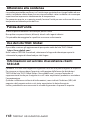
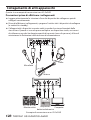
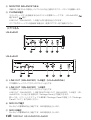
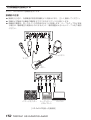
Connecting other equipment
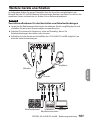
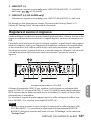
This is an example of US-2x2HR connections.
Precautions before making connections
o Carefully read the operation manuals of the devices to be connected and then
connect them correctly.
o Before making connections, turn this unit and all equipment to be connected o
(standby).
o Install all connected devices, including this unit, so that they are powered from
the same line. When using a power strip or similar device, be sure to use one that
has high current capacity (thick cable) in order to minimize uctuations in power
voltage.
Mic
Guitars
Headphones
ComputerPowered speakers Sequencer/
rhythm machine
Examples of connections to a US-2x2HR
ENGLISH
TASCAM US-2x2HR/US-4x4HR 19

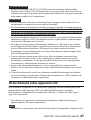
VCAUTION
Lower the LINE OUT and PHONES knobs before changing the phantom power
switch between +48V and OFF. Depending on the connected mics, sudden loud
noises from monitoring equipment could occur, and this could damage the
equipment or harm hearing.
ATTENTION
i Before connecting condenser mics, turn this unit and all equipment to be
connected o (standby).
i The phantom power switch changes the setting for all input channels
simultaneously (2 inputs on US-2x2HR and 4 inputs on US-4x4HR). Do not set the
phantom power switch to +48V when connecting a mic that does not require
phantom power.
i Do not connect or disconnect mics while the phantom power switch is set to +48V.
Doing so could cause a loud noise and might damage this unit and connected
equipment.
i Set the phantom power switch to +48V only when using a condenser microphone
that requires phantom power. Setting phantom power to +48V when a dynamic
mic or other equipment that does not require it is connected could damage this
unit and the connected equipment.
i When using condenser mics that require phantom power and dynamic mics
together, be sure to use balanced dynamic mics. Unbalanced dynamic mics cannot
be used when phantom power is enabled.
i Supplying phantom power to some ribbon mics could break them. If you are
unsure, do not supply phantom power to a ribbon mic.
i If you connect this unit to a laptop computer that is running on battery power
and set the phantom power switch to +48V, the computer battery charge will be
consumed more quickly.
Connecting with iOS devices
To connect with an iOS device that has a Lightning connector use a Lightning to USB
Camera Adapter* and the USB cable included with this product.
To connect with an iOS device that has a USB Type-C connector, use a commercially-
available Type-C–Type-C cable.
* You must obtain a genuine Apple Lightning to USB Camera Adapter separately.
NOTE
When connected, this unit will not provide power to the iOS device.
20 TASCAM US-2x2HR/US-4x4HR
La pagina sta caricando ...
La pagina sta caricando ...
La pagina sta caricando ...
La pagina sta caricando ...
La pagina sta caricando ...
La pagina sta caricando ...
La pagina sta caricando ...
La pagina sta caricando ...
La pagina sta caricando ...
La pagina sta caricando ...
La pagina sta caricando ...
La pagina sta caricando ...
La pagina sta caricando ...
La pagina sta caricando ...
La pagina sta caricando ...
La pagina sta caricando ...
La pagina sta caricando ...
La pagina sta caricando ...
La pagina sta caricando ...
La pagina sta caricando ...
La pagina sta caricando ...
La pagina sta caricando ...
La pagina sta caricando ...
La pagina sta caricando ...
La pagina sta caricando ...
La pagina sta caricando ...
La pagina sta caricando ...
La pagina sta caricando ...
La pagina sta caricando ...
La pagina sta caricando ...
La pagina sta caricando ...
La pagina sta caricando ...
La pagina sta caricando ...
La pagina sta caricando ...
La pagina sta caricando ...
La pagina sta caricando ...
La pagina sta caricando ...
La pagina sta caricando ...
La pagina sta caricando ...
La pagina sta caricando ...
La pagina sta caricando ...
La pagina sta caricando ...
La pagina sta caricando ...
La pagina sta caricando ...
La pagina sta caricando ...
La pagina sta caricando ...
La pagina sta caricando ...
La pagina sta caricando ...
La pagina sta caricando ...
La pagina sta caricando ...
La pagina sta caricando ...
La pagina sta caricando ...
La pagina sta caricando ...
La pagina sta caricando ...
La pagina sta caricando ...
La pagina sta caricando ...
La pagina sta caricando ...
La pagina sta caricando ...
La pagina sta caricando ...
La pagina sta caricando ...
La pagina sta caricando ...
La pagina sta caricando ...
La pagina sta caricando ...
La pagina sta caricando ...
La pagina sta caricando ...
La pagina sta caricando ...
La pagina sta caricando ...
La pagina sta caricando ...
La pagina sta caricando ...
La pagina sta caricando ...
La pagina sta caricando ...
La pagina sta caricando ...
La pagina sta caricando ...
La pagina sta caricando ...
La pagina sta caricando ...
La pagina sta caricando ...
La pagina sta caricando ...
La pagina sta caricando ...
La pagina sta caricando ...
La pagina sta caricando ...
La pagina sta caricando ...
La pagina sta caricando ...
La pagina sta caricando ...
La pagina sta caricando ...
La pagina sta caricando ...
La pagina sta caricando ...
La pagina sta caricando ...
La pagina sta caricando ...
La pagina sta caricando ...
La pagina sta caricando ...
La pagina sta caricando ...
La pagina sta caricando ...
La pagina sta caricando ...
La pagina sta caricando ...
La pagina sta caricando ...
La pagina sta caricando ...
La pagina sta caricando ...
La pagina sta caricando ...
La pagina sta caricando ...
La pagina sta caricando ...
La pagina sta caricando ...
La pagina sta caricando ...
La pagina sta caricando ...
La pagina sta caricando ...
La pagina sta caricando ...
La pagina sta caricando ...
La pagina sta caricando ...
La pagina sta caricando ...
La pagina sta caricando ...
La pagina sta caricando ...
La pagina sta caricando ...
La pagina sta caricando ...
La pagina sta caricando ...
La pagina sta caricando ...
La pagina sta caricando ...
La pagina sta caricando ...
La pagina sta caricando ...
La pagina sta caricando ...
La pagina sta caricando ...
La pagina sta caricando ...
La pagina sta caricando ...
La pagina sta caricando ...
La pagina sta caricando ...
La pagina sta caricando ...
La pagina sta caricando ...
La pagina sta caricando ...
La pagina sta caricando ...
La pagina sta caricando ...
La pagina sta caricando ...
La pagina sta caricando ...
La pagina sta caricando ...
La pagina sta caricando ...
La pagina sta caricando ...
La pagina sta caricando ...
La pagina sta caricando ...
La pagina sta caricando ...
La pagina sta caricando ...
La pagina sta caricando ...
La pagina sta caricando ...
La pagina sta caricando ...
La pagina sta caricando ...
La pagina sta caricando ...
La pagina sta caricando ...
La pagina sta caricando ...
La pagina sta caricando ...
La pagina sta caricando ...
La pagina sta caricando ...
La pagina sta caricando ...
-
 1
1
-
 2
2
-
 3
3
-
 4
4
-
 5
5
-
 6
6
-
 7
7
-
 8
8
-
 9
9
-
 10
10
-
 11
11
-
 12
12
-
 13
13
-
 14
14
-
 15
15
-
 16
16
-
 17
17
-
 18
18
-
 19
19
-
 20
20
-
 21
21
-
 22
22
-
 23
23
-
 24
24
-
 25
25
-
 26
26
-
 27
27
-
 28
28
-
 29
29
-
 30
30
-
 31
31
-
 32
32
-
 33
33
-
 34
34
-
 35
35
-
 36
36
-
 37
37
-
 38
38
-
 39
39
-
 40
40
-
 41
41
-
 42
42
-
 43
43
-
 44
44
-
 45
45
-
 46
46
-
 47
47
-
 48
48
-
 49
49
-
 50
50
-
 51
51
-
 52
52
-
 53
53
-
 54
54
-
 55
55
-
 56
56
-
 57
57
-
 58
58
-
 59
59
-
 60
60
-
 61
61
-
 62
62
-
 63
63
-
 64
64
-
 65
65
-
 66
66
-
 67
67
-
 68
68
-
 69
69
-
 70
70
-
 71
71
-
 72
72
-
 73
73
-
 74
74
-
 75
75
-
 76
76
-
 77
77
-
 78
78
-
 79
79
-
 80
80
-
 81
81
-
 82
82
-
 83
83
-
 84
84
-
 85
85
-
 86
86
-
 87
87
-
 88
88
-
 89
89
-
 90
90
-
 91
91
-
 92
92
-
 93
93
-
 94
94
-
 95
95
-
 96
96
-
 97
97
-
 98
98
-
 99
99
-
 100
100
-
 101
101
-
 102
102
-
 103
103
-
 104
104
-
 105
105
-
 106
106
-
 107
107
-
 108
108
-
 109
109
-
 110
110
-
 111
111
-
 112
112
-
 113
113
-
 114
114
-
 115
115
-
 116
116
-
 117
117
-
 118
118
-
 119
119
-
 120
120
-
 121
121
-
 122
122
-
 123
123
-
 124
124
-
 125
125
-
 126
126
-
 127
127
-
 128
128
-
 129
129
-
 130
130
-
 131
131
-
 132
132
-
 133
133
-
 134
134
-
 135
135
-
 136
136
-
 137
137
-
 138
138
-
 139
139
-
 140
140
-
 141
141
-
 142
142
-
 143
143
-
 144
144
-
 145
145
-
 146
146
-
 147
147
-
 148
148
-
 149
149
-
 150
150
-
 151
151
-
 152
152
-
 153
153
-
 154
154
-
 155
155
-
 156
156
-
 157
157
-
 158
158
-
 159
159
-
 160
160
-
 161
161
-
 162
162
-
 163
163
-
 164
164
-
 165
165
-
 166
166
-
 167
167
-
 168
168


Tascam US-2x2HR Manuale del proprietario
- Tipo
- Manuale del proprietario
- Questo manuale è adatto anche per
in altre lingue
- English: Tascam US-2x2HR Owner's manual
- français: Tascam US-2x2HR Le manuel du propriétaire
- 日本語: Tascam US-2x2HR 取扱説明書
Documenti correlati
-
Tascam 208i Series Manuale del proprietario
-
Tascam TM-90BM Manuale del proprietario
-
-
Tascam 12 Manuale del proprietario
-
Tascam us-4x4 Manuale del proprietario
-
-
-
Tascam DP-24SD Manuale del proprietario
-
-