
SCSMS-20221203
3G/4G LTE SECURITY CAMERA
USER MANUAL(XG-02)
(EN/DE/FR/IT/ES)

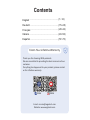
English (1~14)
Contents
Deutsch (15~28)
Français (29~42)
Italiano (43~56)
Español (57~70)
Thank you for choosing XEGA products.
customer.
XEGA XEGA
Claim Your Lifetime Warranty

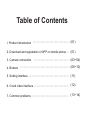
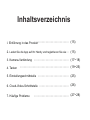
I. Product introduction (01)
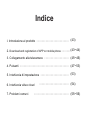
Table of Contents
2. Download and registration of APP on mobile phone (01)
3. Camera connection (03~04)
4. Buttons (05~10)
5. Setting interface
6. Cloud video interface
7. Common problems
(11)
(12)
(13~14)

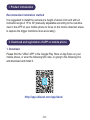
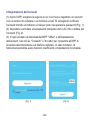
I. Product introduction
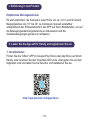
II. Download and registration of APP on mobile phone
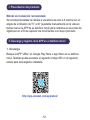
Recommended installation method
It is suggested to install the camera at a height of about 2.6m and with an
inclination angle of 15°to 30°(manually adjustable according to the real-time
view in the APP on your mobile phone to focus on the motion detection areas
to capture the trigger monitions more accurately).
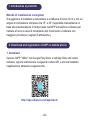
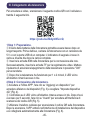
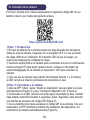
1. Download
Please find the “UBox” APP in the Google Play Store or App Store on your
mobile phone, or scan the following QR code, or going to the following link
and download and install it.
http://app.ubianet.com/app/ubox/
-01-

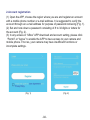
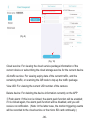
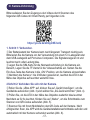
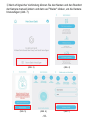
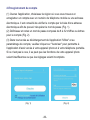
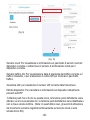
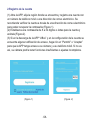
2.Account registration
(1) Open the APP, choose the region where you are and register an account
with a mobile phone number or e-mail address. It is suggested to verify the
account through an e-mail address for purpose of password retrieving (Fig. 1).
(2) Set and note down a password consisting of 8 to 32 digits or letters for
the account (Fig. 2).
(3) In any access in “UBox” APP download and account setting, please click
“Permit” or “Agree” to enable the APP to have access to your camera and
mobile phone. If not so, your camera may have insufficient functions or
incomplete settings.
-02-
(Fig. 1) (Fig. 2)

III. Camera connection
Please realize access to videos by scanning the following QR code with your
mobile phone or through the following link.
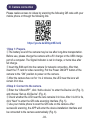
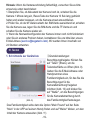
1.Step 1: Prepare.
The battery level of the camera may be low after long-time transportation.
Before use, please charge the camera with a 5V charger or the USB charge
port of a computer. The Signal Indicator is red in charge, or turns blue after
full charge.
Insert the SIM card into the camera for network connection. After that,
insert the TF card for video recording. Put the Power ON/OFF button of the
camera to the “ON” position to power on the camera.
After the camera has run for 1 to 2 minutes, the LED near the lens will
remain lit in blue.
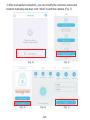
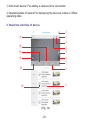
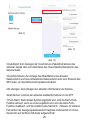
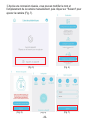
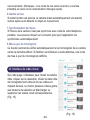
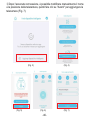
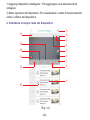
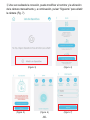
2.Step 2: Connect to the camera.
Enter the “UBox APP”, click “Add a device” to enter the Device List (Fig. 3),
and choose “Set up 4G Device” (Fig. 4).
Check whether the LED near the lens remains lit in blue. After it is lit for 3s,
click “Next” to enter the QR code scanning interface (Fig. 5).
Use your mobile phone to scan the QR code on the camera. After
successful scanning, the APP will enter the device installation interface and
be connected to the camera automatically (Fig. 6).
https://youtu.be/ZDAym9EJvcQ
-03-

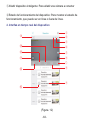
After successful connection, you can modify the camera’s name and
location manually and then click “Next” to add the camera (Fig. 7).
-04-
(Fig. 3) (Fig. 4)
(Fig. 5) (Fig. 7) (Fig. 6)

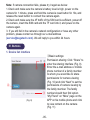
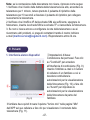
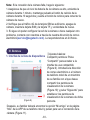
IV. Buttons
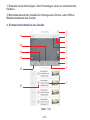
1. Device list interface
Note: If camera connection fails, please try it again as below:
1.Check and make sure the camera’s battery level is high, power on the
camera for 1 minute, press and hold the camera’s reset button for 10s, and
release the reset button to connect the camera again.
2.Check and make sure the 4F traffic of the SIM card is sufficient, power off
the camera, insert the SIM card and the TF card into it, and power on the
camera again.
3. If you still fail in the camera’s network configuration or have any other
problem, please contact us through our e-mail address
([email protected]). We will reply to you within 24 hours.
-05-
(Fig. 8)
①
③
④
②
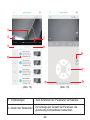
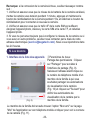
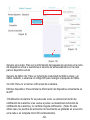
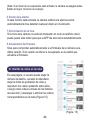
Basic settings:
Permission sharing: Click “Share” to
enter the sharing interface (Fig. 9).
Enter the e-mail address or mobile
phone number of a family member
to whom you would like to share
permissions for camera viewing
(Fig. 10) and click “Next” to set the
permissions of camera viewing by
the family member. The family
number should then find option
“My Friend” on “Mine” page on the
APP on his mobile phone and click
to view content on the camera
(Fig. 11)

-06-
(Fig. 9)
(Fig. 10)
(Fig. 11)
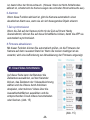
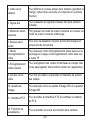
Cloud service: For viewing the cloud service package information of the
current device or subscribing the cloud storage service for the current device
4G traffic service: For viewing expiry date of the current traffic, and the
remaining traffic, or scanning the QR code to top up the traffic package
View UID: For viewing the current UID number of the camera
Delete device: For deleting the device information currently on the APP
Push alarm: If this icon is clicked, the alarm push function will be enabled;
if it is clicked again, the alarm push function will be disabled, and you will
receive no notification. (Note: In the latter case, the motion triggering events
will be recorded to the cloud service or the micro SD card continually.)

-07-
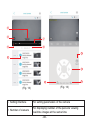
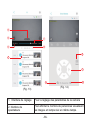
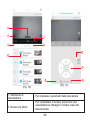
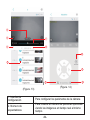
2. Real-time interface of device
(Fig. 12)
Add smart device: For adding a camera to be connected.
Operating state of device:For displaying the device’s online or offline
operating state
⑮
⑭
⑬
⑫
⑪

-08-
(Fig. 13) (Fig. 13)
⑯
⑰
⑳
⑱
⑲
21
22
23
24
25
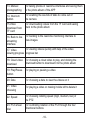
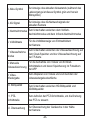
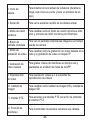
1. Setting interface
2. Number of viewers
For setting parameters of the camera
For displaying number of the persons viewing
real-time images at the same time

-09-
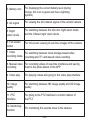
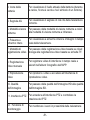
3. Battery icon
4. 4G signal
For displaying the current battery level (during
charge, this icon is green and has a lightning
symbol)
For viewing the 4G network signal of the current camera
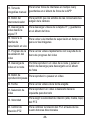
5. Night
vision mode
For switching between the full-color night vision mode
and the infrared night vision mode
6. Full-screen
button For full-screen viewing of real-time images of the camera
7. Video
recording mode For switching between cloud storage-based video
recording and TF card-based video recording
8. Manual video
recording
For recording videos of real-time interfaces and saving
them to the photo album of the APP
9. Video play For playing videos and going to the video play interface
10. Image
quality For switching between HD image quality and SD image
quality
11. PTZ
interface For going to the PTZ interface to control rotation of
the PTZ
12. Monitoring
function For monitoring the sounds close to the camera

-10-
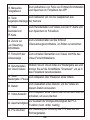
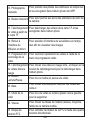
13. Manual
photographing
For taking photos of real-time interfaces and saving them
to the photo album of the APP
14. Intercom
button
For enabling the sounds of talks to come out of
the camera
15.Video
download from
TF card
For downloading videos from the TF card and saving
them to the photo album
16. Back to live
streaming
interface
For backing to the real-time monitoring interface to
view images
17. Video
viewing progress
For viewing videos quickly with help of the video
progress bar
18. Cloud video
download
For choosing a cloud video to play, and clicking the
download button to download it to the photo album
19. Play/Pause
button
For playing or pausing a video
20. Date For choosing a date to view the videos on it
21. Video
choosing For playing a video or making it slide left to delete it
22. Speed
23. PTZ wheel
disc
For choosing rotating speed (high, medium, low) of
the PTZ
For controlling rotation of the PTZ through the four
directional buttons

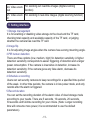
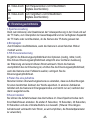
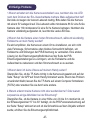
V. Setting interface
1.Storage management
-11-
24. Video zoom
out
For zooming out real-time images (digital zooming
function)
25. Video zoom
in
For zooming in real-time images (digital zooming function)
It is for enabling or disabling video storage to the cloud and the TF card,
checking total capacity and available capacity of the TF card, or judging
whether the camera has read the TF card.
2.Image flip
It is for adjusting image angles when the camera has a wrong mounting angle.
3.PIR human detection
There are three options (low, medium, high) for detection sensitivity. A higher
detection sensitivity corresponds to easier triggering of detection and a larger
power consumption. If the camera is insensitive in detection, increase its
detection sensitivity; if the camera gives any false alarm, decrease its
detection sensitivity.
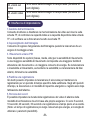
4.Schedule a recording
Users can set security cameras to keep recordings for a specified time period
of the week. In other time periods, the camera is in low power mode, and only
records after the alarm is triggered.
5.Record duration
You can set the recording duration of the alarm video of cloud storage mode
according to your needs. There are 5 seconds, 10 seconds, 20 seconds,
30 seconds and full-time recording for your choice. (Note: Longer recording
time will consume more power, it is recommended to use the default
parameters).

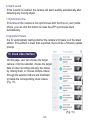
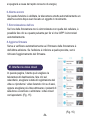
VI. Cloud video interface
-12-
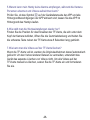
6.Alarm sound
If this function is enabled, the camera will alarm audibly automatically after
detecting any moving object.
7.Synchronize time
If the time on the camera is not synchronous with the time on your mobile
phone, you can click this button to make the APP synchronize them
automatically.
8.Upgrade firmware
It is for automatically testing whether the camera’s firmware is of the latest
edition. If the edition is lower than expected, there will be a firmware update
prompt.
On this page, user can choose the target
camera, click the calendar, choose the target
date of video recording and play the videos
by clicking them, or choose multiple videos
through the selector buttons and download
or delete the corresponding cloud videos.
(Fig. 15)
(Fig. 15)

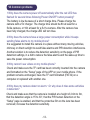
VII.Common problems
-13-
1.Why does the camera power off automatically after the red LED has
flashed for several times following Power ON/OFF button pressing?
The battery is low because of a short charge time. Please charge the
camera with a 5V charger. The charge time should be 8h at least for a
5v/2a camera, or 16h at least for a 5v/1a camera. After the camera has
been fully charged, the charge LED will turn blue.
2.Why does the camera have a large power consumption while it keeps
sending false alarms to my mobile phone?
It is suggested to install the camera in a place without many moving vehicles,
chimney or direct sunlight to avoid false alarms and PIR detection interference.
Another solution is to reduce the detection sensitivity on the page of PIR
detection settings, in a bid to reduce the false alarms and the wake-up time to
save the power consumption.
3.Why cannot I see videos on my mobile phone?
Check and make sure the TF card has been correctly inserted into the camera
and formatted on the “Setup” page of the APP on your mobile phone. If the
problem remains unchanged, have the TF card formatted (FAT32) on a
computer or replaced with another one.
Check and make sure that the camera is installed at a height of 2.6m to 3m,
that the detection angle is 15°to 30°, that the PIR human detection on the
“Setup” page is enabled, and that the protective film on the lens has been
removed; increase the detection sensitivity.
4.Why does my camera detect or alarmOr why does it miss some activities
in detection?

-14-
6.How to restore to the factory settings
Find the position for TF card insertion, which is under head of the camera,
open the rubber cover and press and hold the black button by the TF card
for about 8s.
7.How to delete the videos on the TF card
When the TF card is full, the original records on it will be covered
automatically. To avoid loss of other files, the device does not support
separate deletion of videos. To delete all the videos on the TF card manually,
set and format the TF card.
5.Why cannot my mobile phone receive alarms while the camera can detect
persons and record videos?
Check and make sure the symbol on the device list page of the APP, and
all the background permissions of the APP have all been enabled; keep the
APP run on background of the mobile phone.

I. Einführung in das Produkt (15)
Inhaltsverzeichnis
2. Laden Sie die App auf Ihr Handy und registrieren Sie sie (15)
3. Kamera-Verbindung (17~18)
4. Tasten (19~25)
5. Einstellungsschnittstelle
6. Cloud-Video-Schnittstelle
7. Häufige Probleme
(25)
(26)
(27~28)

I. Einführung in das Produkt
II. Laden Sie die App auf Ihr Handy und registrieren Sie sie
Empfohlene Montagemethode
Es wird empfohlen, die Kamera in einer Höhe von ca. 2,6 m und mit einem
Neigungswinkel von 15° bis 30° zu montieren (manuell einstellbar
entsprechend der Echtzeitansicht in der APP auf Ihrem Mobiltelefon, um auf
die Bewegungserkennungsbereiche zu fokussieren und die
Auslösebewegungen genauer zu erfassen).
1. Herunterladen
Finden Sie die "UBox" APP im Google Play Store oder App Store auf Ihrem
Handy, oder scannen Sie den folgenden QR-Code, oder gehen Sie auf den
folgenden Link und laden Sie sie herunter und installieren Sie sie.
http://app.ubianet.com/app/ubox/
-15-

2.Registrierung des Kontos
(1) Öffnen Sie die APP, wählen Sie die Region, in der Sie wohnen, und
registrieren Sie ein Konto mit einer Handynummer oder E-Mail-Adresse. Es
ist empfohlen, das Konto durch eine E-Mail-Adresse zu verifizieren, um das
Passwort abrufen zu können (Abb. 1).
(2) Legen Sie ein aus 8 bis 32 Ziffern oder Buchstaben bestehendes
Passwort für das Konto fest und notieren Sie es (Abb. 2).
(3) Klicken Sie bei jedem Zugriff in den Download- und Kontoeinstellungen
der "UBox" APP auf "Zulassen" oder "Zustimmen", um der APP den Zugriff
auf Ihre Kamera und Ihr Handy zu ermöglichen. Wenn nicht, verfügt Ihre
Kamera möglicherweise über unzureichende Funktionen oder unvollständige
Einstellungen.
-16-
(Abb.1) (Abb. 2)
La pagina si sta caricando...
La pagina si sta caricando...
La pagina si sta caricando...
La pagina si sta caricando...
La pagina si sta caricando...
La pagina si sta caricando...
La pagina si sta caricando...
La pagina si sta caricando...
La pagina si sta caricando...
La pagina si sta caricando...
La pagina si sta caricando...
La pagina si sta caricando...
La pagina si sta caricando...
La pagina si sta caricando...
La pagina si sta caricando...
La pagina si sta caricando...
La pagina si sta caricando...
La pagina si sta caricando...
La pagina si sta caricando...
La pagina si sta caricando...
La pagina si sta caricando...
La pagina si sta caricando...
La pagina si sta caricando...
La pagina si sta caricando...
La pagina si sta caricando...
La pagina si sta caricando...
La pagina si sta caricando...
La pagina si sta caricando...
La pagina si sta caricando...
La pagina si sta caricando...
La pagina si sta caricando...
La pagina si sta caricando...
La pagina si sta caricando...
La pagina si sta caricando...
La pagina si sta caricando...
La pagina si sta caricando...
La pagina si sta caricando...
La pagina si sta caricando...
La pagina si sta caricando...
La pagina si sta caricando...
La pagina si sta caricando...
La pagina si sta caricando...
La pagina si sta caricando...
La pagina si sta caricando...
La pagina si sta caricando...
La pagina si sta caricando...
La pagina si sta caricando...
La pagina si sta caricando...
La pagina si sta caricando...
La pagina si sta caricando...
La pagina si sta caricando...
La pagina si sta caricando...
La pagina si sta caricando...
La pagina si sta caricando...
La pagina si sta caricando...
La pagina si sta caricando...
La pagina si sta caricando...
-
 1
1
-
 2
2
-
 3
3
-
 4
4
-
 5
5
-
 6
6
-
 7
7
-
 8
8
-
 9
9
-
 10
10
-
 11
11
-
 12
12
-
 13
13
-
 14
14
-
 15
15
-
 16
16
-
 17
17
-
 18
18
-
 19
19
-
 20
20
-
 21
21
-
 22
22
-
 23
23
-
 24
24
-
 25
25
-
 26
26
-
 27
27
-
 28
28
-
 29
29
-
 30
30
-
 31
31
-
 32
32
-
 33
33
-
 34
34
-
 35
35
-
 36
36
-
 37
37
-
 38
38
-
 39
39
-
 40
40
-
 41
41
-
 42
42
-
 43
43
-
 44
44
-
 45
45
-
 46
46
-
 47
47
-
 48
48
-
 49
49
-
 50
50
-
 51
51
-
 52
52
-
 53
53
-
 54
54
-
 55
55
-
 56
56
-
 57
57
-
 58
58
-
 59
59
-
 60
60
-
 61
61
-
 62
62
-
 63
63
-
 64
64
-
 65
65
-
 66
66
-
 67
67
-
 68
68
-
 69
69
-
 70
70
-
 71
71
-
 72
72
-
 73
73
-
 74
74
-
 75
75
-
 76
76
-
 77
77


in altre lingue
- français: XEGA XG-02 Manuel utilisateur
- español: XEGA XG-02 Manual de usuario
- Deutsch: XEGA XG-02 Benutzerhandbuch
Documenti correlati
Altri documenti
-
 Ctronics 680C 2K 4MP Light Bulb Security Camera Manuale utente
-
V TAC V-TAC VT-5157 Outdoor WiFi Camera Manuale utente
-
AKASO P30 Manuale utente
-
Overmax OV-CAMSPOT 4.0 PTZ WHITE Manuale del proprietario
-
PNI IP649 Manuale utente
-
PNI IP930W Guida utente
-
 SCS Sentinel SVI0061 Manuale del proprietario
-
Evolveo StrongVision Manuale utente
-
 ANPVIZ Smart WIFI PTZ Camera Manuale utente
-
 ZOSI ZBC-A4304A-W-US Istruzioni per l'uso


