
1
Manuale Istruzioni RCS Bike - ITA/ENG/TED

S1
S2
8
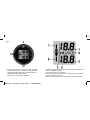
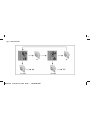
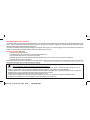
Fig. 1
1. Icona pneumatico anteriore - Front tyre icon - Ikone Vorderreifen
2. Icona pneumatico posteriore - Rear tyre icon - Ikone Hinterreifen
3. Bassa tensione batteria unità centrale - Central unit battery low
Niedrige Batteriespannung Zentraleinheit
4. Unità di misura - Units of measure - Maβeinheit
5.Pressione e temperatura ruota posteriore - Rear wheel pressure and temperature
Druck und Temperatur Hinterreifen
6.Icona di allarme - Alarm icon - Alarm-Ikone
7.Pressione e temperatura ruota anteriore - Front wheel pressure and temperature
Druck und Temperatur Vorderreifen
8.Indicatore luminoso allarme - Luminous alarm indicator - Alarm-Leuchtanzeige
2
Manuale Istruzioni RCS Bike - ITA/ENG/TED

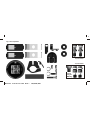
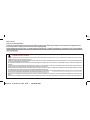
8,3 mm version
11,3 mm version
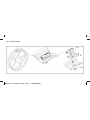
Fig. 2 - Kit composition
Sensor
fixing nut
(BMW only)
3
Manuale Istruzioni RCS Bike - ITA/ENG/TED

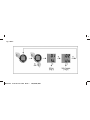
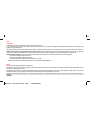
Fig. 3 - Menu
4
Manuale Istruzioni RCS Bike - ITA/ENG/TED

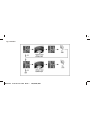
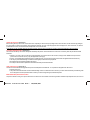
Fig. 4 - Self learn
5
Manuale Istruzioni RCS Bike - ITA/ENG/TED

Fig. 5 - Units of measure
6
Manuale Istruzioni RCS Bike - ITA/ENG/TED

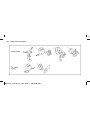
Fig. 6 - Sensor assembly
7
Manuale Istruzioni RCS Bike - ITA/ENG/TED

Fig. 7 - Sensor spring spacing
8
Manuale Istruzioni RCS Bike - ITA/ENG/TED

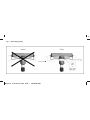
Fig. 8 - Central unit mounting options
9
Manuale Istruzioni RCS Bike - ITA/ENG/TED

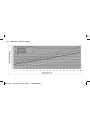
Fig. 9 - Temperature compensation diagram
10
Manuale Istruzioni RCS Bike - ITA/ENG/TED

Gentile Cliente,
La ringraziamo per aver scelto RTS Bike.
Il prodotto da Lei acquistato rappresenta il sistema più innovativo nel campo del monitoraggio dei pneumatici per moto: è completo, accurato ed offre
prestazioni elevatissime.
Esso rappresenta il risultato della continua ricerca che ZADI svolge, da anni, nell'ambito della sicurezza di guida.
Prima dell'utilizzo leggere attentamente questo manuale, esso contiene importanti informazioni relative alla corretta installazione ed utilizzo del
sistema.
Importanti informazioni preliminari:
RTS Bike è un sistema di monitoraggio in tempo reale della pressione e della temperatura dei pneumatici specifico per veicoli a due ruote. Esso deve essere considerato solo un ausilio alla guida
e non deve essere inteso come sostituto alla ordinaria manutenzione e controllo delle gomme. Il sistema non impedisce al guidatore di avviare il veicolo se i pneumatici sono sgonfi; prima della
partenza è quindi indispensabile verificare visivamente lo stato di gonfiaggio delle ruote.
La centrale deve essere posizionata in modo da non distrarre il conducente durante la guida. Non effettuare regolazioni mentre si sta guidando, ma arrestare il veicolo prima di operare sulla
centralina.
In caso di scoppio, sgonfiamento molto rapido del pneumatico o danneggiamento del sensore, dovuti per esempio ad una buca profonda sul manto stradale, la centrale potrebbe non segnalare
correttamente lo stato della ruota. Nel caso si sospetti una pressione non corretta, fermarsi alla prima stazione di servizio per controllare la pressione di tutti i pneumatici.
I sensori all'interno delle ruote, trasmettono i dati alla centrale tramite onde radio. In particolari condizioni (per esempio zone ad alta densità di disturbi elettromagnetici) la centrale potrebbe non
ricevere temporaneamente i dati di pressione e segnalare la mancanza dei sensori.
La centralina compensa automaticamente le variazioni di pressione dovute a cambiamenti di temperatura all'interno del pneumatico. La soglia di allarme per bassa pressione, è impostata al 15%
della pressione memorizzata e viene automaticamente ricalcolata in funzione della temperatura compensata (vedi fig. 9)
ZADI spa declina ogni responsabilità per ogni utilizzo e/o montaggio errato o non previsto del sistema. Attenersi scrupolosamente alle informazioni di installazione e utilizzo.
La mancata osservanza di tutte le prescrizioni sopraindicate, concernenti le avvertenze in tema di installazione, uso e manutenzione del sensore, dal quale derivino, direttamente o
indirettamente, danni a persone, cose o animali, dispensano ZADI spa da qualsiasi responsabilità
11
Manuale Istruzioni RCS Bike - ITA/ENG/TED

UTILIZZO
Modalità di funzionamento:
Allarmi
Per accendere l'unità centrale, premere a lungo (ca. 2 secondi) il pulsante S1 (ON/OFF) (fig. 1).
Per ridurre il consumo la retro-illuminazione normalmente è spenta, il display sarà comunque visibile durante il giorno.
La retro-illuminazione può essere attivata per 20 secondi premendo brevemente uno dei due pulsanti.
Durante il funzionamento, modalità ACTIVE, la centrale riconosce automaticamente se la moto si trova in movimento oppure è ferma e adegua la visualizzazione di
conseguenza:
SLEEP: moto ferma da più di 5 minuti. In questa modalità il consumo della batteria risulta particolarmente ridotto. La centrale visualizza solamente l'icona della moto.
Dopo 24h dall'ingresso in modalità SLEEP la centrale si spegne automaticamente per salvaguardare la durata della batteria
Una breve pressione di S1 riporterà la centrale in modalità ACTIVE.
RUN: moto in movimento. La centrale, oltre a dare segnalazioni di allarme come sopra, visualizza anche i parametri istantanei dei pneumatici, secondo le seguenti
indicazioni:
Visualizzazione continua della pressione dei pneumatici.
Visualizzazione continua della temperatura dei pneumatici.
Visualizzazione alternata di pressione e temperatura ogni 7 secondi.
In funzionamento RUN, il passaggio da un tipo di visualizzazione ad un'altro avviene con una breve pressione di S2 (MODE).
La centrale è dotata di due tipi di allarme visivo:
Se la pressione varia in misura maggiore del 7,5% rispetto a quella di riferimento compensata, si accende automaticamente la retro-illuminazione e sul display comincia a
lampeggiare l'icona di allarme (vedi fig.1)
Se la pressione varia in misura maggiore del 15% o se la temperatura interna del pneumatico supera i 75°C (167°F), si accende automaticamente la retro-illuminazione , sul
display comincia a lampeggiare l'icona di allarme e si accende ad intermittenza l'indicatore luminoso di allarme.
12
Manuale Istruzioni RCS Bike - ITA/ENG/TED

In entrambe le situazioni continuare a guidare il veicolo non è sicuro, è necessario fermarsi per controllare le condizioni delle gomme e effettuare le opportune operazioni di
riparazione/ripristino della pressione, prima di ripartire.
(fig. 3)
Per accedere al menù delle impostazioni, assicurarsi che la centrale sia completamente spenta. Premere e mantenere premuto S2 e contemporaneamente accendere la
centralina con S1. Successivamente si possono scorrere le varie pagine del menù con una breve pressione del tasto S2. Per accedere ad una specifica pagina del menù
premere brevemente S1. Dopo l'ingresso nel menù, se nessun tasto viene premuto per 30 secondi la centrale torna automaticamente al funzionamento normale.
Ogni procedura ha un tempo limite per essere completata, se si eccede questo tempo si esce dalla procedura stessa e questa non viene completata.
(fig. 4)
La centrale, durante le fasi di produzione, viene già accoppiata ai sensori forniti all'interno dello stesso kit. Se per una qualsiasi esigenza, fosse necessario memorizzare un
nuovo sensore, si può procedere come segue:
Entrare nel menù “1 SL”; L'icona del pneumatico anteriore comincerà a lampeggiare. Se si desidera passare al sensore posteriore premere brevemente S2.
Sgonfiare il pneumatico anteriore portando la pressione ad un valore minore di 0,9 bar (13 psi) e maggiore di 0,4 bar (6 psi).
Premere S1. Il led lampeggerà brevemente e l'icona del pneumatico anteriore diventa fissa: il codice del sensore anteriore è stato appreso e salvato in memoria.
L'icona della ruota posteriore comincia a lampeggiare. Per uscire senza eseguire la procedura per la ruota posteriore premere S2.
Procedere seguendo la stessa sequenza di operazioni utilizzata per il pneumatico anteriore.
A procedura ultimata la centrale torna automaticamente in modalità OFF.
(fig. 5)
La centrale viene impostata durante la produzione con la visualizzazione di pressione e temperatura, rispettivamente in “BAR” e “°C”. È possibile visualizzare questi valori
anche in “PSI” e “°F”.
Entrare nel menù “2 Un”
Le icone relative alle unità di misura attualmente in uso cominceranno a lampeggiare. Premere S1 per accettare queste unità di misura; un breve lampeggio del led
confermerà la scelta. Per cambiare unità di misura premere S2 e confermare la scelta effettuata con la pressione di S1; il led lampeggerà brevemente.
Menù impostazioni della centrale:
Apprendimento sensori ruote:
Impostazione unità di misura:
13
Manuale Istruzioni RCS Bike - ITA/ENG/TED

Memorizzazione della pressione di riferimento:
Installazione del sistema:
La pressione di riferimento è quel valore di pressione dei pneumatici, su cui l'unità centrale calcola la soglie di warning e di allarme che sono fissate rispettivamente in ±7,5%
e ±15%, rispetto alla pressione di riferimento memorizzata. Questo valore è compensato in temperatura, ciò significa che la centrale ricalcola automaticamente la soglia di
allarme in base alla temperatura dell'aria all'interno del pneumatico.
Ogni volta che si modifica la pressione dei pneumatici (viaggio con passeggero, utilizzo in pista, ecc.) è necessario aggiornare la pressione di riferimento memorizzata, per
far questo è sufficiente premere in qualsiasi momento S2 mantenendolo premuto per più di 2 secondi.
(figg. 6-7-8)
Rimuovere copertone e valvola di serie;
Assemblare l'insieme sensore-valvola forniti nel kit come indicato nelle figure 6 e 7;
Inserire la valvola nell'apposito foro sul cerchione e serrare a 5 Nm;
Rimontare il pneumatico cominciando l'inserimento dalla parte opposta alla valvola, per non schiacciare il sensore sotto il bordo della gomma;
Procedere nello stesso modo per l'altro sensore.
Se necessario eseguire procedura di auto-apprendimento come indicato in figura 4. Questo step deve essere eseguito solo se si è installato un sensore in sostituzione a uno
di quelli forniti nel kit originale, non è necessario all'atto del primo montaggio.
Dopo ogni installazione ripetere la memorizzazione della pressione di riferimento.
Qualora si debba smontare un pneumatico da un cerchio su cui è installato un sensore, cominciare sempre lo “stallonamento” dalla parte opposta alla vavola,
tenendosi comunque lontani da questa, per evitare di danneggiare il dispositivo elettronico, schiacciandolo sotto il bordo della gomma.
Controllare attentamente che il diametro della valvola all'interno del kit sia compatibile con il diametro del foro sul cerchione della propria moto. Il sistema RTS è
disponibile in diverse versioni, per adattarsi a tutti i tipi di valvola presenti sulle moto in produzione.
Per pulire la centrale utilizzare esclusivamente un panno morbido inumidito con acqua.
L'unità centrale è completamente a prova di spruzzi, tuttavia, non utilizzare acqua a pressione per lavare la moto quando la centralina è installata.
Il kit RTS può essere installato solo su cerchi equipaggiati con pneumatici tubeless (senza camera d'aria)
14
Manuale Istruzioni RCS Bike - ITA/ENG/TED

Dear customer,
thank you for choosing RTS Bike.
The product you purchased is the most innovative in the field of motorcycle tyre monitoring: it complete, accurate and offers very high performance.
It is the result of ZADI continuous research and aims at improving riding safety.
Before installing and using RTS Bike, you should carefully read this manual. It contains important pieces of information for the correct installation
and use of the device
RTS Bike is a real time tyre pressure and temperature monitoring system, specifically developed for two-wheels vehicles. You must consider it a driver's auxiliary device and by no means a
substitute for the ordinary check and maintenance of the tyres.
RTS Bike does not prevent the rider from starting the vehicle if the tyres are flat. The device begins measuring temperature and pressure when wheels turn. Therefore, before starting the vehicle
you must visually check the pressure status of the tyres.
The central unit must be installed in such a way as to prevent it from distracting the person riding the vehicle. Do not make any set-up while riding and stop your vehicle before operating on the
central unit.
In case of tyre burst, tyre very fast deflation or sensor damages due, for example, to a deep road bump, the central unit could eventually not indicate the correct status of the tyre. Should you
suspect an incorrect pressure figure, stop at the nearest service station to check the pressure of all tyres.
The sensors inside the tyres transmit data to the central unit by means of radio waves. In particular conditions (for examples areas with high density of electromagnetic interference) the central
unit could temporarily not receive the pressure data and consequently indicate the absence of the sensors.
The central unit automatically compensate the changes of pressure due to temperature variations inside the tyre. The warning threshold value for low pressure is set at -15% of the memorized
pressure value and is automatically recalculated based on the compensated temperature (see picture no.9)
ZADI declines any responsibility and shall not be liable for any incorrect or not foreseen installation or use of the device. You must carefully follow the installation and use instructions of this
manual.
ZADI declines any responsibility and shall not be liable for any direct or indirect damage caused to persons, objects or animals by the missing observance of any of the instructions of this manual.
Important preliminary information
15
Manuale Istruzioni RCS Bike - ITA/ENG/TED

USE
How it works:
Alarms
To start the central unit push for at least 3 sec. the S1 (On/Off) button (picture no.1).
In order reduce energy consumption the backlight is normally off, the display will in any case be visible in daylight. The backlight may be activated for 10 seconds by shortly
pushing one of the two buttons (S1).
If the central unit has been started, and is therefore in ACTIVE mode, it automatically detects if the motorcycle is moving or not and consequently changes the visualization in:
SLEEP: when the motorcycle has not moved for more than 5 minutes. In this mode the battery consumption is considerably reduced. The central unit only shows the
motorcycle icon. After 24 hours of SLEEP mode the central unit will automatically turn off to preserve battery life. To restore the ACTIVE mode shortly press S1.
RUN: the motorcycle moves. The central unit, besides warning the rider as described above, shows the instant parameters in the following options:
Continuous visualization of the tyres pressure
Continuous visualization of the tyres temperature
Alternating visualization of pressure and temperature every 7 seconds.
In RUN mode, to switch from a visualization option to the other, shortly push the S2 (MODE) button.
The central unit is equipped with two types of visual alarms:
If the pressure values become at least 7,5% lower or higher than the reference pressure value (compensated), the backlight of the display automatically lightens and the
warning icon starts flashing (see pict. no.1)
If the pressure values become 15% lower or higher than the reference pressure value (compensated), or in case of tyre internal temperature higher than 75°C (167°F), the
backlight of the display automatically lightens, the warning icon starts flashing and the warning led light turns on and off.
In both cases it is not safe to ride the vehicle. It is necessary to stop and check your tyres condition. Either repair the tyre or restore the correct pressure before starting your
ride again.
16
Manuale Istruzioni RCS Bike - ITA/ENG/TED

Central unit set-up menu
Tyre sensors learning procedure
Units of measure set up
Memorization of the pressure reference value
(picture no. 3)
Before entering the set up menu make sure the central unit is completely off. Push and keep on pushing S2 and, at the same time, start the central unit by pushing S1.
It is now possible to scroll the menu pages by shortly pressing the S2 button. To access a specific page of the menu shortly press S1. Once in the menu, if no button is
pushed within 30 seconds, the central unit automatically returns to its normal functions.
All procedures must be completed within their maximum time frame. If this time limit is exceeded, the procedure will be terminated without being completed.
(picture no. 4)
The central unit and the tyre sensor have already been matched by the producer. If the memorization of a new sensor is necessary, follow the procedure described
here below:
Enter the “1 SL” menu. The icon of the front tyre will start flashing. If you wish to switch to the rear sensor, shortly push S2. Deflate the front tyre until the
pressure value is lower than 0,9 bar (13 psi) and higher than 0,4 bar (6 psi).
Press S1. The led will shortly flash and the front tyre icon will become fixed. The code of the front tyre sensor has been recognized and stored in the memory.
The rear tyre symbol will start flashing. To exit without executing the procedure for the rear tyre press S2.
Now follow the same procedure described for the front tyre.
Once the procedure has been completed the central unit automatically returns to ACTIVE mode.
(picture no. 5)
The units of measure memorized during production for pressure and temperature are “BAR” and “°C”. It is possible to change these into “PSI” and “°F”.
Enter the “2 Un” menu.
The symbols of the memorized unit of measure will start flashing. Push S1 to confirm these units of measure; your choice will be confirmed by a short flashing of the
led. To change units of measure push S2 and then to confirm your choice shortly pushing S1; the led will shortly flash.
The pressure reference value gives a point of reference to the central unit for the calculation of the warning and alarm thresholds respectively fixed at ±7,5% and ±15%
17
Manuale Istruzioni RCS Bike - ITA/ENG/TED

of the memorized pressure values. This value is compensated according to the temperature: this means that the central unit automatically recalculates the warning and
alarm thresholds based on the air temperature inside the tyre.
Anytime the pressure inside the tyres is intentionally modified (because of a trip with passenger or use of the bike on a race track etc.) it is necessary to update the memorized
pressure reference value. To do this push anytime S2 for more than 2 seconds.
(picture no. 6-7-8)
Remove the tyre and the originally equipped valve.
Assemble the sensor-valve unit of RTS as shown in the pictures;
Insert the valve in the hole of the rim and tighten up to 5 Nm;
Assemble the tyre. It is important to start assembling the tyre from the side opposite to the valve in order not to squash the sensor under the tyre edge;
Proceed in the same way for the second sensor.
If necessary, follow the self-learning procedure indicated in picture no.4. This step must be followed only when one of the originally supplied sensors needs to be replaced.
This procedure is not required when at the first mounting.
Installation of the device
After any installation, repeat the memorization procedure for the pressure reference values.
When the sensor is fixed on the rim and the tyre needs to be demounted, always start bead loosening from the side opposite to the valve. To prevent damages
to the electronic device inside the tyre during bead loosening always keep away from the valve area.
Carefully check that the diameter of the valves supplied in your RTS set is compatible with the hole diameter on your bike rim. RTS is available in different
versions to adapt to the several types of valves available on motorcycles currently produced.
To clean the central unit use a humid (with water only) cleaned cloth. The central unit is completely spray proof, nevertheless do not use under pressure water to
clean your motorbike if the central unit is installed.
RTS is suitable for tubeless (without inner tube) tyres only.
18
Manuale Istruzioni RCS Bike - ITA/ENG/TED

Verehrter Kunde,
wir danken Ihnen, dass Sie sich für RTS Bike entschieden haben.
Das von Ihnen erworbene Produkt stellt das innovativste System auf dem Gebiet der Überwachung der Motorradreifen dar: es ist komplett, genau und
bietet höchste Leistungen.
Es ist das Ergebnis der kontinuierlichen Forschung, die Zadi seit Jahren auf dem Gebiet der Fahrsicherheit betreibt.
Lesen Sie bitte vor der Inbetriebnahme diese Anleitung aufmerksam durch. Sie enthält wichtige Informationen über den korrekten Einbau und
Gebrauch des Systems.
Wichtige einleitende Informationen:
RTS Bike ist ein spezifisch für Zweirad-Fahrzeuge entwickeltes Echtzeit-Überwachungssystem des Reifendrucks und der Reifentemperatur. Es ist ausschlieβlich als Hilfsmittel zur Fahrsicherheit zu
betrachten und darf keinesfalls als Ersatz für die regelmäβige Wartung und Kontrolle der Reifen missverstanden werden. Das System hindert den Fahrer nicht daran, das Fahrzeug mit ungenügend
aufgepumpten Reifen in Betrieb zu nehmen. Vor Fahrtantritt ist es daher zwingend erforderlich, den Reifenzustand visuell zu überprüfen.
Die Zentraleinheit ist so anzubringen, dass der Fahrer während der Fahrt nicht abgelenkt wird. Während der Fahrt keine Einstellungen durchführen, sondern das Fahrzeug vor Eingriffen an der
Zentraleinheit zum Stillstand bringen.
Beim Platzen eines Reifens oder sehr raschem Entweichen der Luft oder einer Beschädigung des Sensors, beispielsweise aufgrund eines tiefen Schlaglochs im Straβenbelag, zeigt die Zentraleinheit
unter Umständen nicht den korrekten Zustand des Reifens an. Falls ein unzureichender Druck vermutet wird, an der nächsten Tankstelle anhalten und den Druck beider Reifen überprüfen.
Die Sensoren im Inneren der Reifen senden die Daten mittels Radiowellen an die Zentraleinheit. Unter besonderen Bedingungen (beispielsweise Gegenden mit hoher Intensität elektromagnetischer
Störungen) kann es vorkommen, dass die Zentraleinheit vorübergehend keine Daten über Reifendruck und -temperatur erhält und daher das Fehlen der Sensoren anzeigt.
Die Steuereinheit kompensiert automatisch die durch Temperaturveränderungen im Innneren des Reifens bedingten Druckveränderungen. Die Alarmschwelle für zu niedrigen Druck ist auf -
15% des gespeicherten Drucks eingestellt und wird in Abhängigkeit von der kompensierten Temperatur automatisch neu berechnet (siehe Fig. 9).
ZADI spa schlieβt jegliche Haftung für Schäden durch unsachgemäβen oder nicht bestimmungsgemäβen Gebrauch und/oder Montage des Systems aus. Bitte halten Sie sich gewissenhaft an die
Einbau- und Bedienungshinweise.
Die mangelnde Beachtung der oben aufgeführten Vorschriften, die die Hinweise zu Einbau, Gebrauch und Wartung des Sensors betreffen, wodurch, direkt oder indirekt, Schäden an Personen, Dingen
oder Tieren entstehen, entbindet die ZADI spa von jeglicher Haftung.
19
Manuale Istruzioni RCS Bike - ITA/ENG/TED

GEBRAUCH
Betriebsmodi:
Alarm:
Zum Einschalten der Zentraleinheit die Taste S1 (ON/OFF) lange (ca. 2 Sekunden) drücken. (Fig. 1)
Zur Reduzierung des Stromverbrauchs ist die Display-Beleuchtung normalerweise ausgeschaltet. Das Display ist jedoch tagsüber lesbar.
Die Hintergrundbeleuchtung kann durch kurzes Drücken einer der beiden Tasten für 10 Sekunden aktiviert werden.
Während des Betriebs, Modus ACTIVE, erkennt die Zentraleinheit automatisch, ob das Motorrad fährt oder steht und passt die Anzeige entsprechend an:
SLEEP: Motorrad steht seit mehr als 5 Minuten. In diesem Modus ist der Batterieverbrauch besonders gering. Das Display zeigt nur die Ikone des Motorrads an.
24h nach Eintritt in den SLEEP-Modus schaltet sich die Zentraleinheit automatisch aus, um die Lebensdauer der Batterie zu wahren.
Ein kurzer Druck der Taste S1 versetzt die Zentraleinheit wieder in den ACTIVE-Modus.
RUN: Motorrad fährt. Neben den oben genannten Alarmanzeigen werden auch die Momentanwerte der Reifen wie folgt wiedergegeben:
Kontinuierliche Anzeige der Reifendrücke.
Kontinuierliche Anzeige der Reifentemperaturen.
Abwechselnde Anzeige von Druck und Temperatur im 7-Sekunden-Takt.
Im RUN-Betrieb erfolgt der Wechsel von einer Art der Anzeige zur anderen durch einen kurzen Druck von S2 (MODE)
Die Zentraleinheit ist mit zwei Alarmanzeigen versehen:
Weicht der Druck um mehr als 7,5% vom kompensierten Referenzdruck ab, schaltet sich automatisch die Hintergrundbeleuchtung ein und auf dem Display leuchtet die
Alarm-Ikone auf (siehe Fig 1).
Weicht der Druck um mehr als 15% ab oder überschreitet die Temperatur im Inneren des Reifen 75°C (167°F), schaltet sich automatisch die Hintergrundbeleuchtung ein, auf
dem Display leuchtet die Alarm-Ikone auf und die Alarm-Leuchtanzeige beginnt zu blinken.
In beiden Fällen ist eine sichere Weiterfahrt nicht mehr gewährleistet. Es ist unbedingt erforderlich, anzuhalten, um den Reifenzustand zu überprüfen und vor
Wiederaufnahme der Fahrt gegebenenfalls erforderliche Reparaturen durchzuführen und/oder die Reifen wieder aufzupumpen.
20
Manuale Istruzioni RCS Bike - ITA/ENG/TED
La pagina si sta caricando...
La pagina si sta caricando...
La pagina si sta caricando...
La pagina si sta caricando...
La pagina si sta caricando...
La pagina si sta caricando...
-
 1
1
-
 2
2
-
 3
3
-
 4
4
-
 5
5
-
 6
6
-
 7
7
-
 8
8
-
 9
9
-
 10
10
-
 11
11
-
 12
12
-
 13
13
-
 14
14
-
 15
15
-
 16
16
-
 17
17
-
 18
18
-
 19
19
-
 20
20
-
 21
21
-
 22
22
-
 23
23
-
 24
24
-
 25
25
-
 26
26


in altre lingue
- English: ZADI RTS Bike User manual
- Deutsch: ZADI RTS Bike Benutzerhandbuch
Altri documenti
-
Ducati SportTouring 2 Manuale del proprietario
-
-
-
-
-
-
-
-
-