Viscount Domus P45 Manuale del proprietario
- Categoria
- Pianoforti digitali
- Tipo
- Manuale del proprietario

Quick Guide - English
Guida Rapida - Italiano
Edition: 1.2
organ series


EN - 1
Table of contents
Quick Guide
Important notes ........................................................................................................................................................................ 2
General descriptions ............................................................................................................................................................... 3
Switching on and main video page ........................................................................................................................................ 8
About the Pipe Sets .............................................................................................................................................................. 10
Settings the volumes (Levels function) ................................................................................................................................ 11
Main Menu basic description ................................................................................................................................................ 12
Tuning the instrument (Tuning menu).................................................................................................................................. 15
Selecting and regulating the voices (Voicing menu) ........................................................................................................... 16
Playing and recording of musical sequences (Sequencer) ................................................................................................ 18
Appendix ................................................................................................................................................................................ 20
TABLE OF CONTENTS

EN - 2
Important notes
Quick Guide
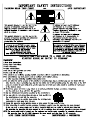
IMPORTANT NOTES
Product Care
Do not apply excessive force to the instrument's structures and controls (knobs, buttons, keyboard etc...).
Whenever possible, do not place the instrument close to units that generate strong interference, such as
radio - TV sets, monitors, etc ...
Do not place the instrument close to heat sources, in damp or dusty places or in the vicinity of strong
magnetic fields.
Do not expose the instrument to direct sunlight.
Never insert foreign bodies or liquids of any kind into the instrument.
For cleaning use only a soft brush or compressed air; never use detergents, solvents or alcohol.
Always use good quality screened cables for connection to amplification or diffusion systems. When
disconnecting cables from sockets, always take hold of the connector and not the cable itself; when winding
cables do not knot or twist them.
Before making connections make sure that the other units you are about to connect (especially amplification
and diffusion systems) are switched off. This will prevent noisy or even dangerous signal peaks.
Connect the net cable to an earthed socket.
Check that the voltage corresponds to the voltage shown on the serial number plate of the organ.
If the instrument is to be out of use for long periods, disconnect the power cable from the power socket.
Do not place the power cord near heat sources. Do not bend the cable too much, or damage it.
Notes about this manual
Keep this manual with care.
This manual is an integral part of the instrument. The descriptions and illustrations contained in this
publication are not binding.
While the instrument’s essential characteristics remain the same, the manufacturer reserves the right to
make any modifications to parts, details or accessories considered appropriate to improve the product or for
requirements of a constructional or commercial nature, at any time and without undertaking to update this
publication immediately.
All rights reserved; the reproduction of any part of this manual, in any form, without the manufacturer’s
specific written permission, is forbidden.
All the trademarks referred to in this manual are the property of the respective manufacturers.
Please read all the information carefully, so that you obtain the best performance and will from your
instrument.
The codes or numbers in square brackets ([ ]) indicate the names of the buttons, sliders, trimmers and
connectors on the instrument. For example, [EXIT] refers to the EXIT button.
The illustrations are purely for information purposes and may differ from your product.
The instructions provided in this manual only concern the instrument's operating system version that was up
to date when the document was released. Therefore, such instructions might not describe faithfully your
current operating system release. Please, visit the website www.viscountinstruments.com to check for the
newest operating system release and manual.
This is a Quick Guide. Check the Reference Manual for detailed descriptions of all the organ's functions.
The manual can be downloaded from the website www.viscountinstruments.com.
This quick guide is updated to version 1.0.5 of the instrument's operating system.
Visit the Physis Plus page on our web site for the detailed description of the Physis Plus
technology!

EN - 3
Quick Guide
General description
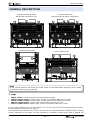
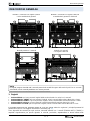
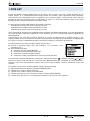
GENERAL DESCRIPTIONS
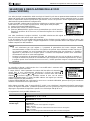
1. Stops
PEDAL section: contains pedal stops and manual-pedal couplers.
MAN II or GREAT section: contains stops, couplers and tremulant of Manual II or Great.
MAN III or SWELL section: contains stops, coupler and tremulant of Manual III or Swell.
MAN IV or SOLO section: contains stops and tremulant of Manual IV or Solo.
MAN I or CHOIR section: contains stops coupler and tremulant of Manual I or Choir.
For each stop a different voice can be selected. You can also adjust the main sound-generation parameters.
Further information can be found on page 16.
Two tremulants are available for each section, and both can be activated through the [TREMULANT] or [TREM]
controls, depending on the model. For each tremulant it is possible to adjust speed, depth, amplitude and
121
3456
46 5 3
1 1
12
3
64
5
1 1
65
3 4
2 1 2
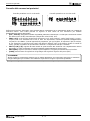
NOTE
All the controls present in the Physis Plus organ models are described below. Depending on the model,
some of the controls may not be present.
3-manuals drawknobs model
with general combinations only
3-manuals tabs model
with general and divisional combinations
3-manuals positiv model
2-manuals tabs model

EN - 4
Quick Guide
General description
waveform and assign it to each voice. Further information can be found on page 15 and Reference Manual.
It is also possible to play one or two orchestral voices in each section. In some models, in which orchestral
stops are not present, it’s necessary to activate the orchestral voice through the functions described on page 16.
The list of stops available to play orchestral voices may change, according to the sound configuration of the
organ. Check the web site www.viscountinstruments.com for further information.
For some models, these sections also contain a [MIDI] control, to transmit MIDI-note codes to the MIDI [OUT] port.
2. Upper panel
Light switch: on-off button for the music stand and manuals lights.
SPEAKERS section: amplification controls.
- [CONSOLE]: switches on/off the instrument’s internal amplification system.
- [EXTERNAL]: this command activates the PROG.OUT outputs in the rear panel (page 7), in order to
link external speakers to the instrument and use them to diffuse the sound around the ambience.
PEDAL section: couplers, sub and super octave of the pedalboard.
MAN II or GREAT section: couplers, sub and super octave of the Manual II or Great.
MAN III or SWELL section: couplers, sub and super octave of the Manual III or Swell.
MAN I or CHOIR section: couplers, sub and super octave of the Manual I or Choir.
COUPLERS section: couplers, sub and super octave of the manuals and pedalboard.
SOLO TO section: couplers of Solo section to the other manuals and pedalboard.
MIDI section: these controls, provided for each manual and the pedalboard, allow transmission of the note
MIDI messages on the MIDI [OUT] port to be enabled and disabled. All the instrument’s other MIDI
messages will continue to be transmitted, even with the MIDI control is off.
TREMULANTS or TREMOLO section: here are the tremulants of each section. Further information are
available in STOPS.
ORCHESTRA section: contains the orchestral voices. It is possible to select the voice activated by the stop
and adjust the main sound generation parameters of each voice. For further information see page 16.
Additional displays.
- [CRESC] or [CRESCENDO]: shows the step currently reached by the [CRESCENDO] pedal.
- [I] or [CH]: Manual I or Choir expression level regulated by the [MAN. I] or [CHOIR] expression pedal.
- [II]: Manual II expression level regulated by the [MAN II] expression pedal.
- [III] or [SW]: Manual III or Swell expression level regulated by the [MAN III] or [SWELL] expression
pedal.
- [TRANSPOSER]: the transposition set by the TRANSPOSER parameter (page 8).
- [MEM. BANK]: displays the memory bank of the combinations, selected using the [- -] or [MEM BANK +]
and [MEM BANK -] thumb pistons.
3. Thumb pistons
General combinations.
- [- -]: press this thumb piston and then the [0] / [9] pistons to select the desired memory bank and
general combination. The first two presses of [0] / [9] piston select the memory bank, the third press
selects the combination. For example, pressing pistons [2], [0] and [4] selects the combination 4 of the
memory bank 20.
- [HR]: restores the voice setup prepared in manual mode before a memory was recalled.
- [0] / [9] or [1] / [8] / [10] / [12]: pistons to recall the combinations saved in the selected memory bank. These
combinations can be modified. To do so, follow the procedure described for [S] or [SET] thumb piston.
- [<] / [>] or [PREV] / [NEXT]: general combinations sequencers. [<] or [PREV] selects them in
descending order, [>] or [NEXT] in ascending order.
Divisional combinations.
[1] / [6] / [8]: under each manual there are thumb pistons for recalling the divisional combinations. The
Pedal ones can be under the Manual I or Choir (on the left) or as toe pistons. These combinations can be
modified. To do so, follow the procedure described for [S] or [SET] thumb piston.
NOTES
-
When the organ is switched on, memory bank 0 (in the models equipped with the [- -] thumb piston or
1 is always selected.
-
Combinations Sets are available in the Physis Plus organs thanks to which the number of usable
combinations is extended. For more information see page 8.

EN - 5
Quick Guide
General description
[TUTTI]: thumb piston that recalls Tutti. The Tutti can be modified. To do so, follow the procedure described
for [S] or [SET] thumb piston.
[PLENUM]: Plenum thumb piston whose content is added to the stop configuration prepared by hand or by
combination. The Plenum can be modified. To do so, follow the procedure described for [S] or [SET] thumb
piston.
[S] or [SET]: piston to save general or divisional combinations, Tutti, Plenum and Crescendo steps.
To save a combination in the actual memory bank:
1) Press and hold the [S] or [SET] thumb piston.
2) Press the desired combination thumb or toe piston.
3) Release the [S] or [SET] thumb piston.
To save a combination in another memory bank,
- In the organ models equipped with [- - ] thumb piston:
1) Select the memory bank pressing [- -] then press two [0] / [9] pistons.
2) Press and hold [S] or [SET].
3) Press [0] / [9] piston to select the combination to be saved.
For example, pressing pistons [2], [0] and [4] saves the combination 4 of the memory bank 20.
4) Release the [S] or [SET] thumb piston.
- In the organ models equipped with MEM BANK thumb pistons:
1) Press [MEM BANK +] or [MEM BANK -] to select the memory bank
2) Press and hold [S] or [SET].
3) Press the thumb piston of general or divisional combination you have to save.
4) Release the [S] or [SET] thumb piston.
To save Tutti or Plenum:
1) Press and hold the [S] thumb piston.
2) Press the [TUTTI] or [PLENUM] thumb or toe piston
3) Release the [S] or [SET] thumb piston.
To save a Crescendo step:
1) Select it through the [CRESCENDO] pedal.
2) Press and hold the [S] or [SET] thumb piston.
3) Press the [HR] or [ENC] (where [HR] is not present) thumb piston.
4) Release the [S] or [SET] thumb piston.
To copy the content of one Crescendo step to another:
1) Select the step you wish to copy.
2) Press and hold the [S] or [SET] thumb piston.
3) Select the step in which you wish to paste the content.
4) Press the [HR] or [ENC] (where [HR] is not present) thumb piston.
5) Release the [S] or [SET] thumb piston.
[PIPE SET]: this thumb piston allows you to select the desired Pipe Set. To do this press this piston and
within 5 seconds one of the general combination lit pistons
In the organ models not equipped with this thumb piston, to select a Pipe Set follow the procedure
described at page 10.
ORCH thumb pistons: orchestral voices pistons of each organ section.
Coupler thumb pistons: under each manual there are the thumb pistons to enable and disable the
couplers to the other manuals and/or pedalboard.
MIDI thumb pistons: thumb pistons that provided, for each manual and the pedalboard, allow transmission
of the note MIDI codes on the MIDI [OUT] port to be enabled and disabled. All the instrument’s other MIDI
messages will continue to be transmitted, even with the MIDI control is off.
[ORGAN SOLO] or [ORG SOLO]: activates the Organ Solo function. By default, using this function you can
play the melody with Swell stops when the III/II or II/I or Swell/Great (depending on the organ model)
coupling is active. Therefore, all the while the function is active, the highest notes are played with
monophonic Swell voices. However the function can be customized among the ORGAN SOLO function in
the KEYBOARDS menu (see Reference Manual).
[AUTO PED] or [AUTO PEDAL]: activates the Automatic Pedal or the Pedal Automatic Piano function.
Select the mode of the piston among the A.P. MODE parameter in the KEYBOARDS menu (see Reference
Manual).
[ENC] or [SWS]: when the Enclosed or All Swells in Swell function is active, the main volume can be
controlled through the [MAN.III] or [MAN.II] or [SWELL] (depending on the organ model) expression pedal.
Which expression pedal and which section are controlled can be customized among the ENC or SWS
CONFIG function in the CONTROLS menu (see Reference Manual).
[C] or [CAN]: Cancel thumb piston to turn off all stops, tremulants, couplers, and the other pistons on the
manuals (except when differently set through the functions in the CONTROLS menu, see Reference
Manual).

EN - 6
Quick Guide
General description
[CYMB STRN] or [ZIMB]: switches on and off the Zimbelstern sound.
[MAN TRANS]: Manuals Transfer thumb piston. By default, using this thumb piston it is possible to invert
the Manual II or Great with Manual I or Choir. However the function can be customized among the
INVERSION function in the KEYBOARDS menu (see Reference Manual).
[REED 32]: switches on and off the reed 32’ pedalboard’s stops.
[DIAP 32]: switches on and off the diapason 32’ pedalboard’s stops.
[MAIN ON]: switches on and off the Main audio outputs. For further information concerning the audio
outputs configurations, see Reference Manual.
[ANT ON]: switches on and off the Antiphonal audio outputs. For further information concerning the audio
outputs configurations, see Reference Manual.
[P / D]: Pipe / Digital thumb piston which allows to play voices with the internal sound generation or with
organ pipes through systems of external interfacing as Viscount VPI.
To the left of the manuals there is the Power switch to switch on/off the instrument.
In the models with rool top, to the right of the manuals there is the roll top lock.
4. Control and programming section
The buttons and the display in this section allow the user to program and set up the instrument and use the
internal sequencer. Depending on the model, this section is located in a drawer on the right underneath the
manuals, or in the upper panel, or on the right of the manuals. The buttons to visualize and navigate through all
the display screens are located near the display and are:
- [SONG]: access the video pages of the internal sequencer.
- [LEVELS]: access the video page for all the volume settings available in the instruments.
- [ ] and []: buttons used to move the cursor, identified by the field in reverse. [ ] moves it in the field
above or the previous field, [ ] in the field below or the next field.
- [+] and [-]: buttons which regulate the values of the parameters, whether they are numerical or
alphanumerical. [+] increases, [-] decreases.
- [EXIT] and [MENU/ENTER]: access and quit the display screens and menus, or confirm or cancel prompts
made by the system. [MENU/ENTER] accesses menus/screens and confirms, [EXIT] quits menus/screens
and cancels. If it is held pressed for a while, the main screen is immediately displayed, regardless of the
current menu level
5. Expression pedals and toe pistons
[CRESCENDO] pedal: with this pedal you can select the Crescendo level (step). These levels activate a
fixed set of stops, linked with an equal number of loudness, from pianissimo to fortissimo. The current level
is shown on the [CRESCENDO] or [CRESC] additional display (see point 2) and in the display by the
CRESC. field in the main video page (see page 8). The Crescendo controls all the registers and couplers.
Each level of the Crescendo can be programmed. To save the Crescendo configuration, see [S] or [SET]
thumb piston description.
Expression pedals: the expression pedals control at every time the volume of one or more sections, and
can be used to obtain the most diverse dynamic effects. The number of the pedals depends on the model
and its number of manuals:
- [MAN IV] or [SOLO]: continuous control of Manual IV or Solo volume.
- [MAN III] or [SWELL]: continuous control of Manual III or Swell volume.
- [MAN II]: continuous control of Manual II volume.
- [MAN I] or [CHOIR]: continuous control of Manual I or Choir volume.
One of the pedals is equipped with a leverage system and can be used to control the sustain effect for
Orchestral voices.
Couplers toe pistons: same function of the couplers thumb pistons.
[0]...[9], or [GEN 1]...[GEN 12]: same function of the general combinations thumb pistons.
[<] / [>] or [PREV] / [NEXT]: same function of the general combinations sequencers thumb pistons.
[PED 1]...[PED 12]: same function of the Pedal divisional combinations thumb pistons.
[REED 32]: switches on and off the reed 32’ pedalboard’s stops.
[FLUE 32]: switches on and off the flute 32’ pedalboard’s stops.
[BOMB 32]: switches on and off the Bombarde 32’ pedalboard’s stop.
[BOURD 32]: switches on and off the Bourdon 32’ pedalboard’s stop.
[PLENUM]: same function of the [PLENUM] thumb piston.
[TUTTI]: same function of the [TUTTI] thumb piston.
[ZIMBEL]: switches on and off the Zimbelstern sound.

EN - 7
Quick Guide
General description
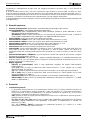
6. Forward connection panel
Underneath the manuals, on the left, there is a panel where you can find the most frequently used connections
and controls.
[MASTER VOLUME]: regulates the main volume.
MIDI [IN]: MIDI input port.
MIDI [OUT]: MIDI output port.
[USB]: two USB ports. The right port links the organ to a computer, in order to use the “Physis Plus The
Editor” Windows / Mac OS / iOs application. The left port is dedicated to USB pen drive (not included with
the organ) to save and load configuration files and songs recorded using the internal sequencer.
AUX [IN]: RCA line inputs which allow other instruments to be played using the organ’s internal and
external amplification.
AUX [OUT]: RCA line outputs with non-amplified signal, for connecting optional amplified speakers, remote
amplification systems or recording systems.
[PHONES]: plug for a headphone set.
[PHONES VOLUME]: regulates the volume of the headphone set connected to the [PHONES] plug.
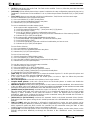
Rear connections panel
On the rear of the organ, there are various sockets to connect it to an external speaker systems, together with
line and microphone input.
[EXT. +12V DC]: +12 Volt can be obtained from these connectors to switch-on any VISCOUNT speaker
connected to the PROG. OUT outputs.
PROG. OUT: the instrument’s general line outputs, allowing simulation of the windchests of pipe organs.
The signals are distributed over the outputs on the basis of the OUTPUTS settings available in the “Physis
Plus The Editor” application. These settings allow you to select the type of windchest, its size based on the
position in space of the speakers. Each output also has dedicated type, mode, level, equalization and
reverb controls.
INPUT [L(+R)] / [R]: line inputs which allow other instruments to be played using the organ’s internal and
external amplification. If the source is monophonic use the [L+(R)] connector only.
INPUT [MIC]: microphone input allowing amplification of the signal from a microphone.
[GAIN]: trimmer for regulating the gain of the input signal received at the [MIC] connector.
N.B.
-For further information about the MIDI interface, see Reference Manual.
-For further information about the USB devices and internal memory, see Reference Manual.
WARNING!
This group of rear connections is not visible from the outside and the organ’s wooden rear panel has to be
removed to access it. Contact qualified staff for this procedure.
12 audio outputs rear panel
4 audio outputs rear panel

EN - 8
Quick Guide
Switching on and main video page
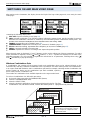
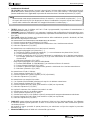
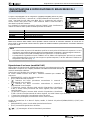
SWITCHING ON AND MAIN VIDEO PAGE
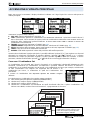
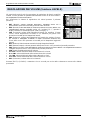
After turning on the instrument, the display shows the Physis Plus logo video page and, once ready, the main
video page:
containing the following display field:
PIPE SET: Pipe Set currently in use (page 10).
CMB: selected combination. The first two numbers indicate the memory bank, the third number (in reverse)
indicates the combination selected as showed by the illuminated general combination thumb piston. The
number of the selected Combinations Set is indicated next to the writing “CMB”.
TRANSP: transposition set in TUNING (page 15).
TEMPERAMENT: temperament currently in use, selected in TUNING (page 15).
PITCH: instrument’s tuning, expressed as the frequency of A4, set in TUNING (page 15).
CRESC: currently selected Crescendo step.
EXPRES: expressions levels in according to the expression pedals position.
When the main page is displayed, [+] and [-] buttons can be used to adjust one of these parameters. To select
which parameter is adjusted, use the [ ] and [ ] buttons, “+” and “-“ symbols are displayed in the field of the
adjusted parameter. It is also possible to regulate the reverb level or no parameter, selecting these using [ ]
and [ ] (showed by a pop-up message).
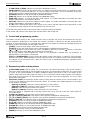
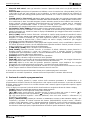
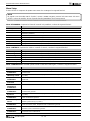
What are Combinations Sets
A Combinations Set contains all the memory banks and combinations that can be selected directly on the
instrument. By selecting a different Combination Set it is possible to use other memory banks and combinations.
In an organ model with 99 banks and 10 combinations per bank for example, selecting another Combination Set
makes another 99 banks and 10 combinations per bank available, replacing
those of the previous Combination Set.
The number of Combinations Sets available depends on the organ model used.
To select a Combinations Set, follow this procedure:
1. in the main video page press the [MENU/ENTER] button,
2. select the COMBINATIONS field,
3. select the SELECT field,
4. select the desired Combinations Set from those displayed in the list. The first
Combinations Set, indicated as MAIN, contains the memory bank n. 1 programmed by Viscount.
Combinations Set X
Combinations Set 3
Combinations Set 2
012345
Memory Bank X
Memory Bank 2
5
Memory Bank 1
012345
6789
Combinations Set 1 (Main)
012345
Memory Bank X
Memory Bank 2
012345
6789
Memory Bank 1
NB: the numbering and quantity of
combinations in this diagram is only by
way of example as it depends on the
organ model used.

EN - 9
Quick Guide
Switching on and main video page
How to navigate in the menus
Here a simple explanation how to display a specific video page, regulate a parameter and come back to the
main video page. Bear in mind this procedure to reach all the parameters described in the Quick Guide and
Reference Manual.
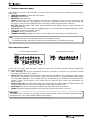
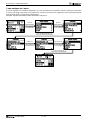
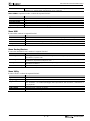
Example: you have to regulate the general pitch at 439,19 Hz:
press the
[MENU/ENTER]
button to enter in
the MAIN MENU
press the
[MENU/ENTER]
button to enter in
the TUNING menu
press the
[EXIT] button
to leave the
TUNING menu
press the
[-] button
to adjust the
PITCH parameter
press the [] button to move
the cursor to PITCH parameter
press the [EXIT] button
to leave the MAIN MENU

EN - 10
Quick Guide
About the Pipe Sets
ABOUT THE PIPE SETS
A Pipe Set identifies the entire configuration of an organ, that is the voice and the relative parameters of each
stop, tuning, configuration of several controls and functions, allowing the appropriate use to the repertoire to be
performed. The many Pipe Sets allow the musician to use several organ configurations, as if several different
instruments were present at the same time in the same place.
The number of Pipe Sets available in the instrument depends on the model purchased:
- Opera models: 10 Pipe Sets of which 5 supplied by Viscount
- Maestro models: 8 Pipe Sets of which 4 supplied by Viscount
- Domus models: 6 Pipe Sets of which 3 supplied by Viscount
The Pipe Sets supplied by Viscount are already present in the instrument at the time of purchase and
programmed by our laboratories on the basis of the appropriate organ schools, however it can be modified by
the user.
The remaining Pipe Sets are free locations, starting from an already existing Pipe Set it is possible to copy it in a
free location (but also overwrite an already existing Pipe Set) and modify each parameter and function to create
a completely different Pipe Set based on the needs and musician's preferences.
To select a Pipe Set it is possible to follow two procedures:
A. Using the [PIPE SET] thumb piston (in the models in which it is present) as
described at page 5.
B. In the main video page,
1. press the [MENU/ENTER] button,
2. select the PIPE SET field,
3. select the SELECT field,
4. select the desired Pipe Set from those displayed in the list.
In this list the currently selected Pipe Set is indicated by the symbol. Use the [ ] and [ ] buttons to move
the cursor to other Pipe Sets, then press [MENU/ENTER] to confirm the new selection and make it usable,
press [EXIT] to avoid the change and leave the currently selected Pipe Set.
To copy a Pipe Set in an other location, follow this procedure:
1. In the main video page press the [MENU/ENTER] button,
2. select the PIPE SET field,
3. select the COPY/RENAME field,
4. select the Pipe Set you want to copy and press the [MENU/ENTER] button,
5. select the location where you wish to place the Pipe Set you are copying.

EN - 11
Quick Guide
Setting the volumes (Levels function)
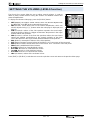
SETTINGS THE VOLUMES (LEVELS function)
The Physis Plus organs allow the user to adjust several volumes, in order to
obtain a perfect sound balance among the sections and between internal and
external amplifications.
To display the volumes video page, press the [LEVELS] button:
MST (Master): the organ’s overall volume, which can also be adjusted with
the [MASTER VOLUME] knob underneath the manuals.
REV (Reverb): reverb effect level on the internal amplification, which can
also be adjusted using [+] / [-] buttons when the main page is displayed (see
page 8).
SUR (Surround): volume of the side speakers expands the sound stage,
giving the feeling of being in a bigger environment. Not present in the organ
models without side speakers.
PRS (Presence): volume of the front side speakers makes the sound more
natural and detailed, emphasizing on the dynamic evolution of the pipes
sound. Not present in the organ models without additional front speakers.
BAL (Balance): stereophonic balance of the side speakers.
EXT (External outputs): general volume of the PROG. OUT connectors of the rear panel.
ERV (External reverb): reverb effect level on the PROG. OUT connectors of the rear panel.
PED (Pedal): pedalboard divisional volume.
II or GRT: Manual II or Great divisional volume.
III or SWL: Manual III or Swell divisional volume.
I or CHR: Manual I or Choir divisional volume.
IV or SOL: Manual IV or Solo divisional volume.
ORC (Orchestra): volume of the orchestral voices.
Press [EXIT] or [LEVELS] or wait about 4 seconds to quit the screen and return to the previous video page.

EN - 12
Quick Guide
Main Menu basic description
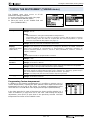
MAIN MENU BASIC DESCRIPTION
The MAIN MENU gives access to all the instrument’s settings.
To access to this menu, in the main video page, press the [MENU/ENTER] button.
The MAIN MENU sections are the following:
Section
Description
TUNING
Instrument’s tuning parameters (see page 15).
PIPE SET
Selection and management of the Pipe Sets.
COMBINATIONS
Selection and management of the Combination Sets.
VOICING
Selection of alternative voices and sound generation parameters adjustment (see page 16).
SETUP
Instrument general settings.
MIDI
MIDI settings.
BACKUP/RESTORE
Save/Load of the entire organ configuration, reset to factory settings.
UTILITY
Accessory functions
Pipe Set menu
The PIPE SET menu contains the following functions:
Function
Description
Select
Selection of a Pipe Set.
Copy/Rename
Copy of a Pipe Set allocating it in one of the available slots and rename.
Restore Default
Reset of a Pipe Set to the initial configuration.
Combinations menu
The COMBINATIONS menu contains the following functions:
Function
Description
Select
Selection of a Combinations Set which consists in a package of all instrument’s combinations.
Copy/Rename
Copy of a Combinations Set allocating it in one of the available slots and rename.
Clear
Deleting the contents of a Combinations Set.
Set/Remove PIN
Enter/delete a security code (PIN) to lock/unlock the editing of a Combinations Set.
Export
Saving a Combinations Set in a USB pen.
Import
Loading a Combinations Set from a USB pen allocating it in one of the available slots.
Reset Main CMB
Reset of the factory Combinations Set.
Setup menu
The SETUP menu consists of four sub-menus containing several functions.
KEYBOARDS menu: manuals and pedalboard settings, contains the following functions:
Function
Description
Velocity
Settings of manuals and pedalboard keys velocity.
Tracker Touch
Settings of Tracker touch simulation.
NOTE
Menus can contain two or more display pages. In this case a or symbol is displayed on the top right of
the video page, indicating the presence of a next or previous page.
NOTE
All the functions of the SETUP sub-menus present in all organ models are described below. Depending on
the model, some of the functions may not be present.

EN - 13
Quick Guide
Main Menu basic description
Tracker Noise
Enable/disable and selection of the tracker noise of manuals and pedalboard keys.
Inversion
Enable/disable and configuration of the Keyboards Inversion function.
1st Short Octave
Enable/disable and configuration of the Short Octave for each manual and pedalboard.
Pist. Combine
Enable/disable and configuration of the Piston Combine function.
Organ Solo
Configuration of [ORGAN SOLO] or [ORG SOLO] thumb piston operating mode.
A.P. Mode
Selection of the [AUTO PEDAL] or [AUTO PED] thumb piston operating mode.
CONTROLS menu: console controls settings, contains the following functions:
Function
Description
ENC Config
Configuration of the [ENC] thumb piston operating mode.
SWS Config
Configuration of the [SWS] thumb piston operating mode.
Swellbox Steps
Selection of the number of steps of the expression pedals.
Crescendo Pedal
Selection of the [CRESCENDO] pedal operating mode.
Link Master Vol.
Selection of the [MASTER VOLUME] knob operating mode.
Orchestra Couplers
Selection of which type of coupler affects the orchestral voices.
COMBINATIONS menu: organ’s combinations operating modes, contains the following functions:
Function
Description
Mem Bank Mode
Selection wheter all combinations or only general combinations have Memory Banks.
MIDI Out Controls in
Combinations
Enable/disable of storing the status of MIDI tab/thumb pistons in the combinations.
MIDI Out Controls
affected by Cancel
Enable/disable to switch off MIDI tab/thumb pistons by [C] or [CANC] thumb piston.
Couplers in Divisional
Combinations
Enable/disable of storing the status (and which type) of couplers in the divisional combinations.
Couplers in
Crescendo
Enable/disable of storing the status (and which type) of couplers in the Crescendo.
Tremulant
parameters in
Combinations
Enable/disable of storing the tremulant parameters in the combinations.
ENC/SWS in
Combinations
Enable/disable of storing the status of [ENC] and [SWS] thumb pistons in the general
combinations.
ENC/SWS affected
by Cancel
Enable/disable to switch off [ENC] and [SWS] thumb pistons by [C] or [CANC] thumb piston.
A.P. in
Combinations
Enable/disable of storing the status of [AUTO PEDAL] or [AUTO PED] thumb piston in the
general combinations.
A.P. affected by
Cancel
Enable/disable to switch off [AUTO PEDAL] or [AUTO PED] thumb piston by [C] or [CANC]
thumb piston.
Speakers in
Combinations
Enable/disable of storing the status of Internal, External, Main, Antiphonal amplifications
switches in the general combinations.
PIPES/DIGITAL in
Combinations
Enable/disable of storing the status of [P/D], [PIPES] e [DIGITAL] thumb piston in the general
combinations.
Orchestra Params in
Combinations
Enable/disable of storing the configuration parameters of orchestral voices in the combinations.
Tutti Mode
Selecting wheter Tutti combination controls stops as a general combination (replaces its content)
or in layered mode (adds its content).
AUDIO menu: audio settings, contains the following functions:
Function
Description
Reverberation
Settings of the Reverb effect.
Int. Amp Equalizer
Settings of the 5-band equalizer of the internal amplification.
Surround Sound
Settings of the side and front speakers.
Ext. Out Volumes
Settings of the volumes of the PROG. OUT audio outputs.
Input to Output
Routing of the audio inputs to the PROG. OUT audio outputs.

EN - 14
Quick Guide
Main Menu basic description
MIDI menu
The MIDI menu contains the following functions, contains the following functions:
Function
Description
TX/RX Channels
Selection of input and output MIDI A and B channels for each organ section.
TX/RX Filters
Enable/disable of input and output MIDI filters.
PRG in Combinations
Store of Program Change and Bank Select MIDI messages in combinations.
Coupled Notes Out
Enable/disable the transmission of MIDI notes generated by couplers.
Backup/Restore menu
The BACKUP/RESTORE menu contains the following functions:
Function
Description
Save Snapshot
Save of the entire organ configuration (Pipe Sets, combinations, settings) in a USB pen.
Load Snapshot
Load the entire organ configuration or single sections (Pipe Sets, combinations, settings) from
a USB pen.
Factory Reset
Restore of the entire organ configuration (Pipe Sets, combinations, settings) to the factory-set
state.
Restore Def. Setting
Restore the instruments settings to the factory-set state.
Utility menu
The UTILITY menu contains the following functions:
Function
Description
System Info
Display of the firmware versions installed in the instrument and other infos.
Op.Sys Upgrade
Upgrade of the instrument’s operating system.
Organ Lock
Set a code to lock out the organ to prevent access to the instrument’s set-up screens and the
modifying / saving of instrument settings, combinations and song recording.
Set Date/Time
Internal date and time setting.
LCD Contrast
Display contrast adjustment.
Shoes Calibration
Expression pedals calibration.

EN - 15
Quick Guide
Tuning the instrument (Tuning menu)
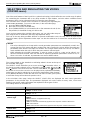
TUNING THE INSTRUMENT (TUNING menu)
The TUNING menu gives access to all the
instrument’s tuning parameters.
To access to this menu, in the main video page,
1. press the [MENU/ENTER] button,
2. place the cursor on the TUNING field and
press [MENU/ENTER].
Parameter name
Description
Transposer
General instrument transposition by semitones.
Settings: -6 to +5
NOTES
- When switched on, the organ’s transposition is always set at 0.
- Transposition does not have any effect on playback of pieces with the internal sequencer
(unlike recording, where the notes are acquired with the current transposition). A specific
transposer is provided for this purpose (see page 19)
Pitch
General fine tuning, indicated as the frequency of A4 (based on a 8’ pitch stop).
Settings: 415,3 Hz (-100 cents) to 466,16 Hz (+100 cents)
[third field on the
display]
(“Equal” in the screen
shown above)
Selector for setting historical temperaments of various periods and countries of origin.
Settings: Equal, Kirnberger II, Werckmeister III, Pythagorean, Meantone 3#, Vallotti, Chaumont,
Kellner 1975, Kirnberger III, Werckmeister IV, Werckmeister V, Silbermann, Meantone 3b,
Meantone Purem3rd, Zarlino, Sauver 1, Sauver 2, Barca, Neidhardt II, Custom 1, Custom 2,
Custom 3, Custom 4
NOTE
Custom temperaments are programmable. See below.
Base Key
Key on which the chain of 12 fifths that make up the temperament starts.
Settings: C to B
Tremulants
Tremolos
Press [MAIN/ENTER] to access to the setting parameters of each tremulant.
Settings: see Reference Manual
Ensemble
Level of tiny natural differences in pitch between one organ pipe and another, simulating the
tuning error that occurs in the organ’s pipes due to wear over time and variations in temperature.
Settings: 0 (pipes perfectly tuned) to 8 (maximum pitch instability)
Air Pressure
Simulates the drop in air pressure when a large quantity of air is requested in a short time (e.g.
when large chords are played with the Tutti). This is reflected in a temporary, gradual drop in
pitch, more evident in the longest, widest pipes (flutes, bourdons, principals).
Settings: 0 (no drop of air pressure) to 8 (maximun drop of air pressure)
Air Supply Conf
Fine adjustment of the AIR PRESSURE parameter.
Settings: see Reference Manual
Programming Custom temperament
In addition to the historical temperaments it is possible to program up to 4
custom temperaments, adjusting the pitch difference with respect to the Equal
temperament for each note of the octave. To program a temperament, select
one of the four CUSTOM items in the display field and press [MENU/ENTER].
In the video page the 12 notes of the octave are shown and the variation in 0.1
cents of semitone in a range from -50 to +50 cents. After making the desired
adjustments, press [EXIT] to store them in the previously selected CUSTOM
temperament and return to the TUNING screen.

EN - 16
Quick Guide
Selecting and regulating the voices (Voicing menu)
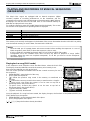
SELECTING AND REGULATING THE VOICES
(VOICING menu)
One of the main features of the Physis Plus synthesis technology is that it offers the user a wide array of options
for customising the instrument with a very large number of organ timbres, and also makes available several
parameters which can be adjusted to further increase the setup potential.
The VOICING menu contains all the functions for selecting and regulating the
voices’ audio parameters. To access to this menu, in the main video page,
1. press the [MENU/ENTER] button,
2. place the cursor on the VOICING field,
3. press [MENU/ENTER] or hold down/out for a few moments the tab (in the
ON position) or drawknob of stop you wish to edit.
Once you have entered the VOICING video page, you can select other stops to
edit, using the tab or drawknob in the same way explained above.
The Led of the stop being modified will flash to prevent modification errors; the stop will be on and can be
played for better, quicker adjustment. Other stops can also be switched on to assess the overall effect of the
changes.
The screen-printed on the drawknob or tab being edited is shown at the top of
the VOICING video page.
The SELECT VOICE field allow you to access to the list of alternative voices. In
this list the currently selected voice is indicated by the symbol. When the [ ]
and [ ] buttons are used to move the cursor to other voices, the symbol will
be moved as soon as the new voice can be played to be evaluated immediately.
Other stops can also be switched on to assess the overall effect of the changes.
Press [MENU/ENTER] to confirm the new voice and make it usable, press [EXIT]
to avoid the change and reselect the previous voice.
In the VOICING video page, below the SELECT VOICE field, are displayed the main sound generation
parameters of the selected stop. The parameters displayed are not the same for every voice, since some
families have specific setting parameters not required for other types of voice.
The settings which can be made are:
Parameter name
Description
Volume
Stop volume.
Settings: -12 dB to +12 dB
Attack
Attack time the sound takes to reach the maximum volume.
Settings: -4 to +4
Tremulant Type
Tremolo Type
Select which tremulant modulates the stop.
Settings:
Off: tremulant is not applied to the stop.
1st: 1st tremulant.
*1st*: 1st tremulant automatically applied to the stop when it will be switched on.
2nd: 2nd tremulant.
*2nd*: 2nd tremulant automatically applied to the stop when it will be switched on.
Tremulant Sens.
Tremolo Sens.
How much the tremulant affect the stop.
Settings: 0 to 8
Ensemble Rescale
Rescaling of the overall ensemble set with the ENSEMBLE parameter (see page 15).
Settings: 0 to 8
NOTES
-
The voices selected for each stop and the sound generation parameters are automatically saved in the
current Pipe Set. This means that when another Pipe Set is recalled, the voices will be reset with new
parameters taken from the last Pipe Set recalled. The changes made earlier are not lost, and will be
made available when the style in which they were made is selected again.
-
While adjusting the VOICING parameters, in order to assign a voice to a stop and to adjust it, we
advice to select the desired voice first and then to adjust its generation parameters. Please do so, as
when a new voice is selected, its parameters are reset to default values.

EN - 17
Quick Guide
Selecting and regulating the voices (Voicing menu)
Character
Harmonic richness.
Settings: -4 to +4
Noise
(only flue voices)
Noise of the air blowing through the pipe.
Settings: -4 to +4
Aeolian Chiff
(not for reed voices)
Chiff noise at the key attack.
Settings: -4 to +4
Celeste Type
(detuned voices only)
Types of beating.
Settings: Orig (original), A-, A+, B-, B+, C-, C+ (different detuning curves)
Celeste Depth
(detuned voices only)
Depth of beating.
Settings: 0 to 8
Mix Brilliance
(mixture voices only)
Mixture brilliance.
Settings: 0 to 8
Ranks Swirl
(mixture voices only)
Random lock/unlock of the pitch between the different pipe ranks.
Settings: 0 to 8
Wavering
(not for mixture voices)
Random pitch variations.
Settings: 0 to 8
Frequency Skew
(reed voices only)
Gradual change of the pitch in the attack and release phases.
Settings: 0 to 8
Release Detune
(not for reed voices)
Gradual change of the pitch in the release phase.
Settings: 0 to 8
Int. Chest
Voices stereophonic reproduction (panning) in the internal amplification.
Settings: C-C#, C#-C, Wing L (left), Wing R (right), Cusp, Dbl Csp (double cusp), Dbl
(double) Wing, Pan L (left), Pan R (right), Center, Poly, Off
Brilliance
(orchestral voices only)
Sound brilliance.
Settings: -8 to 8
Oct. Shift
(orchestral voices only)
Shift the notes played with the stop one octave higher or lower.
Settings: -1 to 1
Sustain
(orchestral voices only)
Sets the status of the sustain pedal. This function is useful for those orchestral voices for
which applying a sustain effect is unrealistic. Select NO to prevent the sustain effect from
affecting the stop.
Settings: YES, NO
Pan
(orchestral voices only)
Stereophonic distribution of the sound.
Settings: -6 (left) to 6 (right)
Split Key
(splitted double orchestral
voices only)
Split point key.
Settings: F2 to E6

EN - 18
Quick Guide
Playing and recording of musical sequences (Sequencer)
PLAYING AND RECORDING OF MUSICAL SEQUENCES
(SEQUENCER)
The Physis Plus organs are equipped with an internal sequencer (digital
recorder) capable of recording performances on the instrument, and the
commands and controls used and MIDI data received through the MIDI [IN] port.
Recordings can then be saved on the USB stick or in the internal memory as
MIDI files and played back at any time.
To recall the sequencer press the [SONG] button beside the display. The screen
for selection of the system’s four operating modes is displayed.
Mode
Description
PLAY
Playing back of the performances saved in the internal memory or the USB pen.
PLAY OPTIONS
Options for playing back songs.
RECORD
Recording of performances.
SONG LIST
Programming of lists of songs.
The memory unit currently used appears in the bottom of the screen. Remember that the USB stick has priority
over the internal memory; to use the latter, first remove the USB stick.
Playing back a song (PLAY mode)
In the sequencer mode selection screen described above, select the PLAY field.
The display shows the MIDI files stored in the memory unit currently in use.
Now select the MIDI file you wish to play back.
The new screen provides information about all the controls necessary for use of
the sequencer:
[MENU/ENTER]: starts playback of the song.
[EXIT]: quits the sequencer.
[ ]: selects the previous song saved in the memory or transferred to a
Songlist.
[ ]: selects the next song saved in the memory or transferred to a Songlist.
[-] (press once): slow down play speed. It can be seen on top left as
percentage (100 in the picture above).
[+] (press once): increase play speed. It can be seen on top left as
percentage (100 in the picture above).
[-] (press and hold): rewind.
[+] (press and hold): fast forward.
Once the playback of a song has been started, the display changes, the functions of the [MENU/ENTER] and
[EXIT] buttons have changed to:
[MENU/ENTER]: pause /restart playback of the piece.
[EXIT]: stop playback of the piece.
[ ], [ ], [-], [+] keep the functions already described.
NOTES
-
Once the USB pen is inserted please wait some seconds before recalling the sequencer. In case of
failed recognition, press [EXIT] to leave the sequencer, then re-enter
-If using a USB pen, remember to format it with FAT or FAT32 (no NTFS) file system.
-
Transposition set in the TUNING menu does not have any effect on playback of songs (unlike
recording, where the notes are acquired transposed). To do this you have to set the transposer
described at page 19.
La pagina si sta caricando...
La pagina si sta caricando...
La pagina si sta caricando...
La pagina si sta caricando...
La pagina si sta caricando...
La pagina si sta caricando...
La pagina si sta caricando...
La pagina si sta caricando...
La pagina si sta caricando...
La pagina si sta caricando...
La pagina si sta caricando...
La pagina si sta caricando...
La pagina si sta caricando...
La pagina si sta caricando...
La pagina si sta caricando...
La pagina si sta caricando...
La pagina si sta caricando...
La pagina si sta caricando...
La pagina si sta caricando...
La pagina si sta caricando...
La pagina si sta caricando...
La pagina si sta caricando...
La pagina si sta caricando...
La pagina si sta caricando...
La pagina si sta caricando...
La pagina si sta caricando...
La pagina si sta caricando...
La pagina si sta caricando...
-
 1
1
-
 2
2
-
 3
3
-
 4
4
-
 5
5
-
 6
6
-
 7
7
-
 8
8
-
 9
9
-
 10
10
-
 11
11
-
 12
12
-
 13
13
-
 14
14
-
 15
15
-
 16
16
-
 17
17
-
 18
18
-
 19
19
-
 20
20
-
 21
21
-
 22
22
-
 23
23
-
 24
24
-
 25
25
-
 26
26
-
 27
27
-
 28
28
-
 29
29
-
 30
30
-
 31
31
-
 32
32
-
 33
33
-
 34
34
-
 35
35
-
 36
36
-
 37
37
-
 38
38
-
 39
39
-
 40
40
-
 41
41
-
 42
42
-
 43
43
-
 44
44
-
 45
45
-
 46
46
-
 47
47
-
 48
48


Viscount Domus P45 Manuale del proprietario
- Categoria
- Pianoforti digitali
- Tipo
- Manuale del proprietario
in altre lingue
- English: Viscount Domus P45 Owner's manual
Documenti correlati
-
Viscount Opera 200 Manuale del proprietario
-
Viscount Cantorum Dou Manuale utente
-
-
-
-
-
Viscount Sonus 60 Manuale del proprietario
-
-
-