

2
GB
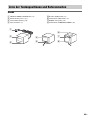
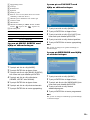
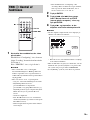
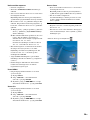
This product is to be used indoor only.
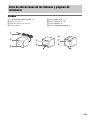
Do not install the appliance in a confined space, such
as a bookcase or built-in cabinet.
The nameplate is located on the bottom exterior.
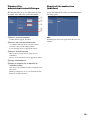
CAUTION
Danger of explosion if battery is incorrectly replaced.
Replace only with the same or equivalent type
recommended by the manufacturer. Discard used
batteries according to the manufacturer’s instructions.
Don’t throw away the battery with
general house waste, dispose of it
correctly as chemical waste.
Batteries or batteries installed apparatus shall not be
exposed to excessive heat such as sunshine, fire or the
like.
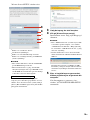
Notice for the customers in Europe
Hereby, Sony Corporation, declares that this TDM-
NC1 Wireless Network Audio Adapter is in
compliance with the essential requirements and other
relevant provisions of Directive 1999/5/EC. For
details, please access to the following URL:
http://www.compliance.sony.de/
This product is intended to be used in the following
countries;
United Kingdom, Republic of Ireland, Federal
Republic of Germany, Republic of Poland, Republic of
Hungary, Czech Republic, Slovak Republic, Republic
of Italy, Kingdom of Sweden, Kingdom of Denmark,
Republic of Finland, Kingdom of Norway, Republic of
Lithuania, Republic of Latvia, Republic of Estonia,
Kingdom of the Netherlands, Spain, Hellenic
Republic, Romania, Republic of Slovenia, French
Republic, Kingdom of Belgium, Republic of Portugal,
Swiss Confederation, Republic of Austria, Republic of
Turkey
Disposal of Old Electrical &
Electronic Equipment
(Applicable in the European
Union and other European
countries with separate
collection systems)
This symbol on the product or on its packaging
indicates that this product shall not be treated as
household waste. Instead it shall be handed over to the
applicable collection point for the recycling of
electrical and electronic equipment. By ensuring this
product is disposed of correctly, you will help prevent
potential negative consequences for the environment
and human health, which could otherwise be caused by
inappropriate waste handling of this product. The
recycling of materials will help to conserve natural
resources. For more detailed information about
recycling of this product, please contact your local
Civic Office, your household waste disposal service or
the shop where you purchased the product.
The manufacturer of this product is Sony Corporation,
1-7-1 Konan Minato-ku Tokyo, 108-0075 Japan. The
Authorized Representative for EMC and product
safety is Sony Deutschland GmbH, Hedelfinger
Strasse 61, 70327 Stuttgart, Germany. For any service
or guarantee matters please refer to the addresses given
in separate service or guarantee documents.
Notice for the customers in the U.S.A.
Owner’s Record
The model and serial numbers are located on the
bottom of the unit. Record the serial number in the
space provided below. Refer to them whenever you
call upon your Sony dealer regarding this product.
Model No. TDM-NC1
Serial No. ______________
This transmitter must not be co-located or operated in
conjunction with any other antenna or transmitter.
This equipment complies with FCC radiation exposure
limits set forth for uncontrolled equipment and meets
the FCC radio frequency (RF) Exposure Guidelines in
Supplement C to OET65. This equipment should be
installed and operated with at least 20cm and more
between the radiator and person’s body (excluding
extremities: hands, wrists, feet and ankles).
WARNING
This equipment has been tested and found to comply
with the limits for a Class B digital device, pursuant to
Part 15 of the FCC Rules. These limits are designed to
provide reasonable protection against harmful
interference in a residential installation. This
equipment generates, uses, and can radiate radio
frequency energy and, if not installed and used in
accordance with the instructions, may cause harmful
interference to radio communications. However, there
is no guarantee that interference will not occur in a
particular installation. If this equipment does cause
harmful interference to radio or television reception,
which can be determined by turning the equipment off
and on, the user is encouraged to try to correct the
interference by one or more of the following measures:
WARNING

3
GB
– Reorient or relocate the receiving antenna.
– Increase the separation between the equipment and
receiver.
– Connect the equipment into an outlet on a circuit
different from that to which the receiver is
connected.
– Consult the dealer or an experienced radio/TV
technician for help.
CAUTION
You are cautioned that any changes or modifications
not expressly approved in this manual could void your
authority to operate this equipment.
FCC RECOMMEND
The shielded interface cable recommended in this
manual must be used with this equipment in order to
comply with the limits for a digital device pursuant to
Subpart B of Part 15 of FCC Rules.
If you have any questions about this product, you may
call;
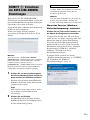
Sony Customer Information Services Center
1-800-222-7669 or http://www.sony.com/
The Number below is for the FCC related matters only.
Regulatory Information
Notice for the customers in Canada
This class B digital apparatus complies with Canadian
ICES-003.
This device complies with RSS-Gen of IC Rules.
Operation is subject to the following two conditions:
(1) this device may not cause interference, and (2) this
device must accept any interference, including
interference that may cause undesired operation of this
device.
This equipment complies with IC radiation exposure
limits set forth for uncontrolled equipment and meets
RSS-102 of the IC radio frequency (RF) Exposure
rules. This equipment should be installed and operated
with at least 20cm and more between the radiator and
person’s body (excluding extremities: hands, wrists,
feet and ankles).
On Copyrights
• M-crew Server and the M-crew Server logo are
trademarks or registered trademarks of Sony
Corporation.
• Microsoft, Windows, Windows Vista and Windows
Media are trademarks or registered trademarks of
Microsoft Corporation in the United States and/or
other countries.
• All other trademarks and registered trademarks are
trademarks or registered trademarks of their
respective holders. In this manual, TM and ® marks
are not specified.
• Adobe, the Adobe logo, and Reader are either
registered trademarks or trademarks of Adobe
Systems Incorporated in the United States and/or
other countries.
Declaration of Conformity
Trade Name: SONY
Model No.: TDM-NC1
Responsible Party: Sony Electronics Inc.
Address:
16530 Via Esprillo,
San Diego, CA 92127 U.S.A.
Telephone No.: 858-942-2230
This device complies with Part 15 of the FCC Rules.
Operation is subject to the following two
conditions.:
(1) This device may not cause harmful interference,
and (2) this device must accept any interference
received, including interference that may cause
undesired operation.
For the state of California, USA only
Perchlorate Material - special handling may apply,
see www.dtsc.ca.gov/hazardouswaste/perchlorate
Perchlorate Material: Lithium battery contains
perchlorate

4
GB
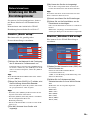
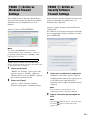
About TDM-NC1 manual....................... 5
Overview ................................................ 6
Getting Started
STEP 1: Checking supplied items...... 10
STEP 2: Installing the supplied M-crew
Server Ver. 2.5 software................. 10
STEP 3: Making the AUTO LINK
FOLDER Settings .......................... 12
STEP 4: Making the Windows Firewall
Settings........................................... 13
STEP 5: Making the Security Software
Firewall Settings............................. 13
STEP 6: Installing the TDM-NC1...... 14
STEP 7: Connecting the TDM-NC1 to
the network..................................... 16
STEP 8: Checking the Operation ....... 20
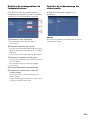
Listening to Music
Registering tracks to the M-crew Server
Ver. 2.5........................................... 22
Listening to music stored on your
computer......................................... 22
— MUSIC SURFIN’
Listening to music in a playlist............. 24
— PLAYLIST
Listening to music in a favorite
playlist............................................ 25
— FAVORITE PLAYLIST
Registration/FAVORITE
PLAYLIST Play
Listening to the same music in different
rooms.............................................. 26
— PARTY MODE
Viewing information in the display...... 27
Listening to Web Radio
Listening to web radio using M-crew
Server Ver. 2.5 ............................... 28
— WEB RADIO
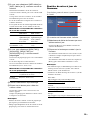
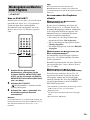
Operating the Unit by the
Connected AV System
Operating the unit by the AV system’s
buttons and remote......................... 29
Operating by the on-screen display.......29
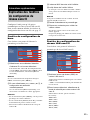
Advanced Network Settings
Using the network menu .......................31
Selecting another server........................31
Making network settings manually.......32
Restarting the network unit...................32
Naming the unit
(My Name function) .......................32
Registering the TDM-NC1 on your
computer manually .........................33
Checking network settings....................33
Troubleshooting
Problems and remedies .........................34
Messages ...............................................35
Additional Information
Explanation of wireless setup windows 37
Glossary ................................................40
Precautions............................................41
Specifications........................................41
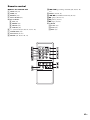
List of button locations and reference
pages ...............................................42
Table of Contents
Check the following website for TDM-NC1’s
latest information, FAQ (Frequently Asked
Questions), and firmware updates;
USA:
http://esupport.sony.com/?ref=http%3A//
www.sony.com/index.php
Canada:
http://www.sony.ca/sonyca/view/english/
warranty/consumer_support.shtml
Europe:
http://support.sony-europe.com/main/
main.asp?l=en

5
GB
TDM-NC1 contains the following manuals.
Refer to them as required by the operation.
TDM-NC1 Quick Setup Guide
This guide explains how to install M-crew
Server and setup the TDM-NC1.
TDM-NC1 Operating Instructions
(this manual)
This manual is included on the supplied CD-
ROM.
It explains the operations of the TDM-NC1
itself.
This manual mainly explains operations using
the remote.
“M-crew Server Ver. 2.5”
Installation Instructions
This Installation Instructions is included on the
supplied CD-ROM.
It explains how to install the supplied “M-crew
Server Ver. 2.5” software on your computer.
“M-crew Server Ver. 2.5” Help
This help manual can be used only after the “M-
crew Server Ver. 2.5” software is installed.
It explains the operations of the “M-crew Server
Ver. 2.5” software which is included on the
same CD-ROM.
About TDM-NC1 manual

6
GB
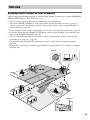
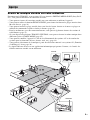
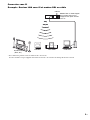
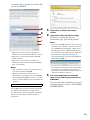
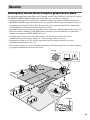
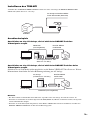
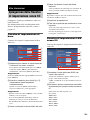
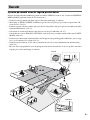
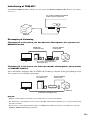
Enjoying music stored on your computer
You can enjoy the following functions by connecting the TDM-NC1 and an AV system with DIGITAL
MEDIA PORT interface (Sony DAV series, etc.).
• You can listen to music stored on your computer by operating the unit.
• You can use MUSIC SURFIN’ to easily enjoy tracks registered to M-crew Server* (page 22).
• You can register the current track to your favorite playlist and play tracks using quick and easy
remote operations (page 24).
• For the computers with internet connections, you can also enjoy listening to web radio (page 28).
• If you have more than one TDM-NC1/CPF-IX001, you can enjoy listening to the same music in
different rooms (PARTY MODE, page 26).
• You can control the unit with an AV system’s remote and the buttons on the system for basic
operations (play, stop, etc.) (page 23).
• You can select music from the TV connected to an AV system (On-screen display function,
page 29).
* M-crew Server software is a computer application for enjoying music files stored on a computer
using the unit.
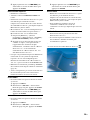
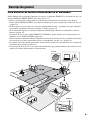
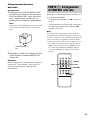
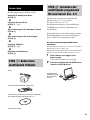
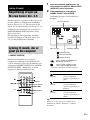
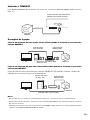
Overview
Internet
TDM-NC1

7
GB
Note
If you perform an operation (recording, file importing, using other applications, etc.) that places a load on the server
computer while playing back a track registered to the server computer, the sound may skip. In addition, the sound
may also skip depending on the network status.
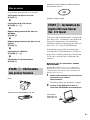
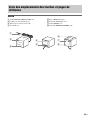
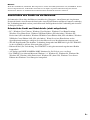
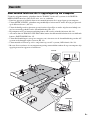
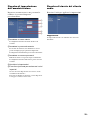
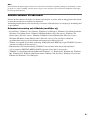
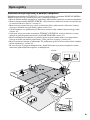
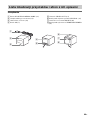
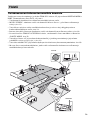
Connecting the unit to the network
You can connect the unit to your computer using the Ethernet port of your computer, a router with a
built-in network switch, a network switching device, or wireless LAN router.
The connection method may vary depending on your network. Connection with a personal computer is
described here as an example.
Required equipment and accessories (not supplied)
• Personal computer* (Windows Vista Ultimate, Windows Vista Business, Windows Vista Home
Premium, Windows Vista Home Basic, Windows XP Home Edition (SP2 or higher), Windows XP
Professional (SP2 or higher), Windows XP Media Center Edition 2004 (SP2 or higher), Windows
XP Media Center Edition 2005 (SP2 or higher)). For further required specification details, refer to
the M-crew Server Installation Instructions.
• Wireless access point (For wireless connection. Compatible with IEEE 802.11g/b. TDM-NC1
cannot use a wireless ad-hoc network.)
• Ethernet cable (For wired connection. TDM-NC1 is compatible with cross cable and straight cable.)
• AV system with DIGITAL MEDIA PORT interface (Sony DAV series, etc.)
* TDM-NC1 is not compatible with Microsoft Windows 3.1, Windows 95, Windows 98, Windows
Me, Windows NT, Windows 2000 Professional, Windows XP (prior to SP2), Windows Vista Starter
Edition or Windows Vista Enterprise.

8
GB
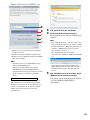
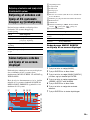
Wired connection
Example: DSL or cable modem equipped with a built-in router (without
network switch ports)
Internet
DSL or cable
modem with a
built-in router*
Hub
Network cable
(not supplied)
To LAN port
TDM-NC1
CPF-IX001 Computer
* Connections may vary depending on your network.
AV system
(DAV, etc.)

9
GB
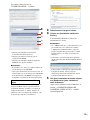
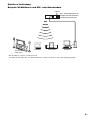
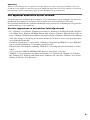
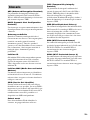
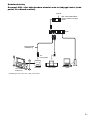
Wireless connection
Example: Wireless LAN router and DSL or cable modem
Internet
DSL or cable modem with a
built-in wireless LAN router
and wireless access point*
* Connections may vary depending on your network.
If your modem does not have a wireless function, you need a wireless access point.
TDM-NC1
CPF-IX001 Computer
AV system
(DAV, etc.)

10
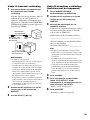
GB
The setup procedure is below.
Check the Supplied Items
(STEP
1)
m
Install M-crew Server
(STEP
2 – 3)
m
Make the Windows Firewall Settings
(STEP
4)
m
Make the Software Firewall Settings
(STEP
5)
m
Set up TDM-NC1
(STEP
6 – 7)
m
Check the Operations
(STEP
8)
You must first install the supplied M-crew
Server Ver. 2.5 software on your computer.
For details on the installation, refer to the
“M-crew Server Ver. 2.5” Installation
Instructions contained on the supplied CD-
ROM.
Installation may take some time depending on
the environment. A progress bar is displayed
while installation is underway. Wait until the
installation is finished.
Note for NAS-CZ1/CPF-IX001 users
Install M-crew Server Ver. 2.5 without uninstalling
M-crew Server Ver. 1.0 or 2.0. The contents
information can be used even after installing M-crew
Server Ver. 2.5.
1 Turn on your computer and login as an
administrator.
Wait for Windows to load.
2 Insert the supplied CD-ROM into the
CD-ROM drive of your computer.
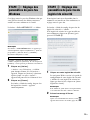
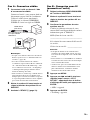
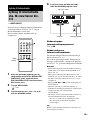
Getting Started
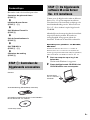
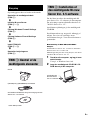
STEP 1: Checking
supplied items
Unit
Remote (RM-ANU010) with battery
TDM-NC1 Operating Instructions/M-crew Server Ver.
2.5 software CD-ROM
Quick Setup Guide
STEP 2: Installing the
supplied M-crew Server
Ver. 2.5 software
M-crew Server
Ver. 2.5 software
CD-ROM

11
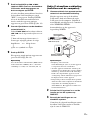
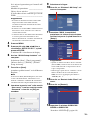
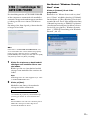
GB
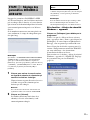
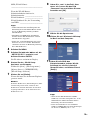
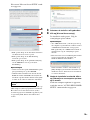
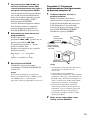
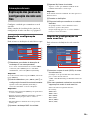
The “M-crew Server SETUP” window will
appear.
1)
Click to display the M-crew Server Installation
Instructions.
2)
Click to start up the WLAN Setup Assistant.
3)
Click to display the TDM-NC1 Operating
Instructions (this manual).
Notes
• If the window does not open, double-click the
CD-ROM Setup.exe icon.
• When the installation is still in progress, do not
interrupt the operation or take CD-ROM out of
the CD-ROM drive. Doing so may render it
impossible to install the software thereafter.
The “Auto Play”
window appears, click [Run
setup.exe] to install the program. Then, the “User
Account Control” (UAC) window appears, click
[Allow]. If you click [Cancel], you will not be
able to start the installation.
3 Select the language to be used.
4 Click [M-crew Server setup].
The installation starts. Follow the on-screen
instructions.
Notes
• If “.NET Framework” (2.0 or higher) is not
installed on your computer, the “.NET
Framework Installer” window appears. Click
[Install] to install “.NET Framework 2.0” and
follow the displayed instructions.
• A warning window may appear during
installation of Windows Media Format SDK
9.5.
To continue installing, click [OK]. For details,
refer to the M-crew Server Installation
Instructions “Installing M-crew Server”.
5 After the installation is completed,
click [Reboot] to restart your computer.
After restarting your computer, the “AUTO
LINK FOLDER SETUP” window appears
automatically.
For Windows Vista users
3
4
1)
2)
3)

12
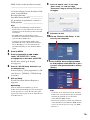
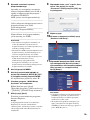
GB
When the AUTO LINK FOLDER settings are
completed, all supportable music files in the
folder and the sub folder that exist on the path
indicated in the window are automatically
imported to M-crew Server.
If many songs are stored on your computer,
loading time may take longer.
Note
If the “AUTO LINK FOLDER SETUP” window does
not automatically appear after rebooting, click [Start] –
[All Programs] – [M-crew Server] – [TOOLS] –
[AUTO LINK] in that order. In this case, [Next] and
[Skip] become [OK] and [Cancel].
1 Click to place a check next to the
directory path that contains the files to
be loaded.
Click again to remove checks next to paths
that are not to be loaded.
Tip
Sub-folders of the selected folder are also subject
to the AUTO LINK function.
2 Click [Next].
The music files located in the checked
directory path(s) are loaded automatically.
The “User Account Control” (UAC) window
appears, click [Allow]. If you click [Cancel], you
will not be able to start the installation.
Note
All supportable music files that exist in the path
indicated in the window are automatically
imported to M-crew Server.
If the “Windows Security Alert”
window appears
Click [Unblock] to unblock the program.
Make sure that the “M-crew Server task tray
icon” appears in “Name”, then click [Unblock].
If you click [Keep Blocking], you will be unable
to use M-crew Server. For details, refer to
“Registering the TDM-NC1 on your computer
manually” in the M-crew Server Installation
Instructions.
In some cases, the “Windows Security Alert”
window appears in “STEP 4: Making the
Windows Firewall Settings” (page 13).
STEP 3: Making the AUTO
LINK FOLDER Settings
For Windows Vista users

13
GB
This setting opens the Windows Firewall so you
can enjoy music files stored on your computer
via the unit.
The “ICF SETTINGS” window appears.
Note
If the “ICF SETTINGS” window does not
automatically appear, click [Start] – [All Programs] –
[M-crew Server] – [TOOLS] – [ICF Settings] in that
order.
The “User Account Control” (UAC) window appears,
click [Allow]. If you click [Cancel], you will not be
able to start the installation.
1 Click [Enable].
“Enable” or “Disable” appears for each
item. If “Disable” appears, click [Enable]
repeatedly until “Enable” appears for all
status items.
2 Click [Close].
The “Security software Firewall setting
guide” window appears automatically.
If commercially available anti-virus software is
installed on your computer, this setting opens
the Firewall.
The “Security software Firewall setting guide”
window appears.
If the security software is not installed on your
computer, click [Close] then go to STEP 6.
1 Click your security software.
The web browser is activated, and the
setting guide of your security software
appears. If your security software is not on
the list, click [Other security software].
Note
To display the guide (web browser), your
computer needs to be connected to the Internet.
2 Follow the on-screen message.
Note
After installing the M-crew Server, the task
tray icon appears on the taskbar (page 36).
STEP 4: Making the
Windows Firewall
Settings
For Windows Vista users
STEP 5: Making the
Security Software
Firewall Settings

14
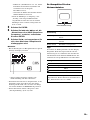
GB
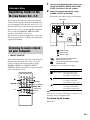
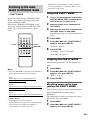
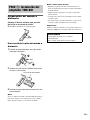
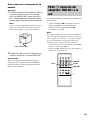
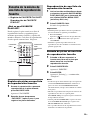
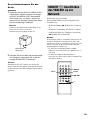
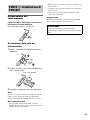
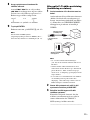
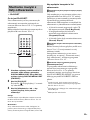
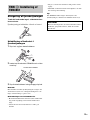
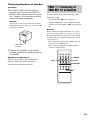
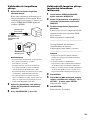
Preparing the remote
Pull out the insulating sheet to allow power
to flow from the battery.
The remote already contains a battery.
To replace the battery in the
remote
1 Slide out and remove the battery case.
2 Insert a new lithium battery CR2025 with the
+ side facing up.
3 Slide the battery case back in.
Note
If you do not use the remote for a long period of time,
remove the battery to avoid possible damage from
battery leakage and corrosion.
Notes on lithium battery
• Keep the lithium battery out of the reach of children.
Should the battery be swallowed, immediately
consult a doctor.
• Wipe the battery with a dry cloth to assure a good
contact.
• Be sure to observe the correct polarity when
installing the battery.
• Do not hold the battery with metallic tweezers,
otherwise a short-circuit may occur.
Tip
When the remote can no longer operate the TDM-NC1,
replace the battery with a new one.
STEP 6: Installing the
TDM-NC1
A lithium battery CR2025
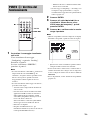
WARNING
Battery may explode if you mistreated.
Do not recharge, disassemble or dispose of in fire.

15
GB
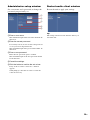
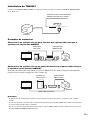
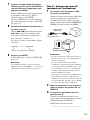
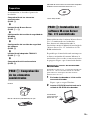
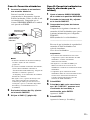
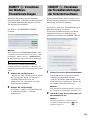
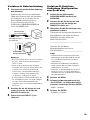
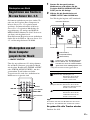
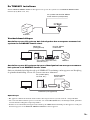
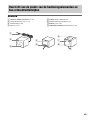
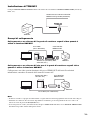
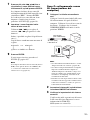
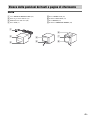
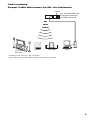
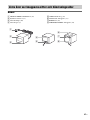
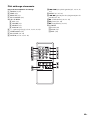
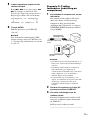
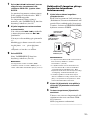
Installing the TDM-NC1
Connect the DIGITAL MEDIA PORT of the unit to an AV system with DIGITAL MEDIA PORT interface (Sony
DAV series, etc.).
Connection examples
Connecting to an AV system which can output video signals when the system is
in DMPORT function
Connecting to an AV system which cannot output video signals when the
system is in DMPORT function
Connect a video cable (not supplied) to the VIDEO OUT jack of the unit. Refer to the user’s guide of
your AV system for further information.
Notes
• The unit turns on/off automatically whenever the connected AV system turns on/off.
• When connecting a video cable to a TV that has a SCART (EURO AV) jack, use a commercially available
conversion connector.
• When connecting a video cable (not supplied) to the VIDEO OUT jack of the unit, no image is output from the
DIGITAL MEDIA PORT cable of the unit.
DMPORT
AV system with DIGITAL MEDIA
PORT interface (back panel)
TDM-NC1
DIGITAL MEDIA
PORT cable
TDM-NC1
Video cable
(not supplied)
TV AV system (Sony DAV series,
STR series, etc.)
DIGITAL MEDIA
PORT cable
TDM-NC1
AV system (Sony
HT series, etc.)
TV
Video cable (not supplied)

16
GB
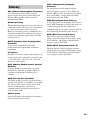
To connect/disconnect the unit
Connecting
1 Connect the DIGITAL MEDIA PORT cable
of this unit to the AV system with DIGITAL
MEDIA PORT interface (Sony DAV series,
etc.). Make sure the AV system is turned off
before connecting.
Note
According to your area’s TV system, switch the
NTSC/PAL selector on the bottom of the unit.
2 Turn on the AV system connected to the
unit, and switch the AV system function to
DMPORT.
Disconnecting
Before disconnecting, turn off the AV system.
Otherwise, this unit cannot backup settings
correctly.
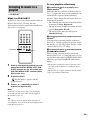
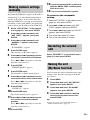
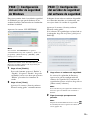
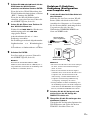
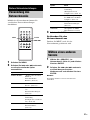
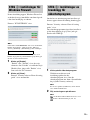
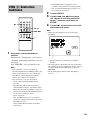
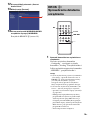
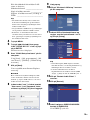
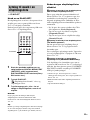
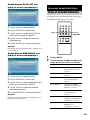
Select your desired network setting from the
following three options.
– Wired setting , select Case A.
– Wireless setting (but the unit is not installed
near computer) , select Case B.
Note
You can set up the wireless setting by starting your
computer web browser. See Case C (page 18). Also, if
your wireless access point settings are applied under
one of the following settings, you need to select Case
C.
– If you set wireless network key (WEP key) to other
than “WEP key No. 1”.
– If you set the access point’s SSID not to transmit
(stealth mode).
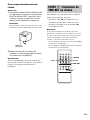
NTSC/PAL
selector
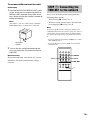
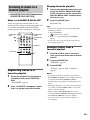
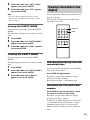
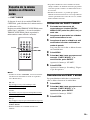
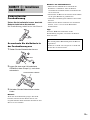
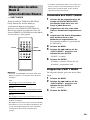
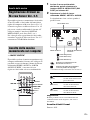
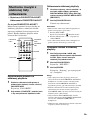
STEP 7: Connecting the
TDM-NC1 to the network
+/–
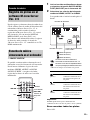
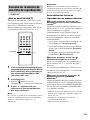
./>
ENTER
MENU
m/M

17
GB
Case A: Wired connection
1 Connect the unit to the network using a
wired connection.
Connect the unit to your router (hub) or
directly to the LAN port of the computer.
Use the network cable (not supplied).
Check that the WIRELESS/WIRED
selector on the unit is set to WIRED.
Notes
• When using the unit with a fixed IP address,
refer to “Advanced Network Settings”
(page 31).
• When connecting the unit to the computer
directly, set the IP address of computer to
“Automatic Private IP Addressing”. After
turning on the computer, “Configuring” appears
in the unit display window for a few minutes.
• In some cases, a message indicating that the
connection is limited, or not available, will
appear in the lower right portion of the
computer; however, the unit will operate
normally.
2 Turn on the AV system, and set the AV
system’s function to DMPORT.
3 Go to STEP 8 (page 20).
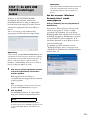
Case B: Wireless connection
(setting up by the unit)
1 Set the WIRELESS/WIRED selector on
the unit to WIRELESS.
2 Turn on the AV system, and set the AV
system’s function to DMPORT.
3 Confirm the settings of your wireless
system.
Check the following items of your wireless
LAN router to set the same information for
the TDM-NC1.
SSID (Wireless Network Name):
________________________________________
If your wireless LAN router security is
enabled,
Wireless Network Key:
__________________
Tips
• For details on how to check the wireless LAN
router settings, refer to the operation manual of
your wireless LAN router.
• In some case, SSID name and wireless network
key numbers/characters are often written on the
wireless LAN router.
• Check that your wireless LAN router uses the
latest firmware version. For details, refer to the
operation manual of your wireless LAN router.
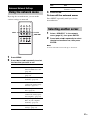
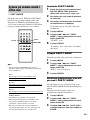
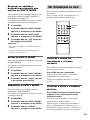
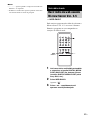
4 Press MENU.
5 Press . or > repeatedly until “Wi-
Fi SETUP?” appears in the unit display
window, then press ENTER.
“SSID?” appears.
6 Press ENTER.
“Searching” appears.
7 Press . or > repeatedly until your
wireless LAN router SSID name
appears, then press ENTER.
If you set the wireless network key in the
wireless LAN setting, “KEY?” appears.
Press ENTER.
If you do not set the wireless network key,
the unit restarts, go to STEP 8 (page 20).
WIRELESS
WIRED
Network cable
(not supplied)
To router (hub)
or LAN port of
the computer
To LAN port
WIRELESS/
WIRED selector

18
GB
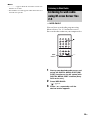
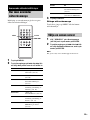
8 Enter the wireless network key
numbers/characters.
Use . / > to choose the character,
m / M to skip entered digits.
Also you can choose letter types using +/–.
Letter types changes as shown below:
9 Press ENTER.
The unit restarts, go to STEP 8 (page 20).
Note
If you set wireless network key (WEP key) to
other than “WEP key No. 1”, you need to select
the Case C connection (page 18).
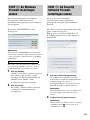
Case C: Wireless connection
(setting up by the computer)
1 Connect the unit to the network using a
wired connection.
Connect the unit to your wireless LAN
router (hub) or directly to the LAN port of
the computer. Use the network cable (not
supplied). Check that the WIRELESS/
WIRED selector on the unit is set to
WIRED.
Notes
• When using the unit with a fixed IP address,
refer to “Advanced Network Settings”
(page 31).
• When connecting the unit to the computer
directly, set the IP address of computer to
“Automatic Private IP Addressing”. After
turning on the computer, “Configuring” appears
in the unit display window for a few minutes.
• In some cases, a message indicating that the
connection is limited, or not available, will
appear in the lower right portion of the
computer; however, the unit will operate
normally.
2 Turn on the AV system, and set the AV
system’s function to DMPORT.
3 Confirm the settings of your wireless
system.
Check the following items of your wireless
LAN router to set the same information for
the TDM-NC1.
SSID (Wireless Network Name):
________________________________________
upper case y lower case
YY
space y symbol y number
WIRELESS
WIRED
Network cable
(not supplied)
To wireless LAN
router (hub)
To LAN port
WIRELESS/
WIRED selector

19
GB
If your wireless LAN router security is
enabled,
Security mode:
_________________________
Wireless Network Key:
__________________
Wireless Network Key No. (when using
WEP):
_________________________________
Tips
• For details on how to check the wireless LAN
router settings, refer to the operation manual of
your wireless LAN router.
• In some case, SSID name and wireless network
key numbers/characters are written on the
wireless LAN router.
• Check that your wireless LAN router uses the
latest firmware version. For details, refer to the
operation manual of your wireless LAN router.
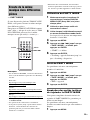
4 Press MENU.
5 Press . or > repeatedly until
“SETUP BY PC?”appears, then press
ENTER.
The IP address appears in the display.
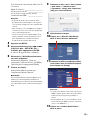
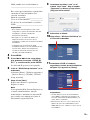
6 Start up the “WLAN Setup Assistant”
on your computer.
Select [Start] - [All Programs] - [M-crew
Server] - [TOOLS] - [WLAN Setup
Assistant].
7 Click [Next].
Wait a moment for Internet Explorer to start
up.
Note
If the web browser (Internet Explorer) does not
start up automatically, start up the web browser
manually, and enter the IP address displayed on
the unit in the address bar of the web browser.
8 Enter the word “root” in the box
marked “User name”. Leave the box
marked “Password” blank, and click
[OK] to login.
9 Select the language.
10Click “Wireless LAN Setup” in the
Menu on your computer.
11Enter the SSID, Security mode and
wireless network key that you checked
in step 3, and click [Setup].
Tips
• When using wireless network key (WEP Key),
check that the wireless LAN router Key No. and
the above setting match.
• In most cases, only one wireless network key
(WEP Key) number is required, in which case
add this to “WEP Key No. 1”.
12Click “Restart Audio Client” in the
Menu.
13Click [Restart].
14Set the WIRELESS/WIRED selector to
WIRELESS.
Go to STEP 8 (page 20).

20
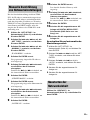
GB
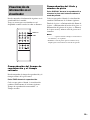
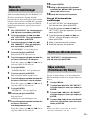
1 Make sure the display message of the
unit.
The message “Configuring” appears, then
“Loading” follows and then disappears. Go
to step 4.
If “SERVER?” appears, go to step 2.
Notes
• If “Check Net” appears, check the network
settings in STEP 7. Or, the wireless signal may
be weak or out of range, move the unit closer to
the wireless access point.
• If “No Server” appears, do the following;
– Make sure the Firewall setting are correct.
– Right click the M-crew Server task tray icon
in the computer’s task tray, then select [Stop
Music Service], and right click the icon
again. Then, select [Start Music Service] to
restart the M-crew Server.
– Restart your computer.
– Execute “DataBaseClear.exe” to initialize
the database (usually located in C:\Program
Files\Mcrewserver).
– Input the wireless network key numbers/
characters again.
• If the “Configuring” or “Loading” messages do
not disappear after a few minutes, or other
messages mentioned above appear, see page 35.
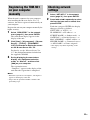
2 Press ENTER.
3 Press . or > repeatedly until
“Mcrew Server v2 on XXXX (your
computer name)” appears, then press
ENTER.
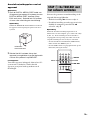
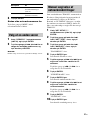
4 Press N and check that music or
sample music is played.
Notes
• When playing the sample music, the unit display is
shown below.
* This icon appears when connecting the unit by
wireless connection.
• If no sound is heard, check if the connected AV
system’s volume is set to zero, or the AV system’s
function is set to other than DMPORT.
• If you have a problem, see “Troubleshooting”
(page 34).
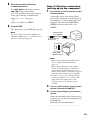
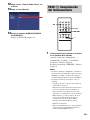
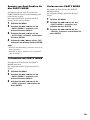
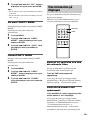
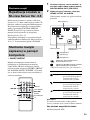
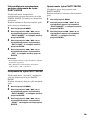
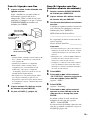
STEP 8: Checking the
Operation
./>
ENTER
+/–
N
*
La pagina si sta caricando...
La pagina si sta caricando...
La pagina si sta caricando...
La pagina si sta caricando...
La pagina si sta caricando...
La pagina si sta caricando...
La pagina si sta caricando...
La pagina si sta caricando...
La pagina si sta caricando...
La pagina si sta caricando...
La pagina si sta caricando...
La pagina si sta caricando...
La pagina si sta caricando...
La pagina si sta caricando...
La pagina si sta caricando...
La pagina si sta caricando...
La pagina si sta caricando...
La pagina si sta caricando...
La pagina si sta caricando...
La pagina si sta caricando...
La pagina si sta caricando...
La pagina si sta caricando...
La pagina si sta caricando...
La pagina si sta caricando...
La pagina si sta caricando...
La pagina si sta caricando...
La pagina si sta caricando...
La pagina si sta caricando...
La pagina si sta caricando...
La pagina si sta caricando...
La pagina si sta caricando...
La pagina si sta caricando...
La pagina si sta caricando...
La pagina si sta caricando...
La pagina si sta caricando...
La pagina si sta caricando...
La pagina si sta caricando...
La pagina si sta caricando...
La pagina si sta caricando...
La pagina si sta caricando...
La pagina si sta caricando...
La pagina si sta caricando...
La pagina si sta caricando...
La pagina si sta caricando...
La pagina si sta caricando...
La pagina si sta caricando...
La pagina si sta caricando...
La pagina si sta caricando...
La pagina si sta caricando...
La pagina si sta caricando...
La pagina si sta caricando...
La pagina si sta caricando...
La pagina si sta caricando...
La pagina si sta caricando...
La pagina si sta caricando...
La pagina si sta caricando...
La pagina si sta caricando...
La pagina si sta caricando...
La pagina si sta caricando...
La pagina si sta caricando...
La pagina si sta caricando...
La pagina si sta caricando...
La pagina si sta caricando...
La pagina si sta caricando...
La pagina si sta caricando...
La pagina si sta caricando...
La pagina si sta caricando...
La pagina si sta caricando...
La pagina si sta caricando...
La pagina si sta caricando...
La pagina si sta caricando...
La pagina si sta caricando...
La pagina si sta caricando...
La pagina si sta caricando...
La pagina si sta caricando...
La pagina si sta caricando...
La pagina si sta caricando...
La pagina si sta caricando...
La pagina si sta caricando...
La pagina si sta caricando...
La pagina si sta caricando...
La pagina si sta caricando...
La pagina si sta caricando...
La pagina si sta caricando...
La pagina si sta caricando...
La pagina si sta caricando...
La pagina si sta caricando...
La pagina si sta caricando...
La pagina si sta caricando...
La pagina si sta caricando...
La pagina si sta caricando...
La pagina si sta caricando...
La pagina si sta caricando...
La pagina si sta caricando...
La pagina si sta caricando...
La pagina si sta caricando...
La pagina si sta caricando...
La pagina si sta caricando...
La pagina si sta caricando...
La pagina si sta caricando...
La pagina si sta caricando...
La pagina si sta caricando...
La pagina si sta caricando...
La pagina si sta caricando...
La pagina si sta caricando...
La pagina si sta caricando...
La pagina si sta caricando...
La pagina si sta caricando...
La pagina si sta caricando...
La pagina si sta caricando...
La pagina si sta caricando...
La pagina si sta caricando...
La pagina si sta caricando...
La pagina si sta caricando...
La pagina si sta caricando...
La pagina si sta caricando...
La pagina si sta caricando...
La pagina si sta caricando...
La pagina si sta caricando...
La pagina si sta caricando...
La pagina si sta caricando...
La pagina si sta caricando...
La pagina si sta caricando...
La pagina si sta caricando...
La pagina si sta caricando...
La pagina si sta caricando...
La pagina si sta caricando...
La pagina si sta caricando...
La pagina si sta caricando...
La pagina si sta caricando...
La pagina si sta caricando...
La pagina si sta caricando...
La pagina si sta caricando...
La pagina si sta caricando...
La pagina si sta caricando...
La pagina si sta caricando...
La pagina si sta caricando...
La pagina si sta caricando...
La pagina si sta caricando...
La pagina si sta caricando...
La pagina si sta caricando...
La pagina si sta caricando...
La pagina si sta caricando...
La pagina si sta caricando...
La pagina si sta caricando...
La pagina si sta caricando...
La pagina si sta caricando...
La pagina si sta caricando...
La pagina si sta caricando...
La pagina si sta caricando...
La pagina si sta caricando...
La pagina si sta caricando...
La pagina si sta caricando...
La pagina si sta caricando...
La pagina si sta caricando...
La pagina si sta caricando...
La pagina si sta caricando...
La pagina si sta caricando...
La pagina si sta caricando...
La pagina si sta caricando...
La pagina si sta caricando...
La pagina si sta caricando...
La pagina si sta caricando...
La pagina si sta caricando...
La pagina si sta caricando...
La pagina si sta caricando...
La pagina si sta caricando...
La pagina si sta caricando...
La pagina si sta caricando...
La pagina si sta caricando...
La pagina si sta caricando...
La pagina si sta caricando...
La pagina si sta caricando...
La pagina si sta caricando...
La pagina si sta caricando...
La pagina si sta caricando...
La pagina si sta caricando...
La pagina si sta caricando...
La pagina si sta caricando...
La pagina si sta caricando...
La pagina si sta caricando...
La pagina si sta caricando...
La pagina si sta caricando...
La pagina si sta caricando...
La pagina si sta caricando...
La pagina si sta caricando...
La pagina si sta caricando...
La pagina si sta caricando...
La pagina si sta caricando...
La pagina si sta caricando...
La pagina si sta caricando...
La pagina si sta caricando...
La pagina si sta caricando...
La pagina si sta caricando...
La pagina si sta caricando...
La pagina si sta caricando...
La pagina si sta caricando...
La pagina si sta caricando...
La pagina si sta caricando...
La pagina si sta caricando...
La pagina si sta caricando...
La pagina si sta caricando...
La pagina si sta caricando...
La pagina si sta caricando...
La pagina si sta caricando...
La pagina si sta caricando...
La pagina si sta caricando...
La pagina si sta caricando...
La pagina si sta caricando...
La pagina si sta caricando...
La pagina si sta caricando...
La pagina si sta caricando...
La pagina si sta caricando...
La pagina si sta caricando...
La pagina si sta caricando...
La pagina si sta caricando...
La pagina si sta caricando...
La pagina si sta caricando...
La pagina si sta caricando...
La pagina si sta caricando...
La pagina si sta caricando...
La pagina si sta caricando...
La pagina si sta caricando...
La pagina si sta caricando...
La pagina si sta caricando...
La pagina si sta caricando...
La pagina si sta caricando...
La pagina si sta caricando...
La pagina si sta caricando...
La pagina si sta caricando...
La pagina si sta caricando...
La pagina si sta caricando...
La pagina si sta caricando...
La pagina si sta caricando...
La pagina si sta caricando...
La pagina si sta caricando...
La pagina si sta caricando...
La pagina si sta caricando...
La pagina si sta caricando...
La pagina si sta caricando...
La pagina si sta caricando...
La pagina si sta caricando...
La pagina si sta caricando...
La pagina si sta caricando...
La pagina si sta caricando...
La pagina si sta caricando...
La pagina si sta caricando...
La pagina si sta caricando...
La pagina si sta caricando...
La pagina si sta caricando...
La pagina si sta caricando...
La pagina si sta caricando...
La pagina si sta caricando...
La pagina si sta caricando...
La pagina si sta caricando...
La pagina si sta caricando...
La pagina si sta caricando...
La pagina si sta caricando...
La pagina si sta caricando...
La pagina si sta caricando...
La pagina si sta caricando...
La pagina si sta caricando...
La pagina si sta caricando...
La pagina si sta caricando...
La pagina si sta caricando...
La pagina si sta caricando...
La pagina si sta caricando...
La pagina si sta caricando...
La pagina si sta caricando...
La pagina si sta caricando...
La pagina si sta caricando...
La pagina si sta caricando...
La pagina si sta caricando...
La pagina si sta caricando...
La pagina si sta caricando...
La pagina si sta caricando...
La pagina si sta caricando...
La pagina si sta caricando...
La pagina si sta caricando...
La pagina si sta caricando...
La pagina si sta caricando...
La pagina si sta caricando...
La pagina si sta caricando...
La pagina si sta caricando...
La pagina si sta caricando...
La pagina si sta caricando...
La pagina si sta caricando...
La pagina si sta caricando...
La pagina si sta caricando...
La pagina si sta caricando...
La pagina si sta caricando...
La pagina si sta caricando...
La pagina si sta caricando...
La pagina si sta caricando...
La pagina si sta caricando...
La pagina si sta caricando...
La pagina si sta caricando...
La pagina si sta caricando...
La pagina si sta caricando...
La pagina si sta caricando...
La pagina si sta caricando...
La pagina si sta caricando...
La pagina si sta caricando...
La pagina si sta caricando...
La pagina si sta caricando...
La pagina si sta caricando...
La pagina si sta caricando...
La pagina si sta caricando...
La pagina si sta caricando...
La pagina si sta caricando...
La pagina si sta caricando...
La pagina si sta caricando...
La pagina si sta caricando...
La pagina si sta caricando...
La pagina si sta caricando...
La pagina si sta caricando...
La pagina si sta caricando...
La pagina si sta caricando...
La pagina si sta caricando...
La pagina si sta caricando...
La pagina si sta caricando...
La pagina si sta caricando...
La pagina si sta caricando...
La pagina si sta caricando...
La pagina si sta caricando...
La pagina si sta caricando...
La pagina si sta caricando...
La pagina si sta caricando...
La pagina si sta caricando...
La pagina si sta caricando...
La pagina si sta caricando...
La pagina si sta caricando...
La pagina si sta caricando...
La pagina si sta caricando...
La pagina si sta caricando...
La pagina si sta caricando...
La pagina si sta caricando...
La pagina si sta caricando...
La pagina si sta caricando...
La pagina si sta caricando...
La pagina si sta caricando...
La pagina si sta caricando...
La pagina si sta caricando...
La pagina si sta caricando...
La pagina si sta caricando...
La pagina si sta caricando...
La pagina si sta caricando...
La pagina si sta caricando...
La pagina si sta caricando...
La pagina si sta caricando...
La pagina si sta caricando...
La pagina si sta caricando...
La pagina si sta caricando...
La pagina si sta caricando...
La pagina si sta caricando...
La pagina si sta caricando...
La pagina si sta caricando...
La pagina si sta caricando...
La pagina si sta caricando...
La pagina si sta caricando...
La pagina si sta caricando...
La pagina si sta caricando...
La pagina si sta caricando...
La pagina si sta caricando...
La pagina si sta caricando...
La pagina si sta caricando...
La pagina si sta caricando...
La pagina si sta caricando...
La pagina si sta caricando...
La pagina si sta caricando...
La pagina si sta caricando...
La pagina si sta caricando...
La pagina si sta caricando...
La pagina si sta caricando...
La pagina si sta caricando...
La pagina si sta caricando...
La pagina si sta caricando...
La pagina si sta caricando...
La pagina si sta caricando...
La pagina si sta caricando...
La pagina si sta caricando...
La pagina si sta caricando...
La pagina si sta caricando...
La pagina si sta caricando...
La pagina si sta caricando...
La pagina si sta caricando...
La pagina si sta caricando...
La pagina si sta caricando...
La pagina si sta caricando...
La pagina si sta caricando...
La pagina si sta caricando...
La pagina si sta caricando...
La pagina si sta caricando...
La pagina si sta caricando...
La pagina si sta caricando...
La pagina si sta caricando...
La pagina si sta caricando...
La pagina si sta caricando...
La pagina si sta caricando...
La pagina si sta caricando...
La pagina si sta caricando...
La pagina si sta caricando...
La pagina si sta caricando...
La pagina si sta caricando...
La pagina si sta caricando...
La pagina si sta caricando...
La pagina si sta caricando...
La pagina si sta caricando...
La pagina si sta caricando...
La pagina si sta caricando...
La pagina si sta caricando...
La pagina si sta caricando...
La pagina si sta caricando...
La pagina si sta caricando...
La pagina si sta caricando...
La pagina si sta caricando...
La pagina si sta caricando...
La pagina si sta caricando...
La pagina si sta caricando...
La pagina si sta caricando...
La pagina si sta caricando...
La pagina si sta caricando...
La pagina si sta caricando...
La pagina si sta caricando...
La pagina si sta caricando...
La pagina si sta caricando...
La pagina si sta caricando...
La pagina si sta caricando...
La pagina si sta caricando...
La pagina si sta caricando...
La pagina si sta caricando...
La pagina si sta caricando...
La pagina si sta caricando...
La pagina si sta caricando...
La pagina si sta caricando...
La pagina si sta caricando...
La pagina si sta caricando...
La pagina si sta caricando...
La pagina si sta caricando...
La pagina si sta caricando...
La pagina si sta caricando...
La pagina si sta caricando...
La pagina si sta caricando...
La pagina si sta caricando...
La pagina si sta caricando...
La pagina si sta caricando...
La pagina si sta caricando...
-
 1
1
-
 2
2
-
 3
3
-
 4
4
-
 5
5
-
 6
6
-
 7
7
-
 8
8
-
 9
9
-
 10
10
-
 11
11
-
 12
12
-
 13
13
-
 14
14
-
 15
15
-
 16
16
-
 17
17
-
 18
18
-
 19
19
-
 20
20
-
 21
21
-
 22
22
-
 23
23
-
 24
24
-
 25
25
-
 26
26
-
 27
27
-
 28
28
-
 29
29
-
 30
30
-
 31
31
-
 32
32
-
 33
33
-
 34
34
-
 35
35
-
 36
36
-
 37
37
-
 38
38
-
 39
39
-
 40
40
-
 41
41
-
 42
42
-
 43
43
-
 44
44
-
 45
45
-
 46
46
-
 47
47
-
 48
48
-
 49
49
-
 50
50
-
 51
51
-
 52
52
-
 53
53
-
 54
54
-
 55
55
-
 56
56
-
 57
57
-
 58
58
-
 59
59
-
 60
60
-
 61
61
-
 62
62
-
 63
63
-
 64
64
-
 65
65
-
 66
66
-
 67
67
-
 68
68
-
 69
69
-
 70
70
-
 71
71
-
 72
72
-
 73
73
-
 74
74
-
 75
75
-
 76
76
-
 77
77
-
 78
78
-
 79
79
-
 80
80
-
 81
81
-
 82
82
-
 83
83
-
 84
84
-
 85
85
-
 86
86
-
 87
87
-
 88
88
-
 89
89
-
 90
90
-
 91
91
-
 92
92
-
 93
93
-
 94
94
-
 95
95
-
 96
96
-
 97
97
-
 98
98
-
 99
99
-
 100
100
-
 101
101
-
 102
102
-
 103
103
-
 104
104
-
 105
105
-
 106
106
-
 107
107
-
 108
108
-
 109
109
-
 110
110
-
 111
111
-
 112
112
-
 113
113
-
 114
114
-
 115
115
-
 116
116
-
 117
117
-
 118
118
-
 119
119
-
 120
120
-
 121
121
-
 122
122
-
 123
123
-
 124
124
-
 125
125
-
 126
126
-
 127
127
-
 128
128
-
 129
129
-
 130
130
-
 131
131
-
 132
132
-
 133
133
-
 134
134
-
 135
135
-
 136
136
-
 137
137
-
 138
138
-
 139
139
-
 140
140
-
 141
141
-
 142
142
-
 143
143
-
 144
144
-
 145
145
-
 146
146
-
 147
147
-
 148
148
-
 149
149
-
 150
150
-
 151
151
-
 152
152
-
 153
153
-
 154
154
-
 155
155
-
 156
156
-
 157
157
-
 158
158
-
 159
159
-
 160
160
-
 161
161
-
 162
162
-
 163
163
-
 164
164
-
 165
165
-
 166
166
-
 167
167
-
 168
168
-
 169
169
-
 170
170
-
 171
171
-
 172
172
-
 173
173
-
 174
174
-
 175
175
-
 176
176
-
 177
177
-
 178
178
-
 179
179
-
 180
180
-
 181
181
-
 182
182
-
 183
183
-
 184
184
-
 185
185
-
 186
186
-
 187
187
-
 188
188
-
 189
189
-
 190
190
-
 191
191
-
 192
192
-
 193
193
-
 194
194
-
 195
195
-
 196
196
-
 197
197
-
 198
198
-
 199
199
-
 200
200
-
 201
201
-
 202
202
-
 203
203
-
 204
204
-
 205
205
-
 206
206
-
 207
207
-
 208
208
-
 209
209
-
 210
210
-
 211
211
-
 212
212
-
 213
213
-
 214
214
-
 215
215
-
 216
216
-
 217
217
-
 218
218
-
 219
219
-
 220
220
-
 221
221
-
 222
222
-
 223
223
-
 224
224
-
 225
225
-
 226
226
-
 227
227
-
 228
228
-
 229
229
-
 230
230
-
 231
231
-
 232
232
-
 233
233
-
 234
234
-
 235
235
-
 236
236
-
 237
237
-
 238
238
-
 239
239
-
 240
240
-
 241
241
-
 242
242
-
 243
243
-
 244
244
-
 245
245
-
 246
246
-
 247
247
-
 248
248
-
 249
249
-
 250
250
-
 251
251
-
 252
252
-
 253
253
-
 254
254
-
 255
255
-
 256
256
-
 257
257
-
 258
258
-
 259
259
-
 260
260
-
 261
261
-
 262
262
-
 263
263
-
 264
264
-
 265
265
-
 266
266
-
 267
267
-
 268
268
-
 269
269
-
 270
270
-
 271
271
-
 272
272
-
 273
273
-
 274
274
-
 275
275
-
 276
276
-
 277
277
-
 278
278
-
 279
279
-
 280
280
-
 281
281
-
 282
282
-
 283
283
-
 284
284
-
 285
285
-
 286
286
-
 287
287
-
 288
288
-
 289
289
-
 290
290
-
 291
291
-
 292
292
-
 293
293
-
 294
294
-
 295
295
-
 296
296
-
 297
297
-
 298
298
-
 299
299
-
 300
300
-
 301
301
-
 302
302
-
 303
303
-
 304
304
-
 305
305
-
 306
306
-
 307
307
-
 308
308
-
 309
309
-
 310
310
-
 311
311
-
 312
312
-
 313
313
-
 314
314
-
 315
315
-
 316
316
-
 317
317
-
 318
318
-
 319
319
-
 320
320
-
 321
321
-
 322
322
-
 323
323
-
 324
324
-
 325
325
-
 326
326
-
 327
327
-
 328
328
-
 329
329
-
 330
330
-
 331
331
-
 332
332
-
 333
333
-
 334
334
-
 335
335
-
 336
336
-
 337
337
-
 338
338
-
 339
339
-
 340
340
-
 341
341
-
 342
342
-
 343
343
-
 344
344
-
 345
345
-
 346
346
-
 347
347
-
 348
348
-
 349
349
-
 350
350
-
 351
351
-
 352
352
-
 353
353
-
 354
354
-
 355
355
-
 356
356
-
 357
357
-
 358
358
-
 359
359
-
 360
360
-
 361
361
-
 362
362
-
 363
363
-
 364
364
-
 365
365
-
 366
366
-
 367
367
-
 368
368
-
 369
369
-
 370
370
-
 371
371
-
 372
372
-
 373
373
-
 374
374
-
 375
375
-
 376
376
-
 377
377
-
 378
378
-
 379
379
-
 380
380
-
 381
381
-
 382
382
-
 383
383
-
 384
384
-
 385
385
-
 386
386
-
 387
387
-
 388
388
-
 389
389
-
 390
390
-
 391
391
-
 392
392
-
 393
393
-
 394
394
-
 395
395
-
 396
396
-
 397
397
-
 398
398
-
 399
399
-
 400
400
-
 401
401
-
 402
402
-
 403
403
-
 404
404
-
 405
405
-
 406
406
-
 407
407
-
 408
408
-
 409
409
-
 410
410
-
 411
411
-
 412
412
-
 413
413
-
 414
414
-
 415
415
-
 416
416
-
 417
417
-
 418
418
-
 419
419
-
 420
420
-
 421
421
-
 422
422
-
 423
423
-
 424
424
-
 425
425
-
 426
426
-
 427
427
-
 428
428
-
 429
429
-
 430
430
-
 431
431
-
 432
432
-
 433
433
-
 434
434
-
 435
435
-
 436
436
-
 437
437
-
 438
438
-
 439
439
-
 440
440
-
 441
441
-
 442
442
-
 443
443
-
 444
444
-
 445
445
-
 446
446
-
 447
447
-
 448
448
-
 449
449
-
 450
450
-
 451
451
-
 452
452
-
 453
453
-
 454
454
-
 455
455
-
 456
456
-
 457
457
-
 458
458
-
 459
459
-
 460
460
-
 461
461
-
 462
462
-
 463
463
-
 464
464
-
 465
465
-
 466
466
-
 467
467


in altre lingue
- français: Sony TDM-NC1 Le manuel du propriétaire
- español: Sony TDM-NC1 El manual del propietario
- Deutsch: Sony TDM-NC1 Bedienungsanleitung
- Nederlands: Sony TDM-NC1 de handleiding
- português: Sony TDM-NC1 Manual do proprietário
- dansk: Sony TDM-NC1 Brugervejledning
- polski: Sony TDM-NC1 Instrukcja obsługi
- svenska: Sony TDM-NC1 Bruksanvisning
Documenti correlati
-
Sony TDM-NC1 Manuale del proprietario
-
-
Sony NAS-CZ1 Manuale del proprietario
-
-
-
-
-
-
-
Sony STR-DA3300ES Manuale del proprietario
