VDO Radio Module RM 8204 Manuale del proprietario
- Categoria
- Ricevitori multimediali per auto
- Tipo
- Manuale del proprietario
Questo manuale è adatto anche per

English
Français
Deutsch
Nederlands
ItalianoEspañol
Dansk
Owner’s manual and mounting instruction
Mode d’emploi et manuel d’installation
Bedienungs- und Einbauanleitung
Gebruiksaanwijzing en inbouwhandleiding
Istruzioni d’uso e d’installazione
Instrucciones de manejo y de montaje
Betjeningsvejledning og monteringsanvisning
RM 8204

English
Changes against owners manual:
1. Instead of the function “FM 123” “FM MEMO” is available. This mode enables the
storage of all receivable stations in alphabetic order.
2. The CD-Changer options “Scan” and “Repeat” are NOT available.
Français
Modifications par rapport au mode d'emploi:
1. A la place de « FM123 », la fonction « FM MEMO » est disponible. Ce mode permet la
mémorisation de toutes les stations captables dans l'ordre alphabétique.
2. Les options « Scan » et « Repeat » pour le chargeur CD ne sont pas disponibles.
Deutsch
Änderungen gegenüber der Bedienungsanleitung:
1. Anstelle der Funktion „FM 123“ ist „FM MEMO“ verfügbar. Diese Betriebsart speichert
alle empfangbaren Sender in alphabetischer Reihenfolge.
2. Die CD-Wechsler Optionen „Scan“ und „Repeat“ sind NICHT verfügbar.
Nederlands
Aanvullingen op de gebruiksaanwijzing:
1. In plaats van de functie “FM123” is “FM MEMO” beschikbaar. Met deze functie is het
mogelijk om alle te ontvangen radiostations tealfabetisch te rangschikken.
2. De CD-wissleaar opties “Scan” en “Repeat” zijn NIET beschikbaar.
Italiano
Correzioni apportate al manuale di istruzioni:
1. Al posto della funzione “FM 123” è disponibile “FM MEMO”. Questa funzione
permette di memorizzare tutte le stazioni sintonizzabili in ordine alfabetico.
2. Le opzioni del commutatore “Scan” e “Repeat” NON sono più disponibili.
Español
Cambios repecto a las instrucciones de manejo:
1. En vez de la función “FM 123” esta “FM MEMO” a disposición. Este modo memoriza
todas las cadenas que se puedan recibir y las ordena en orden alfabético.
2. La opción “Scan” y “Repeat” NO estan a disposición en el cargador CDC.
Dansk
Ændringer i brugermanual:
1. I stedet for funktionen “FM 123” er “FM MEMO” til rådighed. Denne gør, at alle
modtagedygtige stationer gemmes i alfabetisk orden.
2. CD-Changer mulighederne “Scan” og “Repeat” er IKKE tilgængelige.
Addendum

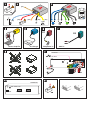
A
+12V
RR FR FL RL
B'
A'
F
A
B
F
E
J
B
A
B
TEL MUTE
Hand brake
Hand brake
AUX in
D2
D1
Telephone in
D1'
D2'
[A1]
[A5]
[A4]
[A6] [A8]
[A7]
Power Amplifier
CD Changer
RCD 5400
Navigation Monitor
AUX / DVDC Video

Contents
General information . . . . . . . . . . . . . . . . . . . . . . . . . . . . . . . . . . . . .4
Notes on operating instructions. . . . . . . . . . . . . . . . . . . . . . . . . . . . . . 4
Safety instructions . . . . . . . . . . . . . . . . . . . . . . . . . . . . . . . . . . . . .4
RDS (Radio Data System). . . . . . . . . . . . . . . . . . . . . . . . . . . . . . . . . . 4
Operation . . . . . . . . . . . . . . . . . . . . . . . . . . . . . . . . . . . . . . . . . . . 5
Control elements. . . . . . . . . . . . . . . . . . . . . . . . . . . . . . . . . . . . . .5
Switching on / off . . . . . . . . . . . . . . . . . . . . . . . . . . . . . . . . . . . . . 6
Activating the radio display and selecting a source . . . . . . . . . . . . . . . . . . . 7
Volume adjustment . . . . . . . . . . . . . . . . . . . . . . . . . . . . . . . . . . . . 7
Main menu . . . . . . . . . . . . . . . . . . . . . . . . . . . . . . . . . . . . . . . . . 8
Status bar. . . . . . . . . . . . . . . . . . . . . . . . . . . . . . . . . . . . . . . . . . 9
Activating / deactivating the timer . . . . . . . . . . . . . . . . . . . . . . . . . . . . 9
Tuner menu: . . . . . . . . . . . . . . . . . . . . . . . . . . . . . . . . . . . . . . . 10
Traffic announcements (TA) . . . . . . . . . . . . . . . . . . . . . . . . . . . . . . . 12
CDC menu . . . . . . . . . . . . . . . . . . . . . . . . . . . . . . . . . . . . . . . . .13
DVD changer . . . . . . . . . . . . . . . . . . . . . . . . . . . . . . . . . . . . . . . 15
AUX input (audio / video source) . . . . . . . . . . . . . . . . . . . . . . . . . . . . 15
SOUND menu . . . . . . . . . . . . . . . . . . . . . . . . . . . . . . . . . . . . . . . 15
SETUP menu. . . . . . . . . . . . . . . . . . . . . . . . . . . . . . . . . . . . . . . .16
Troubleshooting. . . . . . . . . . . . . . . . . . . . . . . . . . . . . . . . . . . . . . . 18
Installation instructions . . . . . . . . . . . . . . . . . . . . . . . . . . . . . . . . . . .19
IMPORTANT INFORMATION . . . . . . . . . . . . . . . . . . . . . . . . . . . . . . . 19
Taking safety precautions, Fig. 1. . . . . . . . . . . . . . . . . . . . . . . . . . . . . 19
Installation . . . . . . . . . . . . . . . . . . . . . . . . . . . . . . . . . . . . . . . . 20
Electrical connections. . . . . . . . . . . . . . . . . . . . . . . . . . . . . . . . . . . 20
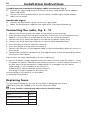
Connecting the radio, Fig. 9 - 11 . . . . . . . . . . . . . . . . . . . . . . . . . . . . . 22
Replacing fuses . . . . . . . . . . . . . . . . . . . . . . . . . . . . . . . . . . . . . . 22
Contents
3

Notes on operating instructions
The following reading aids are used to simplify these operating instructions:
☞
asks you to perform an action.
:
shows the unit’s reaction.
✎
provides extra info.
❑
identifies a list.
A
Safety instructions and warnings contain important information for safe use of the
unit. Failure to observe this information may result in material damage or personal injury.
Therefore, please observe this information with particular care.
Safety instructions
A
Make all inputs via the remote control only when the vehicle is stationary, or have the
passenger make them. Otherwise, you may endanger the occupants and other road users.
A
Please make certain that all persons using your multimedia system have access to this ma
-
nual, and that they read the instructions and suggestions concerning system operation prior to
use.
A
Only look at the monitor if it is safe to do so. Find a suitable place to stop should you
need to look at the screen for a longer period of time.
A
For safety reasons, the driver should not watch television or operate the multimedia
system while driving. Please note that it is illegal in certain countries to watch or to operate
the television when driving.
A
When setting the volume, please make sure that traffic noises (horns, sirens, emer-
gency vehicles, etc.) are still audible.
RDS (Radio Data System)
Many VHF stations transmit RDS information. The RM 8204 evaluates RDS telegrams
and offers the following advantages:
❑
PS (Program Service name): Display of station name.
❑
TA (Traffic Announcement): Traffic announcements, ➽ page 12
❑
EON (Enhanced Other Networks): Automatic fade-in of traffic announcements on
other stations.
❑
AF (Alternative Frequency): Automatic re-tuning to the best alternative frequency,
➽ page 11.
General information
4

5
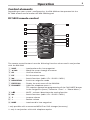
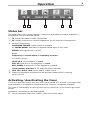
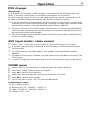
Control elements
Depending on your system’s configuration, the RM 8204 can be operated via the
RC 5400 remote control and/or the MM 5600 keypad.
RC 5400 remote control
The remote control buttons have the following functions when used in conjunction
with the RM 8204:
1 VOICE . . . . . . . . . Load previous disc into magazine*
2 8246 . . . . . . . Move the cursor through the menus
3 OK . . . . . . . . . . . . Confirm selection
4 ESC . . . . . . . . . . . Exit the current menu
5 y . . . . . . . . . . . Search functions (radio / CD* / DVDC* / MP3*)
6 NAVIGATION . . . . Switch to navigation mode
7 ENTERTAIN . . . . . Display the main menu of the RM 8204
8 FAVOURITE . . . . . Open the telephone menu **.
This requires appropriate programming of the FAVOURITE button
in the navigation system (“Favourite - short“ –> “Phone Menu”).
9 LS . . . . . . . . . . . MUTE - activate / deactivate the muting function
0 x . . . . . . . . . . . Search functions (radio / CD* / DVDC* / MP3*)
q V . . . . . . . . . . . . Increase volume
w W . . . . . . . . . . . . Reduce volume
e HOME . . . . . . . . . Load next disc into magazine*
* only possible with a connected MP3/CD or DVD changer (accessory)
** only in conjunction with with telephone option
Operation
1
13
2
5
7
9
11
12
10
6
3
4
8

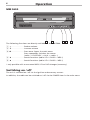
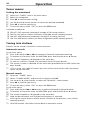
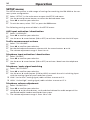
MM 5600
The following functions are directly available on the MM 5600:
1 W . . . . . . . . . . . . Reduce volume
2 V . . . . . . . . . . . . Increase volume
3 O. . . . . . . . . . . . . Press once: Opens the main menu
Press repeatedly: Switches the source
(radio –> CDC/DVDC –> AUX –> radio ...)
4 2 . . . . . . . . . . . . Search functions (radio / CD* / DVDC* / MP3*)
5 8 . . . . . . . . . . . . Search functions (radio / CD* / DVDC* / MP3*)
* only possible with a connected MP3 / CD or DVD changer (accessory)
Switching on / off
The unit is switched on / off via the ignition and accessory contact.
In addition, the radio can be switched on / off via the POWER item in the main menu.
Operation
6
4
5
3
2
1

7
Activating the radio display and selecting a source
When the navigation system is on:
■
Via the RC 5400:
☞
Press ENTERTAIN.
:
The main menu of the RM 8204 will appear.
☞
Using the cursor buttons, select the required source (TUNER, CDC/DVDC or AUX)
and confirm it with OK.
✎
The remote control can also be used to call up the navigation module or a tele
-
phone connected to this module.
✎
If no further button is pressed in the next 5 seconds, the unit switches automatically
to the previous video source (for instance, navigation window). This automatic swit
-
chover can be deactivated via the timer activation / deactivation function.
■
Via the keypad of the MM 5600:
☞
Press the O button.
:
The main menu of the RM 8204 will appear.
☞
Pressing the O button again selects the next source in each case. Explicit confirma
-
tion is not required here.
✎
If no further button is pressed in the next 5 seconds, the unit switches automatically
to the previous video source (for instance, navigation window). This automatic swit-
chover can be deactivated via the timer activation / deactivation function.
■ ‘Busy’ display
While the system is busy, the cursor is displayed in grey. Only once the cursor has
regained its normal colour is the user interface enabled again.
Volume adjustment
☞
Press the W or V button to set the volume.
✎
If the button is held down, the volume changes continuously.
A
When setting the volume, please make sure that traffic noises (horns, sirens, emer
-
gency vehicles, etc.) are still audible.
MUTE function
☞
Press the LS button.
:
This mutes the radio.
☞
Press the LS button again to deactivate the muting function.
✎
The muting function can also be deactivated by adjusting the volume with the
W or Vbutton.
✎
If the muting function is activated during CD playback, the CD changer stops at the
current CD location.
Video / audio signals during driving*
For reasons of driving safety, video images following selection of the AUX or DVDC
source are only displayed when the hand brake is applied.
* Prerequisite: The RM 8204 must be connected to a video source or DVD changer, and
the input for the AUX or DVD changer signals must have been enabled in the SETUP
menu.
Operation

Main menu
When the system is activated via the
ignition, the navigation menu appears.
✎
If the system was set previously to
continuous radio mode, the main
menu appears (also refer to timer
activation / deactivation) when the
ignition is turned on.
☞
Press the ENTERTAIN button on the remote control or the O button on the MM 5600
to open the main menu of the RM 8204.
The following menu items are available:
PHONE: Switchover to the telephone source (provided that a telephone has
been connected to the navigation system).
NAV: Switchover to the navigation mode.
TUNER: Switchover to the radio source / mode (for instance, automatic tuning
function) / opening of the TUNER menu.
CDC or DVDC: Switchover to CD / DVD changer source / mode (CD / MP3 / DVD
playback).
AUX: Switchover to AUX source (audio or combined audio / video source, de-
pending on the connection / configuration).
POWER: Radio activation / deactivation (the main menu remains visible when
the radio is turned off).
TIMER: Activation / deactivation of automatic switchover to the previous video
source after 5 seconds.
TA: Activation / deactivation of traffic information (shown here in the deacti
-
vated state).
SOUND: Sound menu; adjustment of bass, treble, balance, fader, loudness.
SETUP: Setup menu; configuration of the RM 8204.
Operation
8

9
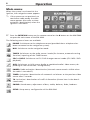
Status bar
The lower part of the screen displays a status bar providing a number of details in
accordance with the selected source.
1 TP: Station broadcasts traffic information.
2 AF: Station transmits on several frequencies (list of alternative frequencies).
3 General information:
CHANGING SOURCE: Audio source is changed.
>> SOUND MENU: Sub-menu is opened (sound menu in this case).
MUTED: Muting function is active.
Radio:
Frequency or station name and memory location.
CD / DVD changer:
LOAD CD 4: Disc number 4 is loaded.
DISC UP: Next disc in the magazine is loaded.
DISC DOWN: Previous disc in the magazine is loaded.
Track number and time (if CD audio has been selected).
4 TUN, CDC, DVDC, AUX: Active audio / video source.
5 Timer for automatic switchover to the previous video source is running
(only if active).
Activating / deactivating the timer
If the unit does not receive any user input for a period of 5 seconds, it switches over
automatically to the previous video source (for instance, navigation window).
The timer is indicated by a running clock on the status bar, in the lower right-hand
corner.
Automatic switchover can be deactivated:
☞
For this purpose, select the “TIMER” item in the main menu.
Operation
TP RADIO VRFAF 12 TUN
21 3 4 5

Tuner menu:
Setting the waveband
☞
Select the “TUNER” item in the main menu.
☞
Select the waveband.
☞
Press OK to confirm your setting.
☞
Use the 8 and 2 cursor buttons to select the desired waveband.
☞
Press OK to confirm your entry.
☞
To exit the menu, select “ESC” or press the ESC button.
Available wavebands:
❑
FM AST: VHF autostore (automatic storage of 10 strong stations)
❑
FM 123: VHF preset stations (30 freely assignable station memory presets)
❑
AM AST: MW autostore (automatic storage of 10 strong stations)
❑
AM 123: MW preset stations (30 freely assignable station memory presets)
Tuning into stations
Stations can be tuned / scanned in various manners:
Automatic search
In the main menu:
☞
Press and hold the y or x to commence forward / backward searching.
☞
To execute this function from the MM 5600, press and hold the 2 or 8 button.
:
The current frequency is displayed on the status bar.
☞
As soon as a station is found, the automatic search function pauses.
☞
The station’s name is indicated on the status bar (provided that an RDS station has
been found).
✎
If TA is active, the radio will search only for stations from which traffic announce-
ments can be received.
Manual search
☞
Open the “TUNER” menu.
☞
Select “TUNING MODE” and confirm this option with OK.
☞
Use the 8 or 2 cursor button to select the “MANUAL” search mode.
☞
Press OK to confirm your entry.
☞
To exit the menu, select “ESC” or press the ESC button.
In the main menu:
☞
Press and hold the y or x button to perform forward / backward search.
☞
To execute this function from the MM 5600, press and hold the 2 or 8 button.
:
The current frequency is displayed on the status bar.
☞
Hold the button down until the desired frequency is attained.
✎
Pressing the search buttons briefly always switches to the previous / next station
memory location.
✎
After 50 seconds, the radio switches back to automatic search.
Operation
10

11
Station intro – SCAN
☞
Open the “TUNER” menu.
☞
Select “SCAN” and press OK twice to activate this function.
:
Each station preset in the currently selected waveband is introduced for about
10 seconds.
:
Press the ESC button to continue listening to the station currently being introduced.
Autostore
Activate this function to automatically store up to 10 VHF / MW stations with strong
signals on the FM AST or AM AST waveband.
☞
Open the “TUNER” menu.
☞
Select “START AST” and press OK to activate this function.
:
This mutes the radio, and the status bar indicates ‘STORING ...’
✎
The autostore process can be cancelled with the ESC button.
✎
All stations stored previously in the FM AST and AM AST waveband are overwritten
by the new stations.
✎
Less than 10 stations might be stored under certain circumstances (for instance, with
poor reception).
AF re-tuning (only on VHF):
The radio continuously checks a series of alternate frequencies (AF) for the selected
station and automatically chooses the best frequency. Deactivate this function only if
you hear brief interruptions in transmission or if the unit automatically switches to an
undesired station (e.g. to an other regional station belonging to the selected pro-
gram).
☞
Open the “TUNER” menu.
☞
Select “AF” and press OK.
☞
Select “OFF” to deactivate the function.
☞
Select “ON” to activate the function.
☞
To exit the menu, select “ESC” or press the ESC button.
Operation

Station memory
Manual storage of stations
You can manually save up to 30 VHF stations in the FM 123 waveband and up to
30 MW stations in the AM 123 waveband.
☞
Select the desired waveband (FM 123 or AM 123).
☞
Tune to the desired station.
☞
Open the “TUNER” menu.
☞
Select “SAVE IN NEXT” and press OK.
:
The tuned station will be saved to the next free memory location.
✎
Unassigned memory locations are indicated as “[EMPTY]”.
☞
Press OK to save the tuned station to the designated memory location.
■
Calling up saved stations
☞
Tune to the desired waveband (FM AST, FM 123, AM AST or AM 123).
☞
Briefly press the y or x button to recall the desired preset station.
☞
To execute this function from the MM 5600, briefly press the 2 or 8 button.
:
The station name (or frequency) and corresponding memory location are indicated
on the status bar.
✎
Unassigned memory locations are skipped automatically.
Traffic announcements (TA)
Activate this function if you wish to hear traffic announcements (TA). The radio will
then issue traffic announcements even during MP3 / CD / DVD playback or if the
muting function is active.
Switching TA on / off
☞
To switch traffic announcements on / off, select the “TA” item in the main menu.
✎
Inactive traffic announcement is indicated by a line across the TA symbol.
✎
If the radio has not been tuned to a station with TA, it will automatically search for
a station broadcasting traffic announcements.
Interrupting a traffic announcement
If you do not want to hear a traffic announcement to the end, you can interrupt it
without deactivating the TA function.
☞
To do so, press the ESC button once during the traffic announcement.
✎
The unit then returns to the previous operating mode.
Operation
12

13
CDC menu
(CD changer accessory)
☞
Select the “CDC” item in the main menu to set the CD changer as the source.
✎
Prerequisite: CDC must have been activated in the setup menu.
You can play 12-cm audio / MP3 CDs on the CD changer.
A
We strongly recommend only playing 12-cm CDs. Please do not play 8-cm CDs (neither
with nor without an adapter).
A
Do not insert DVDs or shaped CDs in the CD magazine. If you ignore these recommen
-
dations, you risk damaging your unit.
✎
The system may not be able to play - either properly or at all - copy-protected audio
CDs which do not correspond to the Compact Disc Audio standard.
■
Requirements
In order to be played, MP3 files must meet the following requirements:
❑
MP3 file names must have the “.mp3" extension
❑
Bit rate: Maximum of 320 kbit/s, constant or variable
❑
Sampling frequency: Maximum of 48 kHz
Selecting a CD from the CD magazine
☞
Briefly press the VOICE button to select the previous CD in the magazine.
☞
Briefly press the HOME button to select the next CD in the magazine.
✎
Once the end of a CD has been reached, playback of the next CD is commenced.
CDs absent from the magazine are ignored automatically.
Previous / next track (audio CD and MP3)
☞
Press the y or x button on the remote control, or the 2 or 8 button on the
MM 5600 to play the previous / next track on the CD.
✎
If you press the y button on the remote control or the 2 button on the MM 5600
after the first 10 seconds of a track have been played, the CD changer starts playing
it again from the beginning.
Fast forward / rewind
☞
Press and hold the y or x button on the remote control, or the 2 or 8 button
on the MM 5600.
☞
Once the required point on the CD has been attained, briefly press the y or x
button on the remote control, or the 2 or 8 button on the MM 5600.
:
Playback is continued at the normal speed.
Operation

Introductory playback - SCAN
☞
Open the “CDC” menu.
☞
Select “INTRO SCAN” and press OK twice to activate this function.
:
Each track of the currently loaded CD or currently selected directory (MP3) is played
for about 10 seconds.
☞
Press the ESC button to listen in full to the track currently being introduced.
Random playback
☞
Open the “CDC” menu.
☞
Select “RANDOM” and press OK.
☞
Select “ON” to activate the random playback function.
☞
Select “OFF” to deactivate the random playback function.
☞
Press OK to confirm your setting.
Repeat function
☞
Open the “CDC” menu.
☞
Select “REPEAT TRACK” and press OK.
☞
Select “ON” to activate the repeat function.
☞
Select “OFF” to deactivate the repeat function.
☞
Press OK to confirm your setting.
Operation
14

15
DVD changer
(accessory)
If, instead of a CD changer, a DVD changer is connected to the RM 8204, selecting
DVDC in the main menu effects a switchover to playback via this device.
The DVD changer’s basic functions (start, stop, search etc.) can be controlled via the
RC 5400 or the MM 5600 as described in the section on the CD changer.
✎
If the hand brake has been applied, the DVD changer’s video signal is output auto
-
matically on the screen. While the vehicle is moving, the video signal remains disab
-
led for safety reasons, although the audio signal remains effective.
✎
To permit full use of the DVD changer’s functionality, this device should be opera
-
ted via its own remote control (for this purpose, an external infrared receiver must
be connected to the DVD changer).
✎
The DVD changer needs to be activated in the SETUP menu (refer to configuration
of the CD / DVD changer).
AUX input (audio / video source)
☞
Select “AUX” in the main menu in order to set the AUX input as the source.
:
If a video source has been connected to the RM 8204, its video and audio signals
will be output.
✎
For safety reasons, the video signal is only output if the hand brake has been
applied.
✎
To make the AUX input available, the AUX option must have been activated in the
SETUP menu.
✎
If a DVD changer has been connected, the AUX input receives purely audio signals.
SOUND menu
☞
Select “SND” in the main menu in order to open the sound sub-menu.
☞
Select bass, treble, balance, fader or loudness.
☞
Press OK to confirm your selection.
☞
Adjust the sound as required with the cursor buttons 8 and 2.
☞
Press OK to confirm your settings.
☞
To exit the menu, select “ESC” or press the ESC button.
■
Adjustment ranges:
❑
Bass, treble: -9 to +9
❑
Balance: LEFT +9 ... MIDDLE ... RIGHT +9
❑
Fader: FRONT +9 ... MIDDLE ... REAR +9
❑
Loudness: ON ... OFF
Operation

SETUP menu
The SETUP menu offers a wide range of settings for matching the RM 8204 to the cur
-
rent system configuration.
☞
Select “SETUP” in the main menu to open the SETUP sub-menu.
☞
Use the 8 and 2 cursor buttons to select the desired menu item.
☞
Press OK to confirm your selection.
☞
To exit the menu, select “ESC” or press the ESC button.
The following settings are available in the SETUP menu:
AUX input activation / deactivation
☞
Select “AUXILIARY”.
☞
Press OK to confirm your selection.
☞
Use the 8 or 2 cursor button (ON or OFF) to activate / deactivate the AUX input.
Traffic announcement volume
☞
Select “TA VOLUME”.
☞
Press OK to confirm your selection.
☞
Set the desired announcement volume with the cursor buttons 8 or 2.
✎
The volume adjustment range is from 0 to +8.
Telephone input activation / deactivation
☞
Select “PHONE”.
☞
Press OK to confirm your selection.
☞
Use the 8 or 2 cursor button (ON or OFF) to activate / deactivate the telephone
input.
Telephone / mute signal matching
☞
Select “MUTE LEVEL”.
☞
Press OK to confirm your selection.
☞
Use the 8 or 2 cursor button (LOW or HIGH) to match the unit’s switching input
with the muting signal of your hands-free system.
❑
LOW: “Active low” muting signal; radio switches to mute at 0 V.
❑
HIGH: “Active high” muting signal; radio switches to mute at 12 V.
Telephone volume adjustment
☞
Select “PHONE VOL”.
☞
Press OK to confirm your selection.
☞
Using the 8 or 2 cursor button, set the desired volume for audio output of the
connected mobile handset and hands-free system.
✎
The volume adjustment range is from -30 to +30.
Operation
16

17
Loading software updates
This function is used by authorized dealers to update operating systems whenever
required.
If this function is activated in the absence of an updated version, the unit waits for
about 15 seconds before resuming normal operation.
IMPORTANT: During a software update, all user settings are restored to factory
values.
Selecting a colour scheme
☞
Select “COLOUR SCHEME”.
☞
Press OK to confirm your selection.
☞
Set the desired colour scheme for screen displays by means of the 8 or 2 cursor
button.
Configuring the CD / DVD changer
☞
Select “CHANGER CTRL”.
☞
Press OK to confirm your selection.
☞
Use the 8 or 2 cursor button to activate a connected CD changer (“CDC”).
☞
Select “DVDC” to activate a connected DVD changer.
☞
Select “OFF” if neither type of device has been connected.
Operation

In rare cases, your unit may not function the way you expect it to. Before calling the
service department, please read the operating instructions thoroughly and go through
the following check list; it may be possible to quickly remedy an apparent malfunction.
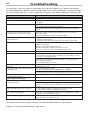
Symptoms Possible cause / remedy
General
Unit does not function. No display. • Check the fuse (unit and vehicle) and the connections (see installation
instructions).
Audio or MP3 CD rejected by the unit. The CD may be dirty.
• Clean the CD with a special CD cleaning fluid.
Incorrect CD format (for instance: Mac format, wrong extension for MP3 file
name).
The telephone is not being detected even
though it has been connected to the radio.
Incorrectly configured muting signal (for instance, in the case of a Nokia
hands-free system).
• Open the PHONE LEVEL setup menu and select HIGH.
Unit not functioning properly / at all on some
VW / Audi vehicles.
Some VW and Audi vehicles have different power supply connector pin
assignments (ISO chamber A).
• Interchange cables A4 and A7 at the fuses of the ISO-A extension cable.
No video signal in the case of DVD / AUX. Hand brake not applied.
• Apply the hand brake.
No video signal despite applied hand brake:
Hand brake signal disconnected or incorrectly connected.
• Check the connections (refer to the installation instructions).
Radio
Poor radio reception. • Check if the antenna is completely extended and correctly connected.
• Check whether the supply voltage’s negative pole (brown cable) is correctly
connected to earth (vehicle chassis).
If the unit is being installed in VW and Audi vehicles, you will need a feed
multicoupler for the antenna.
• Use a suitable adapter (e.g. Votex).
The frequency instead of the station name is
displayed.
The unit is tuned to a station that does not transmit RDS signals or the
transmitter is too weak.
The required station cannot be tuned to using
automatic search.
The desired station is too weak.
• Set the desired station manually (TUNER menu -> MANUAL).
• Check whether the antenna is completely extended and correctly connected.
No traffic announcements are switched through
(during CD / MP3 playback).
• Activate the TA function in the main menu.
MP3 / CD / DVD changer:
Distorted sound / skips during disc playback /
no playback possible.
Changer cannot read disc due to damage or soiling.
Disc is not compatible with CD changer standards.
• Refer to the operating manual of the MP3 / CD / DVD changer for supported
formats.
MP3 / CD / DVD changer does not function. In cold weather conditions, condensation may occur on the laser.
• Wait for 5 minutes until the condensation evaporates.
No sound during CD playback. Some CDs contain multimedia data which are not recognised by the changer.
• Advance the tracks until music is heard.
Problems with new copy-protected audio CDs. Some copy protection procedures are incompatible with accepted standards for
audio CDs. This is not a fault on the unit.
For more information, please contact the service department or your dealer.
Subject to technical modifications and errors.
Troubleshooting
18

19
IMPORTANT INFORMATION
Please read this information carefully and follow all the instructions outlined below.
This will ensure reliable operation and durability of your unit.
Keep the packaging and operating instructions in a safe place in order to pass them on
to a subsequent owner in the event of selling the unit at a later date.
A
Only trained personnel may install the unit.
A
Observe automotive industry quality standards.
A
Fire hazard. When drilling, take care not to damage concealed wiring harnesses, the
fuel tank or fuel lines.
A
Never drill into supporting or safety-relevant body parts.
A
Only install the unit in vehicles with a 12-V on-board voltage; connect negative pole to
earth. Installation in unsuitable vehicles (e. g. heavy goods vehicles, buses) results in a risk
of malfunction, damage and fire.
A
Always ensure correct assignment of vehicle connections. Incorrect assignment of the
connections may damage the unit or vehicle electrical system/electronics.
Installation in vehicles equipped with standard ISO
connectors
The unit can be installed without major preparation in vehicles equipped with ISO
standard connectors. A few signals may have to be routed to ISO plug A (refer to con-
nection overview of ISO chamber A).
For problem-free installation on vehicles with different connection requirements, ask
your dealer for special cables.
A
Only use the accompanying ISO extension cables to establish connections.
Installation in vehicles without standard ISO connectors
If no adapter cables are available for your vehicle, connect the unit as described in the
section on establishing electrical connections.
A
Only use the accompanying ISO extension cables to establish connections on the device
side.
Taking safety precautions, Fig. 1
A
Before starting work, disconnect the earth lead from the negative terminal of the vehi
-
cle battery in order to prevent short circuits. In this process, observe the vehicle manufactu
-
rer’s safety instructions (alarm system, airbag, immobiliser, etc.).
Installation instructions
La pagina si sta caricando...
La pagina si sta caricando...
La pagina si sta caricando...
-
 1
1
-
 2
2
-
 3
3
-
 4
4
-
 5
5
-
 6
6
-
 7
7
-
 8
8
-
 9
9
-
 10
10
-
 11
11
-
 12
12
-
 13
13
-
 14
14
-
 15
15
-
 16
16
-
 17
17
-
 18
18
-
 19
19
-
 20
20
-
 21
21
-
 22
22
-
 23
23


VDO Radio Module RM 8204 Manuale del proprietario
- Categoria
- Ricevitori multimediali per auto
- Tipo
- Manuale del proprietario
- Questo manuale è adatto anche per
in altre lingue
Documenti correlati
Altri documenti
-
Mercedes-Benz COMAND MY08 Manuale utente
-
Fiat 1995 Bravo Manuale utente
-
Opel Movano 2016.5 Infotainment manual
-
Blaupunkt New Jersey MP68 Manuale del proprietario
-
-
-
Panasonic CQRDP472N Manuale del proprietario
-
-
-
Volkswagen 2K0 017 222 Fitting Instruction