La pagina si sta caricando...

Convection 4 x 2/3GN Analogic electric models
2
ISTRUZIONI PER L’INSTALLATORE
INSTRUCTIONS FOR THE INSTALLER
ANLEITUNGEN FÜR DEN INSTALLATEUR
NOTICE POUR L'INSTALLATEUR
INSTRUCCIONES PARA EL INSTALADOR
INDICE
INDEX
INHALTSVERZEICHNIS
INDEX
INDICE
Dimensioni.
Dimensions.
Dimensions.
Medidas.
1.0
Abmessungen.
Tabella dati allacciamento elettrico.
Tableau des données techniques et raccordement électrique
1.6
Technical data for electrical connection.
Tabla datos técnicos de conexión eléctrica.
Tabelle technische Daten für Elektroanschluss.
Dichiarazione di conformità.
Déclaration de conformité.
Conformance declaration.
Declaración de conformidad.
1.9
Konformitätserklärung.
Installazione dell’apparecchio.
Installation de l’appareil.
2.0
Installing the appliance.
Instalación del aparato.
Geräteinstallation.
Posizionamento dell’apparecchio.
Position de l'appareil.
2.1
Positioning the appliance.
Colocación del aparato.
Geräteaufstellung.
Collegamento elettrico.
Connexion électrique.
2.3
Electrical connection.
Conexión eléctrica.
Elektroanschluss.
Collegamento idraulico entrata acqua.
Raccordement hydraulique - arrivée d'eau.
2.4
Plumbing - water inlet.
Conexión hídrica-entrada del agua.
Anschluss ans Wassernetz – Wasserzufuhr.
Automatismi di controllo e sicurezza.
Organes de contrôle et de sécurité.
3.0
Control and safety devices.
Automatismos de control de seguridad.
Kontroll- und Sicherheitsautomatik.
Sostituzione parti di ricambio.
Remplacement des pièces.
3.1
Replacing spare parts.
Piezas de repuesto.
Austausch der Ersatzteile.

Convection 4 x 2/3GN Analogic electric models
3
ISTRUZIONI PER L’INSTALLATORE
INSTRUCTIONS FOR THE INSTALLER
ANLEITUNGEN FÜR DEN INSTALLATEUR
NOTICE POUR L'INSTALLATEUR
INSTRUCCIONES PARA EL INSTALADOR
1.0 DIMENSIONI
1.0 DIMENSIONS
1.0 ABMESSUNGEN
1.0 DIMENSIONS
1.0 MEDIDAS
Modelli Modèles Dimensioni Dimensions Capacità e distanza (passo) tra le teglie. Capacité et écartement entre bacs.
Models Modelos Dimensions Medidas Capacity and distance between trays. Capacidad y distancia (paso) entre las fuentes.
Modelle Abmessungen Fassungsvermögen und Abstand
4 x 2/3 GN Electric
cm 55 x 68 x h 53 n°04 x 2/3 GASTRO NORM 65 mm
Modelli con e senza alimentazione idraulica.
Models with and without hydraulic connection.
Modelle mit und ohne Wasseranschluß.
Modèles avec et sans raccordement hydraulique.
Modelos con y sin alimentaciòn hìdrica.
A
Entrata cavo alimentazione elettrica
Electrical connection
Elektroanschluß
Branchement électrique
Conexión eléctrica
B Entrata acqua φ 3/4″ gas
Water inlet
φ
3/4” gas
Wasserzufuhr φ 3/4” Gas
Arrivée eau
φ
3/4 gaz
Entrada agua φ 3/4″ de gas
C Sfiato camera cottura φ 32 mm
Cooking chamber relief valve
φ
32mm
Schnüffelventil Garraum φ 32 mm
Purge chambre de cuisson
φ
32 mm
Desagüe camara coccion
φ 32 mm
Modelli con serbatoio acqua.
Models with water tank.
Modelle mit Wassertank
Modèles avec réservoir d’eau interne.
Modelos con depòsito de agua.
A
Entrata cavo alimentazione elettrica
Electrical connection
Elektroanschluß
Branchement électrique
Conexión eléctrica
B Tappo serbatoio acqua.
Water tank plug.
Wassertankverschluss
Bouchon réservoir d’eau interne.
Tapòn depòsito de agua.
C Rubinetto scarico serbatoio acqua.
Drain valve for water tank.
Wassertankablaufhahn
Robinet vidange reservoir d’eau.
Grifo desagüe depòsito de agua.
D Sfiato camera cottura φ 32 mm
Cooking chamber relief valve
φ
32 mm
Schnüffelventil Garraum φ 32 mm
Purge chambre de cuisson
φ
32 mm
Desagüe camara coccion
φ 32 mm

Convection 4 x 2/3GN Analogic electric models
4
ISTRUZIONI PER L’INSTALLATORE
INSTRUCTIONS FOR THE INSTALLER
ANLEITUNGEN FÜR DEN INSTALLATEUR
NOTICE POUR L'INSTALLATEUR
INSTRUCCIONES PARA EL INSTALADOR
1.6 TABELLA DATI TECNICI Allacciamento elettrico.
1.6 TABLEAU DES DONNEES TECHNIQUES Branchement électrique.
1.6 ECHNICAL DATA TABLE Electric connection.
1.6 TABLA DATOS TÉCNICOS Conexión eléctrica hornos.
1.6 TABELLE TECHNISCHE DATEN Elektroanschluß.
Modelli Potenza assorbita e voltaggio. n° e potenza motori. Potenza riscaldante. Corrente assorbita. Sez. cavo alimentazione.
Models Power loading and voltage. no. and motors power. Heating power. Absorbed current. Feed cable section.
Modelle Leistung und Spannung. Nr. u. Leistung der Motore Heizleistung. Strom Querschnitt Anschlusskabel.
Modèles Puissance absorbé et voltage. n° et puissance moteur. Puissance de chauffe. Courant absorbé. Section cable alimentation.
Modelos Consumo de potencia y voltaje. n° y potencia motores. Potencia calefacción. Consumo corriente. Sección cable alimentacion.
4 / 5 GN 2/3
2.9 kW 230V ∼ 50/60Hz 1 x 0.1 kW 2.8 kW 12.2 A n°3 x 2.5 mm
2
4 / 5 GN 2/3 4 KW 230V + 3 ∼ 50/60Hz 1 x 0.1 kW 3.9 kW 10.4 A n°3 x 2.5 mm
2
2.0 DICHIARAZIONE DI CONFORMITA’.
Il Costruttore dichiara che gli apparecchi sono conformi alle prescrizioni CEE. L’installazione dovrà essere effettuata in osservanza alle norme vigenti,
soprattutto in merito all’areazione dei locali.
N.B. : Il Costruttore declina ogni responsabilità in caso di danni diretti derivati da: uso non corretto, errata installazione e da cattiva
manutenzione.
2.0 CONFORMANCE DECLARATION.
The Manufacturer declares that the appliances conform to the EEC guidelines. They must be installed in accordance with current standards, especially
regarding aeration of the premises and the exhaust gas evacuation system.
Note: The Manufacturer declines all and every responsibility for any direct damages caused by: an incorrect use, wrong installation or bad
maintenance.
2.0 KONFORMITÄTSERKLÄRUNG.
Die Herstellerfirma bestätigt, dass die Geräte den EU-Vorschriften entsprechen. Die Installation muss, insbesondere bezüglich der Belüftung der Räume
und der Abgasleitung, gemäß den gültigen Normen durchgeführt werden.
N.B. : Der Hersteller haftet nicht für direkte Schäden, die durch unsachgemäße Bedienung, Installation, oder Wartung verursacht wurden.
2.0 DÉCLARATION DE CONFORMITÉ.
Le constructeur déclare que les appareils sont conformes aux normes CEE. L’installation devra être effectuée en respectant les normes en vigueur,
notamment celles concernant l’aération des locaux.
N.B. : Le
constructeur décline toute responsabilité en cas de dommages dérivant d’une utilisation incorrecte, d’une installation erronée et
d’une mauvaise maintenance.
2.0 DECLARACIÓN DE CONFORMIDAD.
El fabricante declara que los aparatos son conformes a las prescripciones CEE. La instalación debe ser efectuada según las normas vigentes, sobre
todo en cuanto a la ventilación de los locales.
N.B.: El Fabricante rehusa cualquier responsabilidad en caso de daños directos causados por: uso no correcto, instalación errada y falta
de mantenimiento.

Convection 4 x 2/3GN Analogic electric models
5
ISTRUZIONI PER L’INSTALLATORE
INSTRUCTIONS FOR THE INSTALLER
ANLEITUNGEN FÜR DEN INSTALLATEUR
NOTICE POUR L'INSTALLATEUR
INSTRUCCIONES PARA EL INSTALADOR
DIRETTIVA EUROPEA 2002/96/EC
Questo apparecchio è contrassegnato in conformità alla Direttiva Europea 2002/96/EC, Waste Electrical and Electronic Equipment (WEEE).
Assicurandosi che questo prodotto sia smaltito in modo corretto, l'utente contribuisce a prevenire le potenziali conseguenze negative per l'ambiente e la
salute.
Il simbolo
sul prodotto o sulla documentazione di accompagnamento indica che questo prodotto non deve essere trattato come rifiuto domestico ma
deve essere consegnato presso l'idoneo punto di raccolta per il riciclaggio di apparecchiature elettriche ed elettroniche.
Disfarsene seguendo le normative locali per lo smaltimento dei rifiuti.
Per ulteriori informazioni sul trattamento, recupero e riciclaggio di questo prodotto, contattare l'idoneo ufficio locale, il servizio
di raccolta dei rifiuti domestici o il negozio presso il quale il prodotto è stato acquistato.
EUROPEAN DIRECTIVE 2002/96/EC
This appliance is marked according to the European directive 2002/96/EC on Waste Electrical and Electronic Equipment
(WEEE).
By ensuring this product is disposed of correctly, you will help prevent potential negative consequences for the environment
and human health, which could otherwise be caused by inappropriate waste handling of this product.
The symbol on the product, or on the documents accompanying the product, indicates that this appliance may not be
treated as household waste. Instead it shall be handed over to the applicable collection point for the recycling of electrical
and electronic equipment.
Disposal must be carried out in accordance with local environmental regulations for waste disposal.
For more detailed information about treatment, recovery and recycling of this product, please contact your local city office,
your household waste disposal service or the shop where you purchased the product.
EUROPÄISCHEN RICHTLINIE 2002/96/EG
In Übereinstimmung mit den Anforderungen der Europäischen Richtlinie 2002/96/EG über Elektro- und Elektronik-Altgeräte (WEEE) ist vorliegendes
Gerät mit einer Markierung versehen.
Sie leisten einen positiven Beitrag für den Schutz der Umwelt und die Gesundheit des Menschen, wenn Sie dieses Gerät einer gesonderten
Abfallsammlung zuführen.
Im unsortierten Siedlungsmüll könnte ein solches Gerät durch unsachgemäße Entsorgung negative Konsequenzen nach sich ziehen.
Auf dem Produkt oder der beiliegenden Produktdokumentation ist folgendes Symbol
einer durchgestrichenen Abfalltonne abgebildet. Es weist
darauf hin, dass eine Entsorgung im normalen Haushaltsabfall nicht zulässig ist Entsorgen Sie dieses Produkt im Recyclinghof mit einer getrennten
Sammlung für Elektro- und Elektronikgeräte.
Die Entsorgung muss gemäß den örtlichen Bestimmungen zur Abfallbeseitigung erfolgen.
Bitte wenden Sie sich an die zuständigen Behörden Ihrer
Gemeindeverwaltung, an den lokalen Recyclinghof für Haushaltsmüll oder an den Händler, bei dem Sie dieses Gerät erworben haben, um weitere
Informationen über Behandlung, Verwertung und Wiederverwendung dieses Produkts zu erhalten.
DIRECTIVE EUROPÉENNE 2002/96/CE
Cet appareil porte le symbole du recyclage conformément à la Directive Européenne 2002/96/CE concernant les Déchets d'Équipements Électriques et
Électroniques (DEEE ou WEEE).
En procédant correctement à la mise au rebut de cet appareil, vous contribuerez à empêcher toute conséquence nuisible pour l'environnement et la
santé de l'homme.
Le symbole présent sur l'appareil ou sur la documentation qui l'accompagne indique que ce produit ne peut en aucun cas être traité comme déchet
ménager. Il doit par conséquent être remis à un centre de collecte des déchets chargé du recyclage des équipements électriques et électroniques.
Pour la mise au rebut, respectez les normes relatives à l'élimination des déchets en vigueur dans le pays d'installation.
Pour obtenir de plus amples détails au sujet du traitement, de la récupération et du recyclage de cet appareil, veuillez vous adresser au bureau
compétent de votre commune, à la société de collecte des déchets ou directement à votre revendeur.
DIRECTIVA 2002/96/EC
Este aparato lleva el marcado CE en conformidad con la Directiva 2002/96/EC del Parlamento Europeo y del Consejo sobre residuos de aparatos
eléctricos y electrónicos (RAEE).
La correcta eliminación de este producto evita consecuencias negativas para el medioambiente y la salud.
El símbolo
en el producto o en los documentos que se incluyen con el producto, indica que no se puede tratar como residuo doméstico.
Es necesario entregarlo en un punto de recogida para reciclar aparatos eléctricos y electrónicos.
Deséchelo con arreglo a las normas medioambientales para eliminación de residuos.
Para obtener información más detallada sobre el tratamiento, recuperación y reciclaje de este producto, póngase en contacto con el ayuntamiento, con
el servicio de eliminación de residuos urbanos o la tienda donde adquirió el producto.
EUROPESE RICHTLIJN 2002/96/EG
Dit apparaat is voorzien van het merkteken volgens de Europese richtlijn 2002/96/EG inzake Afgedankte elektrische en elektronische apparaten
(AEEA).
Door ervoor te zorgen dat dit product op de juiste manier als afval wordt verwerkt, helpt u mogelijk negatieve consequenties voor het milieu en de
menselijke gezondheid te voorkomen die anders zouden kunnen worden veroorzaakt door onjuiste verwerking van dit product als afval.
Het symboo l op het product of op de bijbehorende documentatie geeft aan dat dit product niet als huishoudelijk afval mag worden behandeld. In
plaats daarvan moet het worden afgegeven bij een verzamelpunt voor recycling van elektrische en elektronische apparaten.
Afdanking moet worden uitgevoerd in overeenstemming met de plaatselijke milieuvoorschriften voor afvalverwerking.
Voor nadere informatie over de behandeling, terugwinning en recycling van dit product wordt u verzocht contact op te nemen met het stadskantoor in uw
woonplaats, uw afvalophaaldienst of de winkel waar u het product heeft aangeschaft.

Convection 4 x 2/3GN Analogic electric models
6
5
0
c
m
50 cm
3 cm
ISTRUZIONI PER L’INSTALLATORE
INSTRUCTIONS FOR THE INSTALLER
ANLEITUNGEN FÜR DEN INSTALLATEUR
NOTICE POUR L'INSTALLATEUR
INSTRUCCIONES PARA EL INSTALADOR
2.1 INSTALLAZIONE DELL’APPARECCHIO.
Leggere attentamente questo libretto che fornisce importanti indicazioni riguardanti la sicurezza dell’installazione, l’uso e la manutenzione.
L’installazione dell’apparecchio deve essere eseguita, solo ed esclusivamente, da personale qualificato seguendo le istruzioni riportate nel presente
manuale e nel rispetto delle norme in vigore.
Gli impianti dell’acqua e dell’energia elettrica ed i locali nei quali gli apparecchi vengono installati devono essere eseguiti in conformità alle
corrispondenti norme di installazione e sicurezza.
Collocare il forno in ambiente aerato e procedere alla messa a livello agendo sui piedini regolabili, in modo tale che rimanga una distanza minima di 6
cm tra il fondo del forno ed il piano di appoggio dei piedini.
Installare l’apparecchio in una posizione che ne permetta l’accesso al lato dx e su quello posteriore per le operazioni di installazione, manutenzione e
assistenza tecnica. Mantenere le distanze minime tra le pareti del forno, (posteriore e laterale dx) e le pareti in muratura o le altre apparecchiature come
indicato in figura n°1/A.
Rimuovere manualmente le pellicole protettive dalle parti in acciaio, prima di mettere in funzione l’apparecchio, evitando l’uso di sostanze abrasive e/o
di oggetti metallici.
Qualora il forno venga collocato sugli appositi supporti, da noi forniti su richiesta, fare attenzione che il foro centrale dei
piedini si innesti nel perno del supporto, questo incastro ne garantisce la stabilità. (Fig.1)
2.1 INSTALLING THE APPLIANCE.
Read this handbook through carefully as it provides important information to guarantee a safe installation, use and
maintenance.
The appliance must be installed only and exclusively by qualified personnel following the instructions given herein and in
compliance with current laws in force.
The water system, electricity and the premises on which the appliances are installed comply with the relative installation
and safety standards.
Install the oven on aerated premises and level with the adjustable feet, keeping at least 6 cm between the bottom of the
oven and the floor on which the feet stand.
Install the appliance in a position that allows access to the right and back for installation, maintenance and technical assistance. Maintain the minimum
distances between the oven walls, (rear and right side) and either the brick walls or the other appliances, as illustrated in figure 1/A.
Take the protective film off the stainless steel parts by hand before starting the appliance. Do not use abrasive substances and/or metal objects.
If the oven is placed on its supports, supplied by us on request, make sure the centre hole of the feet snap on to the support pin which will guarantee
stability. (Fig.1)
2.1 GERÄTEINSTALLATION.
Dieses Handbuch aufmerksam durchlesen, da es wichtige Auskünfte über die Sicherheit bei der Aufstellung, die Bedienung und Wartung enthält.
Die Geräteinstallation darf ausschließlich von Fachpersonal, gemäß den in diesem Handbuch angeführten Anleitungen und den gültigen Normen
durchgeführt werden.
Die Wasser- und Stromversorgungsanlagen, sowie der Aufstellungsort, müssen den geltenden Installations- und Sicherheitsbestimmungen
entsprechen.
Den Backofen in einem gut belüfteten Raum aufstellen und mit den höhenverstellbaren Füßen waagrecht ausrichten, sodass ein Mindestabstand von 6
cm zwischen dem Backofenboden und der Stellfläche der Füße bleibt.
Das Gerät so aufstellen, dass die rechte und hintere Seite des Geräts für Installations-, Wartungs- und Reparaturarbeiten zugänglich sind.
Den Mindestabstand zwischen den Wänden des Backofens (hintere Wand und rechte Seitenwand) und Mauern oder anderen Geräten beachten
(Abb.1/A).
Vor Inbetriebnahme des Geräts die Schutzfolie von den Stahlteilen abziehen. Dafür dürfen keine Scheuermittel bzw. Metallgegenstände verwendet
werden.
Sollte der Backofen auf den dafür vorgesehenen Abstellflächen - auf Anfrage lieferbar - aufgestellt werden, ist darauf zu achten, dass der
entsprechende Stellzapfen der Abstellfläche in das zentrale Loch im Stellfuß eingeschoben wird, wodurch ein fester und sicherer Stand des Backofens
gewährleistet wird (Abb.1)
2.1 INSTALLATION DE L’APPAREIL.
Lire attentivement cette notice car elle contient d’importantes indications en ce qui concerne la sécurité de
l’installation, l’emploi et la maintenance.
L’appareil doit être installé exclusivement par du personnel qualifié et agréé, en suivant les instructions reportées dans
cette notice et en respectant les normes en vigueur.
Les installations hydraulique et électrique ainsi que les locaux dans lesquels les appareils sont installés doivent
répondre aux normes d’installation et de sécurité en vigueur.
Installer le four dans un endroit bien aéré et procéder à sa mise à niveau en agissant sur les pieds réglables de façon
à ce qu’il y ait un espace minimum de 6 cm entre le bas du four et le plan où reposent les pieds. Positionner l’appareil
de façon à pouvoir facilement accéder à ses côtés droit et postérieur pour effectuer les opérations d‘installation, de
maintenance et de réparation. Maintenir les distances minimums entre les parois du four (postérieure et latérale droite) et les murs ou les autres
appareils, comme indiqué à la figure n°1/A.
Avant de mettre en marche l’appareil, enlever manuellement les films de protection sur les parties en acier inox, en évitant d’utiliser des substances
abrasives et/ou des objets métalliques.
Au cas où le four serait placé sur nos supports spéciaux, fournis sur demande, faire attention à bien emboîter le trou central des pieds dans la cheville
du support : cette opération assure la bonne stabilité du four (Fig.1)
2.1 INSTALACIÓN DEL APARATO.
Leer detenidamente este folleto que proporciona información importante acerca de la seguridad de la instalación, el uso y el mantenimiento.
La instalación del aparato debe ser efectuada sólo y exclusivamente por personal cualificado, según las instrucciones presentadas en este manual y
conforme a las normas vigentes.
Las instalaciones del agua, de la energía eléctrica así como los locales donde se emplazan los aparatos, deben cumplir las normas de instalación y
seguridad.
Colocar el horno en un sitio ventilado y ponerlo a nivel maniobrando las patas regulables de manera que quede una distancia mínima de 6 cm entre el
fondo del horno y el plano de apoyo de las patas.
Fig.1/A
A
bb.1/A
Fig.1
A
bb.1

Convection 4 x 2/3GN Analogic electric models
7
ISTRUZIONI PER L’INSTALLATORE
INSTRUCTIONS FOR THE INSTALLER
ANLEITUNGEN FÜR DEN INSTALLATEUR
NOTICE POUR L'INSTALLATEUR
INSTRUCCIONES PARA EL INSTALADOR
Instalar el aparato en una posición que permita acceder a su lado derecho y al trasero para poder efectuar las operaciones de instalación,
mantenimiento y reparación. Mantener las distancias mínimas entre las paredes del horno, (trasera y lateral derecha) y las paredes de ladrillos o los
otros aparatos, como indicado en la fig.1/A.
Remover manualmente las películas protectoras de las partes en acero inoxidable antes de poner en servicio el aparato, evitando emplear sustancias
abrasivas y/o objetos metálicos.
Si se coloca el horno sobre los soportes correspondientes, suministrados a demanda, tener cuidado en que el agujero central de las patas encaje en el
perno del soporte, este encaje garantiza la estabilidad. (Fig.1)
2.3 COLLEGAMENTO ELETTRICO.
L’apparecchio consegnato è predisposto per il funzionamento alla tensione riportata sulla targhetta “caratteristiche” applicata sul fianco dx
dell’apparecchio.
La morsettiera di allacciamento è accessibile dal lato dx dell’apparecchio, smontando il fianco di rivestimento.
Il cavo flessibile, per il collegamento elettrico, deve avere caratteristiche non inferiori a quello con isolamento in gomma H07 RN-F, con la sezione dei
conduttori riportata nei dati tecnici.
Installare, a monte dell’apparecchio, un interruttore automatico di protezione e di portata adeguata, che abbia un’apertura dei contatti superiore a 3 mm.
E’ indispensabile collegare l’apparecchiatura ad un efficiente impianto di terra; a tale scopo sulla morsettiera di allacciamento c’è il morsetto, con il
relativo simbolo
, al quale deve essere connesso il conduttore di terra.
L’apparecchiatura deve trovare inserimento in un sistema equipotenziale la cui efficacia deve essere in conformità alla normativa in vigore. Il
collegamento deve essere eseguito tramite la vite collocata in prossimità del pressacavo di alimentazione, contrassegnata dalla sigla EQUIPOTENTIAL.
Il costruttore declina ogni responsabilità qualora questa importante norma antinfortunistica non venga rispettata.
2.3 ELECTRICAL CONNECTION.
When the appliance is delivered it is set to work at the voltage given on the rating plate affixed on the right.
The terminal board used for connecting can be accessed from the right of the appliance, removing the cladding panel.
The specifications of the flexible cable for the electrical connection should be no lower than those of the type with rubber insulation H07 RN-F, with the
cross section of the wires as given in the technical data.
Install a circuit breaker of a suitable capacity upstream from the appliance, making sure it has an opening between the contacts of at least 3-mm.
It is essential to connect the appliance to an effective earthing system; for this purpose the relative terminal with the symbol
to which the earth wire
is to be connected is on the terminal board.
The effectiveness of the equipotential system the appliance is part of must conform to current standards. Connect using the screw you find near the
power cable’s relief cable strain, marked with the word EQUIPOTENTIAL. The manufacturer declines all and every responsibility if this important
accident prevention norm is not complied with.
2.3 ELEKTROANSCHLUSS.
Das Gerät wird fabrikseitig für den Betrieb mit der am Typenschild (auf der rechten Seite des Geräts angebracht) angegebenen Versorgungsspannung
eingestellt.
Die Anschlussklemmleiste wird durch Abnehmen der rechten Seitenwand zugänglich.
Der Anschluss muss mit einem Netzkabel mit den Eigenschaften des Typs H07 RN-F mit Gummiisolierung durchgeführt werden. Die Leiterquerschnitte
müssen jenen unter „Technische Daten” angeführten entsprechen.
Vor dem Gerät muss ein automatischer Schutzschalter, mit mindestens 3 mm Kontaktöffnungsweite, eingebaut werden.
Das Gerät muss unbedingt geerdet werden. Zu diesem Zweck befindet sich auf der Anschlussklemmleiste eine Klemme mit entsprechendem Symbol
, an die der Erdleiter angeschlossen werden muss.
Des weiteren muss das Gerät in ein Potentialausgleichssystem eingeschlossen werden, dessen Wirksamkeit den geltenden Richtlinien entsprechen
muss. Der Anschluss wird mit der Schraube durchgeführt, die mit EQUIPOTENTIAL gekennzeichnet ist und sich in der Nähe der Kabelklemme befindet.
Die Herstellerfirma übernimmt bei Nichtbeachtung dieser Unfallverhütungsmaßnahme keine Verantwortung.
2.3 CONNEXION ÉLECTRIQUE.
L’appareil fourni est prévu pour fonctionner à la tension indiquée sur la plaquette signalétique qui se trouve sur le côté droit de l'appareil.
Le bornier de connexion est accessible sur le côté droit de l'appareil, après avoir enlevé le panneau d'habillage.
Le câble flexible, servant à la connexion électrique, doit posséder des caractéristiques qui ne soient pas inférieures à celles d'un câble avec isolation en
caoutchouc H07 RN-F et avoir la section des conducteurs comme indiqué dans le tableau des données techniques.
Installer en amont de l'appareil un interrupteur de protection automatique ayant une charge adéquate et une ouverture des contacts supérieure à 3 mm.
Il est indispensable de brancher l'appareil à une prise de terre efficace; dans ce but, vous trouverez sur le bornier de connexion, la borne marquée du
symbole
à laquelle vous devrez brancher le conducteur de terre.
L’appareil doit être placé dans un système équipotentiel dont l'efficacité doit être conforme à la réglementation en vigueur. Le branchement doit être
effectué par le biais de la vis qui se trouve à proximité du serre-câble d'alimentation, marqué du sigle EQUIPOTENTIAL. Le constructeur décline toute
responsabilité au cas où cette norme importante concernant la prévention des accidents ne serait pas respectée.
2.3 CONEXIÓN ELÉCTRICA.
El aparato entregado está predispuesto para funcionar con el voltaje indicado en la placa de “Características” aplicada en el lado derecho del aparato.
Se accede al terminal de conexión por el lado derecho del aparato, desmontando el flanco del chasis.
El cable flexible, para la conexión eléctrica, debe tener características no inferiores a aquél con aislamiento en goma H07 RN-F, con la sección de los
conductores indicada en los datos técnicos.
Instalar, aguas arriba del aparato, un interruptor automático con protección y capacidad adecuadas, que tenga una apertura de los contactos superior a
3 mm.
Es indispensable conectar el aparato con una instalación de tierra eficaz; con tal fin, en el terminal de conexión hay un borne, marcado con el símbolo
correspondiente, al cual es preciso conectar el conductor de tierra.
Es preciso conectar el aparato en un sistema equipotencial cuya eficacia debe cumplir las normas vigentes. La conexión debe ser efectuada
empleando el tornillo situado cerca del sujetacable de alimentación, marcado con la sigla EQUIPOTENTIAL. El fabricante rehusa cualquier
responsabilidad en caso de incumplimiento de esta norma fundamental.

Convection 4 x 2/3GN Analogic electric models
8
ISTRUZIONI PER L’INSTALLATORE
INSTRUCTIONS FOR THE INSTALLER
ANLEITUNGEN FÜR DEN INSTALLATEUR
NOTICE POUR L'INSTALLATEUR
INSTRUCCIONES PARA EL INSTALADOR
2.4 COLLEGAMENTO IDRAULICO - ENTRATA ACQUA. (Fig.2)
I forni sono provvisti di un raccordo di entrata-acqua situato nel retro dell’apparecchiatura. Porre sempre tra l’apparecchio e la rete di alimentazione
dell’acqua una valvola di intercettazione con comando facilmente azionabile, si consiglia inoltre il montaggio di un filtro a cartuccia sulla tubazione
dell’entrata dell’acqua.
L’elettrovalvola (A) alimenta tramite l’iniettore (B) il sistema di generazione di vapore nella camera di cottura.
L’acqua di alimentazione deve essere idonea al consumo umano e avere le seguenti caratteristiche:
Temperatura compresa tra 20-90°C.
Durezza totale compresa tra 4 e 8°Francesi, si consiglia di installare sempre un decalcificatore a monte dell’apparecchio, atto a mantenere il valore
della durezza dell’acqua entro detti valori, Il funzionamento del forno con acqua di durezza superiore porta alla formazioni di incrostazioni calcaree sulle
pareti della camera di cottura, eventuali interventi di assistenza tecnica necessari alla riparazione di danni causati dal calcare, non saranno considerati
“in garanzia”.
Pressione compresa tra 100 e 250 KPa (1 - 2.5 bar).
Concentrazione massima di ione cloruro (Cl-) inferiore a 150 mgr/litro.
Concentrazione di Cloro (Cl
2
) inferiore a 0.2 mg/litro.
Ph maggiore di 7.
Conducibilità elettrica compresa tra 50 e 2000 µS/cm.
2.4 PLUMBING – WATER INLET.
(Fig.3)
The ovens have a water inlet coupling at the back. Always install an on-off valve between the appliance and the water mains, making sure it is easy to
operate, we also suggest installing a cartridge filter on the water inlet pipe.
The solenoid valve (A) supplies by mean of the injector (B) the system that generates steam inside the oven.
The water must be suitable to human use with the following characteristics:
Temperature
included between 20 and 90°C.
Total hardness
included between 4 and 8 ° French degree, it is advisable to install a softener upstream from the appliance that will maintain the
hardness level at the mentioned values, the oven’s running with water that has a higher hardness level it will not be long before scale forms on the walls
of the oven and in this case the technical assistance required to repair such damage is not covered by the guarantee.
Pressure
included between 100 and 250 KPa (1 – 2.5 bar).
Maximum chloride
concentration (Cl-) less than 150 mgr/litre.
Chlorine concentration
(Cl
2
) less than 0.2 mg/litre.
Ph
more than 7.
Water conductivity
included between 50 and 2000
µ
S/cm.
2.41 ANSCHLUSS ANS WASSERNETZ - WASSERZUFUHR (Abb.3)
Die Geräte sind auf der Rückseite mit einem Wasseranschluss ausgerüstet. Zwischen dem Gerät und dem
Wasserversorgungsnetz muss ein leicht zugängliches Absperrventil zwischengeschaltet werden. Außerdem ist es ratsam, in der
Wasserzuleitung einen Filter mit Einsatz zu montieren.
Das Elektroventil (A) versorgt durch den Injekteur das System zur Dampferzeugung im Garraum.
Es darf nur trinkbares Wasser zugeführt werden, das für den Menschengebrauch geeignet ist und das die folgenden Merkmale
hat:
Temperature muß zwischen 20 und 90°C.
Wasserhärte: Diesem Gerät muß Wasser zugeführt werden, das eine Härte von 4 bis 8 französischen Graden aufweist. Wird immer empfohlen einen
Entkalker dem Gerät vorzuschalten, damit der Härtegrad des Wassers zwischen diesen Werten liegt. Wird Wasser mit höherem Härtegrad verwendet,
entstehen innerhalb kurzer Zeit Kalkablagerungen auf den Garraumwänden. Eventuelle, dadurch notwendige Reparaturen werden nicht von der
Garantie gedeckt.
Wasserdruck: muß zwischen 100 und 250 KPa (1 – 2.5 bar) betragen.
Maximale Chloridkonzentration (Cl-) kleiner 150 mgr/Liter.
Chlorkonzentration (Cl
2
) unter 0.2 mg/Liter.
Ph über 7.
Leitfähigkeit des Wassers von 50 bis 2000 µS/cm.
A
B
Fig. 2
A
bb. 2
La pagina si sta caricando...

Convection 4 x 2/3GN Analogic electric models
10
ISTRUZIONI PER L’INSTALLATORE
INSTRUCTIONS FOR THE INSTALLER
ANLEITUNGEN FÜR DEN INSTALLATEUR
NOTICE POUR L'INSTALLATEUR
INSTRUCCIONES PARA EL INSTALADOR
3.0 AUTOMATISMI DI CONTROLLO E SICUREZZA.
I forni sono dotati di una serie di automatismi di controllo e sicurezza dei circuiti elettrici ed idraulici
3.0A Fusibile da 2A : è inserito nel circuito ausiliario per la protezione da corto circuito dell’impianto elettrico ed è alloggiato nell’apposito supporto
collocato sulla staffa di fissaggio dei contattori.
3.0B Protezione motore: il motore è protetto dall’impedenza degli avvolgimenti elettrici.
3.0C Termostato sicurezza camera forno: disinserisce le resistenze riscaldanti in caso di anomalie derivate da surriscaldamento, il ripristino dovrà
essere eseguito manualmente dopo la verifica delle cause che ne hanno causato l’intervento.
3.0D Microinterruttore porta: arresta il funzionamento del forno quando viene aperta la porta.
3.0E Valvola sfiato camera: ha la funzione di regolare l’umidità all’interno della camera di cottura. L’apertura della valvola si esegue ruotando il
pomello B in senso antiorario (Fig. 3).
3.0 CONTROL AND SAFETY DEVICES
The ovens are equipped with a set of control and safety devices for the electric and hydraulic circuits.
3.0A 2A fuse:
it is in the auxiliary circuit to protect against short circuiting of the electrical system and is inside its own support on the contactors’s
fixing bracket.
3.0B Motor overload protection:
the motor is protected from the impedance of its winding.
3.0C Oven safety thermostat:
disconnects the heating element or the gas burners when anomalies
related to overheating occur. Subsequent re-set will have to be done manually when causes for thermostat
operation have been determined.
3.0D Door microswitch:
it stops the oven working when the door is opened.
3.0E Oven air valve:
its job is to adjust humidity inside the oven. To open the valve turn counterclockwise
the knob (B) (Fig.3).
3.0 KONTROLL- UND SICHERHEITSAUTOMATIK.
Die Backöfen sind mit einer Reihe von automatischen Kontroll- und Sicherheitsvorrichtungen für Strom- und
Wasserkreise ausgerüstet
3.0A Schmelzsicherung 2A: ist in den Hilfsstromkreis eingebaut, um die elektrische Anlage vor einem Kurzschluss zu sichern und befindet sich im
dafür vorgesehenen Träger am Befestigungsbügel der Kontaktgeber.
3.0B Wärmeschutzschalter Motor: Der motor wird durch die elektrische Impedanz geschützt.
3.0C Sicherheitsthermostat Garraum: hat die Funktion, bei erhöhten Temperaturen im Garraum die Gaszufuhr zu unterbrechen. Die Rückstellung
des Thermostats muss manuell erfolgen, nachdem die Ursachen, die zur Überhitzung geführt haben, behoben wurden.
3.0D Mikroschalter Tür: unterbricht den Backofenbetrieb, jedes Mal, wenn die Tür geöffnet wird.
3.0E Schnüffelventil Garraum: hat die Aufgabe, die Feuchtigkeit im Garraum zu regeln, um das Ventil zu öffnen, den Knopf „B“ gegen den
Uhrzeigersinn drehen (Abb.3).
3.0 ORGANES DE CONTRÔLE ET DE SÉCURITÉ.
Les fours sont équipés d'une série d'organes de contrôle et de sécurité des circuits électriques et hydrauliques.
3.0A Fusible de 2A :
il se trouve dans le circuit auxiliaire afin d'éviter un court-circuit dans l'installation électrique et il est fixé sur le support prévu à
cet effet sur la bride des contacteurs.
3.0B Protection du moteur:
le moteur protegé par l’impedance électrique.
3.0C Thermostat de sécurité enceinte de cuisson:
il déconnecte les résistances électriques en cas d'anomalies qui pourraient résulter à cause
de surchauffe. Le réarmement devra être effectué manuellement après en avoir vérifier les causes.
3.0D Micro-interrupteur porte:
il interrompt le fonctionnement du four quand la porte est ouverte.
3.0E Soupape de purge enceinte:
elle sert à régler l’humidité à l'intérieur de l'enceinte de cuisson. Pour ouvrir le soupape de purge il faut tourner le
bouton B dans le sens contraire des aiguilles d’une montre. (Voir fig.3).
3.0 AUTOMATISMOS DE CONTROL DE SEGURIDAD.
Los hornos disponen de una serie de automatismos de control y seguridad de los circuitos eléctricos e hídricos.
3.0A Fusible de 2A : situado en el circuito auxiliar para la protección contra cortocircuito de la instalación eléctrica y alojado en el soporte
correspondiente situado en la fijación de los contactores.
3.0B Protección del motor: el motor està protegido de la impedancia del cableado electrico.
3.0C Termóstato de seguridad en cámara horno: dispara la válvula del gas en caso de que se presenten anomalías causadas por un
recalentamiento; el restablecimiento debe ser efectuado manualmente después de averiguar las causas que han determinado el disparo.
3.0D Microinterruptor puerta: para el funcionamiento del horno cuando se abre la puerta.
3.0E Válvula alivio cámara: tiene la tarea de regular la humedad dentro de la cámara de cocción. La apertura de la vàlvula se ejecuta girando el
mando Ben sentido contrario a las agujas del reloj. (Ver fig.8).
A
B
Fig. 3
A
bb. 3

Convection 4 x 2/3GN Analogic electric models
11
ISTRUZIONI PER L’INSTALLATORE
INSTRUCTIONS FOR THE INSTALLER
ANLEITUNGEN FÜR DEN INSTALLATEUR
NOTICE POUR L'INSTALLATEUR
INSTRUCCIONES PARA EL INSTALADOR
3.1 SOSTITUZIONE PARTI DI RICAMBIO.
Prima di procedere alla sostituzione delle parti di ricambio è necessario, ai fini della sicurezza, disinserire l’interruttore elettrico di protezione e chiudere
la valvola di intercettazione-acqua installati a monte dell’apparecchio.
3.1A Ventola motore: 1-sganciare i pannelli portateglie dx e sx dai relativi perni di incastro; 2-togliere il pannello di convogliamento e aspirazione
aria dopo aver svitato e tolto i 4 dadi a calotta del fissaggio; 3-svitare e togliere la vite frontale di bloccaggio della ventola all’albero motore; 4-tramite
un estrattore facente leva sull’albero motore sfilare la ventola e sostituirla.
3.1B Motore: dopo avere eseguito lo smontaggio della ventola, come sopra descritto, procedere come segue:
1-scollegare i cavi elettrici di collegamento; 2- svitare e togliere le 4 viti di fissaggio del motore alla camera forno; 3-estrarre il motore sostituendolo
con quello nuovo.
Prima di rimontare la ventola assicurarsi che l’albero motore giri senza attrito sulla flangia di tenuta, in caso contrario svitare le 3 viti che fissano la
flangia alla camera di cottura e procedere alla centratura e successivo bloccaggio in modo tale che l’albero ruoti nella flangia senza attriti.
3.1C Resistenza di riscaldamento: 1-dopo la rimozione dei pannelli portateglie dx e sx e di quello di convogliamento e aspirazione aria, procedere
allo smontaggio dello schienale posteriore in acciaio inox; 2-svitare e togliere le 3 viti ed il dado che fissano la resistenza alla parete della camera di
cottura; 3-disconnettere i cavi del collegamento elettrico; 4-estrarre la resistenza dall’interno della camera di cottura e procedere al montaggio di
quella nuova.
Al fine di garantire la tenuta al vapore, applicare del sigillante al silicone resistente alla temperatura tra la flangia della nuova resistenza e la parete
della camera di cottura.
3.1D Componenti elettrici del cruscotto: il selettore cicli, i termostati, il timer sono accessibili dopo aver smontato il fianco di rivestimento dx . Per
la loro sostituzione è sufficiente: 1-smontare il cruscotto; 2-estrarre le manopole; 3-svitare e togliere le relative viti di fissaggio; 4- scollegare i cavi
elettrici e procedere alla sostituzione del componente. Per la sostituzione dei termostati bisognerà sfilare verso l’esterno i bulbi inseriti nei vari punti
della camera di cottura. A tale scopo i premistoppa, che bloccano i capillari dei bulbi, devono essere rimossi per permetterne la sostituzione e
l’inserimento dei nuovi componenti.
3.1E Lampada illuminazione camera di cottura: è sufficiente aprire il cristallo esterno mobile della porta, smontare la copertura in acciaio inox
della porta e provvedere alla sostituzione della/e lampade di tipo alogeno. Si raccomanda di evitare il contatto diretto della lampada con le mani.
3.1F Guarnizione di tenuta della porta: è sufficiente tirarla, staccandola dalla sede nella quale è inserita a pressione. Ad estrazione avvenuta
inserire quella nuova nella stessa posizione.
CONTROLLO DELLE FUNZIONI.
Mettere in funzione l’apparecchio come da ISTRUZIONI PER L’UTENTE.
Eseguire una prova di tenuta delle condutture idriche e quelle del gas.
E’ indispensabile spiegare all’utente il funzionamento dell’apparecchiatura e consegnargli il libretto istruzioni a cui si dovrà attenere nell’uso.
3.1 REPLACING SPARE PARTS.
Before starting to replace spare parts make sure - for safety reasons - that the electricity main switch is off and that the water on-off valve is closed and
that (for gas powered ovens) the gas supply is turned off.
3.1A Motor fan:
1-unhook the right and left baking tray support panels from their pins; 2-remove the air conveyance and suction panel after having
unscrewed and removed the 4 cap nuts fixing it; 3-unscrew and remove the front screw locking the fan to the motor shaft; 4-with an extractor lever on
the motor shaft, pull the fan out and change it.
3.1B Motor:
once the fan has been removed as described above, proceed as follows:
1-disconnect the electrical cables; 2- unscrew and remove the 4 screws securing the motor to the oven; 3-extract the motor and put the new one in its
place.
Before putting the fan back, check that the motor shaft turns without friction on the sealing flange. To the contrary, unscrew the 3 screws fixing the
flange to the oven, centre the shaft and lock it so it turns smoothly in the flange without friction.
3.1C Heating element electric version:
1-after removing the right and left baking tray support panels and the air conveyance and suction panel,
remove the rear stainless steel panel; 2-unscrew and remove the 3 screws and the nut that are fixing the heating element to the oven wall; 3-
disconnect the electrical cables; 4-pull the heating element out from inside the oven and put the new one in its place.
To guarantee tightness to steam, seal with a temperature resistant silicon between the flange of the new heating element and the oven wall.
3.1D Components on the control panel:
the cycle selector, the thermostats, the timer can be accessed after the right cladding panel has been
removed. To change these components simply: 1-remove the control panel; 2-extract the knobs; 3-unscrew and remove the relative securing screws;
4-disconnect the electrical cables and change the component. When changing the thermostats, the bulbs installed in the various points of the oven
have to be pulled out. For this purpose the stuffing boxes, that are blocking the bulb capillaries, must be removed so the new ones can be fitted.
3.1E Oven light:
just open the external part of the double glass door, take off the stainless steel cover and change the halogen bulb. We advise you
not to touch the bulb directly with your hands.
3.1F Door seal:
simply pull it away – it is only pressed into position. Put the new seal in place.
CHECKING THE FUNCTIONS
Start the appliance following the INSTRUCTIONS FOR THE USER.
Test the water pipes for leaks.
It is essential to explain to the user exactly how the appliance works and to supply him with the instruction handbook that he must follow when using the
oven.
La pagina si sta caricando...
La pagina si sta caricando...

Convection 4 x 2/3GN Analogic electric models
14
ISTRUZIONI PER L’UTENTE INSTRUCTIONS FOR THE USER ANWEISUNGEN FÜR DEN BENUTZER
INSTRUCTIONS POUR L’USAGER
INSTRUCCIONES PARA EL USUARIO
INDICE
INDEX
INHALTSVERZEICHNIS
INDEX
INDICE
Premessa Vorwort Preámbulo
4.0
Foreword Avant-propos
Programmazione e funzionamento. Programmierung und funktionsweise. Programación y funcionamiento.
4.1
Programming and operation. Programmation et fonctionnement.
Analogic
Avviamento Start Arranque
4.2
Starting Mise en marche
Analogic
Descrizione componenti cruscotto. Beschreibunge der Bestandteile. Descripción componentes.
4.3
Components description of control panel. Description des éléments.
Analogic
Comandi e controlli ausiliari. Zusätzliche Steuerung- und Kontrollvorrichtungen. Mandos y controles auxiliares.
5.0
Auxiliary commands and controls. Commandes et contr
ô
les auxiliaires
Analogic
Preriscaldamento della camera forno. Vorheizen des Backraums Precalentamiento cámara horno
5.2
Pre-heating of the oven’s cooking chamber. Préchauffage de l'enceinte du four.
Analogic
Spegnimento del forno. Ausschalten des Backofens. Apagado del horno.
5.3
Turning the oven off. Arrêt du four.
Analogic
Manutenzione. Wartung. Mantenimiento.
8.0
Maintenance. Maintenance.
Comportamento in caso di guasto e/o di un prolungato
non funzionamento
Anweisungen bei störung bzw. längerem gerätestillstand
Comportamiento en caso de avería y/o de un largo plazo
de inactividad.
8.1
What to do in the case of a breakdown and/or extended
period of non use
Que faire en cas de panne et/ou d’arrêt prolongé de
l’appareil
Consigli per le cotture. Nützliche hinweise beim garen. Consejos para las cocciones.
9.0
Cooking tips. Conseils pour les cuissons.
Modalita’ e suggerimenti per le cotture a convezione. Methoden und ratschläge beim garen mit konvektion. Modalidades y sugerencias para las cocc.por convección.
9.1
Tips for convection cooking.
Modalités et conseils pour les cuissons à convection.
Rimedi alle anomalie di cottura. Abhilfe bei abnormalem garen. Remedios para las anomalías de cocción.
9.2
Remedies to cooking hitches. Que faire pour résoudre les problèmes de cuisson.
4.0 PREMESSA
Leggere attentamente le istruzioni per l’uso, con particolare attenzione alle norme relative ai dispositivi di sicurezza.
Questa apparecchiatura dovrà essere destinata solo all’uso per il quale è stata espressamente progettata e costruita e cioè: per tutte le cotture o
lessature di carni, pesci e verdure, per la gratinatura, la grigliatura e per il rigenerazione dei cibi precotti e/o surgelati.
4.0 FOREWORD
Read the instructions for use very carefully paying particular attention to the rules concerning safety devices.
This appliance must only be used for what it has been designed for and built for and that is: all baking and boiling of meat, fish and vegetables, for
browning, grilling and regenerating pre-cooked and/or frozen.
4.0 VORWORT
Diese Bedienungsanleitung und insbesondere die gültigen Richtlinien bezüglich der Sicherheitsvorrichtungen sorgfältig lesen und während des
Gerätebetriebs beachten.
Das Gerät darf nur für den ursprünglich vorgesehenen Zweck, d. h. zum Garen und Kochen von Fleisch, Fisch und Gemüse, zum Gratinieren, Grillen
und Regenerieren von vorgekochten bzw. tiefgekühlten Speisen,
4.0 AVANT-PROPOS
Lire attentivement la notice d'emploi en faisant particulièrement attention aux normes qui concernent les dispositifs de sécurité.
Cet appareil ne devra être destiné qu’à l’emploi pour lequel il a été expressément conçu et construit, à savoir: pour toutes les cuissons au four ou à l’eau
de viandes, poissons et légumes, pour les gratins, la cuisson au gril et la régénération d’aliments précuits et/ou surgelés.
4.0 PREÁMBULO
Leer detenidamente las instrucciones de uso, con particular atención para las normas correspondientes a los dispositivos de seguridad.
Este aparato debe ser destinado sólo para el uso para el cual ha sido expresamente diseñado y fabricado, es decir: para todas las cocciones o
salcochados de carnes, pescados y verduras, para gratinar, asar a la parrilla y regenerar comidas precocidas y/o congeladas.

Convection 4 x 2/3GN Analogic electric models
15
ON
0
75
100
150
200
175
250
270
0
ON
50-270
°C
50
225
125
15
20
55
60
50
0
ON
0
0
0 - 60
min.
5
10
40
45
30
25
35
0
ON
E
A
B
C
D
F
G
H
ISTRUZIONI PER L’UTENTE INSTRUCTIONS FOR THE USER ANWEISUNGEN FÜR DEN BENUTZER
INSTRUCTIONS POUR L’USAGER
INSTRUCCIONES PARA EL USUARIO
4.1 PROGRAMMAZIONE E FUNZIONAMENTO. (Fig.10 / 11)
4.1A Ciclo convezione aria calda. (campo temperatura 50-270°C)
Posizionare la manopola del selettore cicli (A) nella posizione sopra
evidenziata e selezionare la temperatura di cottura agendo sulla
manopola del termostato (C)
4.1D Ciclo raffreddamento.
Aprire la porta del forno e posizionare la manopola del selettore cicli (A)
sulla posizione sopra evidenziata. Questo ciclo permette il funzionamento
del motoventilatore, con la porta aperta, favorendo il rapido
raffreddamento della camera di cottura.
4.1C Produzione e immissione vapore.
Quando il riscaldamento è in funzione e la temperatura nella camera di
cottura ha raggiunto il valore minimo di 150°, si potrà produrre il vapore
nella camera di cottura. Esso verrà generato direttamente nella stessa,
tramite l’immissione di acqua nel ventilatore, la quantità di acqua e
conseguentemente del vapore, dipenderà dal tempo durante il quale
l’interruttore B sarà tenuto in funzione.
4.1 PROGRAMMING AND OPERATION.
(Fig.10 / 11)
4.1A Hot air convection cycle.
(temperature range 50-270°C)
Turn the cycle selector knob (A) to the position indicated above and select cooking
temperature using the thermostat knob.(C)
4.1B Cooling cycle.
Open the oven door and turn the cycle selector knob (A) to the position illustrated above.
This cycle allows the fan to work with the door open to help cool the oven quickly.
4.1C Steam production and injection.
Steam can be produced directly into the cooking chamber by min. 150° of cooking
temperature and when heating is running. Steam generates through direct water injection
in the fan. You can adjust the quantity of water and consequently of steam by turning and
holding down the manual knob (B).
4.1 PROGRAMMIERUNG UND FUNKTIONSWEISE. (Abb.10 / 11)
4.1A Heißluftbetrieb. (temperaturbereich 50-270°C)
Den Zykluswählschalter (A) auf oben angegebene Position stellen und die Temperatur
am Thermostatdrehschalter (C) einstellen.
4.1B Abkühlen.
Die Backofentür öffnen und den Zykluswählschalter (A) auf oben angegebene Position
stellen. Dieser Zyklus erlaubt den Betrieb des Motorventilators, wodurch sich der
Garraum rasch abkühlt.
4.1C Dampferzeugung und Injektion .
Bei der Erreichung von mindestens 150°C kann Dampf direkt im Garraum dadurch
erzeugt werden, daß Wasser auf die Lüfter eingespritzt wird. Die Wasser- und
Dampfmenge hängt davon ab, wie lange der Knopf B gezogen wird.
4.1 PROGRAMMATION ET FONCTIONNEMENT
. (Fig.10 / 11)
4.1A Cycle convection air chaud.
(plage température 50-270°C)
Tourner le bouton du sélecteur de cycles (A) dans la position indiquée ci-dessus et régler
la température de cuisson avec le bouton du thermostat (C).
4.1B Cycle de refroidissement.
Ouvrir la porte du four et tourner le bouton du sélecteur de cycles (A) sur la position
indiquée ci-dessus. Ce cycle met en marche le moto-ventilateur, avec la porte ouverte,
permettant le refroidissement rapide de l'enceinte de cuisson.
4.1C Production et injection de vapeur.
Lorsqu’on a une température minimale de 150°C dans la chambre de cuisson on y peut
introduire directement la vapeur, que vient generée par l’eau injecté sur le ventilateur. La
quantité d’eau et en consequence de vapeur est determinée par le temps, dont on va
presser le bouton B..
4.1 PROGRAMACIÓN Y FUNCIONAMIENTO. (Fig.10 / 11)
4.1A Ciclo convección aire caliente. (campo temperaturas 50-270°C)
Colocar el mando del selector de ciclos (A) en la posición resaltada anteriormente y
seleccionar la temperatura de cocción maniobrando el mando del termóstato (C).
4.1B Ciclo enfriamiento.
Abrir la puerta del horno y colocar el mando del selector de ciclos (A) en la posición resaltada anteriormente. Este ciclo permite que el ventilador
funcione, con la puerta abierta, permitiendo un enfriamiento rápido de la cámara de cocción.
4.1C Producciòn e introducciòn vapor.
Cuando el calentamiento està en marcha y la temperatura en la càmara de cocciòn ha alcanzado el valor mìnimo de 150°, se podrà producir el vapor
en la càmara de cocciòn. El’ estarà generado directamente en la misma, por la introducciòn de agua en el ventilador, la cantidad de agua y por
consiguiente del vapor, dependerà del tiempo durante el cual el interruptor B estarà en marcha.
CONVECTION
5
0
7
2
0
°
C
M
O
D
E
COOLING MO
°
C
D
E
Fig. 11 Modelli con
sistema di produzione
vapore.
Fig. 11 Models supplied
with steam generation
system.
A
bb. Modelle mit
Dampferzeugungsystem.
Fig. 10 Modèles avec
système de production
vapeur.
Fig. 11 Modelos con
sistema de producciòn
vapor.
20
15
100
75
200
175
150
0
ON
270
250
0
ON
50
50-270
°C
225
125
55
60
50
0
ON
0
0
0 - 60
min.
10
5
45
40
35
30
25
E
A
C
G
H
D
Fig. 10 Modelli senza
sistema di produzione
vapore.
Fig. 10 Models supplied
without steam generation
system.
A
bb. 10 Modelle ohne
Dampferzeugungsystem.
Fig. 10 Modèles sans
système de production
vapeur.
Fig. 10 Modelos sin
sistema de producciòn
vapor.

Convection 4 x 2/3GN Analogic electric models
16
ISTRUZIONI PER L’UTENTE INSTRUCTIONS FOR THE USER ANWEISUNGEN FÜR DEN BENUTZER
INSTRUCTIONS POUR L’USAGER
INSTRUCCIONES PARA EL USUARIO
4.2 AVVIAMENTO. (Fig.10 / 11)
Aprire le valvole di intercettazione dell’acqua e l’interruttore elettrico di protezione installato a monte dell’apparecchio.
Selezionare il tempo di cottura sul timer (D) che è regolabile fino ad un massimo di 60min.; per tempi più lunghi selezionare la posizione (∞) di durata
continua. L’inserimento del timer, con la porta chiusa, dà l’avvio al ciclo di cottura con l’avviamento del motoventilatore, l’attivazione del riscaldamento e
la generazione del vapore, se selezionato. Al termine del tempo impostato un segnale acustico avvertirà la fine del ciclo di cottura con relativo arresto di
tutte le funzioni.
Nel selezionare il tempo di cottura occorre tenere sempre in considerazione il tempo necessario per preriscaldare il forno. E’ buona norma osservare
questa avvertenza prima di introdurre i cibi da cuocere nella camera di cottura.
4.2 STARTING.
(Fig.10 / 11)
Ensure that water are turned on and that electricity supply is switched on.
Select the cooking time with the timer (D) that goes up to a maximum of 60 minutes; for longer cooking times, select the (
∞
) non stop position. When
the timer is on and the door is closed the cooking cycle starts together with the electric fan, heating and steam generation, if selected. When the set time
is finished a ring signals that cooking is finished and all the functions stop.
When selecting the cooking time always remember the time needed to heat the oven. The oven should always be heated before food is put in.
4.2 START. (Abb.10 / 11)
Zuerst sind die Wasserzufuhrventile und den Sicherungselektroeinshalter zu öffnen.
Mit dem Zeitregler (D) die Zeitdauer des Garvorgangs bis zu max. 60 Minuten wählen.; für längere Garzeiten ist die Stellung (∞)(stufenlos) zu wählen.
Durch das Einschalten des Zeitreglers bei geschlossener Tür wird der Garbetrieb gestartet bzw. durch den Anlauf des Motorventilators die Heizung und
die Dampfzufuhr - wenn gewählt - eingeschaltet. Nach Ablauf der eingestellten Zeit zeigt ein akustisches Signal das Ende des Garprogramms an, wobei
sämtliche Funktionen ausgeschaltet werden.
Bei der Einstellung der Garzeit ist die Vorheizzeit zu berücksichtigen. Der Backofen sollte vor dem Eingeben der Speisen in den Garraum stets
vorgewärmt werden.
4.2 MISE EN MARCHE.
(Fig.10 / 11)
S’assurer que l’arrivée eau et l’interrupteur automatique de protection installé en amont de l'appareil fonctionnent.
Choisir le temps de cuisson sur le minuteur (D) qui est réglable jusqu'à un maximum de 60 mn; pour des durées supérieures, choisir la position (
∞
) de
durée continue. La mise en marche du minuteur, lorsque la porte est fermée, permet de faire démarrer le cycle de cuisson avec la mise en marche du
moto-ventilateur, du chauffage et de la génération de vapeur, s'il a été sélectionné. Lorsque le temps programmé est écoulé, un signal acoustique
annoncera la fin du cycle de cuisson avec l'arrêt de toutes les fonctions.
En choisissant le temps de cuisson, il faut toujours tenir compte du temps nécessaire pour préchauffer le four. Nous conseillons de préchauffer le four
avant d'introduire les aliments dans l'enceinte de cuisson.
4.2 ARRANQUE. (Fig.10 / 11)
Abrir las llaves de paso del agua y el interruptor eléctrico de protección instalado aguas arriba del aparato.
Seleccionar el tiempo de cocción en el temporizador (D), que es regulable hasta como máximo 60 minutos; para tiempos más largos seleccionar la
posición (∞) de duración ilimitada. La activación del temporizador, con la puerta cerrada, activa el ciclo de cocción con el arranque del motoventilador,
la activación del calentamiento y la generación del vapor, si seleccionada. Al final del tiempo configurado una señal acústica avisa que ha terminado el
ciclo de cocción, con correspondiente parada de todas las funciones.
Cuando se selecciona el tiempo de cocción es preciso tener siempre presente el tiempo necesario para precalentar el horno. Es buena norma ajustarse
a esta advertencia antes de introducir las comidas en la cámara de cocción.
DESCRIZIONE COMPONENTI CRUSCOTTO ANALOGIC
COMPONENTS DESCRIPTION OF THE ANALOGICAL CONTROL PANEL
BESCHREIBUNG DER BESTANDTEILE
DESCRIPTION DES ÉLÉMENTS
4.3
DESCRIPCIÓN COMPONENTES
(Fig.10 / 11)
(Abb.10 / 11)
Selettore cicli Zykluswählschalter Selector ciclos
A
Cycle’s selector-switch Sélecteur de cycles
Regolatore quantità vapore Dampf-Mengenregler Regulador cantidad vapor
B
Steam quantity adjuster Régulateur quantité vapeur
Termostato camera cottura Thermostat Garraum Termóstato cámara cocción
C
Cooking chamber thermostat Thermostat enceinte cuisson
Timer Zeitregler Temporizador
D
Timer Minuteur
Lampada spia forno sotto tensione Kontrollleuchte Backofen unter Spannung
Lámpara piloto horno alimentado
eléctricamente
E
Oven power supply ON pilot light Voyant four sous tension
Lampada spia regolatore vapore in funzione Kontrollleuchte Dampfregler in Betrieb Lámpara piloto regulador vapor en marcha
F
Steam quantity adjuster ON pilot light Voyant régulateur vapeur en fonction
Lampada spia riscaldam. cam. cott. in
funzione
Kontrollleuchte Garraumheizung in Betrieb
Lámpara piloto calentam. cámara coc. en
función
G
Heating cooking chamber ON pilot light
Voyant chauffage enceinte de cuiss. en
fonction
Lampada spia timer in funzione Kontrollleuchte Zeitregler in Betrieb Lámpara piloto temporizador en marcha
H
Timer ON pilot light Voyant minuteur en fonction

Convection 4 x 2/3GN Analogic electric models
17
ISTRUZIONI PER L’UTENTE INSTRUCTIONS FOR THE USER ANWEISUNGEN FÜR DEN BENUTZER
INSTRUCTIONS POUR L’USAGER
INSTRUCCIONES PARA EL USUARIO
5.2 PRERISCALDAMENTO CAMERA FORNO.
Versioni ANALOGIC ed ELECTRONIC
E’ sempre consigliabile eseguire questa operazione prima di introdurre nella camera del forno i cibi da cuocere, il tempo necessario al preriscaldamento
va impostato tenendo in considerazione che nel ciclo convezione aria calda sono necessari 10 minuti circa, per raggiungere la temperatura di 220°C.
Selezionate il tempo e la temperatura desiderata, avviate il forno senza cibi, al termine del tempo impostato la suoneria segnalerà che si potrà iniziare la
cottura.
5.2 PRE-HEATING OF COOKING CHAMBER.
ANALOGIC and ELECTRONIC versions
It is always advisable to pre-heat the oven before cooking food. The time needed to heat the oven should be set taking into account that in the hot air
convection cycle it takes about 10 minutes to reach 220°C.
Having selected the desired time and temperature, switch the oven on without food inside. At the end of the set time the ring signals that cooking can
start.
5.2 VORHEIZEN DES BACKRAUMS.
Modelle ANALOGIC und ELECTRONIC
Es ist immer empfehlenswert, den Backraum vor Eingabe der Speisen vorzuheizen. Die für das Vorheizen nötige Zeit muss unter der Beachtung
eingestellt werden, dass beim Zyklus Konvektion/Heißluft ca. 10 Minuten benötigt werden, um 220°C zu erreichen.
Die gewünschte Zeit und Temperatur wählen, den Backofen ohne Speisen einschalten – bei Ablaufen der eingegebenen Zeit ertönt ein Signal, was
bedeutet, dass der Garvorgang beginnen kann.
5.2 PRÉCHAUFFAGE DE L'ENCEINTE DU FOUR.
Versions ANALOGIC et ELECTRONIC
Nous conseillons de toujours effectuer cette opération avant d'introduire des aliments dans l'enceinte du four. Le temps nécessaire au préchauffage doit
être programmé en tenant compte qu'il faut au moins 10 minutes pour atteindre la température de 220°C pour le cycle à convection air chaud.
Sélectionner le temps et la température désirés, allumer le four sans aliments et au terme du temps programmé, une sonnerie indiquera que l'on peut
commencer la cuisson.
5.2 PRECALENTAMIENTO CÁMARA HORNO.
Versioni ANALOGIC ed ELECTRONIC
Se aconseja efectuar siempre esta operación antes de poner los alimentos a cocer en la cámara del horno; el tiempo necesario para el
precalentamiento debe ser configurado teniendo presente que en el ciclo convección aire caliente se precisan 10 minutos aproximadamente para
alcanzar la temperatura de 220°C.
Seleccionar el tiempo y la temperatura deseada, poner en marcha el horno sin comida; al final del tiempo configurado un aviso acústico indica que se
puede comenzar la cocción.
5.3 SPEGNIMENTO DEL FORNO. (Fig. 10-11)
Lo spegnimento del forno avviene con la selezione della manopola del selettore cicli sulla posizione 0.
5.3 TURNING THE OVEN OFF.
(Fig.10-11)
The oven is turned off by turning the cycle selector knob round to position 0.
5.3 AUSSCHALTEN DES BACKOFENS (Abb.10-11)
Zum Ausschalten des Backofens ist der Druckknopf des Zykluswählschalters auf Stellung (0) zu drehen.
5.3 ARRÊT DU FOUR
(Fig.10-11)
Le four s'éteint lorsqu'on met le bouton du sélecteur de cycles sur la position 0.
5.3 APAGADO DEL HORNO (Fig.10-11)
El horno se apaga colocando el mando del selector de ciclos en la posición 0.

Convection 4 x 2/3GN Analogic electric models
18
ISTRUZIONI PER L’UTENTE INSTRUCTIONS FOR THE USER ANWEISUNGEN FÜR DEN BENUTZER
INSTRUCTIONS POUR L’USAGER
INSTRUCCIONES PARA EL USUARIO
8.0 MANUTENZIONE.
Prima di effettuare qualsiasi operazione di manutenzione è obbligatorio disinserire l’interruttore elettrico di protezione e chiudere la valvola di
intercettazione acqua che sono installati a monte dell’apparecchiatura. La pulizia del forno deve essere effettuata al termine di ogni giornata lavorativa,
utilizzando solo i prodotti adatti allo scopo.
L’eventuale filtro antigrasso, fornito su richiesta, deve essere pulito ogni 3 cicli di cottura in quanto il suo intasamento può provocare la non uniformità
nella cottura e l’allungamento del relativo tempo.
Le parti in acciaio inox devono essere: 1-pulite con acqua tiepida saponata; 2-risciacquate con acqua; 3-asciugate accuratamente. Evitare
assolutamente l’uso di raschietti, paglietta metallica e di attrezzi di acciaio comune in quanto, oltre a strisciare le superfici, possono depositare particelle
di ferro che, ossidandosi provocano la formazione di ruggine.
Non lavare l’apparecchio con getti di acqua.
Non utilizzare per la pulizia dell’acciaio inox prodotti a base di cloro (varecchina, acido cloridrico) anche se diluiti in acqua.
La camera di cottura del forno deve essere pulita da residui di cibo e di grassi dopo ogni processo di cottura. I sughi e i grassi che dagli alimenti cadono
sul fondo vengono convogliati allo scarico posto centralmente. Per la pulizia della camera di cottura usare un prodotto sgrassante adatto alla pulizia
dell’acciaio inossidabile, tipo spray, che permette di coprire tutti i punti dell’apparecchiatura e in particolare il retro del convogliatore di aspirazione.
Procedere quindi come segue: 1-riscaldare il forno fino alla temperatura di 50°C; 2-stendere il prodotto sgrassante secondo le quantità consigliate; 3-
chiudere la porta; 4-selezionare il ciclo vapore; 5-avviare il forno per una durata di 20-30min. Al termine di questo lasso di tempo aprire la porta, avendo
cura di proteggere pelle e occhi dalle fumane provenienti dalla camera di cottura, e procedere ad un lavaggio con acqua, o in lavastoviglie per le parti
smontabili.
La ventola deve essere costantemente pulita per evitare che l’accumularsi di residui di grasso sulle palette possa provocare la riduzione del numero dei
giri del motore, la conseguente diminuzione di portata d’aria, nonchè pericolose sollecitazioni meccaniche al motore stesso.
Durante i periodi di lunga inattività dell’apparecchiatura procedere come segue: 1-disinserire l’interruttore elettrico di protezione; 2-chiudere la valvola di
intercettazione acqua (entrambi installati a monte dell’apparecchiatura); 3-lasciare la porta socchiusa per favorire la circolazione dell’aria ed evitare la
formazione di cattivi odori; 4-stendere, con un panno leggermente imbevuto di olio di vaselina, un velo protettivo su tutte le superfici di acciaio inox.
8.0 MAINTENANCE.
It is compulsory to turn the main switch off and close the water on-off valve, both installed upstream from the oven before servicing it. The oven should
be cleaned at the end of each working day, using specific products only.
If an anti-fat filter is installed (supplied on request) it needs cleaning after every 3 cooking cycles because if it gets clogged, cooking would be uneven
and also cooking time would be longer.
All stainless steel parts should be: 1-cleaned with warm, soapy water; 2-rinsed with water; 3-dried thoroughly. It is absolutely forbidden to use scrapers,
metal soap pads and other common steel tools as they would, besides scratching the surface, deposit iron particles that, oxidising, would cause rust to
form.
Do not wash the appliance with jets of water.
Do not use chlorine based products (bleach, hydrochloric acid) to clean stainless steel parts, even if they are diluted in water.
All food residuals and grease must be removed from the oven each time it is used for cooking. The juices and fat that drip from the food and fall to the
bottom, are conveyed to the drain in the centre. To clean the oven, use a degreasing product suitable for stainless steel, a spray-on product for instance,
that covers all areas, especially the back of the suction conveyor.
Then proceed as follows: 1-heat the oven to a temperature of 50°C; 2-apply the degreasing product in the quantity recommended; 3-close the door; 4-
select the steam cycle; 5- turn the oven on for 20-30 minutes. After this time open the oven door, protecting your eyes and skin from the fumes, and
then wash with water or put the removable parts in the dishwasher.
The fan must be kept clean to avoid grease and fat from depositing on the blades causing motor revolutions to decrease leading to a reduction in the
flow of air and dangerous mechanical stress to the motor itself.
When the appliance is not used for long periods of time: 1- turn the main switch off; 2- close the water on-off valve (both installed upstream from the
oven); 3-leave the door ajar so air can circulate and prevent bad odours; 4-with a cloth spread a thin protective layer of Vaseline oil on all stainless steel
surfaces.
8.0 WARTUNG
Vor Ausführung der Wartungsarbeiten ist der Schutzschalter auszuschalten und der Wasserabsperrhahn zu schließen - alle beide befinden sich
bauseits des Geräts. Den Backofen am Ende eines jeden Tages reinigen, wobei geeignete Produkte zu verwenden sind.
Der auf Anfrage gelieferte Fettfilter muss nach jeweils drei Garprogrammen gereinigt werden. Die Verstopfung des Fettfilters kann ungleichmäßiges
Durchbraten und lange Garzeiten bewirken.
Die Edelstahlteile sind täglich mit lauwarmem Seifenwasser zu reinigen, danach mit Wasser nachzuspülen und sorgfältig trockenzureiben. Keinesfalls
normale Stahlwolle, Stahlbürsten oder Schaber verwenden, da sich Eisenteilchen ablagern können, die aufgrund ihrer Oxydation Roststellen
verursachen.
Das Gerät nicht mit direktem Wasserstrahl waschen.
Für die Reinigung des Edelstahls keine (auch keine verdünnten) Reinigungsmittel verwenden, die Chlor (Bleichmittel, Salzsäure) enthalten.
Den Garraum nach jedem Garvorgang reinigen, damit Kochreste und Fett beseitigt werden. Speisefett oder Saucen, die vom Gargut auf den
Garraumboden tropfen, werden in den Ablauf in der Garraummitte geleitet. Zur Reinigung des Garraums sind fettlösende Sprays zu verwenden, damit
auch schwer zugängliche Stellen, besonders hinter der Stahlplatte mit der Absaugöffnung, erreicht werden.
Es ist in folgender Weise vorzugehen: 1-den Garraum auf 50°C erhitzen; 2-das fettlösende Mittel unter Beachtung der vom Hersteller angegebenen
Menge auftragen; 3-die Backofentür schließen; 4-das Dampfprogramm auf max. einschalten; 5-den Backofen 20 - 30 Minuten lang in Betrieb setzen.
Nach Ablauf dieser Zeit die Backofentür vorsichtig öffnen, Augen und Haut vor Schwaden aus dem Garraum schützen, und sämtliche Teile reinigen. Die
abnehmbaren Teile können auch im Geschirrspüler gewaschen werden.
Der Ventilator muss regelmäßig gereinigt werden, damit sich auf den Ventilatorflügeln kein Fett absetzt. Fettablagerungen verursachen eine
Verminderung der Motordrehzahl und der Luftzufuhr, wodurch eine gefährliche mechanische Beanspruchung des Motors hervorgerufen wird.
Bei längerem Gerätestillstand in folgender Weise vorgehen: 1-den Schutzschalter ausschalten; 2-den Wasserabsperrhahn schließen (alle beide
bauseits des Geräts installiert); 3-zur Vermeidung von Geruchsbildung die Backofentür halb offen lassen; 4-auf alle Edelstahlteile mit einem Tuch eine
dünne Schicht Vaselinöl auftragen.
La pagina si sta caricando...

Convection 4 x 2/3GN Analogic electric models
20
ISTRUZIONI PER L’UTENTE INSTRUCTIONS FOR THE USER ANWEISUNGEN FÜR DEN BENUTZER
INSTRUCTIONS POUR L’USAGER
INSTRUCCIONES PARA EL USUARIO
8.1 COMPORTAMENTO IN CASO DI GUASTO E/O DI UN PROLUNGATO NON FUNZIONAMENTO.
In caso di cattivo funzionamento, guasto o intervento del termostato di sicurezza, bisogna spegnere l’apparecchio, disattivare le alimentazioni elettriche,
idriche e avvisare il servizio tecnico di assistenza.
Tutti i lavori di installazione, manutenzione e riparazione devono essere eseguiti esclusivamente da personale qualificato ed autorizzato. L’apparecchio
deve essere controllato almeno ogni 6 mesi, consigliamo pertanto la stipula di un contratto di manutenzione.
N.B. Il Costruttore declina qualsiasi responsabilità imputabile a errori di trascrizione del presente libretto e si riserva il diritto di apportare all’apparecchio
tutte le modifiche ritenute necessarie che non alterano le caratteristiche funzionali.
8.1 WHAT TO DO IN THE CASE OF A BREAKDOWN AND/OR EXTENDED PERIOD OF NON USE.
If the oven does not work properly, breaks down or if the safety thermostat triggers, switch the oven off, disconnect the electricity and water supply and
notify the technical assistance service.
All works of installation, maintenance and repairs should be carried out exclusively by qualified and authorised personnel. The appliance should be
checked at least once every 6 months for which purpose we suggest stipulating a maintenance contract.
N.B. The Manufacturer declines all and every responsibility attributable to transcription errors in this handbook and reserves the right to made any
modifications to the appliance it may feel necessary and which do not alter its functional characteristics.
8.1 ANWEISUNGEN BEI STÖRUNG BZW. LÄNGEREM GERÄTESTILLSTAND.
Bei defektem Betrieb, Störung oder unsachgemäßer Betätigung des Sicherheitsthermostats muss das Gerät ausgeschaltet und die Strom- und
Wasserzufuhr unterbrochen werden. Den Kundendienst benachrichtigen.
Sämtliche Installations-, Wartungs- und Reparaturarbeiten dürfen ausschließlich vom Fachpersonal durchgeführt werden. Das Gerät muss mindestens
alle 6 Monate überprüft werden; aus diesem Grund ist der Abschluss eines Wartungsvertrags ratsam.
N.B. Die Herstellerfirma haftet für die in diesem Handbuch enthaltenden Fehler bzw. Druckfehler nicht. Außerdem behält sich der Hersteller das Recht
vor, Änderungen, die die grundlegende Betriebsweise des Geräts nicht verändern und für notwendig gehalten werden, am Gerät vorzunehmen.
8.1 QUE FAIRE EN CAS DE PANNE ET/OU D’ARRÊT PROLONGÉ DE L’APPAREIL.
En cas de mauvais fonctionnement, de panne ou d’intervention du thermostat de sûreté, il faut éteindre l’appareil, couper le courant et l’alimentation en
eau puis appeler le service après-vente.
Toutes les opérations d’installation, de maintenance ou de réparation doivent être effectuées exclusivement par du personnel qualifié et agréé.
L’appareil doit être contrôlé au moins tous les 6 mois. Pour cette raison, nous conseillons vivement de stipuler un contrat de maintenance.
N.B.: le constructeur décline toute responsabilité pour toutes erreurs contenues dans la présente notice imputables à des erreurs de transcription et se
réserve le droit d’apporter à l’appareil toutes les modifications qu’il jugera nécessaires et qui ne gênent en aucun cas les caractéristiques essentielles.
8.1 COMPORTAMIENTO EN CASO DE AVERÍA Y/O DE UN LARGO PLAZO DE INACTIVIDAD.
En caso de mal funcionamiento, avería o disparo del termóstato de seguridad, es preciso apagar el aparato, cortar las alimentaciones eléctrica e hídrica
y avisar al servicio técnico.
Todas las operaciones de instalación, mantenimiento y reparación deben ser efectuadas exclusivamente por parte de personal cualificado y autorizado.
Es preciso verificar el aparato por lo menos cada 6 meses, por lo que aconsejamos estipular un contrato de mantenimiento.
N.B. El Fabricante rehusa cualquier responsabilidad debida a errores de transcripción de este folleto y se reserva el derecho de aportar al aparato
todas las modificaciones que considere oportunas que no alteren las características funcionales.

Convection 4 x 2/3GN Analogic electric models
21
ISTRUZIONI PER L’UTENTE INSTRUCTIONS FOR THE USER ANWEISUNGEN FÜR DEN BENUTZER
INSTRUCTIONS POUR L’USAGER
INSTRUCCIONES PARA EL USUARIO
9.0 CONSIGLI PER LE COTTURE.
9.0A Cottura a convezione. Il sistema convezione, ad aria calda e temperature da 50 a 270°C, è indicato per le cotture di: primi piatti, carne, pesce,
contorni e dolci. Si possono eseguire simultaneamente cotture di cibi diversi, alla stessa temperatura, evitando la sovrapposizione dei sapori. Per
ottenere i migliori risultati si consiglia l’uso delle teglie con bordo tipo GASTRO NORM, avendo cura di lasciare sempre uno spazio minimo di 3 cm. tra
il cibo da cuocere e la teglia sovrastante, al fine di permettere la perfetta circolazione dell’aria.
E’ buona norma evitare che il cibo da cuocere debordi dalla teglia; nel caso ciò non fosse possibile, evitare di inserire la teglia del piano
superiore a quello interessato dalla situazione descritta.
Per la scelta ottimale della temperatura di cottura dovrà essere tenuta in considerazione la seguente regola: selezionare una temperatura inferiore di
circa il 20% rispetto a quella impostata nei tradizionali forni senza ventilazione. Il sistema di ventilazione forzata, di cui questo forno è dotato, garantirà
la cottura in tempi minori.
L’inosservanza di quanto sopra detto può pregiudicare il perfetto risultato delle cotture.
9.0B Cottura convezione vapore. Questo sistema detto comunemente “misto”, che unisce i vantaggi del sistema a convezione con aria
surriscaldata (velocità, risparmio di energia e spazio) a quelli del vapore (mantenimento dei principi nutritivi ed organolettici) è l’ottimale per gli alimenti
che devono essere cotti velocemente, a temperature elevate e con molto vapore acqueo. In questo modo il cibo rimane morbido e viene limitata la
perdita di peso. E’ ideale soprattutto per la cottura di brasati, spezzatini, e grosse pezzature di carni per le quali consigliamo sempre l’uso del
controllo- temperatura al cuore, tramite l’apposita sonda a spillone.
9.0 COOKING TIPS.
9.0A Convection cooking.
The convection system, with hot air and temperatures ranging from 50 to 270°C, is suitable for cooking: first courses,
meat, fish, vegetables and cakes. Different foods can be cooked together at the same temperature without flavours getting mingled. For the best
results use GASTRO NORM type baking trays with edge, always leaving a space of at least 3 cm between the food you are cooking and the baking
tray above it: this is to leave room for the air to circulate properly.
It is always good practice not to let food go beyond the tray’s edge. If this is not possible do not put this tray immediately under another.
To choose the best cooking temperature bear the following rule in mind: select a temperature that is about 20% below the one normally used in
traditional, non fan, ovens. The forced ventilation system of these ovens guarantees shorter cooking times.
If you fail to follow this rule it is possible that the food you are cooking will not be perfect.
9.0B Steam convection cooking.
This method, commonly called “combined”, that joins the advantages of convection with heated air (speed, saving
on energy and room) to steam (maintaining the nutritional and organoleptic properties), is excellent for food that has to be cooked quickly at high
temperatures and with a lot of steam. In this way the food stays tender and loses very little weight. It is particularly suitable for braised meat, stews
and large pieces of meat for which we always advise using the heart temperature-control with the skewer probe.
9.0 NÜTZLICHE HINWEISE BEIM GAREN.
9.0A Garen mit Konvektion. Das Konvektionssystem, das mit Heißluft und Temperaturen von 50° bis 270°C funktioniert, eignet sich zum Garen von
Vorspeisen, Fleisch, Fisch, Beilagen und Süßspeisen. Es können gleichzeitig verschiedene Speisen bei gleicher Temperatur gegart werden, ohne
dass sich deren Geschmack überlagert. Um beste Ergebnisse zu erzielen, ist es ratsam, GASTRO-NORM-Behälter mit Rand zu verwenden und
darauf zu achten, dass zwischen der zu garenden Speise und dem darüber stehenden Behälter ein Abstand von mindestens 3 cm besteht, damit die
Luft frei zirkulieren kann.
In der Regel sollte vermieden werden, dass die zu garenden Speisen über den Rand des Behälters herauslaufen; falls sich dies nicht
vermeiden lässt, sollte der darüber stehende Behälter nicht hineingestellt werden.
Für die Wahl der optimalen Gartemperatur sollte folgende Regel beachtet werden: die Temperatur muss um zirka 20% niedriger als bei
herkömmlichen Backöfen ohne Umluft eingestellt werden. Das Zwangsbelüftungssystem, mit dem dieser Backofen ausgestattet ist, erlaubt kürzere
Garzeiten. Bei Nichtbeachtung der oben genannten Regeln kann ein perfektes Garergebnis beeinträchtigt werden.
9.0B Garen mit Konvektion-Dampf. Dieses, gewöhnlich Kombi-Betrieb genannte System, das die Vorteile des Konvektions-Garvorgangs mit
Heißluft (Schnelligkeit, Strom- und Raumeinsparung) mit denen des Dampfgarens (Nährwerte und organoleptische Eigenschaften bleiben erhalten)
vereinigt, eignet sich insbesondere für Speisen, die schnell und bei hohen Temperaturen, mit viel Wasserdampf gegart werden müssen. Auf diese
Weise bleiben die Speisen saftig und der Gewichtsverlust wird eingeschränkt. Der Backofen eignet sich ideal vor allem zum Garen von Schmorbraten,
Gulasch und großen Fleischstücken, wobei geraten wird, die Kerntemperatur mit dem dafür vorgesehenen Speisenthermometer zu kontrollieren.
La pagina si sta caricando...

Convection 4 x 2/3GN Analogic electric models
23
ISTRUZIONI PER L’UTENTE INSTRUCTIONS FOR THE USER ANWEISUNGEN FÜR DEN BENUTZER
INSTRUCTIONS POUR L’USAGER
INSTRUCCIONES PARA EL USUARIO
9.1 MODALITA’ E SUGGERIMENTI PER LE COTTURE A CONVEZIONE.
9.1A Cotture di primi piatti. Per cucinare lasagne, pasticci, pasta al forno, si consigliano le teglie G.N. con profondità di 45 e 60 mm., in funzione
dell’altezza del prodotto. Le temperature di cottura possono variare da 160 a 180°C, mentre l’eventuale gratinatura dovrà essere eseguita a
temperature superiori a 200°C.
9.1B Cotture di arrosti. Per la cottura di carne, pollo e pesce utilizzare sempre le teglie G.N. la cui profondità sarà in funzione della pezzatura del
prodotto. Tenere sempre presente che l’altezza del cibo non deve debordare il livello superiore della teglia. La peculiarità del sistema permette una
drastica riduzione dei condimenti; sarà sufficiente ungere e insaporire gli alimenti prima di introdurli nella camera di cottura. Le temperature di cottura
possono oscillare tra 150 e 180°C. e devono essere selezionate in funzione della pezzatura del prodotto. Più grande è la pezzatura e più bassa dovrà
essere la temperatura di cottura.
9.1C Cotture alla griglia. Adagiare i cibi sulle griglie in dotazione al forno dopo averli preventivamente cosparsi con una miscela di olio e aromi. Per
ottenere il miglior risultato si consiglia di disporre il prodotto in modo tale che, tra i singoli pezzi, rimanga lo spazio sufficiente a permettere una
ventilazione ottimale.
9.1D Cotture di pasticceria. Per le cotture di prodotti che devono lievitare si consiglia l’uso di teglie con altezza di 40-60mm; viceversa per i
prodotti non soggetti a lievitazione come biscotti, pasticcini etc. si possono utilizzare quelle con altezza di 20mm. Per migliorare il risultato si
raccomanda di usare teglie in acciaio smaltato o in alluminio. Questi materiali, in virtù di una migliore trasmissione termica, garantiscono ottime
prestazioni.
9.1 TIPS FOR CONVECTION COOKING.
9.1A Baking first courses.
To cook lasagne and other oven baked pasta, we suggest using the 45 and 60 mm deep G.N. baking trays depending on
the thickness of the product. Cooking temperatures can vary from 160 to 180°C, while temperatures above 200°C are needed for browning.
9.1B Roasting meat.
Always use G.N. baking trays for cooking meat, chicken and fish, the depth depending on the size of meat to cook. Always
remember that the food should be no higher than the tray. With this cooking method you will need very little condiment; just grease and flavour the
food before putting it in the oven. Cooking temperatures can range from 150 to 180°C and should be set according to the size of the piece of meat.
The bigger it is the lower the cooking temperature.
9.1C Grilling.
Place the food on the grills provided with the oven after having brushed on oil and herbs for flavouring. For the best result the food
should be arranged so that there is enough space between each piece to allow optimum ventilation.
9.1D Bakery products.
To cook food that rises we suggest using 40-60 mm high baking trays; vice versa for other products that do not rise, like
biscuits, etc. the 20 mm high trays can be used. For an even better result we suggest using enamelled steel or aluminium baking trays. These
materials, thanks to a better transmission of heat, guarantee excellent results.
9.1 METHODEN UND RATSCHLÄGE BEIM GAREN MIT KONVEKTION.
9.1A Vorspeisen. Für das Garen von Lasagne und überbackenen Nudeln wird geraten, Gastro-Norm-Behälter mit 45 oder 60mm Tiefe zu
verwenden. Die Gartemperaturen können zwischen 160 und 180°C schwanken, während für das Gratinieren Temperaturen von über 200°C
erforderlich sind.
9.1B Braten. Für das Braten von Fleisch, Huhn und Fisch sind stets Gastro-Norm-Behälter zu verwenden, deren Tiefe von der Größe des
Fleischstücks abhängt. Dabei ist darauf zu achten, dass das Gargut nicht höher sein sollte, als der obere Rand des Behälters. Die Besonderheit des
Systems ermöglicht eine drastische Reduzierung von Fett und Flüssigkeit: es ist ausreichend, die Speisen vor dem Hineinschieben in den Garraum
einzufetten und zu würzen. Die Gartemperaturen können zwischen 150 und 180°C schwanken und müssen je nach Größe des Fleischstücks gewählt
werden. Je größer das Stück ist, um so niedriger muss die Temperatur eingestellt werden.
9.1C Grillen. Die Speisen auf die zur Ausstattung des Backofens gehörenden Roste legen, nachdem diese zuvor mit einer Mischung aus Öl und
Würze eingestrichen wurden. Um ein gutes Ergebnis zu erzielen ist es ratsam, das Produkt auf den Rosten so zu verteilen, dass zwischen den
einzelnen Stücken genügend Abstand für eine optimale Luftzirkulation bleibt.
9.1D Kuchen und Gebäck. Für das Backen von Produkten, die aufgehen müssen, wird die Verwendung von Behältern mit 40-60mm Höhe
angeraten, während für Produkte, die nicht aufgehen, wie Kekse und Feingebäck, Behälter mit 20mm Höhe verwendet werden können. Für ein
optimales Ergebnis wird die Verwendung von emaillierten Stahlbehältern oder Behältern aus Aluminium angeraten. Diese Materialien garantieren
dank ihrer großen Wärmeübertragung optimale Leistungen.
9.1 MODALITÉS ET CONSEILS POUR LES CUISSONS À CONVECTION.
9.1A Cuissons de pâtes . Pour cuisiner des lasagnes, des gratins ou des pâtes au four, nous conseillons d'utiliser des bacs G.N. de 45 et 60 mm de
profondeur, en fonction de la hauteur des aliments. Les températures de cuisson peuvent varier de 160 à 180°C, tandis que pour gratiner, il faudra
mettre le four à plus de 200°C.
9.1B Cuissons des rôtis. Pour cuisiner de la viande, du poulet, du poisson, nous conseillons d’utiliser toujours les bacs G.N. ayant une profondeur
adéquate à la grosseur de l'aliment. Faire attention à ce que l’aliment ne déborde pas du bac. Ce système a la particularité de réduire au minimum les
assaisonnements. Il suffira d'huiler et d’épicer les aliments avant de les mettre au four. Les températures de cuisson peuvent varier entre 150° et
180°C et elles devront être choisies en fonction de la grosseur de l'aliment, en sachant que plus celui-ci est gros, plus la température de cuisson doit
être basse.
9.1C Cuisson au gril. Disposer les aliments préalablement assaisonnés avec de l’huile et des arômes sur les grilles fournies avec le four. Pour
obtenir de très bons résultats de cuisson, laisser assez d’espace entre les aliments afin que l’air puisse circuler suffisamment et permettre une
ventilation parfaite.
9.1D Cuissons des pâtisseries. Pour cuire des pâtisseries qui doivent lever, nous conseillons d’utiliser des bacs de 40 à 60 mm de profondeur;
tandis que pour celles qui n’en ont pas besoin, comme par exemple les biscuits, les petits fours, etc., utiliser des bacs de 20 mm de profondeur. Pour
obtenir un meilleur résultat, il est préférable d’utiliser des bacs en acier émaillé ou en aluminium. Ces matériaux, ayant la propriété de transmettre la
chaleur, garantissent des performances optimales.
9.1 MODALIDADES Y SUGERENCIAS PARA LAS COCCIONES POR CONVECCIÓN.
9.1A Cocción de primeros platos. Para cocinar lasañas, timbales, pasta al horno, se aconsejan las fuentes G.N. profundas 45 y 60 mm., según la
altura del producto. Las temperaturas de cocción pueden variar entre 160 y 180°C, mientras que el eventual gratinado debe ser efectuado a
temperaturas superiores a los 200°C.
9.1B Cocción de asados. Para cocer carne, pollo y pescado emplear siempre las fuentes G.N. cuya profundidad dependerá de lo grande que sea el
producto. Tener siempre presente que la altura de la comida no debe salir del borde superior de la fuente. La peculiaridad del sistema permite reducir
drásticamente los condimentos; basta untar y aliñar los alimentos antes de ponerlos en la cámara de cocción. Las temperaturas de cocción pueden
variar entre los 150 y los 180°C y es preciso elegirlas según el tamaño del alimento a cocer. Más grande es el tamaño y más baja debe ser la
temperatura de cocción.
9.1C Cocción a la parrilla. Apoyar los alimentos sobre las parrillas presentes dentro del horno después de haberlos esparcido con una mezcla de
aceite y especias. Para conseguir los mejores resultados se aconseja colocar el producto de manera que, entre cada pieza, quede espacio suficiente
para permitir una excelente ventilación.

Convection 4 x 2/3GN Analogic electric models
24
ISTRUZIONI PER L’UTENTE INSTRUCTIONS FOR THE USER ANWEISUNGEN FÜR DEN BENUTZER
INSTRUCTIONS POUR L’USAGER
INSTRUCCIONES PARA EL USUARIO
9.1D Cocción de postres. Para cocer productos que deben leudar, se aconseja emplear fuentes altas 40-60mm; viceversa, para los productos que
no deben leudar, como galletas, bollos, etc. se pueden utilizar fuentes altas 20mm. Para mejorar el resultado se recomienda emplear fuentes en
acero esmaltado o en aluminio. Estos materiales, gracias a su mejor transmisión térmica, garantizan excelentes prestaciones.
9.2 RIMEDI ALLE ANOMALIE DI COTTURA.
Se la cottura non risultasse uniforme:
Controllate che lo spazio tra il cibo da cuocere e la teglia sovrastante sia almeno di 3 cm. valori inferiori non consentono la corretta ventilazione sul
prodotto da cuocere.
Verificate che i cibi da cuocere non siano stati addossati tra loro, impedendo conseguentemente la corretta
ventilazione tra i prodotti.
La temperatura di cottura può essere troppo elevata, provare con valori inferiori, se il prodotto non sopporta il
contatto diretto con l’aria calda, dovrà essere posto in contenitori G.N. di profondità adeguata.
Se il cibo si presentasse secco:
Il tempo di cottura dovrà essere ridotto.
La temperatura dovrà essere adeguatamente abbassata, ricordiamo in proposito che minore sarà la temperatura di
cottura minore risulterà la perdita di peso dei cibi.
Non è stato selezionato il ciclo misto per favorire un ambiente di cottura ricco di umidità.
Il cibo da cuocere non è stato preventivamente unto con gli opportuni oli o sughi.
9.2 REMEDIES TO COOKING HITCHES
If cooking is uneven:
Check that there is at least 3 cm between the food cooking and the tray above it: if there is less space it will not allow correct ventilation of the food
being cooked.
Make sure that the foods to cook are not against each other which would prevent correct ventilation between them.
Cooking temperature might be too high, try with a lower temperature. If the food cannot stand direct contact with the hot air it must be put in suitably
deep G.N. containers.
If the food is dry:
Reduce cooking time.
The temperature must be adequately lowered. Remember that the lower the temperature is the less weight will be lost.
The combined cycle for a humidity rich cooking environment was not selected.
The food was not greased with oil or juices before it was put in to cook.
9.2 ABHILFE BEI ABNORMALEM GAREN.
Bei ungleichmäßigem Garen:
Sicherstellen, dass der Abstand zwischen der zu garenden Speise und dem darüber liegenden Behälter mindestens 3 cm beträgt. Ein geringerer
Abstand verhindert die korrekte Belüftung des zu garenden Produkts.
Sicherstellen, dass die zu garenden Speisen nicht zu nahe beieinander liegen und dadurch eine korrekte Belüftung zwischen den Produkten verhindern.
Die Gartemperatur könnte zu hoch sein.
Eine niedrigere Temperatur einstellen. Wenn das Produkt den direkten Kontakt mit der Heißluft nicht verträgt, muss es in einem Gastro-Norm-Behälter mit
angemessener Tiefe angeordnet werden.
Bei zu trockenen Speisen:
Die Garzeit verkürzen. Die Temperatur muss niedriger eingestellt werden. Dabei beachten, dass je niedriger die Temperatur eingestellt ist, um so
geringer der Gewichtsverlust ist.
Der Kombi-Garvorgang, der die Luftfeuchtigkeit im Garraum erhöht, wurde nicht eingestellt.
Die zu garende Speise wurde zuvor nicht mit den notwendigen Ölen oder Soßen eingestrichen.
9.2 QUE FAIRE POUR RÉSOUDRE LES PROBLÈMES DE CUISSON
Si la cuisson n'est pas homogène:
Contrôler qu’il y ait au moins un espace de 3 cm entre l’aliment à cuire et le bac placé au-dessus. Un espace inférieur empêche l’air de circuler
correctement.
Vérifier que les aliments à cuire ne soient pas entassés les uns contre les autres, ce qui empêcherait une bonne circulation de l’air entre les aliments.
La température de cuisson est peut-être trop élevée, essayer donc de cuisiner avec des températures plus basses; si le produit ne supporte pas le
contact direct avec l’air chaud, utiliser un bac G.N. ayant une profondeur adéquate.
Si l'aliment cuit résulte sec:
Réduire le temps de cuisson.
Baisser la température. Nous rappelons que plus la température de cuisson est basse, plus la perte en poids est limitée.
Le cycle mixte qui permet d’humidifier l’enceinte de cuisson n’a pas été sélectionné.
L’aliment n’a pas été suffisamment huilé ou recouvert de sauce avant la cuisson.
9.2 REMEDIOS PARA LAS ANOMALÍAS DE COCCIÓN.
Si la cocción no es uniforme:
Comprobar que el espacio entre el alimento a cocer y la fuente de encima sea de por lo menos 3 cm; valores inferiores no permiten una correcta
ventilación sobre el producto a cocer.
Comprobar que los alimentos a cocer no hayan sido agolpados entre ellos, impidiendo de esta manera una correcta ventilación entre los productos.
La temperatura de cocción puede ser demasiado alta; probar con valores inferiores; si el producto no soporta el contacto directo con el aire caliente
entonces es preciso ponerlo en contenedores G.N. de profundidad adecuada.
Si la comida queda seca:
El preciso reducir el tiempo de cocción.
Es preciso reducir la temperatura de manera adecuada; al respecto cabe recordar que menor será la temperatura de cocción y menor será la pérdida
de peso de las comidas.
No se ha seleccionado el ciclo mixto para contar con un entorno de cocción rico en humedad.
El alimento a cocer no ha sido previamente untado con los oportunos aceites o jugos.
-
 1
1
-
 2
2
-
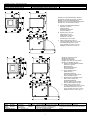 3
3
-
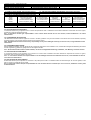 4
4
-
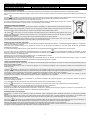 5
5
-
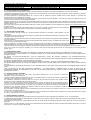 6
6
-
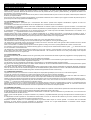 7
7
-
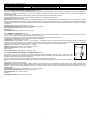 8
8
-
 9
9
-
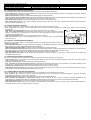 10
10
-
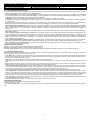 11
11
-
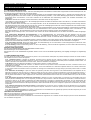 12
12
-
 13
13
-
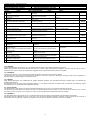 14
14
-
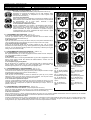 15
15
-
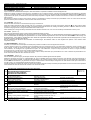 16
16
-
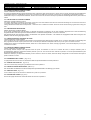 17
17
-
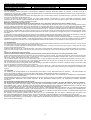 18
18
-
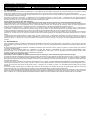 19
19
-
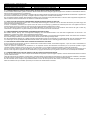 20
20
-
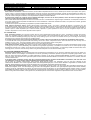 21
21
-
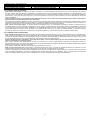 22
22
-
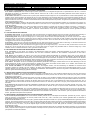 23
23
-
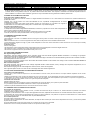 24
24


Whirlpool AGB 630/WP Guida d'installazione
- Tipo
- Guida d'installazione
- Questo manuale è adatto anche per
in altre lingue
Documenti correlati
-
Whirlpool AGB 631/WP Guida d'installazione
-
Whirlpool ADN 510 Guida d'installazione
-
-
Whirlpool ADN 505/1 Guida utente
-
-
-
-
-
Altri documenti
-
Hendi 225516 Manuale utente
-
-
Electrolux BM94X Manuale utente
-
Easy Home GT-SF-TVT-02-US Manuale utente
-
Lotus NG-UA-005G Instructions For Use And Maintenance Manual
-
Casselin CFRPE2632 Manuale utente
-
Bamix SWISSLINE M200 Manuale utente
-