
LAUNCH
ENENFRESDEITRUPT
⽇本語
Quick Start Guide
Guide de démarrage rapide
Guía de Inicio Rápido
Schnellstart-Anleitung
Guida Rapida
Краткое руководство
Guia de Início Rápido
クイックスタートガイド
POWER
VEHICLE
I/O

Note: This equipment has been tested and found to comply with the limits for a Class B
digital device, pursuant to Part 15 of the FCC Rules. These limits are designed to provide
reasonable protection against harmful interference in a residential installation.
- Reorient or relocate the receiving antenna.
FCC Statement
- Increase the separation between the equipment and receiver.
This device complies with part 15 of the FCC Rules. Operation is subject to the following
two conditions: (1) This device may not cause harmful interference, and (2) this device
must accept any interference received, including interference that may cause undesired
operation.
This equipment generates, uses, and can radiate radio frequency energy, and if not
installed and used in accordance with the instructions, may cause harmful interference
to radio communications. However, there is no guarantee that interference will not occur
in a particular installation. If this equipment does cause harmful interference to radio or
television reception, which can be determined by turning the equipment off and on, the
user is encouraged to try to correct the interference by one or more of the following
measures:
Any Changes or modifications not expressly approved by the party responsible for
compliance could void the user's authority to operate the equipment.
- Connect the equipment into an outlet on a circuit different from that to which the
receiver is connected.
Ÿ Keep the tool dry, clean, free from oil, water or grease. Use a mild detergent on a clean cloth to clear the outside of
the equipment when necessary.
Ÿ Automotive batteries contain sulfuric acid that is harmful to skin. In operation, direct contact with the automotive
batteries should be avoided. Keep the ignition sources away from the battery at all times.
Safety Precautions
Before using this test equipment, please read the following safety information carefully.
ŸAlways perform automotive testing in a safe environment.
Ÿ Do not connect or disconnect any test equipment while the ignition is on or the engine is running.
Ÿ DO NOT attempt to operate the tool while driving the vehicle. Have second personal operate the tool. Any
distraction may cause an accident.
Ÿ Before starting the engine, put the gear lever in the Neutral position (for manual transmission) or in the Park (for
automatic transmission) position to avoid injury.
Ÿ NEVER smoke or allow a spark or flame in vicinity of battery or engine. Do not operate the tool in explosive
atmospheres, such as in the presence of flammable liquids, gases, or heavy dust.
Ÿ Keep a fire extinguisher suitable for gasoline/chemical/electrical fires nearby.
Ÿ Wear an ANSI-approved eye shield when testing or repairing vehicles.
Ÿ Put blocks in front of the drive wheels and never leave the vehicle unattended while testing.
Ÿ Use extreme caution when working around the ignition coil, distributor cap, ignition wires and spark plugs. These
components create hazardous voltage when the engine is running.
Ÿ Please use the included battery and power adaptor. Risk of explosion if the battery is replaced with an incorrect type.
Ÿ Do not expose the tool or power adaptor to rain or wet conditions. Water entering the tool or power adaptor increases
the risk of electric shock.
Ÿ When welding vehicle parts with the X-PROG 3 components, the unit is powered off and is grounded.
Ÿ Do not use the tool while standing in water.
Ÿ Keep clothing, hair, hands, tools, test equipment, etc. away from all moving or hot engine parts.
Ÿ Store the tool and accessories in a locked area out of the reach of children.
Ÿ Because there are various procedures, techniques, tools, and parts for servicing vehicles, as well as the skill of the
person doing the service work, the technician must be well knowledgeable of the vehicle and the system being tested.
Ÿ The vehicle parts and the X-PROG 3 components are welded at a constant temperature.
Ÿ Do not connect or disconnect any test equipment while the ignition is on or the engine is
running.
Ÿ Before starting the engine, put the gear lever in the Neutral position (for manual
transmission) or in the Park (for automatic transmission) position to avoid injury.
Safety Instructions
Before using this test equipment, please read the following safety information carefully.
ŸAlways perform automotive testing in a safe environment.
Ÿ DO NOT attempt to operate the tool while driving the vehicle. Have second personal
operate the tool. Any distraction may cause an accident.
Ÿ Put blocks in front of the drive wheels and never leave the vehicle unattended while
testing.
Ÿ Use extreme caution when working around the ignition coil, distributor cap, ignition wires
and spark plugs. These components create hazardous voltage when the engine is
running.
Ÿ Keep clothing, hair, hands, tools, test equipment, etc. away from all moving or hot engine
parts.
Ÿ Store the tool and accessories in a locked area out of the reach of children.
Ÿ Do not use the tool while standing in water.
Ÿ NEVER smoke or allow a spark or flame in vicinity of battery or engine. Do not operate
the tool in explosive atmospheres, such as in the presence of flammable liquids, gases,
or heavy dust.
Ÿ Wear an ANSI-approved eye shield when testing or repairing vehicles.
Ÿ To avoid damaging the tool or generating false data, please make sure the vehicle
battery is fully charged and the connection to the vehicle DLC (Data Link Connector) is
clear and secure.
Ÿ Keep the tool dry, clean, free from oil, water or grease. Use a mild detergent on a clean
cloth to clear the outside of the equipment when necessary.
Ÿ Do not expose the tool or power adaptor to rain or wet conditions. Water entering the tool
or power adaptor increases the risk of electric shock.
Ÿ Please use the included battery and power adaptor. Risk of explosion if the battery is
replaced with an incorrect type.
Ÿ Keep a fire extinguisher suitable for gasoline/chemical/electrical fires nearby.
Ÿ Automotive batteries contain sulfuric acid that is harmful to skin. In operation, direct
contact with the automotive batteries should be avoided. Keep the ignition sources away
from the battery at all times.
Ÿ Because there are various procedures, techniques, tools, and parts for servicing
vehicles, as well as the skill of the person doing the service work, the technician must be
well knowledgeable of the vehicle and the system being tested.
Ÿ The vehicle parts and the X-PROG 3 components are welded at a constant temperature.
Ÿ When welding vehicle parts with the X-PROG 3 components, the unit is powered off and
is grounded.
Copyright © 2021 by LAUNCH TECH CO., LTD (also called LAUNCH for short). All rights
reserved. No part of this publication may be reproduced, stored in a retrieval system, or
transmitted in any form or by any means, electronic, mechanical, photocopying,
recording or otherwise, without the prior written permission of LAUNCH.
Copyright Information
All information, illustrations, and specifications in this manual are based on the latest
information available at the time of publication.
The right is reserved to make changes at any time without notice. We shall not be liable
for any direct, special, incidental, indirect damages or any economic consequential
damages (including the loss of profits) due to the use of the document.
Disclaimer of Warranties and Limitation of Liabilities
Statement: LAUNCH owns the complete intellectual property rights for the software used
by this product. For any reverse engineering or cracking actions against the software,
LAUNCH will block the use of this product and reserve the right to pursue their legal
liabilities.
ENEN
Precautions & Disclaimer

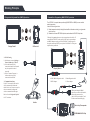
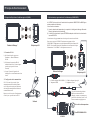
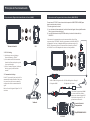
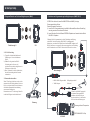
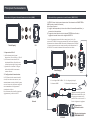
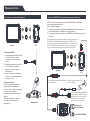
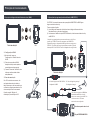
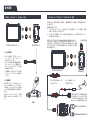
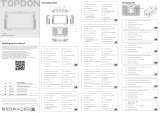
Working Principle
1. Diagnostics/Key Immobilizer (IMMO) Operations 2. Immobilizer Progamming (IMMO PROG) Operations
VCI Device*2
VCI Device*2
X-PROG 3
Vehicle
Display Tablet*1
Display Tablet*1
BT
It has the following functions:
The X-PROG 3 is required when performing IMMO PROG or IMMO (for some vehicle
models) operation.
2). Read/write on-board EEPROM chip data, and read/write MCU/ECU chip data.
1). Read transponder data (including Mercedes Benz infrared smart key), and generate
exclusive keys.
A. DB15-OBD16 Diagnostic cable B. Main Diagnostic cable
C. OBD I adaptor D. Power adaptor
*When performing the IMMO
operations on certain vehicle models,
connect this connector to the
vehicle’s DLC port instead of C and
D. Other connections shall apply.
*Warning: Programming does not require a connection to the vehicle. To
ensure that the X-PROG 3 works properly, ONLY use the power adaptor
and OBD I adaptor to supply power to the X-PROG 3. Obtaining power
through a connection to the DC power jack of the X-PROG 3 via the power
adaptor alone is prohibited.
Vehicle Key/Transponder
EEPROM/MCU/ECU Chip
BT
POW ER
VEH ICLE
I/O
LAUN CH
POWER
VEH ICLE
I/O
A
C
B
D
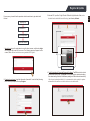
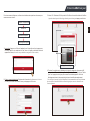
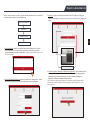
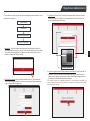
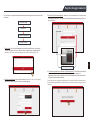
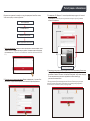
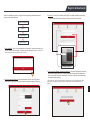
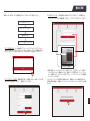
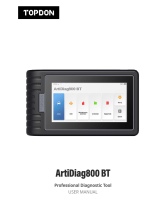
1). On the home screen, tap Settings ->
Network & Internet -> WLAN.
Refer to Section “Register & Update”
for VCI activation.
3). When “Connected” appears, it
indicates that it is properly
connected to the network.
*1. WLAN Setting
*2. Communication Setup
If the VCI is successfully activated, it
will be automatically bound to the
tablet. In this case it is not necessary for
the user to manually configure the
wireless communication link again.
2). Select the desired WLAN
connection from the list (Password
may be required for secured
networks).

98********00
Password Envelope
3. Activate VCI: Input the 12-digit Product S/N and 8-digit Activation Code (can be
obtained from the included Password Envelope), and then tap Activate.
*Allsoftwareisupdatedperiodically.Itisrecommendedtocheckregularlyforupdates
andinstallthelatestsoftwareversionforthe bestserviceandfunctions.
4. Finish Registration & Download Diagnostic Software: Tap OK to enter the vehicle
software download screen. Tap Update on the update page to start downloading.
Once downloading finished, the software packages will be installed automatically.
1. Launch App: tap on the application icon on the home screen, and then tap Login
on the upper right corner of the screen. The following popup will appear on the
screen(*Make sure that the tablet has a strong and stable Wi-Fi signal.).
2. Create an App Account: Input the information (items with * must be filled) following
the on-screen prompts and then tap Register.
For new users, please follow the operation chart shown below to get started with
this tool.
Activate VCI
App Sign-up
Finish Registration
Download Software
ENEN
Register & Update

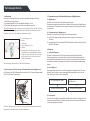
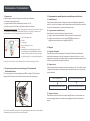
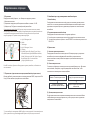
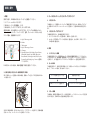
For passenger cars, the DLC is usually located 12 inches away from the center of the
instrument panel, under or around the driver’s side for most vehicles. For some vehicles with
special designs, the DLC may vary. Refer to the following figure for possible DLC location.
For vehicles equipped with OBD II diagnostic socket, connect the VCI device to the
vehicle’s DLC via the included diagnostic cable.
2. Connection (When performing Diagnostics / Key Immobilizer operations)
*For non-OBD II vehicles, a non-16pin connector(adaptor) is required.
Refer to the User Manual for more detailed connection method.
2). The vehicle battery voltage range is 11-14Volts.
Before diagnosing, please make sure the following conditions are met:
1). The ignition is turned on.
1. Preparation
3). Locate the vehicle's DLC port.
F. Hyundai, Daewoo, Kia, Honda, Toyota, Nissan,
Mitsubishi, Renault, Opel, BMW, Mercedes-Benz,
Mazda, Volkswagen, Audi, GM, Chrysler,
Peugeot, Regal, Beijing Jeep, Citroen and most
prevailing models
D. Opel, Volkswagen, Citroen
E. Changan
A. Opel, Volkswagen, Audi
B. Honda
C. Volkswagen
If the DLC cannot be found, refer to the vehicle's service manual for the location.
1). Intelligent Diagnose
4. Diagnostics
This function allows you to use the VIN information of the currently identified vehicle
to access its data (including vehicle information, historical diagnostic records) from
the cloud server to perform quick test, eliminating guesswork and step-by-step
manual menu selection.
2). Local Diagnose
Use this function to diagnose a vehicle manually. For new users, please follow the
operation chart shown below to get familiar with and start using this tool.
3). Remote Diagnose
This function helps repair shops or mechanics to diagnose a remote vehicle, and
launch instant messages, allowing for improved efficiency and faster repairs.
Tap Local Diagnose Follow the prompts on the screen
Select vehicle software Select software version
Connection & Operations
This function allows you to perform the following functions:
2). Immobilizer Programming
This function enables you to perform the anti-theft key matching function, so that the
immobilizer control system on the car identifies and authorizes remote control keys
to normally use the car.
3. Key Immobilizer & Immobilizer Programming
1). Immobilizer
1). Read key transponder data, and generate exclusive keys.
2). Read/write on-board EEPROM chip data, and read/write MCU/ECU chip data.

Remarque: Cet équipement a été testé et jugé conforme aux limites d'un appareil
numérique de classe B, conformément à la partie 15 des règles de la FCC. Ces limites
sont conçues pour fournir une protection raisonnable contre les interférences nuisibles
dans une installation résidentielle.
Cet équipement génère, utilise et peut rayonner de l'énergie radiofréquence, et s'il n'est
pas installé et utilisé conformément aux instructions, il peut causer des interférences
nuisibles aux communications radio. Cependant, rien ne garantit que les interférences
ne se produiront pas dans une installation particulière. Si cet équipement cause des
interférences nuisibles à la réception de la radio ou de la télévision, ce qui peut être
déterminé en éteignant et en allumant l'équipement, l'utilisateur est encouragé à
essayer de corriger les interférences par une ou plusieurs des mesures suivantes:
- Connectez l'équipement à une prise sur un circuit différent de celui auquel le récepteur
est connecté.
Cet appareil est conforme à la partie 15 des règles de la FCC. Le fonctionnement est
soumis aux deux conditions suivantes: (1) Cet appareil ne doit pas causer
d'interférences nuisibles et (2) cet appareil doit accepter toutes les interférences
reçues, y compris celles pouvant entraîner un fonctionnement indésirable.
- Augmentez la séparation entre l'équipement et le récepteur.
Toute modification ou modification non expressément approuvée par la partie
responsable de la conformité pourrait annuler le pouvoir de l'utilisateur d'exploiter
l'équipement.
- Réorientez ou déplacez l'antenne de réception.
Déclaration de la FCC
Safety Precautions
Before using this test equipment, please read the following safety information carefully.
ŸAlways perform automotive testing in a safe environment.
Ÿ Please use the included battery and power adaptor. Risk of explosion if the battery is replaced with an incorrect type.
Ÿ NEVER smoke or allow a spark or flame in vicinity of battery or engine. Do not operate the tool in explosive
atmospheres, such as in the presence of flammable liquids, gases, or heavy dust.
Ÿ Do not connect or disconnect any test equipment while the ignition is on or the engine is running.
Ÿ Keep a fire extinguisher suitable for gasoline/chemical/electrical fires nearby.
Ÿ Do not use the tool while standing in water.
Ÿ Wear an ANSI-approved eye shield when testing or repairing vehicles.
Ÿ Put blocks in front of the drive wheels and never leave the vehicle unattended while testing.
Ÿ Keep clothing, hair, hands, tools, test equipment, etc. away from all moving or hot engine parts.
Ÿ Automotive batteries contain sulfuric acid that is harmful to skin. In operation, direct contact with the automotive
batteries should be avoided. Keep the ignition sources away from the battery at all times.
Ÿ The vehicle parts and the X-PROG 3 components are welded at a constant temperature.
Ÿ When welding vehicle parts with the X-PROG 3 components, the unit is powered off and is grounded.
Ÿ Store the tool and accessories in a locked area out of the reach of children.
Ÿ Before starting the engine, put the gear lever in the Neutral position (for manual transmission) or in the Park (for
automatic transmission) position to avoid injury.
Ÿ Use extreme caution when working around the ignition coil, distributor cap, ignition wires and spark plugs. These
components create hazardous voltage when the engine is running.
Ÿ Do not expose the tool or power adaptor to rain or wet conditions. Water entering the tool or power adaptor increases
the risk of electric shock.
Ÿ DO NOT attempt to operate the tool while driving the vehicle. Have second personal operate the tool. Any
distraction may cause an accident.
Ÿ Because there are various procedures, techniques, tools, and parts for servicing vehicles, as well as the skill of the
person doing the service work, the technician must be well knowledgeable of the vehicle and the system being tested.
Ÿ Keep the tool dry, clean, free from oil, water or grease. Use a mild detergent on a clean cloth to clear the outside of
the equipment when necessary.
• Porter de lunette étanche de sécurité lors des tests ou des réparations.
• Ne pas brancher ou débrancher tout équipement de test alors que le contact est mis ou
que le moteur est en marche.
Consignes de sécurité
• N'essayez PAS d'utiliser l'outil pendant que vous conduisez le véhicule. Demandez à un
deuxième personnel d'utiliser l'outil. car toute distraction pourrait causer un accident.
• Avant de démarrer le moteur, placez le levier de vitesses en position Neutre (pour
transmission manuelle) ou dans la position Park (pour transmission automatique) pour
éviter les blessures.
• NE JAMAIS fumer ou laisser une étincelle ou une flamme à proximité de la batterie ou du
moteur. N'utilisez pas l'outil dans des atmosphères explosives, comme en présence de
liquides inflammables, de gaz ou de poussières épaisses.
• Gardez un extincteur adapté aux feux d'essence/chimiques/électriques à proximité.
ŸToujours effectuer les tests de l'automobile dans un environnement sécuritaire.
Avant d'utiliser cet équipement de test, veuillez lire attentivement les informations de
sécurité suivantes.
• Placez des cales devant les roues motrices et ne laissez jamais le véhicule sans
surveillance pendant les essais.
• Soyez extrêmement prudent lorsque vous travaillez autour de la bobine d'allumage, du
chapeau du distributeur, des câbles d'allumage et des bougies d'allumage. Ces
composants créent des tensions dangereuses lorsque le moteur tourne.
• Pour éviter d'endommager l'outil ou de générer de fausses données, assurez-vous que
la batterie du véhicule est complètement chargée et que la connexion au DLC
(Connecteur de lien de données) du véhicule est claire et sécurisée.
• Les batteries automobiles contiennent de l'acide sulfurique nocif pour la peau. Pendant
l'opération, éviter de contacter directement avec l'acide de la batterie. Gardez toujours
les sources d'inflammation à l'écart de la batterie.
• Gardez l'outil sec, propre, exempt d'huile, d'eau ou de graisse. Utilisez un détergent
doux sur un chiffon propre pour dégager l'extérieur de l'équipement si nécessaire.
• Gardez les vêtements, cheveux, mains, outils, équipement d'essai, etc. loin de toutes les
pièces moteur chaudes ou mobiles.
• Rangez l'outil et les accessoires dans un endroit verrouillé hors de portée des enfants.
• N'utilisez pas l'outil lorsque vous vous trouvez dans l'eau.
• N'exposez pas l'outil ou l'adaptateur secteur à la pluie ou à des conditions humides.
L'entrée d'eau dans l'outil ou l'adaptateur secteur augmente le risque de choc
électrique.
• Veuillez utiliser la batterie et l'adaptateur secteur fournis. Risque d'explosion si la
batterie est remplacée par un type incorrect.
• Étant donné qu'il existe diverses procédures, techniques, outils et pièces pour
l'entretien des véhicules, ainsi que les compétences de la personne effectuant le travail
d'entretien, le technicien doit bien connaître le véhicule et le système testé.
• Lors du soudage de pièces de véhicules avec les composants X-PROG 3, l'unité est mise
hors tension et mise à la terre.
• Les pièces du véhicule et les composants X-PROG 3 sont soudés à température
constante.
Information sur les droits d'auteur
Exclusion de garanties et limite de responsabilité
Le droit est réservé pour apporter des changements à tout moment et sans préavis.
Nous ne serons pas responsables des dommages directs, spéciaux, accessoires,
indirects ou des dommages économiques consécutifs (y compris la perte de profits) dus
à l'utilisation du document.
Déclaration: LAUNCH détient les droits de propriété intellectuelle complets pour les
logiciels utilisés par ce produit. Pour toute action de rétro-ingénierie ou de craquage
contre le logiciel, LAUNCH bloquera l'utilisation de ce produit et se réservera le droit de
poursuivre ses responsabilités légales.
Copyright © 2021 par LAUNCH TECH CO., LTD (également appelé LAUNCH en abrégé).
Tous droits réservés. Aucune partie de ce manuel ne peut être reproduite, stockée ou
incluse dans un système de récupération de données ou transmise à quelque fin ou par
quelque moyen que ce soit (électronique, mécanique, photocopie, enregistrement ou
autre) sans la permission expresse et écrite de LAUNCH.
Toutes les informations, illustrations et spécifications de ce manuel sont basées sur les
dernières informations disponibles au moment de la publication.
Précautions et avis de non-responsabilité
FR

Périphérique VCI
Périphérique VCI
Véhicule
Tablette d'affichage*
Principe de fonctionnement
1. Diagnostics/Opérations d'antidémarrage à clé (IMMO) 2. Opérations de programmation de l'antidémarrage (IMMO PROG)
2). Sélectionnez la connexion WLAN
souhaitée dans la liste. (Un mot de passe
peut être requis pour les réseaux
sécurisés).
Si le VCI est activé avec succès, il sera
automatiquement lié à la tablette. Dans ce
cas, il n'est pas nécessaire pour l'utilisateur
de reconfigurer manuellement la liaison de
communication sans fil.
Reportez-vous à la section « Enregistrement
et mise à jour » pour l'activation du VCI.
3). Lorsque "Connecté" apparaît, cela
indique qu'il est correctement connecté au
réseau.
*2. Configuration de la communication
*1. Paramètre WLAN
1). Sur l'écran d'accueil, appuyez sur
Paramètres -> Réseau & Internet ->
WLAN.
Tablette d'affichage
*Avertissement: La programmation ne nécessite pas de connexion au véhicule.
Pour vous assurer que le X-PROG 3 fonctionne correctement, utilisez
UNIQUEMENT l'adaptateur secteur et l'adaptateur OBD I pour alimenter le X-
PROG 3. Il est interdit d'obtenir de l'alimentation via une connexion à la prise
d'alimentation CC du X-PROG 3 via l'adaptateur secteur seul.
Clé de véhicule/transpondeur
Puce EEPROM/MCU/ECU
LAUN CH
C
B
D
2). Lire/écrire les données de la puce EEPROM embarquée et lire/écrire les données de
la puce MCU/ECU.
Le X-PROG 3 est requis lors de l'exécution d'une opération IMMO PROG ou IMMO (pour
certains modèles de véhicules).
1). Lisez les données du transpondeur (y compris la clé intelligente infrarouge Mercedes
Benz) et générez des clés exclusives.
Il a les fonctions suivantes :
C. Adaptateur OBD I D. Adaptateur secteur
A. Câble de diagnostic DB15-OBD16 B. Câble de diagnostic principal
*Lors de l'exécution des opérations
IMMO sur certains modèles de
véhicules, connectez ce connecteur au
port DLC du véhicule au lieu de C et D.
D'autres connexions s'appliqueront.
BT
POW ER
VEH ICLE
I/O
X-PROG 3
BT
POWER
VEH ICLE
I/O
A

98********00
Enveloppe de mot de passe
3. Activer VCI : Saisissez le S/N du produit à 12 chiffres et le code d'activation à 8 chiffres
(*peut être obtenu à partir de l'enveloppe de mot de passe incluse), puis appuyez sur Activer.
4. Terminer l'enregistrement et télécharger le logiciel de diagnostic : Appuyez sur OK
pour accéder à l'écran de téléchargement du logiciel du véhicule. Appuyez sur "Mettre
à jour" sur la page de mise à jour pour commencer le téléchargement. Une fois le
téléchargement terminé, les paquets logiciel seront installés automatiquement .
* Tous les logiciels sont mis à jour périodiquement. Il est recommandé de vérifier régulièrement
les mises à jour et d'installer la dernière version du logiciel pour un service fonctions et une
Fonction optimaux.
1. Lancer App: Appuyez sur l'icône de l'application sur l'écran d'accueil, puis appuyez sur
Connexion dans le coin supérieur droit de l'écran. La fenêtre contextuelle suivante
apparaîtra à l'écran (* Assurez-vous que la tablette a un signal Wi-Fi fort et stable.).
2. Créer un compte d'application: Saisissez les informations (les éléments avec * doivent
être remplis) en suivant les invites à l'écran, puis appuyez sur S'inscrire.
Pour les nouveaux utilisateurs, veuillez suivre le tableau des opérations ci-dessous pour
commencer avec cet outil.
Activer VCI
Inscription à l'application
Terminer l'inscription
Télécharger des logiciels
S'inscrire&Mettre à jour
FR

*Pour les véhicules non OBD II, un connecteur non 16 broches (adaptateur) est requis. Reportez-
vous au manuel de l'utilisateur pour une méthode de connexion plus détaillée.
1). Diagnostic intelligent
2). Diagnostic local
4. Diagnostic
Cette fonction vous permet d'utiliser les informations VIN du véhicule actuellement
identifié pour accéder à ses données (y compris les informations sur le véhicule, les
enregistrements de diagnostic historiques) à partir du serveur cloud pour effectuer un
test rapide, éliminant les conjectures et la sélection de menu manuelle étape par étape.
Utilisez cette fonction pour diagnostiquer un véhicule manuellement. Pour les nouveaux
utilisateurs, veuillez suivre le tableau d'exploitation ci-dessous pour vous familiariser
avec cet outil et commencer à l'utiliser.
Cette Fonction aide les ateliers de réparation ou les mécaniciens à diagnostiquer un
véhicule distant et à lancer des messages instantanés, permettant une efficacité
améliorée et des réparations plus rapides.
3). Diagnostic à distance
Tapez sur Diagnostic local Suivez les instructions à l'écran
Sélectionner le logiciel du véhicule Sélectionner la version du logiciel
Connexion et opérations
3. Antidémarrage de clé & programmation d'antidémarrage
Cette fonction vous permet d'exécuter la fonction d'adaptation de clé antivol qui permet
au système de contrôle antivol sur la voiture d'identifier et d'autoriser les clés à distance
pour une utilisation normale de la voiture.
2). Programmation d'antidémarrage
Cette fonction vous permet d'effectuer les fonctions suivantes :
1). Lisez les données du transpondeur de clé et générez des clés exclusives.
1). Antidémarrage
2). Lire/écrire les données de la puce EEPROM embarquée et lire/écrire les données de
la puce MCU/ECU.
Pour les véhicules équipés d'une prise de diagnostic OBD II, connectez le SmartLink C
au DLC du véhicule directement via le câble de diagnostic.
2. Connexion (lors de l'exécution des opérations de
diagnostic/d'antidémarrage des clés)
1. Préparation
Pour les voitures de tourisme, le DLC est généralement un connecteur à 16 broches où le dongle
VCI s'interface avec l'ordinateur de bord du véhicule. Il est généralement situé sur le côté
conducteur, environ 12 pouces du centre du tableau de bord.
1). Le contact est mis.
3). Localisez le port DLC (Connecteur de liaison de données) du véhicule.
Avant de diagnostiquer, assurez-vous que les conditions suivantes sont remplies:
2). La plage de tension de la batterie du véhicule est de 11 à 14 volts.
C. Volkswagen
A. Opel, Volkswagen, Audi
B. Honda
D. Opel, Volkswagen, Citroen
E. Changan
F. Hyundai, Daewoo, Kia, Honda, Toyota, Nissan,
Mitsubishi, Renault, Opel, BMW, Mercedes-Benz,
Mazda, Volkswagen, Audi, GM, Chrysler, Peugeot,
Regal, Beijing Jeep, Citroen et les modèles les plus
répandus
Si le DLC ne peut pas être trouvé, se référer au manuel d'entretien du véhicule pour
l'emplacement.

- Reorientar o reubicar la antena receptora.
- Conectar el equipo a una toma de corriente de un circuito diferente al que está
conectado el receptor.
Cualquier cambio o modificación no aprobado expresamente por la parte responsable
del cumplimiento podría anular la autoridad del usuario para operar el equipo.
Este dispositivo cumple con la parte 15 de las Reglas FCC. La operación está sujeto a las
dos condiciones siguientes: (1) Este dispositivo no puede causar interferencias
perjudiciales, y (2) este dispositivo debe aceptar cualquier interferencia recibida,
incluidas las interferencias que puedan causar un funcionamiento no deseado.
Este equipo genera, utiliza y puede irradiar energía de radiofrecuencia y, si no se instala
y utiliza de acuerdo con las instrucciones, puede provocar interferencias perjudiciales en
las comunicaciones por radio. Sin embargo, no hay garantía de que no se produzcan
interferencias en una instalación en particular. Si este equipo causa interferencia
perjudiciales en la recepción de radio o televisión, lo cual se puede determinar
encendiendo y apagando el equipo, se recomienda al usuario que intente corregir la
interferencia mediante una o más de las siguientes medidas:
Declaración de la FCC
Nota: Este equipo ha sido probado y cumple con los límites para un dispositivo digital de
Clase B, de acuerdo con la Parte 15 de las Reglas de la FCC. Estos límites están
diseñados para proporcionar una protección razonable contra interferencias
perjudiciales en una instalación residencial.
- Aumente la separación entre el equipo y el receptor.
Ÿ Wear an ANSI-approved eye shield when testing or repairing vehicles.
Ÿ When welding vehicle parts with the X-PROG 3 components, the unit is powered off and is grounded.
Ÿ Please use the included battery and power adaptor. Risk of explosion if the battery is replaced with an incorrect type.
Ÿ Keep the tool dry, clean, free from oil, water or grease. Use a mild detergent on a clean cloth to clear the outside of
the equipment when necessary.
Ÿ Keep clothing, hair, hands, tools, test equipment, etc. away from all moving or hot engine parts.
Ÿ Keep a fire extinguisher suitable for gasoline/chemical/electrical fires nearby.
Ÿ Before starting the engine, put the gear lever in the Neutral position (for manual transmission) or in the Park (for
automatic transmission) position to avoid injury.
Ÿ Put blocks in front of the drive wheels and never leave the vehicle unattended while testing.
Ÿ Store the tool and accessories in a locked area out of the reach of children.
Ÿ Do not expose the tool or power adaptor to rain or wet conditions. Water entering the tool or power adaptor increases
the risk of electric shock.
Ÿ Do not use the tool while standing in water.
Ÿ The vehicle parts and the X-PROG 3 components are welded at a constant temperature.
Ÿ Use extreme caution when working around the ignition coil, distributor cap, ignition wires and spark plugs. These
components create hazardous voltage when the engine is running.
Ÿ Automotive batteries contain sulfuric acid that is harmful to skin. In operation, direct contact with the automotive
batteries should be avoided. Keep the ignition sources away from the battery at all times.
Ÿ Because there are various procedures, techniques, tools, and parts for servicing vehicles, as well as the skill of the
person doing the service work, the technician must be well knowledgeable of the vehicle and the system being tested.
Ÿ NEVER smoke or allow a spark or flame in vicinity of battery or engine. Do not operate the tool in explosive
atmospheres, such as in the presence of flammable liquids, gases, or heavy dust.
Safety Precautions
Before using this test equipment, please read the following safety information carefully.
ŸAlways perform automotive testing in a safe environment.
Ÿ Do not connect or disconnect any test equipment while the ignition is on or the engine is running.
Ÿ DO NOT attempt to operate the tool while driving the vehicle. Have second personal operate the tool. Any
distraction may cause an accident.
Instrucciones de Seguridad
• Tenga mucho cuidado al trabajar cerca de la bobina de encendido, la tapa del
distribuidor, los cables de encendido y las bujías. Estos componentes crean voltajes
peligrosos cuando el motor está en marcha.
• NO intente operar la herramienta mientras conduce el vehículo. Haga que una segunda
persona opere la herramienta. Cualquier distracción puede provocar un accidente.
• Realice siempre las pruebas de automóviles en un entorno seguro.
• No conecte ni desconecte ningún equipo de prueba mientras el encendido esté
conectado o el motor esté en marcha.
• NUNCA fume ni permita que se produzcan chispas o llamas cerca de la batería o del
motor. No opere la herramienta en atmósferas explosivas, como en presencia de
líquidos inflamables, gases o polvo pesado.
Antes de usar este equipo de prueba, lea atentamente la siguiente información de
seguridad.
• Coloque bloques delante de las ruedas motrices y nunca deje el vehículo desatendido
mientras se realizan las pruebas.
• Mantenga la herramienta seca, limpia, sin aceite, agua o grasa. Utilice un detergente
suave en un paño limpio para limpiar el exterior del equipo cuando sea necesario.
• Guarde la herramienta y los accesorios en un área cerrada fuera del alcance de los
niños.
• Utilice un protector ocular aprobado por ANSI al probar o reparar los vehículos.
• Por favor, utilice la batería y el adaptador de corriente incluidos. Riesgo de explosión si
se reemplaza la batería por otra de tipo incorrecto.
• Antes de arrancar el motor, coloque la palanca de cambios en la posición Neutral (para
transmisión manual) o en la posición de Estacionamiento (para transmisión automática)
para evitar lesiones.
• Las baterías de automóviles contienen ácido sulfúrico que es perjudicial para la piel.
Durante el funcionamiento, debe evitarse el contacto directo con las baterías de
automóviles. Mantenga las fuentes de encendido alejadas de la batería en todo
momento.
• No utilice la herramienta mientras esté en el agua.
• Debido a que existen varios procedimientos, técnicas, herramientas y piezas para dar
servicio a los vehículos, así como la habilidad de la persona que realiza el trabajo de
servicio, el técnico debe conocer bien el vehículo y el sistema que se está probando.
• Mantenga un extintor adecuado para incendios de gasolina/químicos/eléctricos cerca.
• Mantenga la ropa, el pelo, las manos, las herramientas y el equipo de prueba, etc.
alejados de todas las piezas móviles o calientes del motor.
• Las piezas del vehículo y los componentes del X-PROG 3 se sueldan a una temperatura
constante.
• Cuando se sueldan las piezas del vehículo con los componentes X-PROG 3, la unidad
está apagada y conectada a tierra.
• Para evitar dañar la herramienta o generar datos falsos, asegúrese de que la batería del
vehículo está completamente cargada y que la conexión al DLC (Conector de Enlace de
Datos) del vehículo sea clara y segura.
• No exponga la herramienta o el adaptador de corriente a la lluvia o condiciones
húmedas. La entrada de agua en la herramienta o en el adaptador de corriente aumenta
el riesgo de descarga eléctrica.
Renuncia de Garantías y Limitación de Responsabilidades
Se reserva el derecho de hacer cambios en cualquier momento sin aviso. No seremos
responsables de ningún daño directo, especial, incidental, indirecto o cualquier daño
económico consecuente (incluida la pérdida de beneficios) debido al uso del documento.
Toda la información, ilustraciones y especificaciones de este manual se basan en la
información más reciente disponible en el momento de la publicación.
Informacion de Copyright
Declaración: LAUNCH posee todos los derechos de propiedad intelectual del software
utilizado por este producto. Para cualquier acción de ingeniería inversa o craqueo contra
el software, LAUNCH bloqueará el uso de este producto y se reservará el derecho de
perseguir sus responsabilidades legales.
Copyright © 2021 de LAUNCH TECH CO., LTD (también llamado LAUNCH para
abreviar). Todos los derechos reservados. Ninguna parte de esta publicación puede ser
reproducida, almacenada en un sistema de recuperación o transmitida en cualquier
forma o por cualquier medio, ya sea electrónico, mecánico, fotocopiado, de grabación o
de otro tipo, sin el permiso previo por escrito de LAUNCH.
Precauciones y Descargo de Responsabilidad
ES

VCI
VCI
Vehículo
Tableta de Pantalla*
Principio de Funcionamiento
1. Operaciones de Diagnóstico/Inmovilizador de Llaves (IMMO) 2. Operaciones de Programación del Inmovilizador (IMMO PROG)
Refer to Section “Register & Update” for VCI
activation.
1). On the home screen, tap Settings ->
Network & Internet -> WLAN.
3). When “Connected” appears, it indicates
that it is properly connected to the
network.
2). Select the desired WLAN connection
from the list (Password may be required
for secured networks).
*1. WLAN Setting
*2. Communication Setup
If the VCI is successfully activated, it will be
automatically bound to the tablet. In this case
it is not necessary for the user to manually
configure the wireless communication link
again.
Tableta de Pantalla
*Advertencia: La programación no requiere una conexión al vehículo. Para
asegurarse de que el X-PROG 3 funcione correctamente, utilice SOLAMENTE
el adaptador de corriente y el adaptador OBD I para suministrar energía al X-
PROG 3. Obtener energía a través de una conexión a la toma de corriente CC
del X-PROG 3 a través del adaptador de corriente solo está prohibido.
Llave del Vehículo/
Transpondedor
Chip EEPROM/MCU/ECU
LAUN CH
C
B
D
Se requiere el X-PROG 3 cuando se realiza la operación IMMO PROG o IMMO (para
algunos modelos de vehículos).
Tiene las siguientes funciones
2). Leer/escribir datos del chip EEPROM a bordo y leer/escribir datos del chip
MCU/ECU.
1). Leer los datos del transpondedor (incluida la llave inteligente infrarroja de Mercedes
Benz) y generar llaves exclusivas.
A. DB15-OBD16 Diagnostic cable B. Cable de Diagnóstico Principal
C.Adaptador OBD I D. Adaptador de Corriente
*Al realizar las operaciones IMMO
en ciertos modelos de vehículos,
conecte este conector al puerto DLC
del vehículo en lugar de C y D. Se
aplicarán otras conexiones.
BT
POWER
VEH ICLE
I/O
A
BT
POW ER
VEH ICLE
I/O
X-PROG 3

98********00
Sobre de Contraseña
3. Activar VCI: Ingrese el Número de Serie del producto de 12 dígitos y el Código de
Activación de 8 dígitos (* puede obtenerse en el Sobre de Contraseña incluido) y luego pulse
Activar.
4. Finalice el Registro y Descargue el Software de Diagnóstico: Toque OK para entrar en
la pantalla de descarga del software del vehículo. Toque Actualizar en la página de
actualización para comenzar a descargar. Una vez finalizada la descarga, los
paquetes de software se instalarán automáticamente.
*Todo el software se actualiza periódicamente. Se recomienda comprobar regularmente las
actualizaciones e instalar la última versión del software para obtener el mejor servicio y las
mejores funciones.
1. Inicie la Aplicación: toque el icono de la aplicación en la pantalla de inicio y luego
toque Iniciar Sesión en la esquina superior derecha de la pantalla. La siguiente
ventana emergente aparecerá en la pantalla (* Asegúrese de que la tableta tiene una señal
Wi-Fi fuerte y estable).
2. Cree una Cuenta de la Aplicación: Ingrese la información (los elementos con * deben
completarse) siguiendo las indicaciones en pantalla y luego toque Registrar.
Para los nuevos usuarios, por favor, siga la tabla de operaciones que se muestra a
continuación para comenzar con esta herramienta.
Activar VCI
Registro de la Aplicación
Terminar el Registro
Descargar el Software
Registro y Actualización
ES

Para vehículos equipados con toma de diagnóstico OBD II, conecte el VCI al puerto DLC
del vehículo a través del cable de diagnóstico.
2. Conexión (Cuando se realizan operaciones de Diagnóstico/
Inmovilizador)
*Para vehículos sin OBD II, se requiere un conector (adaptador) que no sea de 16 pines. Consulte
el Manual del Usuario para obtener un método de conexión más detallado.
4. Diagnóstico
1). Diagnóstico Inteligente
Esta función le permite utilizar la información VIN del vehículo identificado actualmente
para acceder a sus datos (incluida la información del vehículo, los registros históricos de
diagnóstico) desde el servidor de la Nube para realizar una prueba rápida, eliminando las
conjeturas y la selección del menú manual paso a paso.
2). Diagnóstico Local
Utilice esta función para diagnosticar un vehículo manualmente. Para los nuevos
usuarios, por favor, siga la tabla de operaciones que se muestra a continuación para
familiarizarse con esta herramienta y comenzar a utilizarla.
Esta función ayuda a los talleres de reparación o mecánicos a diagnosticar un vehículo
remoto y a lanzar mensajes instantáneos, lo que permite mejorar la eficiencia y acelerar
las reparaciones.
3). Diagnóstico Remoto
Toque Diagnóstico Local Siga las indicaciones en la pantalla
Seleccione el software del vehículo Seleccione la versión del software
Conexión y Operaciones
Esta función le permite realizar las siguientes funciones:
1). Imovilizador
3. Programación del Inmovilizador de Llave y del Inmovilizador
Esta función le permite realizar la función de coincidencia de llaves antirrobo, de modo
que el sistema de control del inmovilizador en el coche identifique y autorice las llaves del
control remoto para utilizar normalmente el coche.
2). Leer/escribir datos del chip EEPROM a bordo y leer/escribir datos del chip MCU/ECU.
2). Programación del Inmovilizador
1). Leer los datos del transpondedor de llaves y generar llaves exclusivas.
Antes de diagnosticar, asegúrese de que se cumplan las siguientes condiciones:
1.Preparación
1). La ignición está encendida.
3). Localice el puerto DLC (Conector de Enlace de Datos) del vehículo.
Para los automóviles de pasajeros, el DLC es típicamente un conector de 16 pines donde el dongle
VCI interactúa con la computadora de a bordo del vehículo. Por lo general, se encuentra en el
lado del conductor, a unas 12 pulgadas de distancia del centro del tablero.
2). El rango de voltaje de la batería del vehículo es de 11-14 voltios.
Para los vehículos comerciales, el DLC siempre está ubicada en la cabina del conductor.
C. Volkswagen
B. Honda
A. Opel, Volkswagen, Audi
E. Changan
F. Hyundai, Daewoo, Kia, Honda, Toyota, Nissan,
Mitsubishi, Renault, Opel, BMW, Mercedes-Benz,
Mazda, Volkswagen, Audi, GM, Chrysler, Peugeot,
Regal, Beijing Jeep, Citroen y la mayoría de los
modelos predominantes.
D. Opel, Volkswagen, Citroen

Dieses Gerät erzeugt, verwendet und strahlt möglicherweise Hochfrequenzenergie aus.
Wenn es nicht gemäß den Anweisungen installiert und verwendet wird, kann es zu
Funktionsstörungen kommen. Es kann jedoch nicht garantiert werden, dass in einer
bestimmten Installation keine Störungen auftreten. Wenn dieses Gerät schädliche
Störungen des Radio- oder Fernsehempfangs verursacht, was durch Aus- und
Einschalten des Geräts festgestellt werden kann, sollte der Benutzer versuchen, die
Störungen durch eine oder mehrere der folgenden Maßnahmen zu beheben:
FCC-Anweisung
Dieses Gerät entspricht Teil 15 der FCC-Regeln. Der Betrieb unterliegt den folgenden
zwei Bedingungen: (1) Dieses Gerät darf keine schädlichen Störungen verursachen, und
(2) dieses Gerät muss alle empfangenen Störungen akzeptieren, einschließlich
Störungen, die einen unerwünschten Betrieb verursachen können.
- Schließen Sie das Gerät an eine Steckdose an, die sich von dem Stromkreis
unterscheidet, an den der Empfänger angeschlossen ist.
- Richten Sie die Empfangsantenne neu aus oder verlegen Sie sie.
- Vergrößern Sie den Abstand zwischen dem Gerät und dem Empfänger.
Hinweis: Dieses Gerät wurde getestet und entspricht den Grenzwerten für ein digitales
Gerät der Klasse B gemäß Teil 15 der FCC-Regeln. Diese Grenzwerte sollen einen
angemessenen Schutz gegen schädliche Störungen in einer Wohnanlage bieten.
Jegliche Änderungen oder Modifikationen, die nicht ausdrücklich von der für die
Konformität verantwortlichen Partei genehmigt wurden, können dazu führen, dass der
Benutzer die Berechtigung zum Betrieb des Geräts verliert.
Ÿ Automotive batteries contain sulfuric acid that is harmful to skin. In operation, direct contact with the automotive
batteries should be avoided. Keep the ignition sources away from the battery at all times.
Ÿ When welding vehicle parts with the X-PROG 3 components, the unit is powered off and is grounded.
Ÿ Keep clothing, hair, hands, tools, test equipment, etc. away from all moving or hot engine parts.
Ÿ Please use the included battery and power adaptor. Risk of explosion if the battery is replaced with an incorrect type.
ŸAlways perform automotive testing in a safe environment.
Ÿ Use extreme caution when working around the ignition coil, distributor cap, ignition wires and spark plugs. These
components create hazardous voltage when the engine is running.
Ÿ Because there are various procedures, techniques, tools, and parts for servicing vehicles, as well as the skill of the
person doing the service work, the technician must be well knowledgeable of the vehicle and the system being tested.
Ÿ Keep the tool dry, clean, free from oil, water or grease. Use a mild detergent on a clean cloth to clear the outside of
the equipment when necessary.
Ÿ Wear an ANSI-approved eye shield when testing or repairing vehicles.
Ÿ Before starting the engine, put the gear lever in the Neutral position (for manual transmission) or in the Park (for
automatic transmission) position to avoid injury.
Ÿ Do not use the tool while standing in water.
Ÿ Do not expose the tool or power adaptor to rain or wet conditions. Water entering the tool or power adaptor increases
the risk of electric shock.
Ÿ DO NOT attempt to operate the tool while driving the vehicle. Have second personal operate the tool. Any
distraction may cause an accident.
Ÿ Do not connect or disconnect any test equipment while the ignition is on or the engine is running.
Before using this test equipment, please read the following safety information carefully.
Ÿ NEVER smoke or allow a spark or flame in vicinity of battery or engine. Do not operate the tool in explosive
atmospheres, such as in the presence of flammable liquids, gases, or heavy dust.
Ÿ Put blocks in front of the drive wheels and never leave the vehicle unattended while testing.
Ÿ Store the tool and accessories in a locked area out of the reach of children.
Ÿ The vehicle parts and the X-PROG 3 components are welded at a constant temperature.
Ÿ Keep a fire extinguisher suitable for gasoline/chemical/electrical fires nearby.
Safety Precautions
• Führen Sie Automotive Testing immer in einer sicheren Umgebung durch.
Lesen Sie die folgenden Sicherheitsinformationen sorgfältig durch, bevor Sie dieses
Testgerät verwenden.
• Die Fahrzeugbatterien enthalten hautschädliche Schwefelsäure. Im Betrieb sollte ein
direkter Kontakt mit den Fahrzeugbatterien vermieden werden. Halten Sie die Zündquellen
immer von der Batterie fern.
• Halten Sie einen Feuerlöscher in der Nähe bereit, der für Benzin-/Chemikalien-
/Elektrobrände geeignet ist.
• Tragen Sie beim Testen oder der Reparatur der Fahrzeuge einen von ANSI zugelassenen
Augenschutz.
• Stellen Sie den Schalthebel vor dem Starten des Motors in die Neutralstellung (für
Schaltgetriebe) oder in die Parkstellung (für Automatikgetriebe), um Verletzungen zu
vermeiden.
• Stellen Sie Blöcke vor den Antriebsrädern und lassen das Fahrzeug beim Testen niemals
unbeaufsichtigt.
• Halten Sie Kleidung, Haare, Hände, Werkzeuge, Testgeräte usw. von allen beweglichen
oder heißen Motorteilen fern.
• Verwenden Sie das Gerät nicht, während Sie im Wasser stehen.
• NIEMALS rauchen oder Funken oder Flammen in der Nähe der Batterie oder des Motors
zulassen. Betreiben Sie das Gerät nicht in explosionsgefährdeten Bereichen, wie z.B. in
der Nähe von brennbaren Flüssigkeiten, Gasen oder starkem Staub.
• Um eine Beschädigung des Geräts oder die Erzeugung falscher Daten zu vermeiden,
stellen Sie bitte sicher, dass die Fahrzeugbatterie voll aufgeladen wird und die Verbindung
mit DLC des Fahrzeugs klar und sicher ist.
• Da es verschiedene Verfahren, Techniken, Werkzeuge und Teile für die Wartung von
Fahrzeugen sowie die Fähigkeiten der Person gibt, die die Servicearbeiten durchführt,
muss der Techniker das Fahrzeug und das zu testende System gut kennen.
• Versuchen Sie NICHT, das Gerät während der Fahrt zu bedienen. Lassen Sie das Gerät
von einer zweiten Person bedienen. Jede Ablenkung kann einen Unfall verursachen.
• Die Fahrzeugteile und die Komponenten von X-PROG 3 werden bei konstanter Temperatur
geschweißt.
Sicherheitshinweise
• Bewahren Sie dieses Gerät trocken, sauber, frei von Öl, Wasser oder Fett auf. Verwenden
Sie bei Bedarf ein mildes Reinigungsmittel auf einem sauberen Tuch, um die Außenseite
des Geräts zu reinigen.
• Setzen Sie das Gerät oder das Netzteil weder Regen noch Nässe aus. Wasser, das in das
Gerät oder das Netzteil eindringt, erhöht das Risiko eines Stromschlags.
• Beim Schweißen von Fahrzeugteilen mit den Komponenten von X-PROG 3 ist das Gerät
ausgeschaltet und geerdet.
• Verbinden oder trennen Sie das Testgerät nicht, während die Zündung eingeschaltet ist
oder der Motor läuft.
• Bewahren Sie das Gerät und das Zubehör in einem verschlossenen Bereich außerhalb der
Reichweite von Kindern auf.
• Bitte verwenden Sie die mitgelieferte Batterie und das Netzteil. Es besteht
Explosionsgefahr, wenn die Batterie durch einen falschen Typ ausgetauscht wird.
• Bei Arbeiten an Zündspule, Zündverteilerkappe, Zünddrähten und Zündkerzen lassen Sie
äußerste Vorsicht walten. Diese Bauteile erzeugen gefährliche Spannungen, wenn der
Motor läuft.
Urheberrechtsinformation
Wir behalten und das Recht vor, jederzeit und ohne Vorankündigung Änderungen
vorzunehmen. Wir haften nicht für direkte, besondere, zufällige, indirekte Schäden oder
wirtschaftliche Folgeschäden (einschließlich entgangener Gewinne), die durch die
Verwendung des Dokuments entstehen.
Aussage: LAUNCH besitzt die vollständigen geistigen Eigentumsrechte für die von
diesem Produkt verwendete Software. Für alle Reverse Engineering- oder Cracking-
Maßnahmen gegen die Software wird LAUNCH die Verwendung dieses Produkts
sperren und das Recht vorbehalten, die rechtlichen Verpflichtungen zu verfolgen.
Gewährleistungsausschluss und Haftungsbeschränkung
Alle Informationen, Abbildungen und Spezifikationen in diesem Handbuch basieren auf
den neuesten Informationen zum Zeitpunkt der Veröffentlichung.
Copyright © 2021 by LAUNCH TECH CO., LTD (auch kurz LAUNCH genannt). Alle
Rechte vorbehalten. Kein Teil dieser Veröffentlichung darf ohne vorherige schriftliche
Genehmigung von LAUNCH reproduziert, in einem Abfragesystem gespeichert oder in
irgendeiner Form oder mit irgendwelchen Mitteln, elektronisch, mechanisch, durch
Fotokopie, Aufzeichnung oder auf andere Weise übertragen werden.
Vorsichtsmaßnahmen & Haftungsausschluss
DE

VCI
VCI
Fahrzeug
Tablet-Anzeige*1
Tablet-Anzeige*1
. 1 Diagnose/Betrieb von Schlüssel Wegfahrsperre (IMMO) 2. Verfahren zur Programmierung der Wegfahrsperre (IMMO PROG)
2). Wählen Sie die gewünschte WLAN-
Verbindung aus der Liste aus (bei
gesicherten Netzwerken ist möglicherweise
ein Kennwort erforderlich).
*2. Kommunikationsaufbau
Wenn VCI erfolgreich aktiviert wurde, wird sie
automatisch an das Tablet gebunden. In diesem
Fall ist es nicht erforderlich, dass der Benutzer
die drahtlose Kommunikationsverbindung
erneut manuell konfiguriert.
3). Wenn "Verbunden" erscheint, bedeutet dies,
dass das Gerät richtig mit dem Netzwerk
verbunden ist.
Informationen zur VCI-Aktivierung finden Sie
in Abschnitt "Registrieren & Aktualisieren".
*1. WLAN-Einstellung
1). Tippen Sie auf dem Startbildschirm auf
Einstellungen -> Netzwerk & Internet ->
WLAN.
Arbeitsprinzip
*Warnung: Für die Programmierung ist keine Verbindung zum Fahrzeug
erforderlich. Um sicherzustellen, dass X-PROG 3 ordnungsgemäß
funktioniert, verwenden Sie NUR das Netzteil und den OBD I-Adapter, um X-
PROG 3 mit Strom zu versorgen. Die Stromversorgung über eine Verbindung
mit DC-Strombuchse von X-PROG 3 allein über das Netzteil ist verboten.
Fahrzeugschlüssel/Transponder
EEPROM/MCU/ECU-Chip
LAUN CH
C
B
D
1). Lesen Sie die Transponderdaten (einschließlich Mercedes Benz Infrarot Smart Key)
aus und generieren Sie exklusive Schlüssel.
2). Lesen/Schreiben Sie die On-Board-EEPROM-Chipdaten und lesen/schreiben Sie die
MCU/ECU-Chipdaten.
Es hat die folgenden Funktionen:
X-PROG 3 ist erforderlich, wenn Sie IMMO PROG oder IMMO (für einige
Fahrzeugmodelle) ausführen.
A. DB15-OBD16-Diagnosekabel B. Hauptdiagnosekabel
C. OBD I-Adapter D. Netzteil
*Wenn Sie die IMMO-Vorgänge bei
bestimmten Fahrzeugmodellen
ausführen, schließen Sie diesen
Stecker anstelle von C und D an den
DLC-Anschluss des Fahrzeugs an.
BT
POWER
VEH ICLE
I/O
A
BT
POW ER
VEH ICLE
I/O
X-PROG 3

98********00
Passwort-Umschlag
3. VCI aktivieren: Geben Sie die 12-stellige Produktseriennummer und den 8-stelligen
Aktivierungscode ein (*erhältlich aus dem mitgelieferten Passwort-Umschlag) und
tippen Sie anschließend auf Aktivieren.
4. Registrierung abschließen & Diagnosesoftware herunterladen: Tippen Sie auf OK, um
den Bildschirm für Download der Fahrzeugsoftware aufzurufen. Tippen Sie auf der
Update-Seite auf Update, um Download zu starten. Sobald Download abgeschlossen
ist, werden die Softwarepakete automatisch installiert.
*Die gesamte Software wird regelmäßig aktualisiert. Es wird empfohlen, regelmäßig nach
Updates zu suchen und die neueste Softwareversion zu installieren, um den besten Dienst und die
besten Funktionen zu erzielen.
1. App starten: Tippen Sie auf das Anwendungssymbol auf dem Startbildschirm und
anschließend auf Anmelden in der oberen rechten Ecke des Bildschirms. Das folgende
Popup erscheint auf dem Bildschirm (*Stellen Sie sicher, dass das Tablet über ein
starkes und stabiles Wi-Fi-Signal verfügt).
2. Ein App-Konto erstellen: Geben Sie die Informationen ein (mit * gekennzeichnete
Felder müssen ausgefüllt werden), indem Sie den Anweisungen auf dem Bildschirm
folgen, und tippen Sie auf Registrieren.
Für neue Benutzer folgen Sie bitte der unten angezeigten Bedienungstabelle, um mit
diesem Gerät zu beginnen.
VCI aktivieren
App-Anmeldung
Registrierung abschließen
Software herunterladen
Registrieren & Aktualisieren
DE

2. Verbindung (bei der Durchführung von Diagnose/Betrieb der Wegfahrsperre)
Bei Fahrzeugen mit OBD II-Diagnosebuchse schließen Sie VCI über das Diagnosekabel
an DLC-Anschluss des Fahrzeugs an.
*Für Nicht-OBD II-Fahrzeug wird ein nicht-16-poliger Anschluss (Adapter) benötigt. Weitere
Informationen zum Anschluss finden Sie in Benutzerhandbuch.
Verbindung & Betrieb
Bei Personenkraftwagen ist DLC typischerweise ein 16-poliger Anschluss, über den VCI-Dongle
mit dem Bordrechner des Fahrzeugs verbunden wird. Er befindet sich normalerweise auf der
Fahrerseite, etwa 12 Zoll von der Mitte des Armaturenbretts entfernt.
2). Der Spannungsbereich der Fahrzeugbatterie beträgt 11-14 Volt.
1.Vorbereitung
Stellen Sie vor der Diagnose sicher, dass die folgenden Bedingungen erfüllt sind:
1). Die Zündung ist eingeschaltet.
3). DLC (Datenübertragungsstecker)-Anschluss des Fahrzeugs suchen.
C. Volkswagen
A. Opel, Volkswagen, Audi
F. Hyundai, Daewoo, Kia, Honda, Toyota, Nissan,
Mitsubishi, Renault, Opel, BMW, Mercedes-Benz,
Mazda, Volkswagen, Audi, GM, Chrysler, Peugeot,
Regal, Beijing Jeep, Citroen y la mayoría de los
modelos predominantes.
B. Honda
D. Opel, Volkswagen, Citroen
E. Changan
Bei Nutzfahrzeugen befindet sich DLC immer in der Fahrerkabine.
Mit dieser Funktion können Sie die FIN-Informationen des aktuell identifizierten
Fahrzeugs verwenden, um auf dessen Daten (einschließlich Fahrzeuginformationen,
historische Diagnosedatensätze) vom Cloud-Server zuzugreifen und einen Schnelltest
durchzuführen, wodurch Vermutung und schrittweise manuelle Menüauswahl beseitigt
werden.
4. Diagnose
1). Intelligente Diagnose
2). Lokale Diagnose
Verwenden Sie diese Funktion, um ein Fahrzeug manuell zu diagnostizieren. Für neue
Benutzer folgen Sie bitte der unten angezeigten Bedienungstabelle, um sich mit dem
Gerät vertraut zu machen und es zu verwenden.
3). Ferndiagnose
Diese Funktion hilft Reparaturwerkstätten oder Mechanikern bei der Ferndiagnose eines
Fahrzeugs und beim Starten von Sofortnachrichten, was eine verbesserte Effizienz und
schnellere Reparaturen ermöglicht.
Auf „Lokale Diagnose“ tippen Folgen Sie den Anweisungen auf
dem Bildschirm
Fahrzeugsoftware auswählen Softwareversion auswählen
1). Wegfahrsperre
3. Programmierung von Schlüssel Wegfahrsperre & Wegfahrsperre
Mit dieser Funktion können Sie die Anpassungsfunktion des
Diebstahlsicherungsschlüssels ausführen, sodass das Steuersystem für Wegfahrsperre
am Fahrzeug die Funkschlüssel für die normale Verwendung des Fahrzeugs identifiziert
und autorisiert.
Mit dieser Funktion können Sie die folgenden Funktionen ausführen:
2). Lesen/Schreiben Sie die On-Board-EEPROM-Chipdaten und lesen/schreiben Sie die
MCU/ECU-Chipdaten.
1). Lesen Sie die Daten des Schlüsseltransponders und generieren Sie exklusive
Schlüssel.
2). Programmierung der Wegfahrsperre

- Collegare il dispositivo a una presa su un circuito diverso da quello a cui è collegato il
ricevitore.
- Aumentare la separazione tra il dispositivo e il ricevitore
Questo dispositivo genera, utilizza e può irradiare energia a radiofrequenza e, se non
installata e utilizzata secondo le istruzioni, può causare interferenza dannose alle
comunicazione radio Tuttavia, non vi è alcuna garanzia che non si verifichino
interferenze in una particolare installazione. Se questo dispositivo causa interferenze
dannose alla ricezione radiofonica o televisiva, che possono essere determinate
accendendo e spegnendo il dispositivo, l'utente è incoraggiato a provare a correggere
l'interferenza adottando una o più della seguenti misure:
Avviso: Questo dispositivo è stato testato ed è risultato conforme ai limiti per un
dispositivo digitale di Classe B, ai sensi della Parte 15 delle norme FCC. Questi limiti
sono progettati per fornire una protezione ragionevole contro le interferenze dannose in
un'installazione residenziale.
- Riorientare o riposizionare l'antenna ricevute
Dichiarazione FCC(Consolle centrale strutture)
Qualsiasi cambiamento o modifica non espressamente approvata dalla parte
responsabile della conformità potrebbe invalidare l'autorità dell'utente a utilizzare il
dispositivo.
Questo dispositivo è conforme alla Parte 15 delle norme FCC. Il funzionamento è
soggetto alle seguenti due condizioni: (1) Questo dispositivo non può causare
interferenza, e (2) questo dispositivo deve accettare qualsiasi interferenza ricevuta,
incluse le interferenze che potrebbe causare un funzionamento indesiderato.
ŸAlways perform automotive testing in a safe environment.
Ÿ Do not connect or disconnect any test equipment while the ignition is on or the engine is running.
Ÿ NEVER smoke or allow a spark or flame in vicinity of battery or engine. Do not operate the tool in explosive
atmospheres, such as in the presence of flammable liquids, gases, or heavy dust.
Ÿ Keep a fire extinguisher suitable for gasoline/chemical/electrical fires nearby.
Ÿ Before starting the engine, put the gear lever in the Neutral position (for manual transmission) or in the Park (for
automatic transmission) position to avoid injury.
Safety Precautions
Before using this test equipment, please read the following safety information carefully.
Ÿ Wear an ANSI-approved eye shield when testing or repairing vehicles.
Ÿ Put blocks in front of the drive wheels and never leave the vehicle unattended while testing.
Ÿ Use extreme caution when working around the ignition coil, distributor cap, ignition wires and spark plugs. These
components create hazardous voltage when the engine is running.
Ÿ Automotive batteries contain sulfuric acid that is harmful to skin. In operation, direct contact with the automotive
batteries should be avoided. Keep the ignition sources away from the battery at all times.
Ÿ DO NOT attempt to operate the tool while driving the vehicle. Have second personal operate the tool. Any
distraction may cause an accident.
Ÿ Keep clothing, hair, hands, tools, test equipment, etc. away from all moving or hot engine parts.
Ÿ Because there are various procedures, techniques, tools, and parts for servicing vehicles, as well as the skill of the
person doing the service work, the technician must be well knowledgeable of the vehicle and the system being tested.
Ÿ The vehicle parts and the X-PROG 3 components are welded at a constant temperature.
Ÿ When welding vehicle parts with the X-PROG 3 components, the unit is powered off and is grounded.
Ÿ Do not use the tool while standing in water.
Ÿ Do not expose the tool or power adaptor to rain or wet conditions. Water entering the tool or power adaptor increases
the risk of electric shock.
Ÿ Please use the included battery and power adaptor. Risk of explosion if the battery is replaced with an incorrect type.
Ÿ Keep the tool dry, clean, free from oil, water or grease. Use a mild detergent on a clean cloth to clear the outside of
the equipment when necessary.
Ÿ Store the tool and accessories in a locked area out of the reach of children.
Ÿ Eseguire sempre i test automobilistici in un ambiente sicuro.
Ÿ Metti blocchi davanti alle ruote motrici e non lasciare mai il veicolo incustodito durante il
test.
Ÿ Tenere un estintore adatto per benzina/chimica/incendi elettrici nelle vicinanze.
Ÿ Non collegare o scollegare alcuna apparecchiatura di prova mentre la chiave su marcia o
il motore è in moto.
Prima di utilizzare questa apparecchiatura di prova, leggere attentamente le seguenti
informazioni di sicurezza.
Ÿ Prima di avviare il motore, mettere la leva del cambio in posizione di folle (per cambio
manuale) o in posizione P (per cambio automatico) per evitare lesioni.
Ÿ Non fumare MAI o permettere scintille o fiamma nelle vicinanze della batteria o del
motore. Non azionare lo strumento in atmosfera esplosiva, come in presenza di liquidi
infiammabili, gas o polvere pesante.
Istruzioni di sicurezza
Ÿ Non tentare di azionare lo strumento in esercizio di marcia. Avere un secondo personale
di utilizzare lo strumento. Qualsiasi distrazione può causare un incidente.
Ÿ Indossare uno scudo oculare approvato ANSI durante il test o la riparazione dei veicoli.
Ÿ Utilizzare estrema cautela quando si lavora intorno alla bobina di accensione, tappo
distributore, cavi d'accensione e candela. Questi componenti creare tensione pericolosa
quando il motore è in moto.
Ÿ Le batterie per automobili contengono acido solforico dannoso per la pelle. In funzione, il
contatto diretto con le batterie automobilistiche deve essere evitato. Tenere sempre
lontane le sorgenti di accensione dalla batteria.
Ÿ Non utilizzare lo strumento stando in acqua.
Ÿ Perché ci sono varie procedure, tecnici, gli strumenti, e ricambi per la manutenzione dei
veicoli, così come l'abilità della persona che fa il lavoro di servizio, il tecnico deve essere
a conoscenza del veicolo e sistema in fase di test.
Ÿ Per evitare di danneggiare lo strumento o generare dati falsi, assicurarsi che la batteria
del veicolo sia completamente carica e che il collegamento al DLC(Connettore
collegamento dati) del veicolo sia chiara e sicura.
Ÿ I ricambi del veicolo ei componenti X-PROG 3 sono saldati alla temperatura costante.
Ÿ Durante la saldatura di ricambi con i componenti X-PROG 3, l'unità viene spenta ed è
fondato.
Ÿ Utilizzare la batteria inclusa e adattatore di alimentazione. Rischio di esplosione se la
batteria viene sostituita con un tipo non corretto.
Ÿ Mantenere lo strumento asciutto, pulito, privo di olio, acqua o grasso. Utilizzare un
detergente delicato su un panno pulito per pulire l'esterno del dispositivo quando
necessario.
Ÿ Tenere i vestiti, i capelli, le mani, gli strumenti, il dispositivo di prova, ecc. lontano da
tutte le parti del motore in movimento o calde.
Ÿ Non esporre lo strumento o adattatore di alimentazione alla pioggia o le condizioni umido
Acqua che entra negli strumenti o adattatore di alimentazione aumenta il rischio di
scosse elettriche.
Ÿ Conserva lo strumento e accessori nella zona bloccata fuori dalla portata dei bambini.
Informazioni sul Copyright
Esclusione di responsabilità e limitazione delle passività
Tutte le informazioni, illustrazioni e le specifiche tecniche riportate in questo manuale
sono basate sulle informazioni più recenti disponibili al momento della pubblicazione.
Copyright © 2021 by LAUNCH TECH CO., LTD (chiamato anche LAUNCH in breve). Tutti
i diritti riservati. Nessuna parte di questa pubblicazione può essere riprodotta, copiata o
archiviata, o trasmessa in qualsiasi forma e con qualsiasi mezzo, elettronico,
meccanico, a mezzo di fotocopie, registrazioni o altro, senza previa autorizzazione
scritta di LAUNCH.
Si riserva il diritto di apportare modifiche in qualsiasi momento senza preavviso. Non
saremo responsabili per eventuali danni diretti, speciali, incidentali, indiretti o per
eventuali danni economici consequenziali (inclusa la perdita di profitti) dovuti all'uso del
documento.
Dichiarazione: LAUNCH possiede i diritti di proprietà intellettuale completi per il
software utilizzato da questo prodotto. Per qualsiasi azione di reverse engineering o
cracking contro il software, LAUNCH bloccherà l'uso di questo prodotto e si riserva il
diritto di perseguire le proprie responsabilità legali.
Precauzione e Disclaimer
IT

VCI
VCI
Veicolo
Tablet Display*
Principio di funzionamento
1. Operazioni di diagnostica/Immobilizzatore della chiave (IMMO) 2. Operazioni di programmazione immobilizzatore (IMMO PROG)
*1. Impostazione WLAN
1). Sulla schermata iniziale, premi
Impostazioni -> Rete e Internet -> WLAN.
2). Selezionare la connessione WLAN
desiderata dall'elenco (Potrebbe essere
richiesta la password per le reti protette)
3). Quando viene visualizzato 'Collegato',
indica che la tabella è correttamente
connesso alla rete.
*2. Configurazione di comunicazione
Fare riferimento alla sezione 'Registrazione e
Aggiornamento' per l'attivazione VCI.
Se il VCI(Interfaccia di comunicazione del
veicolo) viene attivato con successo, verrà
automaticamente associato al tablet. In questo
caso non è necessario che l'utente configuri di
nuovo manualmente il collegamento di
comunicazione wireless.
Tablet Display
*Avviso: Programmazione non richiede un connessione al veicolo. Per
assicurare il X-PROG 3 funziona correttamente, SOLO utilizzare l'adattatore
di alimentazione e adattatore OBD I alla tensione di alimentazione al X-PROG
3. Ottenere potere attraverso una connessione alla presa di alimentazione CC
di X-PROG 3 solo tramite l'adattatore di alimentazione viene inibito.
Trasportatore/
Chiave del veicolo
Microcircuito integrato
EEPROM/MCU/ECU
LAUN CH
C
B
D
1). Leggere i dati trasportatore (incluso chiave Smart infrarosso Mercedes Benz), e
generare le chiave esclusive.
Ha le seguenti funzioni:
2). Leggere/scrivere dati microcircuito integrato EEPROM rete di bordo, e
leggere/scrivere dati microcircuito integrato MCU/ECU.
Il X-PROG 3 viene richiesto quando esecuzione il funzionamento del IMMO PROG o
IMMO (per alcuni modelli del veicolo)
C. Adattatore OBD I D. Adattatore di alimentazione
A. Cavo diagnosi DB15-OBD16 B. Cavo diagnosi principale
*Quando esecuzione le operazioni
IMMO su alcuni modelli di veicoli,
collegare questo connettore alla
porta DLC del veicolo invece di C e
D. Altri collegamenti si applicano.
BT
POWER
VEH ICLE
I/O
A
BT
POW ER
VEH ICLE
I/O
X-PROG 3

98********00
Busta password
3. Attivare VCI(Connettore diagnosi): Inserire il n. di serie prodotto con 12-cifre e codice
di attivazione con 8-cifre (*Può essere ottenuto dalla busta della password inclusa), e
poi tocca Attivo.
*Tutto il software viene aggiornato periodicamente. Si consiglia di controllare regolarmente per
la disponibilità di aggiornamenti e installare l'ultima versione del software per il miglior servizio
e funzioni.
4. Terminare registrazione e scaricare il software diagnostico: Tocca OK per accedere lo
schermo scarico del software del veicolo. Premi 'Aggiorna' nella pagina di
aggiornamento per avviare il download. Al termine del download, i pacchetti software
verranno installati automaticamente.
1. Esegui App: tocca l'icona dell'applicazione nella schermata iniziale, quindi premi
'Accedi' nell'angolo in alto a Dx. dello schermo. Il seguente pop-up apparirà sullo
schermo (*Assicurarsi che l'ultima tablet presenta un forte e stabile segnale Wi-Fi).
2. Creare un account App: Inserire le informazioni (elementi con * deve essere riempito)
seguentdo le istruzioni sullo schermo e poi tocca Registro.
Per i nuovi utenti, seguire la tabella operativa mostrata di seguito per iniziare con questo
strumento.
Attivare VCI
Iscrizione all'app
Terminare la registrazione
Software scaricato
Registro & Aggiornamento
IT
La pagina si sta caricando...
La pagina si sta caricando...
La pagina si sta caricando...
La pagina si sta caricando...
La pagina si sta caricando...
La pagina si sta caricando...
La pagina si sta caricando...
La pagina si sta caricando...
La pagina si sta caricando...
La pagina si sta caricando...
La pagina si sta caricando...
La pagina si sta caricando...
La pagina si sta caricando...
La pagina si sta caricando...
La pagina si sta caricando...
-
 1
1
-
 2
2
-
 3
3
-
 4
4
-
 5
5
-
 6
6
-
 7
7
-
 8
8
-
 9
9
-
 10
10
-
 11
11
-
 12
12
-
 13
13
-
 14
14
-
 15
15
-
 16
16
-
 17
17
-
 18
18
-
 19
19
-
 20
20
-
 21
21
-
 22
22
-
 23
23
-
 24
24
-
 25
25
-
 26
26
-
 27
27
-
 28
28
-
 29
29
-
 30
30
-
 31
31
-
 32
32
-
 33
33
-
 34
34
-
 35
35


in altre lingue
- français: LAUNCH X431 Mode d'emploi
- español: LAUNCH X431 Guía del usuario
- Deutsch: LAUNCH X431 Benutzerhandbuch
- português: LAUNCH X431 Guia de usuario
- 日本語: LAUNCH X431 ユーザーガイド
Documenti correlati
Altri documenti
-
 Topdon ArtiDiag Pro Guida Rapida
-
 Topdon ArtiDiag600 Guida Rapida
-
 Topdon ArtiDiag500 Manuale utente
-
 Topdon UltraDiag Manuale utente
-
 Topdon UltraDiag Guida Rapida
-
OTOFIX EvoScan Ultra Guida utente
-
 Topdon ArtiDiag800 BT Professional Diagnostic Tool Manuale utente
-
Topdon ArtiDiag800 BT Manuale utente
-
 Topdon Phoenix Plus Manuale utente
-
 thinkcar TPMS90 Manuale utente


