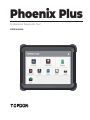
Phoenix Plus
USER MANUAL
Professional Diagnostic Tool

English

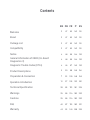
Contents
Welcome
DEEN
347 95 143 191
347 95 143 191
347 95 143 191
347 95 143 191
448 96 144 192
448 96 144 192
449 97 145 193
550 98 146 194
7
45
40
39
39
38
12
52
92
87
86
86
85
57
100
140
135
134
134
133
105
148
188
183
182
182
181
153
196
236
231
230
230
229
201
FR IT ES
About
Package List
Compatibility
Notice
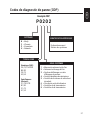
General Information of OBDII (On-Board
Diagnostics II)
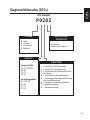
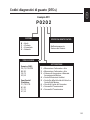
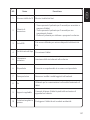
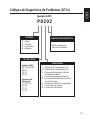
Diagnostic Trouble Codes (DTCs)
Product Descriptions
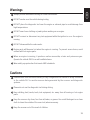
Warnings
Operation Introduction
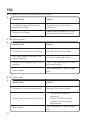
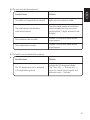
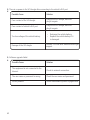
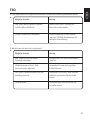
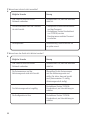
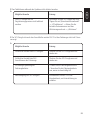
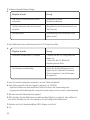
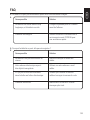
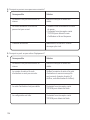
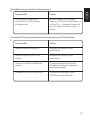
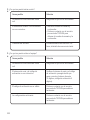
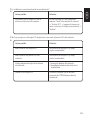
FAQ
Preparation & Connection
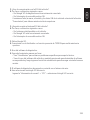
Cautions
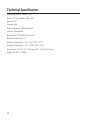
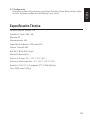
Technical Specication
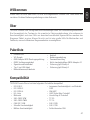
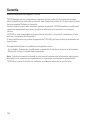
Warranty


3
EN
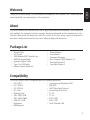
Welcome
About
Package List
Thank you for purchasing TOPDON automotive diagnostic tool Phoenix Plus. Please read and
understand this user manual prior to the operation.
TOPDON Phoenix Plus features a full line of high-performance functionality. The accuracy of
test readings, the expanded vehicle coverage, the improved speed, and an abundance of user-
friendly nature, place the diagnostic tablet in a class of its own, being a great assistance for
mechanics and professionals to have more efcient diagnostic work ever.
•Phoenix Plus
•VCI Dongle
•OBDI Adapter BOX Transfer Line
•OBDII Extension Cable
•Cigarette Lighter Cable
•Type-C to USB Cable
•Battery Clamps/Cable Set
•Power Adaptor
•User Manual
•Password Envelope
•Non-Standard OBDII Adapter*10
•Fuse (φ5*20mm)*4
•Fuse (φ6*30mm)*2
Compatibility
•ISO 9142-2
•ISO 14230-2
•ISO 15765-4
•K/L-Line
•Flashing Code
•SAE-J1850 VPW
•SAE-J1850 PWM
•CAN ISO 11898
•Highspeed
•Middlespeed
•Lowspeed and Singlewire CAN
•GM UART
•UART Echo Byte Protocol
•Honda Diag-H Protocol
•TP 2.0
•TP 1.6
•SAE J1939
•SAE J1708
•Fault-Tolerant CAN
TOPDON Phoenix Plus is compatible with the following protocols:

4
Notice
General Information of OBDII (On-Board Diagnostics II)
Diagnostic Trouble Codes (DTCs)
Phoenix Plus may automatically reset while being disturbed by strong static electricity. THIS
IS A NORMAL REACTION.
This user manual is subject to change without written notice.
Read the instruction carefully and use the unit properly before operating. Failure to do so may
cause damage and/or personal injury, which will void the product warranty.
The OBDII system is designed to monitor emission control systems and key engine
components by performing either continuous or periodic tests of specic components and
vehicle conditions, which will offer three pieces of such valuable information:
•Whether the Malfunction Indicator Light (MIL) is commanded “on” or “off”;
•Which, if any, Diagnostic Trouble Codes (DTCs) are stored;
•Readiness Monitor status.

5
EN
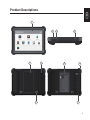
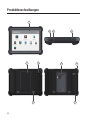
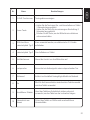
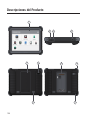
Product Descriptions
1
2
5810
69
7
34

6
Convert an audio signal into a corresponding sound.
Remove and install added modules on the backend.
Used for communication between the function
module and the tablet.
Keep the tablet standing at the desk, or use it to hang
the tablet on the steering wheel.
Secure the tablet from shock and accidental dropping.
8
Loudspeaker
Backplane
Pin
Adjustable Stand
Rubber Corner
Protections
9
10
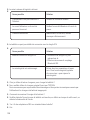
6
7
Can be used to charge 5V electronic devices.
For charging the tablet.
Snapshot the view ahead of the screen.
•Hold the button for 3 seconds to turn the tablet on,
or off.
•Hold the button for 2 seconds for a forced shutdown.
•Press the button to wake up the screen or turn off
the screen.
Power Button
USB Port
Type C Charging Slot
Rear Camera
NameNO. Descriptions
Show test results.1
2
3
4
5
10” Touchable Screen

7
EN
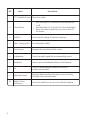
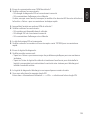
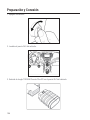
Preparation & Connection
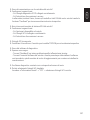
1. Turn the ignition off.
2. Locate the vehicle’s DLC port.
3. Plug the TOPDON Phoenix Plus VCI dongle into the vehicle’s DLC port.

8
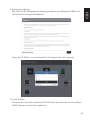
4. Turn the ignition on. The engine can be off or running.
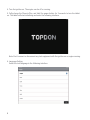
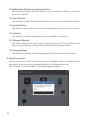
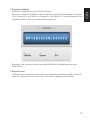
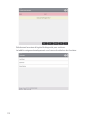
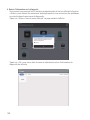
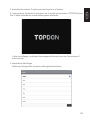
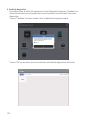
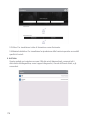
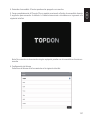
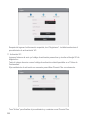
5. Fully charge the Phoenix Plus, and hold the power button for 3 seconds to turn the tablet
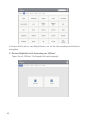
on. The tablet will start initializing and enter the following interface:
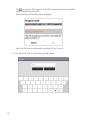
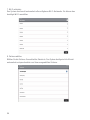
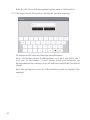
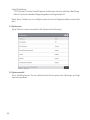
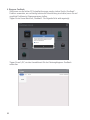
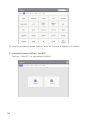
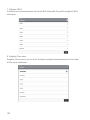
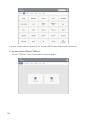
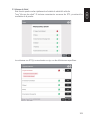
6. Language Setting
Select the tool language in the following interface:
Note: Don’t connect or disconnect any test equipment with the ignition on or engine running.

9
EN
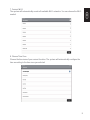
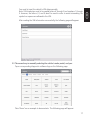
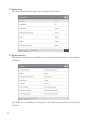
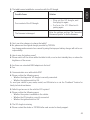
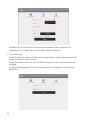
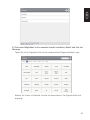
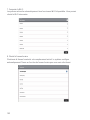
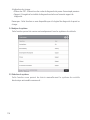
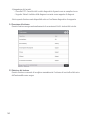
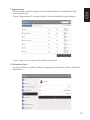
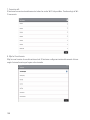
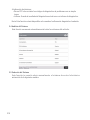
The system will automatically search all available Wi-Fi networks. You can choose the Wi-Fi
needed.
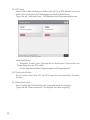
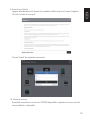
Choose the time zone of your current location. The system will automatically congure the
time according to the time zone you selected.
7. Connect Wi-Fi
8. Choose Time Zone

10
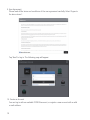
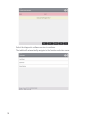
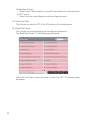
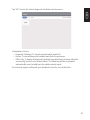
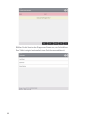
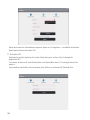
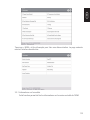
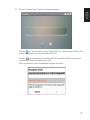
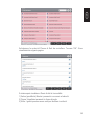
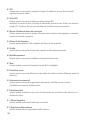
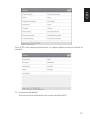
Please read all the terms and conditions of the user agreement carefully. Select “Agree to
the above terms”.
You can log in with an available TOPDON account, or register a new account with a valid
e-mail address.
Tap “Next” to log in. The following page will appear:
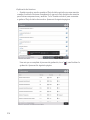
9. User Agreement
10. Create an Account

11
EN
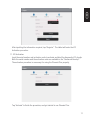
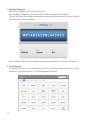
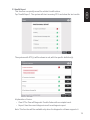
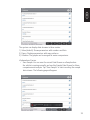
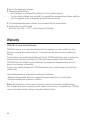
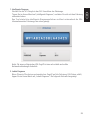
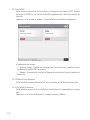
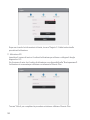
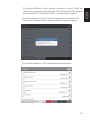
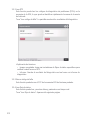
Input the serial number and activation code to activate and bind the diagnostic VCI dongle.
Both the serial number and the activation code are available in the “Password Envelop”.
The activation procedure is necessary for using the Phoenix Plus properly.
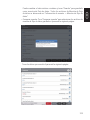
Tap “Activate” to nish the procedure, and get started to use Phoenix Plus.
After inputting the information required, tap “Register”. The tablet will enter the VCI
Activation procedure.
11. VCI Activation

12
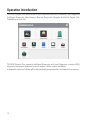
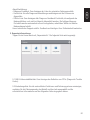
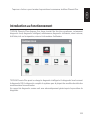
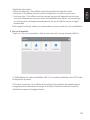
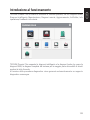
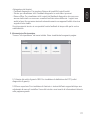
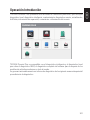
TOPDON Phoenix Plus features an array of practical functions, including Local Diagnosis,
Intelligent Diagnosis, Maintenance, Remote Diagnosis, Upgrade, ArtiFolder, Repair Info,
Feedback, and User Info.
Operation Introduction
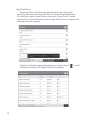
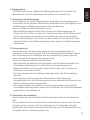
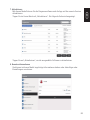
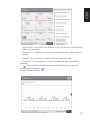
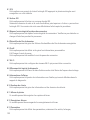
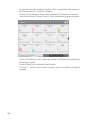
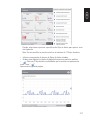
TOPDON Phoenix Plus supports Intelligent Diagnosis and Local Diagnosis covering OBDII
diagnosis, full system diagnosis for most modern vehicle models worldwide.
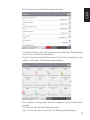
A diagnostic report as follows will be automatically generated after the diagnostic procedure.

13
EN

14
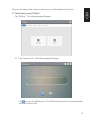
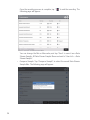
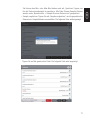
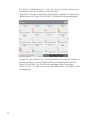
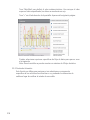
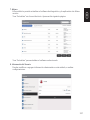
Plug the VCI dongle into the vehicle’s DLC port.
Tap “Intelligent Diagnosis” on the Home Menu after connecting to the vehicle.
The tool will start the intelligent diagnosis procedure, and automatically read the vehicle’s
VIN information, as shown below:
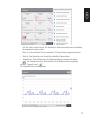
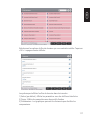
If Phoenix Plus fails to get access to the vehicle VIN data automatically, tap “Local
Diagnosis” on the Home Menu. The following page will appear:
Note: A highly stable and solid network connection is required for successful VIN access.
1. Intelligent Diagnosis
2. Local Diagnosis

15
EN
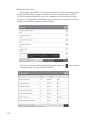
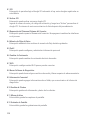
There are two ways in this module to get access to vehicle diagnostic functions.
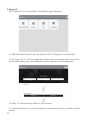
2.1 The rst way is using “VINScan”.
Tap “VINScan”. The following page will appear:
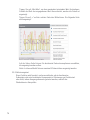
2.1.1 Tap “Camera Scan”. The following page will appear
Tap to scan the VIN barcode. If the VIN barcode cannot be recognized, please
manually input the VIN.

16
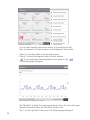
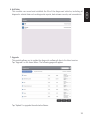
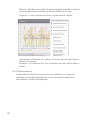
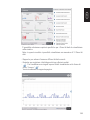
2.1.2 Or, tap “Enter VIN”, the following page will appear:
Note: the VIN code in yellow can be modied if it isn’t correct.
Tap to scan the VIN character. If the VIN character cannot be recognized,
please manually input the VIN.
After scanning, the following page will appear:

17
EN
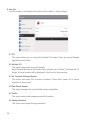
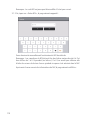
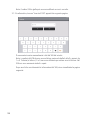
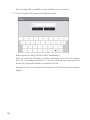
You need to input the vehicle’s VIN data manually.
Note: VIN characters need to be capital letters A through Z and numbers 1 through
0. However, the letters I, O, and Q won't be used in order to avoid misreading. No
symbols or spaces are allowed in the VIN.
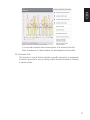
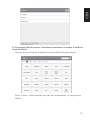
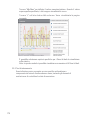
After reading the VIN information successfully, the following page will appear:
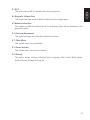
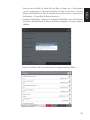
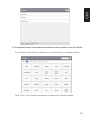
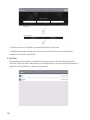
2.2 The second way is manually selecting the vehicle’s make, model, and year.
Tap a corresponding diagnostic software logo on the following page:
Take “Demo” as an example to demonstrate. The following page will appear:
La pagina si sta caricando...
La pagina si sta caricando...
La pagina si sta caricando...
La pagina si sta caricando...
La pagina si sta caricando...
La pagina si sta caricando...
La pagina si sta caricando...
La pagina si sta caricando...
La pagina si sta caricando...
La pagina si sta caricando...
La pagina si sta caricando...
La pagina si sta caricando...
La pagina si sta caricando...
La pagina si sta caricando...
La pagina si sta caricando...
La pagina si sta caricando...
La pagina si sta caricando...
La pagina si sta caricando...
La pagina si sta caricando...
La pagina si sta caricando...
La pagina si sta caricando...
La pagina si sta caricando...
La pagina si sta caricando...
La pagina si sta caricando...
La pagina si sta caricando...
La pagina si sta caricando...
La pagina si sta caricando...
La pagina si sta caricando...
La pagina si sta caricando...
La pagina si sta caricando...
La pagina si sta caricando...
La pagina si sta caricando...
La pagina si sta caricando...
La pagina si sta caricando...
La pagina si sta caricando...
La pagina si sta caricando...
La pagina si sta caricando...
La pagina si sta caricando...
La pagina si sta caricando...
La pagina si sta caricando...
La pagina si sta caricando...
La pagina si sta caricando...
La pagina si sta caricando...
La pagina si sta caricando...
La pagina si sta caricando...
La pagina si sta caricando...
La pagina si sta caricando...
La pagina si sta caricando...
La pagina si sta caricando...
La pagina si sta caricando...
La pagina si sta caricando...
La pagina si sta caricando...
La pagina si sta caricando...
La pagina si sta caricando...
La pagina si sta caricando...
La pagina si sta caricando...
La pagina si sta caricando...
La pagina si sta caricando...
La pagina si sta caricando...
La pagina si sta caricando...
La pagina si sta caricando...
La pagina si sta caricando...
La pagina si sta caricando...
La pagina si sta caricando...
La pagina si sta caricando...
La pagina si sta caricando...
La pagina si sta caricando...
La pagina si sta caricando...
La pagina si sta caricando...
La pagina si sta caricando...
La pagina si sta caricando...
La pagina si sta caricando...
La pagina si sta caricando...
La pagina si sta caricando...
La pagina si sta caricando...
La pagina si sta caricando...
La pagina si sta caricando...
La pagina si sta caricando...
La pagina si sta caricando...
La pagina si sta caricando...
La pagina si sta caricando...
La pagina si sta caricando...
La pagina si sta caricando...
La pagina si sta caricando...
La pagina si sta caricando...
La pagina si sta caricando...
La pagina si sta caricando...
La pagina si sta caricando...
La pagina si sta caricando...
La pagina si sta caricando...
La pagina si sta caricando...
La pagina si sta caricando...
La pagina si sta caricando...
La pagina si sta caricando...
La pagina si sta caricando...
La pagina si sta caricando...
La pagina si sta caricando...
La pagina si sta caricando...
La pagina si sta caricando...
La pagina si sta caricando...
La pagina si sta caricando...
La pagina si sta caricando...
La pagina si sta caricando...
La pagina si sta caricando...
La pagina si sta caricando...
La pagina si sta caricando...
La pagina si sta caricando...
La pagina si sta caricando...
La pagina si sta caricando...
La pagina si sta caricando...
La pagina si sta caricando...
La pagina si sta caricando...
La pagina si sta caricando...
La pagina si sta caricando...
La pagina si sta caricando...
La pagina si sta caricando...
La pagina si sta caricando...
La pagina si sta caricando...
La pagina si sta caricando...
La pagina si sta caricando...
La pagina si sta caricando...
La pagina si sta caricando...
La pagina si sta caricando...
La pagina si sta caricando...
La pagina si sta caricando...
La pagina si sta caricando...
La pagina si sta caricando...
La pagina si sta caricando...
La pagina si sta caricando...
La pagina si sta caricando...
La pagina si sta caricando...
La pagina si sta caricando...
La pagina si sta caricando...
La pagina si sta caricando...
La pagina si sta caricando...
La pagina si sta caricando...
La pagina si sta caricando...
La pagina si sta caricando...
La pagina si sta caricando...
La pagina si sta caricando...
La pagina si sta caricando...
La pagina si sta caricando...
La pagina si sta caricando...
La pagina si sta caricando...
La pagina si sta caricando...
La pagina si sta caricando...
La pagina si sta caricando...
La pagina si sta caricando...
La pagina si sta caricando...
La pagina si sta caricando...
La pagina si sta caricando...
La pagina si sta caricando...
La pagina si sta caricando...
La pagina si sta caricando...
La pagina si sta caricando...
La pagina si sta caricando...
La pagina si sta caricando...
La pagina si sta caricando...
La pagina si sta caricando...
La pagina si sta caricando...
La pagina si sta caricando...
La pagina si sta caricando...
La pagina si sta caricando...
La pagina si sta caricando...
La pagina si sta caricando...
La pagina si sta caricando...
La pagina si sta caricando...
La pagina si sta caricando...
La pagina si sta caricando...
La pagina si sta caricando...
La pagina si sta caricando...
La pagina si sta caricando...
La pagina si sta caricando...
La pagina si sta caricando...
La pagina si sta caricando...
La pagina si sta caricando...
La pagina si sta caricando...
La pagina si sta caricando...
La pagina si sta caricando...
La pagina si sta caricando...
La pagina si sta caricando...
La pagina si sta caricando...
La pagina si sta caricando...
La pagina si sta caricando...
La pagina si sta caricando...
La pagina si sta caricando...
La pagina si sta caricando...
La pagina si sta caricando...
La pagina si sta caricando...
La pagina si sta caricando...
La pagina si sta caricando...
La pagina si sta caricando...
La pagina si sta caricando...
La pagina si sta caricando...
La pagina si sta caricando...
La pagina si sta caricando...
La pagina si sta caricando...
La pagina si sta caricando...
La pagina si sta caricando...
La pagina si sta caricando...
La pagina si sta caricando...
La pagina si sta caricando...
La pagina si sta caricando...
La pagina si sta caricando...
La pagina si sta caricando...
La pagina si sta caricando...
La pagina si sta caricando...
La pagina si sta caricando...
La pagina si sta caricando...
La pagina si sta caricando...
La pagina si sta caricando...
La pagina si sta caricando...
La pagina si sta caricando...
La pagina si sta caricando...
La pagina si sta caricando...
La pagina si sta caricando...
La pagina si sta caricando...
La pagina si sta caricando...
La pagina si sta caricando...
-
 1
1
-
 2
2
-
 3
3
-
 4
4
-
 5
5
-
 6
6
-
 7
7
-
 8
8
-
 9
9
-
 10
10
-
 11
11
-
 12
12
-
 13
13
-
 14
14
-
 15
15
-
 16
16
-
 17
17
-
 18
18
-
 19
19
-
 20
20
-
 21
21
-
 22
22
-
 23
23
-
 24
24
-
 25
25
-
 26
26
-
 27
27
-
 28
28
-
 29
29
-
 30
30
-
 31
31
-
 32
32
-
 33
33
-
 34
34
-
 35
35
-
 36
36
-
 37
37
-
 38
38
-
 39
39
-
 40
40
-
 41
41
-
 42
42
-
 43
43
-
 44
44
-
 45
45
-
 46
46
-
 47
47
-
 48
48
-
 49
49
-
 50
50
-
 51
51
-
 52
52
-
 53
53
-
 54
54
-
 55
55
-
 56
56
-
 57
57
-
 58
58
-
 59
59
-
 60
60
-
 61
61
-
 62
62
-
 63
63
-
 64
64
-
 65
65
-
 66
66
-
 67
67
-
 68
68
-
 69
69
-
 70
70
-
 71
71
-
 72
72
-
 73
73
-
 74
74
-
 75
75
-
 76
76
-
 77
77
-
 78
78
-
 79
79
-
 80
80
-
 81
81
-
 82
82
-
 83
83
-
 84
84
-
 85
85
-
 86
86
-
 87
87
-
 88
88
-
 89
89
-
 90
90
-
 91
91
-
 92
92
-
 93
93
-
 94
94
-
 95
95
-
 96
96
-
 97
97
-
 98
98
-
 99
99
-
 100
100
-
 101
101
-
 102
102
-
 103
103
-
 104
104
-
 105
105
-
 106
106
-
 107
107
-
 108
108
-
 109
109
-
 110
110
-
 111
111
-
 112
112
-
 113
113
-
 114
114
-
 115
115
-
 116
116
-
 117
117
-
 118
118
-
 119
119
-
 120
120
-
 121
121
-
 122
122
-
 123
123
-
 124
124
-
 125
125
-
 126
126
-
 127
127
-
 128
128
-
 129
129
-
 130
130
-
 131
131
-
 132
132
-
 133
133
-
 134
134
-
 135
135
-
 136
136
-
 137
137
-
 138
138
-
 139
139
-
 140
140
-
 141
141
-
 142
142
-
 143
143
-
 144
144
-
 145
145
-
 146
146
-
 147
147
-
 148
148
-
 149
149
-
 150
150
-
 151
151
-
 152
152
-
 153
153
-
 154
154
-
 155
155
-
 156
156
-
 157
157
-
 158
158
-
 159
159
-
 160
160
-
 161
161
-
 162
162
-
 163
163
-
 164
164
-
 165
165
-
 166
166
-
 167
167
-
 168
168
-
 169
169
-
 170
170
-
 171
171
-
 172
172
-
 173
173
-
 174
174
-
 175
175
-
 176
176
-
 177
177
-
 178
178
-
 179
179
-
 180
180
-
 181
181
-
 182
182
-
 183
183
-
 184
184
-
 185
185
-
 186
186
-
 187
187
-
 188
188
-
 189
189
-
 190
190
-
 191
191
-
 192
192
-
 193
193
-
 194
194
-
 195
195
-
 196
196
-
 197
197
-
 198
198
-
 199
199
-
 200
200
-
 201
201
-
 202
202
-
 203
203
-
 204
204
-
 205
205
-
 206
206
-
 207
207
-
 208
208
-
 209
209
-
 210
210
-
 211
211
-
 212
212
-
 213
213
-
 214
214
-
 215
215
-
 216
216
-
 217
217
-
 218
218
-
 219
219
-
 220
220
-
 221
221
-
 222
222
-
 223
223
-
 224
224
-
 225
225
-
 226
226
-
 227
227
-
 228
228
-
 229
229
-
 230
230
-
 231
231
-
 232
232
-
 233
233
-
 234
234
-
 235
235
-
 236
236
-
 237
237
-
 238
238
-
 239
239


in altre lingue
- français: Topdon Phoenix Plus Manuel utilisateur
- español: Topdon Phoenix Plus Manual de usuario
- Deutsch: Topdon Phoenix Plus Benutzerhandbuch