Panasonic SCVK31 Manuale del proprietario
- Categoria
- Lettore CD
- Tipo
- Manuale del proprietario

RQT7703-1L
GC
CD Stereo System
d« ÁœdA pœ rOvu
Operating Instructions
— tÇdœULM«
Model No. SC-VK31
Before connecting, operating or adjusting this pro-
duct, please read these instructions completely.
Please keep this manual for future reference.
UHD ¨ÁU~²Ýœ s¹« rOEMð U¹ ¡«dł« ¨‰UBð« “« q³ÎUNKLF«—u²Ýœ
ÆbOM& tFUD( XbÐ «—
UHDÎÈ—«bN~½ ÁbM¹¬ È«dÐ vFłd( Ê«uMFÐ «— ULM¼«— tÇd²2œ s¹«
ÆbOzU/
UP
DOWN
VOLUME
GS

RQT7703
2
ENGLISH
Dear customer
Thank you for purchasing this product.
For optimum performance and safety, please read these instructions
carefully.
These operating instructions are applicable to the following system.
System SC-VK31
Main unit SA-VK31
Speakers SB-VK31
Safety precautions................................................... 2
Supplied accessories .............................................. 3
Placement of speakers............................................ 3
The remote control .................................................. 3
Set-up ....................................................................... 4
Front panel controls ................................................ 5
CDs ........................................................................... 6
How discs with MP3 differ from CDs ................... 10
The radio: manual tuning...................................... 12
The radio: preset tuning........................................ 12
Cassettes................................................................ 13
Sound quality/sound field ..................................... 13
Recording............................................................... 13
Enjoying karaoke ................................................... 14
Optional antenna connections ............................. 15
External unit connections ..................................... 15
Using an external unit ........................................... 15
Turning the demo function on/off ........................ 16
Convenient functions ............................................ 16
Auto-off function.................................................... 16
Setting the time...................................................... 16
Using the timers .................................................... 17
Troubleshooting guide .......................................... 18
Maintenance ........................................................... 18
Specifications ........................................................ 19
Table of contents
Placement
Set the unit up on an even surface away from direct sunlight, high
temperatures, high humidity, and excessive vibration. These
conditions can damage the cabinet and other components, thereby
shortening the unit’s service life.
Do not place heavy items on the unit.
Voltage
Do not use high voltage power sources. This can overload the unit
and cause a fire.
Do not use a DC power source. Check the source carefully when
setting the unit up on a ship or other place where DC is used.
Power cord protection
Ensure the AC power cord is connected correctly and not damaged.
Poor connection and lead damage can cause fire or electric shock.
Do not pull, bend, or place heavy items on the cord.
Grasp the plug firmly when unplugging the cord. Pulling the AC
power cord can cause electric shock.
Do not handle the plug with wet hands. This can cause electric
shock.
Foreign matter
Do not let metal objects fall inside the unit. This can cause electric
shock or malfunction.
Do not let liquids get into the unit. This can cause electric shock or
malfunction. If this occurs, immediately disconnect the unit from the
power supply and contact your dealer.
Do not spray insecticides onto or into the unit. They contain
flammable gases which can ignite if sprayed into the unit.
Service
Do not attempt to repair this unit by yourself. If sound is interrupted,
indicators fail to light, smoke appears, or any other problem that is not
covered in these instructions occurs, disconnect the AC power cord
and contact your dealer or an authorized service center. Electric shock
or damage to the unit can occur if the unit is repaired, disassembled
or reconstructed by unqualified persons.
Extend operating life by disconnecting the unit from the power source
if it is not to be used for a long time.
Safety precautions
Fuse cover
Fuse (5 ampere)
Figure A Figure B
Figure A Figure B
Fuse (5 ampere)
Note on AC power supply cord (For Saudi Arabia and Kuwait
only)
Before use
Remove the connector cover.
How to replace the fuse
The location of the fuse differs according to the type of AC power
supply cord (figures A and B). Confirm the AC power supply cord
fitted and follow the instructions below.
Illustrations may differ from actual AC power supply cord.
1. Open the fuse cover with a screwdriver.
2. Replace the fuse and close or attach the fuse cover.

RQT7703
3
ENGLISH
Batteries
The remote control
Aim at the sensor, avoiding obstacles, at a maximum range of 7
meters directly in front of the unit.
•
Keep the transmission window and the unit’s sensor free from dust.
•
Operation can be affected by strong light sources, such as direct
sunlight, and the glass doors on cabinets.
Do not:
•
put heavy objects on the remote control.
•
take the remote control apart.
•
spill liquids onto the remote control.
•
Insert so the poles (+ and –) match those in the remote control.
•
Do not use rechargeable type batteries.
Do not:
•
mix old and new batteries.
•
use different types at the same time.
•
heat or expose to flame.
•
take apart or short-circuit.
•
attempt to recharge alkaline or manganese batteries.
•
use batteries if the covering has been peeled off.
•
keep together with metallic objects such as necklaces.
Mishandling of batteries can cause electrolyte leakage which can
damage items the fluid contacts and may cause a fire.
If electrolyte leaks from the batteries, consult your dealer.
Wash thoroughly with water if electrolyte comes in contact with any
part of your body.
Remove if the remote control is not going to be used for a long period
of time. Store in a cool, dark place.
Replace if the unit does not respond to the remote control even when
held close to the front panel.
Use
R6/LR6, AA, UM-3
Placement of speakers
Please check and identify the supplied accessories.
AC power supply cord ... 1 pc.
FM indoor antenna ........ 1 pc.
Video connection cable .. 1 pc.
Remote control
transmitter ..................... 1 pc.
(N2QAJB000117)
For Saudi Arabia and
Kuwait only
AM loop antenna........ 1 pc.
Batteries ................... 2 pcs.
Supplied accessories
If irregular coloring occurs on your television
These speakers are designed to be used close to a television, but the
picture may be affected with some televisions and set-up combinations.
If this occurs, turn the television off for about 30 minutes.
The television’s demagnetizing function should correct the problem. If
it persists, move the speakers further away from the television.
Note
•
Keep your speakers at least 10 mm away from the system for proper
ventilation.
•
You cannot take the front net off the speakers.
Speakers are designed identically so that no left or right channel
orientation is necessary.
This product may receive radio interference caused by mobile
telephones during use. If such interference is apparent, please
increase separation between the product and the mobile
telephone.
THIS UNIT IS INTENDED FOR USE IN TROPICAL CLIMATES.
CAUTION:
Change the voltage setting to suit the AC voltage in your
area. See page 4.
Note that the unit will be seriously damaged or fail to
operate correctly if this setting is not made correctly.
Remote control
signal sensor
Transmission
window
About 7 meters in front of
the signal sensor
30
˚
30
˚

RQT7703
4
ENGLISH
(L)
(R)
2
AM loop antenna
Stand the antenna up
on its base.
Use a flat-head screwdriver to turn the voltage
selector on the rear panel to the appropriate
position for the area in which this system is used.
If the power supply in your area is 115 V or
120 V, please set the voltage selector as follows:
•
For 115 V: Set to 110 V.
•
For 120 V: Set to 127 V.
5
Set the voltage
1
FM indoor antenna
Adhesive tape
Affix where
reception is
best.
4
Video connection cable
1. Connect the video connection cable from
the VIDEO OUT terminal of the rear panel of
this unit to the VIDEO IN terminal of the TV.
2. Set the VIDEO OUT switch according to the
television set to be connected.
PAL : When connecting a PAL system TV.
NTSC : When connecting an NTSC system TV.
For details, refer to the operating instructions of
TV.
VOLT ADJ
Connect the AC power supply cord only after all other connections have been made.
Preparation
Twist and pull off the vinyl tip of the antenna wires and speaker cords.
6 AC power supply cord
Set-up
3
Speaker cords
Insertion of connector
Even when the connector is perfectly inserted, depending on
the type of inlet used, the front part of the connector may jut out
as shown in the drawing.
However there is no problem using the unit.
Note Note
The included AC power supply cord is for use with this unit
only. Do not use it with other equipment.
For your reference
Information you enter into the unit’s memory, except for time,
remains intact for up to a week after the AC power supply cord
is disconnected.
Connector
Appliance inlet
Approx. 6 mm
Caution
•
Use the speakers only with the recommended
system. Failure to do so may lead to damage to
the amplifier and/or the speakers, and may result
in the risk of fire. Consult a qualified service
person if damage has occurred or if you
experience a sudden change in performance.
•
Do not attach these speakers to walls or ceilings.
Use only the supplied speakers.
The combination of the main unit and speakers provide the best
sound. Using other speakers can damage the unit and sound quality
will be negatively affected.
Red (+)
Black (–)
Red
Black
1
3
2
Connect the left (L)
side in the same way.
Grey
Blue
Blue (–)
Grey (+)
To household mains socket

RQT7703
5
ENGLISH
1 AC supply indicator [AC IN]
This indicator lights when the unit is connected to the AC mains
supply.
2 Standby/on switch [
ff
ff
f/I]
Press to switch the unit from on to standby mode or vice versa. In
standby mode, the unit is still consuming a small amount of power.
3 Display
4 Deck select button [DECK 1/2] ............................................13
5 Record button [a REC].........................................................14
6 Microphone volume control [MIC VOL].............................. 14
7 Microphone jacks [MIC 1, 2]................................................ 14
8 Deck 1 cassette holder .........................................................13
9 Disc tray
! CD tray open/close button [c OPEN/CLOSE] ..................... 6
!
CD direct play buttons [1–5] ................................................. 6
# Super sound EQ button [SUPER SOUND EQ]................... 13
$ Built-in sound equalizer button [SOUND EQ]......................13
% Headphones jack [PHONES] ................................................16
& Deck 2 cassette holder .........................................................13
Main unit
Center console
(
Tuner/band select button [TUNER, BAND] ........................ 12
) CD skip/search/previous/next, VCD slow advance, tape fast-
forward/rewind, tune/preset channel select, time adjust buttons
[g/REW/3, PREV, 4/FF/f, NEXT]................... 7, 12, 13
~ Display, demonstration button [DISPLAY, –DEMO] ...........16
+ Deck 1 open button [c DECK 1] ........................................ 13
, AUX button [AUX] ................................................................ 15
- Volume control [VOLUME DOWN, UP] ............................... 14
. CD play/pause, select button [:/ J CD, SELECT] ............... 6
/ Stop/program clear, PBC on/off button [L STOP, PBC] ... 6, 7, 13
: Deck 2 open button [c DECK 2] ........................................ 13
; Tape play/direction button [; : TAPE] ............................. 13
Remote control
Buttons such as 2 function in exactly the same way as the
buttons on the main unit.
< Sleep timer + Auto off button [SLEEP, –AUTO OFF] ...16, 17
= Multi screen button [MULTI-SCREEN].................................. 9
> Disc button [DISC] ................................................................. 7
? Program button [PROGRAM] .................................... 8, 11, 12
@ Time access button [TIME ACCESS].................................... 9
[ Play mode select button [PLAY MODE] ...................... 8, 11-14
\ Repeat button [REPEAT] ....................................................... 7
] On-screen display button [OSD]........................................... 7
^ Tuner/band select, AUX button [TUNER/AUX] .............12, 15
_ CD pause button [J PAUSE]................................................. 6
{ Zoom button [ZOOM]............................................................. 7
| CD display button [CD DISP] .......................................... 7, 10
} CD skip/search/previous/next, album skip, preset channel
select, time adjust buttons
[g f, ALBUM , PREV 3 NEXT 4] .. 7, 8, 9, 11, 12, 16
V Shift button [SHIFT]
To use functions labeled in orange:
While pressing [SHIFT], press the corresponding button.
0 Muting button [MUTING] ..................................................... 16
1 Dimmer + Play timer/record timer button
[DIMMER, rPLAY/REC] ..................................................16, 17
2 Clock/timer button [CLOCK/TIMER] ..............................16, 17
3 Video index buttons [ V-INDEX ].................................... 9
Resume play button [RESUME PLAY] ................................. 7
5 Return button [ ] ......................................................... 7, 10
6 Key control buttons [KEYCON, , ] ............................... 15
7 Numbered buttons [
XX
XX
X
10, 1–9, 0]............................. 6-9, 11, 12
8 CD play, select button [: CD, SELECT] ......................... 6-10
9 Karaoke button [KARAOKE] ................................................14
! Cursor buttons [8, 9, ;, :]/Enter button [ENTER] .. 7, 10, 11, 13
Echo button [ECHO] .............................................................15
# Tape fast-forward/rewind, manual tuning, VCD slow
advance buttons [( ), REW FF] ............................ 7, 12
$ Built-in sound equalizer/manual EQ button
[SOUND EQ, –MANUAL EQ] .................................................13
Front panel controls
DECK 1 DECK 2
UP
DOWN
STOP
REW
PREV NEXT
SELECT
FF
DISPLAY
DEMO
PBC
CD
AUX
TA P E
TUNER
BAND

ENGLISH
RQT7703
6
CDs
CD selection
Disc type Logo Indication in these
operating instructions
Video CD
(version 1.1) Operated in the same way as audio
CDs, these CDs allow playback of
video pictures as well as sound, but
they are not equipped with PBC\.
Video CD
(version 2.0)
Equipped with PBC\, these CDs allow
playback of menus on the TV screen
as well as high resolution still pictures.
You can use functions described for
video CD version 1.1 by turning
PBC off (see page 7)
CD
—
Discs recorded with MP3
\\
\\
\PBC (Playback control)
PBC is a signal recorded on version 2.0 CDs that enables you to
control playback. It makes video enjoyment more interesting by allowing
you to interact with the system via menus, search functions or other
typically computer-like operations.
Do not:
•
use irregularly shaped CDs.
•
attach extra labels and stickers.
•
use CDs with labels and stickers
that are coming off or with
adhesive exuding from under
labels and stickers.
•
attach scratch proof covers or
any other kind of accessory.
•
write anything on the CD.
•
clean CDs with liquids. (Wipe
with a soft, dry cloth.)
•
use CDs printed with label
printers available on the market.
To prevent damage
Always observe the following points:
•
Load only 1 CD on the tray.
•
Load CDs as shown in the figure.
An adaptor is not needed with 8
cm CDs (singles).
•
Set the system on a flat, level surface.
•
Always unload all CDs before moving the unit.
•
Always stop the changer before loading or changing CDs. You
cannot change CDs while a disc is playing.
Do not:
•
set the unit on top of magazines, inclined surfaces, etc.
•
move the unit while a tray is opening/closing, or when loaded.
•
put anything except a CD in the tray.
•
use cleaning CDs or CDs which are badly warped or cracked.
•
disconnect the AC power supply cord from the household AC outlet
during disc changing operation.
8
cm CD
12
cm CD
You can use menus displayed on the TV screen to control playback
when running interactive software.
Preparation:
Turn the television on, select video input with the television input switch.
1 Press [c OPEN/CLOSE] to open the tray.
The unit comes on.
2 Set a CD in the tray. (Label must face upward.)
To continue loading CDs in the other trays
Press [1]–[5] to select the required tray and press [c OPEN/
CLOSE] to open the tray.
Press [c OPEN/CLOSE] to close the tray.
3 Press [1]–[5] to select the desired disc.
(Alternatively, you can press [:/J CD] if the current disc is your
desired CD.)
The track number and its elapsed playing time are shown.
The menu screen appears on the TV (with some discs, it may not
appear immediately). The menu screens that appear may differ
depending on the disc.
Some software may display the menu screen after animated or
still screens have been played.
4 Press the numbered buttons on the remote control to
select the menu item.
To select 1–9, press the corresponding numbered button.
To select a two-digit number, press [
h
10], and then the two numbers
you want.
For example:
Menu item 10 : [
h
10] ➞ [1] ➞ [0]
Menu item 25 : [
h
10] ➞ [2] ➞ [5]
A different menu is displayed or animated/still screens are played.
High-precision still screens are also automatically distinguished
and played.
Use the CD Play Mode function’s ALL-DISC mode to play CDs in
succession. ( A page 8) ( A page 11)
To stop
Press [L STOP].
The total number of tracks and total playing time are shown.
To pause
Main unit: Press [:/J CD] during play.
Remote Control: Press [J PAUSE]
during play.
Press [:/J CD] on the main set or [: CD] on the remote control to
resume play.
“ ” indication
It indicates current disc has 16 or more tracks.
One touch play
During standby mode and when a CD is loaded, press [:/J CD] or
[1]–[5].
The unit comes on and play starts.
XXXXXX XXX XXXXXXX
XXXX XX XXXXX
XXXX XX XXXXX
XXXX XXXX XXXXX
XXXX XX XXXXX
XXXX XXXX XXXXX
XXXX
XX
XXX X
XXX
XXX
X
XXX XX XXXXX
XXXX XX XXXXX
XXXX XX
XX
X
XXX
X
XXXX XX XXXXX
X
XXX XXXX XXXXX
X
X
X
X
X
X
X
X
X
X
X
X
X
X
X
X
X
X
X
X
X
X
X
X
X
X
X
X
X
X
X
X
X
X
X
X
X
X
X
X
X
X
X
X
X
X
X
X
X
X
X
X
X
X
X
X
X
X
X
X
X
X
X
X
X
X
X
X
X
X
X
X
X
X
X
X
X
X
X
X
X
X
X
X
X
X
X
X
X
X
X
X
X
X
X
X
X
X
X
X
X
X
X
X
X
XXX
XXXX
XXXX
x
x
x
x
x
x
x
x
x
x
x
x
x
x
x
x
x
x
x
x
x
x
x
x
x
x
x
x
x
x
x
x
x
x
x
x
x
x
x
x
x
x
x
x
x
x
x
x
x
x
x
x
x
x
XXXX XXXX XXXXX XXXX XX
XXXX XXXX XXXXX
XXXX XXXX XXXXX
XXXX XXXX
VCD 1.1
VCD 2.0
CD
MP3
This unit can play CD-DA (digital audio), MP3 and video CD format
CD-R and CD-RW that have been finalized (a process that enables
players to play CD-R and CD-RW) upon completion of recording.
It may not be able to play some CD-R or CD-RW due to the
condition of the recording.
VCD 1.1
VCD 2.0
VCD 2.0
VCD 2.0
VCD 1.1
Basic play
VCD 2.0
CD
MP3
CD
VCD 1.1
VCD 1.1 CDVCD 2.0 MP3
Current disc indicator
CDVCD 1.1 MP3

RQT7703
7
ENGLISH
Resume play
Remote control only
This function allows you to resume CD playback (A page 6) from the
point it was stopped at, even if the unit was turned off.
Press [SHIFT] + [RESUME PLAY] in the stop mode.
Note
Resume does not work if the tray is opened or changed, or during
program, 1-Disc Random or All-Disc Random modes.
Zoom function
Remote control only
Use the zoom function to expand a portion of the picture on your screen.
1 While paused
Press [ZOOM].
The screen will expand a portion of the picture.
2 Press [8, 9, ;, :] to view different portions of the picture.
Note
•
The search speed increases up to 4 steps.
•
The slow motion advance speed decreases up to 3 steps.
•
Sound may not be issued during use of the search function when
video CDs are played in menu operation.
•
When slide show-type (continuous changing of still screens) video
CD software is played in menu operation, fast-forwarding or
rewinding of the CD may not be possible.
•
During 1-RANDOM or A-RANDOM play (A page 8), you cannot
skip to tracks already played.
•
During program play, 1-RANDOM or A-RANDOM play (A page 8)
you can search only within the track.
Remote control only
1 Press [DISC] and (within 10 seconds) [1]–[5] to select the
disc.
2 Select the track with the numbered buttons.
To select track 10 or over, press [
X
10] then the two digits.
Play starts from the selected track.
Note
You cannot use this function with 1-RANDOM or A-RANDOM mode.
VCD 1.1 CD
VCD 1.1 CD
Remote control only
OSD displays the CD operation, mode, and display information on a
television screen.
Press [OSD].
Every time you press the button:
OSD ON ↔ OSD OFF
Note
OSD indicators differ depending on video CD software.
CD display
Remote control only
You can display the remaining play time of the current track.
Press [CD DISP] during play or pause.
Every time you press the button:
Elapsed play time ↔ Remaining play time
Repeat play
Remote control only
Press [REPEAT] during play.
“ ” is displayed.
Note
You can use repeat mode with program play and CD play mode
functions.
(A page 8)
(A page 11)
To cancel repeat play
Press [REPEAT] to clear “ ”.
Television OSD indicators
(On Screen Display)
VCD 1.1
VCD 2.0 VCD 1.1
CD DISP
[1] – [5]
DISC
REPEAT
OSD
ZOOM
, , ,
RESUME PLAY
SHIFT
CD
VCD 2.0
VCD 1.1
CDVCD 1.1
Direct access play
MP3
MP3
To exit zoom function
Press [ZOOM].
MP3
CDVCD 1.1
MP3
To skip forward/ Press [g/REW/3] (backward) or
backward [4/FF/f] (forward) during play.
To search Hold down [g/REW/3] (backward) or
forward/ [4/FF/f] (forward) (Press [( REW] or
backward [) FF] on the remote control) during play.
How to work with menus
Menus vary with the software. Press the buttons in response to what
appears on the TV and in accordance with the CD’s instructions.
(Example)
To select a menu Press the numbered buttons on the remote
item control to select the menu item.
To select track 10 or over, press [
XX
XX
X
10]
then the two digits.
To move to the Press [NEXT] or [PREV].
next/previous item
To make a selection Press [SELECT].
during PBC playback
(Depending on disc)
To return to the Press [SHIFT] + [ ] on the remote control.
previous menu
To quit menu play While in stop mode
Press [PBC]. “
PBC
OFF” appears on the display.
VCD 2.0
VCD 1.1 CD MP3
VCD 2.0 VCD 1.1 CD
To advance in While paused
slow motion Hold down [4/FF/f] (Press [) FF] on the
remote control.)
VCD 2.0
VCD 1.1

RQT7703
8
ENGLISH
To listen to specific CDs and tracks
(CD Play Mode function)
Remote control only
Preparation: Press [: CD] and then [L CLEAR].
1 Press [PLAY MODE] to select the desired mode.
Every time you press the button:
ALL-DISC 1-RANDOM1-SONG
1-DISC
A-RANDOM
ALL-DISC: Plays all loaded discs in succession from the
selected disc to the final disc .
1-SONG: Plays one selected track on the selected disc.
1-RANDOM: Plays one selected disc in random order.
A-RANDOM: Plays all loaded discs in random order.
1-DISC: Plays one selected disc.
(The original display is restored in about 2 seconds.)
Proceed to step 4 when you selected A-RANDOM in step 1.
2 Press [DISC] and (within 10 seconds) [1]–[5] to select the
disc.
The CD starts.
3 Only when you selected “1-SONG” in step 1
Select the track with the numbered buttons.
To select track 10 or over, press [
X
10] then the two digits.
Play starts from the selected track.
4 Only when you selected “A-RANDOM” in step 1
Press [: CD] to start play.
To stop play
Press [L CLEAR].
When playback ends
The current play mode will be retained.
Final disc
For example, if play starts from disc 4, disc 3 will be the “final disc”.
Order of progression: Disc 4
z
5
z
1
z
2
z
3
Program play
You can program up to 24 tracks.
Remote control only
Preparation: Press [
::
::
: CD] and then [L CLEAR].
Press [PROGRAM].
“PGM” appears.
Press [DISC] and (within 10 seconds) [1]–[5] to select the
disc.
Select the tracks with the numbered buttons.
To select track 10 or over, press [
X
10] then the two digits.
Repeat steps 2 and 3 to program other tracks.
Press [: CD] to start play.
To exit program mode
Press [PROGRAM] in the stop mode. (You can replay your program
by pressing [PROGRAM] then [: CD].)
To cancel
Press [L CLEAR] in the stop mode. “CLEAR” is displayed.
To check program contents
Press [g 3] or [f 4] while “P” is displayed.
Every time you press the button, the track number and program order
are displayed.
To add to the program
Do steps 2 and 3 while “P” is displayed.
1
2
3
4
CD
VCD 1.1
CDVCD 1.1
CDs
4

RQT7703
9
ENGLISH
To find a particular scene using a video
index number
Remote control only
A particular scene in a track you want to watch can be located by
selecting a video index number.
Check the user’s manual or other material for information on whether
video CD software contains video index numbers.
Press [SHIFT] + [V-INDEX ( ) or ( )] in the play mode to
select the video index number.
Play starts at the video index selected.
Note
With some discs, it may not be possible to make a video index search
with the motion picture.
VCD 1.1
Remote control only
Preparation:
Make sure OSD is on (A page 7).
1 Press the numbered buttons to select the desired
track number.
That track will start playing.
2 Press [SHIFT] + [TIME ACCESS].
The track duration appears on the TV screen.
3 Press the numbered buttons to enter the time of the
desired part.
Example:
22:40 : [2] ➞ [2] ➞ [4] ➞ [0]
00:25 : [0] ➞ [0] ➞ [2] ➞ [5]
Play starts from the selected time.
Note
The time to be entered should be a portion of the current track
time. If, for example, you are playing track 2, and you enter
“0:25”, play begins from 25 seconds into track 2.
To cancel this function
Press [SHIFT] + [TIME ACCESS] again.
Note
You cannot use time access in program, 1-Disc Random and All-Disc
Random modes.
To find a particular scene using the
time (TIME ACCESS)
This function allows you to specify a time in the current track and
begin play from that point.
Multi screen functions
Remote control only
There are two multi-screen modes:
DISC MULTI-SCREEN and TRACK MULTI-SCREEN.
Disc multi screen
This function divides the screen up into several parts and displays the
picture from each of the tracks. You can select the track you want
from the various pictures on the screen.
Preparation:
Make sure OSD is on (A page 7).
1 (While playback is stopped)
Press [SHIFT] + [MULTI-SCREEN].
Track 1 will first be played back for a few seconds, then will be
displayed as a still picture. The same will then happen for the
following tracks. Up to 9 tracks will be displayed on the screen
at a time.
To display subsequent tracks:
Press [f 4].
To display previous tracks:
Press [g 3].
To cancel the multi-screen mode:
Press [L CLEAR].
2 Press the numbered buttons to select the desired
track number.
That track will start playing. The number of the selected track is
displayed on the unit’s display.
For your reference:
If you press [: CD] or press [SHIFT] + [MULTI-SCREEN] as a track is
being displayed as in step 1, that track will start playing.
Note
You cannot use disc multi screen in program, 1-Disc Random and
All-Disc Random modes.
Track multi screen
A track is divided into 9 sections and those sections are shown on the
multi screen. Playback can then be started from the section of your
choice.
(During playback)
Press [SHIFT] + [MULTI-SCREEN].
The beginning five second segment of the track is played back,
then the last frame of the segment is displayed on the multi screen.
To cancel the multi-screen mode:
Press [L CLEAR].
Press the numbered buttons to select the desired
section of the track.
Playback begins from that section.
For your reference:
If you press [: CD] or press [SHIFT] + [MULTI-SCREEN] as a track is
being displayed, playback begins from that section.
Note
You cannot use track multi screen in program, 1-Disc Random and
All-Disc Random modes.
VCD 1.1
1
2
VCD 1.1
CD
CDs

RQT7703
Cassette deck operations
10
ENGLISH
How discs with MP3 differ from CDs
This unit can play MP3 files recorded on CD-R/RW with a computer.
Files are treated as tracks and folders are treated as albums.
This unit can access up to 999 tracks, 195 albums and 20 sessions.
When making MP3 files to play on this unit
Disc format
Discs must conform to ISO9660 level 1 or 2 (except for extended
formats).
File format
MP3 files must have the extension “.MP3” or “.mp3”.
To play in a certain order
Prefix the folder and file names with 3-digit
numbers in the order you want to play them.
Files may not be recorded in numbered order if
the prefixes have different numbers of digits.
For example: 1????.mp3, 2????.mp3, 10????.mp3.
However, some writing software may also
cause recording to occur in a different order.
MPEG Layer-3 audio decoding technology
licensed from Fraunhofer IIS and Thomson
multimedia.
Limitations on MP3 play
•
This unit is not compatible with packet-write format.
•
When both MP3 and CD-DA data is recorded on the disc over a
number of sessions:
•
If the first session contains MP3 recordings, the unit will play from
the MP3 made in that session till the session before the first CD-DA
recordings.
•
If the first session contains CD-DA recordings, the unit will play only
the recordings made in that session. The subsequent sessions will
be ignored.
•
Maximum number of displayable characters:
Album/track title: 21
ID3 title/artist name: 24
Text data that the unit doesn’t support cannot be displayed.
(ID3 is a tag embedded in MP3 track to provide information about
the track.)
•
You cannot use 1-RANDOM play, A-RANDOM play, search function,
and time access function.
•
Some MP3 may not be played due to the condition of the disc or
recording.
•
Recordings will not necessarily be played in the order you recorded
them.
File format indicator
“.MP3”: Indicates the disc contains MP3 files
CD display for MP3
Remote control only
During play or pause
Press [CD DISP] to select a desired CD display mode.
Every time you press the button:
If you press the button when the track or album name
is scrolling : The next display will be shown.
ends scrolling : The current display will be shown again.
Using menus to play MP3 discs
Remote control only
Preparation:
1. Turn the television on, select the video input with the television
input switch.
2. Select the desired disc (A page 6).
1 An album list appears.
Press [8 , 9] to select an album and press [ENTER].
2 A track list appears.
Press [8 , 9] to select a track and press [ : CD].
Play starts.
To stop play
Press [L CLEAR].
To return to album list while in track list
Press [SHIFT] G [ ].
Album Name
Elapsed Time
Track Name
SHIFT
CD DISP
root
001
001.mp3
002.mp3
003.mp3
001.mp3
002.mp3
003.mp3
002
Example:
001 ENG POP
002 ENG JAZZ
003 ENG RNB
004 ENG MUSICAL
005 ENG SOUNDTRACK
ROOT
PAGE 01/12
001 CRY ME A RIVER
002 EAST OF THE SUN
003 I'VE GOT YOU
004 HEAVEN
005 RAINBOW
002 ENG JAZZ
PAGE 01/07
002 ENG JAZZ
RAINBOW
JAMES HENSON
001 CRY ME A RIVER
002 EAST OF THE SUN
003 I'VE GOT YOU
004 HEAVEN
005 RAINBOW
PAGE 01/07
Album name
Track name
ID3 artist
name
Current album
name
ID3 title name

RQT7703
Recording operations
Cassette deck operations
11
ENGLISH
CD play mode function for MP3
Remote control only
Preparation: Press [: CD] and then [L CLEAR].
1 Press [PLAY MODE] to select the desired mode.
Every time you press the button:
ALL-DISC → 1-SONG → 1 DISC
ALL-DISC: Plays all loaded discs in succession from the
selected disc to the final disc .
1-SONG: Plays one selected track on the selected disc.
1-DISC: Plays one selected disc.
(The original display is restored in about 2 seconds.)
2 Press [DISC] and (within 10 seconds) [1]–[5] to select the
disc.
The CD starts.
3 When you selected “1-SONG” in step 1
Press [SHIFT] µ [ALBUM ( or )] to select the album.
Play starts from the first track of the selected album.
4 When you selected “1-SONG” in step 1
Press [f 4] or [
g 3] to select a track and press
[ : CD].
Play starts.
To stop play
Press [L CLEAR].
When playback ends
The current play mode will be retained in memory until it is changed
even if the unit is turned off.
Final disc
For example, if play starts from disc 4, disc 3 will be the “final disc”.
Order of progression: Disc 4z5z1z2z3
Note
You cannot use program mode together with CD Play Mode function.
→
Program play for MP3
You can program up to 24 tracks.
Remote control only
Preparation:
1. Turn the television on, select the video input with the television
input switch.
2. Select the desired disc (A page 6)
3. Press [L CLEAR].
1 An album list appears.
Press [PROGRAM].
2 Press [8 , 9] to select an album and press [ENTER].
3 A track list appears.
Press [8 , 9] to select a track and press [ENTER] to
add it to the program.
Repeat this step to program other tracks.
To program from another album
1. Press [SHIFT] + [ ].
2. Do steps 2-3.
4 Press [: CD] to start play.
To exit program mode
Press [PROGRAM] in the stop mode. You can replay your
program by pressing [PROGRAM] then [: CD].
You can do the following while “P” is displayed
• To check program contents
Press [f 4] or [
g 3].
Every time you press the button, the track number and program
order are displayed.
• To add to the program
While checking program contents
Press [ENTER].
Do steps 2-3.
• To clear all tracks
Press [L CLEAR].
Note
• You cannot program more than one disc for MP3.
• You cannot program CD-DA tracks together with MP3 tracks.
• The program memory is cleared when you change a disc or open
the CD tray.
4
SHIFT
4
4
How discs with MP3 differ from CDs

RQT7703
12
ENGLISH
The radio: manual tuning
Preparation:
Press [TUNER/AUX] to select “FM” or “AM”.
Automatic presetting
Do the following once each for FM and AM.
Preparation: Tune to the frequency where pre-setting is to begin.
Hold down [PROGRAM] until the frequency changes.
The tuner presets all the stations it can receive into the channels in
ascending order. When finished, the last station memorized is tuned in.
Manual presetting
Pre-set the stations one at a time.
1 Press [PROGRAM] then press [( REW] or [) FF] to tune
to the desired station.
2 Press [PROGRAM] then press [g 3] or [f 4] to select
a channel.
3 Press [PROGRAM].
The station occupying a channel is erased if another station is preset
in that channel.
Sele
cting channels
Press the numbered buttons to select the channel.
To enter channel 10 or over, press [
X
10], then the two digits.
OR
1 Press [PLAY MODE] to select “PRESET”.
2 Press [g 3] or [f 4] to select the channel.
The radio: preset tuning
Remote control only
There are two methods of pre-setting stations.
Automatic presetting : All the stations the tuner can receive are
preset.
Manual presetting : You can select the stations to preset and the
order they are preset in.
Up to 15 stations each can be set in the FM and AM bands.
1 Press [TUNER, BAND] to select band.
The unit comes on.
Every time you press the button:
FM ↔ AM
2 Press [PLAY MODE] on the remote control to select
“MANUAL”.
Every time you press the button:
MANUAL ↔ PRESET
3 Hold down [
gg
gg
g/REW/
33
33
3] or [
44
44
4/FF/
ff
ff
f] for a moment
to search for a station.
The frequency stops when it finds a clear station.
To stop during the process, press [g/REW/3] or [4/FF/f].
Under excessive interference, a station may not be found.
Press [g/REW/3] or [4/FF/f] repeatedly to tune step-by-
step.
“TUNED” is displayed when a radio station is tuned.
“ST” is displayed when a stereo FM broadcast is being received.
If noise is excessive in FM
Remote control only
Hold down [PLAY MODE] to display “MONO”.
Monaural sound is selected and noise reduces when reception is
weak.
Hold down [PLAY MODE] again to cancel the mode.
“MONO” is also cancelled if the frequency is changed.
AM allocation setting
Main unit only
By adjusting the allocation, you can enable this tuner to receive AM
broadcasts allocated in 10 kHz steps.
Press and hold [TUNER, BAND]. After a few seconds, the display will
change to a flashing display of the current minimum AM frequency. If
you continue to hold the button down, the minimum frequency will
change. Release the button at this time.
To return to the original frequency indication, repeat above.
Note
•
After changing the “allocation” setting, the frequencies you previously
preset in the memory will be cleared.
•
Sound is momentarily interrupted if you load/unload tapes while
listening to AM broadcast.
PROGRAM
PLAY MODE
TUNER/
AUX
REW,
FF
3
3

RQT7703
13
ENGLISH
You can use either deck 1 or deck 2 for tape playback.
Use normal position tapes.
High position and metal position tapes can be played, but the unit will
not be able to do full justice to the characteristics of these tapes.
1 Press [; : TAPE].
The unit comes on.
If a cassette was loaded, play starts automatically (One touch play).
2 Press [c DECK 1] or [c DECK 2] and insert the cassette.
Insert with the side to be played
facing towards you and the
exposed tape facing down.
Close the holder by hand.
3 Press and hold [PLAY MODE] on the
remote control to select the reverse mode.
Every time you press and hold the button:
: One side is played.
: Both sides are played.
: Both sides are played repeatedly until [L STOP] is pressed.
To listen to 2 tapes consecutively
Load a tape into each deck and select “ ”. Both tapes will be
played repeatedly until [L STOP] is pressed.
4 Press [; : TAPE] to start playback.
Every time you press the button: ; R
↔
F :
F : : The forward (front side) will play.
; R : The reverse side will play.
To stop tape playback
Press [L STOP].
To fast-forward or rewind
Press [4/FF/f] (fast-forward) or [g/REW/3] (rewind).
To select between loaded decks
Press [DECK 1/2] (remote control: [PLAY MODE]).
Note
•
Tape playback is momentarily interrupted if you open the other deck.
•
Tapes exceeding 100 minutes are thin and can break or get caught
in the mechanism.
•
Tape slack can get caught up in the mechanism and should be
taken up before the tape is played.
•
Endless tapes can get caught up in the deck’s moving parts if used
incorrectly. Use tapes appropriate to this unit’s auto-reverse mechanism.
Selection of tapes for recording
Use normal position tapes.
High position and metal position tapes can be used, but this unit will
not be able to record or erase them correctly.
Preparation:
Wind up the leader tape so recording can begin immediately.
1 Press [c DECK 2] and insert the cassette to be recorded.
Insert with the side to be recorded facing towards you and the
exposed tape facing down.
The tape direction is automatically set to “F :”.
To record on the reverse side
Press [; : TAPE] twice, then press [L STOP].
2 Press and hold [PLAY MODE] on the remote control to
select the reverse mode.
Every time you press and hold the button:
: One side only records.
: Both sides record (forward A reverse).
“ ” is automatically changed to “ ” when [a REC] is
pressed.
3 Select source to be recorded.
Radio recording:
Tune in the station. (A page 12)
CD recording:
1 Insert the CD(s) you want to record.
Press [:/J CD] and then [L STOP].
(Continued on next page)
Cassettes
Recording
,
Using the built-in sound equalizer
HEAVY (sound quality) : Adds punch to rock
SOFT (sound quality) : For background music
CLEAR (sound quality): Clarifies higher sounds
DISCO (sound field) : Produces sound with the same kind of
lengthy reverberations heard at a disco
LIVE (sound field) : Makes vocals more alive
HALL (sound field) : Adds an expansiveness to the sound to
produce the atmosphere of a great concert
hall.
Press [SOUND EQ] to select a setting.
Each time you press the button:
Note
You cannot use the built-in sound equalizer together with “MANUAL
EQ”.
Sound quality/sound field
HEAVY SOFT CLEAR
EQ-OFF
(cancelled)
DISCO LIVE HALL
Adjusting the bass and treble with
manual equalizer
1 Hold down [–MANUAL EQ] until
“MANUAL EQ” is displayed.
2 Press [;, :] to select “BASS”
“MID“ or “TREBL”.
3 While displaying “BASS”, “MID” or
“TREBL”
Press [8, 9] to adjust the level
(-3 to +3).
Sound quality/sound field
1 4
DECK 1/2
Front side
S.SOUND EQ
1
SOUND EQ
1
; :TAPE
2
4
SHIFT
ALBUM ( or )
You can enhance the bass and treble effect of the sound.
Press [S.SOUND EQ] (Main unit: [SUPER SOUND EQ]).
The button light comes on.
Press the button again to cancel.
The button light goes out.
Note
You cannot use “SUPER SOUND EQ” together with the built-in sound
equalizer/“MANUAL EQ”.
Enhancing the sound quality

RQT7703
14
ENGLISH
Recording Enjoying karaoke
Side A
Tab for side B Tab for side A
Adhesive tape
1 Lower the volume with [MIC VOL], then connect the
microphone(s) (not included).
Plug type: 3.5 mm monaural
2 Press [KARAOKE] on the remote control to select
the voice mode.
Every time you press the button:
V.MUTE MONO RMONO L
(off)
Voice mode selection
If you want to play with the karaoke function, check first whether
or not your software is formatted for karaoke and then select
the voice mode as indicated below.
_: Appropriate
a: For practice, etc.
Note
A bar is indicated in the above table when the voice mode is
least effective. It is better to avoid using the mode in such
cases.
V.MUTE function:
The voice portion of the track is blocked out but not the back-
ground music.
You need software recorded in stereo sound if you want to use
the voice mute function. Voice and/or static may be reproduced
with the following types of software.
•
Software recorded monaural
•
Classical music, or works performed by a limited number of
instruments
•
Chorus works or duets
3 Start the source (CD, etc.).
4 Adjust volume with [VOLUME] and [MIC VOL] and
sing along.
To cancel karaoke
Press [KARAOKE] on the remote control to select “(off)” mode.
Note
•
If strange noise (squealing or howling) is emitted during use, move
the microphone further away from the speakers, or turn down the
microphone volume.
•
When you are not using the microphone, disconnect it from the
MIC jack, and turn down the microphone volume level to MIN.
•
Sound quality and sound field can be adjusted when using karaoke
but recording will not be affected.
Soft-
ware
KARAOKE
Video CDs/
Sound multiplex
(Tape, CD)
Voice
modes
Stereo
(Tape, CD)
Non-
KARAOKE
aa
(off) (Background \ (For singing
music+Voice) along)
V.MUTE — — \
_
MONO L (Background — —
music)
MONO R
a
——
(Voice)
Enjoying karaoke
You can enjoy karaoke while watching the TV screen which displays
the motion picture and words of a song.
To stop recording
Press [L STOP].
If the tape finishes before the CD
The CD continues playing. Press [L STOP] to stop it.
Reducing noise when recording AM
Remote control only
Hold down [PLAY MODE] while recording.
Every time you hold down the button: BP1 ↔ BP2
Choose the setting with the least noise.
Note
•
Changes to volume and sound/field quality do not affect recording.
•
You cannot open deck 1 while recording.
•
You cannot fast-forward or rewind one deck while recording with
the other.
•
When recording an AM broadcast, sound is momentarily interrupted
when you start and stop the recording.
•
While recording in reverse mode, if a track is cut off in the
middle at the end of the front side, it is re-recorded from the
beginning, on the reverse side.
At the end of the reverse side, recording stops and the current track
will be interrupted.
Erasure prevention
Use a screwdriver or similar
object to break out the tab.
To re-record on a protected cassette
Cover the hole with adhesive tape.
To erase a tape
1. Disconnect the microphones.
2. Press [; : TAPE] and then [L STOP].
3. Insert the recorded tape into deck 2.
Ensure there is no tape in deck 1.
4. Press and hold [PLAY MODE] on the remote control to select
reverse mode.
5. Press [a REC].
4
1
4
REC
SHIFT
ECHO
KEYCON, ,
Tape-to-tape recording:
1 Press [; : TAPE] and then [L STOP].
2 Press [c DECK 1] and insert the cassette you want to record.
4 Press [a REC] to start recording.
2 Prepare the desired CD recording mode.
Remote control only
•
To record programmed tracks (A do steps 1–3 on page 8
for : “Program play” or steps 1–3 on page
11 for : “Program play for MP3”).
•
To record specific CDs/tracks
1. For , do steps 1 to 2 on page 8: “To listen
to specific CDs and tracks (CD Play Mode function)”.
Ensure CD is stopped.
For , do steps 1 to 2 on page 11: “CD play mode
function for MP3”.
2. Only for 1-SONG mode: Press [SHIFT] µ [ALBUM
( or )] to select the album.
3. Only for 1-SONG mode: Press [g
3] or [f 4] to select the track.
Preparation:
1. Turn the television on, select the video input with the television
input switch.
2. Select the desired disc (A page 6)CD
VCD 1.1
MP3
CDVCD 1.1
MP3
MP3
CDVCD 1.1
MP3

RQT7703
15
ENGLISH
Changing the key
This function is available only when the “CD” input source is selected.
Remote control only
1 Press [SHIFT] + [KEYCON].
2 To raise the key by a halftone:
Press [SHIFT] + [ ].
(–7 to +7)
To lower the key by a halftone:
Press [SHIFT] + [ ].
(+7 to –7)
To cancel the key control function
Press [SHIFT] + [KEYCON] once again.
Using the echo effect
Remote control only
Press [ECHO].
Every time you press the button:
Enjoying karaoke
ECHO 1 ECHO 2 ECHO 4ECHO 3
OFF
Use outdoor antenna if radio reception is poor.
FM outdoor antenna
Optional antenna connections
•
Disconnect the FM indoor antenna.
•
The antenna should be installed by a competent technician.
1
30
mm
15
mm
1
2
3
2
FM outdoor antenna
(not included)
75∞ coaxial cable (not included)
Shield braid
Core wire
To record your “karaoke” performance
Preparations:
•
Do steps 1 and 2 on page 13: “Recording”.
•
Do steps 1 and 2 on page 14: “Enjoying karaoke”.
•
When singing along with CDs
Insert the desired discs (A page 6).
•
When singing along with tape
Insert the desired tape into deck 1. (A page 13).
Press [a REC] and start karaoke performance.
To stop recording
Press [L STOP].
Note
•
To playback the recorded tape, be sure to press [KARAOKE] on
the remote control to select the “(off)” mode.
•
You cannot play or record karaoke with radio backing.
To record your voice
Preparation: Do steps 1 and 2 on page 13: “Recording”.
1. First, lower volume with [MIC VOL], then connect the microphone(s).
2. Press [a REC] to start recording.
3. Speak through the microphone and adjust volume with [VOLUME]
and [MIC VOL].
AM outdoor antenna
Run a piece of vinyl wire horizontally across a window or other
convenient location.
Leave the loop antenna connected.
Note
Disconnect the outdoor antenna when the unit is not in use.
Do not use the outdoor antenna during a lightning storm.
Optional antenna connections
AM outdoor antenna (not included)
AM loop
antenna
(included)
External unit connections
•
An analog player with a built-in phono equalizer can be connected.
•
A video cassette recorder (VCR), or other recording equipment, can
also be connected.
•
For details, refer to the instruction manual of the units which are to
be connected.
•
When units other than those described above are to be connected,
please consult your audio dealer.
Using an external unit
Listening/Recording an external source
(See above for external unit connection)
1. Press [AUX].
The unit comes on.
2. For listening : Proceed to step 3.
For recording : Press [aREC] (recording starts).
3. Start playback from the external source. (For details, refer to the
external unit’s instruction manual.)
Recording to an external unit
1. Turn on the VCR or other recording equipment and make all
necessary settings.
2. Start recording on the VCR (or other recording equipment) and
then start playing the source to be recorded.
Analog
player
(not
included)
(L)
(R)
RL
Rear panel of this unit
VCR (not included)
5 -12
m
1
2
RL
RL
LINE
OUT
AUX
(L)
(R)
(L)
(R)
Rear panel of this unit
REC
AUX
AUDIO IN
AUDIO
OUT

RQT7703
16
ENGLISH
When the unit is first plugged in, a demonstration of its functions may
be shown on the display.
If the demo setting is off, you can show a demonstration by selecting
“DEMO ON”.
Press and hold [–DEMO].
The display changes each time the button is held down.
NO DEMO (off) ↔ DEMO ON (on)
While in the standby mode, select “NO DEMO” to reduce power
consumption.
Note
DEMO function cannot be turned on when Dimmer is on.
Convenient functions
Auto-off function
Setting the time
Remote control only
Turning the demo function on/off
To dim the display panel
Remote control only
Press [SHIFT] + [DIMMER].
The display is dimmed and the indicators are turned off.
(The AC supply indicator remains on.)
Press [SHIFT] o [DIMMER] again to restore the display.
Switching displays
Press [DISPLAY] to select the desired spectrum analyzer.
Every time you press the button:
Normal AuroraPeak hold
(OFF)
To mute the volume
Remote control only
Press [MUTING].
Press the button again to cancel.
“MUTING” goes out.
To cancel from the unit, turn [VOLUME] to minimum (--dB), then raise
it to the required level.
Muting is also cancelled when the unit is turned off.
When CD or tape is selected as the source
To save power, the unit turns off if it is left unused for ten minutes.
This function does not work if the source is tuner or AUX.
Hold down [–AUTO OFF].
“AUTO OFF” is shown on the display.
The setting is maintained even if the unit is turned off.
If you select tuner or AUX as the source, “AUTO OFF” goes out. It
comes on again when you select CD or tape.
To cancel
Hold down [–AUTO OFF] again.
This is a 24-hour clock.
1 Switch on the unit.
2 Press [CLOCK/TIMER] to select “CLOCK”.
Every time you press the button:
3 (within 7 seconds or so)
Press [g 3] or [f 4] to set the time.
4 Press [CLOCK/TIMER] to finish setting the time.
The display will return to whatever was displayed before you set
the time.
To display the time
Press [CLOCK/TIMER] once when the unit is on or at standby mode.
The time is shown for about 5 seconds.
Note
Reset the clock regularly to maintain accuracy.
Remote control only
Previous display
CLOCK RECPLAY
Using headphones (not included)
Reduce the volume level and connect the headphones to the
[PHONES] jack.
Plug type: 3.5
mm stereo
Note
Avoid listening for prolonged periods of time to prevent hearing damage.
DISPLAY
SHIFT
PHONES
AUTO OFF

RQT7703
17
ENGLISH
Using the timers
Previous display
CLOCK RECPLAY
To cancel the timer
Press [rPLAY/REC] to clear the timer indicator from the display.
(The timer comes on at the set time everyday if the timer is on.)
To change the settings (when the unit is on)
To change the play/record times
Do steps 1, 2, 3 and 5.
To change the source or volume
1. Press [rPLAY/REC] to clear the timer indicator from the display.
2. Make changes to the source or volume.
3. Do steps 4 to 5.
To change the timer
Press [rPLAY/REC] to select the desired timer.
Every time the button is pressed:
RECPLAY
(off)
To check the settings
Press [CLOCK/TIMER] while the unit is on to select “rPLAY” or
“rREC”.
The settings are shown in the following order:
Play timer: start time→finish time→source→volume
Record timer: start time→finish time→source
To check the settings while the unit is off, press [CLOCK/TIMER]
twice.
If you use the unit after the timers are set
After using, check that the correct tape/CD are loaded before turning
the unit off.
Notes
•
If you turn the unit off and on again while a timer is functioning, the
finish time setting will not be activated.
•
If you selected AUX as the source, when the timer comes on, the
unit turns on and engages “AUX” as the source. If you want to
playback or record from a connected unit, set that unit’s timer to the
same time. (See the connected unit’s instruction manual.)
Using the sleep timer
Remote control only
This timer turns the unit off after a set time.
While enjoying the desired source:
Press [SLEEP] to select the time (minutes).
Every time you press the button:
SLEEP 90 SLEEP 120SLEEP 60SLEEP 30
SLEEP OFF
To cancel the sleep timer
Press [SLEEP] to select “SLEEP OFF”.
To confirm the remaining time
Press [SLEEP] once.
The remaining time is shown for about 5 seconds.
To change the setting
Press [SLEEP] to select the new setting.
You can use the sleep timer in combination with the play/record timer.
Make sure the unit is off before the play/record timer’s start time.
Note
The sleep timer will be turned off when you start recording from a CD.
Using the play/record timer
Remote control only
You can set the timer to come on at a certain time to wake you up
(play timer) or to record a radio station or from the aux source (record
timer).
The play and record timers cannot be used together.
Preparations:
•
Turn the unit on and set the clock (A page 16).
•
For the play timer, prepare the desired music source (tape/CD/
radio/aux), and set the volume.
•
For the record timer, check the cassette’s erasure prevention tabs
(A page 14) and insert the tape in deck 2 (A page 13). Tune to the
radio station (A page 12) or select the aux source (A page 15).
1 Press [CLOCK/TIMER] to select the timer function.
Every time you press the button:
rPLAY: to set the play timer
rREC: to set the record timer
2 ON time setting
1
(Within 8 seconds or so)
Press [f 4] or [g 3] to set the start time.
2 Press [CLOCK/TIMER].
3 OFF time setting
1 Press [f 4] or [g 3] to set the finish time.
2 Press [CLOCK/TIMER].
The start and finish times are now set.
4 Press [rPLAY/REC] to display the timer indicator.
Every time you press the button:
RECPLAY
(off)
rPLAY: to turn the play timer on
rREC: to turn the record timer on
(The indicator doesn’t appear if the start and finish times or the
clock hasn’t been set.)
5 Press [
ff
ff
f] to turn the unit off.
The unit must be off for the timers to operate.
•
Play timer: Play will start in the set condition at the set time
with volume increasing gradually to the set level.
•
Record timer: The unit comes on 30 seconds before the set
time with the volume muted.

18
RQT7703
ENGLISH
Before requesting service, make the checks below. If you can’t fix the system as described below, or if something not listed here occurs, refer to the
enclosed directory to locate an Authorized Service Center convenient to you or contact your dealer.
Reference pages are shown as black circled numbers (.
Troubleshooting guide
Listening to the radio
Noise is heard.
The stereo indicator flickers
or doesn’t light.
Sound is distorted.
A beat sound is heard.
A low hum is heard during
AM broadcasts.
Use an outdoor antenna. %
Turn the TV off or separate it from the unit.
Separate the antenna from other cables and cords.
Using the cassette deck
Poor quality sound.
Recording is not possible.
The disc may be upside down. 6
Wipe the disc.
Replace the disc if it is scratched, warped, or non-standard.
Condensation may have formed inside the unit due to a sudden change in temperature. Wait about an hour
for it to clear and try again.
The disc may be scratched, or its data may be defective. Replace the disc.
The disc was incompletely formatted. Use the recording equipment to fully format the disc before recording.
There is a problem with the disc mechanism. (A power failure may have occurred.)
The tray will open automatically. Remove the disc from the tray, and after ensuring there is no disc in the tray,
close it. The unit will make the disc changing noises for a few moments and then it should operate normally.
It is possible that the setting of the video format selector of the unit’s rear panel does not agree with the TV.
Set the video format selector on the unit’s rear panel to the appropriate position. 4
Note
Depending on the TV set used, the picture may shrink vertically and black bars may appear both at the top
and bottom of the screen. This is not an indication of malfunction.
The video connection cable is not connected. Connect the video connection cable. 4
The TV is not set to video input mode. Set the TV to video input mode.
Playing discs
The display is wrong or play
won’t start.
There is a loss of picture
information or the picture is
distorted.
The total number of tracks
displayed differs each time
the same disc is inserted.
Unusual sound is heard.
CD-RW cannot be read.
“TAKE OUT/DISC” appears
on the display.
Picture is smaller than screen.
Picture appears too wide.
Picture appears in
monochrome.
The picture of the video CD
does not appear on TV.
When there is a television set nearby
The picture on the TV
disappears or stripes
appear on the screen.
The location and orientation of the antenna are incorrect. If you are using an indoor antenna, change to
an outdoor antenna.
The TV antenna wire is too close to the unit. Separate the antenna wire of the TV set from the unit.
Remote control
Remote control doesn’t
work.
Check the batteries are inserted correctly. 3
Replace the batteries if they are worn.
If the surfaces are dirty
To clean this unit, wipe with a soft, dry cloth.
• Never use alcohol, paint thinner or benzine to clean this unit.
• Before using a chemically treated cloth, read the instructions that
came with the cloth carefully.
Maintenance
For a cleaner, crisper sound
Clean the heads regularly to assure good quality playback and recording.
Use a cleaning tape (not included).
Clean the heads. See below
If the erasure prevention tabs have been removed, cover the holes with adhesive tape. %
Although the unit is in
standby mode, the display
lights up and changes
continuously.
No sound.
Sound stops.
Sound is unfixed, reversed
or comes from one speaker
only.
Humming heard during play.
“ERROR” is displayed.
“– –:– –” appears on the
display at standby mode.
“F61” is displayed.
Common Problems
Turn off the demo function. ^
If you set the clock, demo function will be turned off automatically. ^
Turn the volume up.
Switch off the unit, determine and correct the cause, then switch the unit on. Causes include shorting of
the positive and negative speaker wires, straining of the speakers through excessive volume or power,
and using the unit in a hot environment.
Check the speaker connections. 4
An AC power supply cord or fluorescent light is near the cables. Keep other appliances and cords away
from this unit’s cables.
Incorrect operation performed. Read the instructions and try again.
You plugged the AC power supply cord in for the first time or there was a power failure recently. Set the
time. ^
Check and correct the speaker cord connections. 4
If this does not fix the problem, there is a power supply problem. Consult the dealer.

19
RQT7703
ENGLISH
Specifications
AMPLIFIER SECTION
PMPO 2500
W
RMS power output
THD 10% both channel driven
1 kHz (Low channel)
75
W per channel (6
Ω)
10 kHz (High channel)
75
W per channel (6
Ω)
Total Bi-Amp power
150
W per channel
Aux
Input sensitivity 250 mV
Input impedance 13.3 k
ΩΩ
ΩΩ
Ω
Phone jack
Terminal Stereo, 3.5 mm jack
Mic jack
Sensitivity 0.7 mV, 680
Ω
Terminal Mono, 3.5 mm jack
(2 system)
FM TUNER SECTION
Frequency range
87.50 – 108.00
MHz (50
kHz steps)
Sensitivity 2.5
ØV (IHF)
S/N 26
dB 2.2
ØV
Antenna terminal(s) 75
Ω (unbalanced)
AM TUNER SECTION
Frequency range
522 – 1629
kHz (9
kHz steps)
520 – 1630
kHz (10
kHz steps)
Sensitivity
S/N 20
dB (at 999 kHz) 560
ØV/m
CASSETTE DECK SECTION
Track system 4 track, 2 channel
Heads
Record/playback Solid permalloy head
Erasure Double gap ferrite head
Motor DC servo motor
Recording system AC bias 100
kHz
Erasing system AC erase 100
kHz
Tape speed 4.8
cm/s
Overall frequency response
(+3
dB, –6
dB at DECK OUT)
NORMAL (TYPE I) 35
Hz – 14
kHz
S/N 50
dB (A weighted)
Wow and flutter 0.18% (WRMS)
Fast forward and rewind time
Approx. 120 seconds with
C-60 cassette tape
CD SECTION
Discs played [8 cm or 12 cm]
(1) CD-Audio (CD-DA)
(2) Video CD
(3) CD-R/RW (CD-DA, video CD, MP3
formatted disc)
(4) MP3
Sampling frequency 44.1
kHz
Decoding 16 bit linear
Pickup
Beam source/wavelength
Semiconductor laser/780
nm
Number of channels Stereo
Frequency response
20
Hz–20
kHz (+1, –2
dB)
Wow and flutter Below measurable limit
Digital filter 8
fs
D/A converter MASH (1 bit DAC)
Video
Video signal system
PAL625/50, PAL525/60, NTSC
Output level
Composite video, 1
Vp-p, 75
Ω
Terminal Pin jack (1 system)
MP3
Bit rate 32
kbps–320
kbps
Sampling frequency
32
kHz, 44.1
kHz, 48
kHz
SPEAKER SECTION
Type 2 way, 2 speaker system (Bass reflex)
Speaker(s)
Woofer 16
cm cone type
Tweeter 6
cm cone type
Impedance
HIGH 6
Ω
LOW 6
Ω
Input power (IEC)
HIGH 75
W (MAX)
LOW 75
W (MAX)
Output sound pressure level
85
dB/W (1.0
m)
Cross over frequency 3 kHz
Frequency range 39 Hz–21
kHz (–16
dB)
52
Hz–20
kHz (–10
dB)
Dimensions (WxHxD) 220 x 330 x 237
mm
Mass 3.4
kg
GENERAL
Power supply
AC 110
V/127 V/220–230 V/240 V,
50/60
Hz
Power consumption 251
W
Dimensions (WxHxD) 250 x 330 x 358
mm
Mass 7.9
kg
Power consumption in standby mode:
0.85 W
Note:
1. Specifications are subject to change
without notice.
Mass and dimensions are approximate.
2. Total harmonic distortion is measured by
the digital spectrum analyzer.
3. HIGH stands for High Frequency.
LOW stands for Low Frequency.

RQT7703
20
v—U
rOSC-VK31
vK« ÁU~œSA-VK31
UuÖbMKSB-VK31
v«dÖ ÈdA
Æ.dJA² ULý “« ÁU~²Ýœ s¹« b¹dš “«
UHD ¨tMONÐ vM1« Ë ¡«dł« È«dÐÎÆbOM tFUD XbÐ «— UNKLF«—u²Ýœ
ÆbM²¼ ÁœUH²Ý« qÐU d¹“ ÈUNL²OÝ È«dÐ v¹«dł« ÈUNKLF«—u²Ýœ
vM1« ÈUNUO«ÆÆÆÆÆÆÆÆÆÆÆÆÆÆÆÆÆÆÆÆÆÆÆÆÆÆÆÆÆÆÆÆÆÆÆÆÆÆÆÆÆÆÆÆÆÆÆ≤∞
vU UIKFÆÆÆÆÆÆÆÆÆÆÆÆÆÆÆÆÆÆÆÆÆÆÆÆÆÆÆÆÆÆÆÆÆÆÆÆÆÆÆÆÆÆÆÆÆÆÆÆ≤±
UuÖbMK Êœ«œ —«dÆÆÆÆÆÆÆÆÆÆÆÆÆÆÆÆÆÆÆÆÆÆÆÆÆÆÆÆÆÆÆÆÆÆÆÆÆÆÆÆÆÆÆÆÆ≤±
—Ëœ Á«— “« ‰dMÆÆÆÆÆÆÆÆÆÆÆÆÆÆÆÆÆÆÆÆÆÆÆÆÆÆÆÆÆÆÆÆÆÆÆÆÆÆÆÆÆÆÆÆÆÆÆÆÆÆÆ≤±
È“«b« Á«—ÆÆÆÆÆÆÆÆÆÆÆÆÆÆÆÆÆÆÆÆÆÆÆÆÆÆÆÆÆÆÆÆÆÆÆÆÆÆÆÆÆÆÆÆÆÆÆÆÆÆÆÆÆÆÆÆÆÆÆ≤≤
vuK tH ÈU ‰dMÆÆÆÆÆÆÆÆÆÆÆÆÆÆÆÆÆÆÆÆÆÆÆÆÆÆÆÆÆÆÆÆÆÆ≤≥
CDU ÆÆÆÆÆÆÆÆÆÆÆÆÆÆÆÆÆÆÆÆÆÆÆÆÆÆÆÆÆÆÆÆÆÆÆÆÆÆÆÆÆÆÆÆÆÆÆÆÆÆÆÆÆÆÆÆÆÆÆÆÆÆÆ≤µ
ÈU pœ ËUH v~u~ÇMP3 U CDU ÆÆÆÆÆÆÆÆ≤∏
vœ vU Ãu ∫uœ«—ÆÆÆÆÆÆÆÆÆÆÆÆÆÆÆÆÆÆÆÆÆÆÆÆÆÆÆÆÆÆÆÆÆÆÆÆÆÆÆÆ≥∞
»U Ãu rOEM ∫uœ«—ÆÆÆÆÆÆÆÆÆÆÆÆÆÆÆÆÆÆÆÆÆÆÆÆÆÆÆÆÆÆÆÆÆÆÆÆÆÆÆÆ≥∞
U XUÆÆÆÆÆÆÆÆÆÆÆÆÆÆÆÆÆÆÆÆÆÆÆÆÆÆÆÆÆÆÆÆÆÆÆÆÆÆÆÆÆÆÆÆÆÆÆÆÆÆÆÆÆÆÆÆÆ≥±
v«b Ê«bO Ø «b XOHOÆÆÆÆÆÆÆÆÆÆÆÆÆÆÆÆÆÆÆÆÆÆÆÆÆÆÆÆÆÆ≥±
j{ÆÆÆÆÆÆÆÆÆÆÆÆÆÆÆÆÆÆÆÆÆÆÆÆÆÆÆÆÆÆÆÆÆÆÆÆÆÆÆÆÆÆÆÆÆÆÆÆÆÆÆÆÆÆÆÆÆÆÆÆÆÆÆÆ≥±
v«u“«Ë¬ XU“« Êœd cÆÆÆÆÆÆÆÆÆÆÆÆÆÆÆÆÆÆÆÆÆÆÆÆÆÆÆÆÆÆÆÆÆ≥≤
È—UO« 7¬ ôUB«ÆÆÆÆÆÆÆÆÆÆÆÆÆÆÆÆÆÆÆÆÆÆÆÆÆÆÆÆÆÆÆÆÆÆÆÆÆÆÆÆÆ≥≥
v—U ÁU~œ ôUB«ÆÆÆÆÆÆÆÆÆÆÆÆÆÆÆÆÆÆÆÆÆÆÆÆÆÆÆÆÆÆÆÆÆÆÆÆ≥≥
vU ÁU~œ p “« ÁœUH«ÆÆÆÆÆÆÆÆÆÆÆÆÆÆÆÆÆÆÆÆÆÆÆÆÆÆÆÆ≥≥
uœ œdJKL Êœd ‘uU Ë sË—ÆÆÆÆÆÆÆÆÆÆÆÆÆÆÆÆÆÆÆÆÆÆ≥¥
VUM ÈUœdJKLÆÆÆÆÆÆÆÆÆÆÆÆÆÆÆÆÆÆÆÆÆÆÆÆÆÆÆÆÆÆÆÆÆÆÆÆÆÆÆÆÆÆ≥¥
—Uœu vuU œdJKLÆÆÆÆÆÆÆÆÆÆÆÆÆÆÆÆÆÆÆÆÆÆÆÆÆÆÆÆÆÆÆÆÆÆ≥¥
ÊU“ rOEMÆÆÆÆÆÆÆÆÆÆÆÆÆÆÆÆÆÆÆÆÆÆÆÆÆÆÆÆÆÆÆÆÆÆÆÆÆÆÆÆÆÆÆÆÆÆÆÆÆÆÆÆÆÆÆ≥¥
Ud1U “« ÁœUH«ÆÆÆÆÆÆÆÆÆÆÆÆÆÆÆÆÆÆÆÆÆÆÆÆÆÆÆÆÆÆÆÆÆÆÆÆÆÆÆÆÆÆÆÆÆÆÆ≥µ
vU VO ÈULM«—ÆÆÆÆÆÆÆÆÆÆÆÆÆÆÆÆÆÆÆÆÆÆÆÆÆÆÆÆÆÆÆÆÆÆÆÆÆÆÆÆÆÆÆÆÆ≥∂
È—«bN~ÆÆÆÆÆÆÆÆÆÆÆÆÆÆÆÆÆÆÆÆÆÆÆÆÆÆÆÆÆÆÆÆÆÆÆÆÆÆÆÆÆÆÆÆÆÆÆÆÆÆÆÆÆÆÆÆÆÆÆ≥∂
vM UBAÆÆÆÆÆÆÆÆÆÆÆÆÆÆÆÆÆÆÆÆÆÆÆÆÆÆÆÆÆÆÆÆÆÆÆÆÆÆÆÆÆÆÆÆÆÆÆÆÆ≥
U—bM XdN
vM1« ÈUNUO«
Êœ«œ —«d
ÈUNð—«dŠ tł—œ ¨bOý—uš rOI² —u½ “« —ËbÐ ·U v×DÝ ÈË— «— ÁU~²Ýœ
Ë gýuÄ tÐ bM½«uð v q«uŽ s¹« ÆbO¼œ —«d b¹bý ÈU¼ ‘“d Ë ¨ôUÐ XÐuÞ— ¨ôUÐ
Æbý b¼«uš d²¼Uðu ÁU~²Ýœ dLŽ s¹«dÐUMÐ Ë ¨bM½UÝdÐ VOݬ ÁU~²Ýœ ¡«eł« d¹UÝ
ÆbO¼b½ —«d ÁU~²Ýœ ÈË— «— 5~MÝ ÂUł«
˛UË
ÁU~²Ýœ tÐ XÝ« sJ2 qLŽ s¹« ÆbOMJ½ ÁœUH²Ý« ôUÐ ˛U²Ë UÐ ÈËdO½ lÐUM “«
ÆœœdÖ È“uÝ gð¬ Vłu Ë Áœ—ˬ —UA
ÈËdO½ l³M “«DCU¹ v²A p¹ —œ ÁU~²Ýœ VB½ ÂU~M¼ ÆbOMJ½ ÁœUH²Ý«
‚dÐ “« t Èd~¹œ ÈUN½UJDCÆbOM pÇ XbÐ «— ËdO½ l³M bMM v ÁœUH²Ý«
‚d rO “« XUH
‚dÐ rOÝ t b¹uý s¾LDAC‰UBð« ÆbýUÐ Áb¹b½ VOݬ Ë Ábý qB² `O× —uDÐ
¨bOAJ½ «— rOÝ Æœuý v~²dÖ ‚dÐ Ë È“uÝ gð¬ Vłu b½«uð v Áb¹œ VOݬ rOÝ Ë hU½
ÆbO¼b½ —«d ʬ ÈË— 5~MÝ ÂUł« U¹ ¨bOMJ½ rš
‚dÐ rOÝ ÊbOA Æb¹dO~Ð tšUýËœ “« «d½¬ bOM v «bł e¹dÄ “« «— rOÝ tJOU~M¼
ACÆœuý v~²dÖ ‚dÐ Vłu b½«uð v
Æœuý v v~²dÖ ‚dÐ YŽUÐ qLŽ s¹« Æb¹dO~½ fOš XÝœ UÐ «— tšUýËœ
v—U ÂU«
‚dÐ Vłu b½«uð v qLŽ s¹« ÆbM²UOÐ ÁU~²Ýœ qš«œ tÐ ÈeK ¡UOý« bO¼b½ Á“Uł«
Æœuý ÁU~²Ýœ Êœd —U bÐ U¹ v~²dÖ
U¹ v~²dÖ ‚dÐ Vłu b½«uð v qLŽ s¹« Æœe¹dÐ ÁU~²Ýœ qš«œ vF¹U bO¼b½ Á“Uł«
ÁbOA ‚dÐ “« «— ÁU~²Ýœ XŽdÐ ¨œU²« vUHð« 5MÇ dÖ« Æœuý ÁU~²Ýœ Êœd —U bÐ
Æb¹dO~Ð ”U9 —UdOLFð UÐ Ë
È«—«œ U?N?½¬ ÆbOM È—«œœuš ÁU~²Ýœ qš«œ U¹ ÈË— UNA ÁdAŠ Êœd ÈdáÝ« “«
b?M?½«uð v ÁU~²Ýœ qš«œ Êbý ÈdáÝ« —u—œ t bMýUÐ v ÁbMM qF²A ÈU¼“UÖ
Æb½œdÖ qF²A
fËd
v/ sýË— U¼d~½UA½ ¨XÝ« Ábý lD «b dÖ« ÆbOMJ½ dOLFð ÊUðœuš «— ÁU~²Ýœ
Áœ«œ `O{uð ULM¼«— tÇd²œ s¹« —œ t Èd~¹œ tK¾ d¼ U¹ ¨œuý v œU−¹« œËœ ¨b½uý
‚dÐ rOÝ ¨XÝ« ÁbA½ACÆb¹dO~Ð ”U9 “U− —UJ¹ËdÝ U¹ —UdOLFð UÐ Ë Áœd «bł «—
tÐd& r hý tKOÝuÐ ÁU~²Ýœ dÖ« b²UOÐ ‚UHð« b½«uð v ÁU~²Ýœ vЫdš U¹ v~²dÖ ‚dÐ
Æœuý ÷uŽ ʬ UFD U¹ “UÐ ¨dOLFð È«
«bł UÐ «d½¬ bOH dLŽ œdOÖ v/ —«d ÁœUH²Ý« œ—u v½ôuÞ vðb È«dÐ ÁU~²Ýœ dÖ«
ÆbO¼œ g¹«e« ËdO½ l³M “« ÁU~²Ýœ Êœd
‚dÐ rOÝ tÐ ‚dÐ rOÝ tÐ
‚dÐ rOÝ tÐ ‚dÐ rOÝ tÐ
‚dÐ rOÝ tÐ
AC
©X¹u Ë ÈœuFÝ ÊU²ÐdŽ È«dÐ jI® bOýUÐ t²ý«œ tłuð ©X¹u Ë ÈœuFÝ ÊU²ÐdŽ È«dÐ jI® bOýUÐ t²ý«œ tłuð
©X¹u Ë ÈœuFÝ ÊU²ÐdŽ È«dÐ jI® bOýUÐ t²ý«œ tłuð ©X¹u Ë ÈœuFÝ ÊU²ÐdŽ È«dÐ jI® bOýUÐ t²ý«œ tłuð
©X¹u Ë ÈœuFÝ ÊU²ÐdŽ È«dÐ jI® bOýUÐ t²ý«œ tłuð
ÁœUH²Ý« “« q³ÁœUH²Ý« “« q³
ÁœUH²Ý« “« q³ÁœUH²Ý« “« q³
ÁœUH²Ý« “« q³
ÆbOM «bł «— ÁbM¼œ ‰UBð« ‘uÄ—œ
“uO Êœd ÷uŽ v~½u~Ç“uO Êœd ÷uŽ v~½u~Ç
“uO Êœd ÷uŽ v~½u~Ç“uO Êœd ÷uŽ v~½u~Ç
“uO Êœd ÷uŽ v~½u~Ç
tšUýËœ Ÿu½ tÐ t²Ð “uO q×AC qJý® XÝ« ËUH² A Ë B©
tšUýËœ Æt b¹uý s¾LDACÆbOM qLŽ d¹“ —uBÐ fáÝ býUÐ VÝUM
tšUýËœ UÐ Ábý rÝ— ‰UJý« XÝ« sJ2ACÆbMýUÐ ËUH²
qJý qJý
qJý qJý
qJýA
qJý qJý
qJý qJý
qJýB
Æ≤Æb¹bM³Ð «— “uO ‘uÄ—œ Ë Áœd ÷uŽ «— “uO
ƱÆbOM “UÐ v²ýuÖ êOÄ v¹ UÐ «— U¼“uO ‘uÄ—œ
qJý qJý
qJý qJý
qJýA
qJý qJý
qJý qJý
qJýB
“uO ‘uÄ—œ
©dᬠµ® “uO
©dᬠµ® “uO
La pagina si sta caricando...
La pagina si sta caricando...
La pagina si sta caricando...
La pagina si sta caricando...
La pagina si sta caricando...
La pagina si sta caricando...
La pagina si sta caricando...
La pagina si sta caricando...
La pagina si sta caricando...
La pagina si sta caricando...
La pagina si sta caricando...
La pagina si sta caricando...
La pagina si sta caricando...
La pagina si sta caricando...
La pagina si sta caricando...
La pagina si sta caricando...
La pagina si sta caricando...
La pagina si sta caricando...
La pagina si sta caricando...
La pagina si sta caricando...
La pagina si sta caricando...
La pagina si sta caricando...
La pagina si sta caricando...
La pagina si sta caricando...
La pagina si sta caricando...
La pagina si sta caricando...
La pagina si sta caricando...
La pagina si sta caricando...
La pagina si sta caricando...
La pagina si sta caricando...
La pagina si sta caricando...
La pagina si sta caricando...
La pagina si sta caricando...
La pagina si sta caricando...
La pagina si sta caricando...
La pagina si sta caricando...
-
 1
1
-
 2
2
-
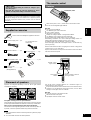 3
3
-
 4
4
-
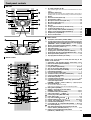 5
5
-
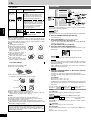 6
6
-
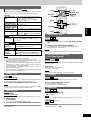 7
7
-
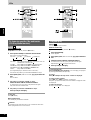 8
8
-
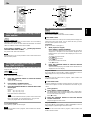 9
9
-
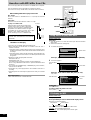 10
10
-
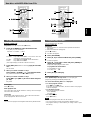 11
11
-
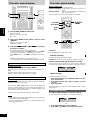 12
12
-
 13
13
-
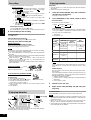 14
14
-
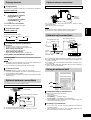 15
15
-
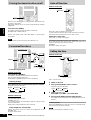 16
16
-
 17
17
-
 18
18
-
 19
19
-
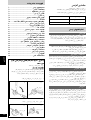 20
20
-
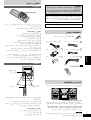 21
21
-
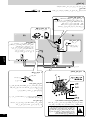 22
22
-
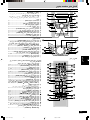 23
23
-
 24
24
-
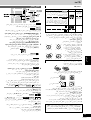 25
25
-
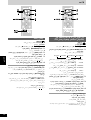 26
26
-
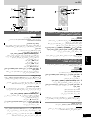 27
27
-
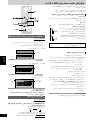 28
28
-
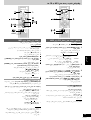 29
29
-
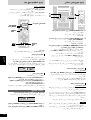 30
30
-
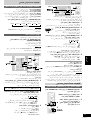 31
31
-
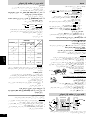 32
32
-
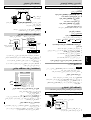 33
33
-
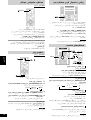 34
34
-
 35
35
-
 36
36
-
 37
37
-
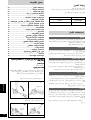 38
38
-
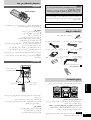 39
39
-
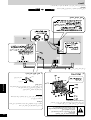 40
40
-
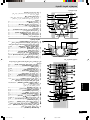 41
41
-
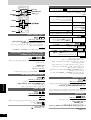 42
42
-
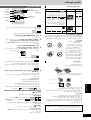 43
43
-
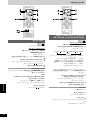 44
44
-
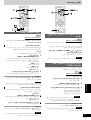 45
45
-
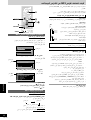 46
46
-
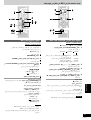 47
47
-
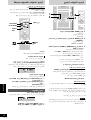 48
48
-
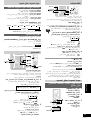 49
49
-
 50
50
-
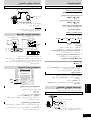 51
51
-
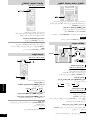 52
52
-
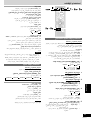 53
53
-
 54
54
-
 55
55
-
 56
56


Panasonic SCVK31 Manuale del proprietario
- Categoria
- Lettore CD
- Tipo
- Manuale del proprietario
in altre lingue
- English: Panasonic SCVK31 Owner's manual
Documenti correlati
-
Panasonic SA-VK62D Istruzioni per l'uso
-
Panasonic SC-AK220 Istruzioni per l'uso
-
Technics SCHDA800 Manuale del proprietario
-
Panasonic SCPM71SD Istruzioni per l'uso
-
-
-
-
-
-
Altri documenti
-
Aiwa NSX-SZ17 Operating Instructions Manual
-
Yamaha GX-700VCD Manuale del proprietario
-
LG DS9543CE4M Manuale utente
-
-
-
Marantz DV4610 Manuale utente
-
-
Sony DCR-VX2000E Istruzioni per l'uso
-
Sony CFS-929S Istruzioni per l'uso
-
Samsung DVD-P250K Manuale utente