
®
®
®
®
®
®
T
E
M
P
E
R
A
T
U
R
E
1
2
3
4
5
6
7
8
9
1
0
®
Laminator
DOCUMEMT
n
e
w
s
p
rin
t 2
2
3
3
N
/A
co
p
y
p
a
p
e
r 2
2
3
3
8
c
a
rd
s
to
c
k
5
5
5
5
9
3 M
IL 5 M
IL 7 M
IL 10M
IL FOIL
POWER
RUN
OFF
W
AR
M
READY
CO
LD
T
E
M
P
E
R
A
T
U
R
E
1
2
3
4
5
6
7
8
9
1
0
®
Laminator
CARD
n
e
w
s
p
rin
t 2
2
3
3
N
/A
co
p
y
p
a
p
e
r 2
2
3
3
8
c
a
rd
s
to
ck
5
5
5
5
9
3 M
IL 5 M
IL 7 M
IL 10
M
IL FO
IL
POWER
RUN
OFF
W
ARM
READY
COLD
Operating Instructions
Instruzioni Per L'Uso
Bedienungsanleitung
Gebruiksaanwijzing
Mode D'Emploi
Manual De Operación
General Binding Corporation
Northbrook, IL 60062-4195
®
La pagina si sta caricando...
La pagina si sta caricando...
La pagina si sta caricando...
La pagina si sta caricando...
La pagina si sta caricando...
La pagina si sta caricando...

1.Stecken Sie den Schukostecker des
Gerätes in eine geeignete Steckdose.
2.Schieben Sie den Hauptschalter in die
Position ”Warm”.
3.Wählen Sie an dem
Temperatureinstellknopf entsprechend
der Ausweishüllenstärke und der zu
kaschierenden Materialstärke die
Temperatureinstellung (beachten Sie die
Richtlinien der Temperatureinstellung).
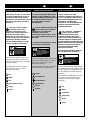
TEMPERATUR-
EINSTELLRICHTLINIEN*
* Die Temperatureinstellung richtet sich
außerdem sehr stark nach Oberfläche,
chemischer Zusammensetzung,
Wärmeabsorption oder anderen
Eigenschaften des zu laminierenden
Materials. Benützen Sie die Einstellricht
linien nur als grobe Anleitung und stellen
Sie die Temperatur ein, wie es notwendig
ist. Wenn die Ausweistasche nach dem
ersten Laminiervorgang an verschiedenen
Stellen milchig bleibt, stellen Sie die
Temperatur höher und lassen Sie das
Produkt ein zweites Mal durch den
Laminator. Wenn der Ausweis eine
wellige Oberfläche zeigt, war die Tempe-
ratureinstellung zu hoch. Lassen Sie das
Gerät auf eine niedrigere
Temperatureinstellung herunterkühlen.
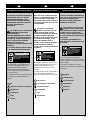
1.Connect power cord to appropriate power
source.
2.Move Power switch to Warm position.
3.Select appropriate temperature for the
pouch gauge thickness and material
thickness you are laminating. Confirm the
type of pouch you are using – carrier or
carrier-less.
TEMPERATURE SETTING
GUIDELINES*
Set the temperature knob to the appropriate
setting for the pouch gauge and material
thickness you are laminating. When lami-
nating thin paper with light ink coverage set
the temperature dial at the low end of the
range. Thick paper and heavy ink coverage
require higher settings within the range.
* Temperature setting will vary due to the
finish, chemistry and heat absorption
properties of the materials you are
laminating. If pouch is cloudy the first
pass through the machine, adjust
temperature setting higher and run
through again. If warping occurs, reduce
temperature. Run additional pieces at
lower setting once machine has cooled.
Always allow sufficient time for laminator
to adjust to changes in temperature
settings.
1.Collegare il cavo elettrico ad una presa
elettrica adeguata.
2.Premere l’interruttore su ”WARM.”
3.Selezionare la temperatura appropriata
in base allo spessore del film della
pouch e del materiale che si deve
plastificare. Verificare il tipo di pouches
che si intende usare, e cioé se sono con
o senz carrier.
TABELLA TEMPERATURE
INDICATIVE*
Regolare la manopola temperatura in
modo adeguato in base allo spessore del
film della pouch e del materiale che si deve
plastiicare. Quando si deve plastificare
carta sottile con inchiostratura leggera,
regolare la temperatura al minimo. La carta
spessa con maggiore inchiostratura
richiederà una temperatura più elevata.
* La regolazione della temperatura potrà
variare in base alla finitura, al trattamento
chimico ed alla capacità di assorbire
calore proprio dei materiali che vengono
plastificati. La tabella ha solo valore
indicativo. Se dopo la plastificazione la
pouch risulta opaca, nebulosa,
aumentare la temperatura e provare a
riplastificare. Se la pouch risulta ondulata
o tende ad avvolgersi ridurre la tempera-
tura. Lasciare raffreddare la macchina e
quindi provare a riplastificare. Dopo ogni
regolazione lasciare alla macchina il
tempo necessario per raggiungere la
temperatura selezionata.
8
I D
SET-UP
PREPARAZIONE
VOREINSTELLUNG
Model 400 Setting
Newsprint Copypaper Cardstock
Standard Pouches
Carrier
3 mil/75 micron 3 3 3
5 mil/125 micron 3 3 3
7 mil/175 micron 5 5 5
10 mil/250 micron 7 7 7
Premium Pouches
Carrierless
3 mil/75 micron 3 3 3
5 mil/125 micron 3 3 3
7 mil/175 micron 4 5 5
10 mil/250 micron 4 7 7
FOIL-Carrier Required
999
Model 1200 Setting
Newsprint Copypaper Cardstock
Standard Pouches
Carrier
3 mil/75 micron 3 3 4
5 mil/125 micron 3 3 4
7 mil/175 micron 4 4 5
10 mil/250 micron 4 4 5
Premium Pouches
Carrierless
3 mil/75 micron 2 2 3
5 mil/125 micron 2 2 3
7 mil/175 micron 3 3 4
10 mil/250 micron 3 3 4
FOIL-Carrier Required
–56
Model 400 Impostare
Carta Carta Cartoncino
leggera da lettera
Pouches Standard
(con carrier)
3 mil/75 micron 3 3 3
5 mil/125 micron 3 3 3
7 mil/175 micron 5 5 5
10 mil/250 micron 7 7 7
Pouches Premium
(senza carrier)
3 mil/75 micron 3 3 3
5 mil/125 micron 3 3 3
7 mil/175 micron 5 5 5
10 mil/250 micron 7 7 7
FOIL-richiesto carrier
999
Model 1200 Impostare
Carta Carta Cartoncino
leggera da lettera
Pouches Standard
(con carrier)
3 mil/75 micron 3 3 4
5 mil/125 micron 3 3 4
7 mil/175 micron 4 4 5
10 mil/250 micron 4 4 5
Pouches Premium
(senza carrier)
3 mil/75 micron 2 2 3
5 mil/125 micron 2 2 3
7 mil/175 micron 3 3 4
10 mil/250 micron 3 3 4
FOIL-richiesto carrier
–56
Modell 400 Einstellung
Zeitungspapier Kopierpapier Karton
Standard Pouches
(mit Carrier)
3 mil/75 micron 3 3 3
5 mil/125 micron 3 3 3
7 mil/175 micron 5 5 5
10 mil/250 micron 7 7 7
Premium Pouches
(ohne Carrier)
3 mil/75 micron 3 3 3
5 mil/125 micron 3 3 3
7 mil/175 micron 5 5 5
10 mil/250 micron 7 7 7
Auch bei Creative Foil 999
Carrier benutzen
Modell 1200 Einstellung
Zeitungspapier Kopierpapier Karton
Standard Pouches
(mit Carrier)
3 mil/75 micron 3 3 4
5 mil/125 micron 3 3 4
7 mil/175 micron 4 4 5
10 mil/250 micron 4 4 5
Premium Pouches
(ohne Carrier)
3 mil/75 micron 2 2 3
5 mil/125 micron 2 2 3
7 mil/175 micron 3 3 4
10 mil/250 micron 3 3 4
Auch bei Creative Foil –56
Carrier benutzen
La pagina si sta caricando...

The GBC Pouch Laminator is
designed to run Carrier or
Carrierless pouches. Check your
pouches. Always run carrier
pouches with a carrier to prevent
pouch adhesive from oozing onto
the rollers. Know your pouch before
operating the laminator.
Carrier Pouches
1. After “READY” light illuminates
switch the machine to “RUN”.
2. Center the item to be laminated
into a pouch.
3. Insert the pouch and item into a
carrier which is provided with
each carton of pouches. Position
the sealed edge of the pouch
against the inside folded edge of
the carrier. Handle carriers
carefully so they can be re-used.
4. Insert the folded edge of the
carrier straight into the front of
the laminator until you feel the
rollers pick up the carrier.
5. Remove the warm carrier from
the rear of the pouch laminator
after it has stopped moving. Place
on flat surface to cool for one
minute before removing finished
pouch.
6. When you are finished laminating
switch the machine to “OFF”.
Carrier-less Pouches
1. After “READY” light illuminates
switch the machine to “RUN”.
2. Center the item to be laminated
into a pouch.
3. Insert the sealed edge of the
loaded pouch into the laminator
until you feel the rollers pick up
the pouch.
4. Remove the warm laminated
pouch from the rear of the
laminator after it has stopped
moving. Place the pouch on a flat
surface to cool.
5. When you are finished laminating
switch the machine to “OFF”.
La plastificatrice a Pouch GBC può
utilizzare pouches “con carrier” e
pouches “senza carrier”. Controllare
le vostre pouches. Le pouches con
carrier devono essere sempre usate
con il carrier per evitare che
l’adesivo finisca sui rulli.
E
’necessario conoscere il tipo di
pouch prima di usare la
plastificatrice.
Pouches Con Carrier
1. Quando la spia “READY” si
accende portare l’interruttore
su “RUN”.
2. Inserire il materiale che si deve
plastificare nella pouch.
3. Inserire pouche materiale nel
carrier fornito con la confezione
di pouches.
4. Inserire il lato piegato del
carrier direttamente
nell”imboccatua della
plastificatrice finché non si
sente che é stato afferrato dai
rulli di transcinamento.
5. Quando si sarà fermato
rimuovere il carrier caldo
all’uscita posteriore della
plastificatrice. Lasciare
raffreddare il carrier su una
superficie piatta per un minuto
prima di rimuovere la pouch
plastificata.
6. Ultimato il lavoro di
plastificazione spegnere la
macchina portando
l’interruttore su “OFF”.
Pouches Senza Carrier
1. Quando la spia “READY” si
accende portare l”interruttore
su “RUN”.
2. Inserire il materiale che si deve
plastificare nella pouch.
3. Introdurre la pouch nella
plastificatrice, inserendola dal
lato saldato, finché non si sente
che é stata afferrata dai rulli di
trascinamento.
4. Quando si sarà fermata,
rimuovere la pouch calda
all’uscita posteriore della
plastificatrice. Lasciare
raffreddare la pouch su una
superficie piatta.
5. Ultimato il lavoro di
plastificazione spegnere la
macchina portando
l’interruttore su off.
10
I
OPERATION UTILIZZO
T
E
M
P
E
R
A
T
U
R
E
1
2
3
4
5
6
7
8
9
1
0
®
Lam
inator
DOCUMEMT
n
ew
s
print 2 2
3
3 N
/A
cop
y p
aper 2
2
3
3
8
ca
rd
stoc
k 5
5 5 5 9
3 M
IL
5
M
IL
7
M
IL 10
M
IL FO
IL
P
O
W
E
R
R
U
N
O
F
F
W
A
R
M
R
E
A
D
Y
C
O
L
D
La pagina si sta caricando...

Set the pouch laminator to
“Cold” on the temperature
control. If the laminator has
recently been used for hot
lamination, then allow sufficient
time to cool before beginning
cold lamination.
1. Select a GBC No-Heat
Laminate that is slightly
larger than the document to
be laminated.
2. Run the film, film-side faced
up, for about 3-6mm (1/8 -
1/4”) into the laminator, and
then press OFF to stop the
rollers.
3. Carefully separate the
backing release paper from
the film, and drape the clear
film over the top of the
laminator.
4. Place the document between
the separated film and
backing. Turn the power
switch to RUN.
5. After the laminated document
exits the rear of the
laminator, then either cut off
the excess pouch edge for a
flush-cut appearance, or
leave the edge as an
adhesive border for signage.
Impostare la plastificatrice su
COLD. Se la macchina è stata
appena usata per una
plastificazione a caldo, farla
raffreddare a sufficienza prima
di eseguire una plastificazione
a freddo.
1. Scegliete un film per
plastificazione a freddo
leggermente più largo del
documento da plastificare.
2. Fate scorrere il film nella
macchina, con il lato del film
rivolto verso l'alto, per circa
3-6 mm e premete OFF per
fermare i rulli.
3. Delicatamente, separate la
carta sul retro dal film, e
stendetelo sulla parte
superiore della macchina.
4. Mettete il documento tra il
film separato ed il retro.
Girare l’interruttore su RUN.
5. Dopo che il documento
plastificato è uscito dal retro
della macchina, o tagliate il
bordo eccedente, o lo
lasciate come contorno
adesivo per.
I
12
OPERATION CONT. OPERAZIONE CONT.
OPERATION, COLD LAMINATION PLASTIFICAZIONE A FREDDO
GBC NO-HEAT LAMINATE™ GBC NO-HEAT LAMINATE™
T
E
M
P
E
R
A
T
U
R
E
1
2
3
4
5
6
7
8
9
1
0
®
Lam
inator
DOCUMEMT
new
sp
rin
t 2
2 3 3 N
/A
cop
y pap
er 2 2 3 3 8
card sto
ck 5 5
5
5
9
3
M
IL
5
M
IL
7
M
IL
1
0
M
IL
F
O
IL
P
O
W
E
R
R
U
N
O
F
F
W
A
R
M
R
E
A
D
Y
C
O
L
D
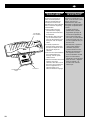
Film Draped
over Laminator
Backing Release
Paper
Document
La pagina si sta caricando...

14
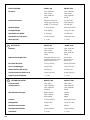
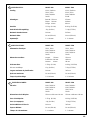
SPECIFICATIONS: MODEL 400 MODEL 1200
Electrical: 120V, 50/60 Hz 120V, 50/60 Hz
230V, 50 Hz 230V, 50 Hz
100V, 50/60 Hz 100V, 50/60 Hz
240 W 520 W
Machine Dimensions: Width 9d" (250 mm) 10" (254 mm)
Length 11a" (290 mm) 19s" (498 mm)
Height 3
11
/16" (94 mm) 3d" (98 mm)
Machine Weight: 2.72 kg (6.0 lbs) 6.02 kg (13.25 lbs)
Packaged Weight: 4 kg (8.8 lbs.) 7.9 kg (17.5 lbs.)
Maximum Pouch Width: 4" (100 mm) 12" (305 mm)
Maximum Pouch Thickness: 10 mm (250 mic) 10 mm (250 mic)
Warm-Up Time: 2 - 4 min. 1 - 2 min.
SPECIFICHE: MODEL 400 MODEL 1200
Elettriche 120V, 50/60 Hz 120V, 50/60 Hz
230V, 50 Hz 230V, 50 Hz
100V, 50/60 Hz 100V, 50/60 Hz
240 W 520 W
Dimensioni della Macchina: Profondité 250 mm (
9d") 254 mm (10")
Lunghezza 290 mm (11a") 498 mm (19s")
Altezza 94 mm (3
11
/16") 98 mm (3d")
Peso della Macchina: 2.72 kg (6.0 lbs) 6.02 kg (13.25 lbs)
Peso (con Imballaggio): 4 kg (8.8 lbs.) 7.9 kg (17.5 lbs.)
Altezza Massima della Pouch: 100 mm (4") 305 mm (12")
Larghezza Massima della Pouch: 10 mm (250 mic) 10 mm (250 mic)
Tempo di preriscaldamento: 2 - 4 min. 1 - 2 min.
TECHNISCHE DATEN: MODELL 400 MODELL 1200
Stromanschluß: 230V, 50Hz 230V, 50Hz
Stromverbrauch: 100V, 50/60 Hz 100V, 50/60 Hz
120V, 50/60 Hz 120V, 50/60 Hz
240 Watt 520 W
Maschinenabmessungen: Breite: 250mm 254mm
Tiefe: 290mm 498mm
Höhe: 94mm 98mm
Gewicht: 2.72 kg (6.0 lbs) 6.02 kg (13.25 lbs)
Bruttogewicht: 4 kg (8.8 lbs.) 7.9 kg (17.5 lbs.)
Maximale Laminierbreite: 100mm 305mm
Maximale Laminierdicke: 10 mm (250mic) 10 mm (250mic)
Aufheizzeit: 2 - 4 min. 1 - 2 min.
I
D
La pagina si sta caricando...
La pagina si sta caricando...
-
 1
1
-
 2
2
-
 3
3
-
 4
4
-
 5
5
-
 6
6
-
 7
7
-
 8
8
-
 9
9
-
 10
10
-
 11
11
-
 12
12
-
 13
13
-
 14
14
-
 15
15
-
 16
16


in altre lingue
- English: GBC 1200 User manual
- français: GBC 1200 Manuel utilisateur
- español: GBC 1200 Manual de usuario
- Deutsch: GBC 1200 Benutzerhandbuch
- Nederlands: GBC 1200 Handleiding
Documenti correlati
-
GBC Inspire A4 Manuale utente
-
GBC HeatSeal H310 Manuale utente
-
ACCO Brands 1701920 Manuale utente
-
-
MyBinding Fusion 5000L A3 Manuale utente
-
GBC Fusion 1000L Manuale utente
-
GBC Fusion 3000L A4 Manuale utente
-
-
-
Altri documenti
-
Leitz 75190000 Manuale utente
-
 ACCO Brands SmartA4Laminator/5442 Manuale utente
-
Royal Sovereign ES-915 Manuale utente
-
 ACCO Brands H535 Manuale utente
-
Geha A4 Comfort Faststarter Manuale del proprietario
-
-
Hama Premium L411 - 50314 Laminator Manuale del proprietario

